AUDI A3 SEDAN 2018 Repair Manual
Manufacturer: AUDI, Model Year: 2018, Model line: A3 SEDAN, Model: AUDI A3 SEDAN 2018Pages: 404, PDF Size: 62.3 MB
Page 61 of 404
LL co .... N
" N .... 0 N > co
Seats and storage
General information
A WARNING
Refer to the chapter Driving Safely
~ page 249, Driving safety for important in
formation, tips, suggestions and warnings that you should read and follow for your own
safety and the safety of your passengers.
Front seats
Manual seat adjustment
Applies to vehicles with manual adjustable seats
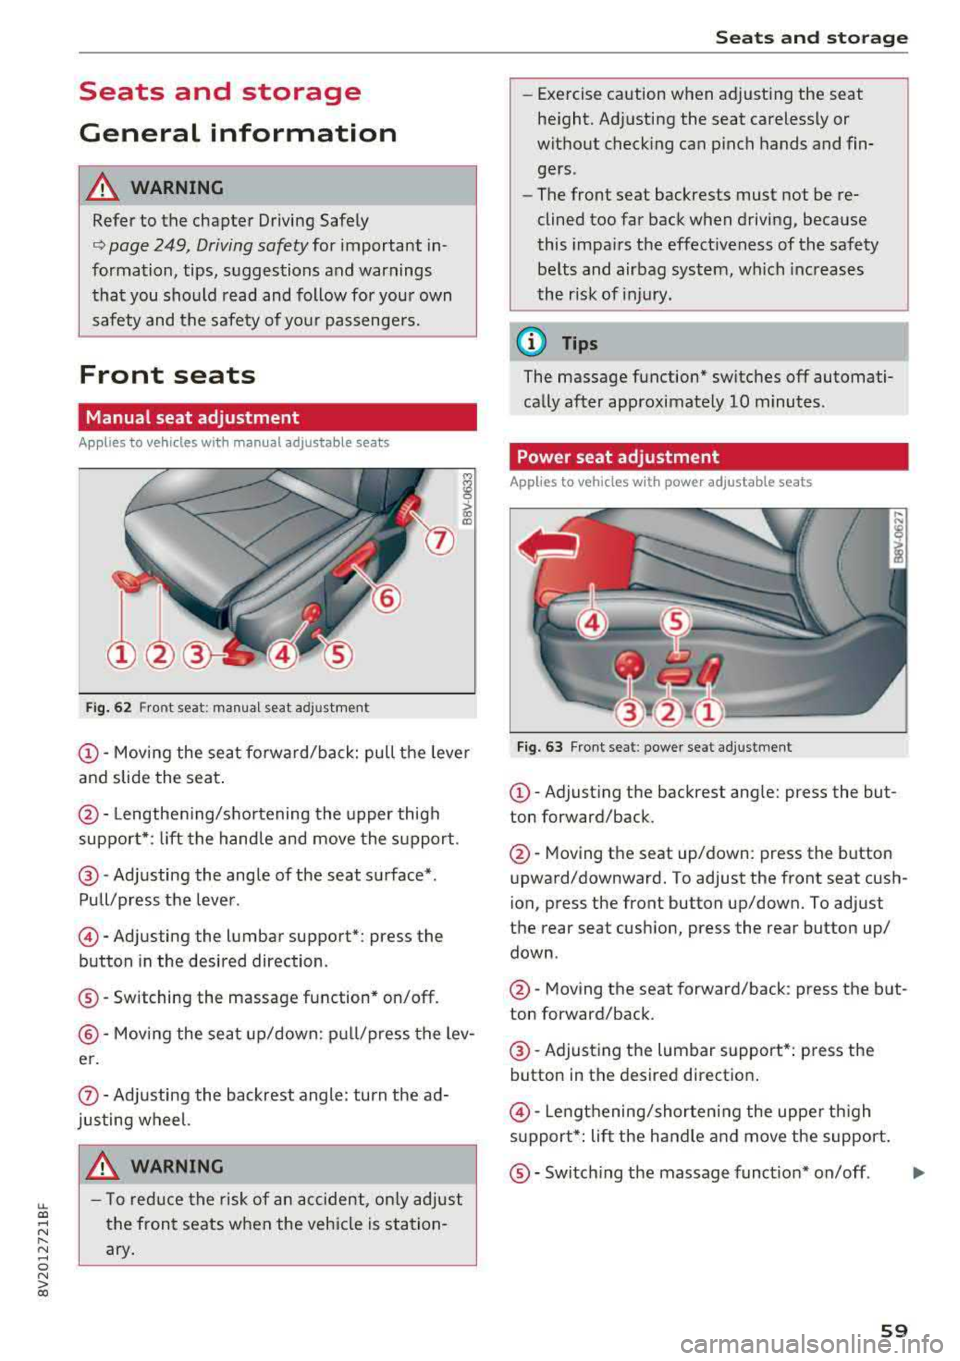
Fig. 62 Fro nt seat: manual seat ad justment
@ -Moving the seat fo rward/back: pu ll the leve r
and slide the seat .
@-Lengthen ing/shortening the upper thigh
support* : lift the handle and move the support.
@-Adjusting the angle of the seat surface* .
Pull/press the lever .
©-Adjusting the lumbar support* : press the
button in the desired direction .
®-Switching the massage function* on/off .
@-Moving the seat up/down: pull/press the lev
er.
(J) -Adjusting the backrest angle : turn the ad
justing wheel.
A WARNING
- T o reduce the risk of an accident , only adjust
the front seats when the vehicle is station
ary.
Seats and storage
-Exercise caution when adjusting the seat
height. Adjusting the seat carelessly or
without checking can pinch hands and fin
gers .
- The front seat backrests must not be re
clined too far back when driving, because
this impairs the effectiveness of the safety
be lts and airbag system, which increases
the risk of injury.
(D Tips
The massage function* switches off automati
cally after approximately 10 minutes .
Power seat adjustment
Applies to vehicles w it h power adjustab le seats
Fig. 63 Front se at: p ower seat adj ustmen t
@-Adjust ing the backrest ang le: press the but
ton forward/back .
@-Moving the seat up/down: press the button
upward/downward. To adjust the front seat cush
ion, press the front button up/down. To adjust
the rear seat cushion, press the rear button up/
down .
@-Moving the seat forward/back : press the but
ton forward/back .
@-Adjusting the lumbar support*: press the
button in the desired direction .
©-Lengthening/shorten ing the uppe r th igh
s u pport*: lift the handle and move the support.
®-Switch ing the massage funct ion* on/off .
59
...
Page 62 of 404
Seats and stor age
A WARNING
- To reduce the risk of an accident, on ly adjust
the front seats when the vehicle is station
ary.
- The power adjustment for the front seats al
so works w ith the ignition switched off or
with the ignition key removed . T o reduce
the risk of injury, chi ld ren should never be
left unattended in the vehicle for this rea
son.
- Exercise caution when adjusting the seat
height. Uns uperv ised or careless seat ad
justment can p inch f ingers or hands, wh ich
increases the risk of injury.
- T he front seat backres ts m ust not be re
clined too far back when driving, because
this impairs the effectiveness of the safety
belts and airbag system, which increases
the risk of injury.
(D Tips
The massage function* switches off a utomat i
cally after approximately 10 min utes.
Easy seat entry
Applies to: veh icles with entry assistance
En try assistance makes it easier for the rear pas
sengers to enter and leave the vehicle.
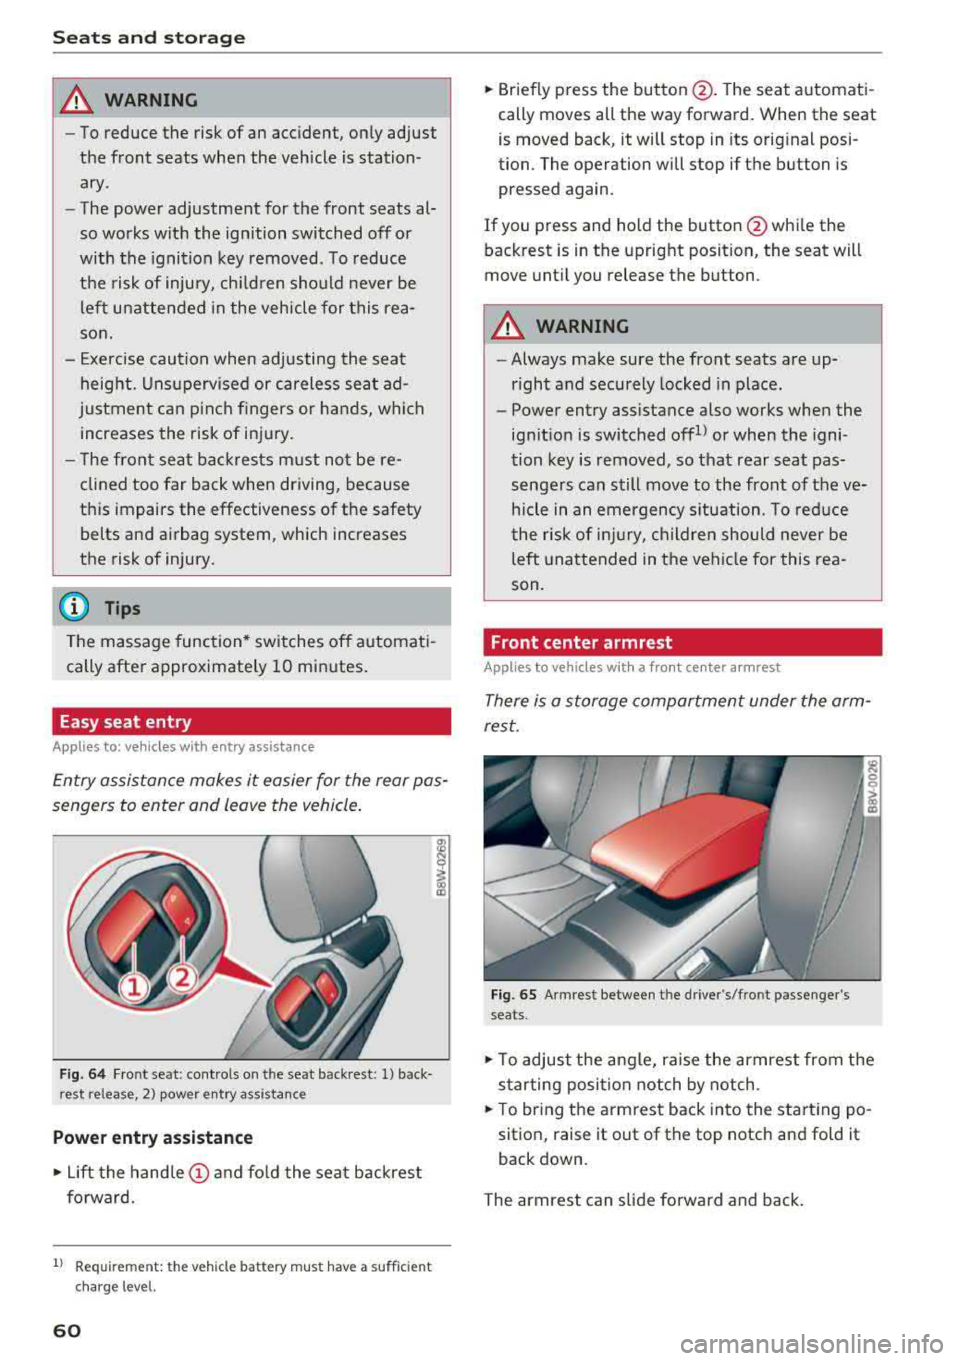
F ig . 64 Fr ont se at: cont ro ls on t he sea t back res t: 1) back
rest release , 2) power entry a ssistance
Power entry assistance
.,. Lift the hand le (!) and fo ld the seat backrest
forward.
1) Requ irem en t: the ve hicle battery m ust have a suff ic ie n t
c ha rg e le v e l.
60
.,. Briefly p ress the button @. T he seat a utomati
cally moves all the way forward. When the seat
is moved back, it will stop in its orig inal posi
tion. The operation will stop if the button is
pressed again .
If you press and ho ld the button @whi le the
back rest is in the upright posit ion, the seat will
move unt il you release the button .
A WARNING
-Always make sure the front seats are up
r ight and securely locked in place.
-
- Power entry assistance also works when the
ign it ion is switched offll or when the igni
tion key is removed , so that rear seat pas
senge rs can still move to the front of the ve
hicle in an emergency s ituation. To reduce
the r isk of injury, childre n should never be
left unattended in the vehi cle for this rea
son.
Front center armrest
Applies to vehicles with a front center armrest
There is a storage compartment under the arm
rest.
Fig. 65 Armrest between t he dr ive r's/fro nt passenger 's
seats .
.,. To adjust the angle, raise the armrest from the
s tarting posi tion notch by notch .
.,. To br ing the armrest back in to the start ing po
sition, raise it out of the top notch and fold it
back down .
The armrest can slide forwa rd and ba ck .
Page 63 of 404
LL co .... N
" N .... 0 N > co
Head restraints
Front head restraints
Applies to: vehicles with adjustable head restraints
Applies to: version 1
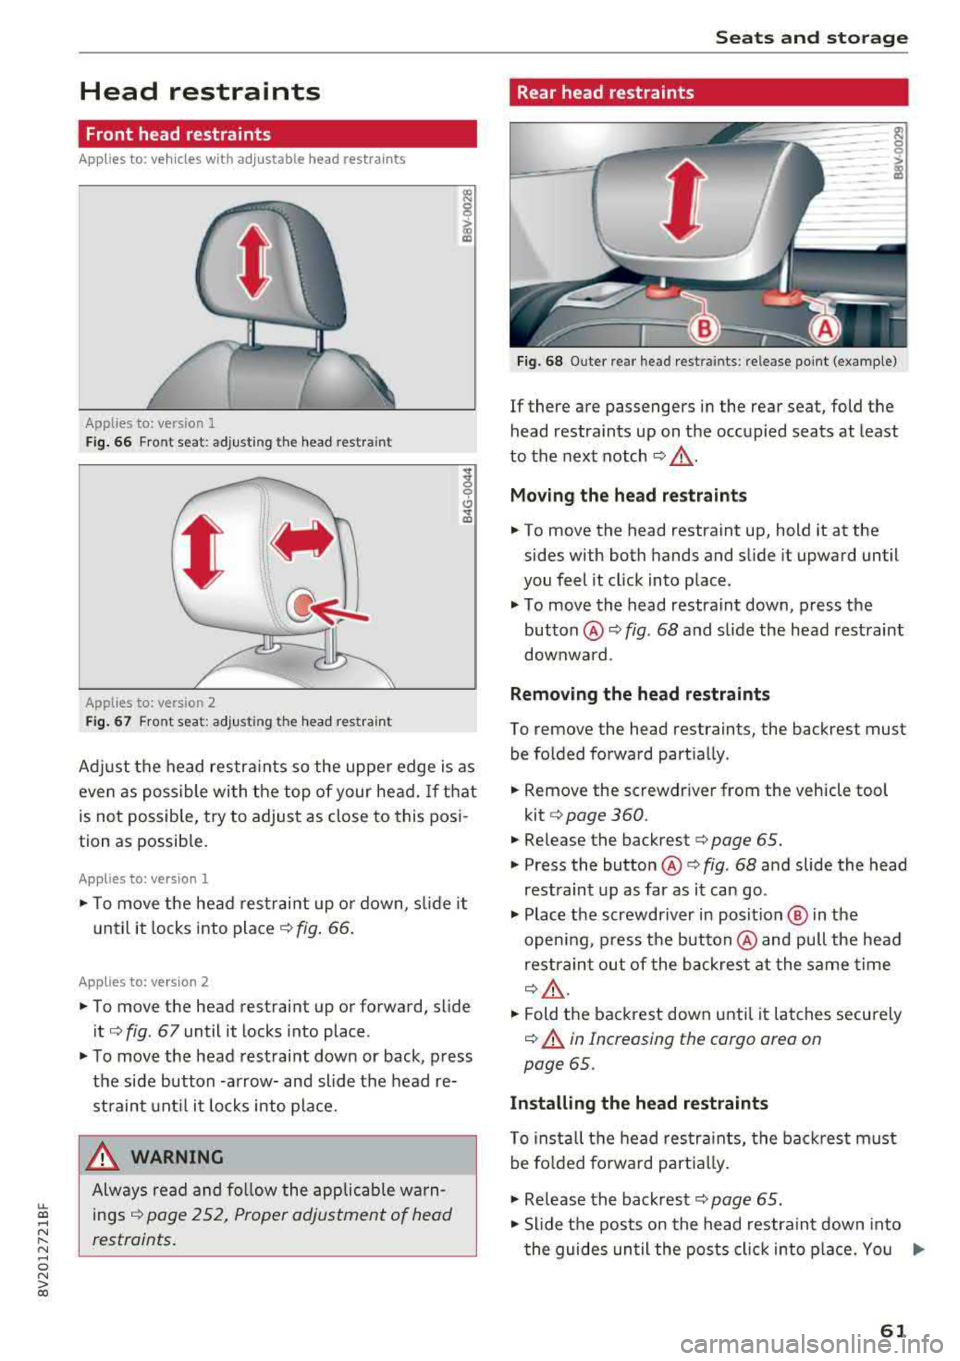
Fig . 66 Front seat: adjusting the head res train t
Applies to: version 2
Fig. 67 Front seat: adjusting the head restrain t
Adjust the head restra ints so the upper edge is as
even as possible wi th the top of your head.
If that
is not possible, t ry to adjust as close to this posi
tion as possible.
Applies to: version l
... To move the head restraint up or down, s lide it
until it locks into
place ¢ fig. 66.
App lies to: version 2
... To move the head restraint up or forward, slide
it¢ fig . 67 until it locks into place .
... To move the head restraint down or back, press
the side button -arrow-and slide the head re
straint unt il it locks into place.
_& WARNING
Always read and follow the applicable warn
ings
~ page 2 52, Proper adjustment of head
restraints.
-
S eats and storag e
Rear head restraints
~ -0 -c;>
18
Fig. 68 O uter rear head restraints: release point (example)
If there are passengers in the rear seat, fold the
head restraints up on the occupied seats at least
to the next notch
~ .&_ .
Mo ving the head r estraint s
... To move the head restraint up, hold it at the
sides with both hands and slide it upward until
you feel it cl ick into place .
.,. To move the head restraint down, press the
button@~ fig. 68 and slide the head restraint
downward .
Removing the he ad re straint s
To remove the head restraints, the backrest must
be folded forward partially .
... Remove the screwdriver from the vehicle tool
kit¢ page 360.
.,. Release the backrest ¢ page 65.
... Press the button @¢ fig. 68 and slide the head
restraint up as far as it can go .
.,. Place the screwdriver in posit ion @ in the
open ing , press the button @and pull the head
restraint out of the backrest at the same time
¢ A .
... Fold the backrest down until it latches securely
~.&. in Increasing the cargo area on
page 65.
In stalling the head r estraint s
To insta ll the head restra ints, the back rest must
be fo lded forward part ia lly.
.,. Re lease the backrest ¢ page 65.
.,. Slide the posts on the head restraint down into
t he guides un til the posts click into place. You
.,.
61
Page 64 of 404
Seats and stor age
shou ld not be able to pu ll the head restraint
out of the backrest.
~ Fo ld the backrest down until it latches securely
c:> .& in Increasing the cargo area on
page 65.
.,&. WARNING
-Always read and fo llow the applicable warn
ings
c:> page 252, Proper adjustment of
head restraints .
-Only remove the rear seat head restraints
when necessary in order to install a child
sa fety seat ¢
page 294, Child safety. In
stall t he head res tra int aga in immed iately
once the child safe ty seat is removed . Dr iv
ing with the head restraints removed or not
in the upright position increases the risk of
serious injury.
Power sources
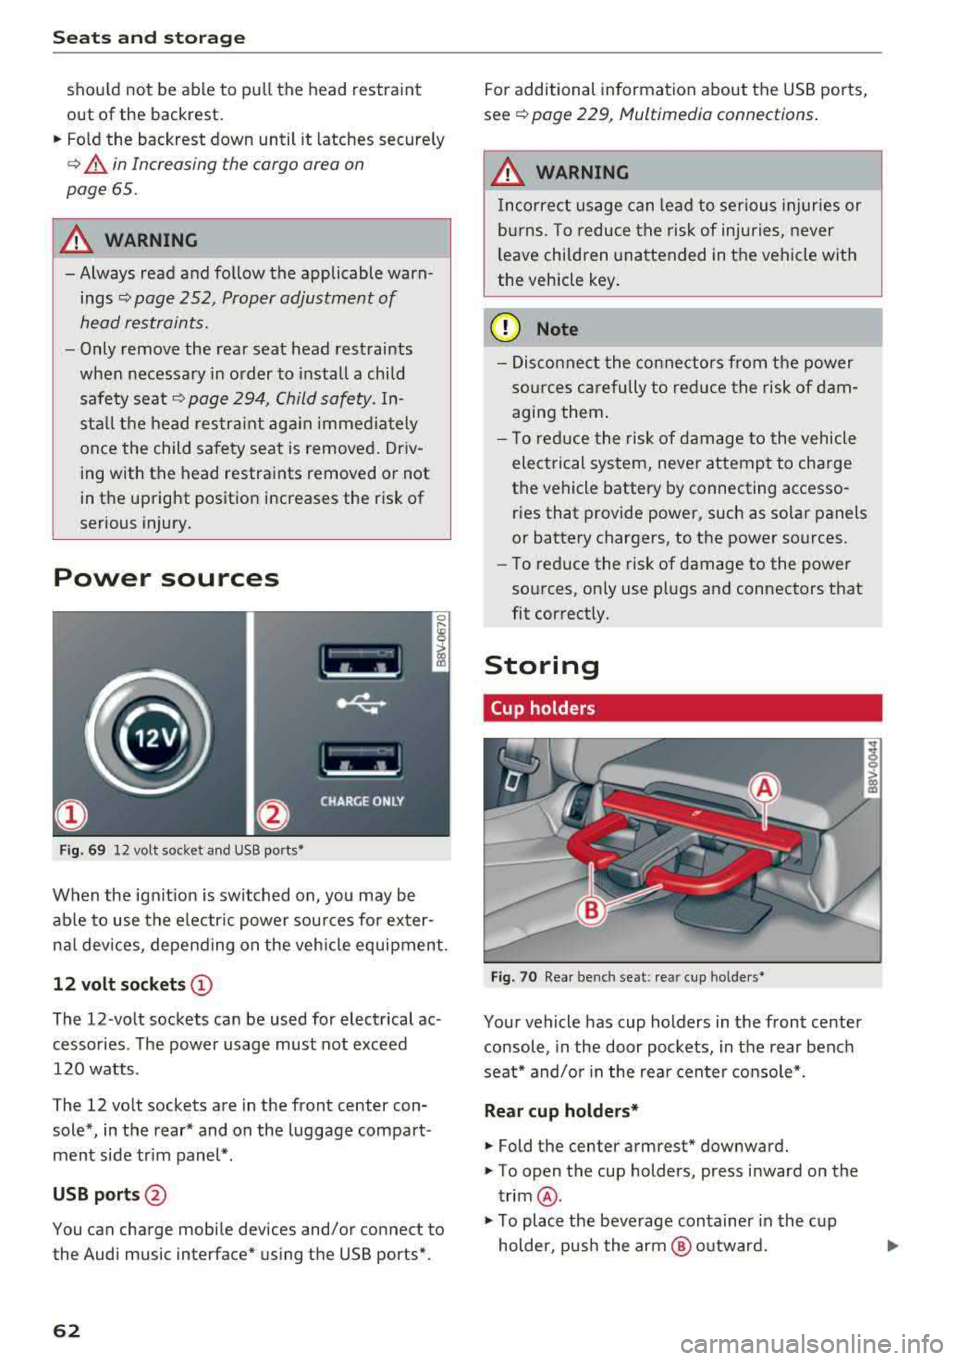
F ig . 69 12 volt socket and USB ports•
When the ign it ion is swit ched on , you may be
ab le to use the e lectr ic power sou rces for exter
nal devices, depending on the veh icle equipment .
12 volt sockets(!)
The 12-volt sockets can be used for electrical ac
cessories . The power usage must not exceed
120 watts .
The 12 volt sockets are in the front center con sole*, in the rear* and on the luggage compart
men t side tr im panel* .
USB ports @
You can charge mobile devices and/or connect to
the Audi music interface* us ing the USB ports*.
62 For additional information about the USB ports,
se e¢
page 229, Multimedia connections .
.,&. WARNING
Incorrect usage can lead to se rious injuries or
b ur ns. To reduce the risk of injuries, never
l eave children una ttended in the vehicle with
the vehicle key .
(D Note
-Disconnect the connectors from t he power
so urces carefully to reduce the risk of dam
agi ng them .
- T o red uce the risk of damage to the vehicle
electrical system, never attempt to charge
the vehicle battery by connecting accesso
ries that provide power, such as solar panels
or battery chargers , to the power sources.
- To reduce the risk of damage to the power
so urces, on ly use plugs and connectors that
fit correctly.
Storing
Cup holders
Fig . 70 Rear benc h seat : rea r cup holder s•
Your vehicle has cup holders in the front center
console, in the door pockets, in the rear bench
seat* and/or in the rea r cente r console*.
Rear cup holders*
~ Fold the center armrest* downward.
~ T o open the cup holders, press inward on the
trim @.
~ To place the beverage container in the c up
holder, pus h the arm @ outward.
Page 65 of 404
~ Then push the arm against the beverage con
tainer so that the arm lies closely against it.
~ To close the cup holders, push them back into
the slot.
A WARNING
-
- Do not put any hot beverages in the cup
holder while the vehicle is moving . Hot bev
erages could spill, wh ic h increases the risk
of injury.
- Do not use any breakable beverage contain
ers (for example, made out of glass or por celain). You cou ld be injured by them in the
event of an accident .
CD Note
Beverage containers in the cup holders should
always have a lid. If not, beverages could sp ill
and cause damage to vehicle equipment, such
electronics or seat covers.
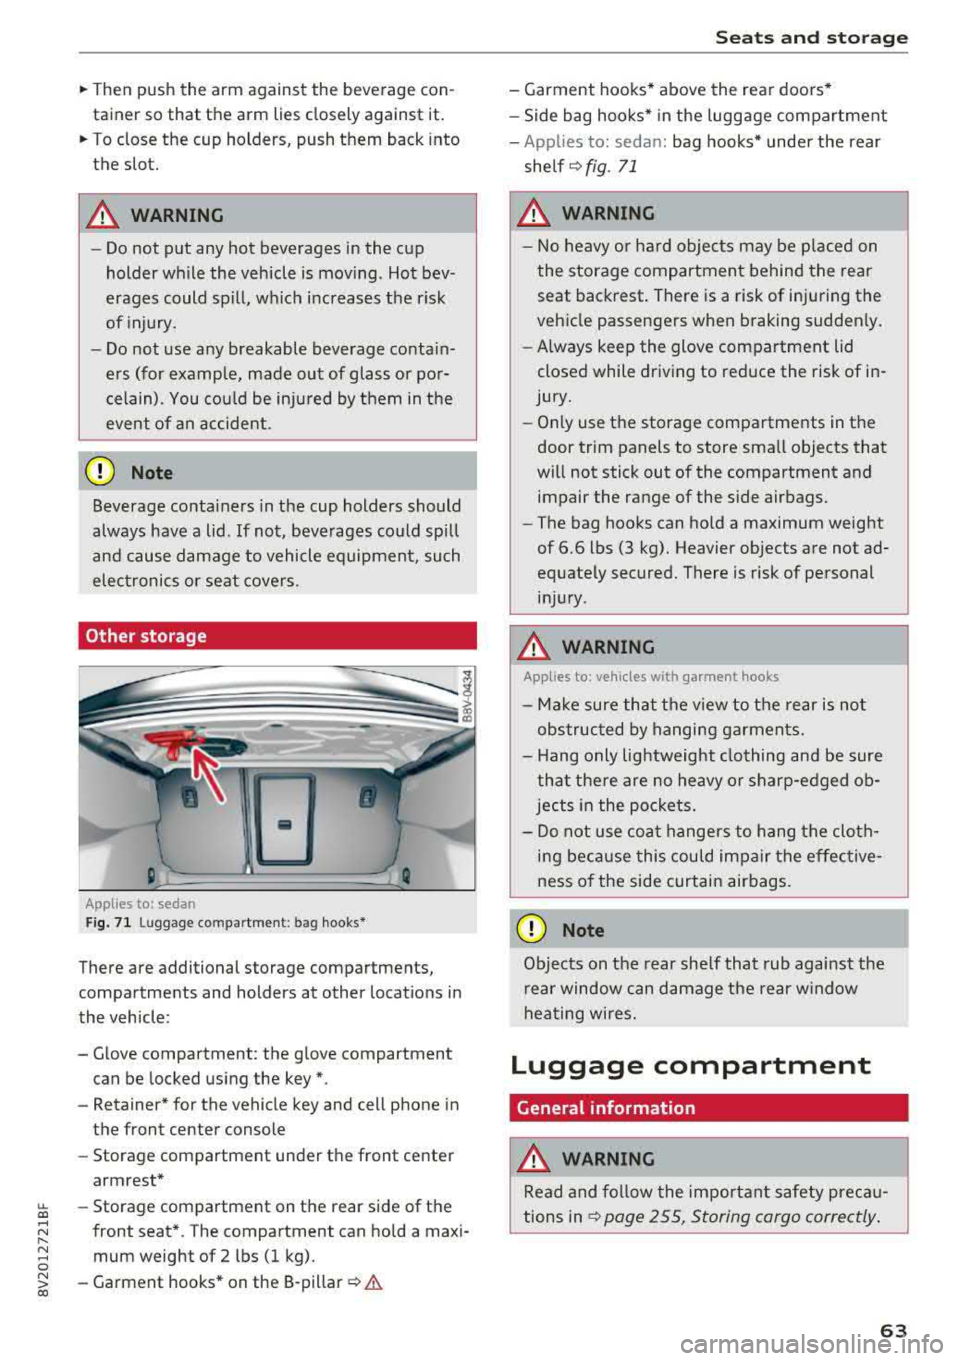
Other storage
Applies to: sedan
F ig. 7 1 Lugg age comp artment : bag hooks*
There are additional storage compartments,
compartments and holders at other locations in
the vehicle :
- Glove compartment : the glove compartment
can be locked us ing the key*.
- Retaine r* for the vehicle key and cell phone in
the front center console
- Storag e compartment under th e front center
armrest*
~ - Storage compartment on the rear side of the
.... ~ front seat* . The compartment can hold a maxi -
8 mum weight of 2 lbs (1 kg).
~ -Garment hooks * on the 8-pillar ¢ .& co
S eats and storag e
- Garment hooks* above the rea r doo rs *
- Side bag hooks* in the luggage compartment
- App lies to: sedan: bag hooks* unde r the rear
shelf ¢
fig. 71
A WARNING
-No heavy or hard objec ts may be p laced on
the storage compartment behind the rear seat backrest . There is a risk of injuring the
veh icle passengers when braking sudden ly .
- Always keep the glove compartment lid
closed while dr iv ing to red uce the risk of in
jury.
- On ly use the storage compartments in the
door trim panels to store sma ll objects that
will not stick out of the compartment and impair the range of the side airbags.
- The bag hooks can ho ld a maximum weight
of 6.6 lbs (3 kg). Heavier objects are not ad
equate ly secured. There is risk of personal
in jur y.
A WARNING ,_
Applies to: vehicles with garment hooks
- Ma ke sure that t he view to the rear is not
obs truc ted by hanging ga rments.
- H ang only lightweight clothing and be sure
that the re are no heavy o r sharp-edged ob
jec ts in the po ckets.
- Do not use coat hangers to hang t he cloth
i n g beca use this could impair the effective
ness o f the side curtain airbags .
CD Note
Objects on the rear she lf that rub against the
r ear window can d amage the rear w indow
hea ting wires.
Luggage compartment
General information
.&, WARNING
Read and follow the impo rtant s afety preca u
tions in
~ page 255, Storing cargo correctly .
63
Page 66 of 404
Seats and stor age
Luggage compartment cover
App lies to: ve hicles w ith luggage co mpartme nt cover
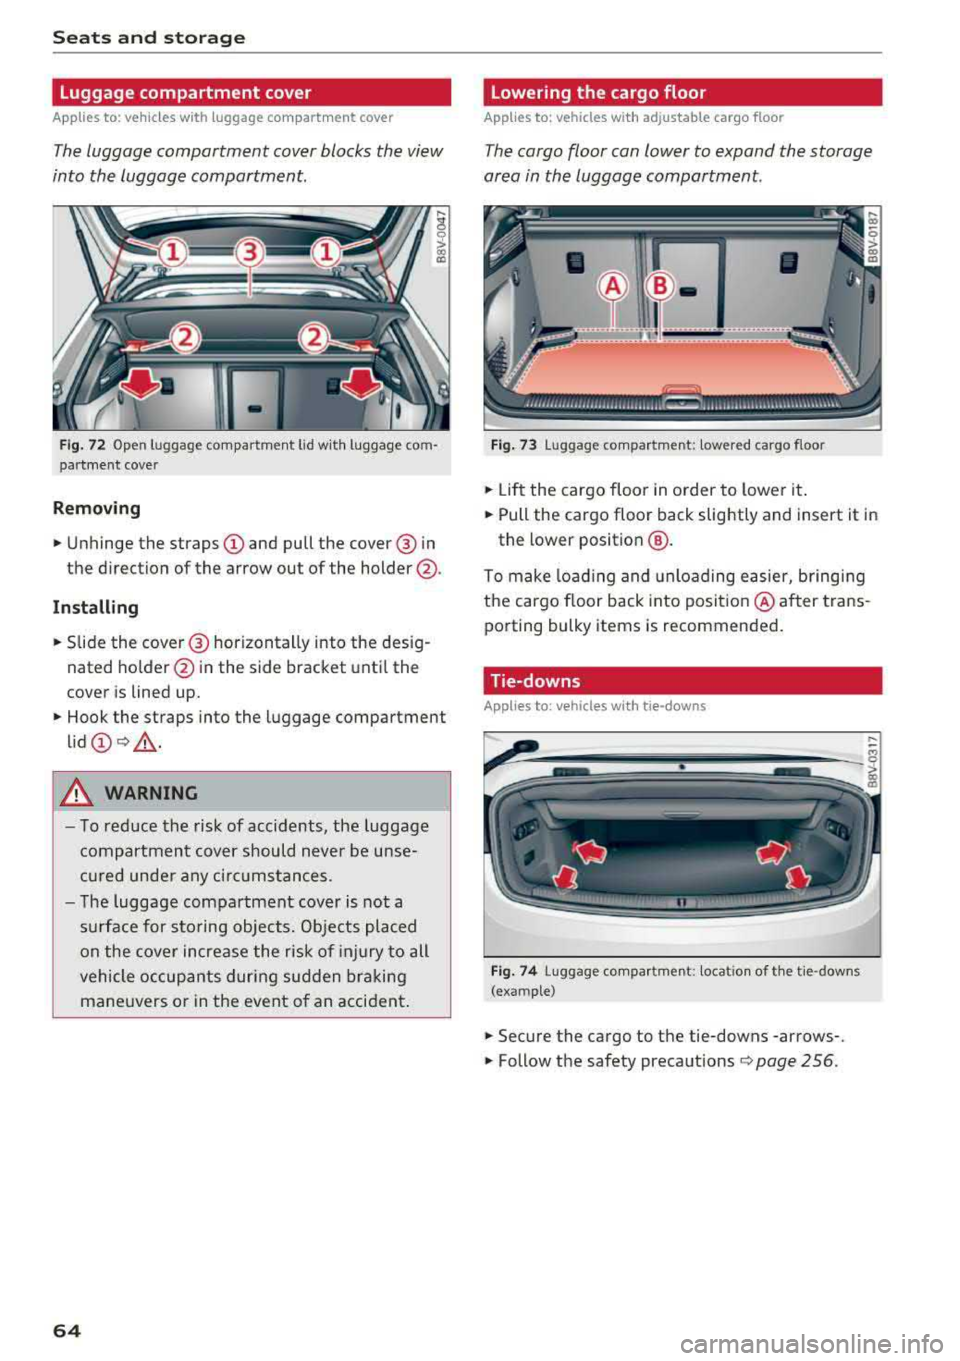
The luggage compartment cover blocks the view
into the luggage compartment.
F ig. 72 Open luggage compartment lid wit h luggage com
par tme nt cover
Remo ving
.. Unhinge the straps CD and pull the cover @ in
the direction of the arrow out of the holder @.
Install ing
.. S lide the cover @ horizontally into the des ig
nated ho lder @in the side bracket unt il the
cover is lined up.
.. Hook the straps into the luggage compartment
lid
CD Q _A .
A WARNING
- To reduce the risk of accidents, the luggage
compartmen t cover should never be unse
cu red unde r any ci rc u mstances.
- The luggage compartment cover is not a
s u rface for sto ring objects. Objects placed
on the cover increase the risk of injury to all
vehicle occupants during sudden bra king
mane uvers o r in the event o f an accident .
64
Lowering the cargo floor
Applies to : vehicles with adjustable cargo floor
The cargo floor can lower to expand the storage
area in the luggage compartment.
Fig . 73 Luggage compartment: lowered cargo floor
.. Li ft the cargo floor in order to lower it .
.. Pull the cargo floor back slightly and insert it in
the lower position
@ .
To make load ing and unloading easier, bringing
the cargo floor back into posit io n @ after trans
porting bulky items is recommended .
Tie-downs
App lies to : vehicles wi th tie- downs
Fig . 74 Luggage compartment: locat io n of th e tie -downs
(example)
.. Secure the cargo to the tie-downs -arrows-.
.. Follow the safety precautions Q page 256.
Page 67 of 404
LL co .... N
" N .... 0 N > co
Luggage compartment net/cargo bag
Applies to: vehicles with luggage compartment cargo net/car
go bag
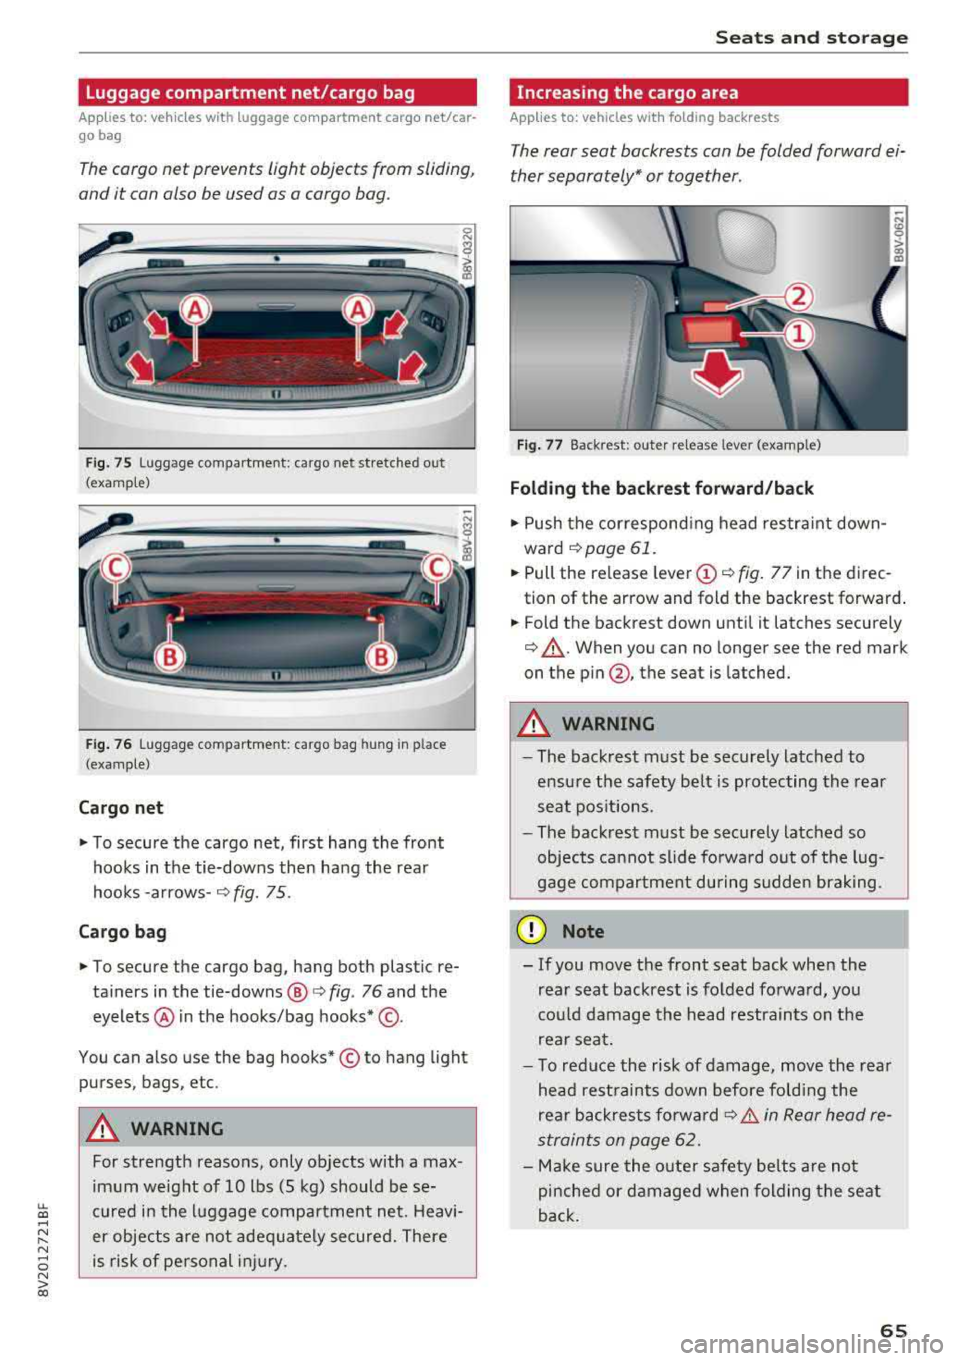
The cargo net prevents light objects from sliding,
and it can also be used as a cargo bog.
Fig. 75 Luggage compartment: cargo net stretched out
(examp le)
F ig . 76 Luggage compartment: cargo bag hung in place
(examp le)
Cargo net
" To secure the cargo net, first hang the front
hooks in the tie-downs then hang the rear
hooks
-arrows- ¢ fig. 75.
Cargo bag
" To secure the cargo bag, hang both plastic re
ta iners in the tie-downs @
c> fig. 76 and the
eyelets @ in the hooks/bag hooks* ©-
You can also use the bag hooks* © to hang light
purses, bags, etc .
A WARNING
For strength reasons, only objects with a max
imum weight of 10 lbs (5 kg) should be se
cured in the luggage compartment net. Heavi
er objects are not adeq uately secured. There
is risk of personal injury .
Seats and storag e
Increasing the cargo area
Applies to: vehicles with folding backrests
The rear seat backrests con be folded forward ei
ther separately* or together .
Fig. 77 Backrest: outer re lease lever (example)
Folding th e backr est forward /back
" Push the correspond ing head restra int down
ward
¢page 61.
" Pull the release leve r (D ¢ fig. 77 in the direc
tion of the arrow and fold the backrest forward .
.. Fold the backrest down until it latches securely
¢ &_. When you can no longer see the red mark
on the
p in @ , the seat is latched.
A WARNING ~ -
- The backrest must be securely latched to
ensu re the safety belt is protecting the rear
seat pos itions.
- The backrest must be securely latched so
objects cannot slide fo rwa rd out of the lug
gage compartment during sudden brak ing.
@ Note
- If you move the front seat back when the
rear seat backrest is folded forwa rd, yo u
cou ld damage the head restrain ts on the
rear seat.
- To red uce the risk of damage, move the rea r
head rest raints down before fo ld ing the
rear backrests fo rwa rd
¢ &. in Rear head re
straints on page
62.
- Make sure the oute r safety be lts are not
pinche d or damaged when folding the seat
back.
65
Page 68 of 404
Seats and storage
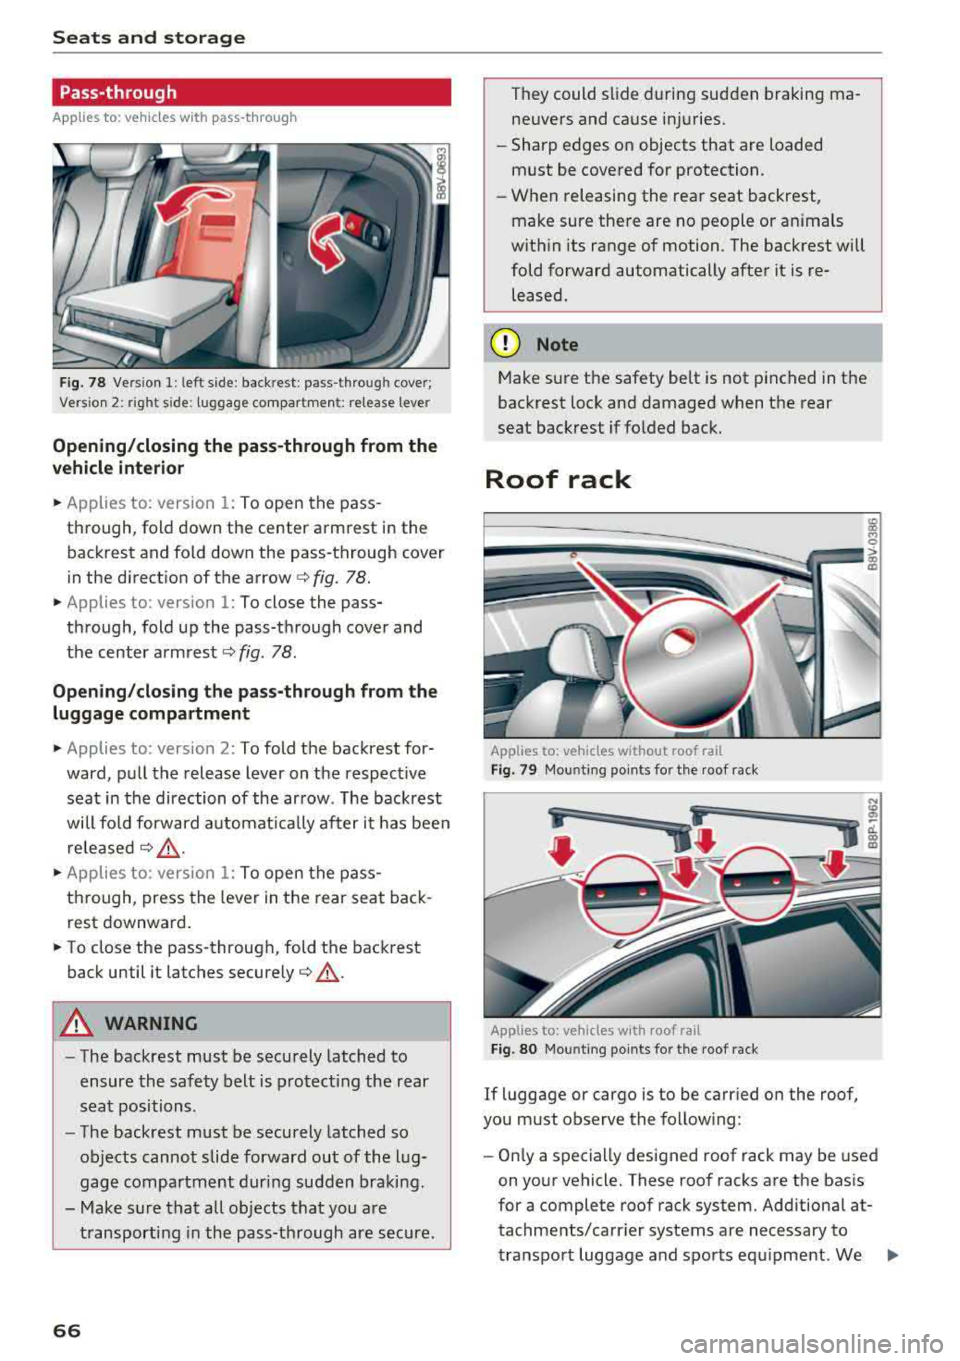
Pass-through
Applies to: vehicles with pass-through
Fig. 78 Vers ion 1: left side: backrest: pass-through cover;
Vers io n 2: right side : luggage co mpartment: relea se lever
Opening/closing the pass-through from the
vehicle interior
.,. Applies to: version 1: To open the pass
through, fold down the center armrest in the backrest and fo ld down the pass-through cover
in the direct ion of the arrow
c:> fig. 78 .
.,. Applies to: version 1: To close the pass
through, fold up the pass-through cover and
the center
armrest¢ fig. 78.
Opening/closing the pass-through from the luggage compartment
.,. Applies to: version 2: To fold the backrest for
ward, pull the release lever on the respect ive
seat in the direction of the arrow. The backrest
will fo ld forward automat ically after it has been
released
¢ &_ .
.,. Applies to: version 1: To open the pass
through, press the lever in the rear seat back
rest downward .
.,. To close the pass-through, fold the backrest
back until it latches
securely¢ &_.
A WARNING
-The backrest must be securely latched to
ensure the safety belt is protecting the rear
seat positions .
- The backrest must be securely latched so
objects cannot slide forward out of the lug
gage compartment during sudden braking .
- Make sure that all objects that you are
transporting in the pass-through are secure.
66
They could slide during sudden braking ma
neuvers and cause injuries.
- Sharp edges on objects that are loaded
must be covered for protection.
- When releasing the rear seat backrest,
make sure there are no people or anima ls
with in its range of motion. The backrest will
fold forward automatically after it is re leased.
(D Note
Make sure the safety belt is not pinched in the
backrest lock and damaged when the rear
seat backrest if folded back.
Roof rack
Applies to: vehicles without roof rail
Fig. 79 Mounting po ints for the roof rack
Applies to: vehicles with roof rail
Fig. 80 Moun ting points fo r the roof rack
If luggage or cargo is to be carried on the roof,
you must observe the following:
- Only a specially designed roof rack may be used
on your vehicle. These roof racks are the basis
for a complete roof rack system. Additional at
tachments/carr ier systems are necessary to
transport luggage and sports equipment. We
..,.
Page 69 of 404
u. 00 .-< N l' N .-< 0 N > 00
recommend roof racks and attachments from
the Audi Genuine Accessories program.
- When installing the roof rack, make sure that it
is mounted on ly at the designated points on
the roof ¢
fig. 79 or ¢ fig. 80.
-Note the permitted axle load, permitted tota l
weight, and permitted roof load of your vehicle
¢
page 382 . The roof load is the tota l of the
weight of the roof rack, the attachments and
the cargo you are carrying. However, you must also note the permitted load of the carr ier sys
tem being used .
A WARNING
-Follow the installat io n instructions provided
with the roof rack system. If you do not se
cur e the roof ra ck sys tem and objec ts on the
roof correctly, they co uld come loose from
the vehi cle and cause an accident.
- T he ris k of an a cc ident i ncreases when using
a roof rack system, because it changes the
driving characteristics by shifting the center
of gravity and/or the increasing the s urface
area exposed to wind. You may need to
adapt your driv ing style and speed to the
current conditions.
@ Note
- If you use other roof luggage rac k systems
or do not insta ll the racks as intended, any
damage to the ve hicle is not cove red by the
warranty. Carefully follow the assembly and i nsta llation instruct ions included with the
r oof rack car rier system .
- Make sure t hat the luggage compartment
l id and the pa norama glass
roof* do not
come into contact with objects on the roof
whe n they are ope n.
@) For the sake of the environment
Your veh icle w ill req uir e more fuel due to the
increased wi nd resistance. So remove th e roof
rac k after using it.
Seat s and sto rag e
67
Page 70 of 404
Warm and cold
Warm and cold Climate control system
Description
The climate control system circulates , warms or
coo ls, and removes humid ity from the air in the
veh icle interior . It is the most effective when the
windows and panorama g lass roof* or power top*
are closed. If there is a build-up of heat inside
the vehicle, ventilation can help to speed up the
coo ling process.
Pollutant filter
The pollutant filter removes pollutants such as
dust and po llen from the air.
Key recognition
Various sett ings are stored and ass igned to the
remote control key being used.
These settings are different when the power top* is open or closed .
Presetting
Several functions can be preset in the Infotain
ment system.
Select in the Infotainment system:
IMENU ! but
ton
> Vehicle > left control button > Air condi
tioning
A WARNING
Poor visibility can lead to accidents.
- For safer driving, keep all windows free of
ice, snow and fog.
- Become familiar with the correct use and
function of the climate control system as
quickly as poss ible, espec ia lly with the de
frosting and defogging functions.
- When the temperature is below freezing, only use the windsh ield washer system after
68
the windshield has been warmed by the cli
mate control system. The washer fluid could
freeze on the windshie ld and impair visib ili
ty .
@ Note
-If you suspect that the climate contro l sys
tem is damaged, switch the system off to
prevent further damage and have it checked
by an authorized Aud i dealer or authorized
Audi Serv ice Facility.
- Repa irs to the Aud i climate control system
require special technical knowledge and
special tools . See an authorized Aud i dealer
o r authorized Aud i Serv ice Facility .
@ For the sake of the environment
-To save fuel, turn off the climate control
system cooling mode by press ing the A/C
button. This w ill also reduce emissions . The
climate control system is off when the LED
in the button turns off.
- In vehicl es w ith the efficie ncy prog ram*,
yo u can find other consumpt ion information
and more economy tips ¢ page 19.
© Tips
- To prevent int erference with the heat ing
and cooling output and to prevent the win
dows from fogging over, the air intake in
front of the windshie ld must be free of ice,
snow or leaves.
- Condensation from the cooling system* can
drip and form a pudd le of water under the
vehicle . This is normal and does not mean
there is a leak.
- Th e energy management system may tem
porarily switc h off certain functions, such as
the seat heating* or rear window defogger.
These systems are ava ilable again as soon
as the energy supply has been restored.