automatic AUDI A4 2013 Repair Manual
[x] Cancel search | Manufacturer: AUDI, Model Year: 2013, Model line: A4, Model: AUDI A4 2013Pages: 302, PDF Size: 75.61 MB
Page 219 of 302
Refuelling
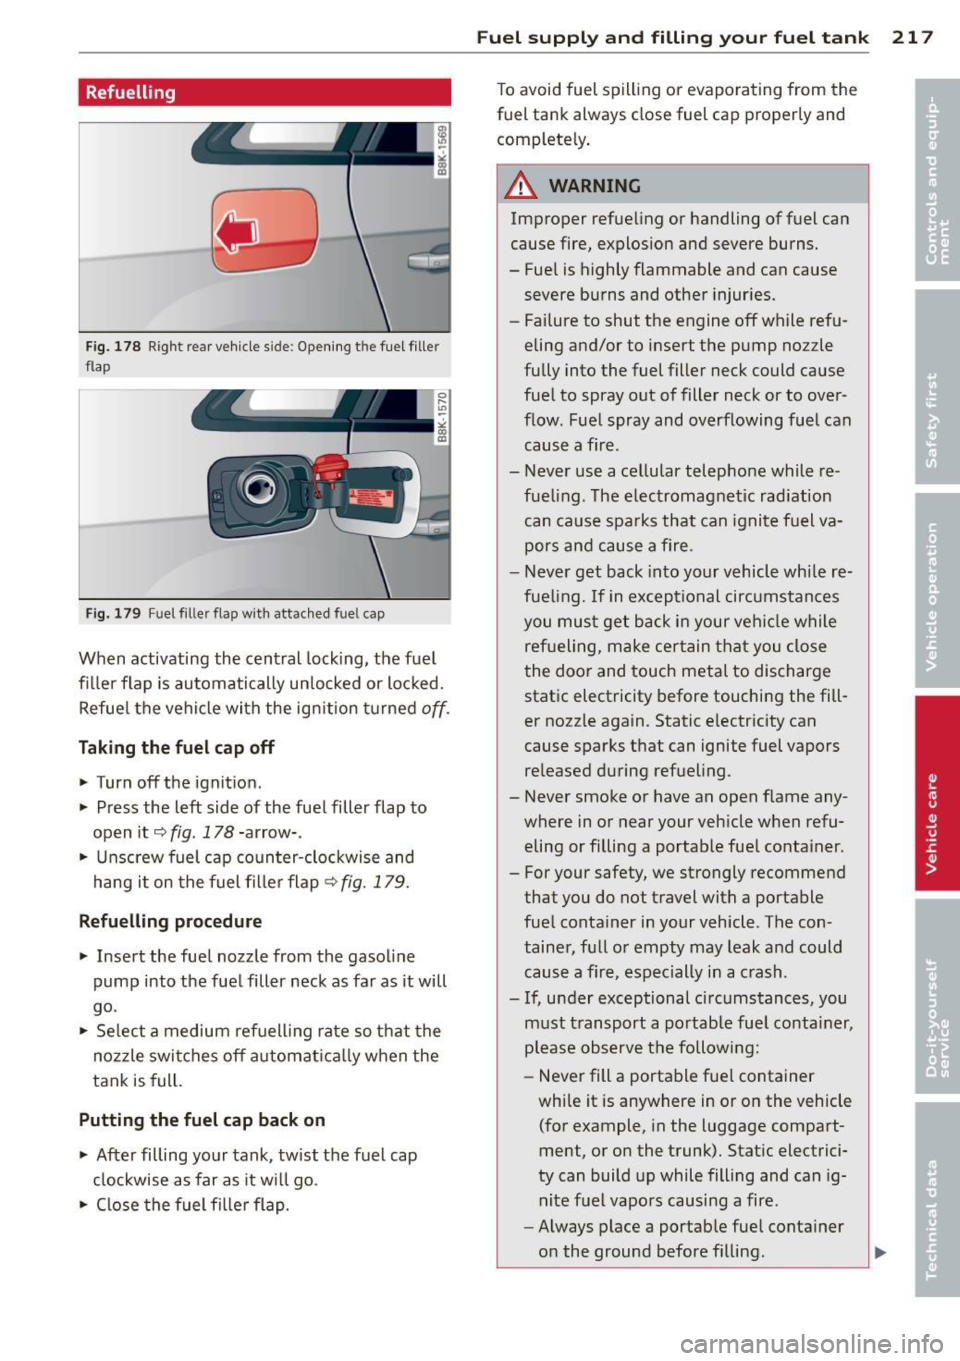
Fig. 178 Right rear vehicle sid e: Opening t he fuel filler
flap
Fig. 179 Fu el filler flap with attached fuel cap
When activating the central locking, the fuel
filler flap is automatically unlocked or locked.
Refuel the vehicle with the ignition turned
off.
Taking the fuel cap off
.. Turn off the ignition .
.. Press the left side of the fuel filler flap to
open it~
fig. 178 -arrow- .
.. Unscrew fuel cap counter-clockwise and
hang it on the fuel filler flap~
fig. 179.
Refuelling procedure
.. Insert the fuel nozzle from the gasoline
pump into the fuel filler neck as far as it will
go .
.. Select a medium refuelling rate so that the
nozzle switches off automatically when the
tank is full.
Putting the fuel cap back on
.. After filling your tank, twist the fuel cap
clockwise as far as it will go .
.. Close the fuel filler flap.
Fuel supply and filling your fuel tank 217
To avoid fuel spilling or evaporating from the
fuel tank always close fuel cap properly and
completely.
_& WARNING
Improper refueling or handling of fuel can
cause fire, explosion and severe burns.
- Fuel is highly flammable and can cause
severe burns and other injuries.
- Failure to shut the engine off while refu
eling and/or to insert the pump nozzle
fully into the fuel filler neck could cause
fuel to spray out of filler neck or to over
flow. Fuel spray and overflowing fuel can cause a fire .
- Never use a cellular telephone while re
fueling. The electromagnetic radiation
can cause sparks that can ignite fuel va
pors and cause a fire.
- Never get back into your vehicle while re
fueling.
If in exceptional circumstances
you must get back in your vehicle while
refueling, make certain that you close
the door and touch metal to discharge static electricity before touching the fill
er nozzle again. Static electricity can
cause sparks that can ignite fuel vapors
released during refueling .
- Never smoke or have an open flame any
where in or near your vehicle when refu
eling or filling a portable fuel container .
- For your safety, we strongly recommend
that you do not travel with a portable
fuel container in your vehicle . The con
tainer, full or empty may leak and could
cause a fire, especially in a crash.
- If, under exceptional circumstances, you must transport a portable fuel container,
please observe the following:
- Never fill a portable fuel container
while it is anywhere in or on the vehicle
(for example, in the luggage compart
ment, or on the trunk). Static electrici
ty can build up while filling and can ig
nite fuel vapors causing a fire .
- Always place a portable fuel container
on the ground before filling.
Page 220 of 302
218 Fuel supply and filling your fuel tank
-Always keep the filler nozzle complete
ly inside the portable container before
and during filling.
- If filling a portable container made of
metal , the filler no zzle must always be
in contact with the container. Th is will
help prevent static electricity from dis
charging and cause a fire .
- Never spill fuel inside the vehicle or
luggage compartment. Fuel vapors are
highly flammable .
-Always observe local and state/provin
cial laws regarding the use, storage
and transportation of fuel containers.
- Make certain the fuel container meets
industry standards (ANSI/ ASTM
F 852-86).
(D Note
If any fuel has spilled onto the car, it
should be removed immediately to prevent
damage to the paint .
@ For the sake of the environment
As soon as the correctly operated nozzle
sw itches off automatically for the first
time, the tank is full . Do not try to add
more fuel because fuel may spill out. In
addition, the expansion space in the fuel
tank will be filled -causing the fue l to
overflow when it becomes warm and pol
lute the environment.
@ Tips
-Running yo ur engine while refuelling
may cause vapors to escape or even
cause fue l to spill out of the tank . This
would then shut off the fuel nozzle be
fore the tank is full.
- Do not refuel your vehicle with the igni
tion turned on. The fuel gauge may oth
erwise not indicate the correct fuel level
after refuelling .
- The fuel filler flap of your vehicle is not locked when you lock the vehicle from
the inside .
Unlocking the fuel filler flap by hand
You can open the fuel filler flap by hand if the
power locking system should fail.
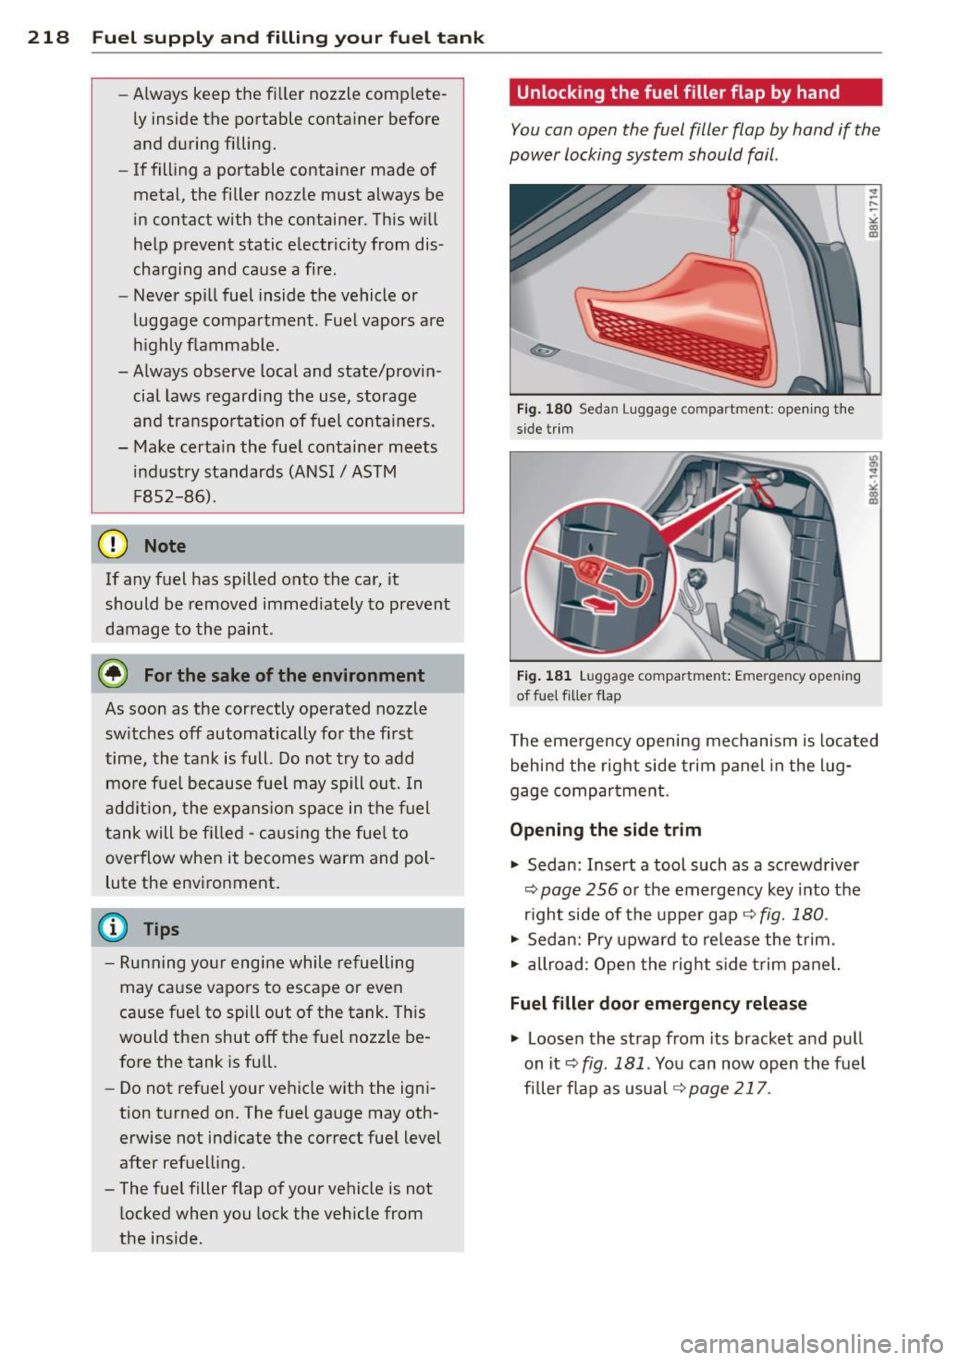
Fig. 180 Sed an Lugga ge com pa rtment: op ening the
side trim
Fig. 181 Lug gag e compart men t: Em erge ncy opening
of fuel filler fla p
The emergency opening mechanism is located
behind the right side trim panel in the lug
gage compartment .
Opening the side trim
"' Sedan: Insert a tool such as a screwdriver
c:> page 256 or the emergency key into the
right side of the upper gap~
fig. 180 .
"' Sedan: Pry upward to release the trim .
.,.. allroad : Open the right side trim panel.
Fuel filler door emergency release
"' Loosen the strap from its bracket and pull
on it
c:> fig . 181 . You can now open the fuel
fi ller f lap as usual
c:> page 217.
Page 221 of 302
Checking and filling Engine hood
Releasing and opening the engine hood
The engine hood is released from inside the
vehicle .
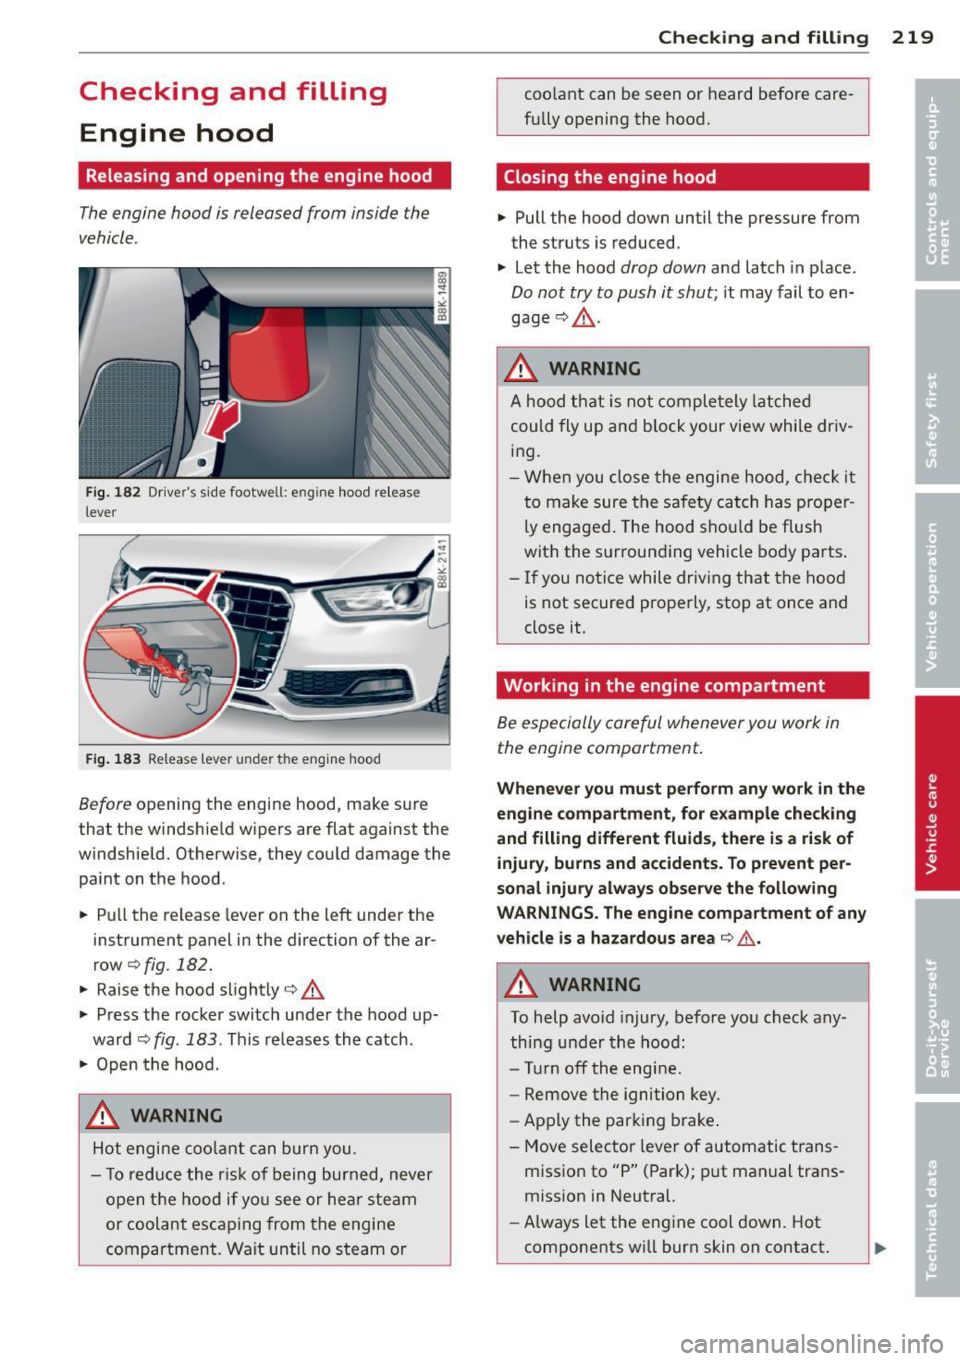
Fig . 182 Dr iver's side footwell: eng ine hood release
lever
... ~ - ---
F ig . 183 Re lease lever un der the engine hood
Before opening the engine hood, make sure
that the windshield w ipers are flat against the
windshield. Otherwise, they could damage the
paint on the hood.
.. Pull the release lever on the left under the
instrument panel in the direction of the ar
row
Q fig. 182.
.. Raise the hood slightly QA
.. Press the rocker switch under the hood up
ward
c::> fig . 183 . This re leases the catch .
.,. Open the hood.
& WARNING
Hot engine coo lant can burn you.
- To redu ce the r isk of being burned, never
open the hood if yo u see or hear steam
or coolant escaping from the engine
compartment. Wait until no steam or Checkin
g and fillin g 219
coolant can be seen or heard before care
fully opening the hood.
Closing the engine hood
.. Pull the hood down until the pressure from
the struts is reduced .
.. Let the hood
drop down and latch in place.
Do not try to push it shut; it may fail to en
gage
c::> .&, .
_&. WARNING
-
A hood that is not comple tely latched
could fly up and b lock your view while dr iv
ing.
- When you close the engine hood, chec k it
to make sure the safety catch has p ro pe r
ly engaged . The hood sho uld be flush
with the surrounding vehicle body parts .
-If you notice while driv ing that the hood
is not secured prope rly, stop at once and
close it.
Working in the engine compartment
Be especially careful whenever you work in the engine compartment .
Whenever yo u mu st p erform an y w or k in th e
eng in e compa rtment, for example checking
and filling differ ent fluid s, there i s a ri sk of
injury , burns and accidents. To prevent per
sonal injury always obser ve the following
WARNINGS . The eng ine compa rtment of any
v ehicle is a hazardous are a
QA .
_&. WARNING
To help avoid injury, before you check any
thing under the hood:
- Turn off the engine.
- Remove the ignition key.
- Apply the parking brake .
- Move selector lever of automatic trans -
mission to "P" (Park); p ut manual trans
miss ion in Neutral.
- Always let the engine cool down. Hot
components w ill burn skin on contact .
Page 222 of 302
220 Checking and filling
-To reduce the risk of being burned, never
open the hood if you see or hear steam
or coolant escaping from the engine
compartment . Wait until no steam or
coolant can be seen or heard before care
fully opening the hood .
- Keep children away from the engine com
partment .
- Never spill fluids on hot engine compo
nents. They can cause a fire.
- Never touch the radiator fan. The auxili
ary electric fan is temperature controlled
and can switch on suddenly.
- Never open the coolant reservoir cap
when the engine is still warm. The cool
ant system is pressurized and hot cool
ant could spray out.
- Protect your face, hands and arm from
steam or hot engine coolant by placing a
thick rag over the cap when you open the
coolant reservoir .
- Do not remove the engine cover under
any circumstances. This increases the
risk of burns.
- If work on the fuel system or the electri
cal system is necessary:
- Always disconnect the battery.
- Never smoke or work near heaters or
open flames. Fluids in the engine com partment could start a fire.
- Keep an approved fire extinguisher im
mediately available.
- To avoid electrical shock and personal in
jury while the engine is running or being
started, never touch:
- Ignition cables
- Other components of the high voltage
electronic ignition system.
- If you must perform a check or repair
with the engine running:
- First, fully apply the parking brake,
move selector lever of automatic trans- mission to
"P" (Park); put manual
transmission in Neutral.
- Always use extreme caution to prevent
clothing, jewelry, or long hair from get
ting caught in the radiator fan, V-belts
or other moving parts, or from contact ing hot parts . Tie back hair before
starting, and do not wear clothing that
will hang or droop into the engine .
- Minimize exposure to emission and
chemical hazards
~ /1. .
A WARNING
=
California Proposition 65 Warning:
- Engine exhaust, some of its constituents,
and certain vehicle components contain
or emit chemicals known to the State of
California to cause cancer and birth de
fects and reproductive harm. In addition,
certain fluids contained in vehicles and
certain products of component wear con
tain or emit chemicals known to the
State of California to cause cancer and
birth defects or other reproductive harm.
- Battery posts, terminals and related ac
cessories contain lead and lead com
pounds, chemicals known to the State of
California to cause cancer and reproduc
tive harms. Wash hands after handling.
(D Note
When adding fluids, always make sure that
they are poured into the proper container
or filler opening, otherwise serious dam
age to vehicle systems will occur.
@) For the sake of the environment
To detect leaks in time, inspect the vehicle
floor pan from underneath regularly. If
you see spots from oil or other vehicle flu ids, have your vehicle inspected by an au
thorized Audi dealer.
Page 230 of 302
228 Check ing and filling
scalding from hot coolant by following
these steps .
- Turn off the eng ine and allow it to cool
down.
- Protect your face, hands and arms from escaping flu id and steam by cover ing
the cap with a large, thick rag .
- Turn the cap slowly and very carefully
i n a counter-clockwise direction while
apply ing l ight, downwa rd press ure on
the top of the cap .
- To avo id being burned, do not spi ll an
tifreeze or coolant on the exhaust sys
tem or hot engine parts . Under certain
conditions, the ethylene glyco l in en
gine coolant can catch f ire .
- Antifreeze is poisonous . Always store an
tifreeze in its or iginal container and we ll
out of the reach of children.
- If you drain the coolant, it must be
caught and safely stored in a proper con
tainer clear ly marked "poison".
@ Note
- Coolant po llutes the env ironment and
could cause an engine fire . Excess coo l
ant will be forced out through the pres
sure re lief valve in the cap when the en
gine becomes hot.
- If, in an emergency, only water can be
added, the correct ratio between water
and antifreeze
c::> page 226 must be re
stored as soon as possible .
@ For the sake of the environment
Drained coolant should not be re used. Al
ways dispose of used coolant while observ
ing all environmental regulat ions .
Radiator fan
The radiator fan switches on automatically by
itself
T he radiator fan is driven by the engine via the
V-be lt . The viscous clutch regulates the speed
of the fan accord ing to the temperature of the
coolant. An a
uxiliary electric radiator fan* switches on
and off depend ing on coolant temperature
and other vehicle operat ing condit ions .
After yo u sw itch the engine off, the aux iliary
f an can continue running for up to 10 minutes
- eve n wit h the ignit ion off. It can even switc h
on again later by itself
c::> &. , if
- t he tempe rature of the engine coo lant rises
due to the heat build -up from the engine in
the engine compartment, or
- the engine compa rtment heats up because
the vehicle is parked in i ntense sunlight.
_& WARNING
- To reduce the risk of personal injury nev
er touch the radiator fan.
- The auxiliary electric fan is temperat ure
controlled and can sw itch on suddenly
even when the engine is not running.
- The a uxiliary radiator fan sw itches on au
tomatically when the engine coo lant
reaches a certai n temperature and will
continue to run until the coolant temper
ature drops .
Brake fluid
Checking brake fluid level
The brake fluid level can be checked with a
quick glance.
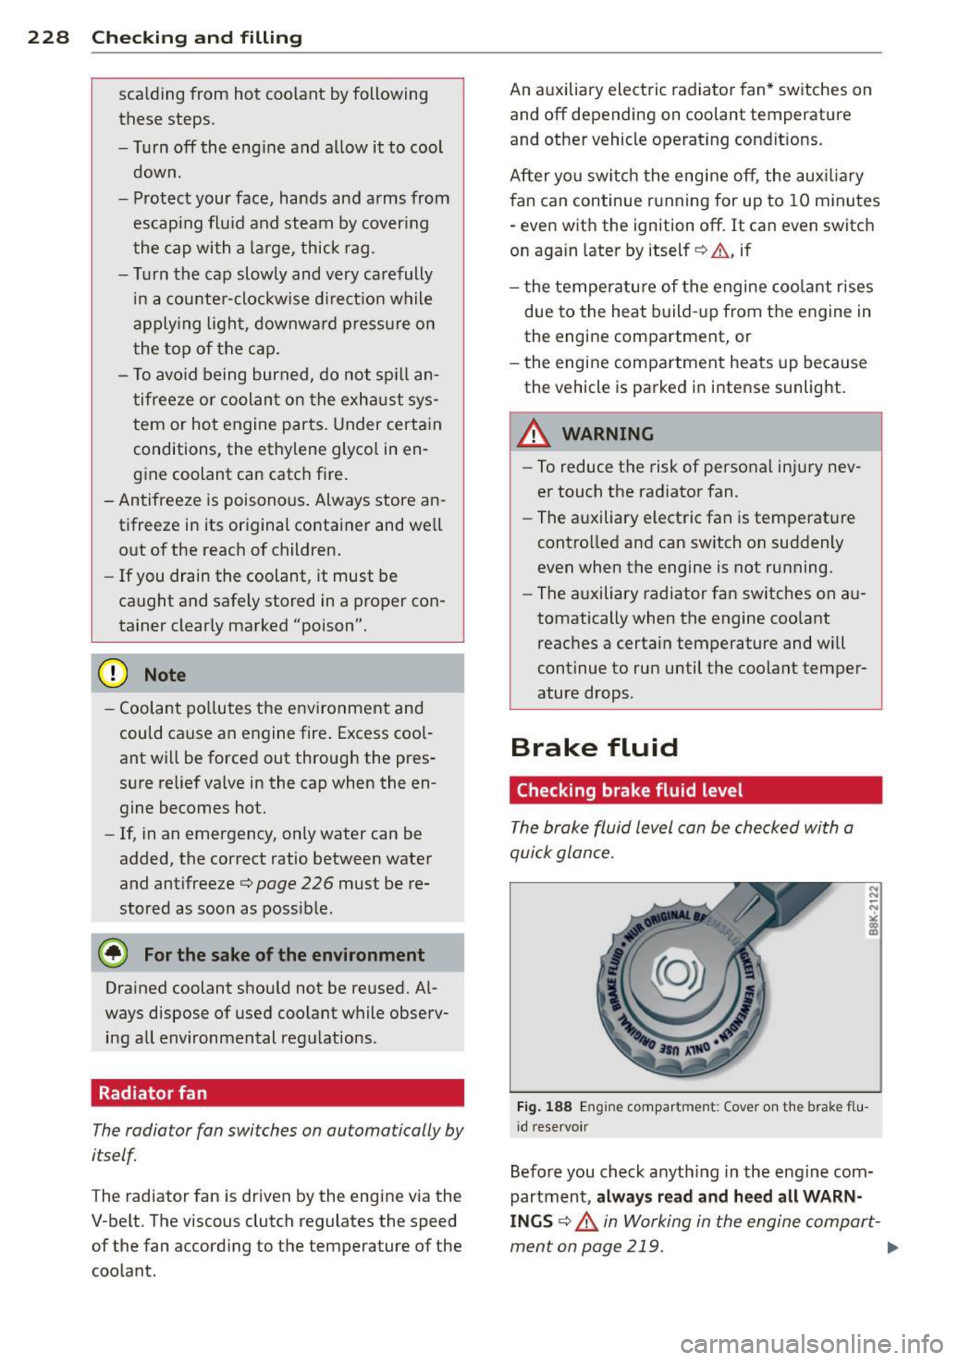
F ig . 1 88 Engin e compart men t: Cover on the b rak e flu
i d reservo ir
Before you check a nyth ing in the engine com
partment,
always read and hee d all WARN
INGS c::> .&. in Working in the engine compart-
ment on page 219 . .,..
Page 231 of 302
~ Read the brake fluid level from the brake
fluid reservoir ~
fig. 188, ¢ page 221,
fig . 184.
T he brake fluid level must be be
tween the "MIN" and "MAX" markings.
The brake f luid reservoir is located at the rear
partition of the engine compartment on the
l eft side
¢ page 221 .
The fluid level may drop slightly after some
time due to the automatic adjustment of the brake pads . This is not cause for alarm .
If the brake fluid level falls considerably be
l ow the "M IN" mark, the bra ke wa rning/ind i
cator light (U .S . mode ls:
1111 , Canadian
models: .) will come on
¢ page 15. Do not
continue to operate the vehicle. The complete
brake system shou ld be thoroughly checked
by an authorized Audi dealer or qualified
workshop and the cause co rrected . If the
b rake fluid level is too low, the b rake wa rn ing/
i nd icator lig ht w ill illuminate . Co ntact an a u
thor ized Audi dealer immediately.
@ Tips
The brake f luid rese rvoir is located unde r
neath the cove r.
Changing brake fluid
Have the brake fluid changed by an experi
enc ed technician .
Brake fluid ab sorbs moisture from the a ir. If
the water content in the brake fluid is too
hi gh, corrosion in the b rake system may result
after a per iod of t ime . The bo iling po int of t he
b ra ke fluid w ill also decrease con siderab ly and
d ec rease brak ing per forman ce.
Therefore, the brake flu id must be changed
every two year s. Always use new b ra ke fluid
which confo rms to Fede ral Motor Vehicle
S tand ard "FMVSS 1 16 DOT 4".
The brake flu id rese rvoir can be difficult to
r eac h, therefo re , we recommend that yo u
have the brake fl uid changed by yo ur aut ho r
iz ed Audi dealer. Your dealer has the correc t
Checking and fillin g 229
tools, the right brake fl uid and t he know -how
to do this for you .
A WARNING
- Brake fl uid is poisonous. It must be stor
ed only in the closed or iginal container
out of the reach of children!
- Brake failure can res ult from o ld or inap
propriate brake f lu id. Observe these pre
cautions:
- Use only brake fluid th at mee ts SA E
spe cificat ion
J 17 03 and conforms to
Fe dera l Mo to r Ve hicl e Standard 1 16.
Always check with yo ur autho rized Au di
dealer to make sure yo u are using the
correct brake fluid. The c orrect type of
brake f luid is also ind icated on t he
brake f luid reservoir .
- The bra ke fl uid must be new. Heavy use
of the brakes ca n cause a vapor lock if
the b rake fluid is left i n the system too
long. This can se riously affect the effi
c iency of the b rakes as well as your
safety , T his could result in an accide nt.
(!) Note
Brake fluid will damage the pai nt of your
vehicle.
@) For the sake of the environment
Because of the prob lem of proper disposal
of brake fluid as well as the spec ial too ls
r equired an d th e nec essary exper tise, w e
r ecomme nd that yo u have th e brake flu id
c hanged by yo ur aut ho rize d Aud i dea le r.
Battery
General information
U nder normal operating cond itions, the bat
te ry in your Audi does not need any ma inte
nance . With
high outside temperat ures or
lo ng da ily drives we recommend that you have
t h e e lectrolyte leve l che cked by an autho riz ed
A udi de aler or qu alified workshop. The elec
tro lyte leve l should also be checked e ach time
the battery is charged
¢ page 232 . 1J1>
•
•
Page 261 of 302
~ Unscrew the valve stem from the spare tire.
~ Screw the tire filler hose from the compres
sor firmly onto the valve of the spare tire.
~ Insert the plug from the compressor into a
socket of the vehicle¢
page 64.
~ Switch the compressor on .
~ Let the compressor run until the value
specified on the tire pressure label is
reached
¢ page 238, fig. 192. Switch the
compressor off after running for 12 minutes
at the most -danger of overheating!
A WARNING
The compressor and the tire filler hose can
become extremely hot while they are run
ning -danger of burns!
(D Note
Switch the compressor off after running
for 12 minutes at the most -danger of
overheating! Allow the compressor to cool
down for a few minutes before you use it
again.
Changing a wheel
Before changing a wheel
Observe the following precautions for your
own and your passenger's safety when chang
ing a wheel .
~ After you experience a tire failure, pull the
car well away from moving traffic and try to
reach
level ground before you stop¢ L!)..
~ All passengers should leave the car and
move to a safe location (for instance, behind
the guardrail) ¢
A.
~ Engage the parking brake to prevent your
vehicle from rolling unintentionally ¢
A.
~ Shift into 1st gear on vehicles with manual
transmission, or move the
selector lever to
the P position
on vehicles with automatic
transmission .
~ If you are towing a trailer: unhitch the trail
er from your vehicle.
~ Take the jack¢ page 256 and the spare tire
¢ page 257 out of the luggage compart
ment.
What do I do now? 259
A WARNING
You or your passengers could be injured
while changing a wheel if you do not fol
low these safety precautions:
- If you have a flat tire, move a safe dis
tance off the road. Turn off the engine,
turn the emergency flashers on and use
other warning devices to alert other mo
torists.
- Make sure that passengers wait in a safe
place away from the vehicle and well
away from the road and traffic.
- To help prevent the vehicle from moving
suddenly and possibly slipping off the
jack, always fully set the parking brake
and block the wheel diagonally opposite
the wheel being changed with the fold
ing chocks or other objects. When one
front wheel is lifted off the ground, plac ing the Automatic Transmission in "P"
(Park) will
not prevent the vehicle from
moving .
- Before you change a wheel, be sure the
ground is level and firm. If necessary,
use a sturdy board under the jack.
- Always store the vehicle tool kit, the
jack* and the replaced tire in the luggage compartment
¢page 133.
(D Note
If you are changing the wheel on a steep
incline, use a rock or similar object to
block the opposite wheel to prevent the
vehicle from moving.
(D Tips
Obey all laws.
Changing a wheel
When you change a wheel , follow these
quence described below step-by-step and in
exactly that order.
l. Remove the decorative wheel cover* or
-
the wheel bolt caps*. For more details see..,.
•
•
Page 263 of 302
Refitting
• Place the caps over the wheel bo lts and
push th em back on.
The caps are to protect and keep the wheel bolts clean.
Loosening and tightening the wheel
bolts
The wheel bolts must be loosened before ra is
ing the vehicle .
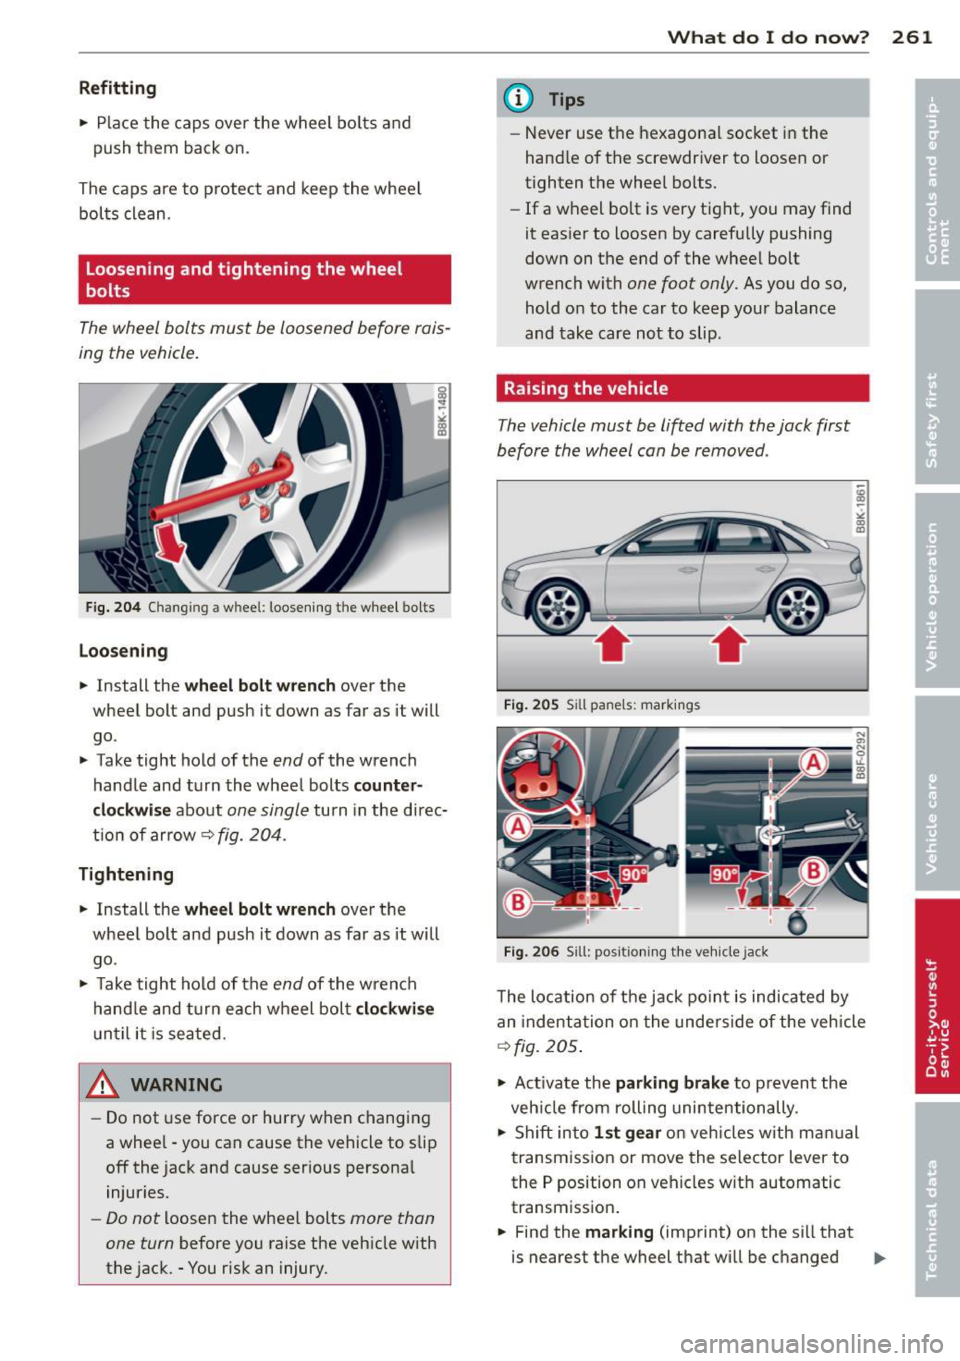
Fig. 204 C hangin g a whee l: l oosening t he w heel bolts
Loo sening
• Install the wheel bol t w rench over the
wheel bolt and push it down as far as it will
go .
• Take tight hold of the
end of the wrench
hand le and turn the whee l bolts
co unter
cl ock wise
about one single turn in the direc
t ion of arrow
9 fig. 204 .
Tightening
• Install the whe el bolt w rench over the
wheel bolt and push it down as far as it will go .
• Take tight hold of the
end of the wrench
hand le and turn each wheel bol t
clockwi se
until it is seated .
_& WARNING
-Do not use force or hurry when changing
a whee l -you can cause the vehicle to slip
off the jack and cause serious persona l
injuries.
- Do not Loosen the wheel bolts more than
one turn
before you raise the veh icle with
the jack. -You risk an injury .
What do I do now ? 261
@ Tips
-Never use the hexagona l socket in the
hand le of the screwdr iver to loosen or
tighten the wheel bolts.
- If a wheel bo lt is very tight, you may find
it eas ier to loosen by carefully pushing
down on the end of the wheel bolt
wrench with
one foot only . As you do so,
hold o n to the car to keep your balance
and take care not to slip .
Raising the vehicle
The vehicle must be lifted with the jack first
before the wheel can be removed .
Fig . 205 Sill panels: mark ings
Fig. 20 6 Sill: positi on ing the v eh icle ja ck
The location of the jack po int is indicated by
an indentation on the underside of the vehicle
9 fig . 205 .
• Act ivate the parking brak e to prevent the
veh icle from rolling unintentionally .
• Shift into
1st ge ar on veh icles with ma nual
transmiss ion or move the selector Lever to
the P position on vehicles w ith automatic
transm iss ion .
• Find the
m arking (impr int) on the sill that
i s nearest the wheel that will be changed .,..
Page 267 of 302

Fuses and bulbs
Fuses
Replacing a fuse
Fuses that have blown will have metal strips
that have burned through.
Fig. 20 9 Left cockp it : fuse panel cover
The fuses are located at the front left and
r igh t of the cockpit and behi nd the trim on
the right side of the luggage compartment .
.. Turn off the ign it ion a nd the affected elec-
t rical consumers .
.. Check the following table to see which fuse
belongs to the consume r .
.. Remove the appropriate cover¢
fig. 209 or
¢page 218, fig. 180 .
.. To remove the purple plastic cl ip if necessa
ry
ll, hold onto it at the small s ide and pull
it out of the fuse panel¢
page 265,
fig. 210 .
.. Remove the clamp from the rear side of the
fuse cover ¢
fig. 209 .
.. Remove the fuse using the clamp and re
pla ce the blown fuse w ith an identical new
one.
& WARNING , -
Do not repair f uses and never replace a
blown fuse w ith one that has a higher amp
rating. This can cause damage to the e lec
trical system and a fire.
11 You can dis pos e of the plastic clip after removing it.
Fu se s and bulb s 265
(D Note
If a new fuse burns out again after short ly
have you have insta lled it, have the electri
ca l system checked by your authorized
Audi dealer .
{!) Tips
-The following table does not list fuse lo
cat ions that are not used .
- Some of the equipment items listed are
opt ional or only available on certa in
mode l configurations.
Left cockpit fuse assignment
Fi g. 21 0 Left cockpit: fuse panel wit h plastic clip
No. Consumer
Amps
Fuse panel @(black)
1 Dynamic steering 5
2 ES C control module 5
A/C system pressure sensor,
electromechanical parking
3
brake, Homelink, automatic
5 dimming interior rear view
mirror, air quality/outside
ai r sensor, ESC button
Page 271 of 302
Emergency situations
General
This chapter is intended for trained emer
gency crews and working personnel who
have the necessary tools and equipment to
perform these operations.
Starting by pushing or
towing
(D Note
Vehicles with an automatic transmission
cannot be started by pushing or towing .
Starting with jumper
cables
If necessary, the engine can be started by
connecting it to the battery of another vehi
cle.
If the engine should fail to start because of a
discharged or weak battery, the battery can be
connected to the battery of
another vehicle,
using a
pair of jumper cables to start the en
g ine.
Jumper cables
Use only jumper cables of sufficiently
largecross section to carry the starter current
safe ly. Refer to the manufacturer's specifica
tions.
Use only jumper cables with
insulated termi
na l clamps which are distinctly marked:
plus(+) cable in most cases colored red
minus(-) cable
in most cases colored black .
A WARNING
Batteries contain electricity, acid, and gas.
Any of these can cause very serious or fatal
injury. Follow the instructions below for
safe handling of your vehicle's battery.
- Always shield your eyes and avoid lean
ing over the battery whenever possible.
Emergency situations 269
-A discharged battery can freeze at tem
peratures just below 32 °F (0 °C). Before
connecting a jumper cable, you must
thaw the frozen battery completely, oth
erwise it could explode.
- Do not allow battery acid to contact eyes
or skin . Flush any contacted area with
water immediately .
- Improper use of a booster battery to
start a vehicle may cause an explosion.
- Vehicle batter ies generate explosive gas
es. Keep sparks, flame and lighted c iga
rettes away from batteries.
- Do not try to jump start any veh icle w ith
a low ac id level in the battery.
- The voltage of the booster battery must
also have a 12-Volt rating. The capacity
(Ah) of the booster battery should not be
lower than that of the discharged bat
tery. Use of batteries of diff erent voltage
or substantially different "Ah" rat ing
may cause an exp losion and personal in
jury.
- Never charge a frozen battery. Gas trap
ped in the ice may cause an explosion.
- Never charge or use a battery that has
been frozen . The battery case may have
be weakened.
- Use of batter ies of different voltage or
substantially different capacity (Ah) rat
ing may cause an exp losion and injury .
The ca pa city (Ah) of the booster battery
should not be lower than that of the dis
charged battery.
- Before you check anything in the engine
compartment, always read and heed all
WARNINGS¢
page 213, Engine com
partment.
(D Note
- App lying a higher voltage booster bat
tery will cause expensive damage to sen
sit ive electronic components, such as
control units, relays, rad io, etc .
- There must be no electrical contact be
tween the vehicles as otherwise current
could already start to flow as soon as the
posit ive(+) terminals are connected. ..,. •
•