automatic AUDI A4 2013 Workshop Manual
[x] Cancel search | Manufacturer: AUDI, Model Year: 2013, Model line: A4, Model: AUDI A4 2013Pages: 302, PDF Size: 75.61 MB
Page 115 of 302

Audi drive select Driving settings
Introduction
Appl ies to vehicles: wit h Audi drive select
Drive select provides the possibility to experi
ence different types of vehicle settings in one
veh icle. For instance, using the three
Com
fort, Auto and Dynamic modes, the driver can
switch from a sporty to a comfortab le driving
mode with the press of a button.
Addit ionally, in vehicles with
MM I*, the vehi
cle setup for
Individual* mode can be cus
tomized by you. This makes it possib le to
combine settings such as a sporty engine tun
ing with comfortable steering.
A WARNING
Improper use of the Audi drive select can
cause collisions, other acc idents and seri
ous personal injury.
Description
Applies to vehicles: w it h Audi drive select
The vehicle setup in each mode depends on
the vehicle's features. However, the engine,
automatic t ransmission* and steering are al
ways involved.
-
Engine and automatic transmission*
Depending on the mode, the engine and the
automatic transmission respond quicker or in
a more ba lanced manner to accelerator pedal
movements. In the sporty dynamic mode, the
automatic transmission shifts at higher RPMs .
Steering
The steering adapts in terms of steering effort
and steering ratios. Indirect steer ing that
moves easily, like the steering in comfort
mode, is best su ited to long dr ives on a high
way. In contrast, dynamic mode prov ides
sporty, direct steering.
The follow ing applies to vehicles with dynam ic
steer ing*: the steering ratio changes based on
veh icle speed in order to maintain optimum
Audi drive select 113
steering effort for the driver at all times. This
sets the steering to be less sensitive at higher
speeds in order to provide improved vehicle
control. At reduced speeds, however, steering
is more direct in order to keep the steering ef
fort as minimal as possible when the driver is
maneuveri ng the vehicle . At low and average
speeds, dynamic steering addit iona lly pro
vides more responsive steering performance.
Adaptive dampers*
The adaptive dampers* use sensors to record
information regarding steering movements,
braking and acceleration operations by the
drive r, road surface, driving speed, and load.
T his makes it possible to adapt damp ing to
the driving situation virtually i n rea l time.
Drive select also makes it possible to satisfy
the desire for sporty suspension (Dynamic)
and comfortab le suspension (Comfort) with
out giving up balanced tuning (Auto) .
Sport differential*
As a component of the all wheel dr ive system
(quattro ®)
q poge 191, the sport differential*
distributes the driving power to the rear axle
depending on the situation . The distribution
of power varies depending on the mode se lected. The goal is a high level of agility and
ability to accelerate on curves . The vehicle is
very respons ive to steering .
Audi adaptive cru ise control*
The behavior when accelerating can be adjust
ed from comfortab le to sporty, depending on
the drive select mode. Adaptive cruise control
also responds to the driving behavior of the
vehicle ahead in a more conservative or sporty
manner .
Engine sound*
The sound of the engine is adapted to the se
lected mode and ranges from subtle to sporty.
0) Tips
-In some models, the maximum vehicle
speed can only be reached in the
Auto
and Dynamic modes.
Page 116 of 302
114 Audi drive select
-For vehicles with an automatic transmis
sion, selecting the
Dynamic mode re
su lts in sporty shifting characteristics .
The S gear position engages automati
cally.
- In vehicles that have dynamic steering*,
operating noise is heard when starting or
stopping the eng ine . This does not ind i
cate a problem .
Selecting the driving mode
Applies to vehicles: with Audi drive select
You con choose between Comfort, Auto, Dy·
namic
and Individual * modes.
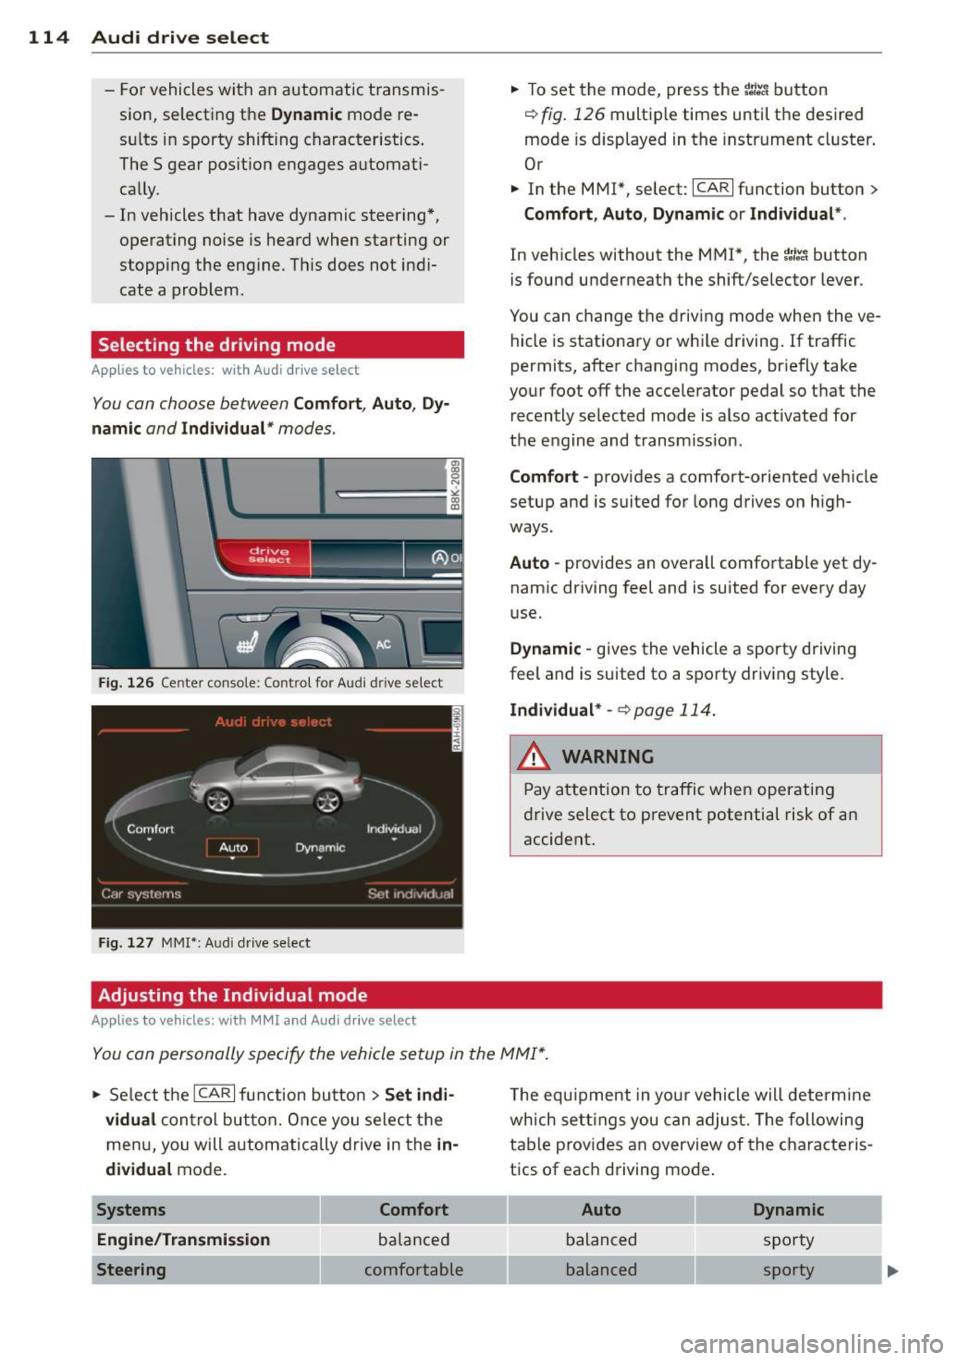
Fig. 126 Center console: Control for Au di dri ve select
Fig. 127 MMI•: Aud i drive select
Adjusting the Individual mode
Applies to vehicl es: with MMI and Aud i drive select
.,. To set the mode, press the f:l:-.i button
~ fig. 126 multiple times until the desired
mode is displayed in the instrument cluster .
Or
.,. In the MMI*, select: ICARlfunction button>
Comfort, Auto, Dynamic or Individual *.
In vehicles without the MMI*, the~:/;-~ button
is found underneath the shift/selector lever.
You can change the driving mode when the ve
hicle is stationary or wh ile driving . If traffic
permits, after changing modes, br iefly take
your foot off the accelerator pedal so that the recently selected mode is also activated for
the engine and transm ission .
Comfort -provides a comfort-oriented vehicle
setup and is suited for long drives on h igh
ways .
Auto -provides an overall comfortable yet dy
namic driving feel and is suited for every day
use.
Dynamic -gives the vehicle a sporty driving
feel and is suited to a sporty driving style.
Individual * -¢page 114.
& WARNING
Pay atte ntion to traffic when operating
drive select to prevent potential risk of an
accident .
You con personally specify the vehicle setup in the MMI* .
.,. Se lect the ICAR I function butto n > Set indi ·
vidual
control but ton. Once you select th e
menu, you will automatically drive in the
in·
dividual
mode.
Systems Comfort
Engine/Transmi ssion
balanced
Steering comfortable T
he equipment in your vehicle will determine
wh ich sett ings you can adjust. The following
table provides an overview of the characteris
tics of each driving mode .
Auto Dynamic
balanced sporty
balanced sporty
Page 143 of 302
To provide maximum protection, safety belts
must always be positioned correctly on the
wearer's body .
... Adjust the front seat and head restra int
properly
r::!:> page 58, Seats and storage.
• Make sure the seatback of t he rear seat
bench is in an upright pos ition and securely
latched in place before using the belt¢,&. .
... Hold the be lt by the tongue and pull it
evenly across the chest and pelvis ¢ ,&. .
"" Inse rt the tongue into the correct buckle of
you r seat until you hear it latch securely
r::!:>fig . 148.
• Pull on the belt to make sure that it is se-
c ur ely la tched in the buckle.
Automatic safety belt retractors
Every safety belt is equipped with an automat
i c belt retractor on the shoulder be lt. T his fea
ture locks the belt when the belt is pulled out
fast, during hard braking and in an accident.
The belt may also lock when you drive up or
down a steep hill or through a sharp curve. During normal driving the belt lets you move
freely.
Safety belt pretensioners
The safety belts are equipped with a belt pre
tensioner that helps to tighten t he safety belt
and remove s lack when the pretensioner is ac
tivated. The function of the pretensioner is monitored by a warning light¢
page 20 .
Switchable locking feature
Every safety belt except the one on the driver
seat is eq uipped with a switchable locking fea
ture that
must be used when the safety belt is
used to attach a child safety seat . Be sure to
read the important information about this
feature¢
page 176.
A WARNING
Improperly positioned safety belts can
cause se rious injury in an accident
r::!:> page 141, Safety belt position .
- Safety belts offer optimum protection
only when the seatback is upright and
Safety belts 141
belts are proper ly positioned on the
body.
- Always make sure that the rear seat
backrest to which the center rear safety
be lt is attached is securely latched when
ever the rear center safety belt is being
used. If the backrest is not securely latched, the passenger w ill move for
ward with the backrest during sudden
braking, in a sudden maneuver and espe
cially in a crash .
- Never attach th e safety belt to the buck
le for another seat . A tt ach ing the belt to
t he wrong buckle will reduce s afety be lt
effectiveness and can cause ser ious per
sonal injury.
- A passenger who is not properly restrain
ed can be seriously injured by the safety
be lt itself when it moves from the stron
ger parts of the body into cr itical areas
like the abdomen.
- Always lock the convertible locking re
tractor when you are securing a child safety seat in the vehicle
¢ page 178.
Safety belt position
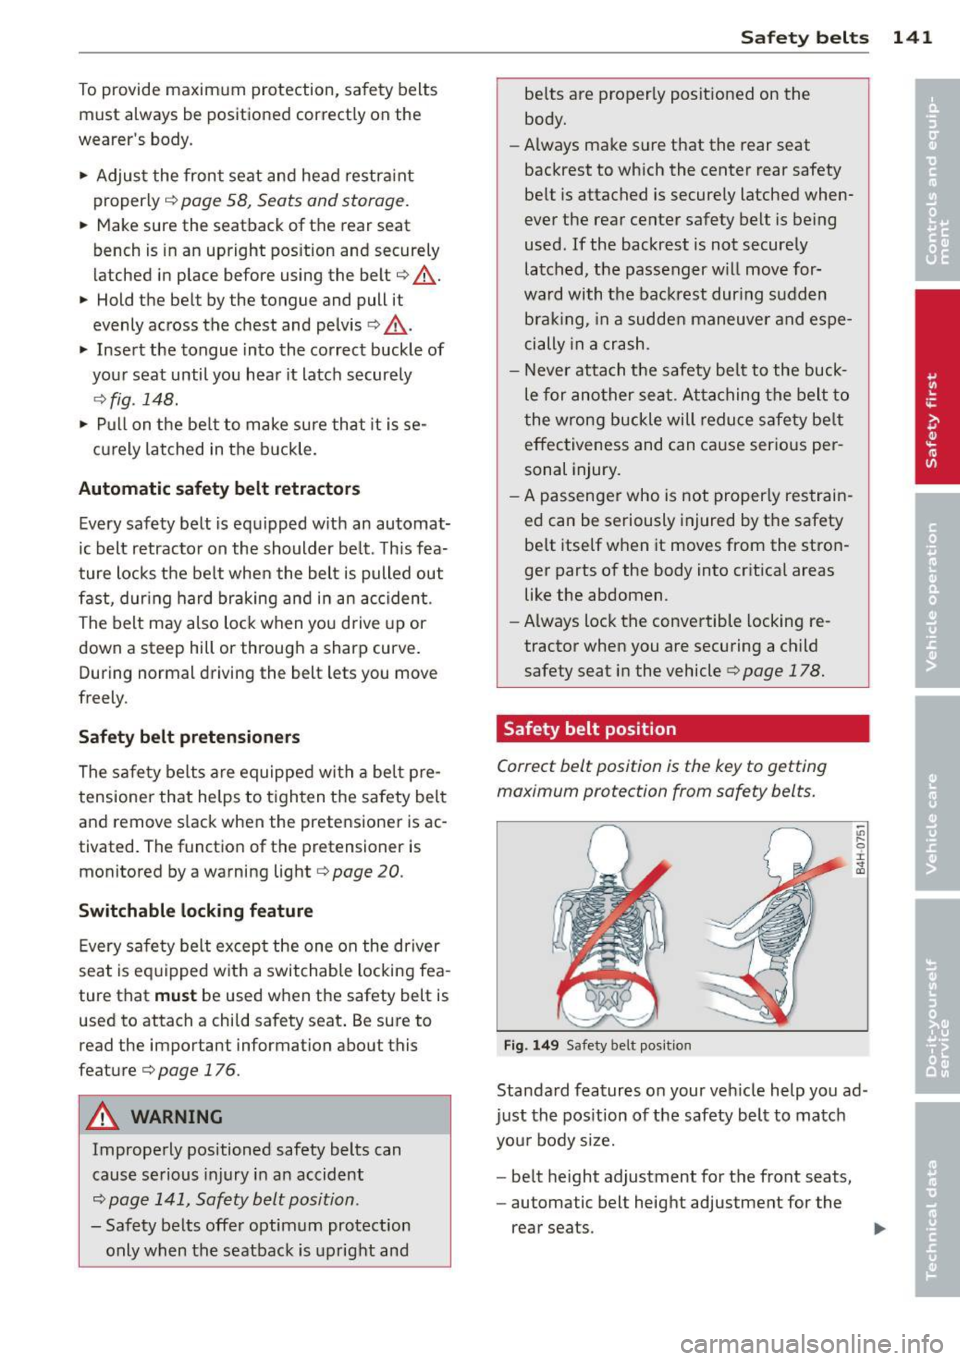
Correct belt position is the key to getting
maximum protection from safety belts.
Fig . 149 Safety belt position
Standa rd features on your veh icle help you ad
just the position of the safety belt to match you r body size.
- belt height adjustment for the front seats,
- automatic belt height adjustment for the
rear seats .
Page 145 of 302
.. Let the belt wind up on the retractor as you
guide the belt tongue to its stowed position .
A WARNING
Never unfasten safety belt while the vehi
cle is moving. Doing so will increase your
r isk of being injured or killed .
Adjusting safety belt height
-
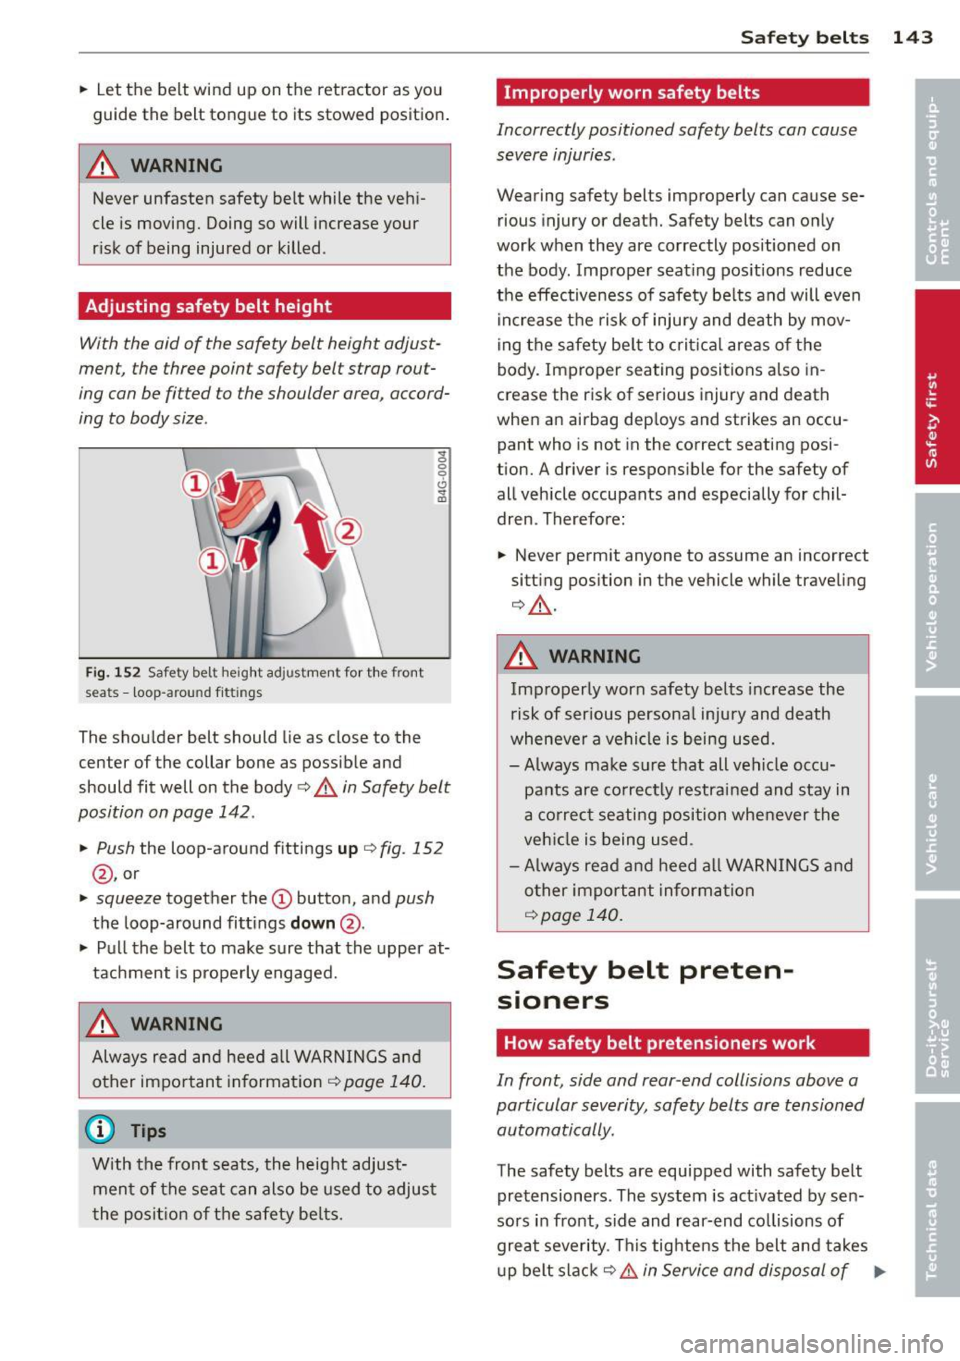
With the aid of the safety belt height adjust
ment, the three point safety belt strap rout
ing can be fit ted to the shoulder area , accord
ing to body size .
;g 0 0 C) .., m
Fig. 152 Saf ety be lt height ad justme nt fo r th e fro nt
seats - loop -ar ou nd fitt ings
The shoulder belt should lie as close to the
center of the collar bone as possible and
should fit well on the body¢&.
in Safety belt
position on page 142 .
.,. Push
the loop-around fittings up ¢ fig. 152
@ , or
.. squeeze together the (D button, and push
the loop-around fitt ings down @ .
.. Pull the belt to make sure that the upper at
tachment is properly engaged.
A WARNING
Always read and heed all WARNINGS and other impo rtant informat io n ¢
page 140.
@ Tips
With the front seats, the height adjust
men t of the seat can also be used to adjust
t he pos it ion of the safety be lts.
Safety belts 143
Improperly worn safety belts
I ncorrectly positioned safety belts can cause
severe injuries .
Wearing safety belts improperly can cause se
rious injury or death. Safety belts can only
work when they are correctly positioned on
the body . Improper seat ing pos itions reduce
the effectiveness of safety be lts and will even
i ncrease the risk of injury and death by mov
ing the safety be lt to crit ica l areas o f the
body. Improper seating positions also in
crease the risk of serious injury and death
when an airbag dep loys and strikes an occu
pant who is not in the correct seating posi
tion. A driver is responsible for the safety of
all vehicle occupants and especially for ch il
dren . Therefore:
.. Never permit anyone to assume an incorrect
sitt ing position in the vehicle while traveling
¢ &,. .
A WARNING
Improperly worn safety belts increase the
risk of serious persona l injury and death
whenever a ve hicle is being used.
- Always make s ure that all vehicle occu
pa nts are co rrectly restrained and stay in
a co rrec t seating position whenever the
veh icle is being used .
- Always read and heed al l WARNINGS a nd
o ther important informat ion
¢ page 140.
Safety belt preten
sioners
How safety belt pretensioners work
In front , side and rear -end collisions above a
particular severity, safety belts are tensioned automatically.
The safety belts are equipped with safety belt
pretensioners . The system is activated by sen
sors in front, side and rear-end co llisions of
great seve rity . This tightens the belt and takes
u p belt slack¢.&.
in Service and disposal of Iii>
Page 181 of 302
Deactivating the convertible locking
retractor
The convertible locking retractor for child re
straints will be deactivated automatically when the belt is wound all the way back into the retractor.
" Press the red button on the safety belt
buckle. The belt tongue will pop out of the
buckle.
" Guide the safety belt all the way back into
its stowed pos ition.
Always let the safety belt retract completely
into its stowed pos ition. The safety belt can
now be used as an ordinary safety belt with
out the convertible locking retractor for child
rest raints .
If the convertible locking retractor should be
activated inadvertently , the safety belt must
be unfastened and guided completely back in
to its stowed position to deactivate this fea
t ure. If the conver tible locking retractor is not
deactivated, the safety belt will gradually be
come tighter and uncomfortable to wear .
A WARNING
Improperly installed child safety seats in
crease the risk of serious personal injury
and death in a collision.
- Never unfasten the safety belt to deacti
vate the convertible locking retractor for
child restraints while the vehicle is mov
ing. You would not be restrained and
could be seriously injured in an accident.
- Always read and heed all WARNINGS
whenever using a child restrained in ave
hicle is being used ¢
page 166. Special
precautions apply when installing a child
safety seat on the front passenger seat
¢ page 146, Child restraints on the front
seat -some important things to know .
Child Safety 1 79
•
•
Page 189 of 302
-Always acce lerate with specia l care on
even, smooth surfaces s uch as those that
are wet or covered with ice and snow.
The drive wheels can spin even with
these assistance systems that cannot al
ways help to reduce the risk of loss of ve hicle control.
(0 Tips
- ABS and ASR on ly work correctly when
all four wheels are equ ipped w ith ident i
ca l tires. Different tire s izes can lead to a
reduct ion i n eng ine power.
- You may hear noises when the systems
described are wo rking .
- If the indicator light D] or m!S (USA
models) ;tiJ (Canada models) appears,
the re may be a malfunct ion
c:> page 19,
~ page 19.
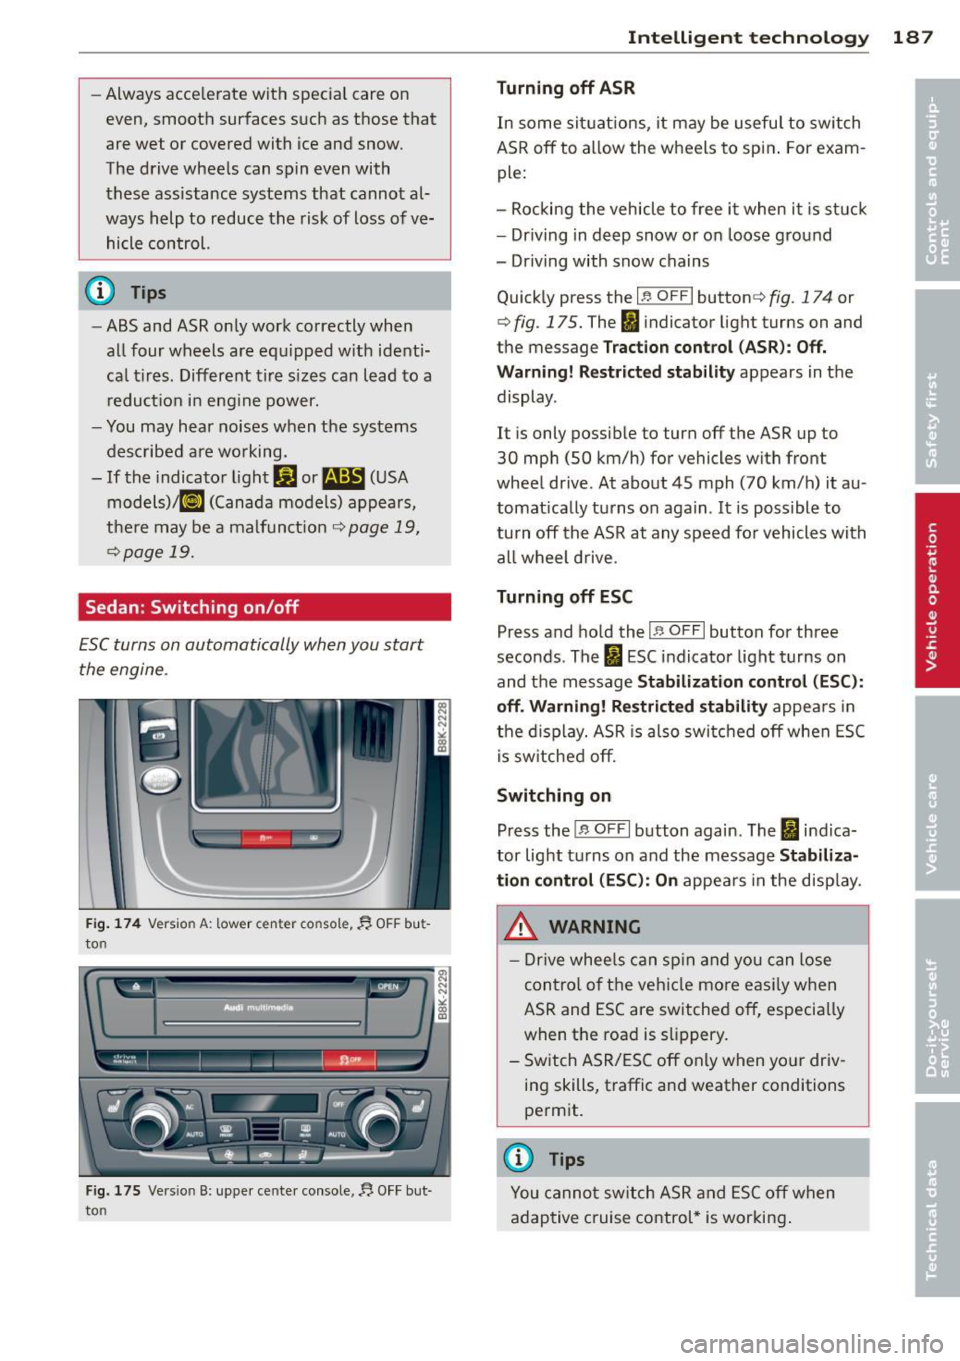
Sedan : Switching on/off
ESC turns on automatically when you start
the engine .
Fig . 174 Vers io n A: low er c en te r co nsol e, 1', O FF bu t
to n
Fig. 175 Ve rsio n B: upper ce nte r console,~ OFF bu t
to n
Intelligen t technolog y 187
Turning off ASR
In some sit uatio ns, it may be useful to switch
ASR
off to a llow the wheels to spin . For exam
ple:
- Rocking the vehicle to free it when i t is st uck
- Dr iving in deep snow or on loose ground
- Dr iving with snow chains
Qu ick ly press the
I~ O FF I button c:> fig. 174 or
c:>
fig . 175. The fil indica tor light turn s on and
t he me ssage
T rac tion control (A SR ): Off.
War ning! R estrict ed stability
appears in the
display .
It i s only possible to turn
off the ASR up to
30 mph (SO km/h) for vehicles wi th front
wheel drive . At about 45 mph (70 km/h) it au
tomat ically turns on again .
It is possible to
turn
off the ASR at any speed fo r vehicles with
all wheel drive .
Turning off ESC
Press and hold the I;; OFFI button for three
seconds . The
fl ESC indicator light turns on
and the message
Stabil ization cont rol (ESC ):
o ff . Warni ng ! Re str icted stab ilit y
appea rs in
the d isplay. ASR is also sw itched
off when ESC
i s sw itched off.
Switching on
Press the j ;; O FFI button again . The fi indica
tor light t urns on and the message
St abi liz a
t ion control (ESC ): On
appears in the disp lay.
_&. WARNING
- Drive whee ls can sp in and you can lose
contro l of the vehicle more eas ily when
ASR and ESC are switched off, especia lly
when the road is s lippery .
- Switch ASR/ESC
off only when yo ur driv
ing skills, traffic and weather conditions
permit.
@ Tips
You cannot sw itch ASR and ESC off when
adaptive cruise control* is working .
-
Page 190 of 302
188 Intelligent technology
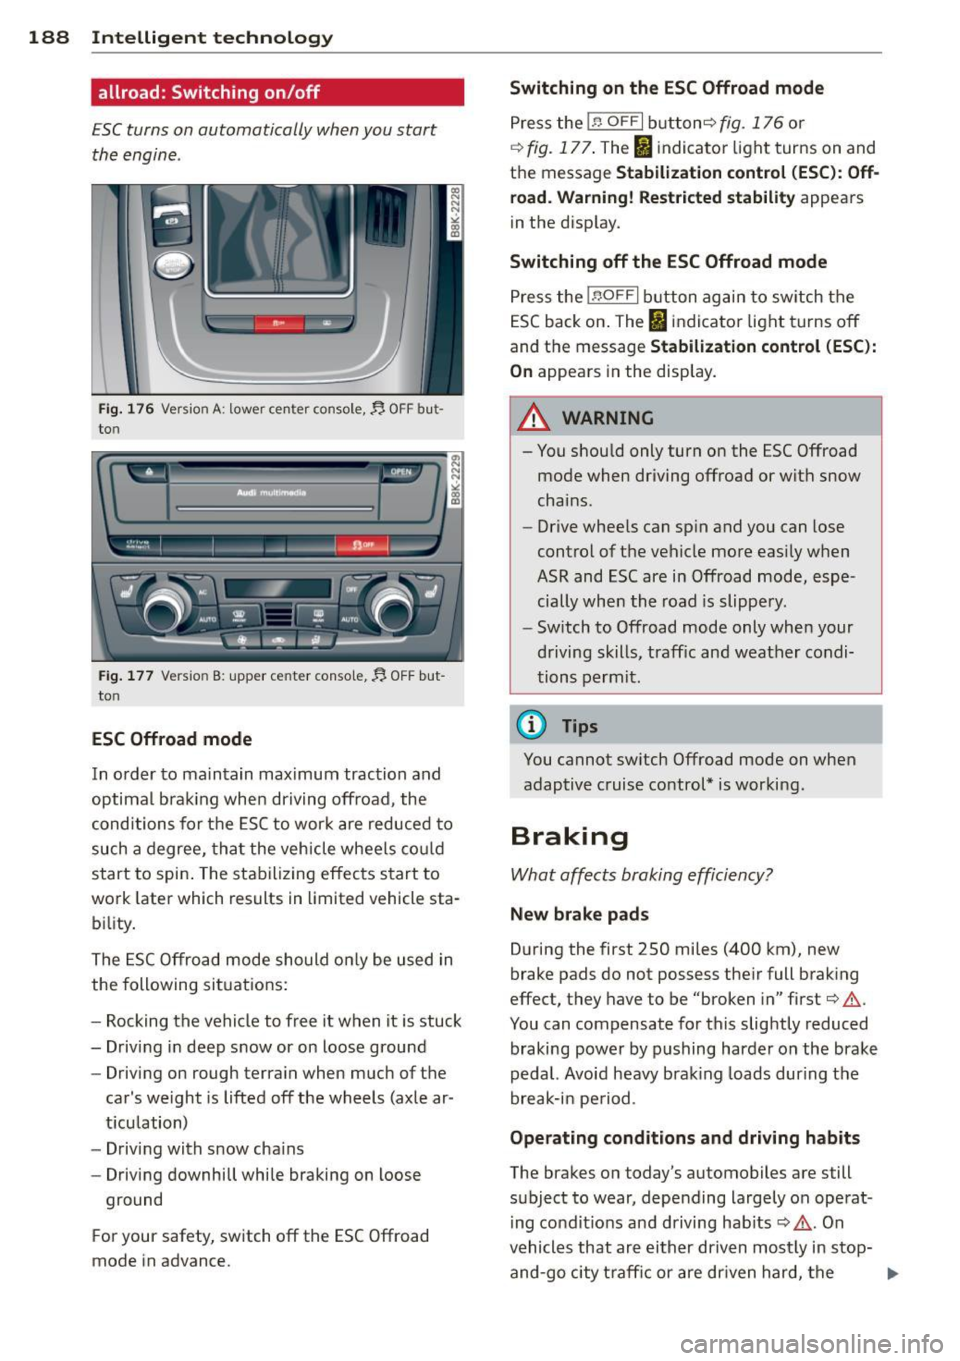
allroad: Switching on /off
ESC turns on automatically when you start
the engine .
Fig. 176 Version A: lower ce nter console,~ OFF but
to n
...... [ I I n-I _,,. .,., -------' -"~ __..,
Fig. 177 Versio n B: upper ce nter conso le,~ OFF but
to n
ESC Offroad mode
In order to maintain maximum traction and
optima l brak ing when driving offroad , the
conditions for the ESC to work are reduced to
such a degree, tha t the vehicle whee ls co uld
start to spin . The stabilizing effects start to
work later wh ich results in limited vehicle sta
b ili ty.
The ESC Offroad mode should on ly be used in
the following situations:
- Rocking the vehicle to free it when it is stuck
- Driving in deep snow or on loose ground
- Driving on rough terra in when much of the
car's weight is lifted off the wheels (axle ar
t icu lation)
- Driving with snow cha ins
- Driving downhill while braking on loose
ground
F or your safety, switch off the ESC Offroad
mode in advance.
Switching on th e ES C Offroad mode
Press the In OF FI button ¢ fig. 176 or
¢ fig. 177 . The I indicator light turns on and
the message
St abilization cont ro l ( ES C): Off
ro ad. Wa rning! Rest ricted stability
appears
in the disp lay.
Swit ching off th e ESC Offroad mode
Press the !.$ O FF I button again to sw itch the
ESC back on . The
IJ indicator light turns off
and the message
Stabil ization contro l (ESC ):
On
appears in the display.
_& WARNING
- You shou ld only turn on the ESC Offroad
mode when driving offroad or with snow
chains.
- Drive whee ls can sp in and you can lose
control of the vehicle more easi ly when
ASR and ESC are in Offroad mode, espe
cially whe n the road is slippery.
- Switch to Offroad mode only whe n your
driving skills, traff ic and weather condi
tions permit .
(D Tips
You cannot sw itch Offroad mode on when
adaptive cruise control* is working.
Braking
What affects braking efficiency?
New brake pad s
During the first 250 mi les (400 km), new
brake pads do not possess the ir full brak ing
effect, they have to be "broken in" first¢ .&,.
You can compensate for this slightly reduced
braking power by p ushing harde r on the brake
pedal. Avoid heavy brak ing loads dur ing the
break-in pe riod.
Oper ating cond ition s and driving habit s
The brakes on today's automobiles are still
subject to wear, depending largely on operat
ing co nd it ions and driving hab its
¢ .&, . On
vehicles that are either driven most ly in stop-
and-go city traff ic or are dr iven hard, the
lilJ,,
Page 193 of 302
@ Tips
- If the . or
fT j indicator light on ly stays
on for a short t ime, you may continue
driving.
- The dynamic steering* stability systems
are not available in the event of a system
malfunction.
- For additional information on dynamic
steering*, refer to
c:> page 113.
Driving with your
quattro ®
Applies to vehicles: with a ll-wheel drive
With all-wheel drive, all four wheels are driv
en.
Gener al inform ati on
W ith all-wheel drive, power is distributed to
all four wheels . This happens automatically
depending on your dr iving style and the road
conditions at the t ime. See also
c:> page 185.
A center different ial distr ibutes the dr iv ing
power var iably to the front and rear axle . It
works together with selective wheel torque
control, which activates when driving throug h
curves
c:> page 186. With the spo rt d ifferen
tial*, power dist ribution to the rear wheels is
variable and can be adjusted with drive select
c:> page 113.
The all-wheel drive concept is designed for
h igh engine power. Yo ur vehicle is exception
ally powerful and has exce llent driving charac
teristics both under normal driving conditions
and on snow and ice. Always read and fo llow
safety precautions
c:> A .
Winter t ir e s
When driv ing in the w inter, your veh icle w ith
all-wheel drive has an advantage,
even with
regular tires. In winter road conditions it may
be advisable to mount winter tires (or all-sea
son t ires) for improved driveability and brak
ing: these tires must be mounted on
a ll four
w heels . See also c:> page 250, Winter tires .
Intellig ent technolog y 191
Tire chain s
Where tire chains are mandatory on certain roads, this no rma lly also applies to veh icles
with all-wheel drive
c:> page 251, Snow
chains.
Replacing wheels /tires
Vehicles with a ll-wheel drive must always
have tires of t he same s ize. A lso avoid tires
with different tread depths . For detai ls see
page
c:> page 246, New tires and replacing
tires and wheels .
Off-Road driving?
You r A udi does no t have enough ground clear
ance to be used as an off-road vehicle .
It is
therefore best to avoid rough tracks and un
even terrain as much as possib le . Also refer to
c:> page 194.
A WARNING
Always adjust your dr iving to road and traf
f ic conditions. Do not let the extra safety
afforded by all-wheel drive tempt you into
taking extra risks .
- Although the all-wheel drive is very ef
fective, always remember that braking
capacity is lim ited by tire traction. You
should therefore not d rive at excessive
speeds on icy or slippe ry road surfa ces.
- On wet road surfaces, be careful not to
drive too fast because the front wheels
co uld begin to slide on top of the water
(aquaplaning) . If this should occur, yo u
will have no warning from a s udden in
crease in engine speed as w ith a front
wheel drive veh icle. Always drive at
speeds which are su ited to the road con
ditions -risk of crash.
•
•
Page 205 of 302
Automatic car wash
The vehicle can be washed in almost any
modern automatic car wash .
The vehicle paint is so durable that the vehicle
can normally be washed without problems in
an automatic car wash. However, the effect on
the paint depends to a large extent on the de
sig n of the fac ility, the filte ring of the wash
water, the type of wash and care mater ial , etc.
If the paint has a dull appearance afte r go ing
through the car wash or is scratched, bring
this to the attention of the operator immedi
ately. If necessary, use a different car wash.
Before going through a ca r wash, be s ure to
take the usual precautions such as closing the
windows and the roof . Factory installed an
tennas must not be removed.
If you have installed additional accessories on
the vehicle -such as spoilers, roof rack, etc. -
it is best to ask the car was h operator if these
should be removed .
A WARNING
Always read and heed a ll WARNINGS and
other information
r:=> page 202.
CD Note
-Before washing the vehicle in an auto
matic car wash, please make sure to re
tract the exterior m irrors to prevent
them from being damaged. Power fo ld
i ng exter ior mirrors* must not be folded
i n or out by hand . Always use the electri
ca l power control.
- Compare the width of your vehicle with the width of the tunnel at the fac ility.
Washing the vehicle by hand
A lot of water is needed when washing a vehi
cle by hand.
.,. Before you start washing, make sure you
have read and understood the WARNINGS
Q fr. .
Cleaning and protec tion 203
.,. First soak all dried dirt unti l it is soft, then
rinse it off.
.,. As you clean your vehicle, start w ith the
roof and work your way down to the bottom,
using a sponge, a sponge glove or a clean
brush .
.,. Rinse the sponge or the sponge glove often,
flushing it clean each time.
.,. Use spec ial car shampoo only fo r
very per
sistent d irt.
.,. Rinse the car thoroughly w ith water.
.,. Use a chamois leather to gent ly wipe the ex -
terior dry .
Use a separate sponge for cleaning the
whee ls, door s ills and other regions exposed
to road dirt. In this way, you wi ll not scratch
the paint with coarse particles imbedded in
the sponge the next time you wash the car.
A WARNING
- Wash your vehicle only when the ignition
is switched off to reduce the risk of a
crash .
- Always read and heed all WARNINGS and
other information
r=> page 202 .
CD Note
-Never try to remove dirt, mud or dust if
the surface of the veh icle is dry. Never
use a dry cloth or sponge, s ince this
could scratch your vehicle's paint or win
dows .
- Never wash your car in bright sunlight.
Drops of wate r act as magn ifying lenses
and may damage yo ur paint .
- When you wash your car in the winter: if you rinse your vehicle with a hose, be careful not to aim the stream of water
directly at locks, or at door or hatch
openings - they can freeze shut.
- Never use sponges designed to remove
insects, or any k itchen scouring sponges
or similar p rod ucts. They can damage
your paint finish .
- Never use a dry cloth or sponge to clean
the headlights . Only use wet cloths o r •
•
Page 208 of 302
206 Cleaning and protection
You can use a liquid car wax to protect your
paint as soon as one week after your vehicle
has been de livered.
Even if you regularly use a
waxing process in
automatic car washes, we recommend that
you manua lly app ly a coat of wax to give the
pa int extra protection, particular ly if water no
longer beads on the clean paint.
Protect plastic body parts with car wax in the
same way as the vehicle body.
During warm weather dead insects tend to
collect on the front bumper and on the for
ward area of the hood. They are much easier
to remove from paint that is waxed
often.
Polishing
Polish your vehicle only if the paint has lost its
shine and the gloss cannot be brought back
with wax.
If the polish used does not contain preserva
tive compounds, the paint must be waxed af
terwards.
A WARNING
Always read and heed all WARNINGS and
other information
¢page 202.
(D Note
Do not use car wax on
- matte or anod ized metal trim
- rubber or rubber-like trim .
Trim strips
Metal trim needs special care.
For environmenta l reasons, Audi fabricates
the bright trim strips and trim pieces from pure chromium-free aluminum.
Dirt and marks on the trim strips should be
removed with a
pH-balanced cleaning agent
(do not use a chrome cleaner). Authorized
Aud i dealers carry cleaning products which
have been tested for use on your vehicle and
are not harmful to the environment . T
o avoid corrosion on the exterior trim strips,
only a pH-ba lanced solution should be used
for the windsh ield washer.
A WARNING "--
Always read and heed all WARNINGS and
other information
¢ page 202.
Plastic and vinyl
Plastic needs special care .
Use a clean, damp cloth or sponge to remove
dust and light surface dirt. For other soil, use
a lukewarm all-purpose cleaning solution or a
mild saddle soap for vinyl trim. Remove water
spots and traces of soap with a clean, damp
cloth or sponge. Use a clean, soft cloth to rub
dry .
Grease, tar or oil stains can be removed with a
clean cloth or sponge soaked with all-purpose
cleaner or with a solvent designed espec ially
to clean v inyl.
Occasiona lly app ly a colorless vinyl or leather
preservative to retain the material's luster
and pliability .
A WARNING
Always read and heed all WARNINGS and
other information
¢ page 202.
Aluminum trim
Use only neutral-pH products to remove spots
and deposits from aluminum surfaces.
Chrome care products and alkaline cleaners
will attack aluminum surfaces and can dam
age them over time.
A WARNING
A lways read and heed all WARNINGS and
other information
¢ page 202.