AUDI A4 2016 Service Manual
Manufacturer: AUDI, Model Year: 2016, Model line: A4, Model: AUDI A4 2016Pages: 278, PDF Size: 70.26 MB
Page 41 of 278
..... N
0 ::..:: co .....
compartment lid upward .
~ Press and hold the¢ fig. 29 button again for at
least four seconds and this will store the new
open position .
T he settings in the radio or
MM!* determine if
the rear lid can be opened using the handle
¢ page 36.
Opening will be stopped immediately when :
- You press the~ button on the remote control
master key for at least one second, or
- You press the~ button in the rear lid, or
- You push the handle in the rear lid, or
- You pull the~ button in the driver's door, or
- When something blocks the rear lid o r makes it
difficult for the lid to move .
If you press one of the buttons~ now, the rear
lid will either open or close, depending on its an
gle.
If yo u pull light ly on its handle, the rear lid will
close.
C lo sing will be stopped immediately when:
- You press the~ button in the rear lid, or
- You push the handle in the rear lid, or
- You release the~ button on the driver's door,
or
- When something blocks the rear lid or makes it
difficult for the lid to move.
If you press one of the buttons~ now, the rear
lid will either close or open, depending on its an
gle.
If you pull light ly on its handle, the rear lid will
close.
You can manually stop the a utomat ic opening/
closing of the luggage compartment lid. The au
tomatic closing process begins if you push down
on the rear lid.
A WARNING
- Never close the rear lid inattentively or with
out checking first . Although the closing
Op ening and cl osing
force of the rear lid is limited, you can still
seriously injure yourself or others.
- Always ensure that no one is within range of
the rear lid when it is moving, in particu lar
close to the hinges and the upper and lower
edges - fingers or hands can be pinched.
- To help prevent poisonous exhaust gas from
be ing drawn into the vehicle, a lways keep
the rear lid closed while dr iving. Never
transport objects larger than those which fit
comp letely into the luggage area, because
then the rear lid cannot be fully closed.
- Never leave your veh icle unattended espe
cially with the rear lid left open. A child
could crawl into the car through the luggage
compartment and pull the lid shut, becom
ing trapped and unab le to get out. To re
duce the risk of personal in jury, never let
children play in or around your vehicle . Al
ways keep the rear lid as we ll as the veh icle
doors closed when not in use .
- If there is a luggage rack or bicycle rack
mounted on the rear lid, it may not be able
to open comp letely or an opened rear lid
may close by itself because of the added
weight . So the open rear lid must be sup
ported or the we ight must be removed from
the l uggage rac k first.
(!) Tips
- When the vehicle is locked, the rear lid can
be unlocked separately by pressing the but
ton~ on the master key . When the rear lid
is closed again, it locks automatically.
- The following applies to vehicles equ ipped
w ith the convenience key* feature : if the re
mote contro l key is left in the luggage com
partment , luggage compartment will auto
matically unlock itse lf after you lock the ve
hicle. This prevents you from unintentiona l
ly locking your key in the luggage compart
ment.
- If the vehicle battery charge drops below a
certain level, you can still open or close the
rear lid manually, however, you will need to
app ly more force to close it.
39
Page 42 of 278
Opening and closing
Sedan: Rear lid emergency release
Applies to vehicles: w ith fixed rear seat backrest
F ig. 30 Rear bench seat : eme rge ncy release cable
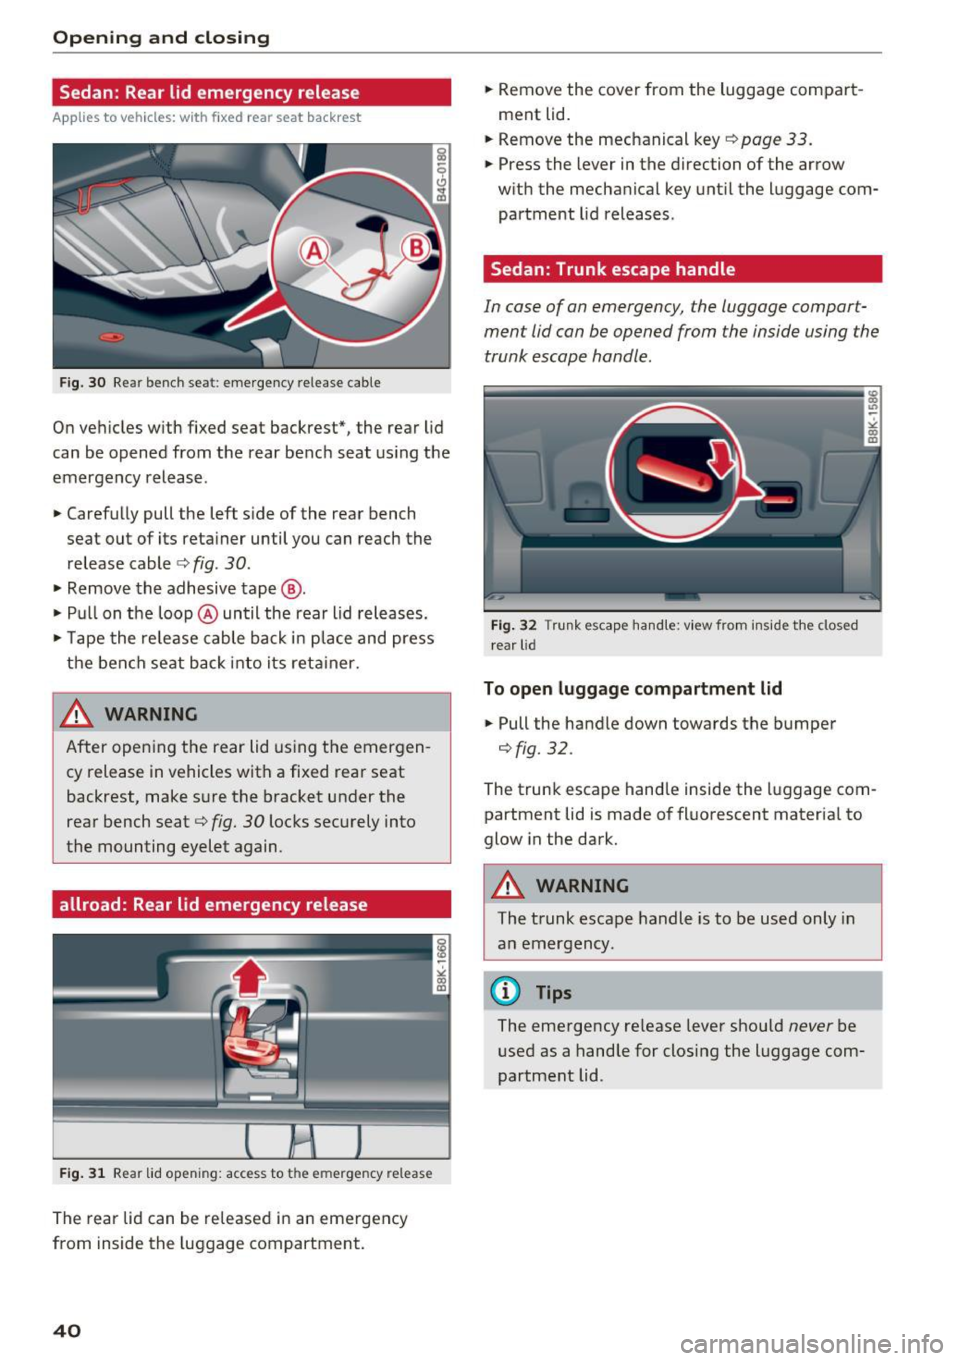
On veh icles w ith fixed seat backrest*, the rear lid
can be opened from the rear bench seat using the
emergency release .
.. Carefully pull the left s ide of the rear bench
seat out of its reta iner until you can reach the
release cable
c> fig . 30 .
.. Remove the adhesive tape@ .
.. Pu ll on the loop@until the rea r lid releases.
.. Ta pe the release cable back in place and press
the bench seat back into its reta iner.
_& WARNING
After open ing the rear lid using the emergen
cy release in vehicles with a fixed rear seat
backrest, make sure the bracket under the
rear bench seat
c> fig. 30 locks securely into
the mounting eyelet again.
allroad: Rear lid emergency release
Fig. 31 Rear lid opening: access to the emergency release
The rear lid can be released in an emergency
from inside the lug gage compartment.
40
.. Remove the cover from the luggage compart
ment lid.
.. Remove the mechanical key
c> page 33 .
.. Press the lever in the direction of the arrow
with the mechanical key until the luggage com
partment lid releases .
Sedan: Trunk escape handle
In case of an emergency, the luggage compart
ment lid can be opened from the inside using the trunk escape handle.
Fig. 32 Trunk escape hand le : v iew from inside th e closed
r ear lid
To open luggage compartment lid
.. Pull the handle down towards the bumper
¢fig.32.
The trunk escape handle inside the luggage com
partment lid is made of fluorescent materia l to
glow in the dark.
A WARNING
The trunk escape handle is to be used only in
an emergency.
(D Tips
The emergency re lease lever should never be
used as a handle for closing the luggage com
partment lid.
Page 43 of 278
,....,
N
0
""' CX) ,....,
I.Cl U"I ,....,
I.Cl ,....,
Child safety lock
Child safety locks in the rear doors
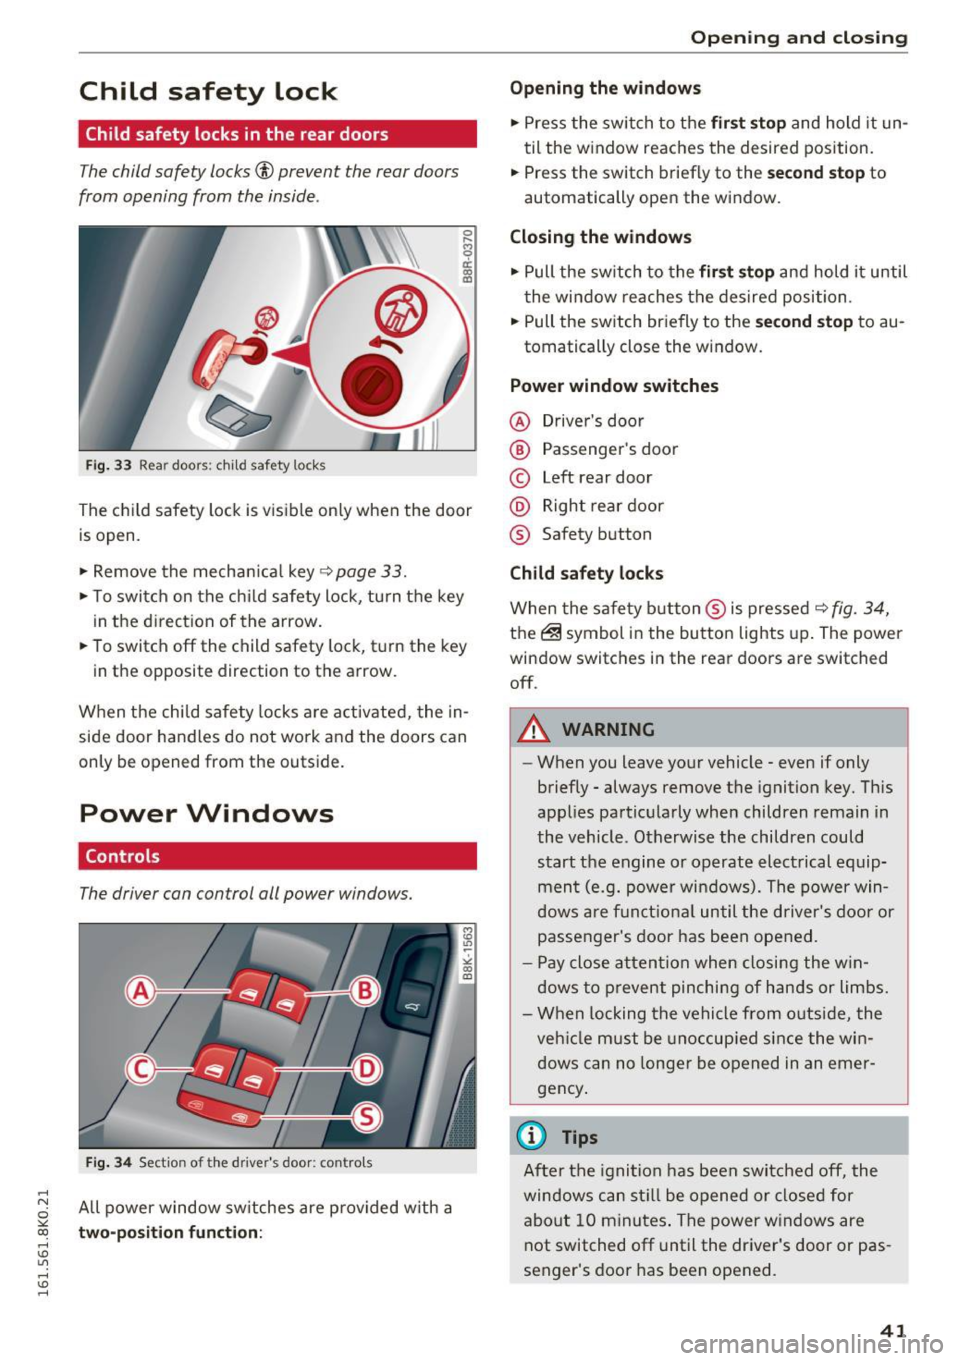
The child safety locks© prevent the rear doors
from opening from the inside .
Fig. 33 Rear doors: child safety locks
0 ,.._ O') 0
i a,
The child safety lock is visible on ly when the door
is open .
.,. Remove the mechanical key
~ page 33.
.,. To switch on the child safety lock, tu rn the key
in the direction of the arrow.
.,. To switch off the child safety lock, t urn the key
in the opposite direction to the arrow.
When the child safety locks are activated, the in
side door handles do not work and the doors can
only be opened from the outside.
Power Windows
Controls
The driver can control all power windows.
Fig. 34 Section of the driver's door: contro ls
All power window switches are provided with a
two-position function:
Open ing and closing
Opening the windows
.,. Press the switch to the first stop and hold it un
til the window reaches the desired position.
.,. Press the switch briefly to the
second stop to
automatically open the window.
Closing the windows
.,. Pull the switch to the first stop and hold it until
the window reaches the desired position .
.,. Pull the switch briefly to the
second stop to au-
tomatically close the window.
Power window switches
@ Driver's door
@ Passenger's door
© Left rear door
@ Right rear door
® Safety button
Child safety locks
When the safety button ® is pressed ~ fig. 34,
the@symbol in the button lights up. The power
window switches in the rear doors are switched off .
A WARNING
--When you leave your vehicle - even if only
briefly - always remove the ignition key. This
applies particularly when children remain in
the vehicle. Otherwise the children could
start the engine or operate electrical equip
ment (e.g. power windows). The power win
dows are funct ional until the driver's door or
passenger's door has been opened.
- Pay close attention when closing the win
dows to prevent pinching of hands or limbs.
- When locking the vehicle from outside, the
veh icle must be unoccupied since the win
dows can no longer be opened in an emer
gency .
(0 Tips
After the ignition has been switched off, the
windows can still be opened or closed for
about 10 minutes. The power windows are
not switched off until the driver's door or pas
senger's door has been opened.
41
Page 44 of 278
Opening and clo sin g
Convenience opening /clos ing
The windows and the power sunroof can be
opened and closed with the mechanical key or
the emergency key.
®
'
l
® '
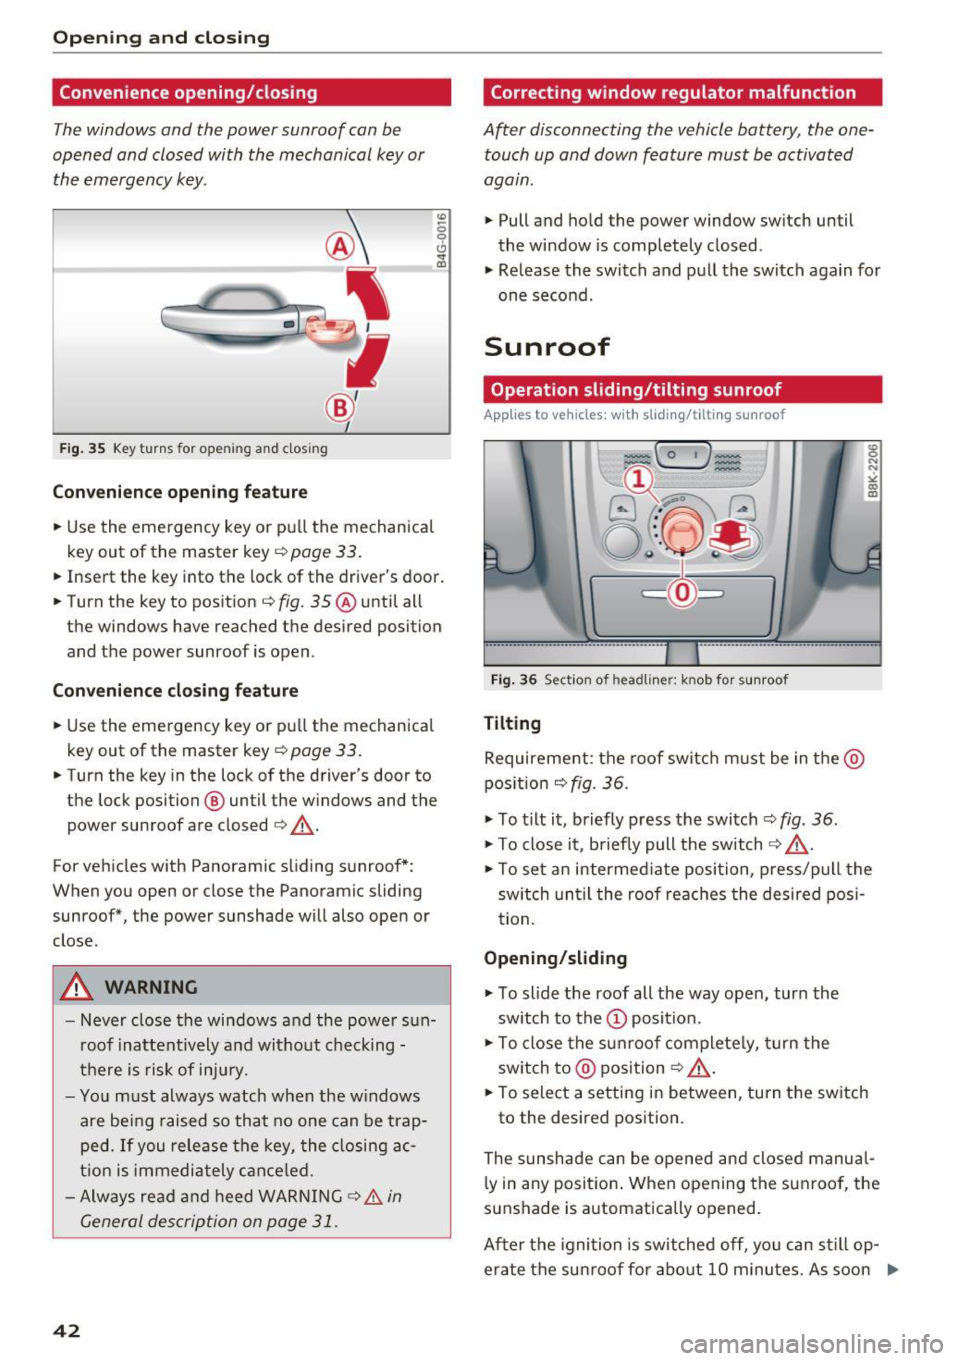
Fig . 35 Key turns for opening an d clos ing
Convenienc e opening f eature
.,. Use the eme rgency key or pu ll the mechanical
key out of the master key
¢ page 33 .
.,. Insert the key into the lock of the driver's door .
.,. Turn the key to position ¢
fig. 35 ® until all
the windows have reached the desired position
and the power sunroof is open .
Convenience cl osing fea tur e
.,. Use the emergency key or pull the mechanical
key out of the master key
q page 33.
.,. Turn the key in the lock of the driver's door to
the lock position @ until the windows and the
power sunroof are closed
q _&..
For vehicles with Panoramic sliding sunroof*:
When you open or close the Panoramic sliding
sunroof*, the power sunshade will also open or
close.
A WARNING
- Never close the windows and the power s un
roof inattent ively and without checking -
there is risk of injury.
- Yo u m ust always watch when the w indows
are be ing raised so that no one can be trap
ped. If you release the key, the closing ac
t ion is immediately cance led.
- Always read and heed WARNING
9 & in
General description on page 31 .
42
Correcting window regulator malfunction
After disconnecting the vehicle battery, the one
touch up and down feature must be activated
agam .
... Pull and hold the power window sw itch until
the window is completely closed .
... Release the switch and pull the switch again for
one second.
Sunroof
Operation sliding /tilting sunroof
Applies to vehicles: with sliding/tilt ing sunroof
Fig . 36 Section of headliner: knob for sunroof
Tilting
Requirement: the roof switch m ust be in the @
pos ition
q fig. 36 .
... To t ilt it, briefly press the switch ¢ fig . 36.
... To close it, b riefly pull the switch 9 _&. .
:g N
N
•
" CD m
... To set an intermed iate position, p ress/p ull the
sw itch un til the roof reaches the desired posi
tion.
Opening /slid ing
... To slide the roof all the way open, tur n the
sw itch to the
(D position.
... To close the s unroof complete ly, turn the
sw itch to @ position
<=? _&..
... To select a setting in between, turn the sw itch
to the desired position.
The sunshade can be opened and closed manual l y in any position . W hen opening the sunroof , the
sunshade is a utomatically opened.
After the ignition is switched off, yo u can st ill op
erate the su nroof fo r abo ut 10 m inutes. As soon .,.
Page 45 of 278
.... N
0
""' CX)
.... I.Cl U"I
.... I.Cl ....
as the driver's or passenger's door is opened, the
switch is inoperative .
A WARNING
Pay careful attention when closing the sun
roof -otherwise serious injury could result!
For this reason, always remove the ignition
key when leaving the vehicle.
CD Note
Always close your sunroof when leaving your
vehicle. Sudden rain can cause damage to the interior equipment of your vehicle, particular
ly the electronic equipment .
(D Tips
-Information on convenience opening/clos
ing
c:> page 42.
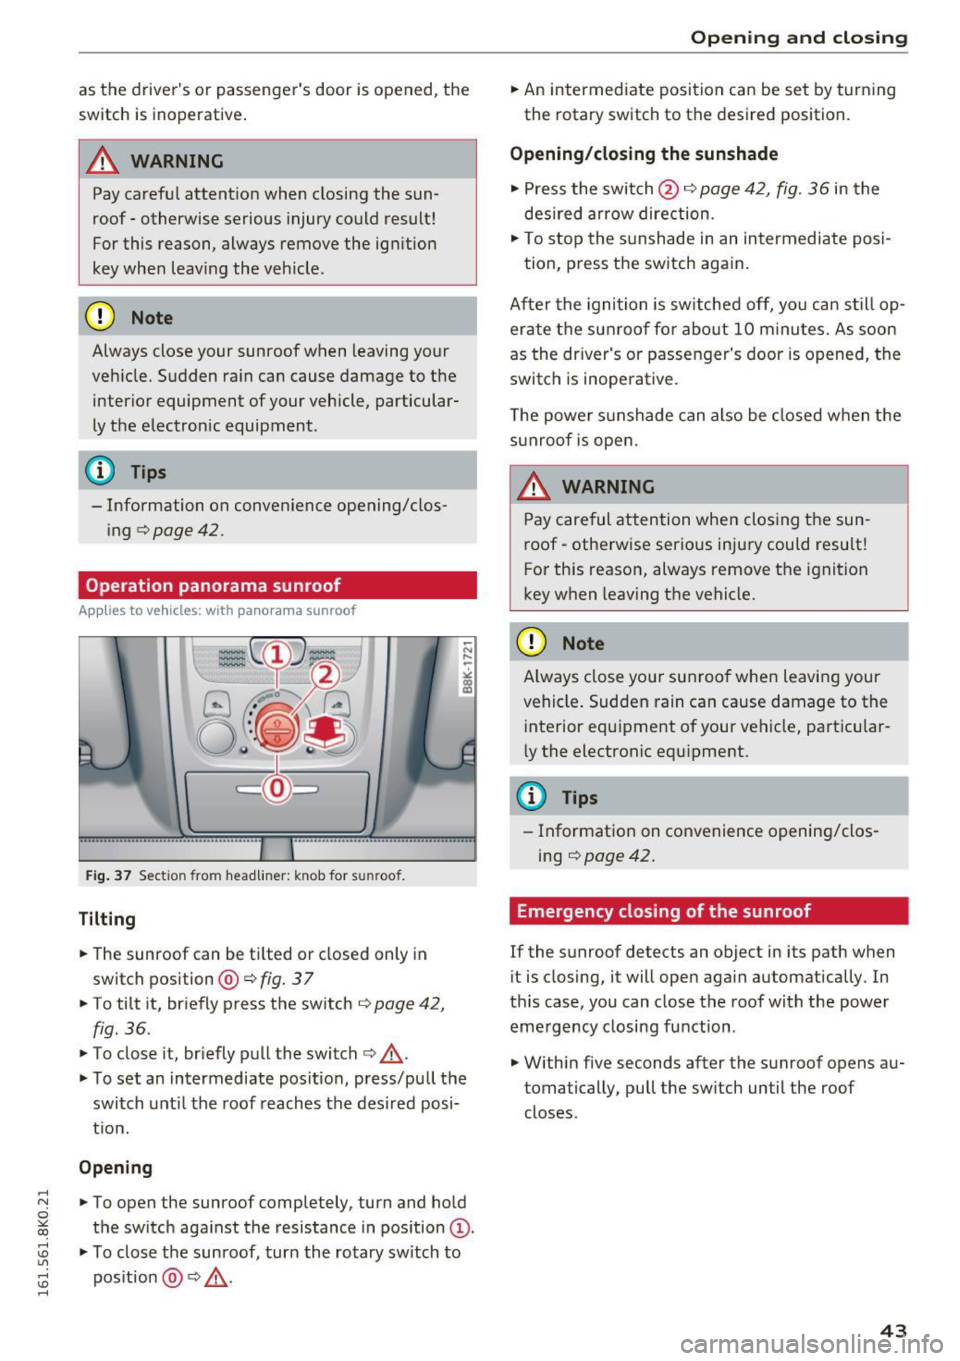
Operation panorama sunroof
Appl ies to vehicles: with pa nora ma sunroof
Fig . 37 Sectio n fro m headliner: knob for sunroof.
Tilting
• The sunroof can be ti lted or closed only in
switch position @c:>
fig. 37
• To tilt it, briefly press the switch c:> page 42,
fig. 36.
• To close it, briefly pull the switch c:> &_ .
• To set an intermediate position, press/pull the
switch unt il the roof reaches the desired posi
t ion.
Opening
• To open the sunroof completely, turn and hold
the switch against the resistance in position
Q) .
• To close the sunroof, tur n the rotary sw itch to
pos ition @~&_ .
Open ing and closing
• An intermediate position can be set by turn ing
the rotary switch to the desired position.
Opening/closing the sunshade
• Press the switch @c:> page 42, fig. 36 in the
desired arrow direction.
• To stop the sunshade in an intermediate posi-
tion, press the switch again.
After the ignition is sw itched off, you can still op
erate the sunroof for about 10 minutes. As soon
as the driver's or passenger's door is opened, the
switch is inoperative.
The power sunshade can also be closed when the
sunroof is open.
A WARNING ~ ~
Pay careful attention when closing the sun
roof -otherwise serious inju ry could result!
For this reason, always remove the ignition
key when leaving the vehicle.
CD Note
Always close your sunroof when leaving your
vehicle . Sudden rain can cause damage to the
interior equipment of your vehicle, particular
ly the electronic equ ipment.
({D Tips
- Information on convenience opening/clos
ing c:>
page 42.
Emergency closing of the sunroof
If the sunroof detects an object in its path when
it is closing, it will open again automatically. In
th is case, you can close the roof with the power
emergency closing function .
• Within five seconds after the sunroof opens au
tomatically, pull the sw itch until the roof
closes.
43
Page 46 of 278
Opening and clo sin g
Valet parking
Applies to vehicles: with folding and lockable rear seatbacks
The valet parking feature protects the luggage
comportment from unauthorized access .
-
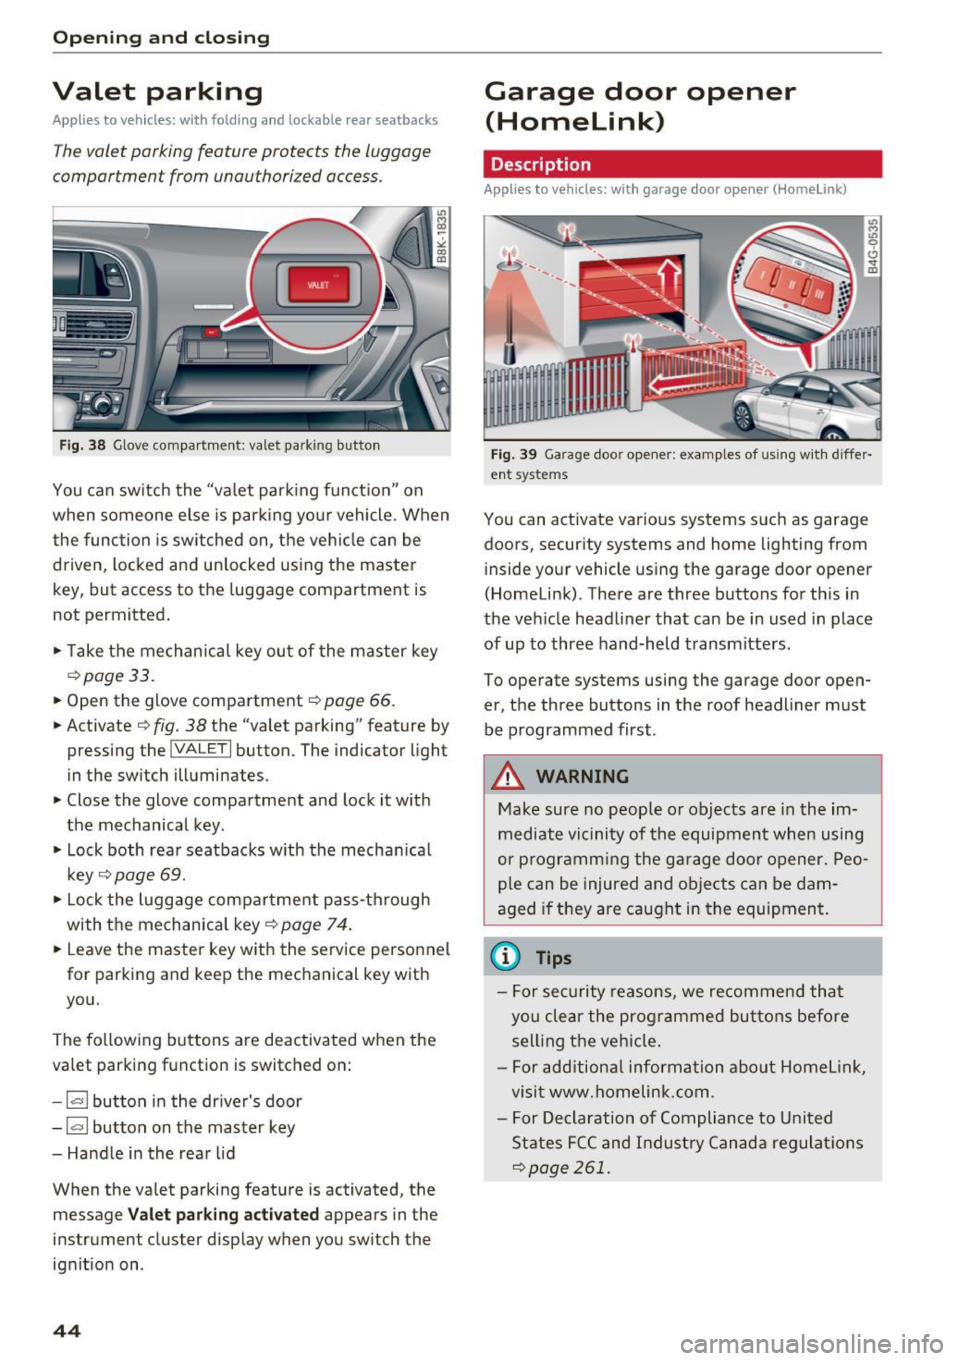
Fig. 38 Glove compartment: valet park ing button
You can sw itch the "va let park ing funct ion" on
when someone else is pa rk ing you r vehicle. When
the function is sw itched on, the vehicle can be
driven, locked and un locked using the master
key, but access to the luggage compartment is
not permitted .
• Take the mechanical key ou t of the master key
<=> page 33.
• Open the glove compartment r::!> page 66 .
• Activate
¢ fig. 38 the "valet parking" feature by
pressing the
! VALET I button. The indicator light
in the switch illuminates.
• Close the glove compartment and lock it with
the mechanical key.
• Lock both rea r seatbacks w ith the mechan ica l
key
¢ page 69.
• Lock the luggage compar tment pass-through
with the mechanical key<=>
page 74 .
• Leave the master key with the service personnel
for parking and keep the mechanical key with
you.
The fo llowing buttons are deactivated when the
valet parking function is switched on:
- 1""' 1 bu tton in the dr iver's door
- I a I button on the master key
- Handle in the rear lid
When the valet parking feature is activated, the message
V alet park ing activ ated appears in the
instrument cluster display when you switch the ignit ion on .
44
Garage door opener
(Homelink)
Description
Applies to vehicles: with garage door opener (Horne Link)
Fig. 3 9 Garage doo r opene r: exa mples of using w it h d iffer·
ent syste ms
You can act ivate vario us systems suc h as garage
doors, secur ity systems and home lighting from
inside your vehicle using the garage door opener
(Homelink) . There are three buttons for th is in
the veh icle headliner that can be in used in place
of up to three hand-held transmitters.
To operate systems using the garage door open
er, the three buttons in the roof headliner must be programmed first .
A WARNING
Make sure no people or objects are in the im
mediate vi cinity of the equipment when using
or p rogramm ing the ga rage door opener. Peo
pl e can be injured and ob jects can be dam
aged i f they are caught in the equipment.
(D Tips
- For sec urity reasons, we recommend that
yo u clear the prog rammed but tons before
sell ing t he ve hicl e.
- For add itiona l information about HomeL ink,
visit www.homelink .com .
- For Declaration of Compliance to United
States FCC and Indust ry Canada regulat ions
<=>page 261.
Page 47 of 278
.... N
0
""' CX)
.... I.Cl U"I
.... I.Cl ....
Operation
Applies to vehicles: with garage door opener (Homelink)
·-
~ •• r ·O : o ··) ,,;~
®
~ (_ 0_1 J c:cc
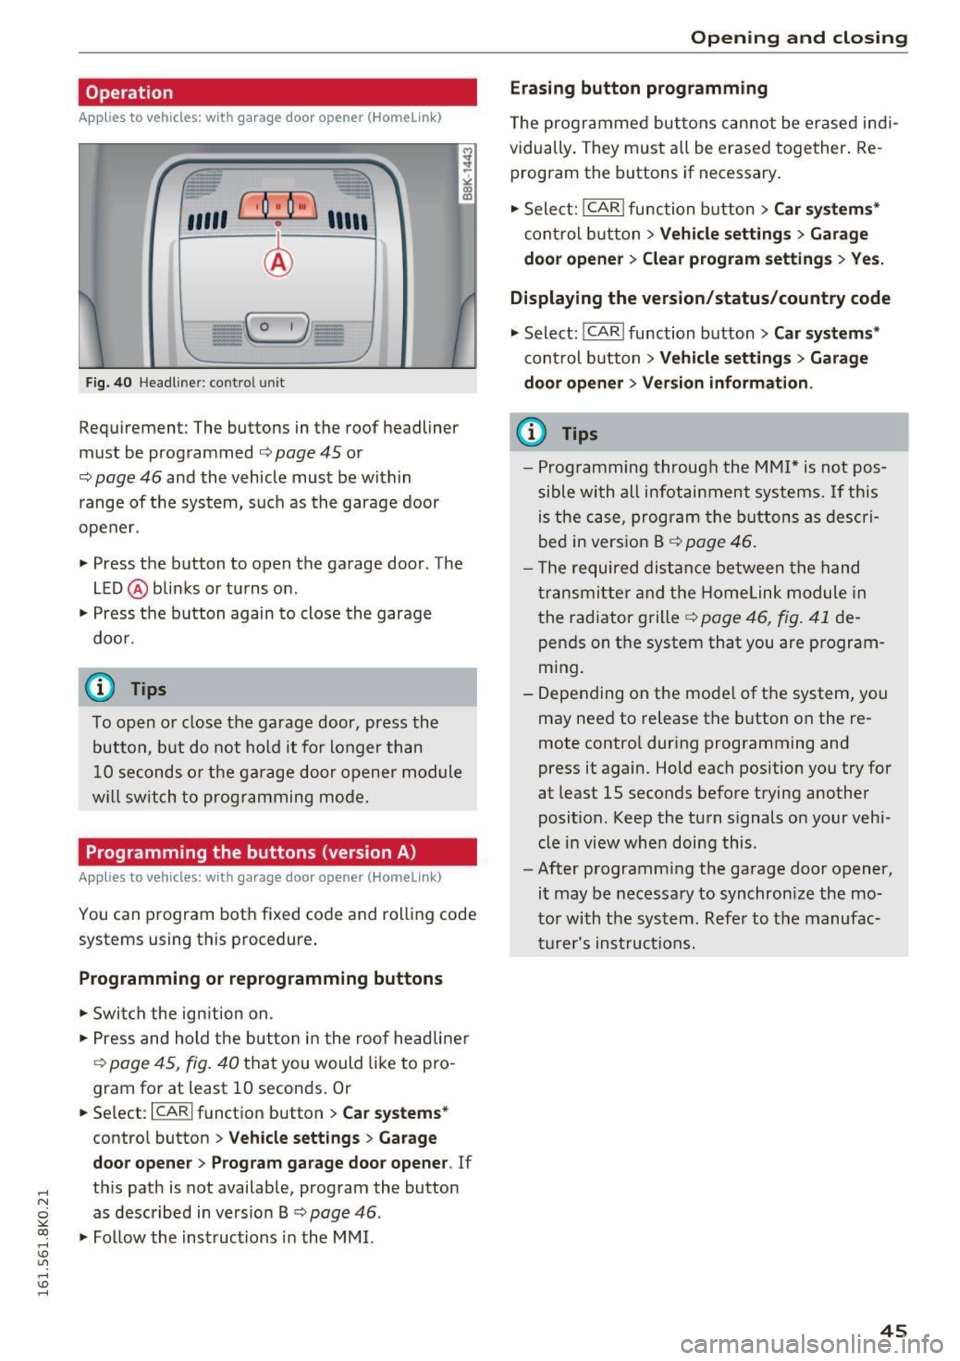
F ig. 40 Headl iner: c on tro l uni t
Requirement: The buttons in the roof headliner
must be programmed
c:> page 45 or
c::> page 46 and the vehicle must be within
range of the system, such as the garage door
opener.
" Press the button to open the garage door . The
LED @blinks or turns on .
" Press the button again to close the garage
door .
@ Tips
To open or close the garage door, press the
button, but do not hold it for longer than
10 seconds or the garage door opener module
w ill switch to programming mode.
Programming the buttons (version A )
Applies to vehicles: with garage door opener (Homelink)
You can program both fixed code and rolling code
systems using this procedure .
Programming or reprogramming buttons
"Switch the ignition on.
"P ress and hold the button in the roof headliner
c::> page 45, fig. 40 that you would like to pro
gram for at least 10 seconds. Or
.. Select:
I CAR I function button > Car systems*
contro l button > Vehicle settings > Garage
door opener> Program garage door opener . If
th is path is not available, program the button
as described in version B
c::> page 46 .
"Fol low the instructions in the MMI.
Open ing and closing
Erasing button programming
The programmed buttons can not be erased ind i
vidually . They must all be erased together. Re
program the buttons if necessary.
" Select:
!CAR ! function button> Car systems*
control button > Vehicle settings > Garage
door opener > Clear program settings > Yes.
Displaying the version/status/country code
" Select: !CAR ! function button> Car systems*
cont rol button > Vehicle settings > Garage
door opener > Version information .
(D Tips
-Programming through the MMI* is not pos
sible with all infotainment systems. If this
is the case, program the buttons as descri
bed in version B
c::> page 46.
- Th e required distance between the hand
transmitter and the Homelink module in
the radiator grille
c::> page 46, fig. 41 de
pends on the system that you are program
ming.
- Depending on the model of the system, you
may need to release the button on the re
mote control during programming and
press it again. Hold each position you try for
at least 15 seconds before trying another
posit ion . Keep the turn s ignals on your vehi
cle in view when doing this.
- After programming the garage door opener,
it may be necessary to synchronize the mo
tor with the system. Refer to the manufac
turer's instructions.
45
Page 48 of 278
Opening and clo sin g
Programming the buttons (version B)
Applies to vehicles: with garage door opener (Homelink)
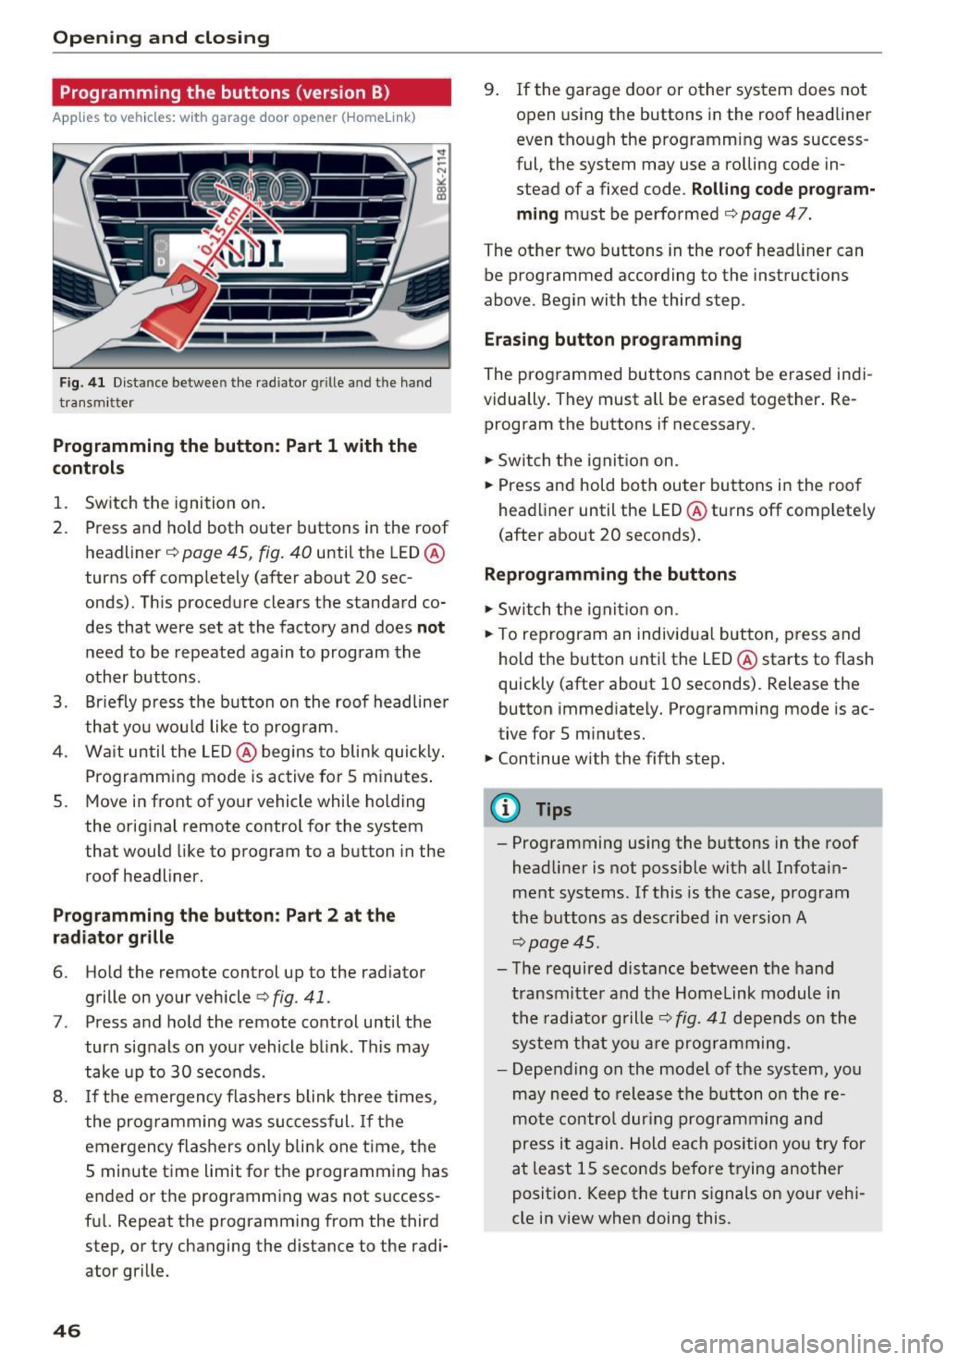
Fig. 41 Dist an ce betwee n th e rad iator g rille an d th e hand
tra nsm itt er
Programming the button : Part 1 with the
contr ols
1. Switch the ignition on.
2. Press and ho ld both outer b uttons in the roof
headliner ~
page 45, fig. 40 until the LED @
turns off completely (after about 20 sec
onds). This procedure clears the s tandard co
des that were set at the factory and does
not
need to be repeated again to program the
other buttons .
3. Br iefly p ress the b utton o n the roof headliner
that you wou ld like to program .
4. Wa it until the LED @ begins to blink quickly .
Programming mode is active for 5 minutes .
5. Move in front of yo ur vehicle while holding
the original remote control for the system
t hat would like to program to a button in the
roof headliner.
Prog ramming th e butt on : Part 2 at the
r a d iat or gr ille
6. Ho ld the remote control up to the radiator
grille on your vehicle¢
fig. 41 .
7. Press and hold the remote control until the
turn signals on your vehicle blink . This may
take up to 30 seconds.
8 .
If the emergency flashers blink th ree t imes,
the programming was suc cessful.
If th e
emergency flashers only b lin k one t ime , the
5 minute time limit for t he p rogramming has
ended or the programm ing was not success
fu l. Repeat the programming from the third
step, or try changing the distance to the radi
ator grille.
46
9 . If the garage door or other system does not
op en using the buttons in the roof headliner
even though the programming was success
ful , the system may use a ro lling code in
s tead of a fixed code .
Rolling code prog ram
m ing
must be performed ¢ page 47.
The other two b uttons in the roof head liner can
be programmed according to the instruct ions
above . Begin with the third s tep .
Era sing button prog ramm ing
The prog rammed buttons cannot be erased indi
vidually . They must a ll be erased tog ether . Re
program the buttons if necessary .
.. Switch the ignit io n on.
.. Press and hold both outer bu ttons in the roof
headliner until the LED @turns off comp lete ly
( after about 20 seconds).
Reprogramm ing the buttons
.. Switch the ignit io n on .
.. To reprogram an individual button, press and
hold the button unti l the LED @starts to flash
quickly (after about 10 seconds) . Release the
button immed iately. Programming mode is ac
tive for 5 m inu tes.
.. Continue with the fifth step.
@ Tips
- Programming using the buttons in the roof
headliner is not possible with all Infotain
ment systems . If this is the case, program
the buttons as descr ibed in version A
¢ page 45 .
- The required distance between the hand
transm itte r and the Homelink module in
the radiator grille~
fig. 41 depends o n the
system that you are prog ramming.
- Depending on the mode l of the system, you
may need to release the b utton o n the re
mote contro l dur ing programm ing and
press it again. Hold each position yo u try for
a t least 15 seconds before trying another
posit ion . Keep the turn s ignals on your vehi
cle in view when doing this .
Page 49 of 278
Rolling code programming
Applies to vehicles: with garage door opener (Homelink)
Rolling code programming is also needed for
some systems.
Ident ifying a rolling code
~ Press and hold the button in the roof headliner
that was already programmed .
~ Watch the LED@¢ page 45, fig. 40. If the LED
blinks quickly, the systems (such as a garage
door) is equ ipped with a roll ing code .
~ Program the rolling code as follows:
Acti vati ng the motor unit in a system
~ Locate the programming button on the sys
tem's motor unit. The exact location and color of the button may vary depending on the brand
of the system.
~ Press the programm ing button on the garage
door opener motor unit (th is w ill usually acti
vate a n "indicator" on the moto r unit). You now
have approximate ly
30 second s to program the
button in the roof headliner .
Programming the button in the roof
h eadline r
~ Press and hold the previously programmed but
ton in the roof headliner for 2 seconds.
~ To end rolling code programming, press and hold the button again for 2 seconds.
~ With some systems, the button may need to be
pressed a third time to end the programming
process .
After programming, the system should detect
the signal and beg in mov ing when the button in
the roof headliner is pressed . Now you may pro
gram the other buttons as needed.
(D Tips
- The rolling code can be programmed more
quickly and more easily with the help of a
second person.
- If you have difficulty programm ing the roll-
,.... ing code, referring to the user guide for the
N
~ system may help.
co .....
47
Page 50 of 278

Light and Vision
Light and Vision
Exterior lighting
Switching the lights on and off
Fig. 42 Instrument panel : headlig ht co ntrol sw itch
Light switch ·'t/;
T u rn the switch c::> fig. 42 to the co rresponding
position . When the lights are switched on, the :
00
:
symbo l turns on.
O -The lights are off or the daytime r unning
lights are on :
-USA mode ls: The daytime running lig hts are
activated when the light switch
c:) fig . 42 is in
the
O pos it ion or the AUTO position (only in
daylight cond it ions) . The daytime runn ing
l ights fu nction can be turned on a nd off in the
r ad io or MM I* menu
Exterior lighting
c:) page 49, c::> & .
-Canada mo del s: T he daytime runn ing lights are
activ ated when t he lig ht switch
c:) fig . 42 is in
the
o pos it ion, :oo : position or the AUTO pos i
tion (only in daylight condit ions). The dayt ime
runn ing lights fu nction cannot be tur ned off
c> & .
AUTO * -Automatic headlights switch on and off
depending on brightness, for example in twilight,
du ring ra in or i n tunne ls
c::> & .
;o o: -Side marker lights
fD -Low beam headlights
Fog lights /rear fog light (s)*
Press the appropriate button c::> fig. 42 :
}0 -Fog lights
O* -Rear fog light(s)
48 adaptive light*
When switched on
, adap tive ligh t ad ap ts to
curves in the roa d depending on the vehicle
speed and the steering ang le. Th is prov ides bet
ter light ing th rough the curve. The system oper
ates at speeds between approximately 6 mph (10 km/h) and 68 mph (110 km/h).
Static cornering light* (veh icles with adaptive
li ght) -the corne ring light switches on at speeds
up to approximately 25 mph (40 km/h) when a
ce rtain steering wheel angle is reached or when a
turn signal is act ivated . The area to the side of
the veh icle is illuminated better when turning .
T he adaptive light and the cornering light only
funct ion when the switc h is in the AUTO position
(automat ic head lights*) .
A WARNING
- Daytime r unning lights and au tomatic head
lights* are o nly intended to ass ist the d river .
They do not relieve the d rive r of his res pon
sibility to check t he headlights and to tur n
t hem on m anually accordi ng to the curren t
light and visibili ty cond itions. For example,
fog cannot be detected by the light sen
sors*. So a lways switch on the headlights
io
unde r these weather conditions and when
driving in the dark .
- Crashes can happen when you cannot see
the road ahead and when you cannot be
seen by ot her motorists. Always tur n on the
headlights so that yo u can see ahead a nd so
that others can s ee yo ur ca r from the back .
- Please obey all laws w hen us ing the lighting
sys tems described here.
(D Note
The rear fog lights* shou ld only be turned on
i n accordance with traffic regu lation, as the
lights are bright for following traff ic.
{!) Tips
- The light sensor* for headlight contro l is lo
cated in the rear view m irror mount. You
should the refore not apply any stickers to .,.