display AUDI A4 2018 Repair Manual
[x] Cancel search | Manufacturer: AUDI, Model Year: 2018, Model line: A4, Model: AUDI A4 2018Pages: 403, PDF Size: 66.81 MB
Page 145 of 403
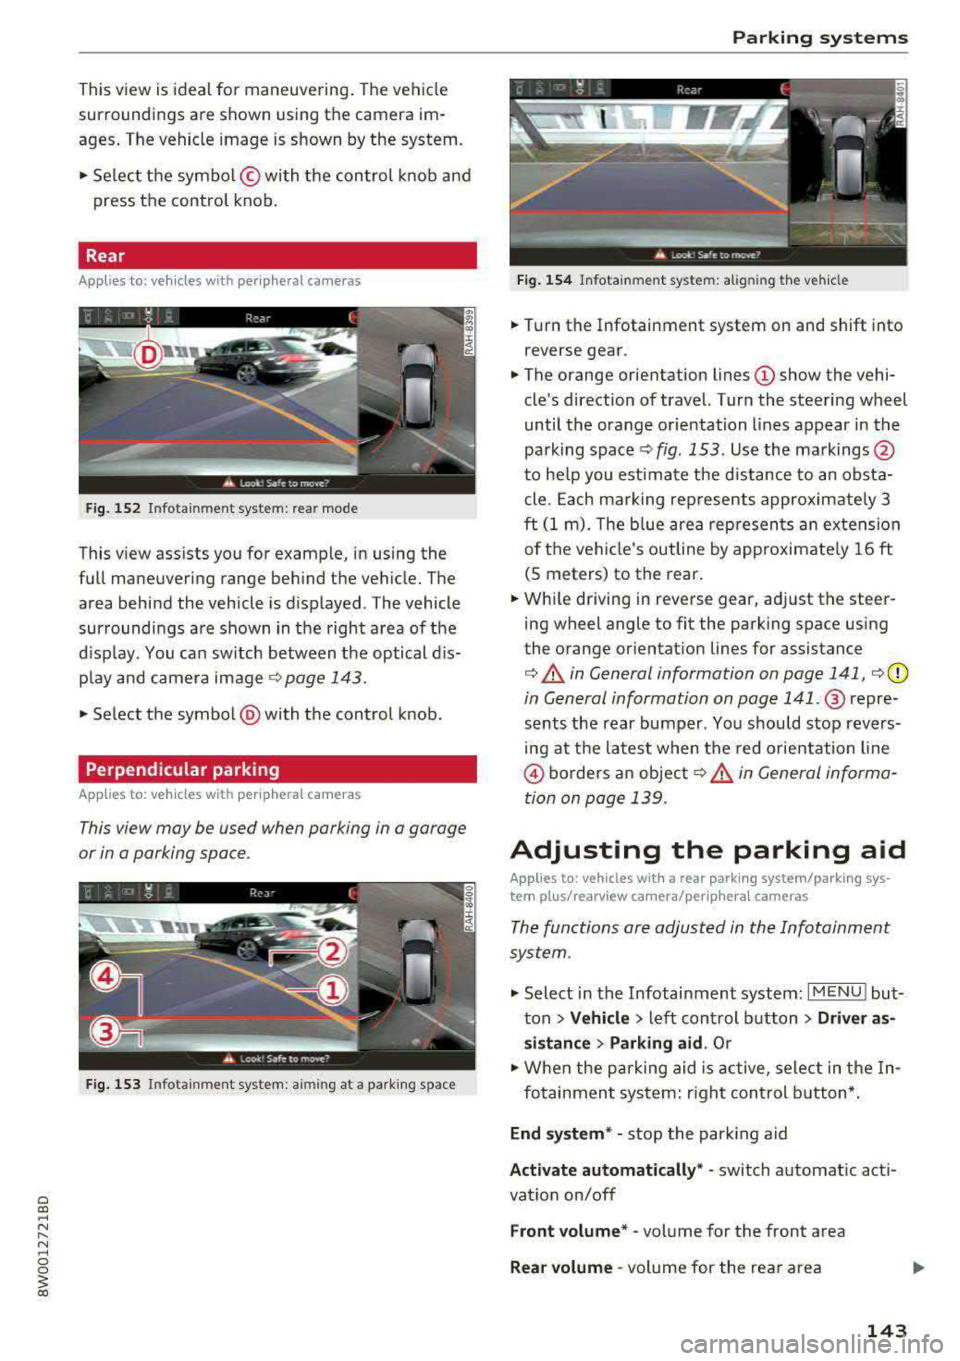
This view is ideal for maneuvering. The vehicle
surroundings are shown using the camera im
ages . T he vehicle image is shown by the system .
... Select the symbol © with the control knob and
press the control knob.
Rear
Applies to: vehicles with peripheral came ras
F ig. 152 In fot ainm en t system : rear mo de
T his v iew assists you for example, in us ing the
full maneuvering range behind the vehicle. The
area behind the vehicle is displayed. The vehicle
surroundings are shown in the right area of the
display. You can switch between t he optical dis
play and camera image
¢page 143.
... Select the symbol @with the control knob.
Perpendicular parking
Applies to: vehicles with peripheral cameras
This view may be used when parking in a garage
or in a parking space .
Fig. 153 In fot ainm ent system : aiming a t a park ing s pace
Parking systems
Fig. 154 Infotain m ent sys te m: alig nin g the vehi cle
... Turn the Infotainment system on and shift into
r everse gear .
... The orange orientation lines (D show the vehi
cle's direction of travel. Turn the steering wheel
until the orange orientation lines appear in the
pa rking
space ¢ fig. 153 . Use the markings @
to help you estimate the d istance to an obsta
cle. Each marking represents approximately 3
ft (1 m). The b lue area represen ts an extension
of the vehicle's outline by approximate ly 16 ft
(5 meters) to the rear.
... While driving in reverse gear, adj ust the steer
ing wheel angle to fit the park ing space using
the orange or ientation lines for assistance
¢ &. in General information on page 141, ¢(D
in General information on page 141 .@ repre
sents the rear bumper . You shou ld stop revers
ing at the latest when the red orientation line
@ borders an object¢&. in General informa
tion on page 139.
Adjusting the parking aid
Applies to: vehicles with a rear parking system/parking sys
tem plus/ rearview camera/per iphe ra l cameras
The functions are adjusted in the Infotainment
system .
.,. Select in the Infotainment system: I MENU ! but
ton
> Vehicle > left control button > Driver as
sistance > Parking aid .
Or
.,. When the parking aid is active, select in the In-
fotainment system: r ight control button*.
End system* -stop the parking aid
Activate automatically * -switch automatic act i
vat io n on/off
Front volume* -volume for the front area
Rear volume -volume for the rear area
143
Page 146 of 403

Parking sy stem s
Enterta inment fade r -the volume o f the audio/
video source is lowered when the parking system
is turned on
The newly selected level is demons trated briefly
by the sound generator.
Vi ew * -switch betwee n an optical d isplay
( Graphi c) and camera image (C amera ) in the
right section of the disp lay.
Trail er view * -show trailer view
*Auto. front /rear camera ch ange * -the view be
h ind the veh icle
( R ear mode) is displayed auto
mat ically when you shift into reverse gear. The
view in front of the vehicle
( Front mode) is d is
p layed automatically when you shift into the for
ward gea rs. When first activat ing in a forward
gear with the
P,, 1A button, the front s ide v iew is
d isp layed
( Corner view (front) mode).
I f you do not set the../, the view behind the vehi
cle
( Rear mode) is a lways d isplayed and it does
not swi tch to the
Front mode when a forward
gear is se lected.
(D Tips
- Seve ral menus can be accessed w it h t he
right contro l butto n only whe n the park ing
aid is active.
- T he settings for volume and automatic act i
vation* are au tomatically sto red and as
signed to the remote control key being
used .
Error messages
Appl ies to: ve hicles w ith a rea r parking sys te m /pa rking sys
tem plus/rearv iew camera/p eripheral ca meras
Ill Rear park a ssis t: malfunction! Obstacles
c anno t be d etec ted
Ill Front park assist: m alfunction! Obstacle s
cannot be d ete cted
Ill Park a ssist: mal function! Obstacles cannot
be d ete cted
When one of these messages appears, there is a
system ma lf u nction. The LED in the
P11.A. button al
so blinks when switching it on. The relevant mes-
144 sage on
ly appears again when you manually acti
vate the parking aid with the button.
[II Rear parking aid: ob stacl e detection re str ict
ed
The rear c ross-traffic ass ist* ¢ page 132, Rear
cross-traffic assist
i s no t available. Either the ESC
i s sw itched off, or the rada r senso rs may be cov
ered by a bike rack, stickers, leaves, snow or oth
er objects . Switch the ESC on, or clean the area in
front of the sensors if necessary ¢
page 129,
fig . 130.
If this message cont inues to be d is
played, drive immed iate ly to an authori zed Audi
dealer or authorized Audi Service F acility to have
the malfunct ion repaired .
Parking sy stem plu s*
If a sensor or speaker is faulty, the 94 symbo l
will appea r in front of/behind the vehicle in the
Infotainment system d isplay. If a rear sensor is
faulty, only obstacles that are in areas @and @
are
shown ¢ page 137, fig . 136 . If a front sensor
i s faulty, o nly obstacles that are in a reas © and
@ are shown .
Peripheral cameras*
There is a system malfunction if the% symbol
appears and the corresponding area of the dis
play is shown in black . The camera is not working
i n th is area .
Drive to an authori zed Audi dealer or authori zed
Audi Service Facility immed iate ly to have the
malfu nction corrected.
Trailer hitch
App lies to : vehicles wi th a rear park ing system/ parking sys
t e m plus/ rea rview ca mera /pe riph eral cameras and traile r
hi tc h
When the trailer socket is i n use, the parking sys
tem rear se nsors are not a ct ivated when you sh ift
into reverse gear or when you press the
? #A but
ton. This resu lts in the following restrictions .
Rear parking system*
There is no distan ce warning .
Page 147 of 403
a co .... N ,....
N .... 0 0
3 co
Parking system plus*
There is no distance warning for the rear. The
front sensors remain activated. The visual display
switches to trailer mode.
Rearview camera* /peripheral cameras*
There is no distance warning for the rear. The
front sensors remain activated. The visual display
switches to trailer mode. The rearview camera
image will not show the orientation lines and the
blue surfaces.
(D Tips
Trailer hitches that are not installed at the
factory may cause the parking system to mal
function or they may restrict its function.
Parking systems
145
Page 154 of 403
Intelligent Technology
Idling current management
The idling c urrent management dec reases the
energy used w hile pa rked. With the engine
sw itched off, it manages the energy distribution
to the different elect rical components . Data from
the battery diagnosis is taken into account for
this .
Depending on the vehicle battery charge level,
e lectrical equipment is switched off one item af
ter the other to prevent the vehicle battery from
draining and to maintain the starting ability.
Dynamic energy manag em ent
W hil e driving, dynamic energy management dis
tr ibutes the appropriate amount of energy to the
electrical equipment. It controls the battery
charge level so that the amount of energy is not
greater than the amount being generated in or
der to mai nta in a n optimal vehicle battery charge
level.
(D Tips
- Energy management cannot overcome the
l aws of phys ics . Note that the charge leve l
and leng th of the vehicle battery life a re
li mi ted .
- When the starting ability is endanger ed, the
(•) ind icator light turns on~ page 30.
What you should know
Maintaining the starting ability is the highest
priority.
A lot of stress is placed on the vehicle battery
when dr iv ing short d istances, dur ing c ity dr iv ing,
and at cold times of the year . A lot of energy is
used but little is gene rated . It is a lso cri tical
wh en the engine is not runn ing but e lectr ica l
e qui pment is swi tc h ed o n. In this case, energy is
u sed bu t none is ge nera te d.
In s ituatio ns l ike this, energy management will
actively regu late the d ist ribu tion of ene rgy.
Long pe riods without use
If you do not drive your vehicle for several days or
weeks, electrica l equipment is gradually scaled
back or swi tched off . This reduces energy use and
152 ensures
the vehicle will be ab le to s tart a fter long
periods of time. Some conven ience f unctions,
such as interior lig hting or power seat ad just
ment, may not be avai lab le under ce rtain circum
stances. These conven ience functions will be
available again once you switch the ignit ion on
and sta rt the eng ine.
With the engine switched off
The vehicle battery will drain if you use Infotain
ment functions such as listening to the radio
whi le the engine is switched off.
If the vehicle's ability to start may be impaired by
the energy use, a message will appear i n the In
fota inment system display. The message indi
cates that the system will switc h off automatical
l y soon. If yo u wou ld like to continue using the
funct io ns, you must s tart the engine .
With the engine running
Although electr ica l energy is generated w hile
driv ing, the veh icle battery can d ra in. This can
happe n if litt le ene rgy is generated but much is
used, and the charge level of the vehicle battery
is not optimal.
To resto re t he ba lance of energy, components
that require large amounts of energy are tempo rarily scaled back or sw itched off. Heat ing sys
te ms in pa rticula r r equir e a great deal of e nergy .
I f you notice, fo r example, t hat the seat heati ng*
o r r ear window defogger is not wor king, then it
h as been tempor arily reduce d or switched off.
These sys tems are avai lab le aga in as soon as t he
energy supp ly has been restored.
I n add it ion, yo u may notice tha t the idle speed
h as slig htly incre ase d. Tha t is normal and no
ca use for concer n. By in creasing the idling spee d,
the addit io na l required energy will be gene rated
and t he vehicle battery w ill be charged.
Page 158 of 403
Multi Media Interface
Switching the MMI on /off : the M MI can be
switched on/off manua lly.
- Switching on manu ally : press the On/Off knob
@ c> fig. 159 briefly . Or: press the I MENU ! but
ton ®
c> page 155 , fig. 157 or c> page 155,
fig . 158,
or one of the buttons to open the me
nus d irectly @.
-Switching off manually : press and hold the
On/Off knob
@ c> fig. 159 until the MMI
switches
off. If the MMI has bee n switched off
manually, it does not switch on again au tomati
ca lly the next time the ignit io n is switched on .
Additional functions :
- Adjusting the volume :
tu rn the On/Off k nob @
.:>fig. 159.
-Muting : press the O n/Off knob @.:> fig. 159
briefly.
-Selecting the previou s/next function (for ex
ample, a radio stat ion /tra ck ):
press the On/Off
kn ob @ .:> fig. 159 briefly toward the le ft l«l or
rightt>C>I .
-Fast forwarding /re winding (for example
song s):
p ress and hold the On/ Off knob @
c> fig. 159 toward the left l«l or right t>C>I.
A WARNING
Adjust the volume of t he a udi o system so that
signa ls from outside t he ve hicle, such as po
lice and fire sirens, can be heard easily at all
times .
@ Tips
The MMI sw itches off automatically if the en
gine is not r unning and the vehicle battery is
low .
Infotainment system
display
Switching on and off
- Switching on and off manually :
press the roJ
button @ c> page 8, fig. 2.
When the M MI i s switched o n and the disp lay is
sw itched off, you can operate certa in f unct io ns
using the On/Off knob with t he M MI joystick
function
.:> page 155.
156
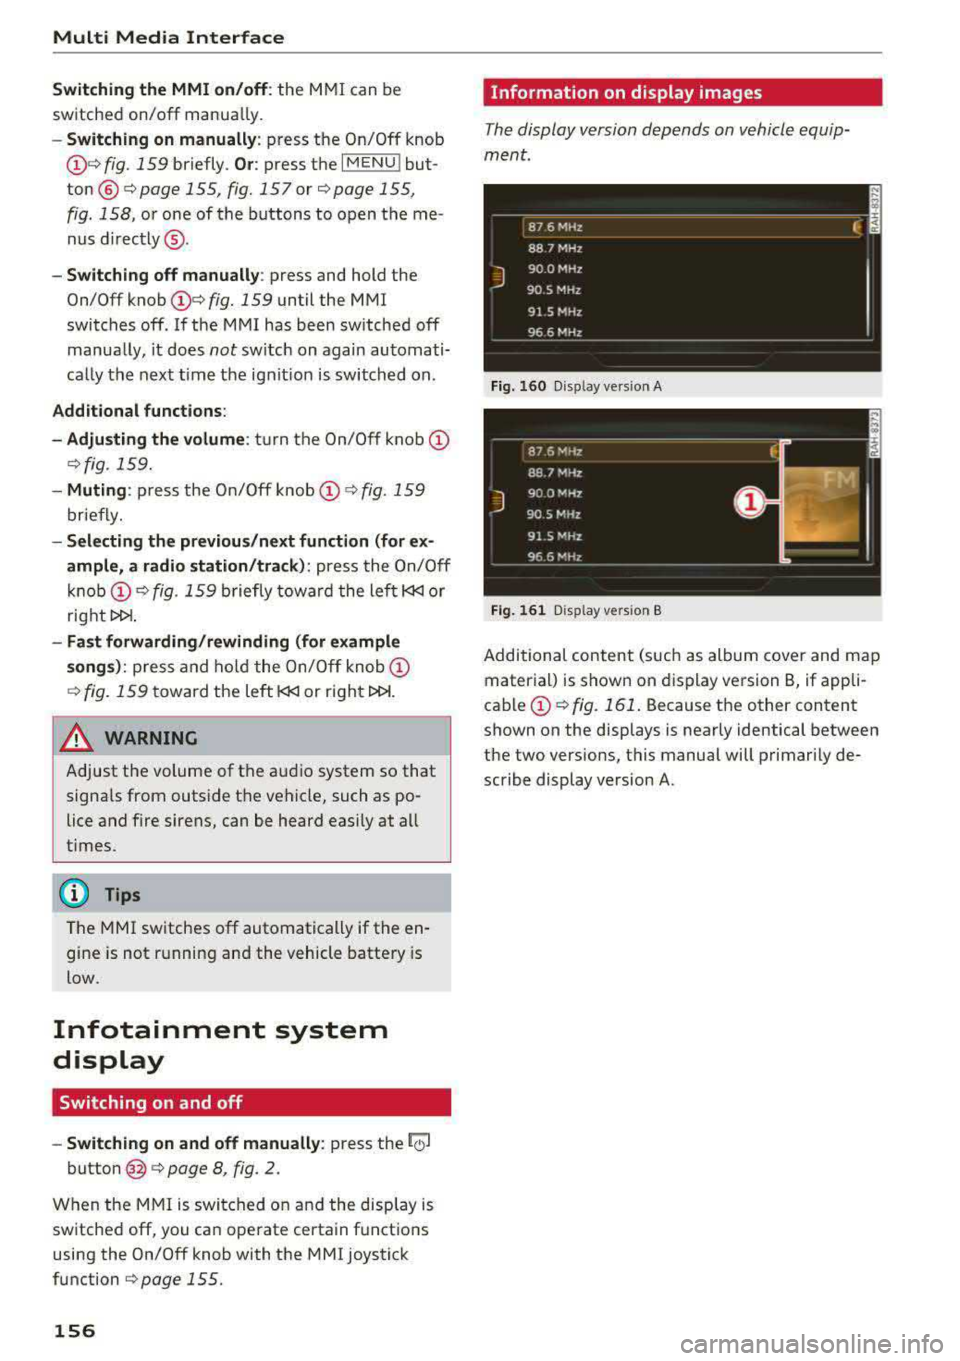
Information on display images
The display version depends on vehicle equip
ment .
Fig. 16 0 Disp lay ve rs ion A
F ig. 161 Disp lay ve rs ion B
Additional content (such as album cover and map
mater ial) is shown on display ve rsion
B, if appli
cable@.:> fig. 161 . Because the other content
shown on the displays is nearly identical between
the two vers ions, this manual will p rimari ly de
scribe display version A .
Page 159 of 403
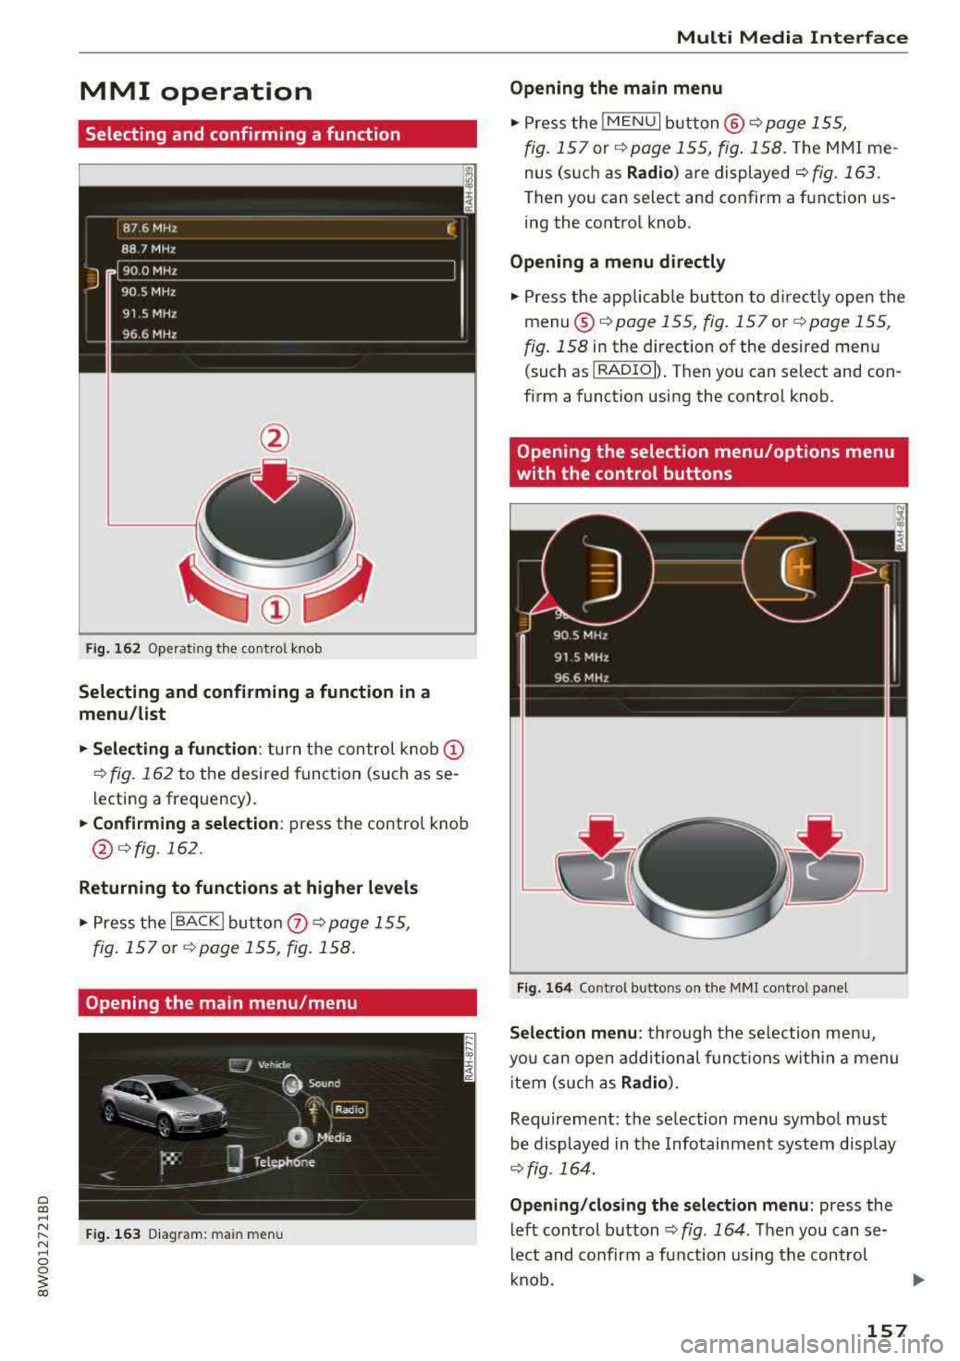
MMI operation
Selecting and confirming a function
Fig. 16 2 Operat ing t he cont ro l knob
Selecting and confirming a function in a
menu /list
.,. Selecting a function : turn the control k no b(!)
¢ fig. 162 to the desired function (such as se
l ecting a frequ ency) .
.,. Confirming a selection : press the control knob
@ r::!vfig.162 .
Returning to functions at higher levels
.,. Press the I BACK I bu tto n 0 ¢ page 155,
fig . 157
or r::!v page 155, fig. 158 .
Opening the main menu/menu
Fig. 163 D ia gram: main m en u
Multi Media Interface
Opening the main menu
.,. Press the I MEN u I b utt on @ ¢ page 155,
fig . 157
or ¢ page 155, fig . 158 . The MMI me
nus (s uch as
Radio ) are displayed ¢ fig. 163.
Then yo u can sel ect and confirm a f unction us
ing the contro l knob .
Opening a menu directly
.,. Press the applicab le bu tto n t o d irec tly open the
menu ®¢ pag e 155, fig . 157 o r c;> pag e 155 ,
fig . 158
in the direction of the desired me nu
( such as
I RADIO I) . T hen you can s ele ct and con
firm a funct ion using the contro l knob .
Opening the selection menu/options menu
with the control buttons
Fig . 164 Co ntro l b utto ns on t he MM I co ntr ol p an el
Selection menu : thr ough the s election men u,
yo u can open additional funct ions wit hin a menu
item (s uch as
Radio) .
Requireme nt: the se lection menu symbo l must
b e display ed in the Info tainmen t system disp lay
¢ fig . 164.
Opening /closing the selection menu : press the
left cont rol button
¢ fig . 164 . Then you can se
lect and confirm a function us ing the con trol
k nob.
157
Page 160 of 403
Multi Media Interface
Option s menu :
using the opt ions menu, you can
select and conf irm context-dependent functions
as well as sett ings within a menu item (such as
Rad io ).
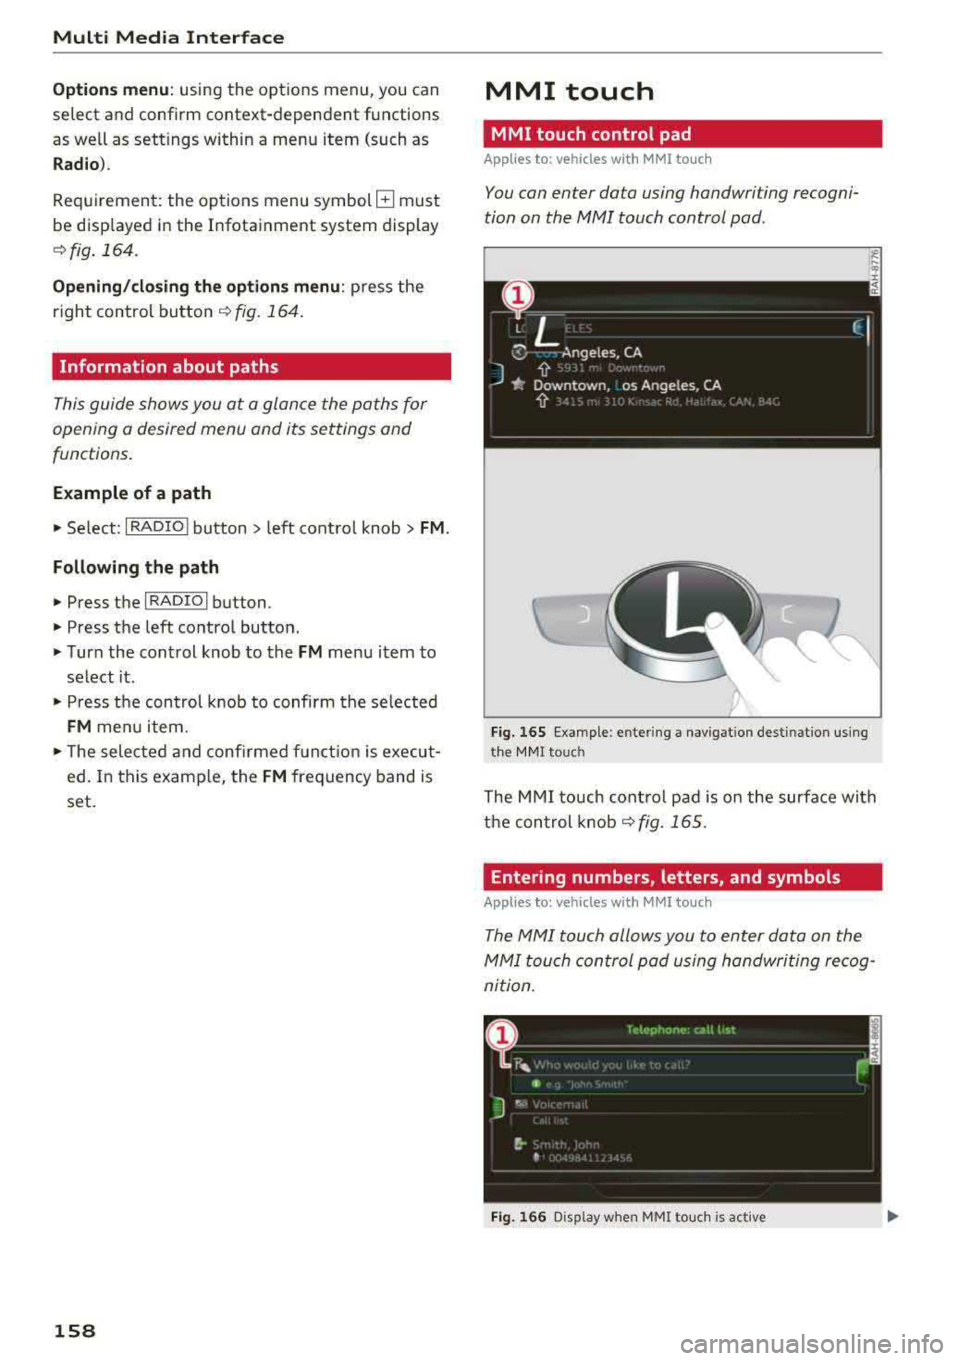
R eq uiremen t: the options menu symbol B must
be disp layed i n the I nfotainment system display
¢ fig . 164.
Opening /clo sing the option s menu : press the
right control button
~ fig. 164.
Information about paths
This guide sho ws you at a glan ce the paths for
opening a desired menu and its settings and
functions.
Example of a path
• Se lect : IRADIO I button> left cont rol knob> FM.
Following the path
• Press the I RADIO I button .
• Press the left co ntro l button.
• Turn the control knob to the FM menu item to
select it .
• Press the con trol knob to confirm the se lected
FM menu item.
• The selec ted and confirmed f un cti on is execu t
ed. In this example, the FM frequency band is
set .
158
MMI touch
MMI touch control pad
Applies to: vehicles with MMI touch
You can enter data using handwriting recogni
tion on the
MMI touch control pad.
Fi g. 16 5 E xamp le : en te ring a navigat ion dest inat ion us ing
t h e MM I touch
The M MI touch cont rol pa d is on the surfa ce with
the con trol knob
¢ fig. 165 .
Entering numbers, letters, and symbols
Applies to: vehicles with MMI touch
The MMI touch allows you to enter data on the
MMI touch control pad u sing handwri ting recog
nition .
Fig. 166 D isp lay whe n MMI to uch is active
Page 161 of 403
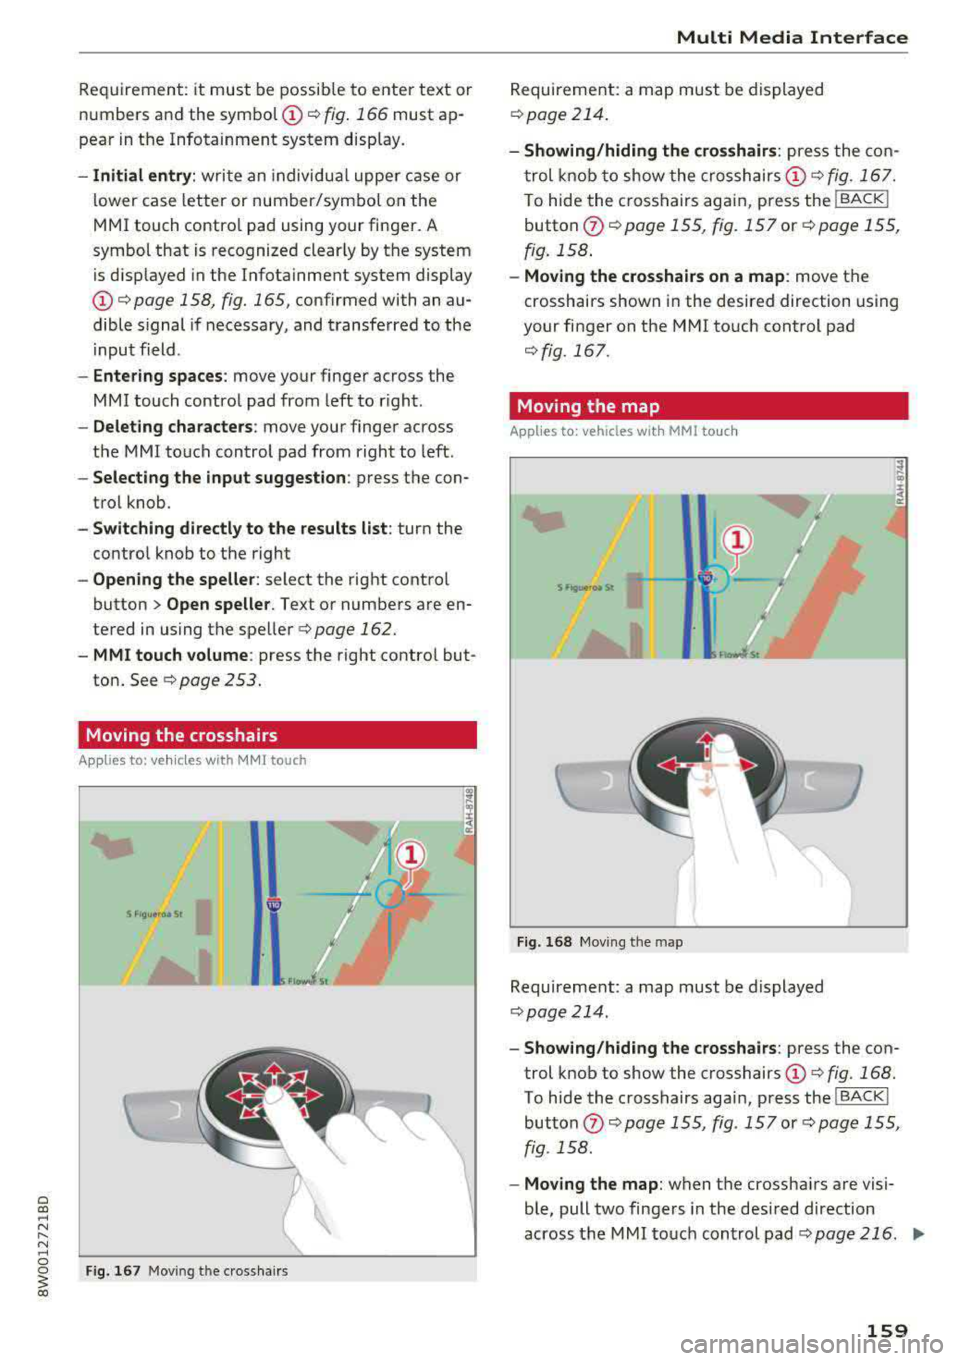
Requirement: it must be possible to enter text or
numbers and the
symbol (!)¢ fig. 166 must ap
pear in the Infotainment system display.
- Initial entry: write an individua l uppe r case or
lower case letter or number/symbol on the
MMI touch contro l pad using your finger.
A
symbol that is recognized clearly by the system
is disp layed in the Infotainment system display
(D ¢ page 158, fig. 165, confirmed with an au
dible s ignal if necessary, and transferred to the
i nput field.
- Entering spaces: move your finger across the
MMI touch control pad from left to right.
-Deleting characters : move your finger across
the MMI touch control pad from right to left.
-Selecting the input suggestion: press the con
trol knob.
- Switching directly to the results list: turn the
control knob to the right
- Opening the speller: select the right control
button
> Open speller. Text or numbers are en
tered in using the speller
¢ page 162.
- MMI touch volume: press the right control but
ton.
See r::;, page 253.
Moving the crosshairs
Appl ies to: ve hicles with MMI touch
Fig . 167 Moving the c rossha irs
Multi Media Interface
Requirement: a map must be displayed
r=>page 214.
-Showing/hiding the crosshairs: press the con
trol knob to show the crosshairs
(D ¢ fig. 167.
To hide the crosshairs again, press the !BACK !
button (J) c:;, page 155, fig. 15 7 or¢ page 155,
fig. 158.
-Moving the crosshairs on a map : move the
crosshairs shown in the desired direction using
your finger on the MMI touch control pad
¢fig. 167.
Moving the map
Applies to : vehicles wi th MMI to uch
Fig. 168 Moving the map
gJ
I
Requirement: a map must be displayed
¢page 214.
- Showing/hiding the crosshairs : press the con
trol knob to show the crosshairs
(D ¢ fig. 168.
To hide the crosshairs aga in, press the !BACK !
button (J) ¢ page 155, fig. 157 or c:;, page 155,
fig . 158.
-Moving the map: when the crossha irs are visi
ble, pull two fingers in the des ired direction
across the MMI touch control pad
r=>page 216 . .,,_
159
Page 163 of 403
a co .... N ,....
N .... 0 0
3 co
Additional functions
Appl ies to: ve hicles with joystick function
Display ing the input field /sw itching to
s p ell er input
Push the contro l knob up ¢page 160, fig. 170 to
reach the beginning of a list in the central area or
the input field. If the input field is a lready open,
switch directly to the speller in the input fie ld by
push ing the control knob up again
¢ page 162,
Letter/number speller.
On the map
Requirement: a map must be disp layed
¢ page 214.
- Di splaying the in put fi eld : push the control
knob up.
- Di spla ying rout e guidan ce : when route guid
ance is active , you can also display the ro ute
guidance by pushing the control knob up
¢ page 209, fig. 191 .
-Zooming in /out on the map (zoom ): turn the
contro l knob to the right/ left to zoom in/out on
the map.
A ppl ies to: ve hicles witho ut MMI touch with joystick functi on
- Showing /h iding th e cro ssha irs: press the con
trol knob . The crosshairs are shown on the
map. Press the
I BACK I button to hide the cross
hairs.
- Moving th e cro sshair s: when the crosshairs are
visible, turn the cont rol knob in the d irection
the crossha irs shou ld move. Press the contro l
knob and ho ld i t unti l the crossha irs are in the
desired po int on the map.
- Additional option s on the map : see
¢page 215
Adjusting the sound focus
Appl ies to: ve hicles witho ut MM I touch with joystick fun ction
Requirement: the ba la nce/fader funct ion must
be selected
¢ page 252.
- Mo ving the sound focus using the cro sshai rs :
the crossha irs can be moved horizontally. Turn
the control knob to the left or to the r ight .
Press the control knob to move the crosshai rs
vertically. Turn the contro l knob to the left o r
to the right. Press the con trol knob aga in to
save the setting.
Multi Media Interfac e
Using the DVD main menu
Requirement: a DVD must be playing
¢
page 236 . The DVD main menu is shown.
-Selecting a menu item : move the contro l knob
w it h joys tic k function up or down o r to t he left
or r ight.
- Confirming a s election : press the cont rol knob.
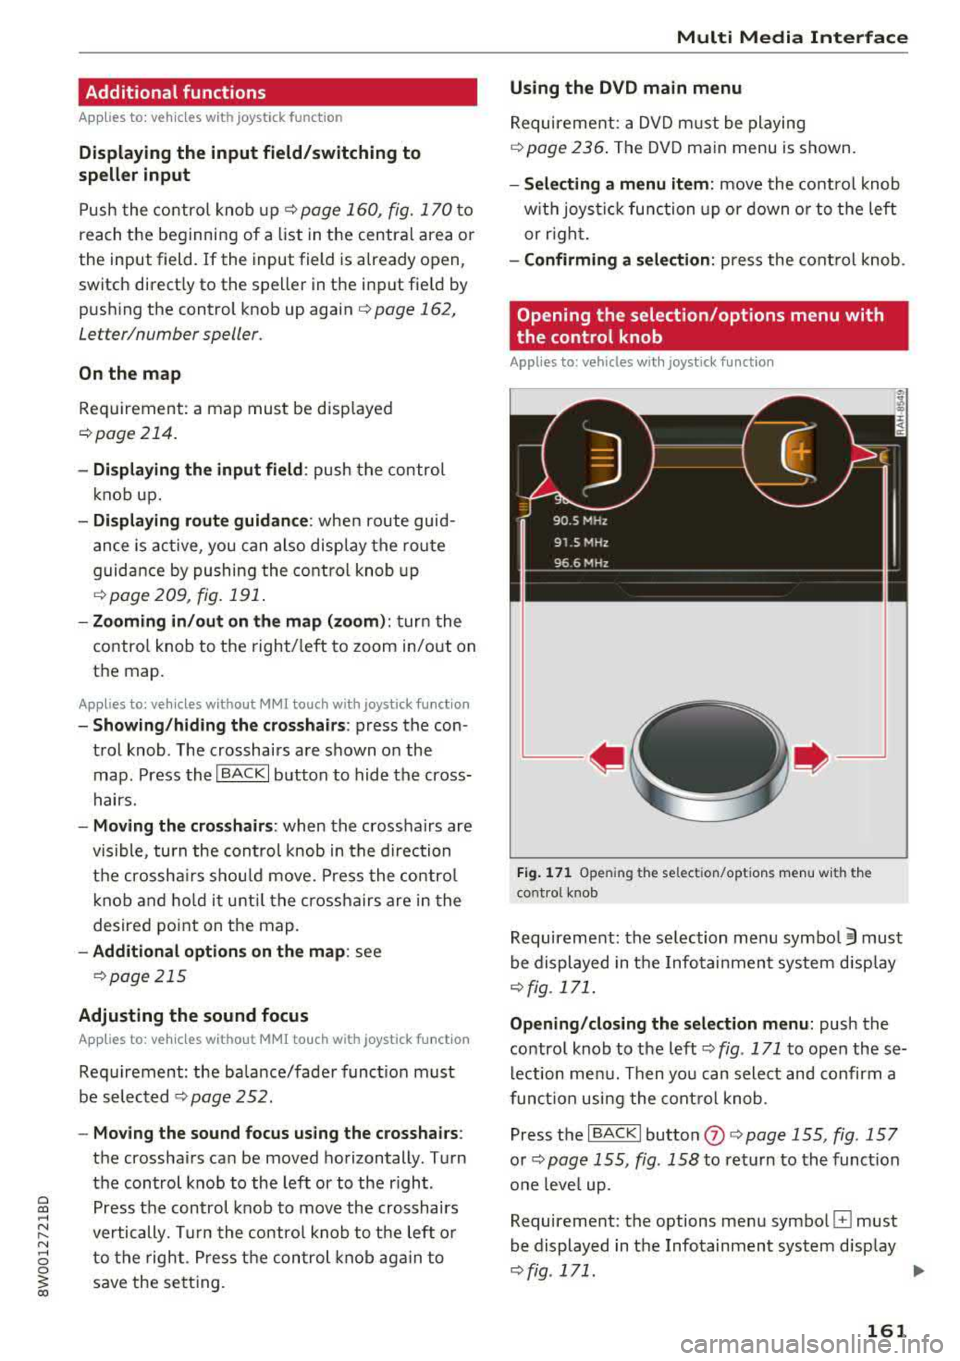
Opening the selection/options menu with
the control knob
Appl ies to : vehicles wi th joys tick fun ctio n
Fig . 17 1 Ope ning the select ion/opt ions menu with the
cont ro l knob
Requirement: the selection menu symbo l 3 must
be displayed in the Infotainment system d isp lay
¢fig. 171.
Opening /closing the sel ect ion m enu: push the
contro l knob to the
left ¢ fig. 171 to open these
lection me nu. Then you can select and confirm a
funct ion usi ng the cont rol knob.
Press the
I BACK I button (J) ¢ page 155, fig. 15 7
or ~ page 155, fig . 158 to ret urn to the funct ion
one leve l up.
Requirement: the options menu symbo l
G must
be displayed in the Infotainment system display
~ fig . 171. ...
161
Page 164 of 403
Multi Media Interface
Opening /closing the opti on s menu : push the
control knob to the rig ht
r=> fig. 171 to open the
options menu. Then you can se lect and confirm a
function using the control knob.
Press the
! BACK I button (J) r=:> page 155, fig . 157
or r=:> page 155 , fig. 158 to return to the function
one level up .
Shortcut keys
Frequently used radio stations can be stored on
the shortcut keys.
A pp lies to : ve hicles w ith a uto mat ic t ra nsmi ssio ns
T he s ho rtcu t keys a re loc ated on the M MI co ntrol
p a nel @
c> page 155, fig. 15 7.
A pp lies to: ve hicles w ith manu al transmiss ion
The shortcut keys are located on the center con
sole @r=> page 155, fig. 158.
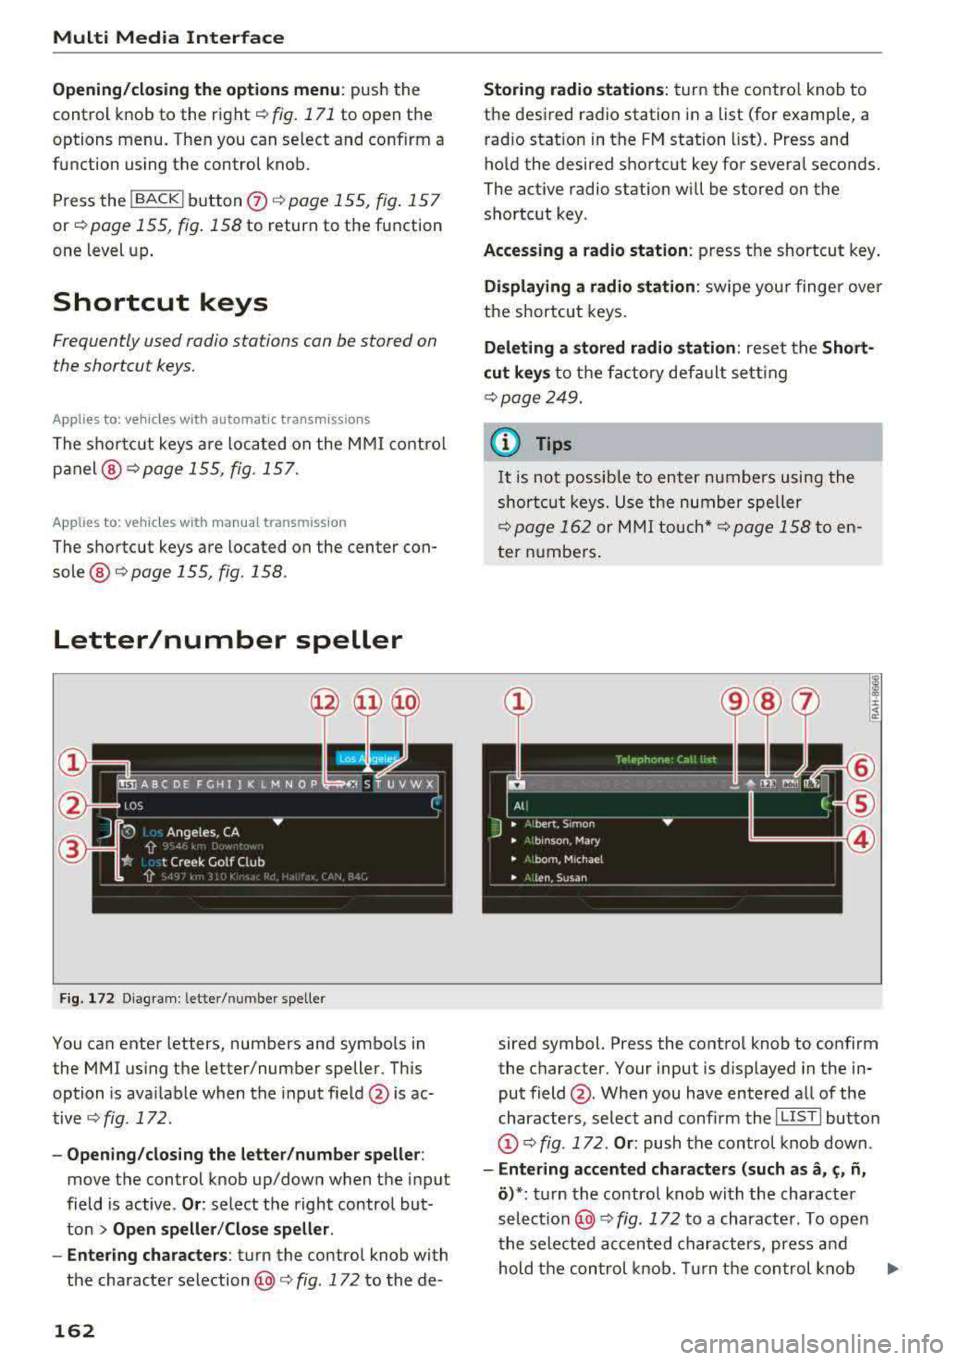
Letter/number speller
Fig . 172 D ia gram: letter/ numbe r spe ller
You can enter letters, numbers and symbo ls in
the
MMI us ing the letter/number speller. Th is
option is ava ilable when t he input field
@ is ac
tive <=>
fig. 172.
-Opening/clos ing the letter /number speller :
move the control knob up/down when the input
field is active .
Or: select t he right control but·
ton
> Open speller /Close speller .
-Entering characters : turn the control knob with
the character
selection @c> fig. 172 to the de -
162
Storing radio st ation s: turn the contro l knob to
the desired radio station i n a list (for examp le, a
rad io station in the FM station list). Press and
hold the desired shortcut key for several seconds.
The act ive radio station w ill be stored on the
sho rtc ut key .
Accessing a radio station : press the shortcut key .
Displaying a radio station : swipe you r finge r over
the shortcut keys.
Deleting a stored radio station : reset the Short·
cut keys
t o t he fa ctory default se tt ing
r=:> page 249.
{!) Tips
It
is no t possible to enter numbers using the
s h or tcut keys. U se the number spe ller
c>page 162 or MM I touch* c>page 158 to en
ter numbers .
sired symbol. Press the control knob to confirm
the character. Your input is displayed in the in
put field @. When you have entered a ll of the
characters, select and confirm the
I L ISTI butto n
@r=> fig . 172 . Or: push the control knob down .
-Entering accented characters (such as a, ~. ii,
o )*: tu rn the control knob with the characte r
se lec tio n @ c=> fig. 172 to a character. To open
the selected accen ted char acters, press an d
hold the con trol knob. Turn the con trol knob
Ill-