AUDI A4 AVANT 2008 Owners Manual
Manufacturer: AUDI, Model Year: 2008, Model line: A4 AVANT, Model: AUDI A4 AVANT 2008Pages: 368, PDF Size: 46.19 MB
Page 101 of 368
App lies to vehic les: wit h powe r seats
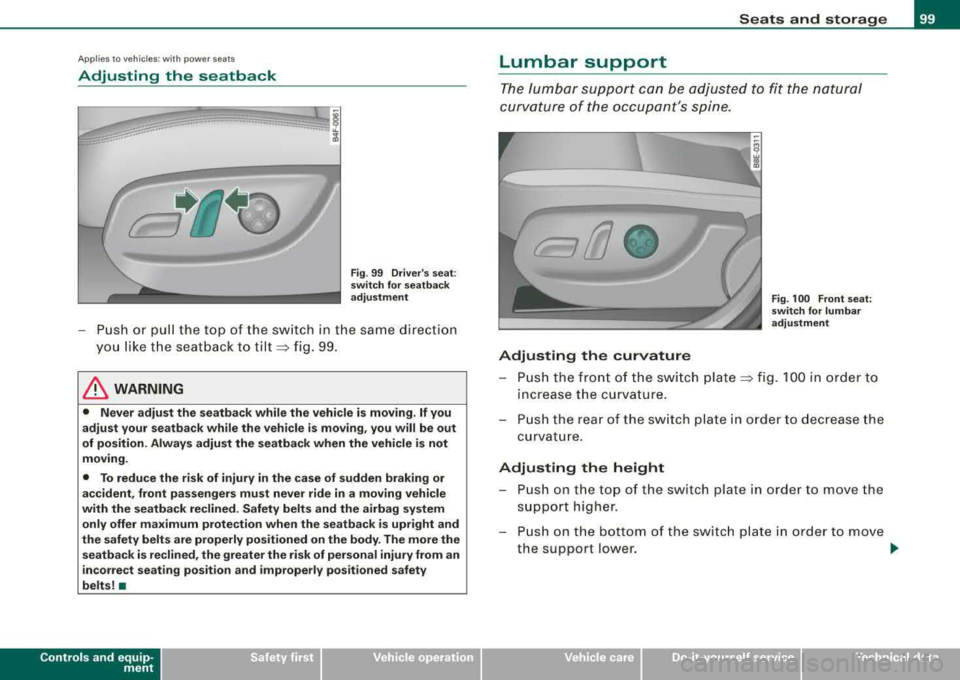
Adjusting the seatback
Fig . 99 Driver 's seat :
switch for seatback
adjustment
- Push or pull the top of the switch in the same direction
you like the seatback to
tilt~ fig. 99.
& WARNING
• Never adjust the seatback while the vehicle is moving. If you
adjust your seatback while the vehicle is moving, you will be out
of position. Always adjust the seatback when the vehicle is not
moving.
• To reduce the risk of injury in the case of sudden braking or
accident, front passengers must never ride in a moving vehicle
with the seatback reclined. Safety belts and the airbag system
only offer maximum protection when the seatback is upright and
the safety belts are properly positioned on the body. The more the
seatback is reclined, the greater the risk of personal injury from an
incorrect seating position and improperly positioned safety
belts! •
Controls and equip
ment
Seats and storage
Lumbar support
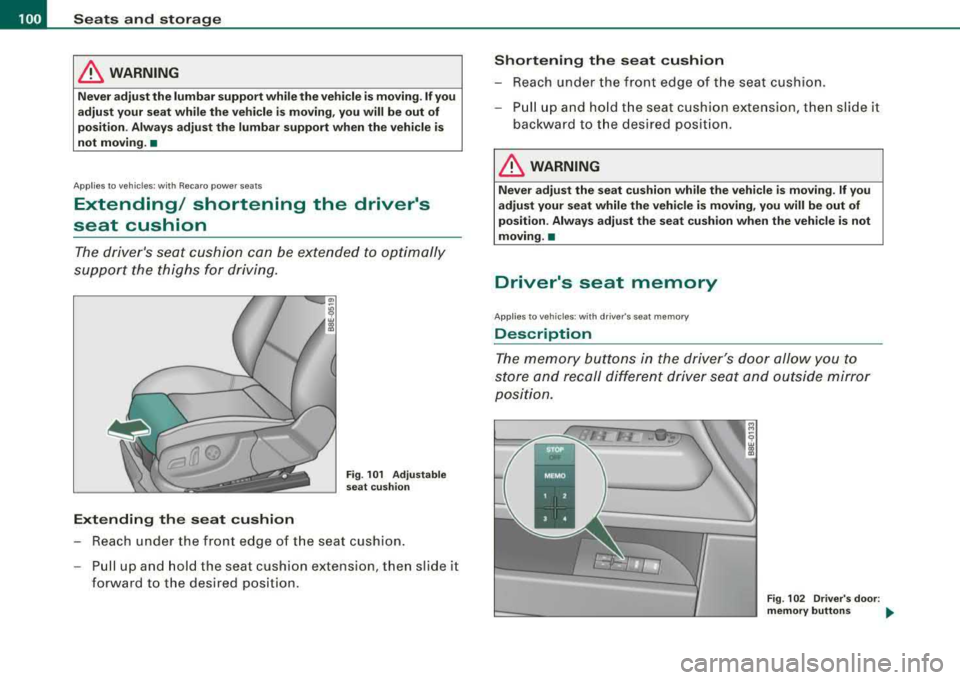
The lumbar support can be adjusted to fit the natural
curvature of the occupant's spine.
Adjusting the curvature
Fig . 100 Front seat:
switch for lumbar
adjustment
- Push the front of the switch plate ~ fig. 100 in order to
i nc rease the curvature.
- Push the rear of the switch plate in order to decrease the
curvature.
Adjusting the height
- Push on the top of th e sw itch plate in o rder to move the
support h igher.
- Push on the bottom of the sw itch plate in order to move
the support lower.
..,_
irechnical data
Page 102 of 368
___ S_ e_a _t_ s _ a_n_ d
__ s _t _o _r_a ..: g=-- e ________________________________________________ _
& WARNING
Never adjust the lumbar support while the vehicle is moving. If you
adjust your seat while the vehicle is moving, you will be out of
position. Always adjust the lumbar support when the vehicle is
not moving .•
App lies to vehic les: w ith Recaro power seats
Extending / shortening the driver's
seat cushion
The driver's seat cushion can be extended to optimally
support the thighs for driving.
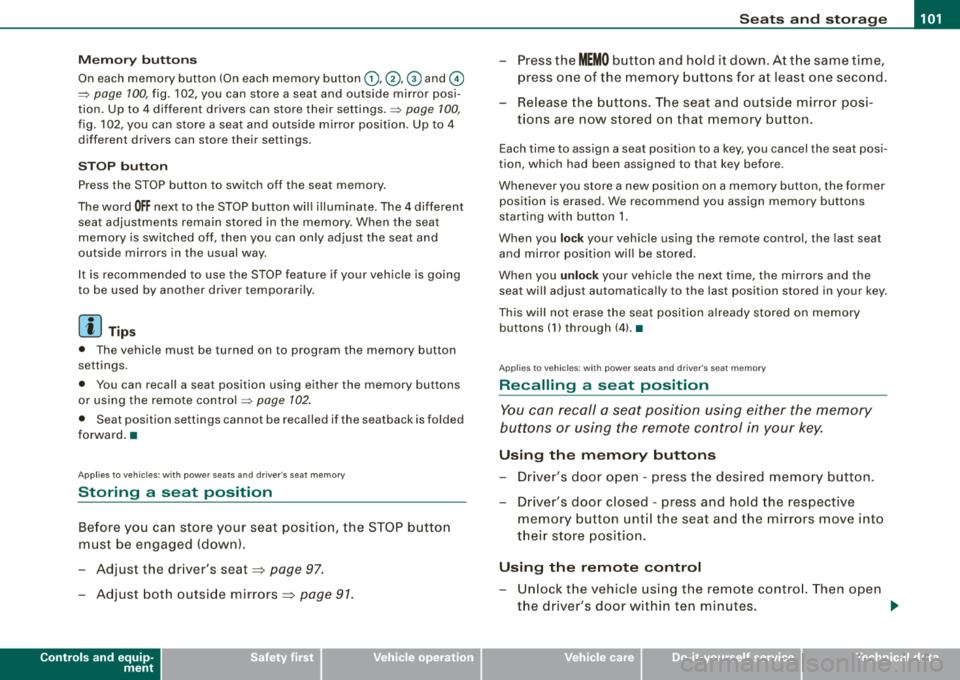
Extending the seat cushion
Fig . 101 Adjustable
seat cushion
- Reach under the front edge of the seat cushion.
- Pull up and hold the seat cushion extension, then slide it
forward to the desired position .
Shortening the seat cushion
-Reach under the front edge of the seat cushion.
- Pull up and hold the seat cushion extension, then slide it
backward to the desired position.
& WARNING
Never adjust the seat cushion while the vehicle is moving . If you
adjust your seat while the vehicle is moving, you will be out of
position . Always adjust the seat cushion when the vehicle is not
moving. •
Driver's seat memory
Applies to vehicles: wi th dri ver's seat memory
Des cription
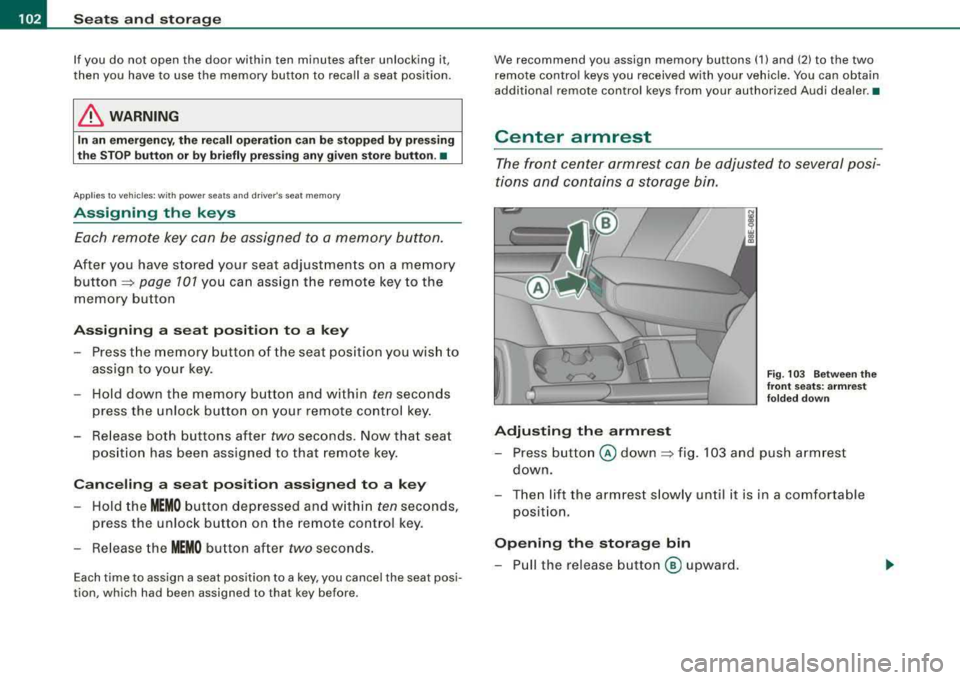
The memory buttons in the driver's door allow you to
store and recall different driver seat and outside mirror
position.
Fig . 102 Driver 's door :
memory buttons
~
Page 103 of 368
________________________________________________ S_ e_ a
_ t_
s _a_ n_d _ s_t _o _ r_ a_ g~ e __ ffllll
Memory buttons
On each memory button (On each memory button G) ,@ , G) and ©
=> page 100, fig. 102 , you can sto re a sea t and outside mirror posi
tion . Up to 4 different drivers can store their
settings .=> page 100,
fig. 102 , you can sto re a seat and outside mirro r position . Up to 4
d iffer ent driv ers can stor e their s ettings .
ST OP b utton
Press the STOP button to switch off the seat memory.
The word
OFF next to the STOP button wi ll illuminate. The 4 different
sea t adjust ments remain stored in th e memory . When the s eat
memory is switched off, then you can only adjust the seat and
outsid e mirrors in th e usual way .
It is recommended to use the STOP feature if your vehicle is going
to be used by another driver temporarily .
[ i ] Ti ps
• The vehicle must be turned on to p rogram the memory button
settings .
• You can recall a seat posi tion using either the memory bu ttons
or using the remote contro l
=> page 102.
• Seat position settings cannot be re ca lled if the s eat back is folded
forward. •
Applies t o vehi cle s: w ith po wer seats and driver's seat memory
Storing a seat position
Before you can store your seat position, the S TOP button
must be engaged (down) .
-Adjust the driver 's seat => page 97 .
Adjust both outside mirrors=> page 91.
Controls and equip
ment
-Press the MEMO button and hold it down. A t th e same time,
press one of the memory buttons for at least one seco nd.
-Re lease the buttons . The seat and outside mirror pos i-
t ions are now stored on that memory button.
Each time to assign a sea t position to a key , you ca ncel the seat posi
t ion, wh ich had be en assigned to that key befor e.
Whenever you store a new pos it ion on a memory button, the former
position is erased. W e recommend you assign m emory buttons
starting with button 1.
When you
l ock your vehicle using the remote control, the las t seat
and mirror position wil l be stored.
When you
unl ock your vehic le the next t ime, the mirrors and the
seat wi ll adjust automat ica lly to the last pos ition stor ed in your k ey .
This wil l not erase the seat posi tion a lready stored on memory
buttons (1) th rough (4).
•
App lies to veh ic les: w ith power seats and d river 's se at memory
Recalling a seat position
You can recall a seat position using either the memory
buttons or using the remote control in your key.
Usin g th e memory buttons
-Driver's door open -press the desired memo ry button.
-Driver's door c losed -press and hold the respective
memory button unt il the seat and the m irrors move into
t h eir store posi tion .
U sing th e remote control
-Un lock the vehicle using the remote contro l. Then open
the driver's door w ithin ten minutes . .,._
Page 104 of 368
___ S_ e
_ a_t_s _ a_n_ d
__ s _t _o _r_a ...::g==---- e ________________________________________________ _
If you do not open the door within ten minutes after unlocking it,
then you have to use the memory button to recall a seat position.
& WARNING
In an emergency, the recall operation can be stopped by pressing
the STOP button or by briefly pressing any given store button . •
App lies to vehicles: with power seats and driver's seat memory
Assigning the keys
Each remote key can be assigned to a memory button.
After you have stored your seat adjustments on a memory
button~ page 101 you can assign the remote key to the
memory button
Assigning a seat position to a key
- Press the memory button of the seat position you wish to
assign to your key.
- Hold down the memory button and within
ten seconds
press the unlock button on your remote control key.
- Release both buttons after
two seconds . Now that seat
position has been assigned to that remote key.
Canceling a seat position assigned to a key
-Hold the MEMO button depressed and within ten seconds,
press the unlock button on the remote control key.
- Release the
MEMO button after two seconds.
Each time to assign a seat position to a key, you cancel the seat posi
tion, which had been assigned to that key before. We recommend you assign
memory buttons (1) and (2) to the two
remote control keys you received with your vehicle. You can obtain
additional remote control keys from your authorized Audi dealer. •
Center armrest
The front center armrest can be adjusted to several posi
tions and contains a storage bin.
Adjusting the armrest
Fig. 103 Between the
front seats: armrest
folded down
- Press button @ down ~ fig. 103 and push armrest
down.
- Then lift the armrest slowly until it is in a comfortable
position.
Opening the storage bin
- Pull the release button ® upward.
Page 105 of 368
__________________________________________________ s_ e_ a_t _s _ a_n _ d_ s_ t
_ o_ r_a ""'g :o.. e _ __.l9I
& WARNING
When folded down, the armrest can restrict the driver's move
ment. When driving in conditions that may call for quick maneu
vers, fold up the armrest . This will allow you to react more quickly
to avoid an accident.
[ i] Tips
The storage area in the center armrest may be equipped with a tele
phone base plate to house a phone cradle. Ask your authorized Audi
dealer if you have questions. •
Rear seats
General information
Safe transportation of passengers on the rear seats
requires proper safety precautions.
All passengers on the rear seats must be seated in compliance with
the safety guidelines explained
in=> page 176 and => page 187. The
correct seating position is safety critical for front
and rear seat
passengers
alike => page 170.
& WARNING
• Vehicle occupants in the front and rear seats must always be
properly restrained .
• Do not let anyone ride in the vehicle without the head restraints
provided . Head restraints help reduce injuries .
• Loose items inside the passenger compartment, can fly
forward in a crash or sudden maneuver and injure occupants.
Always store articles in the luggage compartment and use the
fastening eyes, especially when the rear seat backs have been
folded down.
Controls and equip
ment
& WARNING (continued)
• Read and heed and all WARNINGS => page 170, "Proper seating
positions for passengers in rear seats". •
Rear armrest
The storage bin inside the armrest contains the first-aid
kit*.
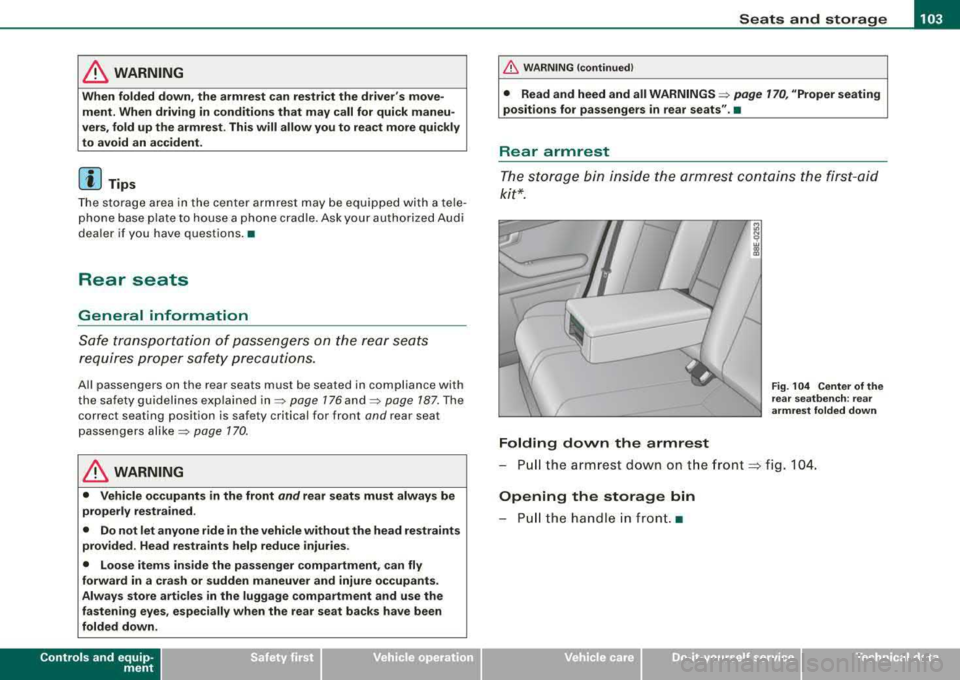
Folding down the armrest
Fig . 104 Center of the
rear seatbench: rear
armrest folded down
-Pull the armrest down on the front ~ fig. 104.
Opening the storage bin
-Pull the handle in front. •
irechnical data
Page 106 of 368
___ S_ e
_ a_t_s _ a_n_ d
__ s _t _o _r_a ...::g==---- e ________________________________________________ _
Folding backrest
You can fold down either or both parts of the rear back
rest.
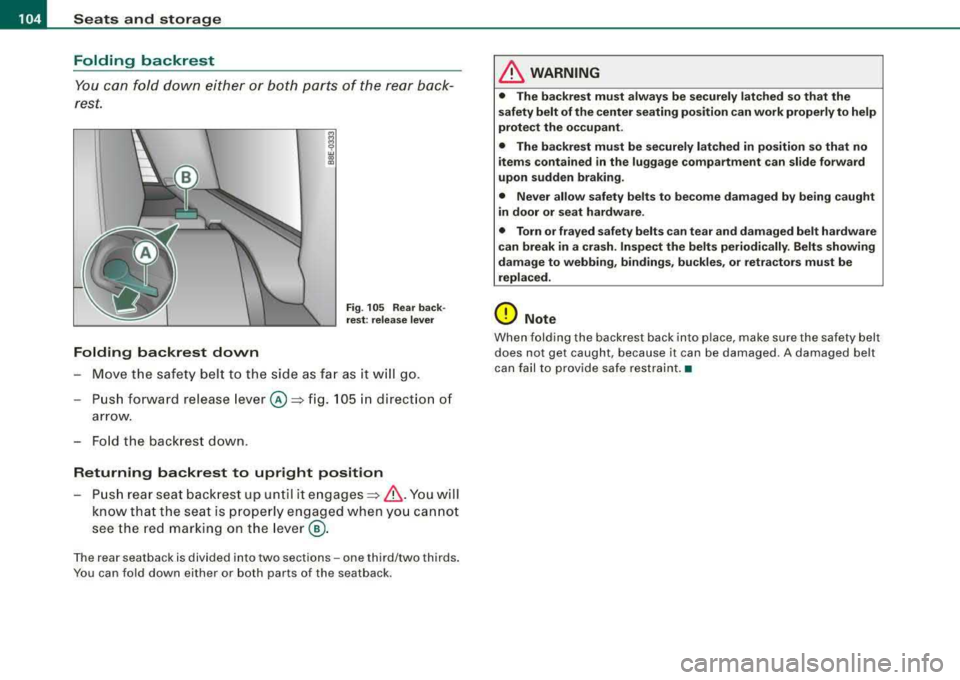
Folding backrest down
Fig . 105 Rear back·
rest: release lever
-Move the safety belt to the side as far as it will go.
- Push forward release
lever @~ fig. 105 in direction of
arrow.
- Fold the backrest down .
Returning backrest to upright position
- Push rear seat backrest up until it
engages ~& . You will
know that the seat is properly engaged when you cannot
see the red marking on the lever@.
The rear seatback is divided into two sections -one third/two thirds.
You can fold down either or both parts of the seatback .
& WARNING
• The backrest must always be securely latched so that the
safety belt of the center seating position can work properly to help
protect the occupant.
• The backrest must be securely latched in position so that no
items contained in the luggage compartment can slide forward
upon sudden braking.
• Never allow safety belts to become damaged by being caught
in door or seat hardware.
• Torn or frayed safety belts can tear and damaged belt hardware
can break in a crash. Inspect the belts periodically. Belts showing
damage to webbing, bindings, buckles, or retractors must be
replaced.
0 Note
When folding the backrest back into place, make sure the safety belt
does not get caught, because it can be damaged . A damaged belt
can fail to provide safe restraint. •
Page 107 of 368
________________________________________________ s_ e_ a __ ts __ a_ n_d -- s..:t ..:o ..:r..: a;;..: g::!....:. e_--11111
Head restraints
Adjusting head restraints , front seats
The head restraints must be adjusted properly to provide
protection.
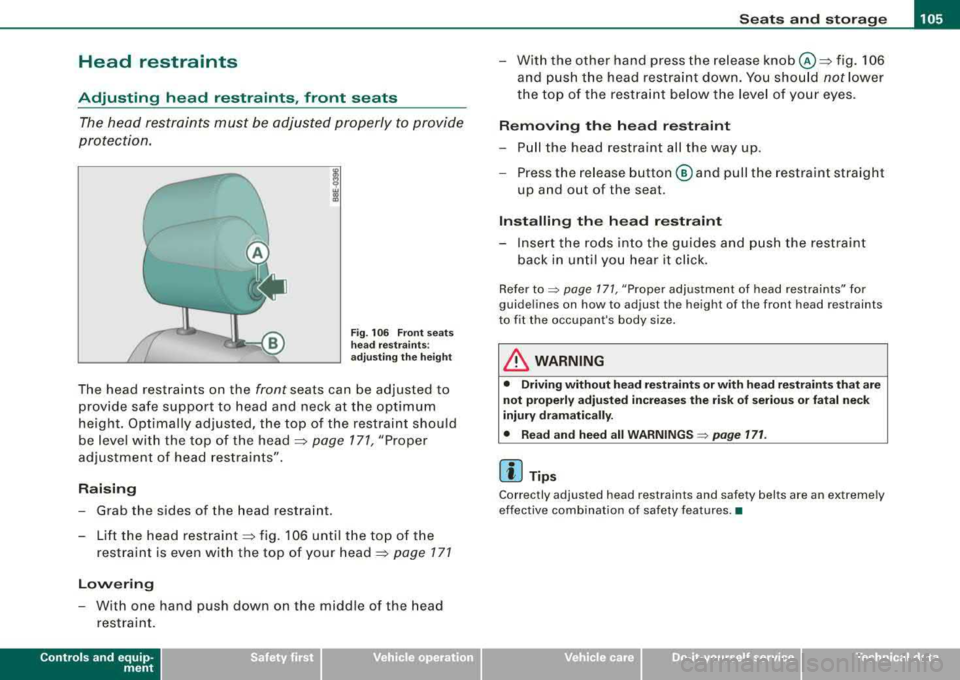
Fig. 106 Front seats
head restraints :
adjusting the height
The head restraints on the front seats can be adjusted to
provide safe support to head and neck at the optimum
height. Optimally adjusted, the top of the restraint should
be level with the top of the head
=> page 171, "Proper
adjustment of head restraints".
Raising
- Grab the sides of the head restraint.
- Lift the head
restraint => fig. 106 until the top of the
restraint is even with the top of your
head=> page 171
Lowering
- With one hand push down on the middle of the head
restraint.
Controls and equip
ment
- With the other hand press the release knob@=> fig. 106
and push the head restraint down. You should
not lower
the top of the restraint below the level of your eyes.
Removing the head restraint
-Pull the head restraint all the way up.
- Press the release button @ and pull the restraint straight
up and out of the seat.
Installing the head restraint
- Insert the rods into the guides and push the restraint
back in until you hear it click.
Refer to::::> page 171, "Proper adjustment of head restraints" for
guidelines on how to adjust the height of the front h ead restraints
to fit the occupant's body size.
& WARNING
• Driving without head restraints or with head restraints that are
not properly adjusted increases the risk of serious or fatal neck
injury dramatically.
• Read and heed all
WARNINGS => page 171.
[ i] Tips
Correctly adjusted head restraints and safety belts are an extremely
effective combination of safety features .•
irechnical data
Page 108 of 368
___ S_ e
_ a_t_s _ a_n_ d
__ s _t _o _r_a ...::g==---- e ________________________________________________ _
Rear head restraints (outer seating positions)
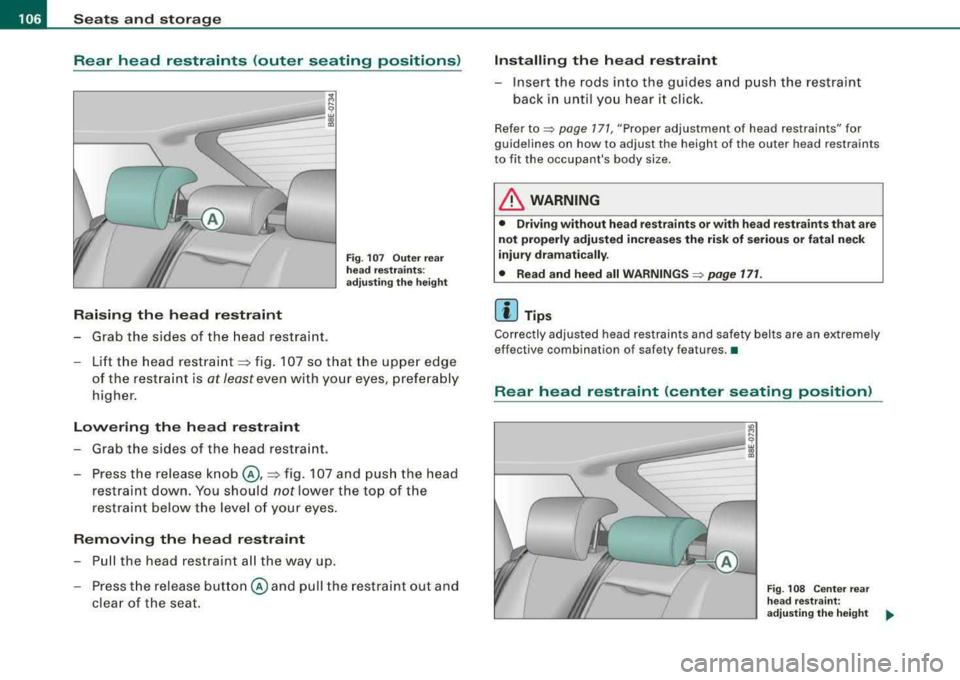
Raising the head restraint
-Grab the sides of the head restraint.
Fig. 107 Outer rear
head restraints :
adjusting the height
-Lift the head restraint => fig. 107 so that the upper edge
of the restraint is
at least even with your eyes, preferably
higher.
Lowering the head restraint
Grab the sides of the head restraint.
Press the release knob @,
=> fig. 107 and push the head
restraint down. You should
not lower the top of the
restraint below the level of your eyes.
Removing the head restraint
-Pull the head restraint all the way up.
-Press the release button @and pull the restraint out and
clear of the seat.
Installing the head restraint
- Insert the rods into the guides and push the restraint
back in until you hear it click.
Refer to~ page 171, "Proper adjustment of head restraints" for
guidelines on how to adjust the height of the outer head restraints
to fit the occupant's body size.
& WARNING
• Driving without head restraints or with head restraints that are
not properly adjusted increases the risk of serious or fatal neck
injury dramatically.
• Read and heed all
WARNINGS ~ page 171.
[ i] Tips
Correctly adjusted head restraints and safety belts are an extremely
e ffectiv e combination of safety fea tures .•
Rear head restraint (center seating position)
Fig . 108 Center rear
head restraint:
adjusting the height
~
Page 109 of 368
________________________________________________ S_ e_ a
_ t_
s _a_ n_d _ s_t _o _ r_ a_ g~ e __ ,n
Raising the head restraint
- Grab the sides of the head restraint.
- Lift the head restraint=>
page 106, fig. 108 so that the
upper edge of the restraint is at
least even with your eyes,
or higher.
Lowering the head restraint
- Press the release knob @,::::> page 106, fig. 108 and lower
the head restraints so that the upper edge of the restraint
is
at least even with your eyes, or higher.
Removing the head restraint
-Pull the head restraint all the way up.
- Press the release button @ and remove.
Installing the head restraint
- Insert the rods into the guides and push the restraint
back in until you hear it click.
The height of the center head restraints is adjustable. They should
be adjusted to fit the occupant's body size. Correctly adjusted head
restraints and safety belts are an extremely effective safety feature
=> page 171.
& WARNING
Read and heed all WARNINGS => page 171, "Proper adjustment of
head restraints". •
Controls and equip
ment
Luggage compartment
Increasing size of the luggage compartment
space
Folding the seat back forward increases the space of the
luggage compartment.
You can fold down both parts of the seat back either separately or
together to increase the size of the luggage compartment
=> page 104.
Stowing luggage
Follow instruction => page 173, "Loading the luggage compart
ment".
& WARNING
Always read and heed WARNINGS => & in "Loading the luggage
compartment" on page
173. •
Page 110 of 368
___ S_ e
_ a_t_s _ a_n_ d
__ s _t _o _r_a ...::g==---- e ________________________________________________ _
Fastening eyes
The luggage compartment is equipped with four tie-down
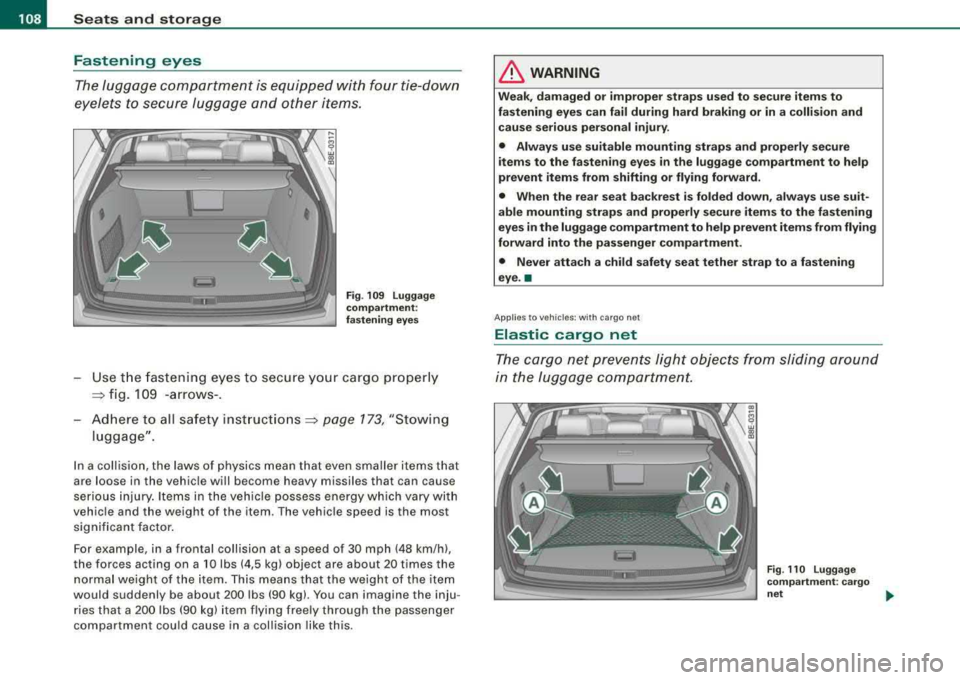
eyelets to secure luggage and other items.
Fig. 109 Luggage
compartment:
fastening eyes
Use the fastening eyes to secure your cargo properly
~ fig. 109 -arrows-.
Adhere to all safety
instructions ~ page 173, "Stowing
luggage".
In a collision, the laws of physics mean that even smaller items that
are loose in the vehicle will become heavy missiles that can cause
serious injury. Items in the vehicle possess energy which vary with
vehicle and the weight of the item . The vehicle speed is the most
significant factor.
For example, in a frontal collision at a speed of 30 mph (48 km/hl,
the forces acting on a 10 lbs (4,5 kg) object are about 20 times the
normal weight of the item. This means that the weight of the item
would suddenly be about 200 lbs (90 kgl. You can imagine the inju
ries that a 200 lbs (90 kg) item flying freely through the passenger
compartment could cause in a collision like this.
& WARNING
Weak, damaged or improper straps used to secure items to
fastening eyes can fail during hard braking or in a collision and cause serious personal injury .
• Always use suitable mounting straps and properly secure
items to the fastening eyes in the luggage compartment to help
prevent items from shifting or flying forward.
• When the rear seat backrest is folded down, always use suit
able mounting straps and properly secure items to the fastening
eyes in the luggage compartment to help prevent items from flying
forward into the passenger compartment.
• Never attach a child safety seat tether strap to a fastening
eye. •
Applies to vehicles : w ith cargo net
Elastic cargo net
The cargo net prevents light objects from sliding around
in the luggage compartment.
Fig . 110 Luggage
compartment: cargo
net .,_