AUDI A5 CABRIOLET 2011 Repair Manual
Manufacturer: AUDI, Model Year: 2011, Model line: A5 CABRIOLET, Model: AUDI A5 CABRIOLET 2011Pages: 364, PDF Size: 86.48 MB
Page 61 of 364
& WARNING
When raising the power top compartment cover, avoid contact
with the supports or other moving parts. Otherwise you could
pinch your hands. •
Step 3: Lifting the power top storage bay
cover out
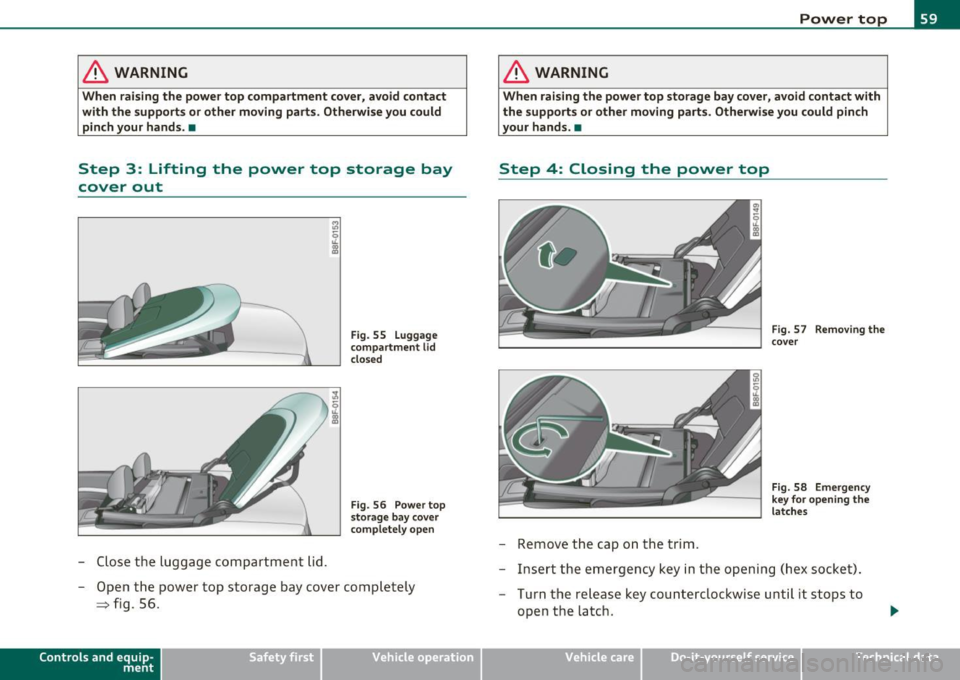
-Close the luggage compartment lid.
Fig . 55 Luggage
compartment lid
closed
Fig. 56 Power top
storage bay cover
completely open
- Open the power top storage bay cover completely
=> fig. 56.
Con tro ls a nd e quip
m en t Vehicle
OP-eration
Power top
& WARNING
When raising the power top storage bay cover, avoid contact with
the supports or other moving parts. Otherwise you could pinch
your hands. •
Step 4: Closing the power top
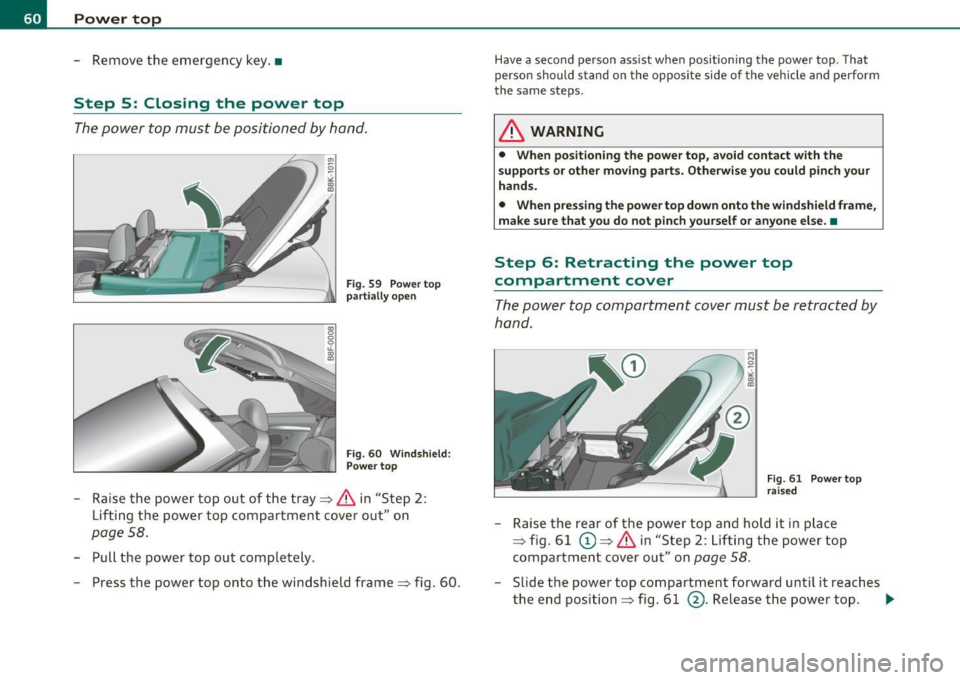
-Remove the cap on the trim.
Fig. 57 Removing the
cover
Fig . 58 Emergency
key for opening the
latches
- Insert the emergency key in the opening (hex socket).
- Turn the release key counterclockwise until it stops to
open the latch .
Vehicle care Do-it-yourselt service iTechnical data
Page 62 of 364
Power top
-Remove the emergency key. •
Step 5: Closing the power top
The power top must be positioned by hand.
Fig. 59 Power top
partially open
Fig . 60 Windshield :
Power top
- Raise the power top out of the tray~ & in "Step 2 :
Lifting the power top compartment cover out" on
page 58.
-Pull the power top out completely .
- Press the power top onto the windshield frame~ fig. 60 .
Have a second person assist when positioning the power top . That
person should stand on the opposite side of the vehicle and perform
the same steps.
& WARNING
• When positioning the power top, avoid contact with the
supports or other moving parts. Otherwise you could pinch your
hands.
• When pressing the power top down onto the windshield frame,
make sure that you do not pinch yourself or anyone else. •
Step 6: Retracting the power top
compartment cover
The power top compartment cover must be retracted by
hand.
~ 0
;i; co a,
Fig. 61 Power top
raised
- Raise the rear of the power top and hold it in place
~ fig. 61 (D ~ & in "Step 2 : Lifting the power top
compartment cover out" on
page 58.
-Slide the power top compartment forward until it reaches
the end position ~ fig. 61
@. Release the power top. .,
Page 63 of 364
& WARNING
Do not pinch yourself or others when closing the power top
compartment. •
Step 7: Locking the power top
The locking system for the power top latches are located
on the inside of the power top.
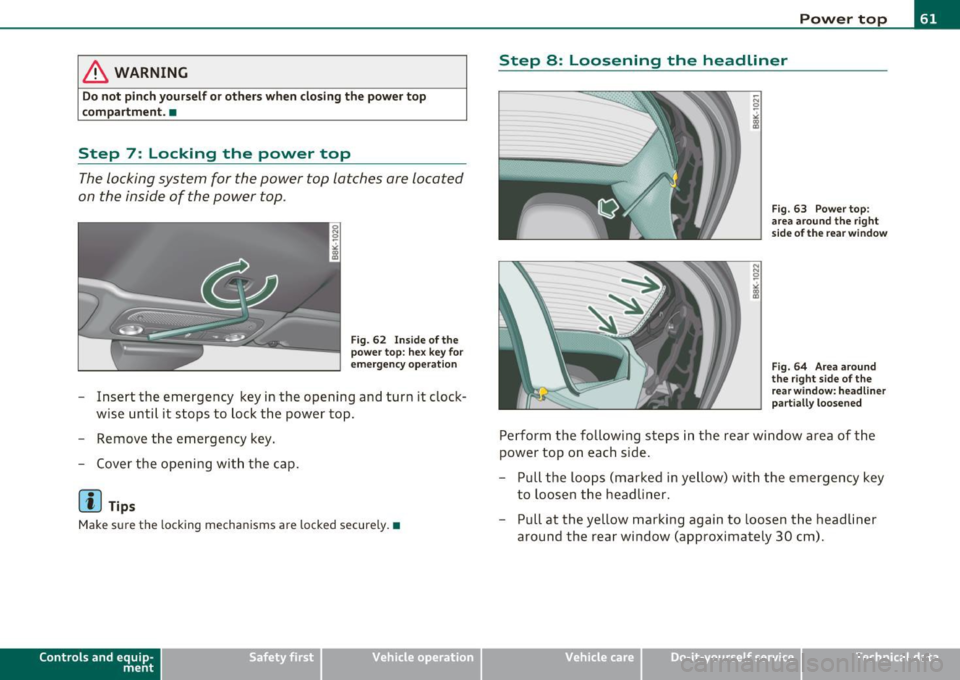
Fig. 62 Inside of the
power top: hex key for
emergency operation
- Insert the emergency key in the opening and turn it clock
wise until it stops to lock the power top.
- Remove the emergency key.
- Cover the opening with the cap.
(J] Tips
Make sure the locking mechanisms are locked securely. •
Contro ls a nd e quip
m en t Vehicle
OP-eration
Power top
Step 8: Loosening the headliner
Fig. 63 Power top:
area around the right
side of the rear window
Fig. 64 Area around
the right side of the
rear window: headliner
partially loosened
Perform the following steps in the rear window area of the
power top on each side.
- Pull the loops (marked in yellow) with the emergency key
to loosen the headliner.
- Pull at the yellow marking again to loosen the headliner
around the rear window (approximately 30 cm).
Vehicle care Do-it-yourselt service iTechnical data
Page 64 of 364
Power top
Step 9: Securing the latch
. . : . . . . .. ·
. . .
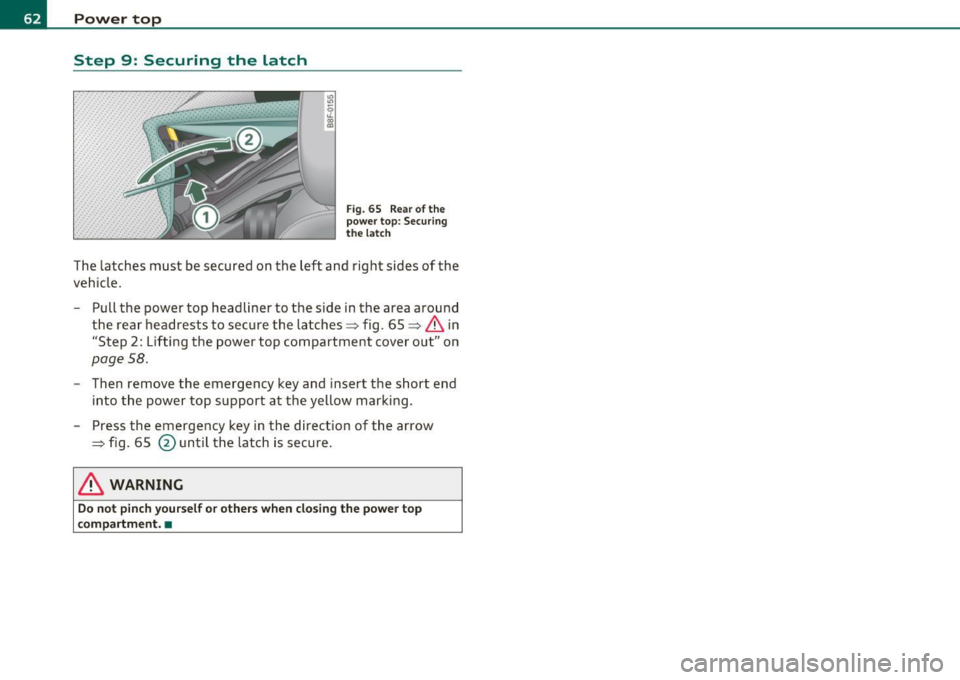
Fig. 65 Rea r of the
powe r top: Securing
t he latc h
The latches must be secured on the left and right sides of the
vehicle.
- Pull the power top headliner to the side in the area around
the rear headrests to secure the latches=> fig. 65 =>
& in
"Step 2: Lift ing the power top compartment cover out" on
page 58.
- Then remove the emergency key and insert the short end
into the power top s upport at the yellow marking.
- Press the emergency key in the d irection of t he arrow
=> fig. 65
@ until t he latch is secure .
& WARNING
Do not pinch y ou rself or other s when clo sing the power top
compartment. •
Page 65 of 364

Clear vision
Lights
Switching the lights on and off ·t!·
0 9
" l8
Fig. 66 Instru ment
pan el: He ad lig ht
con trol swi tc h
Switching on AUTO -Automatic headlight
controls*
- Turn the light switch to AUTO => fig. 66.
Turning on the side marker lights
- Turn the head light control switc h to ~oo~.
Switching on low beams
- Turn the headlight control switch to ;D .
Switching off the lights
- Turn the headlight control switch to 0.
The low beams only illuminate with the ign ition turned o n.
With the side marker lights or headlights switched on, the symbol
next to the light switch illum inates
:oo:c .
Con tro ls a nd e quip
m en t Vehicle
OP-eration
Clear vision
AUTO -Automatic headlight contro l*
With the switch in the AUTO position, the low beams are switched on
au tomatically depending on the ambient light, for examp le in a
tunnel, at dusk and when it is raining or snowing . When the low
beams are sw itched on, the
: oo ~ symbo l comes on. The low beams
remain switched on rega rdless of the ambient light when you turn on
the fog lights.
When you tu rn off the ignition, the low beams are automatically
switched off .
On veh icles with a ra in sensor the head lights sw itch on autom atically
after a few windshield wiper passes . H owever, the instrument
lighting will not be switched on .
With automatic head lig ht control, you also have the high-beam func
tion available . However, if you have not switched high beams back to
low beams wh ile dr iving with au toma tic headlight contro l, o nly the
low beams come on the next t ime you turn on automatic headlight
cont rol. In o rder to return to high beams again, you first have to pull
the high beam lever back to the normal pos ition and then push the
lever forward.
Light sensor m alfunction
In the event of a light senso r malfunction, the dr iver is notified in the
instrument cluster display:
Autom ati c dri ving light s/automatic wiper s defecti ve
For safety reaso ns, the low beams a re turned on permanen tly with
the switch in
AUTO . However, you can continue to turn the lights on
and off us ing the l igh t sw itch . H ave the ligh t se nsor checked as soon
as possible at an authorized Audi dealer or other qualif ied workshop . .,,_
Vehicle care Do-it-yourselt service Technical data
Page 66 of 364

Clear vision
& WARNING
Automatic headlights are only intended to assist the driver. They
do not relieve the driver of his responsibility to check the head
lights and to turn them on manually according to th e current light
and visibility conditions . For example, fog cannot be detected by
the light sensors. So always switch on the headlights under these
weather conditions and when driving in the dark
io.
[ i ) Tips
• The light sensor for headlight cont rol is located in the rear view
m irror mo unt. You s hou ld therefore not apply a ny st ic kers to the
windshield in th is area in order to prevent malfunct ions or fa ilures.
• T he sensitivity leve l for the light se nsor set a t the factory ca n be
changed in the MMI menu~
page 65 in the automatic driving lights
fu nction .
• When you remove your key from t he ign itio n while the veh icle's
lights a re tu rned on, a bu zzer sounds as long as t he driver's doo r is
open.
• Please obey a ll laws when us ing t he lig htin g systems desc ribed
here.
• The coming home/ leav ing home function is ava ilab le only with the
switch in the AU TO position. •
Appli es to veh icles : w ith fog lights
Fog lights
Fig . 67 Fog light
switch
- To tur n on the fog lights }D, press bu tton (D ~ fig. 6 7.
- To turn on the rear fog ligh ts
0$ , press butto n@ .
Fog lights
The side marker lights or low beams must be switc hed on . W hen the
fog lights are switc hed on, the gree n check light at t he edge of the
switch co m es on.
If automat ic dr iv ing light control AUTO is activated , the low beams
a re sw itched on whe n the fog lights are t urned on.
Rear fog lights
Low beams o r side m arke r lig hts w ith fog ligh ts m ust be t urned on .
When the rear fog lig hts are tur ned on, the ye llow check lig ht at the
edge of the swi tch comes on.
0 Note
Th e rear fog lights sho uld on ly be tur ned o n in accordance with traff ic
reg ulat io n, as the lights a re br ight for following traffic. •
Page 67 of 364
Adjusting exterior Lighting
The functions are selected in the radio or in the fv1fv1I.
- Select: Function button [CAR)> E xterior lighting .
Coming home
The coming home function ensures that after
turn ing off the ignit ion
and ope ning the dri ver' s door
the ve hicle per iphery is illuminated in
the dark . In add ition, the fron t fog lights, the ta il ligh ts and the
l icense p late ligh t are t urned on . The powe r-on time can be set for a
period from O (off) to 60 seconds .
Leaving home
The leaving home functions ensures that
when unloc king , the vehicle
periphery is illum inated in the da rk. In add it io n, the fron t fog ligh ts,
the tai l lights and the license p late light are turned on . This funct ion
can be turned on and off.
Autom atic driving light s*
When the lig ht sw itc h i s in the AUTO => page 63 pos it ion, the switch
on po int of the lights can be changed in the automatic driving light
function.
Daytime running lights*
Th e daytime running lig hts ca n be turned on or off using this func
tion. If the funct ion is act ive, the daytime running l ights are tu rned
on a utoma tica lly w hen the ignition is sw itche d on .
In the versions for some countr ies it is not poss ible to switch off the
daytime running lights or they may not have dayt ime runn ing lig hts.
[ i ] Tips
The coming home/leaving home function is available on ly with the
switch in the AU TO position .•
Controls and equip
ment Safety first
Clear v
ision
Daytime running Lights
When you turn on the ignition the daytime running lights
will come on aut omatically .
USA models
Th e daytime running lights a re a ct ivated when t he lig ht swit ch
=>
page 63, fig. 66 is in the O position or the AUTO position (on ly in
daylig ht condit ions) . The daytime running lights function ca n be
turned on and off in the radio or MMI* menu
E xterior lighting
=> page 65 .
Canada models
Th e daytime r unning lights are activ ated w hen the light switch
=> page 63 , fig . 66 is in the O position, oo oc position or the AUTO posi
tion (only in day light condit ions) . The dayt ime running lights funct ion
cannot be turned off .
& WARNING
Never use daytime running lights to see where you are going. They
are not bright enough and will not l et you see far enough ahead
for s afety , especiall y at dusk or wh en it is dark. Be aware of
change s in outside light condition s when you are dri ving and
respond b y switching on your low beams
io.
0 Note
Always be aware of change s in outside light condition s whil e you
are driving. Respond in time to fading d aylight by turning the light
s witch to po sition
io (or "AUTO ") to turn on your headlight s.•
Vehicle care Technical data
Page 68 of 364

Clear vision
Instrument lighting
The basic brightness of the illumination for the instru
ments, the center console and the display can be
adjusted .
-Press the knob to release it.
N ~ 0 0 ,;
"'
lighting
Rotating the knob to the right"+" will increase the basic
brightness when it is dark.
- Rotating the knob to the left"-" will decrease the basic
brightness when it is dark.
- Pressing the knob will prevent unintentional changes.
(I] Tips
The illumination for the instrument cluster lights up whenever you
switch on the ignition with the vehicle headlights off . As the daylight
fades, the instrument cluster illumination likewise dims automati
cally and will go out completely when the outside light is very low.
This feature is meant to remind you to switch on the headlights when
outside light conditions become poor. •
Appli es to veh icles : wi th xenon headlights
Xenon headlights
After starting the engine , the xenon headlights are automatically
adjusted to the load and angle of the vehicle (for example, during
acceleration and braking). This prevents oncoming traffic from expe
riencing unnecessary headlight glare from your xenon headlights .
If the system is not operating properly, a warning symbol in the Auto
Check Control is displayed~
page 37. •
Ap plies to vehi cles: with adap tive light
Adaptive light
When driving around bends, the relevant area of the road
is better illuminated.
Fig. 69 Adaptive light
when driving
The benefit of adaptive light is that the curve and the edge of the road
are better illuminated ~ fig. 69. Dynamic adaptive light is controlled
automat ically, depending on vehicle speed and steering wheel angle.
When driving around bends, the headlights are controlled according
to steering wheel angle . So that there is no black hole ahead of the
vehicle , the two main beams pivot at different angles. .,.
Page 69 of 364
![AUDI A5 CABRIOLET 2011 Repair Manual (]] Tips
The system works above a speed of about 6 mph (10 km/h) .•
Emergency flashers ~
The emergency flashers makes other motorists aware
that you or your vehicle are in an AUDI A5 CABRIOLET 2011 Repair Manual (]] Tips
The system works above a speed of about 6 mph (10 km/h) .•
Emergency flashers ~
The emergency flashers makes other motorists aware
that you or your vehicle are in an](/img/6/57571/w960_57571-68.png)
(]] Tips
The system works above a speed of about 6 mph (10 km/h) .•
Emergency flashers ~
The emergency flashers makes other motorists aware
that you or your vehicle are in an emergency situation.
Fig. 70 Emergency
flasher switch
- Press the switch ~=> fig. 70 to turn the emergency
flashers on or off.
When the emergency flashers are on, all four turn signals blink at the
same time . The turn signal indicator lights¢¢ in the instrument
cluster, as well as the light in the emergency flasher switch~ blink
likewise . The emergency flashers also work when the ignition is
turned off.
The emergency flashers will turn on automatically if you are in an
accident where the airbag has deployed.
(]] Tips
You should turn on the emergency flashers when :
• you are the last vehicle standing in a traffic jam so that any other
vehicles coming can see you, or when
Con tro ls a nd e quip
m en t Vehicle
OP-eration
Clear vision
• your vehicle has broken down or you are in an emergency situa
tion, or when
• your vehicle is being towed by a tow truck or if you are towing
another vehicle behind you .•
Turn signals -¢ Q and high beam gD lever
The lever on the le~ side of the steering column is used to
operate the turn signals and the high beam as well as the
headlight flasher.
Fig. 71 Turn signal
and high beam lever
The turn signal and high beam lever has the following func
tions:
Turn signals¢¢ (D@
- Push the lever up as far as it can go to turn on the right
turn signal or down to turn on the left turn signal
=> fig. 71 .
- Move the lever briefly until you meet resistance and
release it to flash three times.
- Move the lever (up or down) until you meet resistance and
hold it there to determine the flashing time for the turn
signals. _.,
Vehicle care Do-it-yourselt service iTechnical data
Page 70 of 364

Clear vision High be am
~D @
- Push the lever forward to switch on the high beam.
- Pull the lever back towards you to switch off the high
beam.
H eadlight flasher ~D ©
- Pull the lever toward the steering whee l to use the head
light flasher.
Not es on th es e fe ature s
• The turn signals only work with the ignit ion turned on. The indi
cato r lights ¢ or¢ in the instrument cluster also blink.
• After you have turned a corner, the turn signal switches off auto
matically.
• The
high beam works only when the headlights are on. The indi
cator light ~D in the instrument cluster illuminates when the high
beams are on.
• T he
headlight flasher works only as long as you hold the lever -
even if there are no lights switched on. The indicator light ~Din the
instrument cluster illuminates when you use the headlight flasher.
0 Note
Do not use the high beam or headlight flasher in if you know that
these could be blinding oncoming traffic.•
Interior lights
Interior lights
The interior lights include the reading lights for the driver
and the front passenger .
Activating door contact circuit
Fig. 72 Sect ion from
h ead liner: Interio r
l ig ht s
- Press the button@. The LED in the button illuminates .
Deactivating door contact circuit
-Press the button@. The LED in the button goes out .
Front reading Lights ~
- Press one of the switches @ to turn the right or le ft
reading light on or off .
With the door contact circu it, the inte rior lights turn on as soon as
you un lock the vehicle or open the doors. The interior lights are also
tu rned on when the ignit ion key is removed. The lights turn off about
30 seconds after the doors are closed. When the vehicle is locked or
when the ignition is tu rned on, the interior lights are turned off.
When a door is open, the interior lights are turned off after about 10
min utes to prevent battery draining. _,.