fuel AUDI A5 CABRIOLET 2013 Owners Manual
[x] Cancel search | Manufacturer: AUDI, Model Year: 2013, Model line: A5 CABRIOLET, Model: AUDI A5 CABRIOLET 2013Pages: 290, PDF Size: 72.35 MB
Page 5 of 290
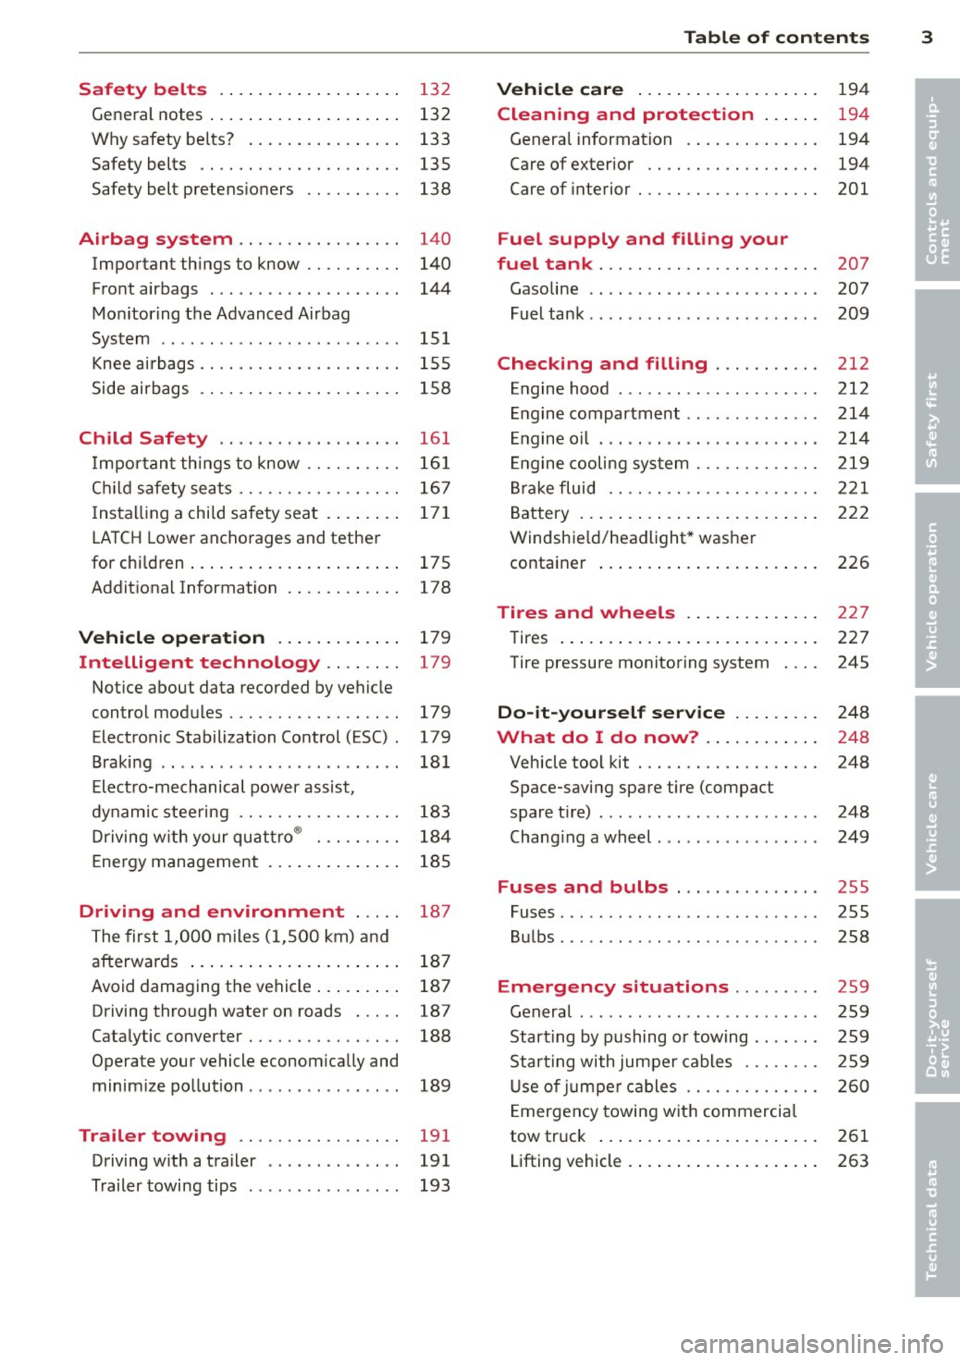
Safety belts . . . . . . . . . . . . . . . . . . . 13 2
General notes . . . . . . . . . . . . . . . . . . . . 132
Why safety be lts? . . . . . . . . . . . . . . . . 133
Safety belts . . . . . . . . . . . . . . . . . . . . . 135
Safety belt pretens ioners . . . . . . . . . . 138
Airbag system . . . . . . . . . . . . . . . . . 140
Important things to know . . . . . . . . . . 140
Front airbags . . . . . . . . . . . . . . . . . . . . 144
Mon itor ing the Advanced Airbag
System . . . . . . . . . . . . . . . . . . . . . . . . . 151
Knee ai rbags . . . . . . . . . . . . . . . . . . . . . 1 55
Side airbags . . . . . . . . . . . . . . . . . . . . . 158
Child Safety . . . . . . . . . . . . . . . . . . . 16 1
I mpor tant th ings to know . . . . . . . . . . 16 1
C hi ld safety sea ts . . . . . . . . . . . . . . . . . 16 7
I ns tall ing a chi ld safety seat . . . . . . . . 171
L A T CH Lower anchorages and tether
for children ... .... .... ... .. .. .. .. 175
Addit ional Information
178
Vehicle operat ion . . . . . . . . . . . . . 179
Intelligent technology . . . . . . . . 179
Not ice about data recorded by vehicle
control modules.......... .... .. .. 179
Electronic Stabilization Control (ESC) . 179
Braking . . . . . . . . . . . . . . . . . . . . . . . . . 181
E lect ro-mechanical power assist ,
dynamic stee ring . . . . . . . . . . . . . . . . . 183
Driving w ith your qu attro ® . . . . . . . . . 184
E nergy management . . . . . . . . . . . . . . 185
Driving and environment . . . . . 18 7
The first 1,000 miles (1,500 km) and
afterwards . . . . . . . . . . . . . . . . . . . . . . 187
Avoid damaging the vehicle . . . . . . . . . 187
Driving through water on roads . . . . . 187
Catalytic converter . . . . . . . . . . . . . . . . 188
Operate your vehicle econom ically and
minim ize pollution . . . . . . . . . . . . . . . . 189
Trailer towing . . . . . . . . . . . . . . . . . 191
Driving w ith a trailer . . . . . . . . . . . . . . 191
Trailer towing tips . . . . . . . . . . . . . . . . 193
Table of contents 3
Vehicle care . . . . . . . . . . . . . . . . . . .
194
Cleaning and protection . . . . . . 194
Genera l information . . . . . . . . . . . . . . 194
Care of exterior . . . . . . . . . . . . . . . . . . 194
Care of interior . . . . . . . . . . . . . . . . . . . 201
Fuel supply and filling your
fuel tank . . . . . . . . . . . . . . . . . . . . . . .
207
Gasoline . . . . . . . . . . . . . . . . . . . . . . . . 207
Fuel tank . . . . . . . . . . . . . . . . . . . . . . . . 209
Checking and filling . . . . . . . . . . . 212
Engine hood . . . . . . . . . . . . . . . . . . . . . 212
Engine compartment .............. 214
E ngine oil . . . . . . . . . . . . . . . . . . . . . . . 214
En gine cooling system . . . . . . . . . . . . . 219
Br ake fluid . . . . . . . . . . . . . . . . . . . . . . 221
Battery . . . . . . . . . . . . . . . . . . . . . . . . . 222
Windshie ld/headlight* washer
container . . . . . . . . . . . . . . . . . . . . . . . 226
Tires and wheels . . . . . . . . . . . . . . 227
Tires . . . . . . . . . . . . . . . . . . . . . . . . . . . 227
Tire pressure monitoring system 245
Do-it-yourself service . . . . . . . . . 248
What do I do now? . . . . . . . . . . . . 24 8
Vehicle tool kit . . . . . . . . . . . . . . . . . . . 248
Space-saving spare tire (compact
spare tir e) . . . . . . . . . . . . . . . . . . . . . . . 248
Changi ng a wheel . . . . . . . . . . . . . . . . . 249
Fuses and bulbs . . . . . . . . . . . . . . . 2SS
Fuses ... .. .. .. .. .. . .. .... ...... . 255
Bulbs . . . . . . . . . . . . . . . . . . . . . . . . . . . 258
Emergency situations . . . . . . . . . 259
General . . . . . . . . . . . . . . . . . . . . . . . . . 259
Starting by pushing or towing . . . . . . . 259
Star ting with jumpe r cables . . . . . . . . 259
U se of jumpe r cables . . . . . . . . . . . . . . 260
E mergency towing with commercia l
tow truck . . . . . . . . . . . . . . . . . . . . . . . 261
Lifting vehicle . . . . . . . . . . . . . . . . . . . . 263
•
•
Page 12 of 290
10 Instruments and warning/indicator lights
Instruments and warning/indicator Lights
Instruments
Instrument cluster and controls
The instrument cluster is your central source of information.
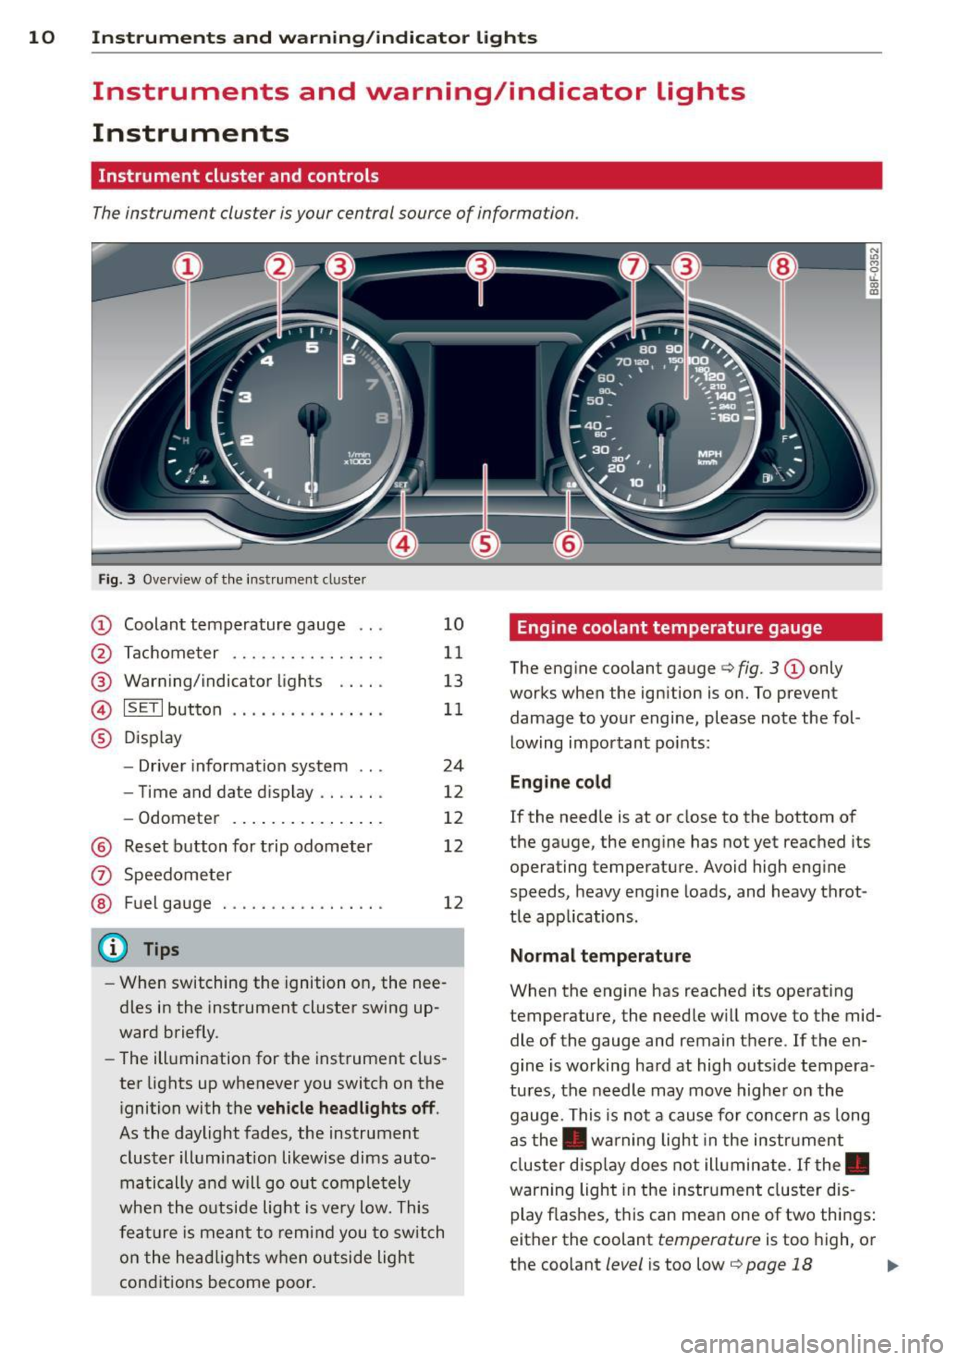
Fig. 3 Overv iew of the inst rument cluster
CD Coolant temperature gauge .. .
@ Tachometer ............... .
@ Warning/indicator lights .. .. .
© IS ETlbutton ............ .. . .
® Display
- Driver information system .. .
- Time and date d isplay .. .. .. .
- Odometer ............. .. .
@ Reset button for trip odometer
(z) Speedometer
@ Fuel gauge . ......... .. .. .. .
@ Tips
10
11
13
11
24
12
12
12
12
- When switching the ignition on, the nee
dles in the instrument cluster swing up
ward briefly.
- The illumination for the instrument clus
ter lights up whenever you switch on the
i gnition with the
vehicle headlights off .
As the daylight fades, the instrument
cluster illumination likewise dims auto
matically a nd will go out completely
when the outside light is
very low. This
feature is meant to remind you to switch
on the headlights when outside light
conditions become poor.
Engine coolant temperature gauge
The engine coolant gauge c> fig. 3 CD only
works when the ignition is on. To prevent
damage to your engine, please note the fol
lowing important points:
Engine cold
If the needle is at or close to the bottom of
the gauge, the engine has not yet reached its
operating temperature. Avoid high engine
speeds, heavy engine loads, and heavy throt
tle app lications.
Normal temperature
When the engine has reached its operating
temperature, the needle will
move to the mid
dle of the gauge and remain there . If the en
gine is working hard at high outs ide tempera
tures, the needle may
move higher on the
gauge. This is not a cause for concern as long
as the . warning light in the instrument
cluster display does not illuminate. If the.
warning light in the instrument cluster dis
play flashes, this can mean one of two things:
either the coolant
temperature is too high, or
the coolant
level is too low c> page 18 Ill-
Page 13 of 290
Instrument s and warning /indicator lights 11
/! WARNING
- Always observe the warning in
¢ page 205, Engine compartment, be
fore opening the hood and checking the
engine coolant level.
- Never open the engine hood if you see or
hear steam, or if you see engine coolant
dripping from the engine compartment.
You could burn yourself . Let the engine
cool off first so that you cannot hear or
see any steam or engine coolant .
(D Note
-Mounting additional lights or accessories
in front of the air inlets reduces the cool
i ng effect of the radiator . At h igh outside
temperatures or high engine load, the
engine could overheat.
- The front spo iler has been designed to
properly distribute the cooling air when
the veh icle is moving. If the spoiler is
damaged, this could reduce the cooling
effect and the engine could then over
heat. Ask your authorized Audi dealer for
assistance.
Tachometer (engine rev counter)
The tachometer indicates the engin e RPM
(revolutions per minutes).
If engine RPM d rops be low 1,500 , you should
downshift to the next lower gear. The red area
at the end of the scale indicates maximum
permissible engine RPM after the break-in pe
riod . Before reaching this area, move these
lector lever to position D/S or ease your foot
off the accelerator pedal.
(D Note
The tachometer needle@¢ fig. 3 should
only briefly be in the red zone: you cou ld
damage your engine! The beginning of the
red zone varies depending on the engine.
@) For the sake of the environment
Upshifting early saves fuel and reduces en
gine noise.
~ button
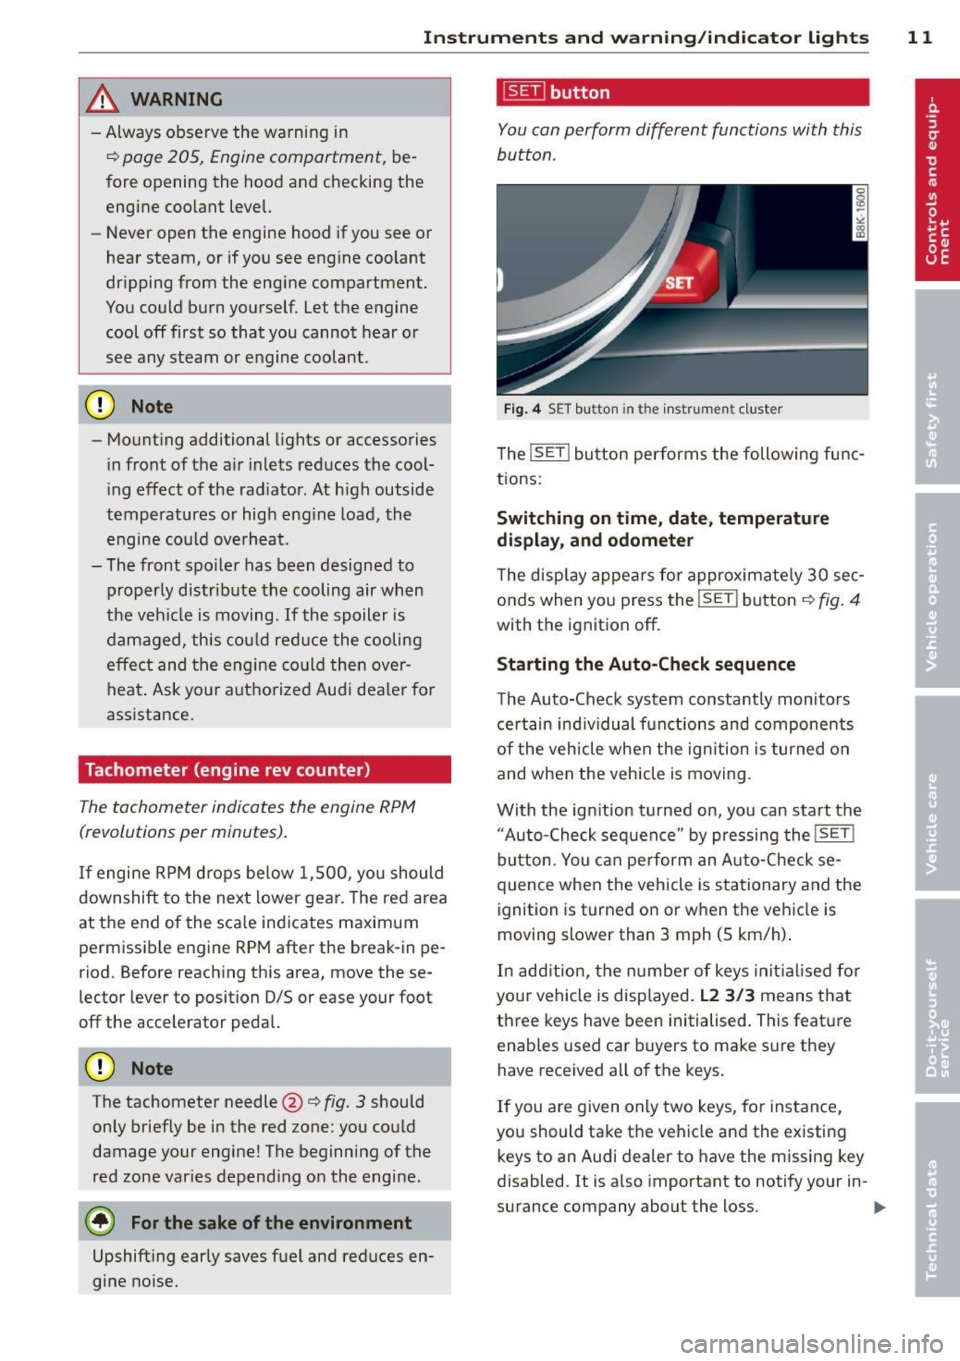
You can perform different functions with this
button .
Fig. 4 SET but ton in th e in str ume nt cluster
The !SE T! button performs the following func
tions:
Switching on time, date , temperature
display, and odometer
The display appears for approximately 30 sec
onds when you press the
!SE Ti button ¢ fig. 4
with the ignition off.
Starting the Auto -Check sequence
The Auto-Check system constantly monitors
certain ind iv idual functions and components
of the vehicle when the ign ition is turned on
and when the vehicle is moving .
With the ignition turned on, you can start the " Auto-Check sequence" by pressing the
!S ET i
button. You can perform an Auto-Check se
quence when the vehicle is stationary and the
ignition is turned on or when the vehicle is
moving slower than 3 mph (5 km/h) .
In addition, the number of keys initial ised fo r
your vehicle is displayed.
L2 3/3 means that
three keys have been initialised. This feature
enables used car buyers to make sure they
have received all of the keys.
If you are given only two keys, for instance,
you should take the vehicle and the existing keys to an Audi dealer to have the missing key
disabled.
It is also important to notify your in -
surance company about the loss .
IJJ,-
Page 14 of 290
12 Instrum ents a nd warning /indic ato r li ghts
Se tting th e speed warning
By pressing the I SETI button br iefly, you can
set threshold 1 of the speed warning while
you are driving
¢page 83. By maintaining
pressure on the
ISETI button, you delete the
warn ing threshold.
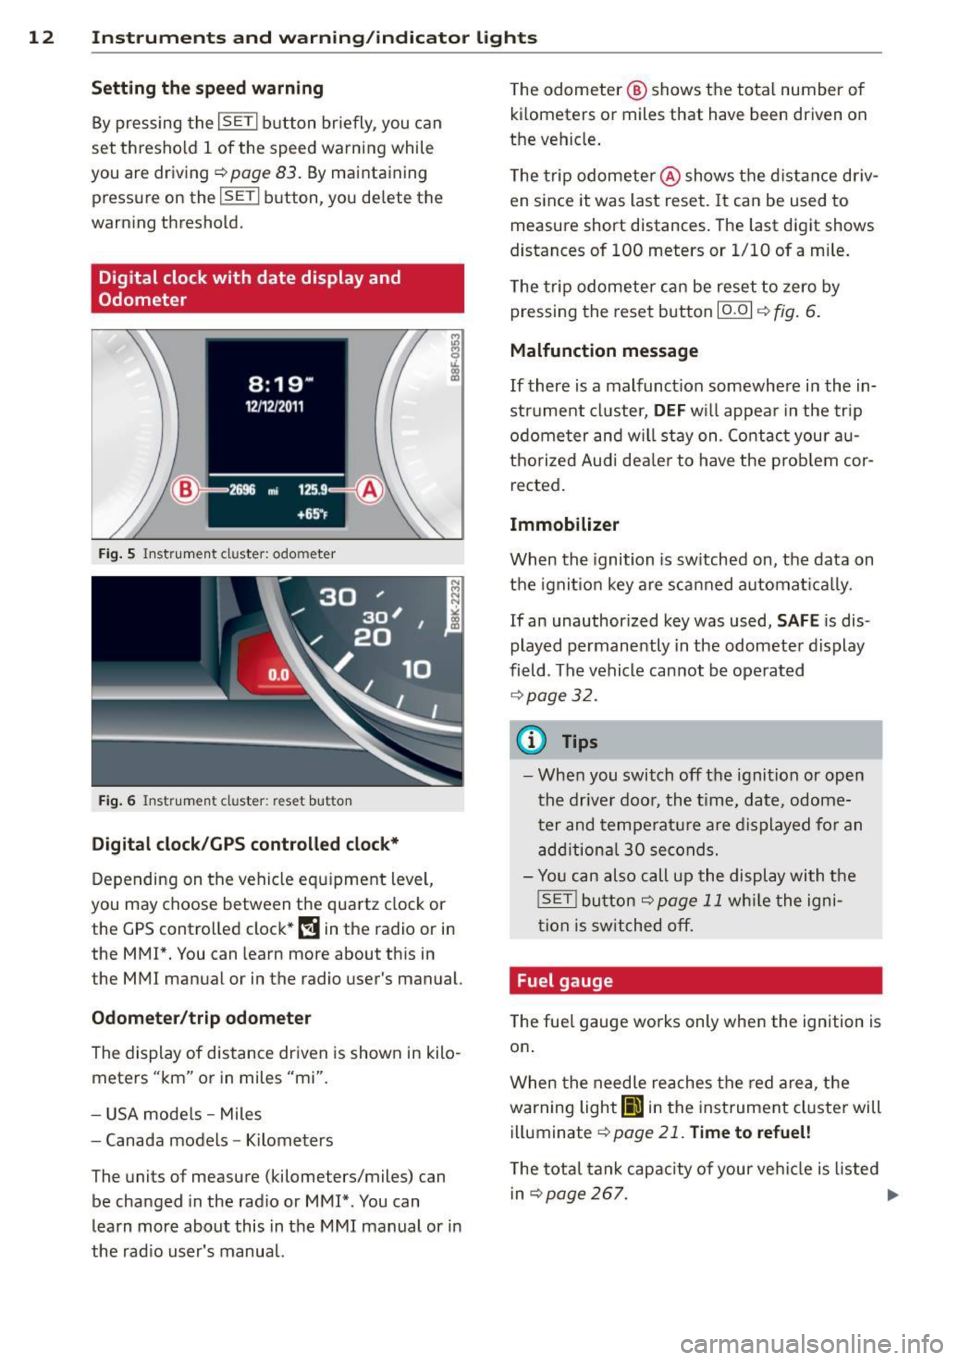
Digital clock with date display and
Odometer
Fig. S Instrument cl uster: odo meter
Fig. 6 Instrument cl uster: reset button
Digital cl ock /GPS controll ed cl ock *
Depending on the vehicle equipment level,
you may choose between the quartz clock or
the
GPS controlled clock* l!'j in the radio or in
the MMI*. You can learn more about this in
the MMI manual or in the radio user's manual.
Odometer /trip odom eter
The display of distance driven is shown in kilo
meters "km" or in miles "mi".
- USA mode ls - Miles
- Canada models -Kilometers
The units of measure (kilometers/miles) can
be changed in the radio or MMI*. You can
learn more about this in the MMI manual or in
the rad io user's manual. T
he odometer @ shows the total number of
kilometers or m iles that have been driven on
the vehicle .
The trip odometer @shows the d istance driv
en since it was last reset. It can be used to
measure short distances. The last digit shows
distances of
100 meters or 1/10 of a mile.
The trip odometer can be reset to zero by
pressing the reset button
1 0.01 ¢ fig. 6.
Ma lfunct ion message
If there is a malfunct ion somewhere in the in
strument cluster,
DEF w ill appea r in the trip
odometer and wil l stay on . Co ntact your au
thorized Aud i dea ler to have the problem cor
rected.
Immob ilizer
When the ignition is sw itched on, the data on
the ignit ion key are scanned automat ica lly.
If an unauthor ized key was used,
SAF E is dis
played permanently in the odomete r display
field . The vehicle cannot be operated
¢page 32.
(j) Tips
-When you switch off the ignition or open
the driver door, the t ime, date, odome
t er and temperature are displayed for an
add itiona l
30 seconds.
- You can also call up the display with the
!SET ! button ¢page 11 wh ile the igni
tion is switched off.
Fuel gauge
The fuel gauge works only when the ignition is
on .
When the needle reaches the red area, the
warning light
Ii] in the instrument cluster will
illuminate
<:!> page 21. Tim e to refuel!
The tota l tank capacity of your vehicle is listed
in
I::!> page 267. .,.
Page 15 of 290
Instrument s and warnin g/indic ator ligh ts 13
(D Note
Never run the tank completely dry! An ir
reg ular supply of fuel can cause eng ine
m isfiring and fuel could enter into the ex
haust system. The catalyt ic converter
could the n overheat and be damaged .
Warning/indicator
Lights
Description
The indicator lights in the instrument cluster
blink or turn on . They indicate functions or
malfunct ions ¢,&. .
Messages may appear with some indicator
lights. A warning signal will sound at the
same time . The messages disappear again af
ter a short t ime . To display a message again ,
pressthelSE T!button
¢ page 11. If severa l
malfunc tions occu r, each of the indica to r/
warn ing lamps will be d isplayed in succession
for abo ut two seconds at a time .
Some ind icators lights in the disp lay can turn
on in several colors.
_& WARNING
- F ailure to heed warning lights and o ther
impor tant vehicle info rmation may result
in serious persona l injury o r vehicle dam
age.
- Whenever sta lled or stopped for repair,
move the vehicle a safe distance off the
road, stop the engine, and turn on the
eme rgency flasher¢
page 54.
-The e ngine compartment of any motor
vehicle is a potentially hazardous area.
Before you check anything in the engine
compartment, stop the engine and let it
cool down. Always exercise extreme cau
t ion when wor king under the hood
¢ page 205, Engine compartment
(D Tips
Ma lfunctions or faults w ill be identified ei
ther with a red symbo l (pr io rity 1 -Dan- ger!) or with a yellow symbol (prio
rit y 2 -
Warning).
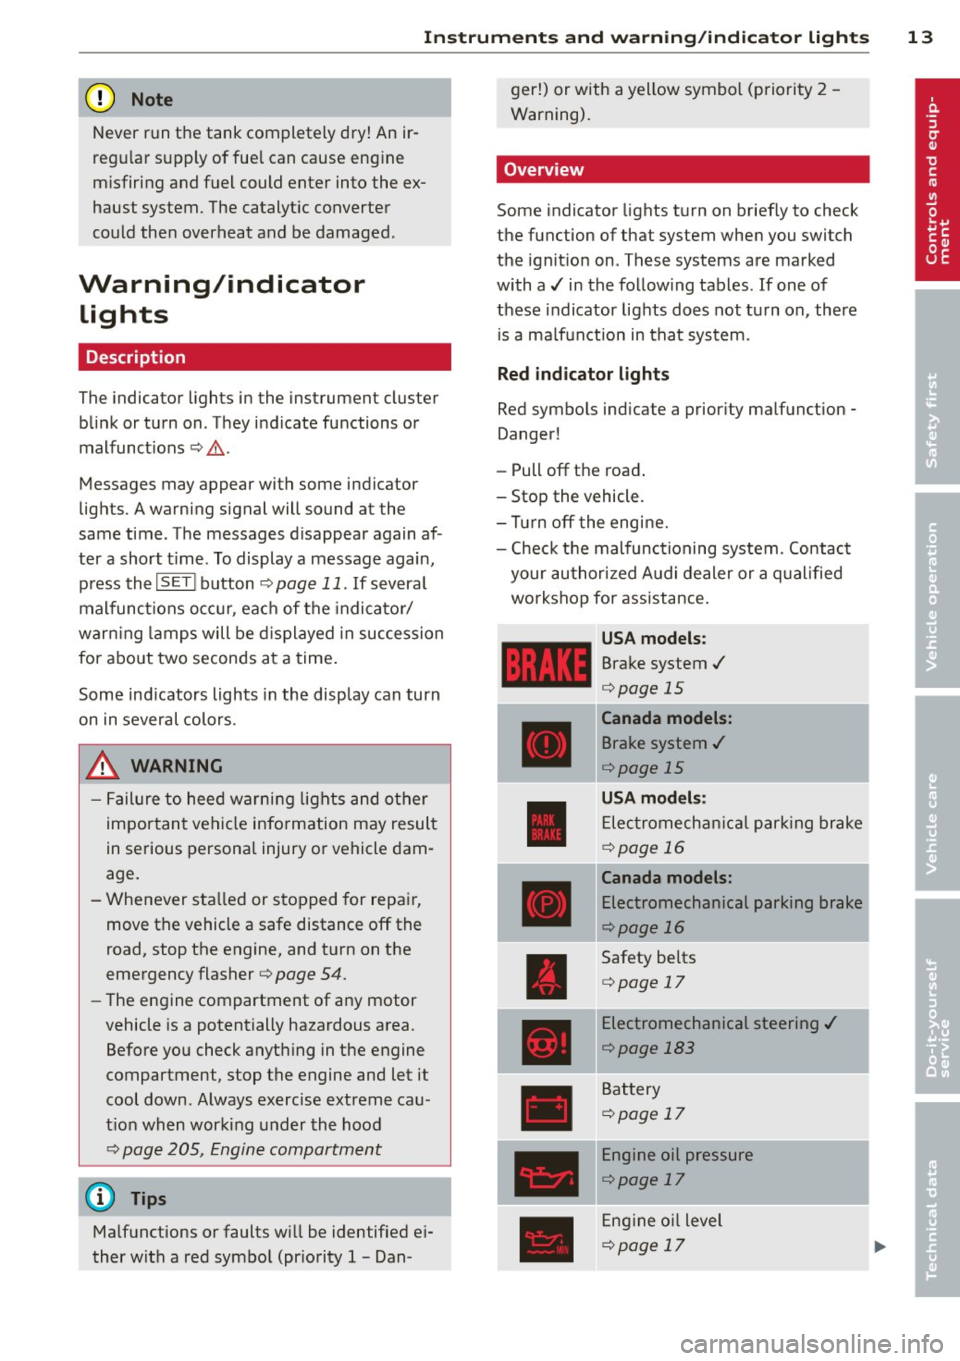
' Overview
Some indicator lights t urn on briefly to check
the function of that system when you switch
the ignit ion on . These systems are marked
with a../ in the fo llow ing tables . If one of
these indicator lights does not tu rn on, there
i s a ma lf u nct ion in that system.
Red indicator lights
Red symbo ls indicate a prior ity ma lfunction -
Danger!
- Pull off the road .
- Stop the vehicle.
- Tur n off the engi ne.
- Check t he malfunc tioning system. Contac t
your author ized A udi dealer or a q ualified
workshop for assistance.
USA models :
Brake system../
¢page 15
----~r~
Canada models:
Brake system ../
¢page 15
USA mod els :
Elec tromech anical parki ng br ake
¢ page 16
Canada models:
Electromechanical parking brake
¢page 16
Safety be lts
¢ page 17
Electromechanical steering ../
¢page 183
Battery
¢page 17
Engine oil pressure
¢page 17
Eng ine oil level
¢page 17
Page 19 of 290
Instruments and warning/indicator lights 17
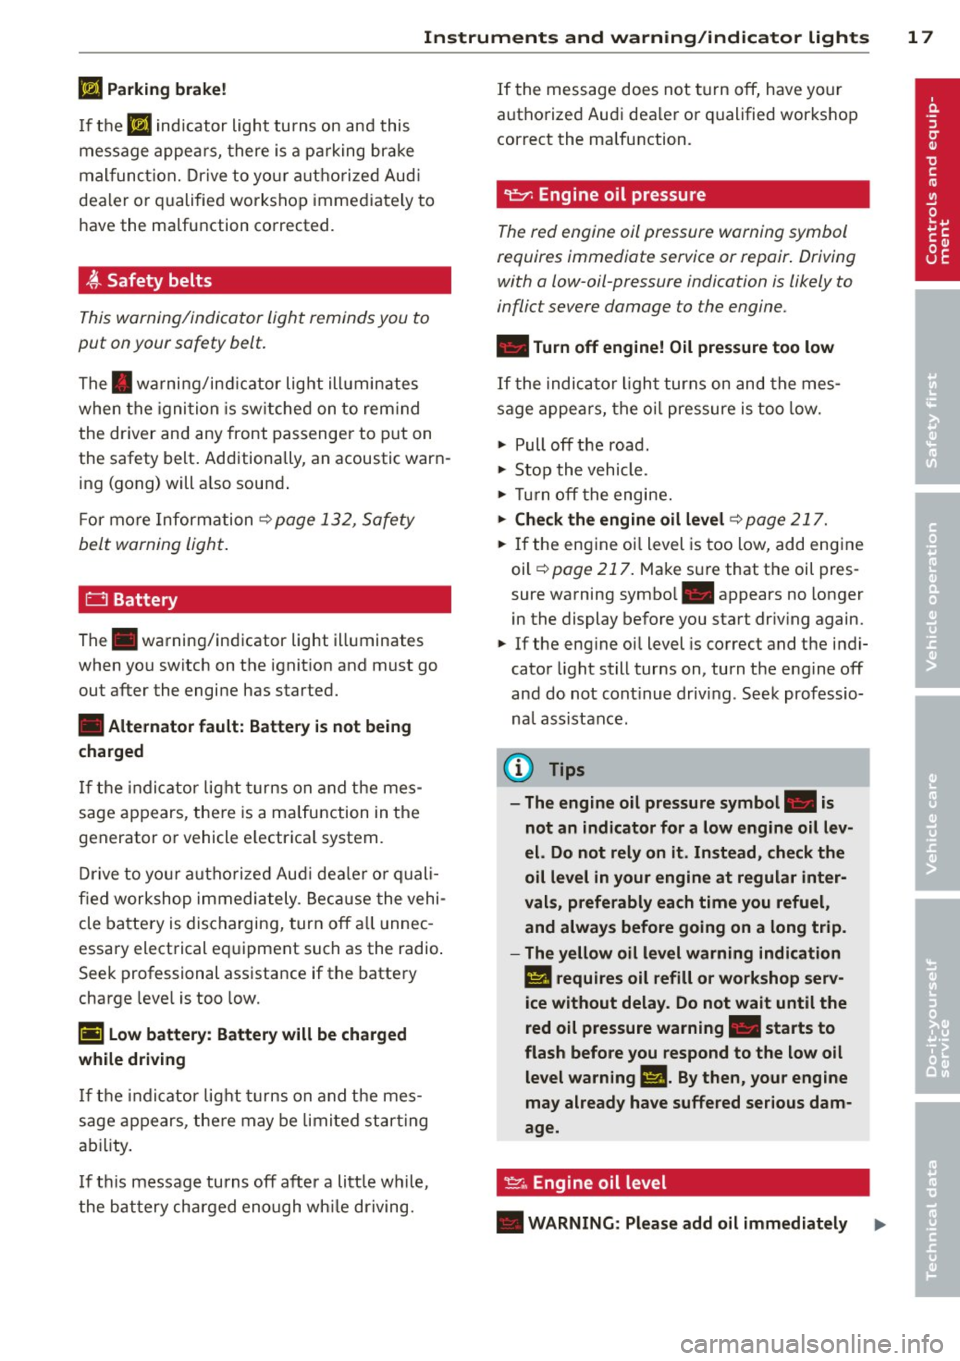
E Parking brake!
If the E indicator light turns on and this
message appears, there is a pa rking brake
mal funct ion. Drive to your authorized Aud i
dea ler or qualified workshop immediately to
have the malfunction corrected.
,(,_ Safety belts
This warning/indicator light reminds you to
put on your safety belt.
The . warning/ind icator light illuminates
when the ignition is switched on to rem ind
the driver and any front passenger to put on
the safety belt. Additionally, an acoustic warn i ng (gong) will a lso sound .
Fo r more Information
c:> page 132, Safety
belt warning light .
E::::3 Battery
The. warning/indicator light illuminates
when you switch on the ignition and must go
out after the engine has started.
• Alternator fault: Battery is not being
charged
If the indicator light turns on and the mes
sage appears, there is a malfunction in the
generator or vehicle e lectrica l system.
D rive to you r autho rized Aud i dealer or quali
fied workshop immediately . Because the vehi
cle battery is discharging, turn
off a ll unnec
essary electrical equipment such as the radio .
Seek professional assistance if the battery
charge leve l is too low.
(•) Low battery: Battery will be charged
while driving
If the indicator light turns on and the mes
sage appears, there may be limited starting
ability.
If th is message turns
off after a litt le while,
the battery charged enough wh ile driving. If the
message does not turn
off, have your
authorized Audi dea ler or qualified workshop
correct the ma lfunction.
'l:::7: Engine oil pre ssure
The red engine oil pressure warning symbol
requires immediate service or repair . Driving
with a low-oil-pressure indication is likely to
inflict severe damage to the engine .
• Turn off engine! Oil pressure too low
If the indicator light turns on and the mes
sage appears, the oil pressure is too low.
.,. Pull
off the road.
.,. Stop the vehicle.
.,. Tur n
off the engine .
.,. Check the engine oil level c:> page 217.
.,. If the engine oi l level is too low, add engine
oil
¢ page 217. Make sure that the oil pres
sure warning symbol. appears no longer
in the display before you start dr iv ing again.
.,. If the eng ine oil level is correct and the indi
cator light still turns on, turn the engine
off
and do not cont inue driv ing. Seek professio
nal assistance .
(D Tips
- The engine oil pressure symbol. is
not an indicator for a low engine oil lev
el. Do not rely on it. Instead, check the
oil level in your engine at regular inter
vals, preferably each time you refuel,
and always before going on a long trip.
- The yellow oil level warning indication
l!I requires oil refill or workshop serv
ice without delay. Do not wait until the
red oil pressure warning. starts to
flash before you respond to the low oil
level warning
Ill. By then, your engine
may already have suffered serious dam
age.
~ -, Engine oil level
• WARNING : Please add oil immediately .,,.
Page 23 of 290

Instruments and warning/indicator lights 21
o Malfunction Indicator Lamp (MIL)
The Malfunction Ind icator Lamp (M IL) is part
of the On-Board Diagnostic (OBD II) system.
The symbol
¢'4 lights up when the ignition is
switched on and wi ll turn off after the engine
has started and has sett led at a constant idle
speed. This ind icates that the MIL is working
properly .
The warning light illuminates when there is a
malfunction in the engine e lectronic system .
Contact your author ized Audi dealer and have
the ma lfunction corrected .
An improperly closed fue l fi ller cap may also
cause the MIL light to illuminate ¢
page 210.
For more informat ion ¢ page 29.
!?) Engine speed limitation
Applies to vehicles: wit h en gin e speed l im it at ion
(II Do not exceed max. engine speed of
XXXX rpm
The Ill symbo l illuminates when there is an
engine control malfunction . Th e~ indicator
light in the instrument cluster also illumi
nates. The engine speed is limited to the
speed displayed in the driver information sys
tem. Keep in mind that the eng ine speed will
not exceed the value displayed in the driver in
formation system, for example when down
shifting.
Drive to your authorized Aud i dea ler immedi
ately to have the malfunction corrected.
~ . Engine oil level
II Add oil, max XXXX l. You may cont. driv.
When the symbo l II and driver message ap
pear, add the amount of o il appearing i n the
d isplay at the next opportunity¢
page 217.
If the symbol illuminates, contact your au
thorized Audi dealer and have the o il sensor inspected.
Until you have this done, check the
oi l level each time you refue l just to be on the
safe sid e¢
page 217 .
Bu Tank system
flm Please refuel
If the indicator light turns on for the first
time and the message appears, there are
about 2.1 -2.4 gallons (7 -9 liters) of fuel left
in the tank . T ime to refuel ¢
page 209.
Ii] Fuel tank system malfunction! Contact
dealer
If the indicator light turns on and this mes
sage appears, there is a malfunction in the
tank system.
Drive to your authorized Audi dealer immed i
ate ly to have the malfunction corrected.
If the symbol illuminates, add w indshie ld
washe r fluid to the washer system and also to
the headlight washer system * ¢
page 226.
~ Windshield wipers
£!I Windshield wiper defective
The re is a malfunction with the windshie ld
wipe rs.
Drive to your authorized Audi dealer immedi
ately to have the malfunction corrected .
~/ }0 10 $ Defective light bulb warning
If the
l':;:'1 indicator light turns on, a bulb has
failed. The message indicates the location of
the bu lb.
- If the
II indicato r light also turns on, then
a fog light has failed. The position of the in
dicator light corresponds with the location
on the vehicle .
- If the
[tD indicator light also turns on, then
a rear fog* light has failed. The position of ..,_
Page 27 of 290
Trip computer
Introduction
The trip computer gives you information on
current and average fuel mileage, average
speed, fuel range and driving time .
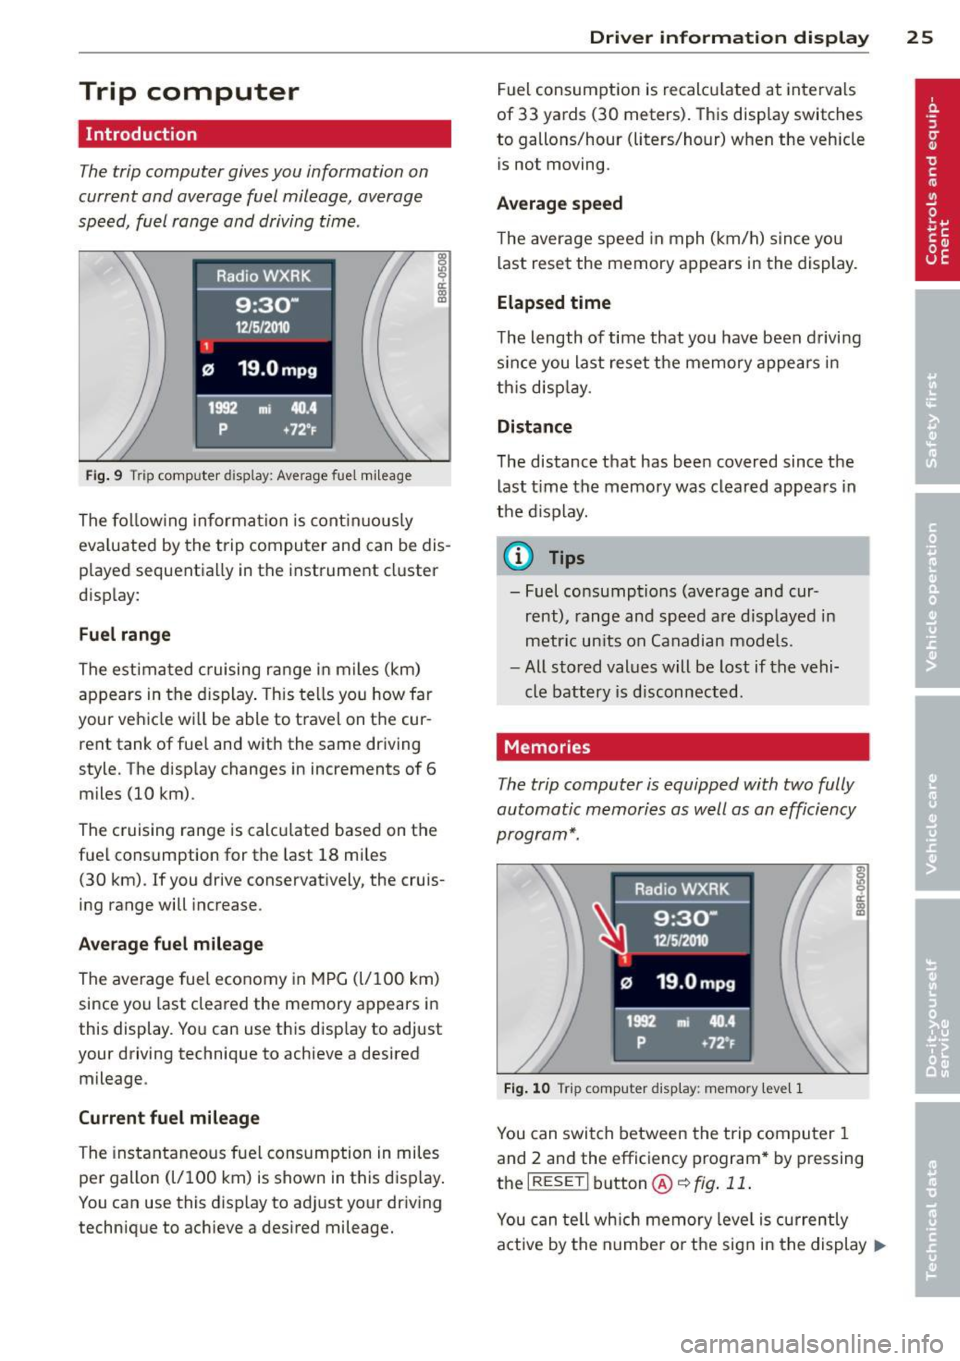
Fig. 9 Trip computer display: Average fuel mileag e
The fo llowing information is continuously
eva luated by the trip computer and can be dis
p layed sequentially in the instrument cluster
display:
Fuel range
The estimated cruising range in miles (km)
appears in the display. This tells you how far
your vehicle wi ll be able to travel on the cur
rent tank of fue l and with the same driving
style. The display changes in increments of 6
miles (10 km).
The cruising range is calcu lated based on the
fuel cons umption for the last 18 mi les
(30 km) . If you drive conservatively, the cruis
ing range will increase.
Average fuel mileage
The average fuel economy in MPG (l/100 km)
since you last cleared the memory appears in
this display. You can use this disp lay to adjust
your driving technique to achieve a desired
mileage .
Current fuel mileage
The instantaneous fuel consumption in miles
per gallon (l/100 km) is shown in this display .
You can use this display to adj ust yo ur driving
technique to ach ieve a desired mileage.
Driver information display 25
Fuel consumption is recalcu lated at intervals
of 33 yards (30 meters). This display switches
to gallons/hour (liters/hour) when the veh icle
is not moving.
Average speed
The average speed in mph (km/h) s ince you
last reset the memory appears in the display.
Elapsed time
The length of time that yo u have been driving
s ince you last reset the memory appears in
th is disp lay.
Distance
The distance that has been covered since the
last time the memory was cleared appears in
the d isplay .
(0 Tips
- Fuel consumptions (average and cur
rent), range and speed are displayed in
metric units on Canadian mode ls.
- All stored values will be lost if the vehi
cle battery is disconnected.
Memories
The trip computer is equipped with two fully
automatic memories as well as an efficiency
program* .
Fig . 10 Tri p computer display: memory leve l 1
You can switch between the trip computer 1
and 2 and the efficiency program* by pressing
the
I RESET I button @r:::> fig. 11 .
You can tell which memory leve l is currently
active by the number o r the sign in the display
II--
Page 28 of 290
26 Driver in formation d isplay
¢fig . 10 . The data from the single -trip mem
ory (memory leve l 1) is being displayed if a
D
appears in the display . If a II is shown, then
the data from the total -trip memory is being
d isplayed (memory leve l 2). The fuel pump
nozzle
iii indicates the efficiency program*
¢ page 27.
Single-tr ip m emory (Trip computer 1 )
The single-trip memory stores the trip infor
mat ion from the time the ignition is turned o n
until it is turned off. If the trip is continued
w ithin 2 hours from the t ime the ignition was
turned off, the new data will be included in
the calcu lation of the current trip i nfo rma
tion .
If the t rip is inte rrupted fo r more than 2
hours the memory is reset automati ca lly.
Total -trip memory (Trip computer 2)
Unlike the sing le-trip memory, the tota l- tr ip
memory is not reset automatically . Th is per
mits you to evaluate your d riving data for the
enti re pe riod be tween manual rese ts.
Efficiency program*
The effic iency program can help you to use
less fuel ¢
page 2 7.
Operation
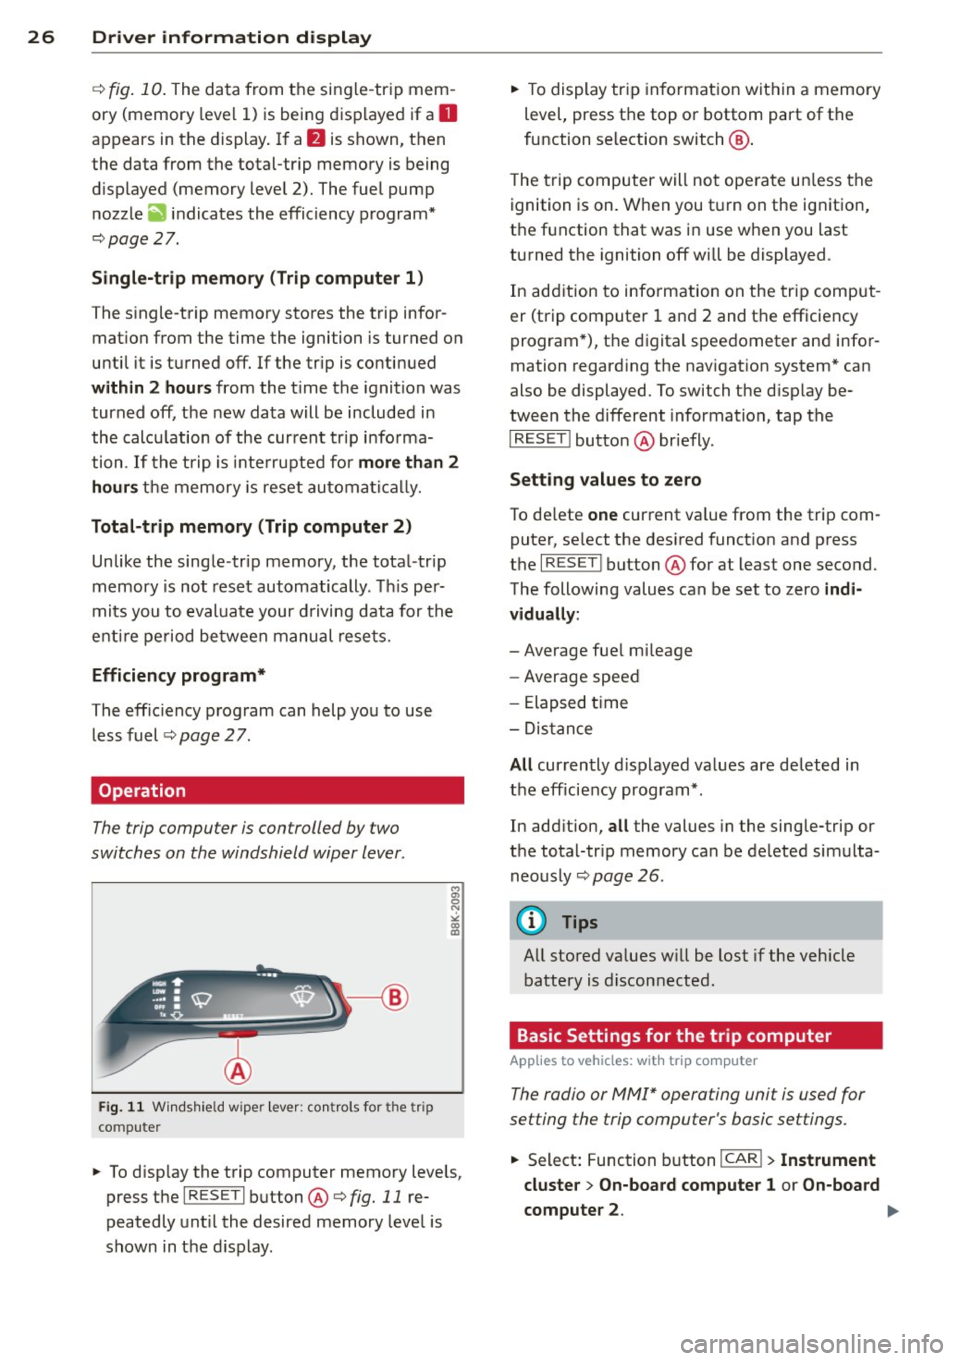
The trip compu ter is controlled by two
switches on the windshield wiper lever.
F ig . 11 W ind sh ie ld wipe r lever: co ntro ls fo r the tri p
co mp ute r
.. To d isp lay the trip computer memory levels,
press t he
I RES ET I button @¢ fig. 11 re
peatedly unt il the desired memory leve l is
shown in the d isplay. ..
To display tr ip in format ion wit hin a memory
level, press the top or bottom part of the
function se lection switch @.
T he trip computer will not ope rate un less the
ignition is on. W hen you t urn on the ignition,
the function that was in use when you last
turned the ignition off will be displayed .
In add ition to info rmation on the trip comput
er (trip computer 1 and 2 and the efficiency
program *), the digital speedometer and infor
mation regard ing the nav igat ion system* can
also be displayed. To switch the d isp lay be
tween the different information, tap the
I RESET ! button@ briefly.
Sett ing values to zero
To de lete one current va lue from the trip com
puter, se lect the des ired funct ion and press
t h e
I RES ET I button @for at least one second.
The following values can be set to zero
indi
vidually :
- Average fue l mi leage
- Average speed
- Elapsed t ime
- Dis tance
All cur rently d isplayed va lues are deleted in
the eff iciency program*.
In add it ion,
all the values in the single-trip or
the total-tr ip memory can be de leted simulta
neously ¢
page 26.
(D Tips
All stored va lues w ill be lost if the veh icle
battery is discon nected .
Basic Settings for the trip computer
Applies to vehicles: with trip computer
The radio or MMI* operating unit is used for
setting the trip computer's basic settings.
.. Select: Function b utton ICAR ! > In strument
cluster > On -board computer 1 or On-board
computer 2 . .,.
Page 29 of 290
The values in the single-t rip or the total-trip
memory can a ll be reset to zero at the same
time under
Reset in the menu .
I n addition, you can determine what informa
tion from the trip computer should be shown
in the instrument cluster display. If one of the
p ieces of driver information is turned
Off , that
driver information w ill not be shown in the
display. The information will continue to be
calculated by the trip computer and can be
turned back
On at any t ime.
(D Tips
- This function is not avai lab le on all
vehicles.
- The driving information in the efficiency
program is also reset to zero with the
s ingle-trip memory.
Efficiency program
Description
Applies to vehicles: with trip compu ter with effic iency
program
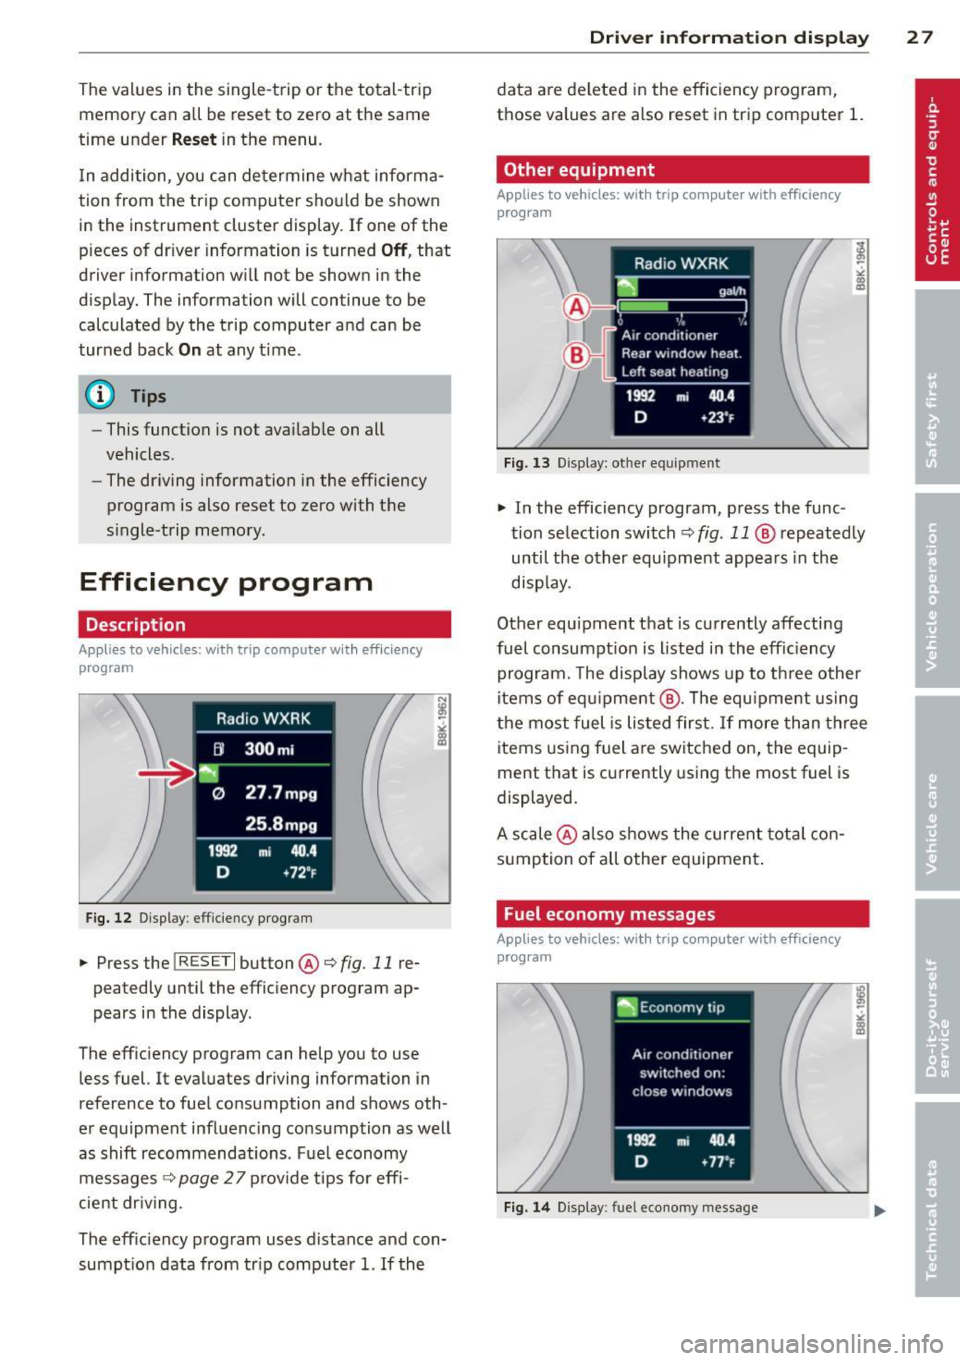
F ig. 12 Display : efficiency program
... Press the !RESET I button @c::> fig. 11 re
peatedly until the efficiency program ap
pears in the display .
The eff iciency program can help you to use
less fuel. It evaluates driving information in
reference to fuel consumption and shows oth
er equipment influencing consumption as well
as shift recommendations . Fue l economy
messages c::>
page 2 7 provide tips for effi
cient driv ing.
The eff ic iency program uses d istance and con
sumption data from trip computer
1. If the
Driver information display 2 7
data are deleted in the efficiency program,
those values are also reset in trip computer
1.
Other equipment
Applies to vehicles: with trip computer with efficiency
program
Fig. 13 Display: othe r equ ipment
.,. In the efficiency program, press the func
tion selection switch
c::> fig . 11 @ repeatedly
until the other equipment appears in the
disp lay.
Other equipment th at is currently affecti ng
fuel consumptio n is listed in the efficiency
program. The display shows up to three othe r
items of equipm ent@. T he equ ipme nt using
the most fuel is lis ted first .
If more than three
items using fuel are switched on, the equip
ment that is currently using the most fuel is
displayed.
A scale @also shows the current total con
sumption of all other equipment .
Fuel economy messages
Applies to vehicles: with trip compute r with efficiency
program
Fig. 14 Display : fu el econo my message