technical data AUDI A5 COUPE 2011 Owner's Guide
[x] Cancel search | Manufacturer: AUDI, Model Year: 2011, Model line: A5 COUPE, Model: AUDI A5 COUPE 2011Pages: 362, PDF Size: 84.88 MB
Page 65 of 362

High beam l[D ®
-Push the lever forward to switch on the high beam.
- Pull the lever back towards you to switch off the high
beam.
Headlight flasher l[D ©
-Pu ll the lever toward the steering wheel to use the head
light flasher.
Notes on the se fea ture s
• The turn signals only work with the ignition turned on. The indi
cato r lights ¢ or¢ in the instrument cluste r also blink.
• After you have turned a corner, the turn signal switches off auto
matically.
• The
high beam works only when the headlights are on. The indi
cato r light [D in the instrument cluster illuminates when the h igh
beams are on.
• T he
headlight flasher works only as long as you ho ld the lever -
even if there are no lights switched on. The ind icator light [Din the
instrument cluste r illuminates when yo u use the headlight flasher.
0 Note
Do not use the high beam or headlight flasher in if you know that
these could be blinding oncoming traffic. •
Contro ls a nd e quip
m en t Vehicle
OP-eration
Clear vision
Interior lights
Front interior lights
The front interior lights also contain reading lights for
the driver and passenger.
Fig. 56 Headli ner:
Fron t interior lig hts
The rocker switch©==> fig . 56 for operating the inter ior
light ing has the following functions:
Doo r contact switch
- Place the switch© in the middle position.
Interior light switched on
-Place the switch© in position I.
Interior light switched off
-Place the switch© in position 0 .
Front reading lights ~
-Press one of the switches ® to turn the r ight or left
reading light on or off.
Vehicle care Do-it-yourselt service iTechnical data
Page 67 of 362

Applie s to vehicles : with su n s had e
Sun shade
Fig. 59 with MMI:
Button for rear window
sun shade
Fig. 60 without MMI :
Button for rear window
sun shade
- To extend/retract the rear window sun shade, press the
button
r.&l => fig. 60. In vehicles with MMI*, the button is
located above the climate control system=> fig. 59.
The rear window sun shade can be set in the MMI* so that it retracts
automatically when driving in reverse. Select [CAR]>
Window> Rear
window sun shade> On
to do this. The sun shade is extended again
as soon as the vehicle is traveling forward at a speed greater than
9 mph (15 km/h) if the ignition has not been switched off in the
meant ime. The current setting is automatically stored and assigned
to the remote key .
Contro ls a nd e quip
m en t Vehicle
OP-eration
Clear vision
(I) Tips
• Pressing the button~ several times consecutively can trigger the
overload protection. The sun shade can only be extended/retracted
again after a brief waiting period .
• The rear window sun shade only functions when the vehicle inte
rior is warmer than 14°F (-10°(). •
Wiper and washer system
Switching the windshield wipers on
Fig. 61 Windshield
wiper lever
Move the windshield wiper lever to the corresponding position :
@-Windshield wiper off
©-Interval mode. To extend/shorten the wiper intervals, move the
switch @to the left/right. In vehicles with a rain sensor*, the wind
shield wipers are activated automati cally starting at a speed of 2 mph
(4 km/h) . The higher the sensitivity of the rain sensor* is set (switch
© to the right), the earlier the windshield wipers react to moisture
on the w indshield.
@ -Slow wiping
®-Fast wiping .,_
Vehicle care Do-it-yourselt service iTechnical data
Page 69 of 362
![AUDI A5 COUPE 2011 Owners Guide - If the wiper blades are not frozen to the windshield, bring the windshield wiper lever to the basic position ®
=:> page 65, fig. 61.
- Select: Function b utt on
I CAR ]> Windsh AUDI A5 COUPE 2011 Owners Guide - If the wiper blades are not frozen to the windshield, bring the windshield wiper lever to the basic position ®
=:> page 65, fig. 61.
- Select: Function b utt on
I CAR ]> Windsh](/img/6/57583/w960_57583-68.png)
- If the wiper blades are not frozen to the windshield, bring the windshield wiper lever to the basic position ®
=:> page 65, fig. 61.
- Select: Function b utt on
I CAR ]> Windshield wipers >
Service position.
• On -chang ing the w indshield w iper blades can on ly be done if you
bring the wiper arms to the service position~ page
66, fig. 62. You
wi ll also avoid pa int damage to the hood when working on the w ipers
in this position.
• Off -the w indshield wipers are moved to their initia l posit ion
again .
0 Note
Never maneuver yo ur vehicle with the front w indshield wiper arms
raised since they will automatically be moved back to their basic posi
tion above a speed of 3 mp h (6 km/h) and can scratch the hood .
W Tips
• You ca n also use the se rvice pos ition, for example, if you want to
protect the w indshield from icing by using a cover.
• The service position automatically switches to
Off w hen you
operate the windshield wiper lever, or speed exceeds
3 mph (6
km/h). •
Controls and equip
ment Safety first
Clear v
ision
Replacing windshield wiper blades
Wiper blades in good condition help keep the windshield
clear .
~ 0 0 ci:
~
Fig . 63 R emoving th e
wi pe r b la de
Removing the wiper blade
- Bring the windshield wipers to the service position
=:> page 66.
-Lift the winds hie ld wiper arm up from the windshie ld.
- Press the locking knob ©::::> fig. 63 on the wiper blade .
Hold the wiper blade firm ly .
- Remov e the wi per b lad e in the di rection of th e ar row.
Attaching the wiper blade
- Install the new w iper b lade in the retai ner on the wiper
arm @until you hear it click into place on the wiper arm .
- Place the wiper arm back on the windsh ield .
& WARNING
• Clean your wiper blade s regularly with a wind sh ield wa she r
solution to prevent streak ing . If th e wiper blade s are very dirty , .,
Vehicle care Technical data
Page 71 of 362
headligh ts from rearward a pproachi ng veh icles). E ven in dimming
mod e, the mirr or s urf ac e tur ns b rig ht whe n:
• t he in ter ior light is swi tc he d o n
• reve rse gear i s eng ag ed.
& WARNING
Broken glass of automatic dimming mirror can cause electrolyte
fluid leakage. Electrolyte fluid can irritate skin, eyes, and respira
tory system.
• Repeated or prolonged exposure to electrolyte can cause irrita
tion to the respiratory system, especially among people with asthma or other respiratory conditions. Get fresh air immediately
by leaving the vehicle or, if that is not possible , open windows and
doors all the way.
• If electrolyte gets into the eyes, flush them thoroughly with
large amounts of clean water for at least 15 minutes; medical
attention is recommended.
• If electrolyte contacts skin, flush affected area with clean
water for at least 15 minute s and then wash affected area with
soap and water; medical attention is recommended. Tho roughly
wash affected clothing and shoes before reuse.
• If swallowed and person is conscious, rinse mouth with water
for at least 15 minutes. Do not induce vomiting unless instructed
to do so by medical professional. Get medical attention immedi ately .
0 Note
Liquid elec tro ly te le aked from a b roken mirr or glass will d am age a ny
plas tic surfaces it comes in contact wi th . Clean up spi lled electro lyte
immediately wit h clear wate r and a spon ge.
Con tro ls a nd e quip
m en t Vehicle
OP-eration
Clear vision
(I) Tips
• If you switch off the automatic dimming function on the inside
mirror , automatic dimming of the outside mirrors will likewise be
disabled.
• Check to make sure there are no o bjects prevent ing lig ht from
reach ing the inside mirror.
• Do not attach any st ic kers to the w indshield in fro nt of t he lig ht
senso r*, as this wo uld int erfere with both the a utomatic op eration of
the headlights a nd the automat ic di mm ing of the inside mirror .
• Be aware that a uto mat ic dimming o f the inside mirro r can on ly
operate pro pe rly if t he rear w indow s un bli nd* is ret racted .•
Outside mirrors
The outsid e mirr ors a re e le ctri call y ad juste d (powe r
mirr ors) .
Adjusting exterior mirrors
Fig . 65 Fo rward
section of driver 's
armrest : power mirror
c ontrols
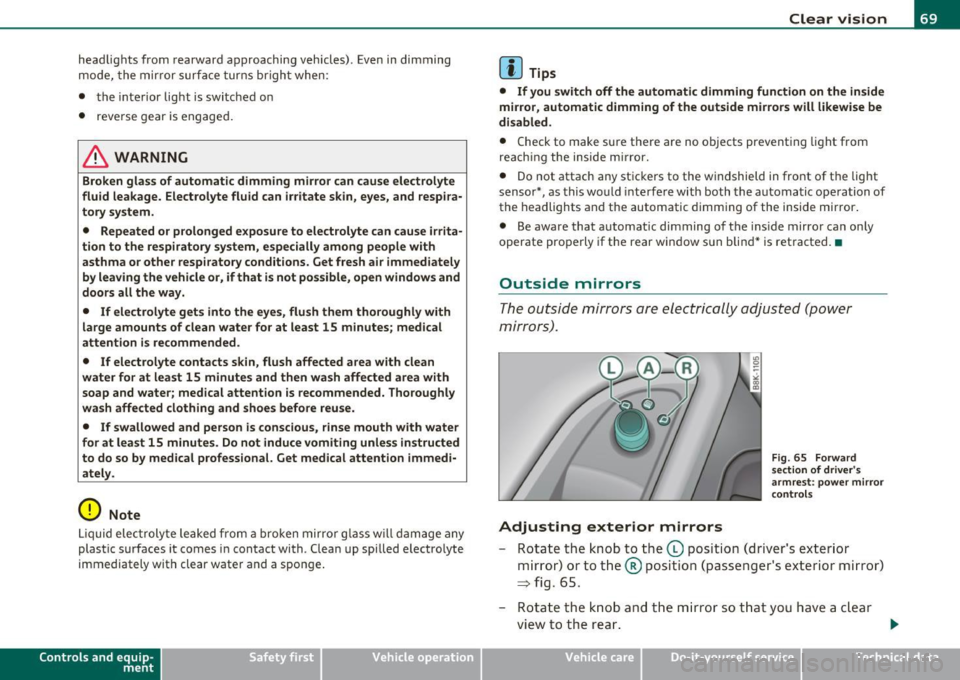
- Rotate the kn ob t o the (D position ( driv er's exter ior
m irro r) o r t o th e® pos it ion (p asse nger 's exterior mi rror)
~ fig. 65 .
- Rotate t he k nob a nd th e mirror so t hat you hav e a c lear
v iew to the re ar. .,.
Vehicle care Do-it-yourselt service iTechnical data
Page 73 of 362
& WARNING (co ntinued )
• If swallowed and person is consciou s, rinse mouth with water
for at least 15 minutes. Do not induce vomiting unle ss in structed
to do so by medical professional. Get medical attention immedi
ately .
0 Note
Liquid elec troly te le aked from a broken mirro r g las s w ill d amage any
plast ic s urfaces it comes in contact with . Clean up spilled e lectro lyte
immedi ately wi th clear wa te r an d a sp on ge.
[ i J Tips
• Switching off the dimming function of the inside rear view
mirror also deactivates the automatic dimming function of the
exterior mirrors.
• Automati c dimm ing for t he mirro r only operates proper ly i f the
su n s had e* for the re ar win dow is no t in use or th e light st riking the
inside m irror is not h indered by other objects .•
Controls and equip
ment Safety first
Clear vision
Digital compass
Ap
plies to veh icles: w it h d igita l co m pa ss
Activating or deactivating the compass
The direction is displayed on the interior rear vi ew mirror .
Fig. 66 Insi de rea r
v iew m irror : digita l
c om pas s activated
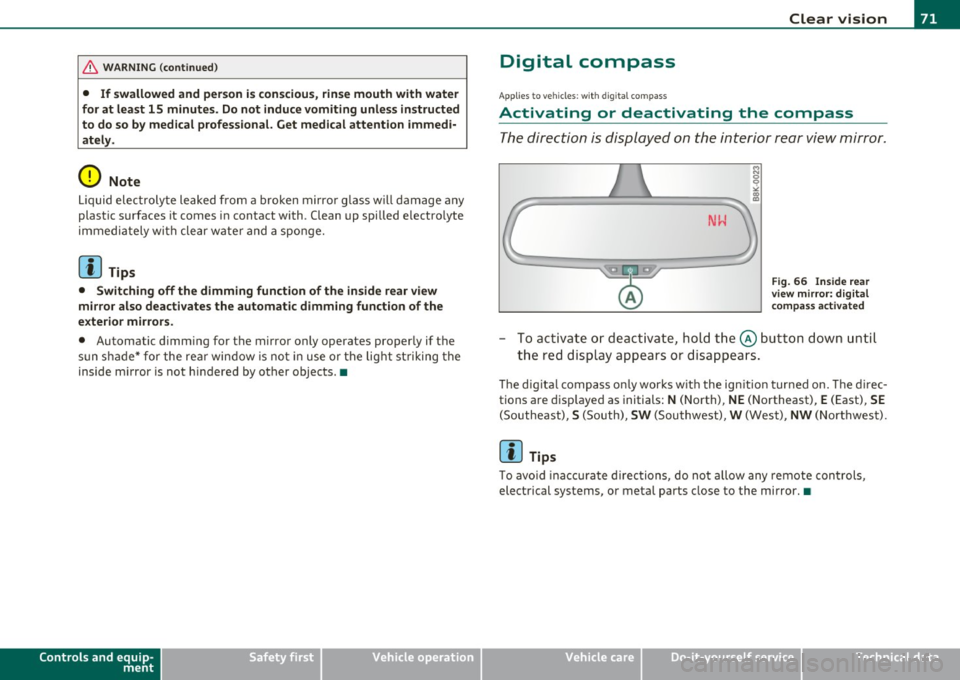
- To a ct iva te or deact iva te, h old the @ butto n do wn u ntil
t he red d isp lay ap pears or dis a pp ears.
Th e dig ital co mpa ss o nly wor ks w ith the ig nition t urned on . Th e dir ec
tions a re di sp layed as initials:
N (No rth) , NE (N ortheast), E (East), SE
(Sou the ast) , S (South), SW (Sou thwest), W (Wes t) , NW (N ort h wes t) .
(I] Tips
T o avo id inaccur ate dir ections, d o not allow any rem ote con trol s,
electrical systems, or meta l parts close to the mirro r. •
Vehicle care Technical data
Page 75 of 362
Seats and storage
General recommendations
Why is your seat adjustment so important?
The safety belts and the airbag system can only provide
maximum protection if the front seats are correctly
adju sted.
Th ere a re various ways of adjusting t he front seats to provide safe and
comfortable support for the driver and the front passenger . Ad just
your seat properly so that :
• you can easily and quickly reach a ll the switc hes and contro ls in the
ins trumen t pa nel
• your body is properly supported thus reducing phys ica l stress and
fatigue
• the safety be lts and airbag system can offer maximum protection
=>
page 190 .
In the following sections, you w ill see exact ly how you can best ad just
your sea ts .
Th ere are special regulations a nd instr uctions for install ing a child
safety seat on the front passenger's sea t. Always follow the informa
tion regarding child safety p rovided in=>
page 215, "Child Safety ".
& WARNING
Incorrect seating posit ion of the dri ver and all other passengers
can result in seriou s personal injury.
• Always keep your feet on the floor when the vehicle is in
motion -never put your feet on top of the instrument panel, out
of the window o r on top of the seat cush ion. This applies especially
to the passengers.
If your seating po sition is incorrect, you
increase the ri sk of injury in the case of sudden braking or an acci-
Controls and equip
ment Safety first
Seats and storage
& WARNING
(con tinu ed)
dent . If the airbag inflates and the seating position is incorrect ,
this could result in per sonal injury or even death .
• It is important for both the dri ver and front passenger to keep
a distan ce of at least 10 inche s (25 cm) between themselves and
the steering wheel and /or instrument panel. If you 're sitting any
closer than this , the airbag system cannot protect you properly. In
addition, the front seats and head restraints must be adjusted to
your body height so that they can give you maximum protection .
• Always try to keep as much distance as possible between your
self and the steering wheel or instrument panel.
• Do not adjust the driver's or front passenger 's seat while the
vehicle is moving. You r seat may move unexpectedly , causing
sudden loss of vehicle control and personal injury . If you adjust
your seat while the vehicle is moving , you are out of position. •
Driver's seat
The correct seat position is important for saf e and
re lax ed driving.
W e recomme nd that you a djust the drive r's sea t in the
f ollowing man ner :
- Ad just the seat in fore and aft direction so that you can
easily pus h the pedals to the floor w hile keeping your
knees slightly bent=>
& in "Why is yo ur seat a djus tme nt
so importa nt?" .
- Adjust the seatback so that when yo u sit with yo ur back
agai nst t he seatback , you can st ill grasp t he top of the
steering w heel. ..,
Vehicle care Technical data
Page 77 of 362
Applies to veh icles : w ith manua lly ad justable seats
Adjusting the seat
Position and shape of the seat can be adjusted manually
to ensure safe and comfortable seating.
Read and follow the warning notices~ & before you adjust
your seat .
Fore-and-aft adjustment
- Pull the lever CD~ page 74, fig. 68 up and push the seat
to the desired position.
- Release the lever
CD and continue to move the seat until it
locks into place.
L e ngthening or shortening upper thigh
support *
- Lift the button@ under the seat cush ion. The front seat
cushion moves forward under spring force.
- Push the seat cushion back when you have finished using it.
Adjusting seat cushion angle *
- Pull or push the lever®==> page 74, fig. 68 up or down
(pumping motion) .
Adjusting the curv ature of the lumb ar
support *
-Push the switch plate© forward or backward to increase
or reduce the curvature .
Controls and equip
ment Safety first
S
eats and storage
Adjusting the height of the lumbar support *
- Push the switch plate© up or down to position the curva
ture higher or lower.
R aising or lowering seat height
- Pull or push the lever©==> page 74, fig. 68 up or down
(pump ing motion) .
Adjusting s eatback angl e
Remove weight from the seatback (do not lean against it) .
- Turn the hand wheel©==>
page 74, fig. 68 to adjust the
angle of the seatback accordingly .
L1}. WARNING
• Adju st t he d riv er 's se at onl y when th e v ehicle is st atio nary. Y ou
ri sk an ac cident oth erwi se .
• Exe rci se ca ution w hen a djust in g th e sea ts. A dju st in g th e sea t
ca re less ly o r witho ut checkin g ca n pinch h and s and fin gers.
• While the vehicle is m oving , th e seat backs of th e front seats
mu st n ot b e incl in ed t oo far to the re ar b ecau se the effe cti ve ness
o f the s afe ty bel ts and th e air ba g sys te m is sev erel y co mpr om is e d
- ther e is a risk of injury. •
Vehicle care Technical data
Page 79 of 362
Applies to veh icles : w ith power adjusta ble seats
Adjusting the seat
Position, angl e and shape of the seat can be adjusted
ele ctrically to ensure safe and comfortabl e seating .
Read an d follow the warning notices~ & before you ad just
your seat .
Adjusting the curvature of the lumbar
support*
- Pu sh the switch p late @forwa rd or backward to in crease
or red uce the curvature.
Adjusting the height of the lumbar support*
- Push the sw itch p late @ up or dow n to position the curva
ture higher or lower.
Fore-and-aft adjustment
- P ush t he switc h® forward or backward ~ page 76,
fig .
70 .
Adjusting seat height
- Pull or push t he switch ® up o r down.
Front seat cushion up/ down
- P ress the sw itch ® at the fron t up or down .
Rear seat cushion up/ down
- Press the swi tch ® at the rear up o r dow n.
Adjusting seatback angle
- P ush t he switc h © forward or backw ard .
Controls and equip
ment Safety first
Seats and storage
Head restraint height adjustment*
- P ress the switch @from up to down or t he ot her way.
Lengthening or shortening upper thigh
support*
- Li ft the button @ under the seat cush io n. T he front seat
cushion moves forward under spri ng force .
- Pus h t he s eat c ushion ba ck w hen you hav e finishe d us ing
i t.
& WARNING
• Adjust the driver's seat only when the vehicle is stationary . You
risk an accident oth erwise .
• The power adjustment for the front seat s al so works with the
ignit ion switched off or with the ign ition key removed. For this
rea son, children should never be left unattended in the vehicle -
they could be injured!
• Exerci se caution when adjusting the seat height. Unsupervis ed
or careless seat adjustment can p inch fingers or hands causing
injuries .
• While the vehicle is moving , the seat backs of the front seats
must not be inclined too far to the rear be cause the effectiveness
of the safety belts and the ai rbag system is severely compromised
- there is a risk of injury .•
Vehicle care Technical data
Page 81 of 362
Storing and recalling settings
With the help o f the memory buttons 1 and 2 ::::> page 78, fig. 72 the
sett ings fo r two d ifferent d rivers can be stored and recalled
::::>
page 79 .
Th e cur rent settings are a lso a utomat ically stored on the remote
cont rol key being used when the vehicle is locked. W hen the vehicle is
unlo cked , the settings stored on the remo te co ntro l key being used
are automatically reca lled.
Turning seat memory on and off
If the [ ON/OFF ] switch is depressed, the seat memory is inoperative .
Th e wo rd
OFF in the [ ON/OFF ] swi tch illum inates.
All the stored sett ings are retained . We recommend us ing the
I ON/OFF ] switch and deact ivat ing the sea t memory if the vehicle is
only go ing to be used
temporarily by a drive r whose settings are not
going to be stored .•
A ppli es to ve hicl es : wit h seat me mory
Storing and recalling settings
Before you ca n st ore or recall your settings , the [ O N/OF F]
switch o n the seat memory must be engage d (not raise d).
Storing settings
- Adjust the driver's seat.
- Adjust the two exterior mirrors.
- Press the!SE T] button a nd hold it dow n. In ad dit ion , press
o ne of the memory buttons fo r at least o ne second .
- Release t he b utto ns . The s ett in gs a re now sto red un der
the corres ponding m emo ry bu tt on.
Controls and equip
ment Safety first
Seats and storage
Recalling settings
- If t he driver's doo r is o pen , tap the co rresponding memory
button brie fly.
- If the driver 's door is closed, press the appropriate
me mory button until the stored posi tio n is reached.
Su ccessfu l storage is confirmed audib ly and by the light in the [ SET ]
button illuminat ing::::> page 78, fig. 72.
Wh en the vehicle is
locked , the current settings are stored and
assigned to the remote con trol key . Bu t the settin gs s to red on
memo ry butto ns 1 to 2 are not deleted . They ca n be recalled a t any
time. When the vehicle is
unlocked , the settings stored on the
remote cont rol key are restored .
If your ve hicle is d riven by other persons us ing your remote contro l
key , you sho uld save yo ur individ ual seat p osi tion on one of the
memory butto ns. Yo u can recall your settings aga in simp ly and
c onvenien tly by press ing the corres ponding memory bu tton . Wh en
the ve hicle is locked, these settings a re a utomat ically re -ass ig ned to
the remote control key and stored.
& WARNING
• For safety rea sons, the seat setting can only be recalled when
the vehicle is stationary -otherwise you risk having an accident .
• In an emergency the recall procedure can be cancelled by
pressing the [
ON/OFF] switch or by tapp ing of the the memory
button s. •
Vehicle care Technical data
Page 83 of 362
The head restraints on the front seats can be adjusted to
provide safe support to head and neck at the optimum height
=> page 80, fig. 73. Adjust the head restraint so the upper
edge is as even as possible with the top of your head. If that
is not possible, try to adjust the head restraint so that it is as
close to this position as possible=>
page 80.
Raising/Lowering the head restraint
-Grasp the sides of the head restraint with both hands and
slide the head restraint upward/downward, until you feel
it click into place=>
page 80, fig. 73.
Electric height adjustment*
Push the switch up or down=> page 80, fig. 74 to adjust
the height of the head restraint.
Refer to=> page 174, "Proper adjustment of head restraints" for
guidelines on how to adjust the height of the front head restraints to
suit the occupant's body size.
& WARNING
• Driving without head restraints or with head restraints that are
not properly adjusted increases the risk of serious or fatal neck
injury dramatically.
• Read and heed all WARNINGS=>
page 174.
(I) Tips
Correctly adjusted head restraints and safety belts are an extremely
effective combination of safety features. •
Contro ls a nd e quip
m en t Vehicle
OP-eration
Seats and storage
Rear head restraints
Adjusting the head restraints
Fig. 75 Rear seats:
Head restraint
Fig. 76 Rear head
restraints: release
- To move the head restraint up, hold it at the sides with
both hands and slide it upward until you feel it click into
place.
- To move the head restraint down, press the button ©
=> fig. 75 and slide the head restraint downward.
Removing the head restraints
- Fold the backrest forward=> page 84.
-Move the head restraint upward as far as it can go.
Vehicle care Do-it-yourselt service iTechnical data