ECU AUDI A5 COUPE 2012 User Guide
[x] Cancel search | Manufacturer: AUDI, Model Year: 2012, Model line: A5 COUPE, Model: AUDI A5 COUPE 2012Pages: 316, PDF Size: 78.59 MB
Page 74 of 316
7 2 Seats and storage
locking the seatback
Appli es to vehicles: with fold ing rear seatback
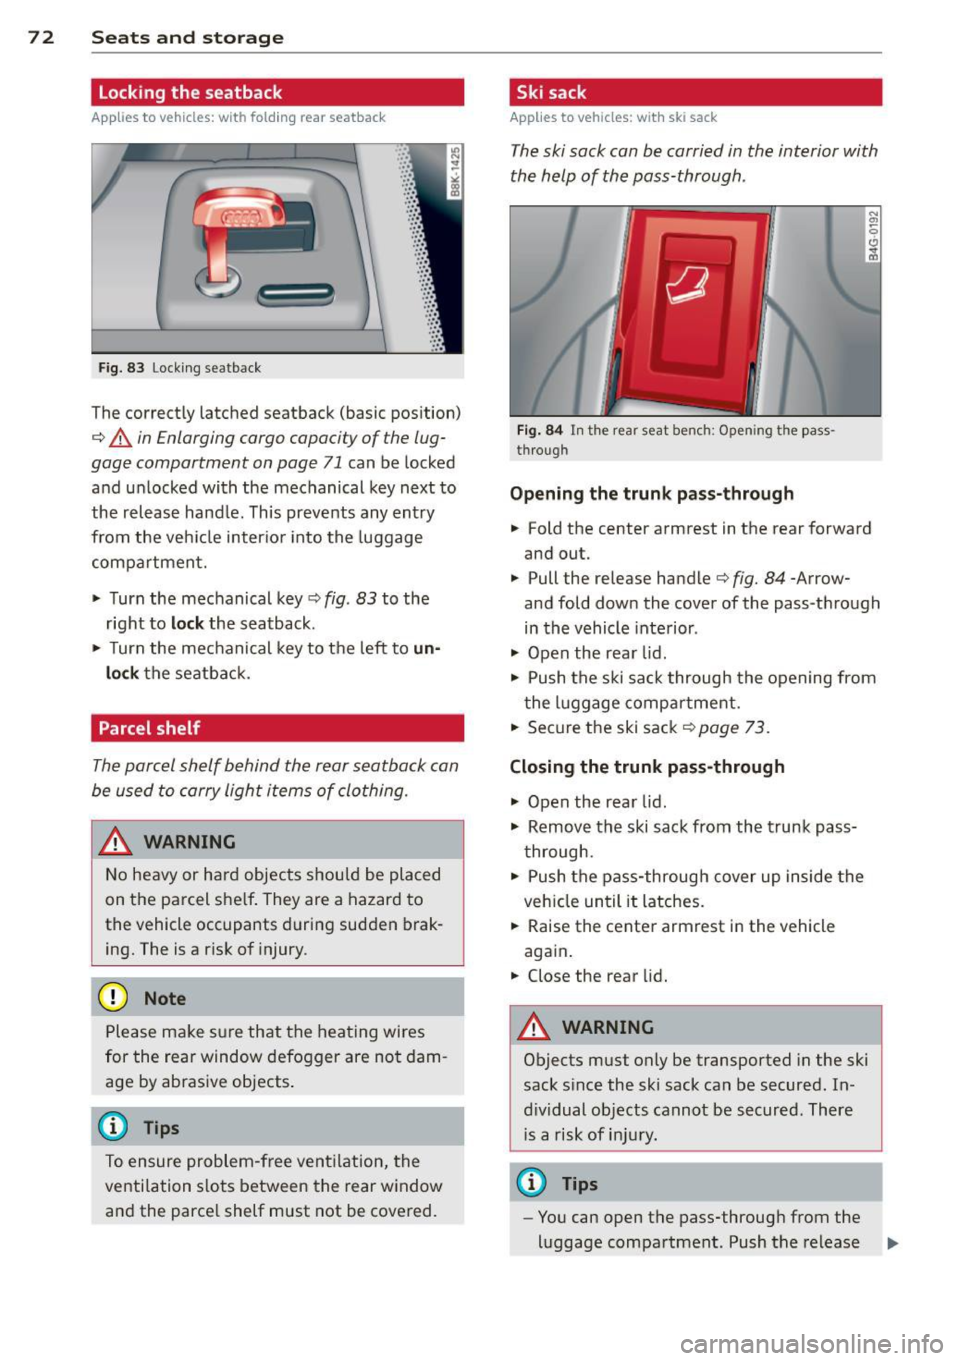
Fig. 83 Lock ing seatback
.. ... ,:: ·:: ·: : ·:: • :: ... ,: ·: ... .. ·::
· ::
•: : ·:: · :: ·:: · ::
· ::
· ::
· :: ·:: ·:: · :: ...
The correctly latched seatback (basic pos ition)
¢ A in Enlarging cargo capacity of the lug
gage compartment on page 71
can be locked
and unlocked with the mechanical key next to
the release hand le . This prevents any entry
from the vehi cle inter io r i nto the luggage
compartment.
.. Turn the mechanical key¢
fig. 83 to the
r ight to
loc k the seatback .
.. Turn the mec hani cal key to the left to
un
lock
the seatba ck.
Parcel shelf
The parcel shelf behind the rear seatback can
be used to carry light items of clothing.
A WARNING
N o heavy or ha rd objec ts shou ld be placed
on the parcel she lf . They are a hazard to
the vehicle occupants during sudden brak
ing. The is a r is k of injury .
(D Note
Please ma ke s ure that the heating wires
for the rear window defogger are no t dam
age by abrasive objects .
@ Tips
To ensure problem-free ventilation, the
ventilation s lots between the rear window
and the parce l shelf must not be cove red.
Ski sack
Applies to vehicles: w ith ski sack
The ski sack can be carried in the interior with
the help of the pass-through .
Fig . 84 In t he rear seat bench: Opening the pass
through
Opening the trunk p ass-through
.. Fold the center armrest in the rear forward
and out.
.. Pull the release handle¢
fig. 84 -Arrow
and fold dow n the cover of the pass -through
in the vehicle inte rior .
.. Open the rea r lid.
.. Push the ski sa ck through the opening from
the l uggage compar tment.
.. Secure the ski sack¢
page 73.
Closing the trunk pass -through
.. Open the rear lid .
.. Remove the ski sack from the trunk pass
through .
.. Push the pass-through cover up inside the
veh icle until it latches.
.. Raise the center armrest in the vehicle
aga in .
.. Close the rear lid.
A WARNING
=
Objects must only be transported in the ski
sack s ince the ski sack can be secured. In
d iv idual objects cannot be secured. There
i s a risk of in ju ry.
@ Tips
- You can open the pass-through from the
luggage compartment. Push the release
II>
Page 75 of 316
button down and push the cover for
ward.
- The pass-through can be locked and un
l ocked with the vehicle mechanical key
r=;, fig. 84.
Securing the ski sack
Applies to vehicles: with ski sack
The ski sack must be secured in the luggage
compartment.
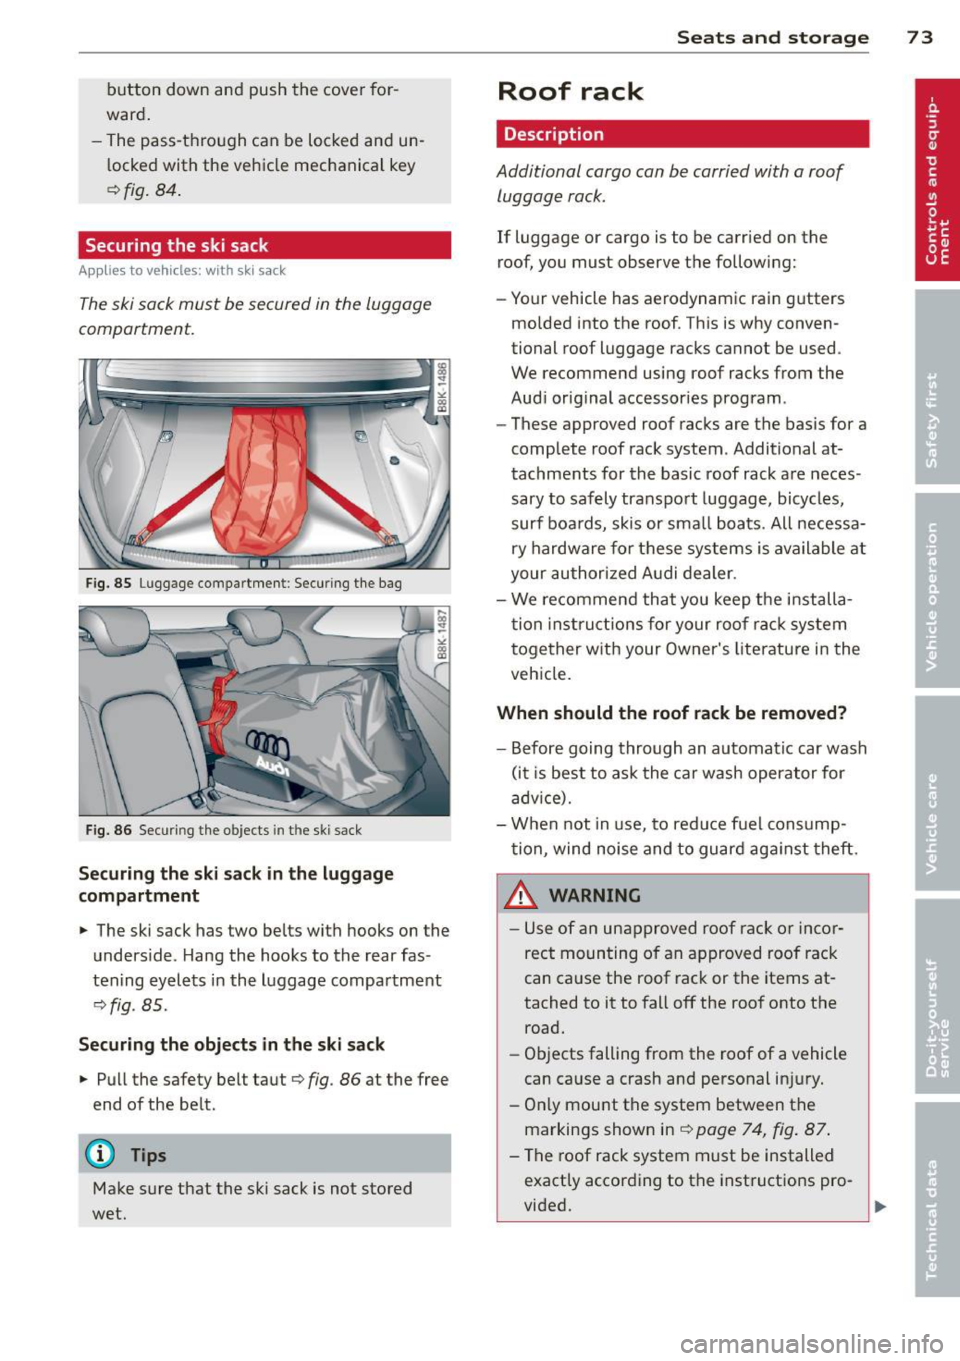
F ig. 85 Luggage compartment : Securing the bag
Fig. 86 Securing the objects in t he ski sack
Securing the ski sack in the luggage
compartment
.,. The ski sack has two belts with hooks on the
underside . Hang the hooks to the rear fas
tening eyelets in the luggage compartment
¢ fig . 85.
Securing the objects in the ski sack
.,. Pull the safety belt taut ¢ fig. 86 at the free
end of the be lt.
(D Tips
Make sure that the ski sack is not stored
wet.
Seats and storage 73
Roof rack
Description
Additional cargo can be carried with a roof
luggage rack .
If luggage or cargo is to be carried on the
roof, you must observe the following:
- Your vehicle has aerodynamic rain gutters
molded into the roof . This is why conven
tional roof luggage racks cannot be used .
We recommend using roof racks from the
Aud i original accessories program .
- These approved roof racks are the basis for a
complete roof rack system. Additional at
tachments for the basic roof rack are neces
sary to safely transpo rt luggage, bicycles,
surf boards, skis or sma ll boats. All necessa
ry hardware for these systems is available at
your authorized Audi dealer.
- We recommend that you keep the installa
tion instructions for your roo f rack system
together with your Owner's literature in the
vehicle.
When should the roof rack be removed?
-Before going through an automatic car wash
(it is best to ask the car wash operator for
advice).
- When not in use, to reduce fuel consump
tion, wind noise and to guard aga inst theft.
8_ WARNING
- Use of an unapproved roof rack or incor
rect mounting of an approved roof rack
can cause the roof rack or the items at
tached to it to fall off the roof onto the
road.
- Objects falling from the roof of a vehicle
can cause a crash and personal in jury.
- Only mount the system between the
markings shown in
r=;, page 74, fig. 87 .
- The roof rack system must be installed
exactly according to the instructions pro-
-
vided. .,,.
Page 76 of 316
7 4 Seats and storage
(D Note
- Your vehicle warranty does not cover any
damages to the vehicle caused by using
roof racks or mounting structures not
approved by Audi for your vehicle . The
same applies to damage resulting from incorrect roof rack installation .
- Always check the roof rack mountings
and hardware before each trip and dur
ing a trip to make sure everything is se
curely tightened. If necessary, retighten
the mountings and check the ent ire sys
tem from time to time.
- After mounting a roof rack system, or
when you transport objects on the roof
of your vehicle, the height of the vehicle
is naturally increased. Be careful when
driving under low bridges or in parking
garages for example. This could cause
damage to the load and even the vehicle itself.
Mounting points
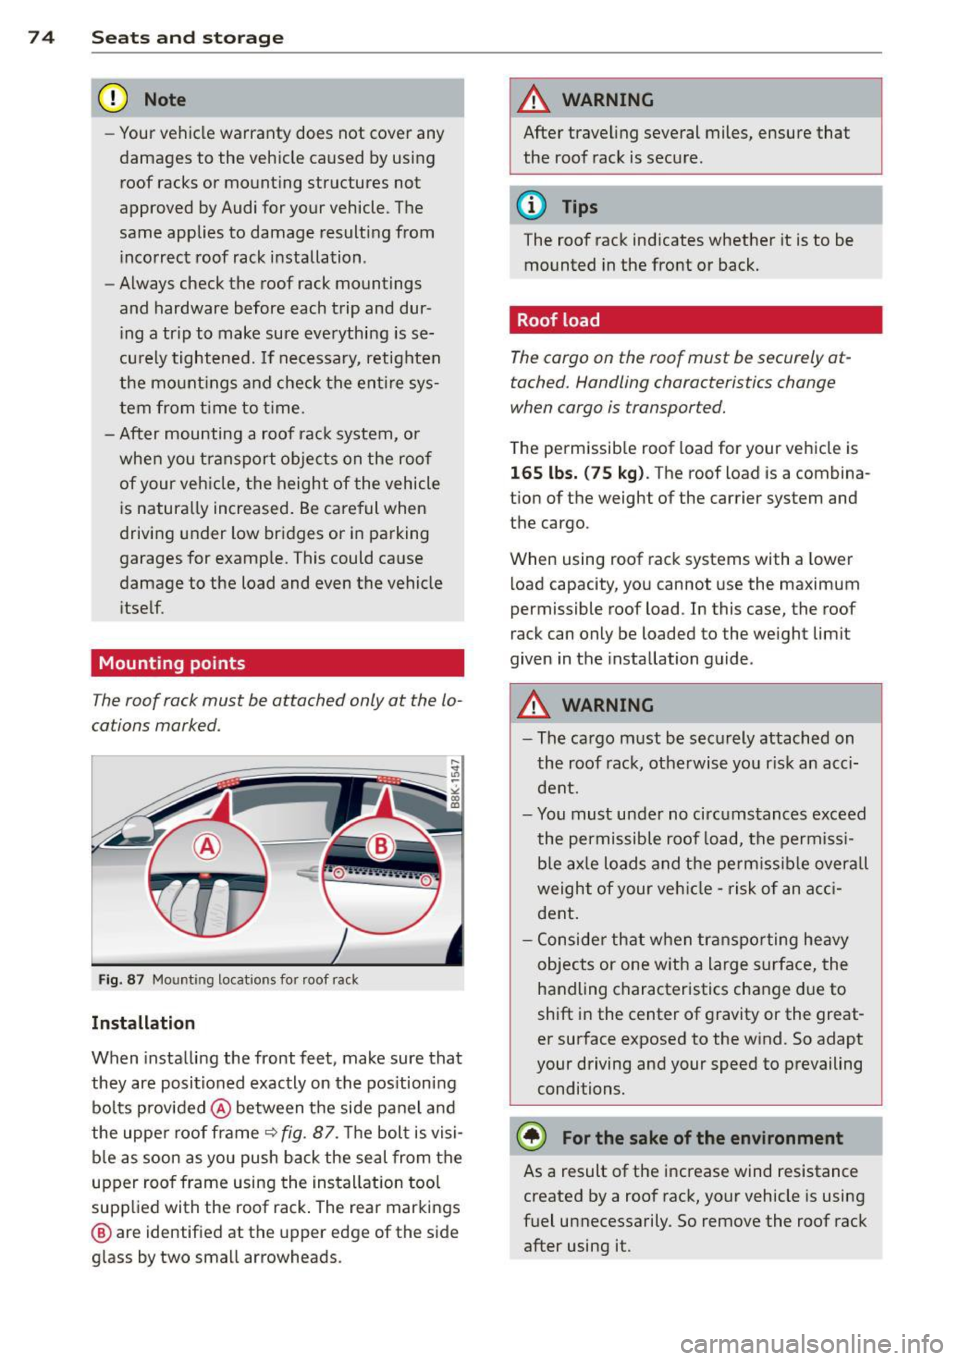
T he roof rack must be attached only at the lo
cations marked .
Fig. 87 Mounting locations for roof rack
Installation
When installing the front feet , make sure that
they are positioned exactly on the positioning
bolts provided @between the side panel and
the uppe r roof frame¢
fig . 87. Th e bolt is visi
ble as soon as you push back the seal from the
upper roof frame using the installation tool
supplied with the roof rack . The rear markings
@ are identified at the upper edge of the side
glass by two small arrowheads.
A WARNING
-After traveling several miles, ensure that
the roof rack is secure.
(D Tips
The roof rack indicates whether it is to be mounted in the front or back.
Roof load
The cargo on the roof must be securely at
tached. Handling characteristics change
when cargo is transported.
The permissible roof load for your vehicle is
165 lbs. (75 kg) . The roof load is a combina
tion of the weight of the carrier system and the cargo.
When using roof rack systems with a lower
load capacity, you cannot use the maximum
permissible roof load . In this case, the roof
rack can only be loaded to the weight limit
given in the installation guide.
A WARNING
- The cargo must be securely attached on
the roof rack, otherwise you risk an acci
dent.
- You must under no circumstances exceed
the permissible roof load, the permissi
ble axle loads and the permissible overall
weight of your vehicle -risk of an acci
dent.
- Consider that when transporting heavy
objects or one with a large surface, the
handling characteristics change due to
shift in the center of gravity or the great
er surface exposed to the wind. So adapt
your driving and your speed to prevailing conditions.
~ For the sake of the environment
As a result of the increase wind resistance
created by a roof rack, your vehicle is using
fuel unnecessarily. So remove the roof rack
after using it.
Page 77 of 316
Beverage holders
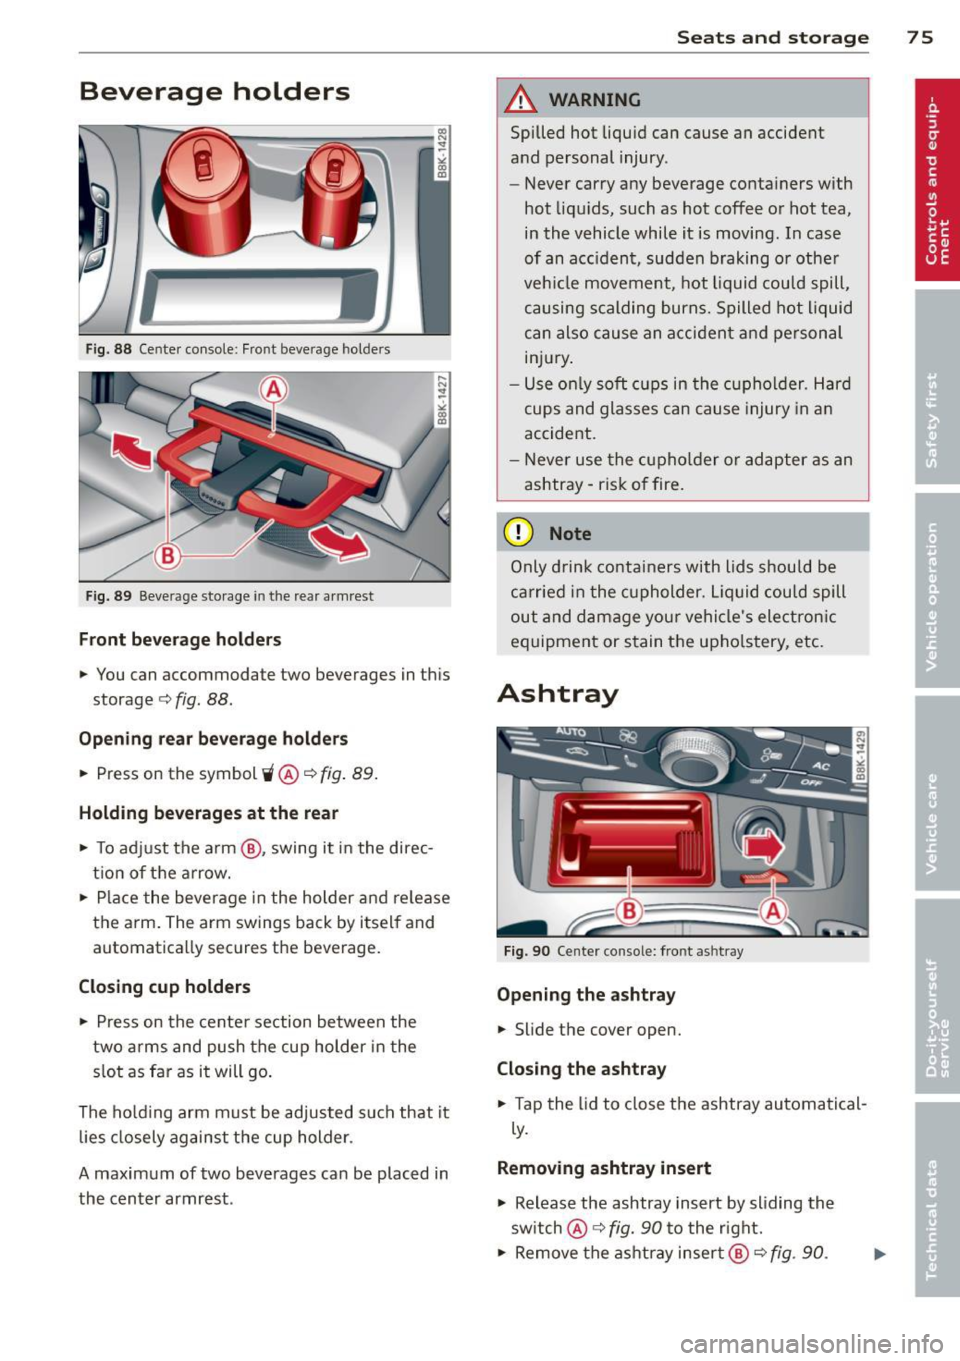
Fig. 88 Center console: Front beverage holders
Fig. 89 Beve rage storage in the rear armrest
Front beverage holders
... You can accommodate two beverages in this
storage c::>
fig. 88.
Opening rear beverage holders
... Press on the symbol~ @c::> fig. 89.
Holding beverages at the rear
.,. To adjust the arm @, swing it in the direc
tion of the arrow .
.,. Place the beverage in the holder and release
the arm. The arm swings back by itself and
automatically secures the beverage.
Closing cup holders
.,. Press on the center section between the
two arms and push the cup holder in the
slot as far as it will go.
The holding arm must be adjusted such that it
lies closely against the cup holder.
A maximum of two beverages can be placed in
the center armrest .
Seats and storage 75
A WARNING
Spilled hot liquid can cause an accident
and personal injury.
- Never carry any beverage containers with
hot liquids, such as hot coffee or hot tea,
in the vehicle while it is moving. In case
of an accident, sudden braking or other
vehicle movement, hot liquid could spill,
causing scalding burns. Spilled hot liquid
can also cause an accident and personal
injury.
- Use only soft cups in the cupholder. Hard
cups and glasses can cause injury in an
accident.
- Never use the cupholder or adapter as an
ashtray -risk of fire.
(D Note
Only drink containers with lids should be
carried in the cupholder. Liquid could spill
out and damage your vehicle's electronic
equipment or stain the upholstery, etc.
Ashtray
Fig. 90 Center console: front ashtray
Opening the ashtray
... Slide the cover open.
Closing the ashtray
.,. Tap the lid to close the ashtray automatical
ly.
Removing ashtray insert
.,. Release the ashtray insert by sliding the
switch @ c::>
fig. 90 to the rig ht .
.,. Remove the ashtray insert@ c::>
fig. 90 .
Page 95 of 316

~ Insert the key into the ignition lock .
~ Manual transmission: Fully depress the
clutch peda l and move the sh ift lever to the
neutral position.
~ Automa tic transmission*: Step on the brake
pedal and move the selector lever to the
P
or N position .
~ Press the key~ fig. 105 -the eng ine will
sta rt.
By pressing the key
without stepp ing on the
clutch or the brake, the ig nition is switched o n
and off. With the ignit io n on, t he steer ing
wheel is un locked.
You can only remove the key w ith the ignition
sw itched off . T o do this, you have to p ress on
the key aga in. Wi th an a utomat ic transm is
sion, the se lecto r lever must be in the
P posi
tion .
When starting the engine, ma jor e lectr ica l
l oads are switched off tempo ra rily .
After start ing a cold engine, there may be a
brief period of increased no ise because the oi l
p ressu re must fi rst build up in the hydraulic
va lve adjusters. This is normal and not a cause
fo r concern.
If the engine should not start immediately,
the starting p rocess is automatically stopped
after a sho rt time . Repeat sta rting p rocedu re.
Driver me ssage in the in strument cluster
display
Press brake pedal to start engine
This message appea rs if you do not step on
the brake pedal to sta rt the eng ine on a veh i
cle with an automat ic transm iss ion.
Press clutch pedal to start engine
This message appears if you do not step on
the clutch peda l to start the engine on a ve hi
cle with a manua l transm ission .
Engage Nor P to start engine
T his message appears when attempting to
start the engine if the se lector lever for the
automatic transmission is not in the
P or N
On th e ro ad 93
posit ion . The engine can only be started wi th
the se lecto r in these positions .
Shift to P, otherwise vehicle can roll away.
Doors do not lock if lever is not in P .
This message appears for safety reasons
along with a warn ing signal.
It a ppears if the
se lector lever for the automatic transmission
is not in the
P position after the ignition is
switched off . Move the selector lever to the
P
pos ition, ot herwise the vehicle is not secured
against ro lling away . You also cannot lock the
vehicle us ing the locking b utton o n the doo r
hand le o r us ing the remo te key .
.8, WARNING
-Always take the key w ith you whe never
you leave your ve hicle. O therw ise, the
en gine cou ld be sta rted o r ele ct rical
eq uip me nt s uch as the power windows
could be operated. This can lead to seri
ous injury.
- Never leave children or persons re quiring
assistance unattended in the ve hicle. The
doors can be locked using the remote
transmitter, preventing people from es caping from t he veh icle on t heir own in
the ev ent of an e merge ncy. D epe nding
on t he time of yea r, peop le inside the ve
hicle can be expo sed to very high o r very
low tempe ra tur es.
- Never re mo ve the ign ition key from the
ig nition lo ok while the veh icle i s m oving .
O the rwise, the s teering lock could su d
d enly en gage and yo u wo uld not be a ble
to steer the vehicle .
@ Note
- In th e even t of a m alf un ct io n in the ele c
t ronic ignit io n loc k a symbol in the in
strument cl uste r flashes with the mes
sage
Ignition lock defective .
-Avo id hi gh engine spee ds, fas t a ccelera
tion or heavy engine loa ds while the en
gine is still cold . This could damage the
eng ine.
Page 129 of 316
Rocking back and forth to becom e
un stuc k
~ Shift on ly between D and R when the vehi
cle is at a full stop and the e ngine is r unni ng
at idle speed .
Stopping
~ Press and ho ld the brake pedal unti l the ve
hicle has come to a complete stop .
~ Keep the brake pedal depressed so that the
vehicle cannot roll forward or backward
while it is idling¢ &_.
~ Once stopped, do not depress the accelera
tor pedal to rev up the engine ¢&_ .
Parkin g
~ Press and ho ld the brake pedal unti l the ve
hicle has come to a complete stop.
~ Set the parking brake firmly¢ page 97,
Parking.
~ Press and hold the release button in these
lector lever handle, move the selector lever
into
P a nd the n let go of the release button
¢,&_ .
The selector lever must be in Nor P. If one of
the dr iving pos it ions is engaged a safety
sw itch w ill prevent the engine from be ing
started. See also ¢
page 92.
Before you move the selecto r lever from the P
position, you must always apply the brake
pedal before and whi le dep ress ing t he button
i n the hand le of the se lec to r lever .
A WARNING
-Unintended ve hicle movement can cause
serious injury.
- When the selector lever is i n a dr iving
position, the ve hicle may creep, even at
i dl e speed . Therefo re do not release
the par king brake or foot b rake until
you are re ady to move, because powe r
is transmit ted to the whee ls as soon as
a dr iving position is engaged.
- Do not ac celera te while selecti ng a
d riving posi tion. At th is time the en
g ine must be at idle speed so t hat un-
Tran sm iss ion 12 7
due stress is not placed on the clutches
in the transmiss ion.
- Remember: Even when stopped briefly
with the automatic transmission in D,S
or R, eng ine power is being transmit
ted to the wheels. Your veh icle cou ld
"creep" forward or backward. When
stopped, keep the b rake pedal fu lly de
pressed and use the pa rking brake if
ne cessary to keep the vehicle from ro ll
i ng.
- I f the selecto r lever is un intent ionally
moved into N while you are dr iv ing, t ake
your foo t off the accelerator ped al and
wait for the engine to retu rn to idle
speed before se lecting a driving position .
- Never sh ift into
R or P when the vehicle is
in motion.
- Never get out of the driver's seat when
the engine is running.
- If you m ust ge t out of the vehicle, move
the selector lever secure ly into the P po
sition and apply the pa rking brake firmly.
- If t he eng ine mus t rem ain r unning , neve r
have any driving posit ion engaged w hen
checking under the hood. Make sure the
selector lever has securely engaged and
is locked in P w ith the park ing brake
firm ly set¢
page 230, Engine compart
ment.
Othe rwise, any inc rease in engine
speed may set the vehicle in motion,
even with the park ing brake applied .
Page 145 of 316
When completed, the Homelink® system will
be in the programming mode and is then
ready to learn the codes for remote contro lled
devices.
@ Tips
- Programmed buttons cannot be erased
i ndividually.
- For security reasons you are advised to
erase the programming of the Home
Link ® system before you sell your vehicle.
Homelink ® 143
Page 149 of 316
-Passengers must always sit in an upright
position and never lean against or place
any part of their body too close to the
area where the airbags are located.
- Passengers who are unbelted, out of po
sition or too close to the airbag can be
seriously injured by an airbag as it un
folds with great force in the blink of an
eye .
- Always make sure that there are at least
10 inches (25 cm) between the front
passenger's breastbone and the instru
ment panel.
- Each passenger must always sit on a seat
of their own and properly fasten and
wear the safety belt belonging to that seat.
- Before driving, always adjust the front
passenger seat and head restraint prop
erly.
- Always keep your feet on the floor in
front of the seat. Never rest them on the
seat, instrument panel, out of the win
dow, etc. The airbag system and safety
belt will not be able to protect you prop
erly and can even increase the risk of in
jury in a crash .
- Never drive with the backrest reclined or
tilted far back! The farther the backrests
are tilted back, the greater the risk of in
jury due to incorrect positioning of the
safety belt and improper seating posi
tion.
- Children must always ride in child safety
seats <=:>
page 186 . Special precautions
apply when installing a child safety seat
on the front passenger seat
<=:> page 162.
Proper seating positions for passengers
in rear seats
Rear seat passengers must sit upright with
both feet on the floor consistent with their
physical size and be properly restrained
whenever the vehicle is in use.
To reduce the risk of injury caused by an incor
rect seating position in the event of a sudden
braking maneuver or an accident, your pas-
Driving Safely 147
sengers on the rear bench seat must always
observe the following:
.,. Make sure that the seatback is securely
latched in the upright position<=:>
page 70.
.,. Keep both feet flat in the footwell in front
of the rear seat.
.,. Fasten and wear safety belts properly
<=:>page 157 .
.,. Make sure that children are always properly
restrained in a child restraint that is appro
priate for their size and age
Q page 186.
A WARNING
Passengers who are improperly seated on
the rear seat can be seriously injured in a
crash.
- Each passenger must always sit on a seat
of their own and properly fasten and
wear the safety belt belonging to that
seat.
- Safety belts only offer maximum protec
tion when the seatback is securely latch
ed in the upright position and the safety
belts are properly positioned on the
body. By not sitting upright, a rear seat
passenger increases the risk of personal
injury from improperly positioned safety
belts!
- Always adjust the head restraint properly
so that it can give maximum protection .
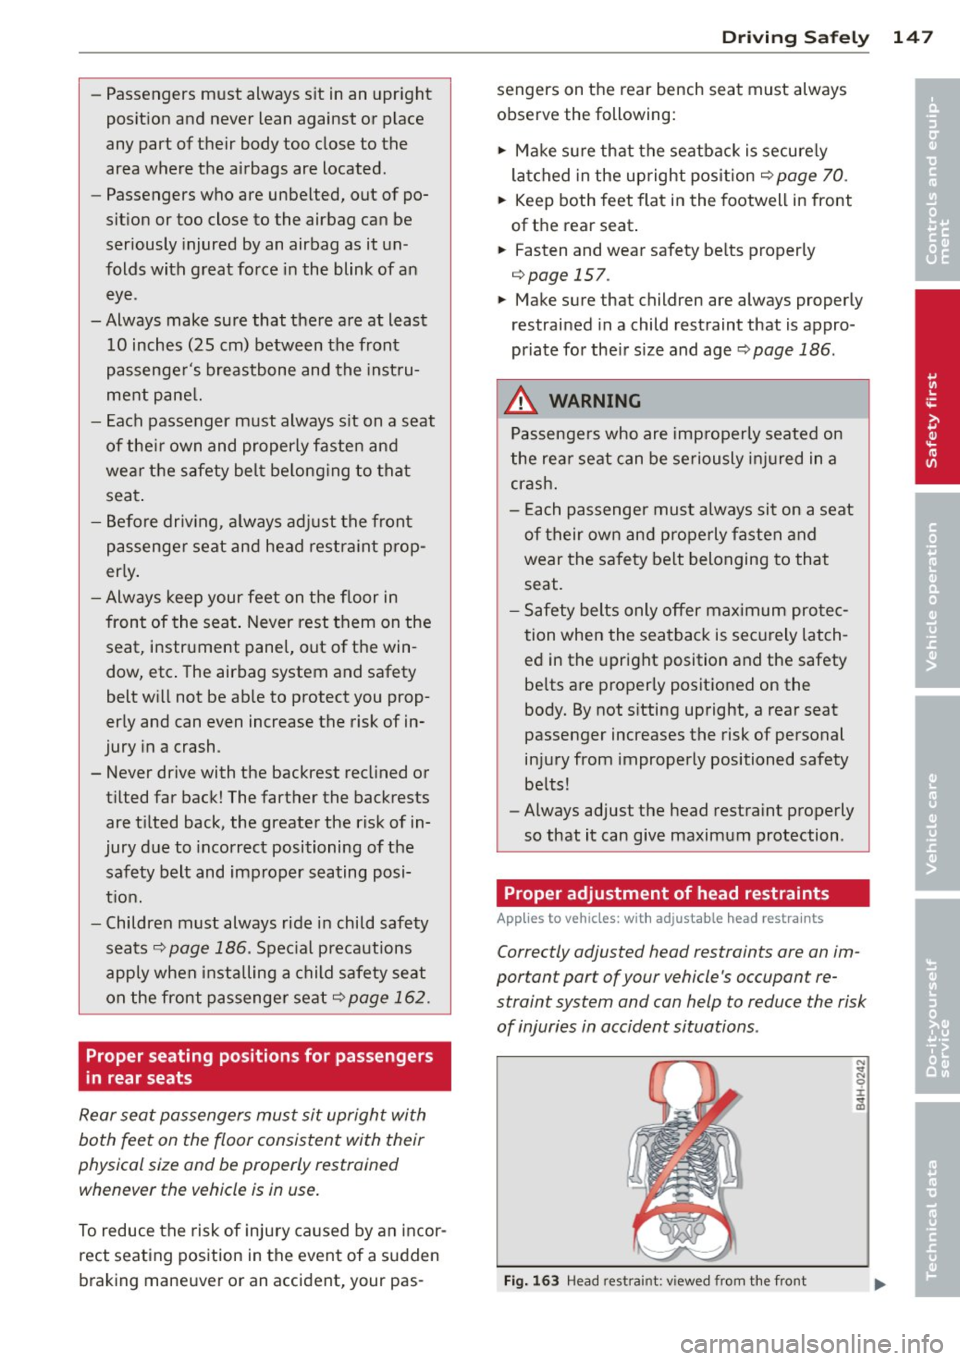
Proper adjustment of head restraints
Applies to vehicles: with adjustable head restra ints
Correctly adjusted head restraints ore on im
portant por t of your vehicle 's occupant re
straint system and con help to reduce the risk
of injuries in occident situations .
Fig. 163 Head restra int: v iewed from the front
"' ...
"' 0 ±
~
•
•
Page 151 of 316

Driver and passenger
side footwell
Important safety instructions
Applies to vehicles: with knee airbags
A WARNING
Always make sure that the knee a irbag can
inflate without interference . Objects be
tween yourself and the airbag can increase
the risk of inju ry in an acc ident by interfer
ing w ith the way the a irbag deploys or by
be ing p ush ed into you as the airbag de
ploys .
- No persons (ch ild ren) or animals should
ride in the footwell in front of the pas
senger seat. If the airbag deploys, this
can result in serious or fata l injuries .
- No objec ts of any k ind sho uld be car ried
in t he footwell area in front of the driv
er's or passenger's seat . B ulky objects
(shopping bags, for example) can ham
per or prevent proper deployment of the
airbag . Small objects can be thrown
through the vehicle if the airbag deploys and injure you o r your passengers .
Pedal area
Pedals
The pedals must always be free to move and
must never be interfered with by a floor mat
or any other object.
M ake sure t hat all pedals move freely witho ut
in te rference and th at nothing prevents them
from returning to the ir origina l positions.
Only use floo r mats that leave the peda l area
free and can be secured w it h floor mat fas ten
e rs.
If a b rake circuit fails, increased b rake pedal
travel is req uired to br ing the vehi cle to a full
stop.
Dr iving S afel y 149
A WARNING
Pedals that cannot move free ly can cause
loss of vehicle control and increase the risk
of ser ious inju ry .
- Never p lace any objects in the drive r's
footwell . An ob ject cou ld get into the
pedal area and inte rfe re with pedal func
tion . In case of sudde n bra ki ng o r an ac
cident, yo u wo uld not be a ble to brake or
ac celer ate!
- Always ma ke su re tha t no thing can fall
or m ove into the driver's footwel l.
Floor mats on the driver side
Always use floor mats that can be securely
attached to the floor mat fasteners and do
not interfere with the free movement of the
pedals .
"' Ma ke s ure that the floor mats are prope rly
secured and cannot move and inte rfe re with
t he ped als~ ,&. .
U se on ly floor mats that leave the pedal area
unobst ructed and that are firmly secu red so
that they cannot slip o ut of posi tion . You ca n
obt ain suitab le floo r mats from yo ur aut ho r
ized Audi dea ler .
Floor mat fastene rs a re insta lled in your Aud i.
Floor mats used in your vehicle must be at
tac hed to these fastene rs . Prope rly secur ing
the floor mats will prevent them from sliding
i nto positions that could interfere with the
peda ls o r impa ir safe ope rat io n of yo ur vehicle
i n othe r ways.
A WARNING
Pedals that cannot move free ly can result
in a loss of vehicle control and inc rease the
risk of serious persona l injury.
- Always ma ke s ure that floo r mats a re
properly secu red.
- Never p lace or ins tall floor mats o r other
f loor coverings in the vehicle that cannot
be properly secured in p lace to prevent
them from slipping and interfer ing with
~
•
•
Page 152 of 316
150 Driving Safely
the pedals or the ability to control the
vehicle.
- Never place or install floor mats or other
floor coverings on top of already instal
led floor mats. Additional floor mats and
other coverings will reduce the size of
the pedal area and interfere with the pedals.
- Always properly reinstall and secure floor
mats that have been taken out for clean
ing.
- Always make sure that objects cannot fall into the driver footwell while the ve
hicle is moving. Objects can become
trapped under the brake pedal and accel
erator pedal causing a loss of vehicle
control.
Stowing luggage
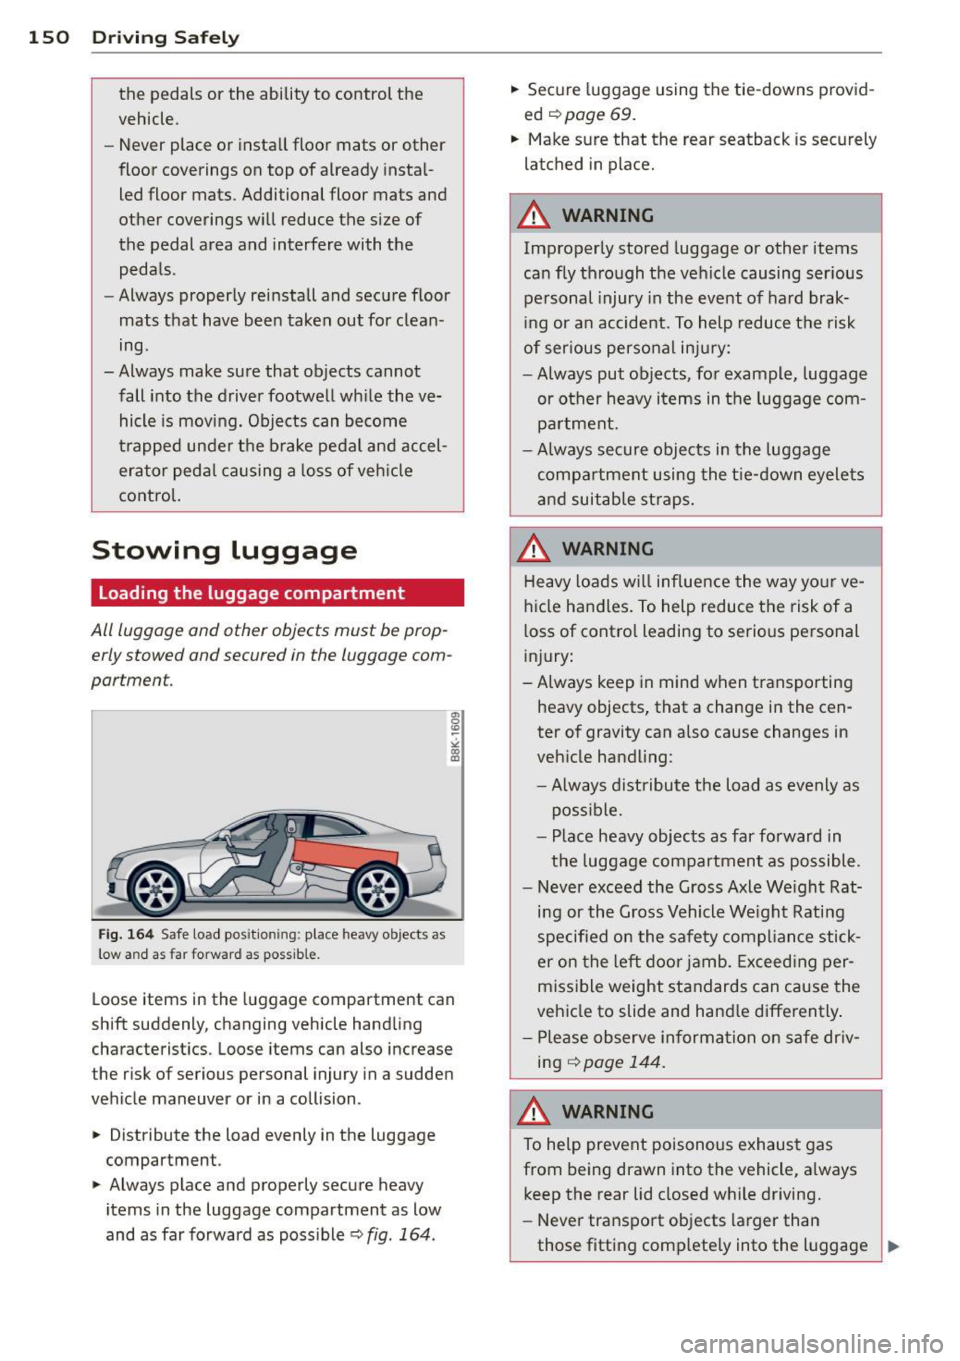
Loading the luggage compartment
All luggage and other objects must be prop
erly stowed and secured in the luggage com
portment.
Fig. 164 Safe load pos ition ing: place heavy objects as
low an d as far forward as possible.
Loose items in the luggage compartment can
shift suddenly, changing vehicle handling
characteristics . Loose items can also increase
the risk of serious personal injury in a sudden
vehicle maneuver or in a collision .
.,. Distribute the load evenly in the luggage
compartment.
.,. Always place and properly secure heavy
items in the luggage compartment as low
and as far forward as possible
cc> fig . 164 . .,.
Secure luggage using the tie-downs provid
ed
c:>poge 69.
.. Make sure that the rear seatback is securely
latched in place.
A WARNING ,..__
Improperly stored luggage or other items
can fly through the vehicle causing serious
personal injury in the event of hard brak
ing or an accident. To help reduce the risk
of serious personal injury:
-Always put objects, for example, luggage
or other heavy items in the luggage com
partment.
- Always secure objects in the luggage
compartment using the tie-down eyelets
and suitable straps.
A WARNING
Heavy loads will influence the way your ve
hicle handles. To help reduce the risk of a
loss of control leading to serious personal
injury:
-Always keep in mind when transporting
heavy objects, that a change in the cen
ter of gravity can also cause changes in
vehicle handling:
- Always distribute the load as evenly as
possible.
- Place heavy objects as far forward in
the luggage compartment as possible.
- Never exceed the Gross Axle Weight Rat
ing or the Gross Vehicle We ight Rating
specified on the safety compliance stick
er on the left door jamb. Exceeding per
missible weight standards can cause the
vehicle to slide and handle differently .
- Please observe information on safe driv
ing
~ page 144.
A WARNING
To help prevent poisonous exhaust gas
from being drawn into the vehicle, always keep the rear lid closed while driving.
- Never transport objects larger than
those fitting completely into the luggage
~