368 AUDI A5 COUPE 2018 Owners Manual
[x] Cancel search | Manufacturer: AUDI, Model Year: 2018, Model line: A5 COUPE, Model: AUDI A5 COUPE 2018Pages: 409, PDF Size: 67.63 MB
Page 6 of 409
Table of contents
Additional settings . . . . . . . . . . . . . . . . . . 228
Troubleshooting . . . . . . . . . . . . . . . . . . . . . 229
Media ... .. .... ... .......... .. .. ... 230
I ntroduction . . . . . . . . . . . . . . . . . . . . . . . . 230
Notes ... .... .. .. . .......... .. .. ... 230
Media drives . . . . . . . . . . . . . . . . . . . . . . . . 231
Bluetooth audio player . . . . . . . . . . . . . . . 233
Wi-Fi audio player . . . . . . . . . . . . . . . . . . . 234
O nline media and Internet radio . . . . . . . . 235
Mult imedia connect ions . . . . . . . . . . . . . . 236
Pla ying media . . . . . . . . . . . . . . . . . . . . . . . 239
Additional settings . . . . . . . . . . . . . . . . . . 242
Supported media and file formats . . . . . . 245
Troubleshooting. . . . . . . . . . . . . . . . . . . . . 246
Audi smartphone interface . . . . . . 249
Setup . . . . . . . . . . . . . . . . . . . . . . . . . . . . . 249
Operating . . . . . . . . . . . . . . . . . . . . . . . . . . 249
Troubleshooting . . . . . . . . . . . . . . . . . . . . . 250
System settings ........... .. .. .. .
Sett ing the date and time ............ .
MMI settings ..... ........... ...... .
Connection manager .......... .... .. .
System update .. .. . .......... .. .. .. .
Sound settings .. ..... ........... ... .
Volume settings . ................ ... .
Restarting the MMI ... .... .... .. .. .. .
Software license i nfo rmat ion 25
1
251
251
252
254 255
255
256
256
Safety first . . . . . . . . . . . . . . . . . . . . . . . 258
Driving safety . . . . . . . . . . . . . . . . . . . . 258
Bas ics . . . . . . . . . . . . . . . . . . . . . . . . . . . . . 258
Correct passenger seating positions . . . . . 259
Driver's and front passenger's footwell . . 262
Pedal area . . . . . . . . . . . . . . . . . . . . . . . . . . 263
Storing cargo correctly . . . . . . . . . . . . . . . 263
Active rollover protection system . . . . . . . 265
Reporting Safety Defects . . . . . . . . . . . . . . 266
Safety belts ............... .... ... 268
General information . . . . . . . . . . . . . . . . . 268
Why use safety belts? . . . . . . . . . . . . . . . . 269
Safety belts . . . . . . . . . . . . . . . . . . . . . . . . 272
Be lt tensioners . . . . . . . . . . . . . . . . . . . . . . 275
4
Airbag system ... .. ... .......... .. 277
Important information . . . . . . . . . . . . . . . 277
Front airbags . . . . . . . . . . . . . . . . . . . . . . . 281
Monitoring the Advanced Airbag System 289
Knee a irbags. . . . . . . . . . . . . . . . . . . . . . . . 293
S ide air bags . . . . . . . . . . . . . . . . . . . . . . . . 295
S ide curta in air bags . . . . . . . . . . . . . . . . . . 298
Child safety . . . . . . . . . . . . . . . . . . . . . . 302
Important informat ion . . . . . . . . . . . . . . . 302
Child safety seats . . . . . . . . . . . . . . . . . . . . 308
Securing child safety seats . . . . . . . . . . . . 313
LATCH system (lower anchorages and
tethers for children) . . . . . . . . . . . . . . . . . 316
Additional information . . . . . . . . . . . . . . . 32 1
Maintenance and Care . . . . . . . . . . . 322
Checking and Filling . . . . . . . . . . . . . 3 22
Gasoline . . . . . . . . . . . . . . . . . . . . . . . . . . . 322
Diesel fue l . . . . . . . . . . . . . . . . . . . . . . . . . 323
Refueling . . . . . . . . . . . . . . . . . . . . . . . . . . 324
Se lective cata lytic reduction (Ad Blue/
DEF) . . . . . . . . . . . . . . . . . . . . . . . . . . . . . . 326
Emiss ions control systems . . . . . . . . . . . . 329
Engine compartment . . . . . . . . . . . . . . . . . 330
Eng ine oil . . . . . . . . . . . . . . . . . . . . . . . . . . 332
Cooling system . . . . . . . . . . . . . . . . . . . . . . 336
Brake fluid . . . . . . . . . . . . . . . . . . . . . . . . . 337
Battery . . . . . . . . . . . . . . . . . . . . . . . . . . . . 338
Windshield washer system . . . . . . . . . . . . 339
Se rvice interva l display
340
Wheels .......... .. ... .......... .. 3 41
Wheels and Tires . . . . . . . . . . . . . . . . . . . . 341
Tire pressure monitoring system . . . . . . . 359
Care and cleaning . . . . . . . . . . . . . . . . 362
Genera l information . . . . . . . . . . . . . . . . . 362
Car washes . . . . . . . . . . . . . . . . . . . . . . . . . 362
Cleaning and care information . . . . . . . . . 363
Plac ing your vehicle out of serv ice . . . . . . 367
Do It Yourself ... .. ............. .. 368
Emergency assistance . . . . . . . . . . . 368
General information . . . . . . . . . . . . . . . . . 368
Equipment . . . . . . . . . . . . . . . . . . . . . . . . . 368
T ire mobility kit . . . . . . . . . . . . . . . . . . . . . 369
Page 369 of 409
Emergency assistance
Emergency assistance
General information
.,. Park the vehicle as far as possible from moving
traffic in the event of a breakdown. In the event
of a flat tire, park the vehicle on a level surface .
It you are on a steep hill, be especially careful.
.,. Set the parking brake .
.,. Switch the emergency flashers on .
.,. Have the passengers exit the vehicle . They
should move to a safe place, for example be
hind a guard rail.
_& WARNING
Follow the steps given above . This is for your
protection and the for the safety of other driv
ers.
Equipment
Vehicle tool kit/tire mobility kit/vehicle
jack
App lies to: veh icles with the vehicle tool kit, tire mobility kit
and veh icle jack
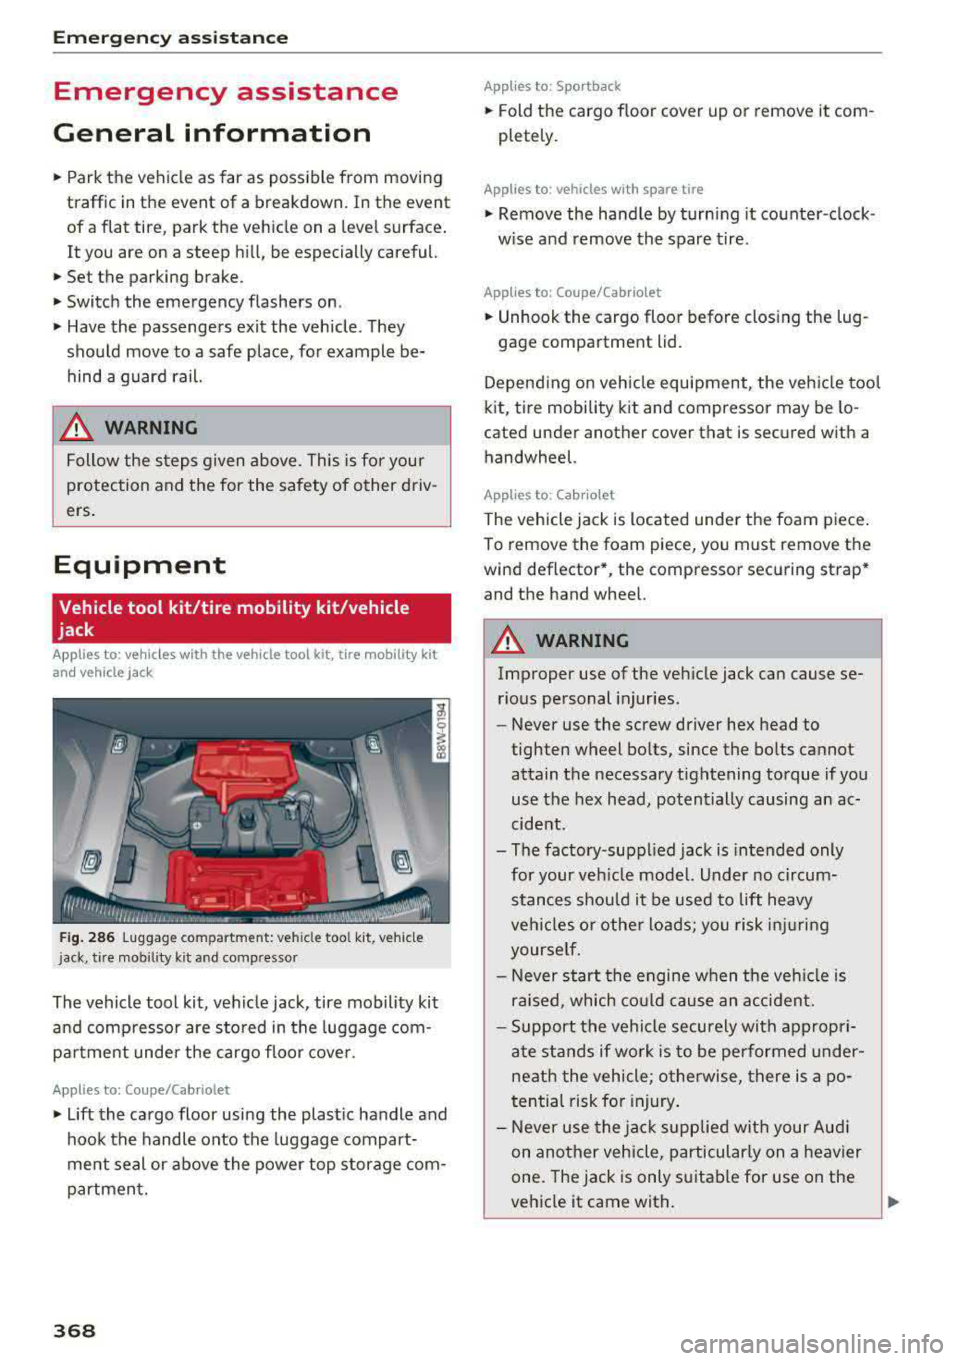
Fig. 286 Luggage compartment: veh icle tool kit, vehicle
j ack, tire mobil ity kit and compressor
The vehicle tool kit, vehicle jack, tire mobility kit
and compressor are stored in the luggage com
pa rtm ent under the cargo floor cover.
Applies to: Coupe/Cab riolet
.,. Lift the cargo floor using the plastic handle and
hook the handle onto the luggage compart
ment seal or above the power top storage com
partment.
368
App lies to : Sportback
.,. Fold the cargo floor cover up or remove it com
pletely .
Applies to: vehicles with spare tire
.,. Remove the handle by turning it counter-clock
w ise and remove the spare tire.
App lies to: Coupe/Cabr io let
.,. Unhook the cargo floor before closing the lug -
gage compartment lid.
Depending on vehicle equipment, the vehicle tool
kit, tire mobility kit and compressor may be lo
cated under another cover that is secured with a handwheel.
Applies to: Cabriolet
The vehicle jack is located unde r the foam piece.
To remove the foam piece, you must remove the
wind deflector*, the compressor securing strap*
and the hand wheel.
_& WARNING
Improper use of the veh icle jack can cause se
rious personal injuries.
- Never use the screw driver hex head to
tighten wheel bolts, since the bolts cannot attain the necessary tightening torque if you
use the hex head, potentially causing an ac
cident.
- The factory-suppl ied jack is intended only
for your veh icle model. Under no circum
stances should it be used to lift heavy
veh icles or othe r loads; you risk injuring
yourse lf.
- Never start the engine when the ve hicle is
raised, which could cause an accident.
- Support the vehicle securely with appropri
ate stands if work is to be performed under
neath the vehicle; otherwise, there is a po
tential risk for in jury .
- Never use the jack supplied with your Aud i
on another vehicle, particularly on a heavier
one. The jack is only suitable for use on the
vehicle it came with.
~
Page 370 of 409
@ Tips
The vehicle jack in your vehicle is mainte
na nee-free.
Tire mobility kit
Preparation
App lies to: vehicles with tire mobility kit
~ Read and follow the important safety precau
tions¢ page 368.
• Set the parking brake.
Applies to: vehicles with manual transmiss ion
• Shift into 1st gear.
Applies to: vehicles with automatic transm issions
~ Se lect the P selector lever position.
~ Check if a repair with the tire mobility kit is pos
sible
¢ page 369 .
Using the tire mobility kit
Applies to: veh icles with tire mobility kit
@
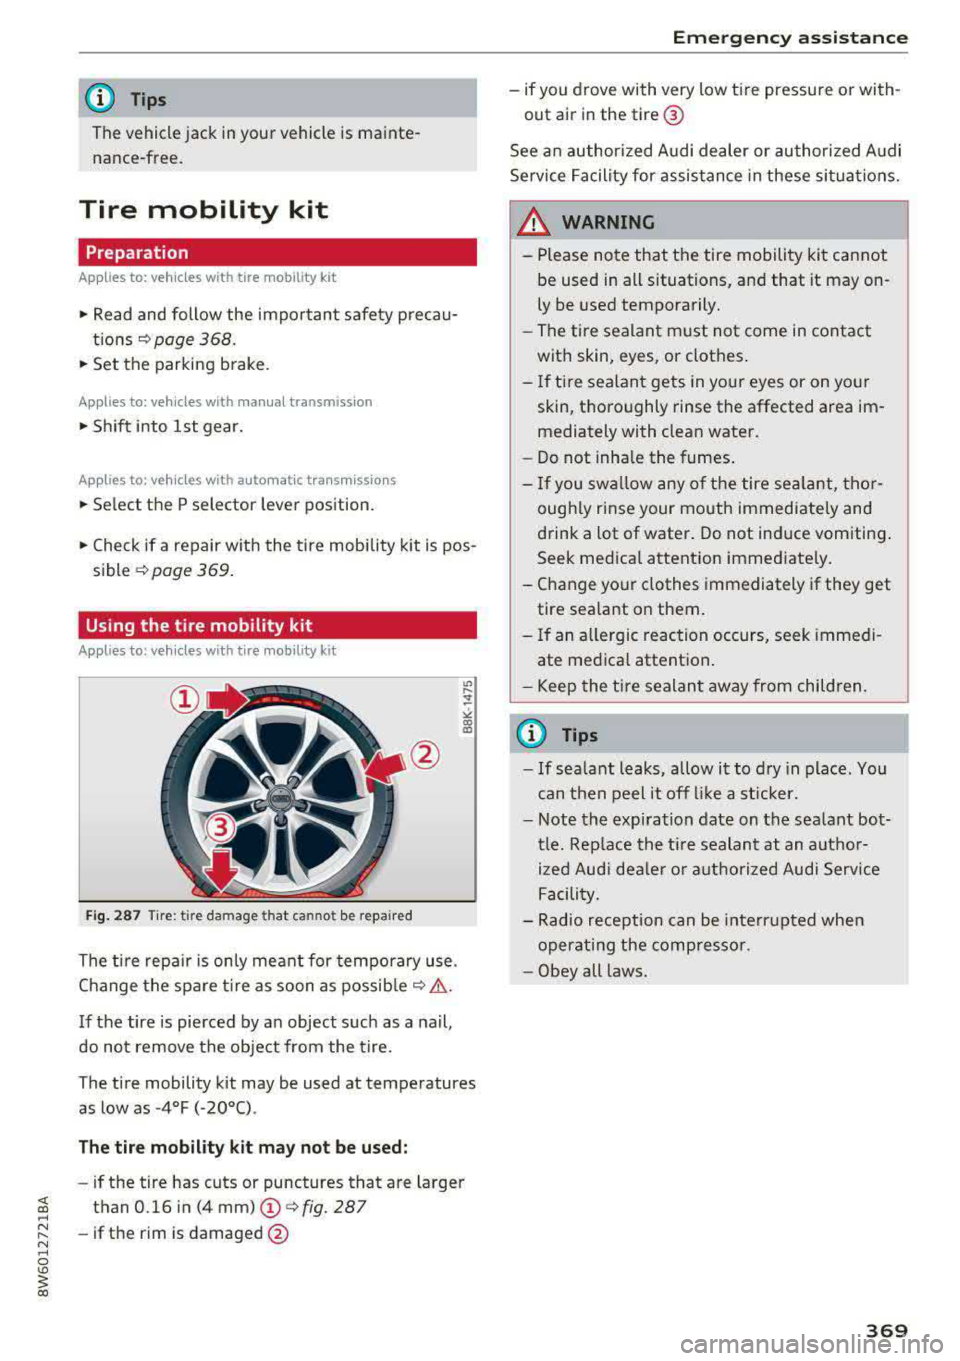
Fig. 287 Tire: tire damage that cannot be repa ired
The t ire repa ir is only meant for temporary use .
Change the spare t ire as soon as
possib le ¢ .&, .
If the tire is pierced by an object such as a nail,
do not remove the object from the tire.
The t ire mobility kit may be used at temperatures
as low as
-4°F (- 20°C) .
The tir e mobil ity kit may not be used:
- if the tire has cuts or punctures that are larger
than 0.16 in (4 mm)
(D ¢ fig. 287
-if the rim is damaged @
Emergen cy a ssis tanc e
- if you drove with very low t ire pressure or with
out air in the tire@
See an author ized Audi dealer or authori zed A udi
Service Facility for assis tance in these si tua tions.
_& WARNING ,...___
- Please note that the tire mobility kit cannot
be used in all situations, and that it may
on
ly be used temporarily.
- The tire sealant must not come in contact
with skin, eyes, or clothes .
- If tire sealant gets in your eyes or on your
skin, thoroughly rinse the affected area
im
mediately with clean water.
- Do not inha le the fumes .
- If you swallow any of the tire sea la nt, tho r-
ough ly rinse your mouth immediately and
d rink a lot of water . Do not induce vomiting .
Seek medica l attent ion immed iate ly.
- Change your clothes immediately if they get tire sealant on them.
- If an a llergic reaction occurs, seek immedi
ate medica l attent io n.
- Keep the tire sealant away from children.
(i) Tips
- If sea lant leaks, allow it to d ry in place . You
can then peel it off like a st icker.
- Note the expiration date on the sealant bot
tle. Rep lace the ti re sealant at an a utho r
ized Aud i dea le r o r a uthorized Audi Serv ice
Facili ty.
- Rad io reception can be in terr upted when
operat ing the comp resso r.
- Obey all laws.
369
Page 371 of 409
Emergency assistance
Repairing tires
Applies to: vehicles w ith tire mob ility k it
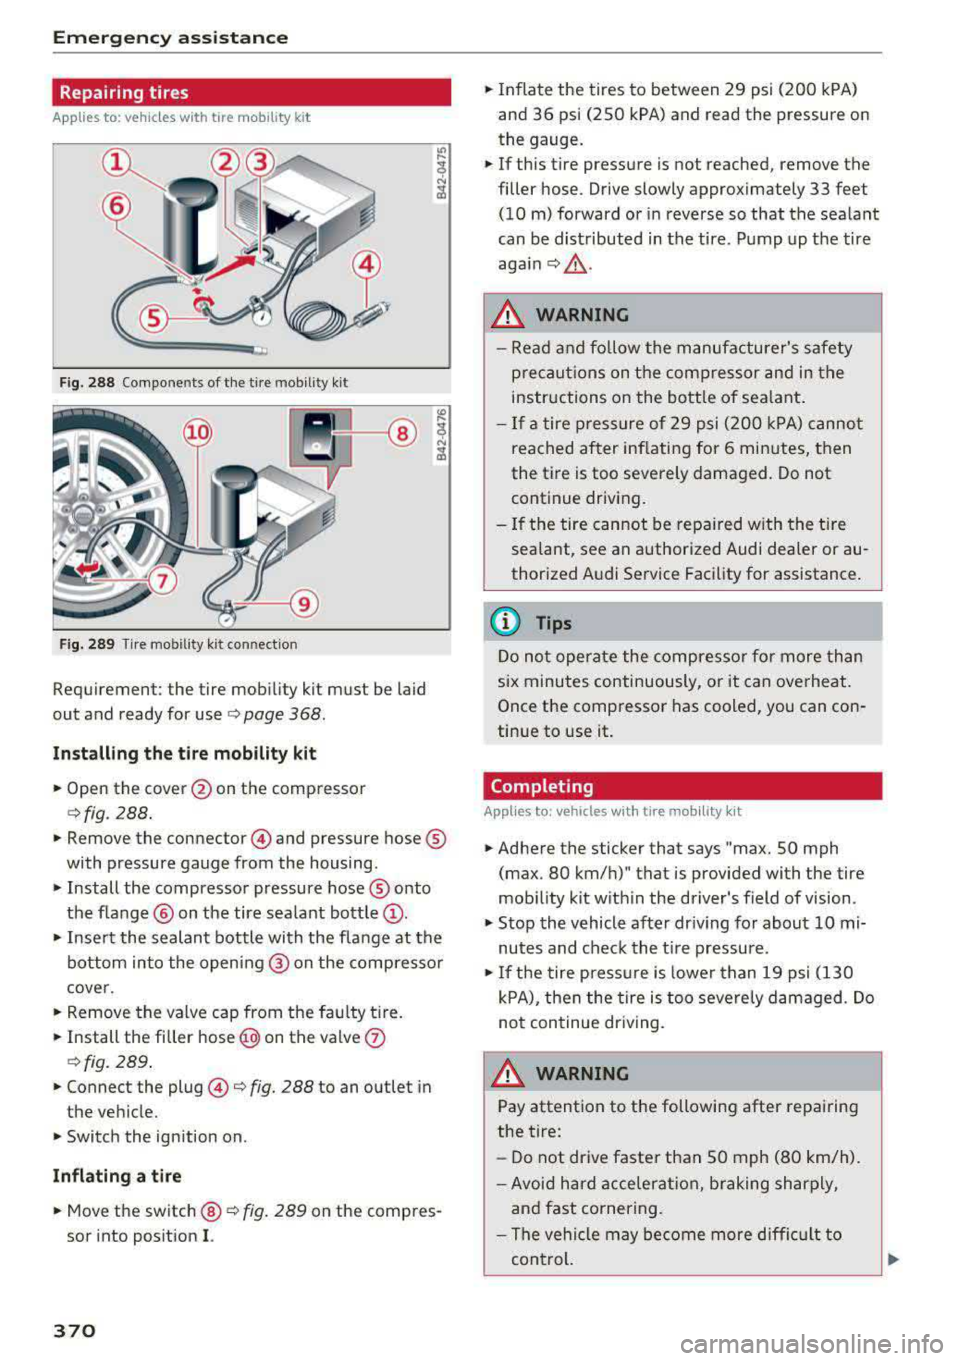
Fig. 288 Components of the tire mobility kit
F ig. 289 Tire mobility k it connec tion
Requirement: the tire mobility kit must be laid
out and ready for use
o page 368.
Installing the tire mobility kit
.. Open the cover @on the compressor
¢fig. 288 .
.. Remove the connector @) and pressure hose®
with pressure gauge from the housing.
• Install the compressor pressure hose ® onto
the f lange @ on the tire sea lant bottle
(D .
.. Insert the sealant bottle with the flange at the
bottom into the opening @ on the compresso r
cover.
.. Remove the valve cap from the fau lty tire.
.. Install the filler hose @) on the valve (J)
ofig. 289 .
.. Connect the plug@¢ fig. 288 to an outlet in
the vehicle.
.. Switch the ignition on.
Inflating a tire
.. Move the switch @ o fig. 289 on the compres
sor into position
I.
370
.. Inflate the tires to between 29 psi ( 200 kPA)
and 36 psi (250 kPA) and read the pressur e on
the gauge .
.. If this tire pressure is not reached, remove the
filler hose. Drive slowly approximately 33 feet
(10 m) forward or in reverse so that the sea lant
can be distributed in the tire. Pump up the tire
aga in¢ ,&.
.
.&_ WARNING
-Read and follow the manufacturer's safety
precaut ions on the compressor and in the
instructions on the bottle of sea lant .
- If a tire pressure of 29 psi (200 kPA) cannot
reached after inflating for 6 minutes, then
the tire is too severely damaged. Do not
continue driving.
- If the tire cannot be repa ired with the tire
sealant, see an authorized Audi dealer or au
thorized Audi Service Facility for assistance.
(D Tips
Do not operate the compressor for more than
six minutes continuously, or it can overheat.
Once the compressor has cooled, you can con
tinue to use it.
Completing
App lies to : vehicles wit h tire mob ility kit
.. Adhere the sticker that says "max. SO mph
(max . 80 km/h)" that is provided with the tire
mob ility kit with in the driver's field of vision.
.. Stop the vehicle after driv ing for about 10 mi
nutes and check the tir e pressure.
.. If the tire press ure is lower than 19 psi (130
kPA), then the tire is too severely damaged. Do
not continue driving .
.&_ WARNING
Pay attention to the following after repairing
the tire:
- Do not drive faster than SO mph (80 km/h).
- Avoid hard acceleration, braking sharply,
and fast cornering .
- The vehicle may become more difficult to
con trol.
Page 372 of 409
-If the t ire is too severely damaged , see an
authorized Aud i dealer or authorized Aud i
Service Facility for assistance .
@ For the sake of the environment
You can give the used tire sealant bottle to an
author ized Audi dealer or authorized A udi
Serv ice Facility for disposal.
@ Tips
Remember to obtain a new bottle of sea lant
from an authorized Audi dea ler or authorized
Audi Service Facility after repair ing a tire.
Replacing a wheel
Preparation
You must complete the preparation before
changing a tire .
.,. Read and follow the important safety precau
tions ~ page 368 .
.,. Set the parking brake .
Applies to: ve hicles with man ua l transmiss ion
.,. Shift in to 1st gear.
Applies to: ve hicles with automat ic t ra n smi ssio ns
.,. Select the P selector leve r pos ition .
.,. When towing a trailer: disconnect the tra iler
from your veh icle .
.,. Lay out the veh icle tool kit 9 page 368 and the
spare tire
~ page 375 .
.,. Switch the ignition off .
A WARNING
When using the vehicle jack* on a road with a
steep hill or offroad, you must take extra pre
cautions to prevent the vehicle from rolling .
Use suitab le objects to b lock the front and
back of the wheel that is diagonal from the
wheel with the flat tire.
A WARNING
You or your passengers could be in ju red wh ile
chang ing a wheel if you do not follow these
safety precautions :
Emergen cy a ssis tanc e
-If you have a flat tire, move a safe distance
off the road. Turn off the eng ine, turn the
emergency flashers on and use other warn
ing dev ices to alert other motorists .
- Make sure that passengers wait in a safe
place away from the vehicle and well away
from the road and traff ic .
- To help prevent the veh icle from moving
suddenly a nd possib ly slipping off the jack*,
always fully set the park ing brake and block
the front and back of the wheel diagonally opposite the wheel being changed. When
one front wheel is lif ted off the gro und,
p la cing the Automa tic Transmission in P
(Park) will
not prevent the vehicle from
moving.
- Before you change a wheel, be sure the
g ro und is leve l and firm. If necessary, use a
sturdy board under the jack *.
- Always store the vehicle tool kit, the jack *
a nd the replaced tire in the luggage com
partment
~ page 263 .
(D Tips
Obey all laws .
Removing the caps
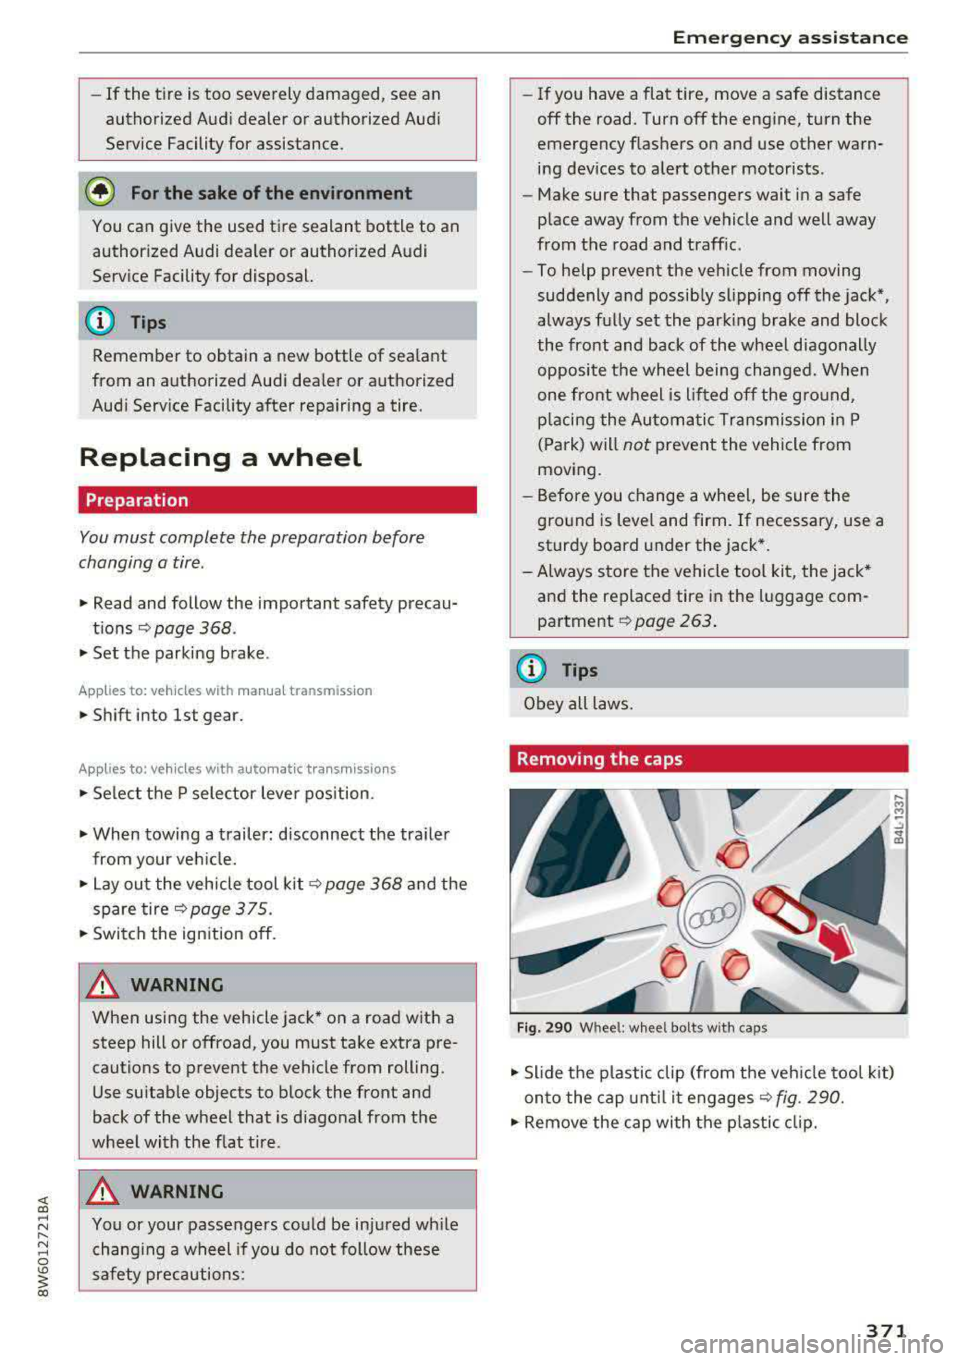
Fig. 290 W hee l: whee l bolt s w ith ca ps
.,. Slide the p lastic clip (from the veh icle tool k it)
on to the cap unt il it
engages ~ fig. 290.
.,. Remove the cap with the p lastic clip.
371
Page 376 of 409
<( a, .... N ,....
N .... 0 \0
3 a,
-Always store damaged wheel, jack* and
tools securely in the luggage compartment.
Otherwise, in an accident or sudden maneu
ver they could fly forward, causing injury to
passengers in the vehicle.
Space-saving spare tire
App lies to: ve hicles with space-saving spare t ire (co mpact
spare tire)
The spare tire is intended for short-term use on
ly. Have the damaged tire checked and replaced,
if necessary, by an authorized Audi dealer or au
thori zed Audi Service Facility as soon as possible.
There are some restrictions on the use of the
compact spare tire . The compact spare tire has
been designed specifically for your type of vehi
cle . Do not replace it with the spare tire from an
other type of vehicle.
The compact spare tire is located in the luggage
compartment under the cargo f loor cover
c::>page368.
The tire pressure must be 61 PSI (420 kPA).
Snow chains
For technical reasons, the use of snow chains on
the compact spare tire is not permitted.
If you have to drive with snow chains and a front
tire fails, mount the spare t ire in place of a rear
tire. Install the snow chains on the rear tire that
you removed, and insta ll that in place of the
front tire that failed.
A WARNING
-After installing a spare tire, the tire pres
sure must be checked as soon as possible .
-Do not drive faster than 50 mph (80 km/h)
with a compact spare tire. Driving faster
than that increases the risk of an accident.
-T o reduce the risk of an accident, avoid full
thrott le acceleration, heavy braking, and
fast cornering with the compact spare tire.
-To reduce the risk of an accident, never drive
with more than one compact spare tire.
-Normal summer or winte r tires must not be
mounted on the compact spare wheel rim.
Emergency assistance
375
Page 377 of 409
Fuses and bulbs
Fuses and bulbs
Fuses
Replacing fuses
A fuse that has blown will have metal strips that have burned through .
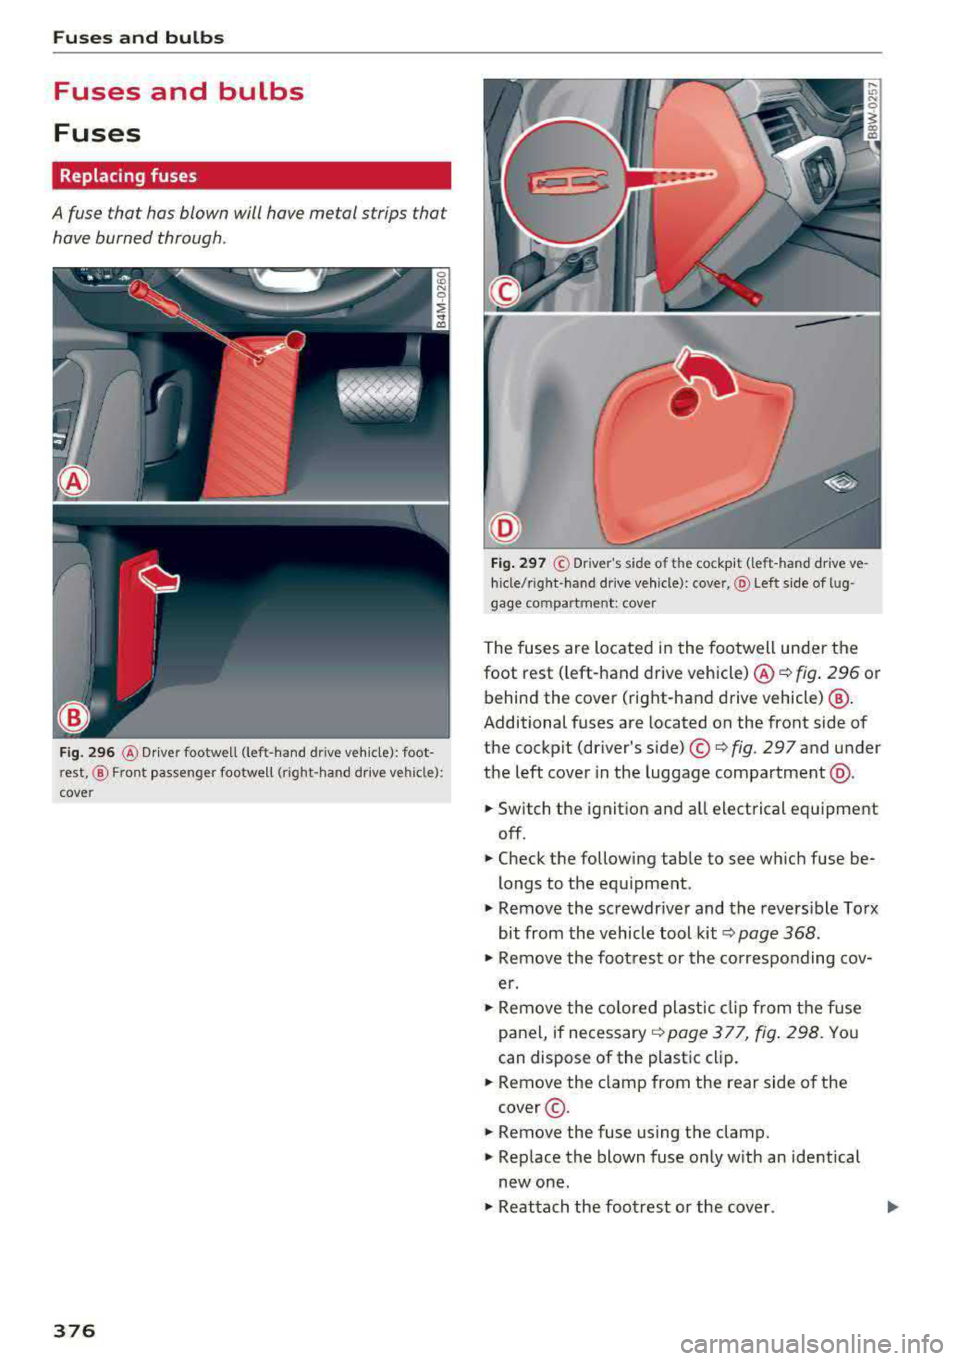
Fig. 296 @ Driver footwell (left-hand dr ive vehicle): foot
rest, ® Front passenger footwell (right -hand drive vehicle):
cover
376
Fig. 297 © Dr iver's side of the cockpit (left -hand drive ve
hicle/r ight -hand drive vehicle): cove r, @ Left side of lu g
gage compartment: cover
The fuses are located in the footwell under the
foot rest ( left-hand drive vehicle) @
¢fig. 296 or
behind the cover (right-hand drive vehicle) @.
Additional fuses are located on the front side of
the cockpit (driver's
side) ©¢ fig. 297 and under
the left cover in the luggage compartment @.
.,. Switch the ignition and all electrical equipment
off .
.,. Check the following table to see which fuse be
longs to the equipment .
.,. Remove the screwdriver and the reversible Torx
bit from the vehicle tool
kit¢ page 368 .
.,. Remove the footrest or the corresponding cov
er.
.,. Remove the colored plastic clip from the fuse
panel, if necessary
¢ page 377, fig. 298. You
can dispose of the plastic clip .
.,. Remove the clamp from the rear side of the
cover@ .
.,. Remove the fuse us ing the clamp .
.,. Replace the blown fuse only with an identical
new one .
.,. Reattach the footrest or the cover.
Page 384 of 409
-When connecting jumper cables, make sure
that they cannot get caught in any moving
parts in the engine compartment.
- Do not bend over the batteries
-danger of
chem ical burns!
- The battery cell locking screws must be
tightened securely.
- Before you check anything in the engine
compartment, always read and heed all
WARNINGS
c!.> page 330.
(D Note
Improper hook-up of jumper cables can ruin
the generator.
- Always connect POSITIVE(+) to POSITIVE
( + ), and NEGATIVE(-) to NEGATIVE(-)
ground post of the battery manager contro l
unit.
- Check that all screw p lugs on the battery
cells are screwed in firmly. If not, tighten
plugs prior to connecting clamp on negative
battery terminal.
- Please note that the procedure for connect
i ng a jumper cable as described above ap
plies specifically to the case of your vehicle
being jump started. When you are giv ing a
jump start to another vehicle, do
not con
nect the negative (-) cab le to the negative
(-) terminal on the discharged battery @
c!.> fig. 303. Instead, securely connect the
negative (-) cable to either a solid me tal
component that is firm ly bolted to the en
gine block or to the engine bloc k itself. If
the battery that is be ing charged does not
vent to the outs ide, escaping battery gas
could ignite and explode!
Towing with a tow truck
General hints
Your Audi requires special handling for towing .
The following information is to be used by com
mercial tow truck operators who know how to op
erate their equipment safely.
-Never tow your Audi, towing will cause dam
age to the engine and transmission .
Emergency situations
-Never wrap the safety chains or winch cables
around the brake lines .
- To prevent unnecessar y damage, your Audi
must be transported with a flat bed truck.
- To load the vehicle on to the flat bed , use the
towing loop found in the vehicle tools and at
tach to the front or rear anchorage
¢ page 383 and ¢ page 384 .
A WARNING
--
A vehicle being towed is not safe for passen
gers. Never allow anyone to ride in a vehicle
being towed, for any reason.
Front towing loop
Only install the front towing loop when it is
needed.
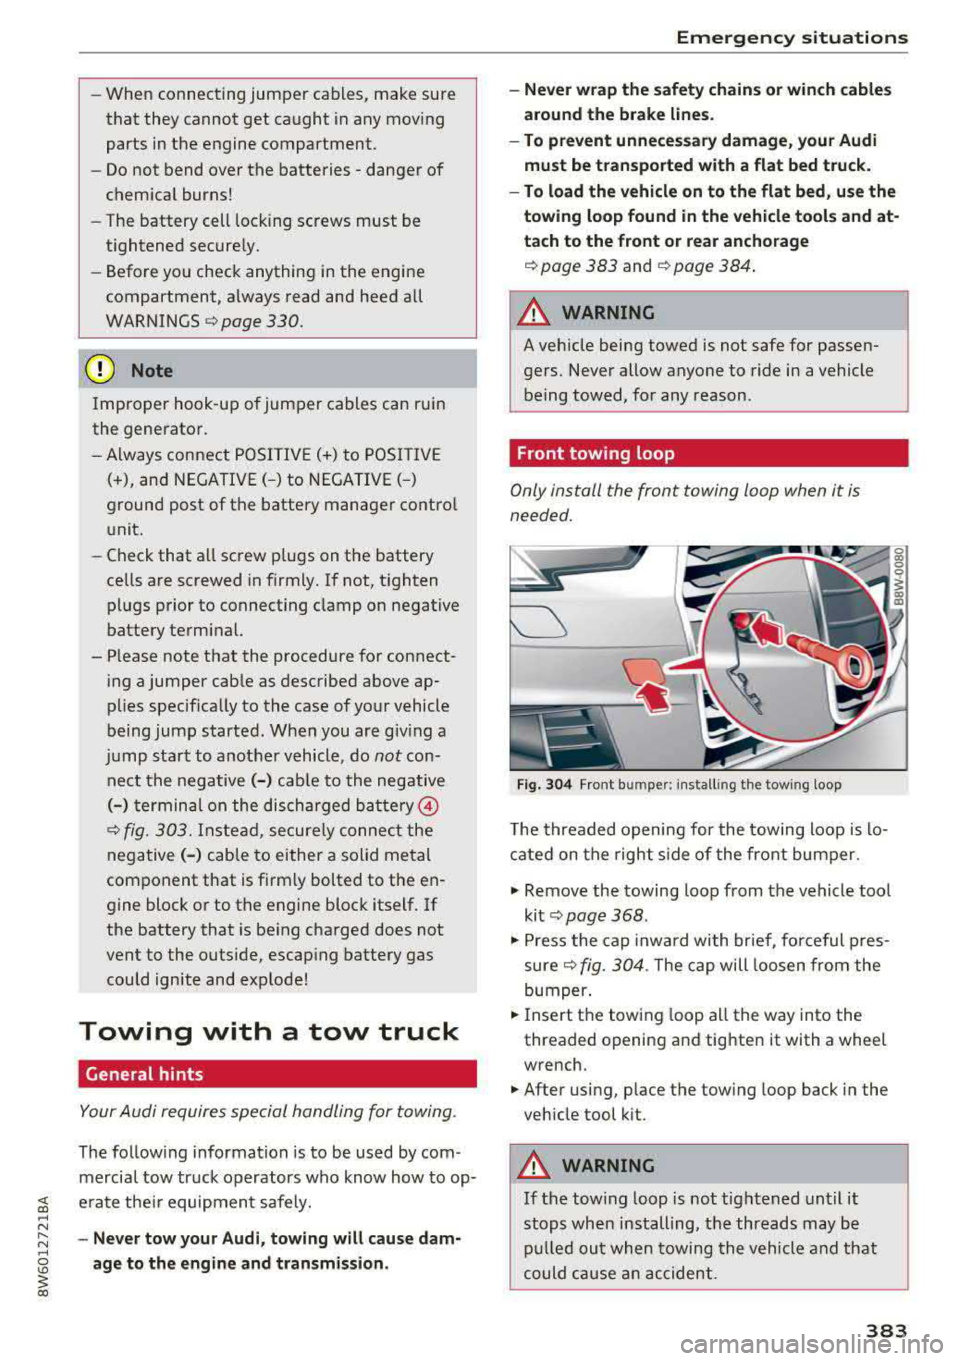
Fig . 304 Front bumper : in sta lling the towing loop
The threaded opening for the towing loop is lo
cated on the right side of the front bumper.
.. Remove the towing loop from the vehicle too l
kit
¢ page 368 .
.. Press the cap inward with brief, forceful pres
sure
c!.>fig. 304 . The cap will loosen from the
bumper .
.. Insert the towing loop a ll the way into the
threaded opening and tighten it with a wheel
wrench.
.. After using, place the towing loop back in the
veh icle tool kit.
A WARNING
'"' -
If the towing loop is not tightened until it
stops when installing, the threads may be
pulled out when towing the vehicle and that
could cause an accident.
383
Page 385 of 409
Emergency situations
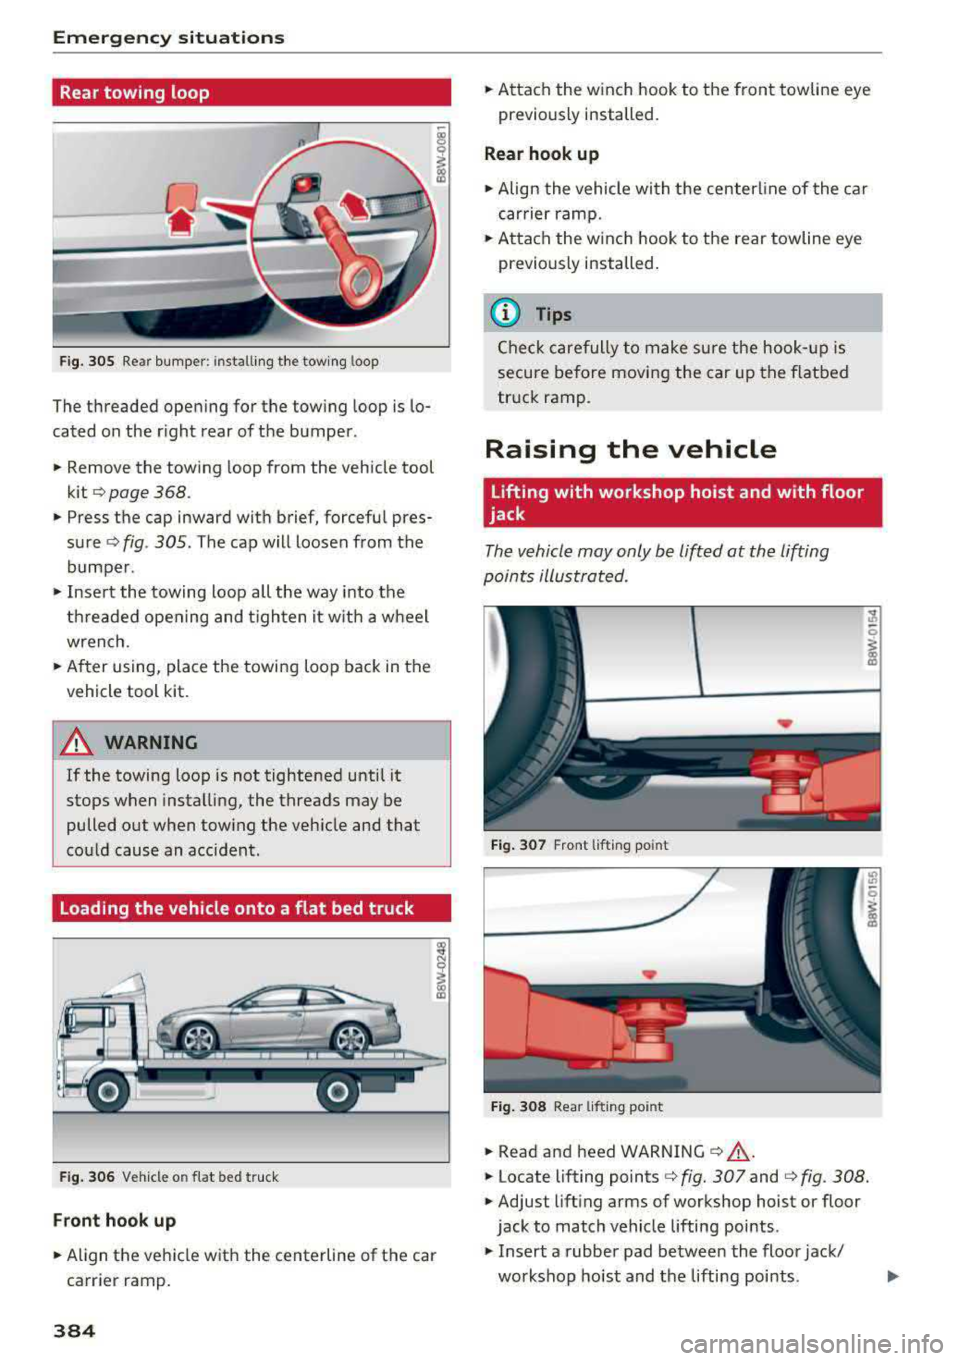
Rear towing loop
Fig. 305 Rear bumper: i nstalling the towing loop
The threaded opening for the towing loop is lo
cated on the r ight rear of the bumper.
• Remove the towing loop from the vehicle tool
kit
q page 368.
• Press the cap inward with brief, forceful pres
sure
q fig . 305. The cap will loosen from the
bumper .
• Insert the towing loop all the way into the
threaded opening and t ighten it w ith a wheel
wrench.
• After using, place the towing loop back in the
vehicle tool k it.
,& WARNING
If the towing loop is not tightened until it
stops when installing, the threads may be
pulled out when towing the veh icle and that
cou ld cause an accident.
Loading the vehicle onto a flat bed truck
F ig . 306 Vehicle o n flat bed truck
Front hook up
• Align the vehicle with the centerline of the car
carrier ramp .
384
• Attach the winch hook to the front towline eye
previously installed.
Rear hook up
• Align the vehicle with the center line of the car
carrier ramp.
• Attach the w inch hook to the rear towline eye
previously installed .
(D Tips
Check carefully to make sure the hook- up is
secure before moving the car up the flatbed
truck ramp.
Raising the vehicle
Lifting with workshop hoist and with floor
jack
The vehicle may only be lifted at the lifting
points illustrated .
Fig. 307 Front lifting point
Fig. 308 Rear lifting po int
.. Read and heed WARNING ¢ A.
• Locate lifting points q fig. 307 and q fig . 308.
• Adjust lifting arms of workshop hoist or floor
jack to match vehicle lifting poi nts .
• Insert a rubber pad between the floor jack/
workshop hoist and the lifting points .
..,.
Page 394 of 409
<( a, .... N ,....
N .... 0 \0
3 a,
A
A/C MAX (button) . . . . . . . . . . . . . . . . . . . . . . 83
A/C (button) . . . . . . . . . . . . . . . . . . . . . . . . . . 82
ABS . . . . . . . . . . . . . . . . . . . . . . . . . . . . . . . . 151
Accessories 75,391
Active lane assist Cleaning the camera area ......... ... .
also refer to Audi active lane assist .. .. .
Active rollover protection system ... .... .
Adapt ive cr uise control ............ .... .
Cleaning the sensors ................ .
Distance indicator and distance warning .
Messages .. .. ................ ..... .
Predictive control .
.......... .. .. .... .
Traffic jam assist ............. .. .... .
Ad Blue
. . .. .. .. ................ ..... .
Messages
Additional accessories 363
130
265
113
363
123 123
120 121
326
326
391
Adjusting air distribution (automatic climate
control) . . . . . . . . . . . . . . . . . . . . . . . . . . . . . . 83
Adjusting the sound 255
Adjusting the temperature (automatic climate
control) . . . . . . . . . . . . . . . . . . . . . . . . . . . . . . 83
Advanced key
refer to Convenience key . . . . . . . . . . . . . . . 89
Airbag . ... .. .. ................ ..... . 277
Airbag system .. ..... ....... ...... 277,297
Advanced Airbag System components . . . 284
Care .. .. .. .. .. ............. .. .. .. . 292
Ch ildren . . . . . . . . . . . . . . . . . . . . . . . . . . . 304
Child restraints
Components (front airbags) ..... ..... .
Danger of fitting a child safety seat on the
front passenger seat .......... .. .... .
Disposal . .. .. .. ............. .. .. .. .
Front airbags ......... ..... ... . .
How do the front airbags work? ....... .
H ow many airbags does my vehicle have?
H ow the Advanced Airbag System compo-
nents work together .......... .. .. .. .
Important safety instructions on the knee
airbag system ................. ..... .
Indicator light ..................... .
K . b nee air ags .. ............... .. .... .
Monitoring . .. ............... .. .... .
PASSENGER AIR BAG light ....... .. .. .
Repairs .. .. .. ........ ..... ... ... .. . 304
284
278 292
282
287 284
286
295 289
293
289
289
292
Index
Safety instructions . . . . . . . . . . . . . . . . . . . 291
When must the system be inspected? . . . 289
Air pressure Tires · · · · · · · · · · · · · · · · ·
· · ....... .. .. 351
Alignment pin (changing the wheel) . . . . . . 368
All season tires . ... .. ................ . 357
All weather lights . . . . . . . . . . . . . . . . . . . . . . 61
All wheel drive Indicator light . . . . . . . . . . . . . . . . . . . . . . . 35
also refer to quattro . . . . . . . . . . . . . . . . . 154
AMI
refer to Audi music interface . . . . . . . 236, 237
Android Auto
refer to Aud i smartphone interface . . . . . 249
Anti -freeze
Windshield washer system . . . . . . . . . . . . 339
Anti- lock braking system
refer to ABS . . . . . . . . . . . . . . . . . . . . . . . . 151
Anti-Slip Regu lation
refer to ASR ... .. .................. .
Apple CarP lay
refer to Aud i smartphone interface ... ..
Arrow view
ASR
Audi active lane assist Messages
Audi connect emergency call and service ..
Online roadside assistance
.......... ..
Audi connect vehicle contro l ............
Parking location .. .................. .
Remote locking and unlocking ..... .. . .
Vehicle status report ............... . . 151
249 23
151
130
132
205
206
201
202
202
202
Audi connect (Infotainment) . . . . . . . . 191, 198
Data protection . . . . . . . . . . . . . . . . . . . . . 199
Services overview
' . . ................ .
Starting ...... .. .. ................ .
Audi drive select
. .. .. ............. .. ..
Audi Entertainment mobile ...... ... .. ..
Audi music interface . ................. .
Audi music stream
refer to Wi-F i .. .. .. ............... . .
Audio files
.. .... .. .. ............... ..
Audio player
Bluetooth audio player .............. .
Wi-Fi audio player . ................. .
Audio track 192
192
138
238
236
234
239
233
234
242
393