battery AUDI A6 2016 Owners Manual
[x] Cancel search | Manufacturer: AUDI, Model Year: 2016, Model line: A6, Model: AUDI A6 2016Pages: 294, PDF Size: 73.88 MB
Page 5 of 294
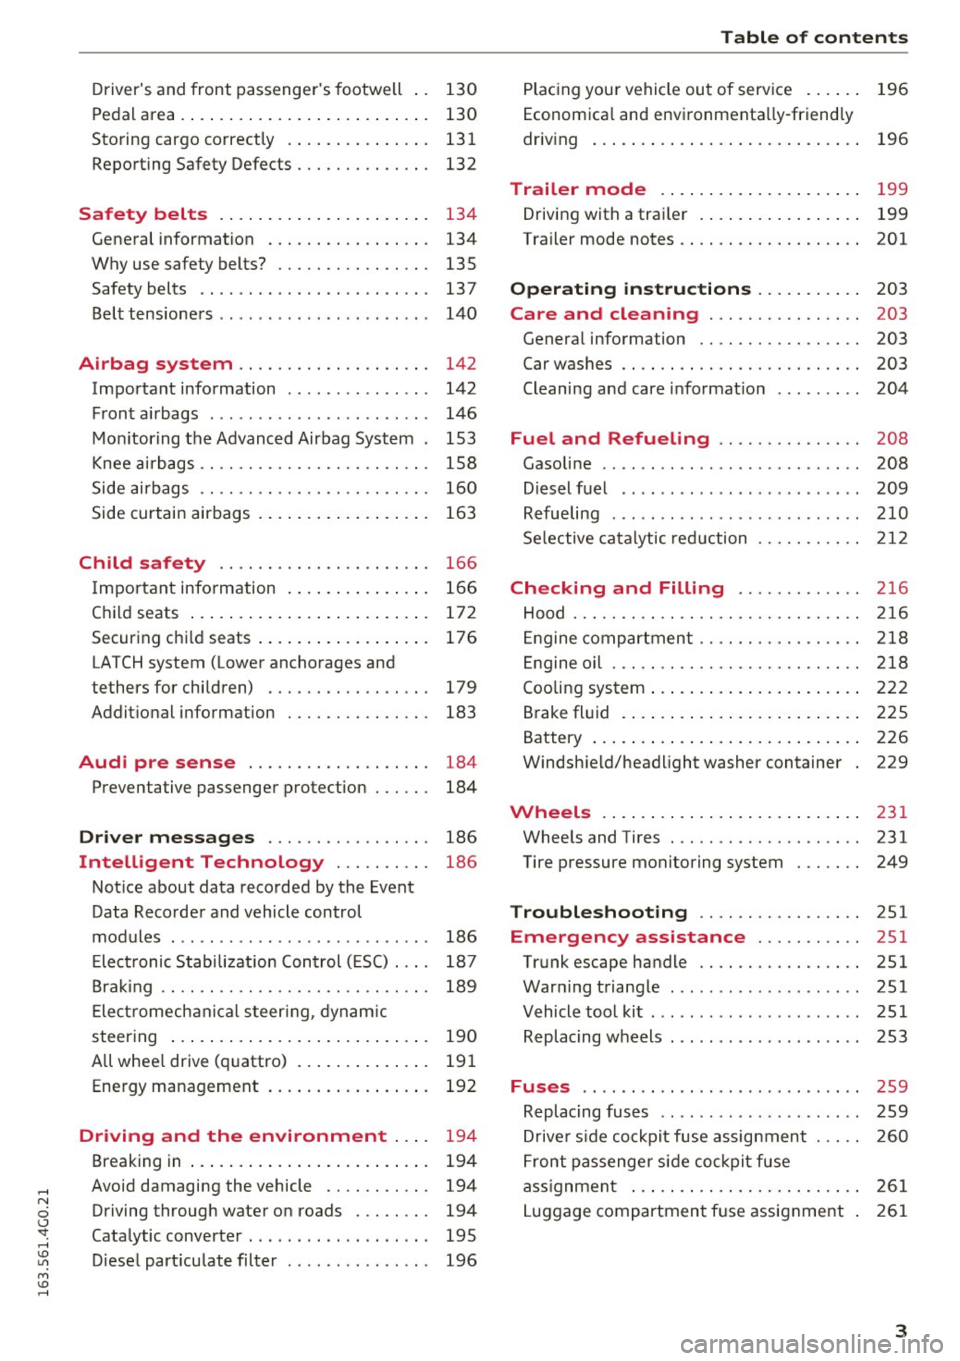
Driver's and front passenger 's footwell . . 130
Pe dal area . . . . . . . . . . . . . . . . . . . . . . . . . . 130
Sto ring cargo correctly . . . . . . . . . . . . . . . 131
Repo rting Safety Defects . . . . . . . . . . . . . . 132
Safety belts . . . . . . . . . . . . . . . . . . . . . . 134
Gene ral information . . . . . . . . . . . . . . . . . 134
Why use safety belts? . . . . . . . . . . . . . . . . 135
Safety belts . . . . . . . . . . . . . . . . . . . . . . . . 137
Belt tens ione rs . . . . . . . . . . . . . . . . . . . . . . 140
Airbag system . . . . . . . . . . . . . . . . . . . . 142
Important information . . . . . . . . . . . . . . . 142
F ront ai rbags . . . . . . . . . . . . . . . . . . . . . . . 146
M oni toring the Advanced Airbag Syst em . 153
K nee ai rbags . . . . . . . . . . . . . . . . . . . . . . . . 158
Side airbags . . . . . . . . . . . . . . . . . . . . . . . . 160
Side curtai n airbags . . . . . . . . . . . . . . . . . . 163
Child safety . . . . . . . . . . . . . . . . . . . . . . 166
I mportant inform ation . . . . . . . . . . . . . . . 166
C hil d seats . . . . . . . . . . . . . . . . . . . . . . . . . 17 2
Securing ch ild seats . . . . . . . . . . . . . . . . . . 176
LATCH system (Lower anchorages and
tethers for children) . . . . . . . . . . . . . . . . . 179
Addit ional information
183
Audi pre sense . . . . . . . . . . . . . . . . . . . 184
Preventative passenger protection 184
Driver messages . . . . . . . . . . . . . . . . . 186
Intelligent Technology . . . . . . . . . . 186
Not ice about data recorded by the Event
Data Recorde r and vehicle control
modules . . . . . . . . . . . . . . . . . . . . . . . . . . . 186
E lect ronic Stabili zat ion Control ( ESC) . . . . 187
Bra king . . . . . . . . . . . . . . . . . . . . . . . . . . . . 189
E le ctr omech anica l steer ing, dynam ic
steering . . . . . . . . . . . . . . . . . . . . . . . . . . . 190
A ll whee l drive (q uattro) . . . . . . . . . . . . . . 19 1
Ene rgy management . . . . . . . . . . . . . . . . . 192
Driving and the environment . . . . 194
Breaking in . . . . . . . . . . . . . . . . . . . . . . . . . 194
Avoid damaging the vehicle . . . . . . . . . . . 194
Driving throug h wate r on roads . . . . . . . . 194
Catalytic converter . . . . . . . . . . . . . . . . . . . 195
D iese l part iculate filte r . . . . . . . . . . . . . . . 196
Table of contents
Plac ing you r vehicle out of serv ice . . . . . . 196
Econ om ica l and envi ronmenta lly-friend ly
driv ing . . . . . . . . . . . . . . . . . . . . . . . . . . . . 196
Trailer mode . . . . . . . . . . . . . . . . . . . . . 199
Driving with a trai ler . . . . . . . . . . . . . . . . . 199
Trailer mode notes .. ............... .. 201
Operating instructions . . . . . . . . . . . 203
Care and cleaning . . . . . . . . . . . . . . . . 203
Genera l information . . . . . . . . . . . . . . . . . 203
Car washes . . . . . . . . . . . . . . . . . . . . . . . . . 203
Cleaning and care informat ion 204
Fuel and Refueling . . . . . . . . . . . . . . . 208
Gasoline . . . . . . . . . . . . . . . . . . . . . . . . . . . 208
Diesel f uel . . . . . . . . . . . . . . . . . . . . . . . . . 209
Refue ling ... .. .. .. .... ...... ... .. .. 210
Se lective cata lytic red uction 212
Checking and Filling . . . . . . . . . . . . . 216
Hood ..... .... .. ................. .. 216
En gine compartment ............. .. .. 218
En gine oi l . . . . . . . . . . . . . . . . . . . . . . . . . . 218
Cooling sys tem . . . . . . . . . . . . . . . . . . . . . . 2 22
Brake fl uid . . . . . . . . . . . . . . . . . . . . . . . . . 225
Battery . . . . . . . . . . . . . . . . . . . . . . . . . . . . 226
Windsh ield/headlight washer container 229
Wheels .. .. .. .. .. ... .. ..... ... .. .. 231
Whee ls and Tires . . . . . . . . . . . . . . . . . . . . 231
Tire p ressure monitoring system
249
Troubleshooting . . . . . . . . . . . . . . . . . 251
Emergency assistance . . . . . . . . . . . 251
Trunk escape handle . . . . . . . . . . . . . . . . . 251
War ning t riang le . . . . . . . . . . . . . . . . . . . . 251
Vehicle tool ki t . . . . . . . . . . . . . . . . . . . . . . 251
Replacing w heels . . . . . . . . . . . . . . . . . . . . 253
Fuses .......... .. ................. 259
Replacing fuses . . . . . . . . . . . . . . . . . . . . . 259
D rive r side cockpit fuse assignmen t
F ront passenge r sid e co ckpit fuse 2
60
ass ignment . . . . . . . . . . . . . . . . . . . . . . . . 2 61
L uggage compartment fuse assignment . 261
3
Page 14 of 294
Instruments and indicator lights
-The engine compartment of any motor vehi
cle is a potentially hazardous area. Before
you check anything in the engine compart ment, stop the engine and let it cool down.
Always exercise extreme caution when work ing under the hood~
page 216.
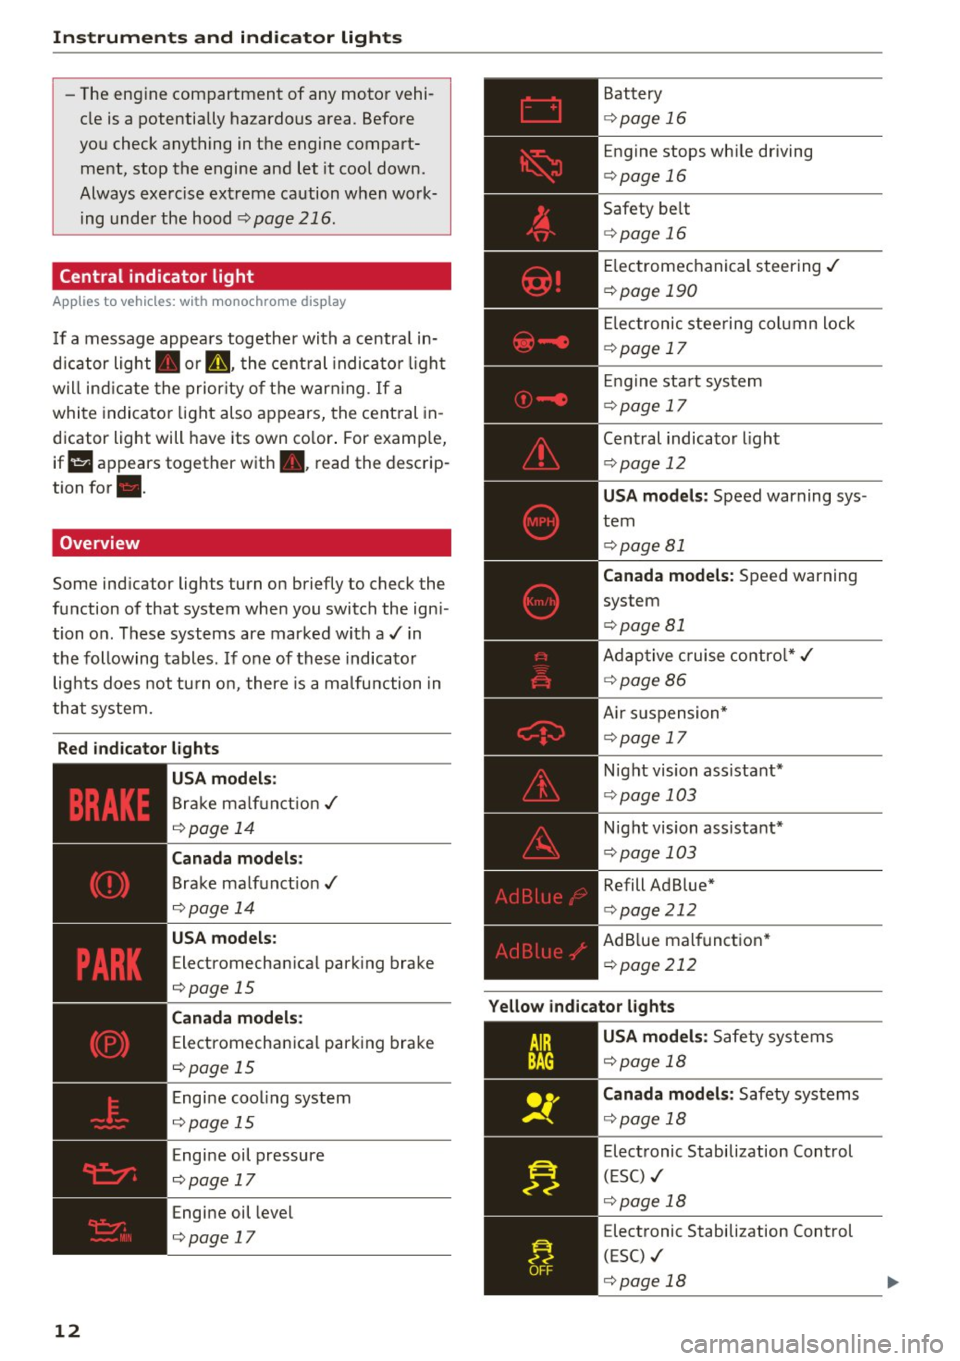
Central indicator light
Applies to vehicles: w ith monochrome display
If a message appea rs together with a centra l in
d icator light . or
n. the cent ral indica to r li gh t
w ill ind icate the prior ity of the warn ing . If a
white indicato r light also appears, the cent ral in
d icator light will have its own co lor . For examp le,
if l!!JI appears together with. , read the desc rip
tion for •.
Overview
Some ind icator lights turn on briefly to check the
function of that system when you switch the ign i
tion on. These systems are marked with a ./ in
the following tables. If one of these indicator
lig hts does not tu rn o n, there is a ma lfu nction in
that system.
Red indic ator lights
12
-------------
US A mode ls:
Brake malf u nct ion./
¢ page 14
Canada models :
Brake malfunct io n ./
¢page 14
USA models:
Electromechan ica l park ing brake
¢page 15
Canada models :
Electromechanica l park ing bra ke
¢ page 15
Engine coo ling system
¢ page 15
Engine oil pressure
¢page 17
Engine oil level
¢page 17
Battery
¢ page 16
Engine stops wh ile driving
¢ page 16
Safety be lt
¢ page 16
Elec tromechanical steering ./
¢page 190
Elec tronic steering col umn lock
¢ page 17
En gine sta rt system
¢ page 17
Cent ral indicator light
¢ page 12
USA models : Speed warning sys
tem
¢ page 81
Can ada model s: Speed warning
system
¢ page 81
Adap tive cruise contro l* ./
~ page 86
Air su spension*
¢ page 17
Night vision assistant*
¢page 103
Night vision assistant*
¢ page 103
Refill Ad Blue*
¢page 212
AdB lue malfunct ion *
¢ page 212
Yellow ind icator l ights
AIR
BAG
r--------------
U SA m odels : Safety systems
¢page 18
Canada models : Safety systems
¢page 18
Electronic Stabilization Control
(ESC) ./
¢page 18
Electronic Stabilization Control
(ESC) ./
¢page 18
Page 15 of 294
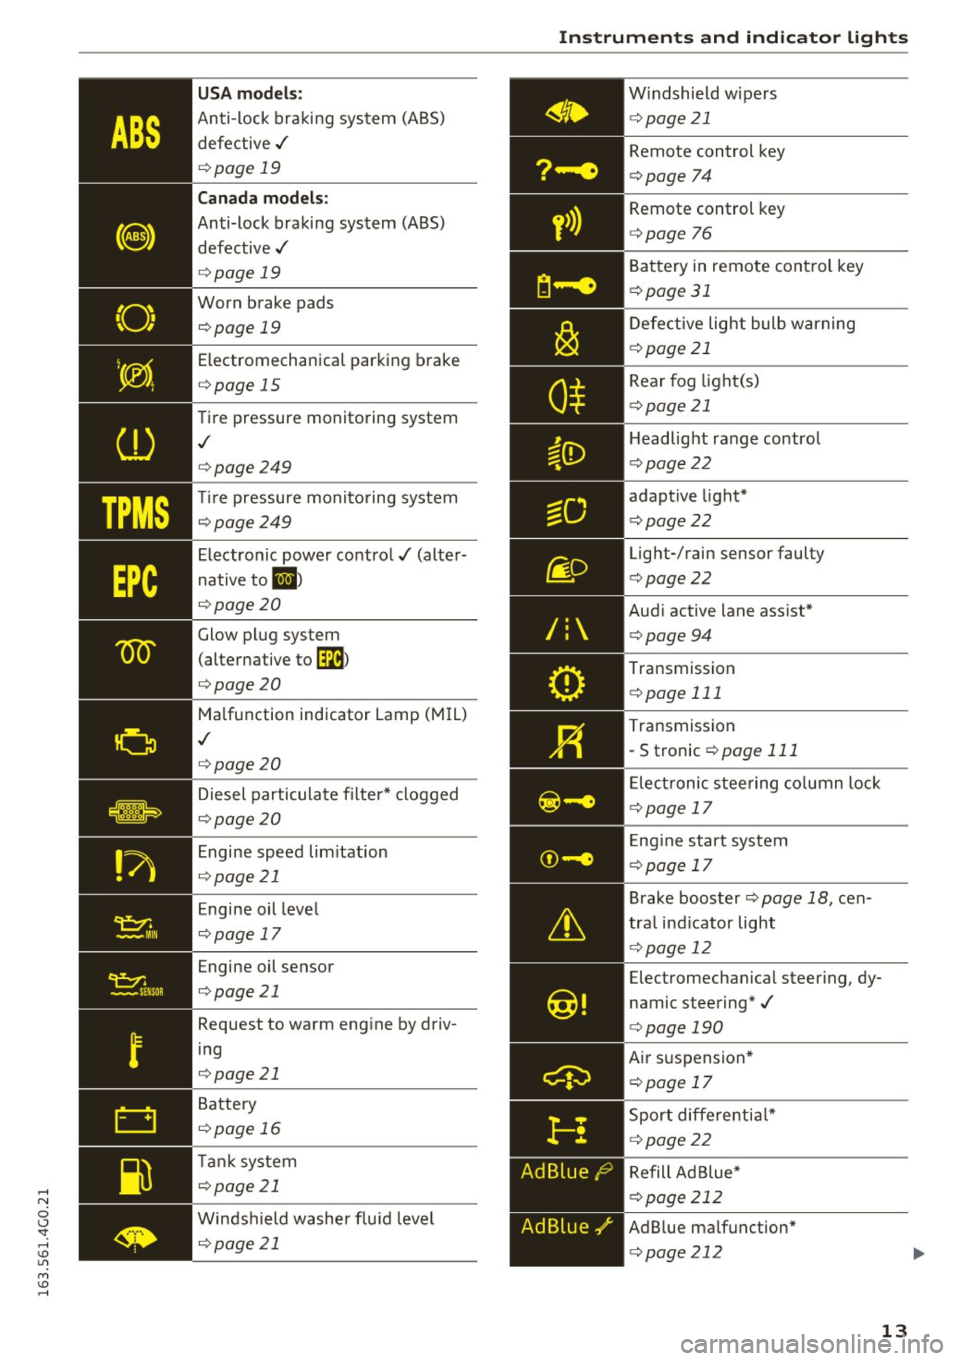
USA models:
Anti-lock braking system (ABS)
defective ./
¢page 19
Canada models:
Anti-lock braking system (ABS)
defective ./
¢page 19
Worn brake pads
¢page 19
Electromechanical parking brake
¢page 15
Tire pressure monitoring system
,I
¢page 249
Tire pressure monito ring system
¢page249
Electronic power control./ (alter
native to
II )
¢page20
Glow plug system
(alternative
tom
¢page20
Malfunction indicator Lamp (M IL)
,I
¢page 20
Diesel particulate filter* clogged
¢page20
Engine speed lim itation
¢page 21
Engine oil level
¢page 17
Engine oil sensor
¢page 21
Request to warm eng ine by driv
ing
¢page 21
Battery
¢page 16
Tank system
¢page 21
Windshield washer flu id leve l
¢page 21
Instruments and indicator lights
/:
Ad Blue,/'
Windshield wipers
¢p age 21
Remote control key
¢page 74
Remote control key
¢page 76
Battery in remote control key
¢page 31
Defective light bulb warning
¢page 21
Rear fog light(s)
¢ page 21
Headlig ht range control
¢pag e22
adaptive light*
¢page22
Light-/rain sensor faulty
¢page22
Audi active lane assist*
¢page94
Transmission
¢page 111
Transmission
-S tronic
¢page 111
Elect ronic steering column lock
¢page 17
Eng ine start system
¢p age 17
Brake booster¢ page 18, cen
tra l ind icator light
¢page 12
Electromechanical steer ing, dy
namic steering*./
¢page 190
Air suspension *
¢page 17
Sport differential*
¢page 22
Refill Ad Blue*
¢page 212
AdBlue ma lfunction*
¢page212
13
Page 18 of 294
Instruments and indicator lights
& WARNING
-If your veh icle should break down for me
chanical or other reasons, park at a safe dis
tance from moving traffic, turn off the en gine and turn on the hazard warn ing lights
¢ page 47, Emergen cy flasher.
- Never open the hood if you see or hea r
steam o r coolant escap ing from the eng ine
compartmen t -yo u risk be ing sc alded. Wa it
u nti l you can no longer see or hear s team or
coolant escaping.
- T he eng ine compartment of any vehicle is a
dange rous a rea. Befo re yo u perform any
work in the engine compartment, turn of
the engine and allow it to coo l. Follow the
warning stickers
¢ page 216.
@ Note
Do not contin ue driving if the . symbo l ill u
m ina tes . There is a mal function in the eng ine
coo ling system -you could damage your en
gine.
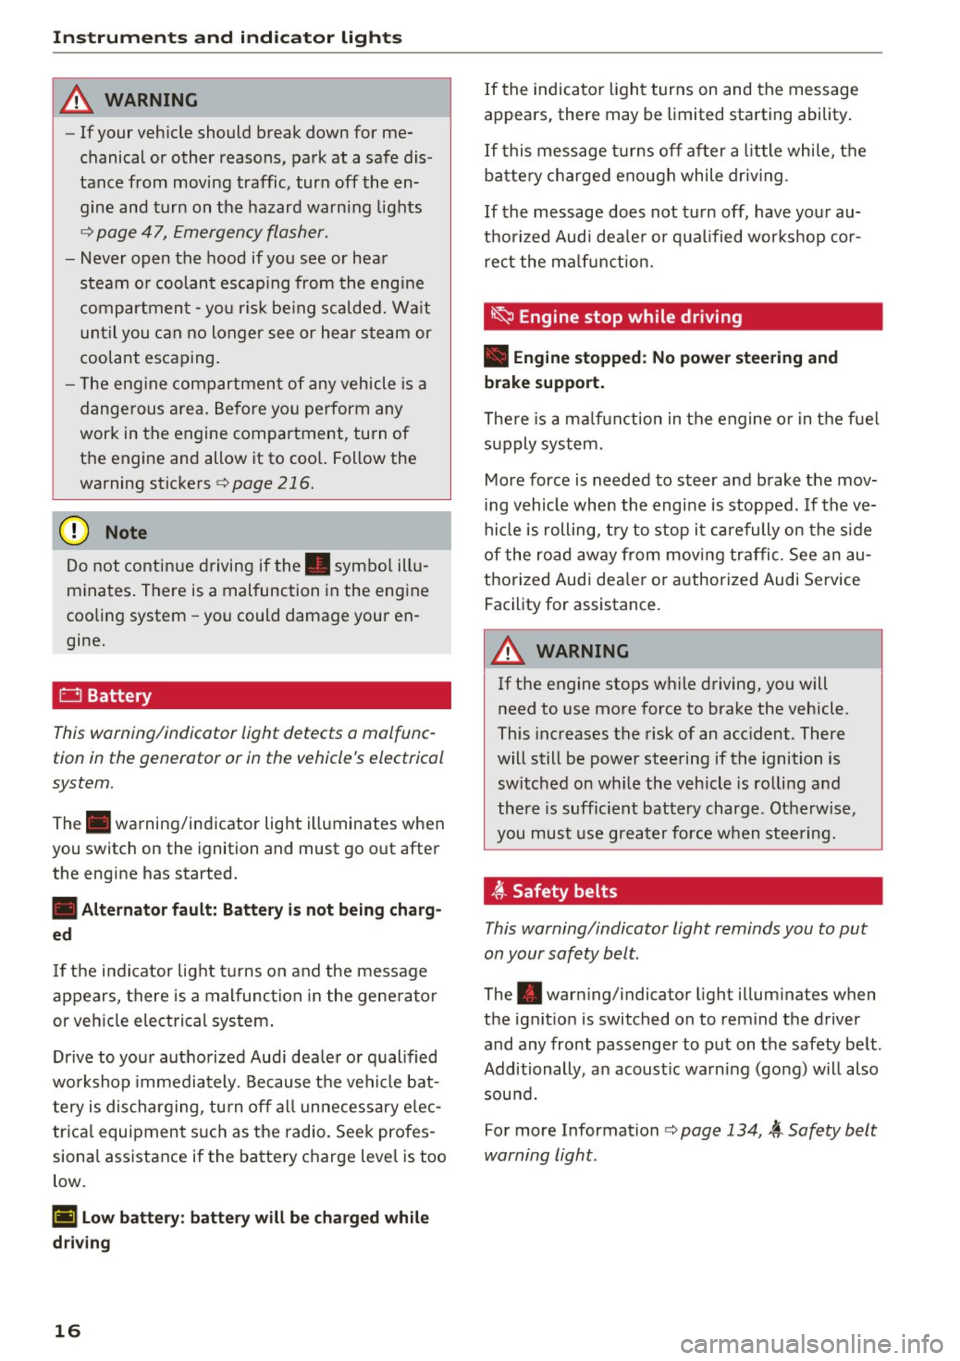
0 Battery
This warning/indicator light detects a malfunc
tion in the generator or in the vehicle's electrical
system.
The . warning/indicator light ill uminates when
you switch on the ignition and must go out after
the engine has started.
• Alternator fault: Batte ry is not being charg
ed
If t h e indicator lig ht t urns on and the message
appears, there is a malfunc tion in the gene rator
or veh icle ele ctrical system .
Dr ive to you r autho rized Aud i dea le r or q ual ified
wo rkshop immedia tely. Because the vehi cle bat
tery is discharging, tu rn off a ll unnecessary e lec
tr ica l equipment s uch as the radio. Seek profes
sional assistance if the ba ttery charge level is too
low.
(•) Low b att ery : battery will be charged whi le
dri ving
16
If the indica tor light turns on and the message
appears, there may be limited sta rting ability .
If this message t urns off after a little whi le, t he
batte ry c harged enough while dr iv ing .
If the message does not tu rn off, have you r au
t h orized Audi dea le r or qual ified wor ks hop co r
r ect the ma lf u nction.
~ Engine stop while driving
• Engine stopped : No power steering and
brake support.
There is a ma lf u nction in the engine o r in t he f uel
s u pply sys tem.
Mo re force is needed to steer a nd b rake the mov
i ng vehicle when the engi ne is stopped . If the ve
hicle is rolling, t ry to stop i t carefully on the s ide
of the road away from moving traffic. See an au
thorized Audi dea le r or a uthorized Audi Service
Facil ity for assistance.
& WARNING
I f t he engine stops w hile d riving, you will
need to use more force to brake the vehicle.
This increases the risk of an acc ident. There
will still be power steering if the ignition is
swi tched on while the vehicle is ro lling and
there is suff ic ient battery charge . Otherwise ,
you must use greater force w hen stee ring.
4'-Safety belts
This warning/indicator light reminds you to put
on your safety belt.
The . warn ing/ indicator light illum inates when
the ignit ion is switched on to remind the driver
and any front passenger to pu t on the safety belt.
Additionally , a n acoust ic wa rn ing (go ng) w ill also
sou nd.
For more Information
¢ page 134 , 4'-Safety belt
warning light .
Page 27 of 294
.... N
0 CJ '
-Short-term memory overview
- Long-term memory overview
The short-term memory collects driving informa
tion from the time the ignition is sw itched on un
til it is switched off. If you cont inue driv ing with
in two hours after switching the ignition off, the
new values are included when calculat ing the cur
rent trip information.
Unlike the short-term memory , the long-term
memory is not erased automat ically. Yo u can se
lect the time period for evaluat ing trip informa
tion you rself .
F or some vehicle functions , you can access the
trip informat ion from the temporary memory in
the line
(D .
Fuel consumption
The current fuel consumption can be displayed
using a bar ~
fig. 8. The average consumpt ion
(mpg) stored in the short-term memory is also
displayed . When the bar turns green, your veh icle
saves fuel by one of the following functions:
-Recuperation : When the vehicle is coasting or
driving downhill, electrical ene rgy can be stor
ed in the battery. The bar will move toward D.
-Cylinder on demand System*: when the de
ma nd for power is low and other conditions are
met, the engine automatically de activates fo ur
cylinders. The driver and passengers w ill not
even notice this. The cylinders switch on again
when more power is needed.
(D Tips
Fue l consumptions (average and current),
range and speed are displayed in metric units
on Canadian models.
Instruments and indicator lights
Efficiency program
Applies to vehicles: with efficiency program
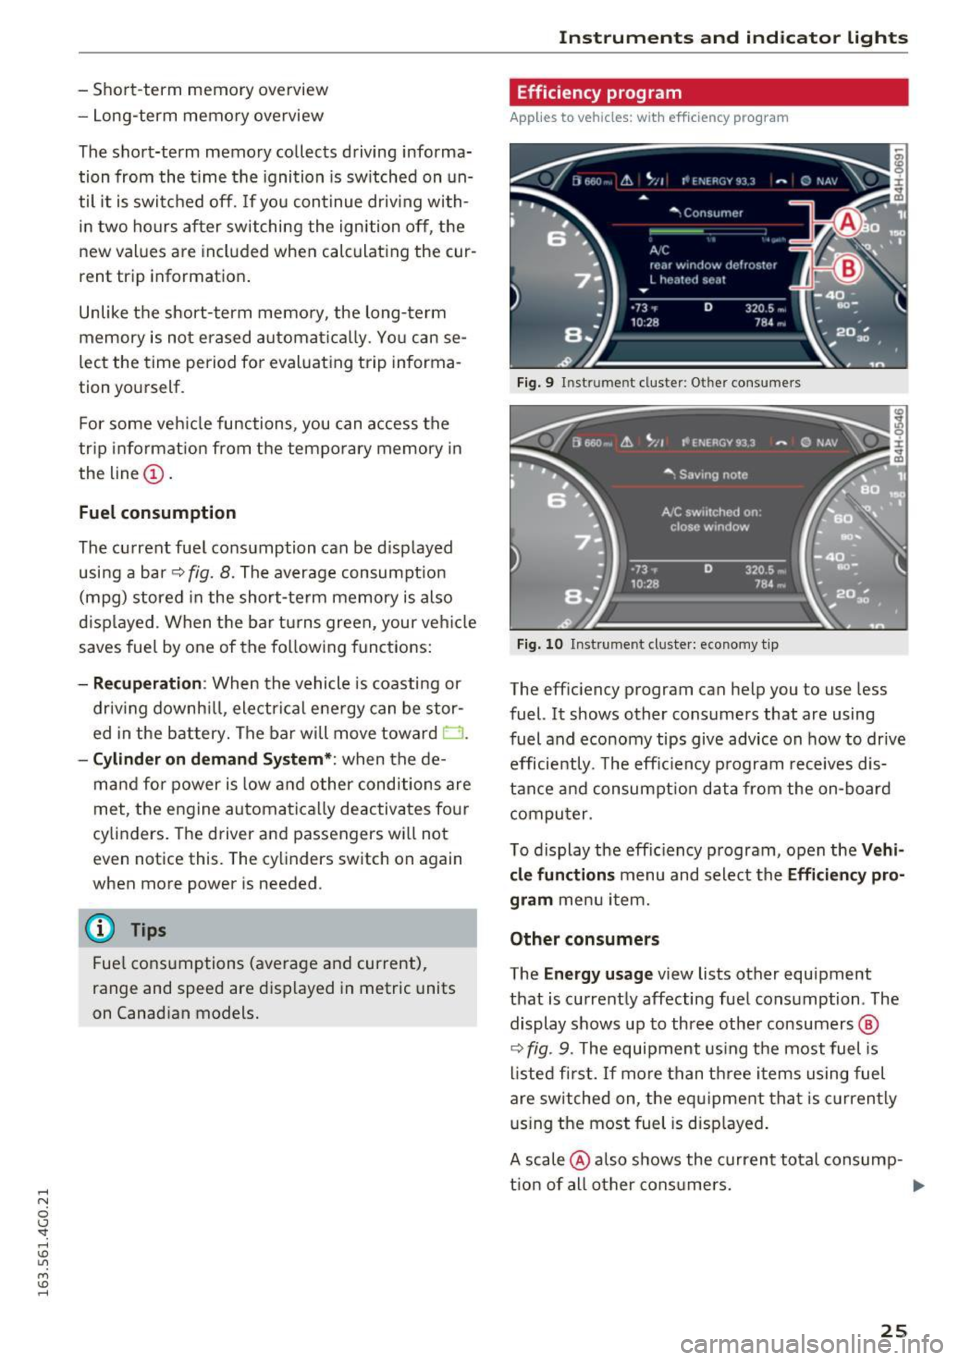
Fig. 9 In st rum en t cluster : Ot her con sum ers
Fig. 10 Instrume nt cl uste r: economy tip
The efficiency program can help you to use less
fuel. It shows other consumers that are using
fuel and economy tips give advice on how to drive
efficiently . T he eff iciency program receives dis
tance and consumption data from the on-board
computer.
To display the efficiency program, open the
Vehi
cle functions
menu and select the Efficiency pro
gram
menu item.
Other consumers
The Energy usage view lists other equipment
that is currently affecting fuel consumption . The
display shows up to three other consumers @
~ fig. 9. The equipment using the most fuel is
listed first. If more than th ree items using fuel
are switched on, the eq uipment that is currently
using the most fuel is displayed .
A scale @also shows the current total consump-
tion of all other consumers. .,.
25
Page 29 of 294
.... N
0 CJ '
-Inspection or oil change reminder: After a cer
tain distance driven, a message appears in the
instrument cluster display each time the ign i
tion is switched on or off¢
fig. 13. The remain
ing distance or time is displayed briefly.
-Inspection or oil change due: If your vehicle is
due for an inspection or oil change or both, a
message appears briefly in the instrument clus
ter display when sw itching the ign ition on or
off:
Inspection due! or Oil change due! or Oil
change and inspection due! .
Checking service intervals
You can check the remaining distance or time un
til the next oil change or next inspection n the
Car menu. To do this, select: the
ICARI function
button
> (Car)* Systems control button > Service
& control > Service intervals .
Resetting the indicator
Your authorized Audi dealer or authorized Audi
Service Facility will reset the service interval dis
play after performing service .
If you have changed the oil yourself, you must re
set the oil change interval.
To reset the indicator, select: the
ICARI function
button
> (Car)* System control button > Service
& control > Service intervals. Turn the control
knob downward to
Reset oil change interval and
press the control knob.
(D Note
-Only reset the oil change indicator if the oil
was changed.
- Following the service intervals is critical to
maintain ing the service life and va lue of
your vehicle, especially the engine. Even if
the mileage on the vehicle is low, do not ex
ceed the time for the next service.
- Calculating the t ime to the next oil change
i s interrupted when the vehicle battery is
disconnected.
If the vehicle is not driven for
a long period of time, check the mainte
nance schedule so that you can follow the
maintenance interva ls.
Instruments and indicator lights
Head-up display
Applies to vehicles: with Head-up display
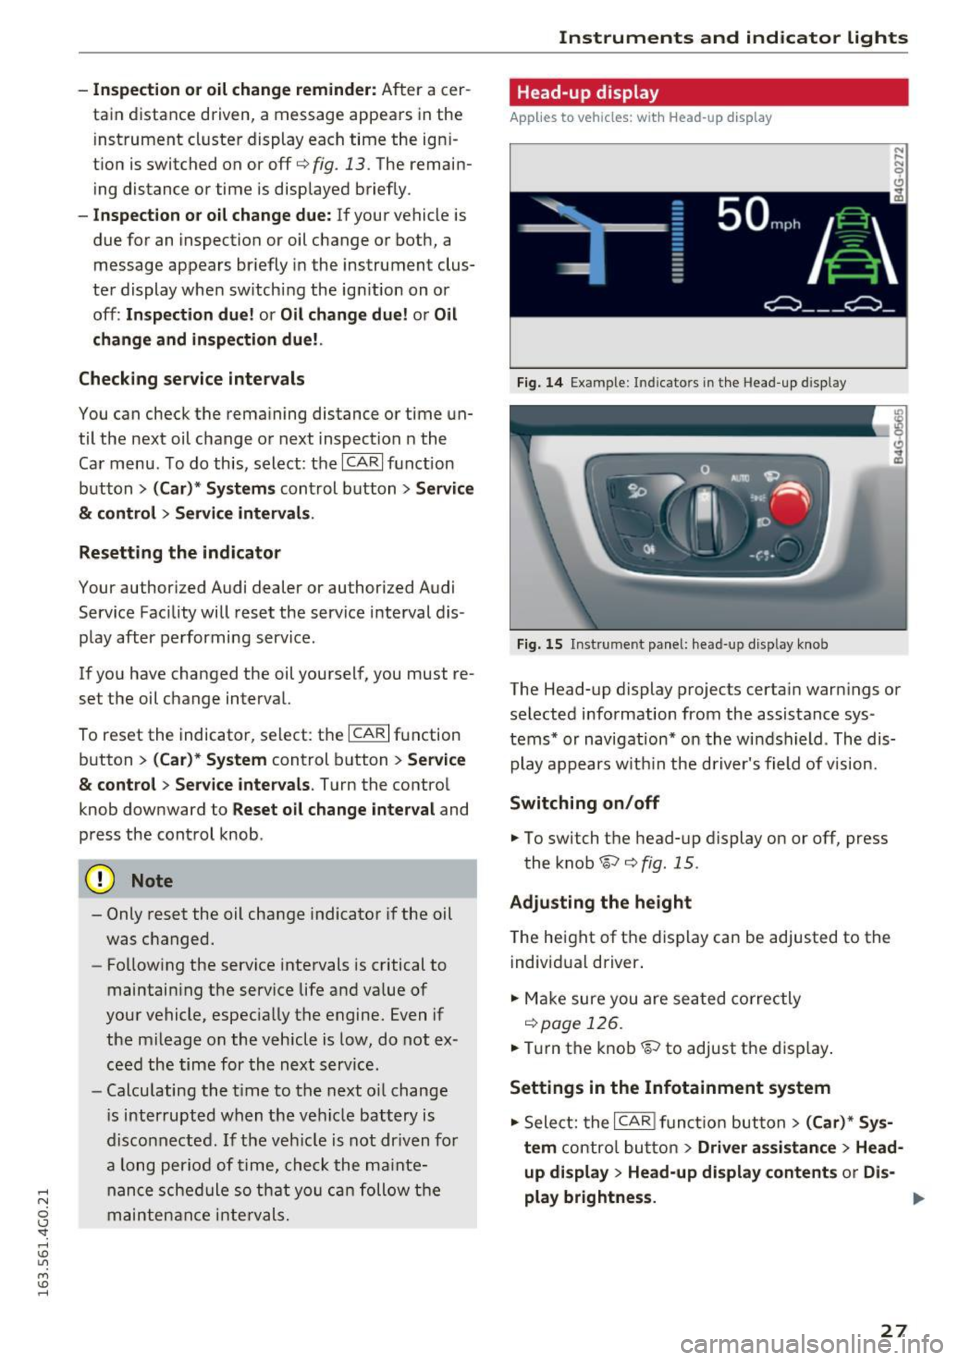
Fig. 14 Example : Indicato rs in the Head -up d isplay
Fig . 15 Instrument panel: head-up display knob
The Head-up display projects certain warnings or
selected information from the assistance sys
tems* or navigation* on the windshield . The dis
play appears w ithin the driver's field of vision.
Switching on/off
.. To switch the head-up display on or off, press
the knob~¢
fig. 15 .
Adjusting the height
The height of the display can be adjusted to the
individual driver .
.. Make sure you are seated correctly
r=!)page 126.
.. Turn the knob~ to adjust the disp lay .
Settings in the Infotainment system
.. Select: the I CAR I function button> (Car)* Sys
tem
control button > Driver assistance > Head
up display > Head-up display contents
or Dis-
play brightness. .,..
27
Page 33 of 294
.... N
0 CJ '
.. Press the release button@ c::> fig. 18.
.. Pull the mechanical key @ out of the master
key.
Using the mechanical key , you can:
- lock and unlock the storage compartment on
the passenger's s ide
c::> page 61.
- lock and unlock the vehicle manually
Qpage 35.
-lock the front and rear passenger doors me
chanically
c::> page 36.
LED and batteries in the remote control key
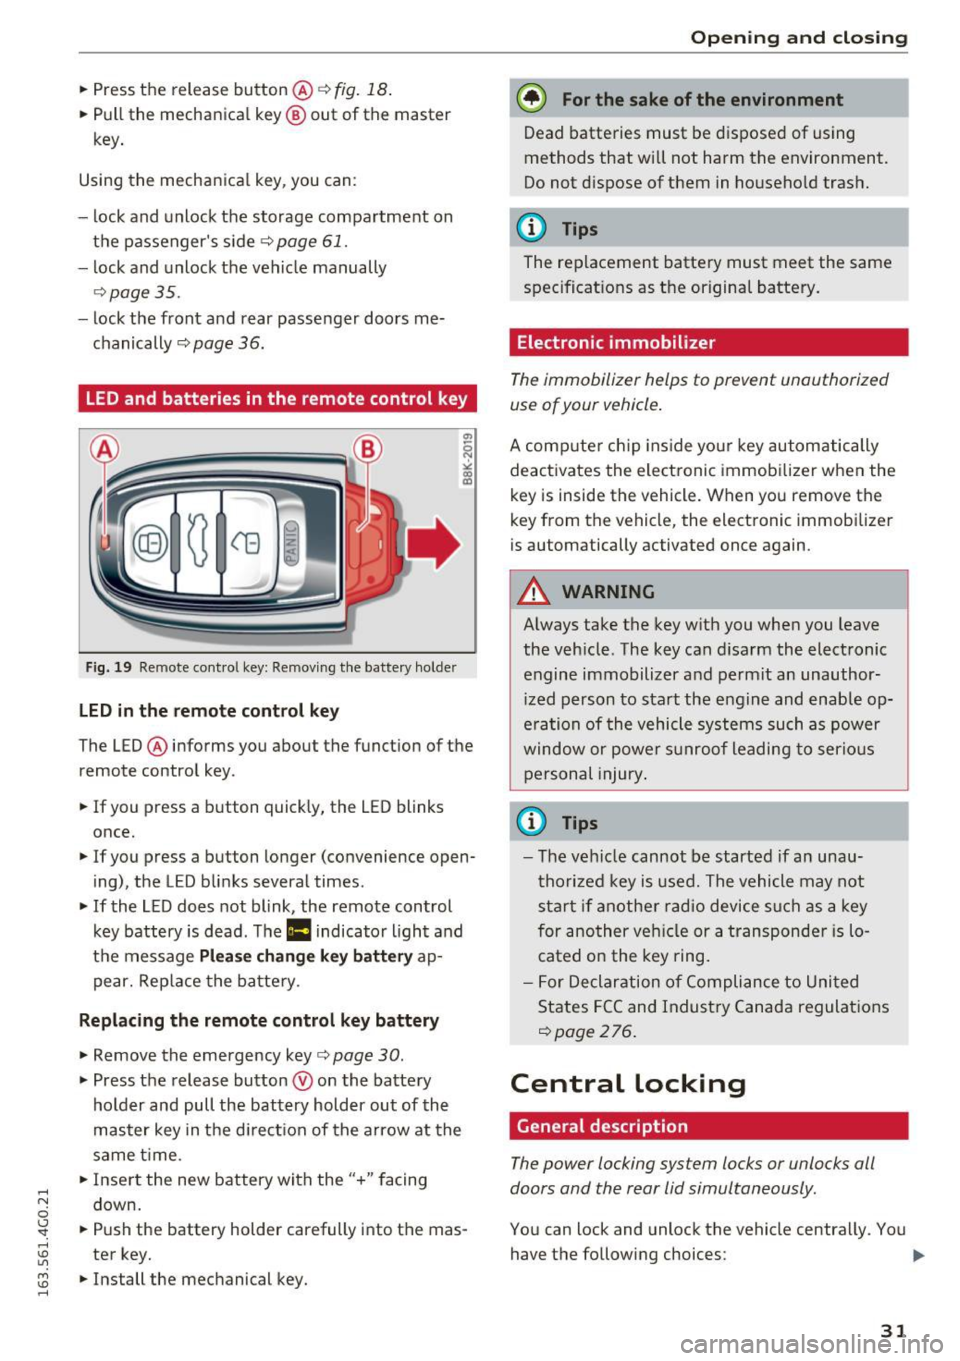
Fig. 19 Re mote cont ro l key: Removing the battery holde r
LED in the remote control key
The LED ® informs you about the function of the
remote control key .
.. If you press a button quickly, the LED blinks
once.
.. If you press a button longer (convenience open
ing) , the LED blinks several times .
.. If the LED does not blink, the remote control
key battery is dead . The
Ill indicator light and
the message
Plea se change key battery ap
pear. Replace the battery .
Replacing the remote control key battery
.. Remove the emergency key c::> page 30 .
.,. Press the release button ® on the battery
holder and pull the battery holder out of the
master key in the direction of the arrow at the
same time.
.. Insert the new battery with the
"+ " facing
down.
.. Push the battery holder carefully into the mas
ter key.
.. Install the mechanical key.
Open ing and closing
@) For the sake of the environment
Dead batteries must be disposed of using
methods that will not harm the environment.
Do not d ispose of them in household trash.
@ Tips
The replacement battery must meet the same
specifications as the origina l battery.
Electronic immobilizer
The immobilizer helps to prevent unauthorized
use of your vehicle .
A computer chip ins ide your key automatically
deactivates the electronic immobilizer when the
key is inside the vehicle. When you remove the
key from the vehicle, the electronic immobilizer
is automatically activated once again.
A WARNING
-Always take the key with you when you leave
the vehicle. The key can disarm the electronic
engine immobilizer and permit an unauthor
iz ed person to start the engine and enable op
e rat ion of the vehicle systems such as power
window or power s unroof leading to serious
personal injury .
@ Tips
-The vehicle cannot be started if an unau
thorized key is used. The vehicle may not
start if another radio device such as a key
for another vehicle or a transponder is lo
cated on the key ring.
- For Declaration of Compliance to United
States FCC and Industry Canada regulations
Qpage 276 .
Central Locking
General description
The power locking system locks or unlocks all
doors and the rear lid simultaneously.
You can lock and unlock the vehicle centrally. You have the following choices:
111>
31
Page 36 of 294
Opening and closin g
(D Tips
- In order to make sure the locking function is
working, you shou ld always keep your eye
on the vehicle to make sure it is properly l ocked.
- Do not use the remote contro l if you are in
side the car, otherwise you may uninten
tionally lock the veh icle, and then you would
set off the anti-theft alarm when you try to
start the engine or open a door. In case this
happens anyhow, push the unlock button
ITJ.
- The vehicle can only be locked when these
l ector lever is in the P posit ion .
- Use the panic funct ion only if you are in an
emergency s ituation.
Locking and unlocking with convenience
key
A ppl ies to veh icles: w ith conve nien ce key
The doors and the rear lid can be unlocked and
locked without operating the master key.
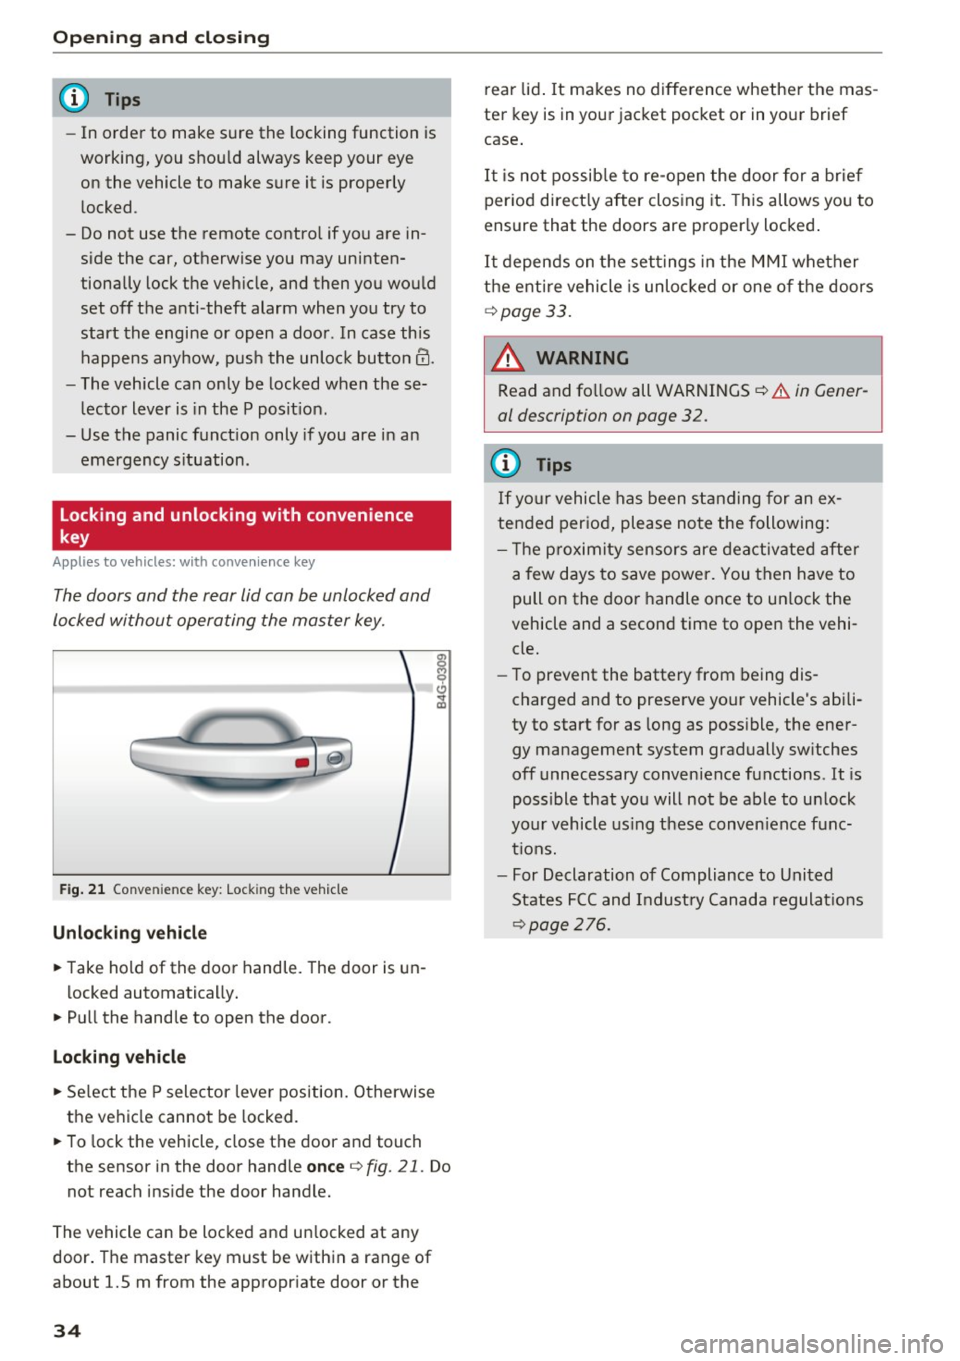
F ig . 2 1 Conven ie n ce key: Lock ing the vehicle
Unlocking vehicle
.. Take hold of the door handle. The door is un -
l ocked automatically .
.,. Pull the hand le to open the door.
Loc king vehicle
.,. Se lect the P selector leve r position. Otherwise
the vehicle cannot be locked .
.. To lock the vehicle, close the door and touch
the sensor in the door handle
once q fig. 21 . Do
not reach ins ide the door handle.
The vehicle can be locked and un locked at any
door . The master key must be w ith in a range of
about 1.5 m from the appropriate door or the
34
rear lid . It makes no diffe rence whether the mas
ter key is in your jacket pocket or in yo ur brief
case .
It is no t possib le to re-open the door for a br ief
per iod direct ly after clos ing it . T his allows you to
ensure that the doors are proper ly locked .
It depends on t he set tings in the M MI whether
the enti re vehicle is unlo cked or one of the doors
¢ page 33.
_& WARNING
Read and fo llow all WARNINGS¢
& in Gener
al description on page 32.
@ Tips
If yo ur vehicle has been s tanding for an ex
tended period, please note the following:
- T he p roximity sensors are deactiv ated after
a few d ays to save power. You then have to
pull on the door handle once to un lock the
vehicle and a second time to open the vehi
cle.
- To prevent the battery from being dis
charged and to prese rve your vehicle's abili
ty to start for as long as poss ible, the ene r
gy management system gradually sw itches
off unnecessary convenience functions . It is
possible that yo u will not be able to un lock
yo ur vehicle using t hese conven ience f unc
t ions.
- For Declaration of Compliance to United
States FCC and Indust ry Canada regulat io ns
¢page
276.
Page 40 of 294
Opening and clo sin g
_& WARNING
Read and follow all WARNINGS¢ page 31,
General description.
- After closing the rear lid, always pull up on
it to make sure that it is properly closed.
Otherwise it could open suddenly when the
vehicle is mov ing.
- To help prevent poisonous exhaust gas from
being drawn into the veh icle, always keep
the rear lid closed while driving. Never
transport objects larger than those which fit
comple tely into the luggage area, because
then the rear lid cannot be fully closed.
- Never leave yo ur vehicle unattended espe
c ially w ith the rea r lid left open. A child
could crawl into the car through the luggage
compartment and pull the lid shut, becom
ing trapped and unable to get out. To re
duce the r isk of personal injury, never let
children play in or around your vehicle. Al
ways keep the rear lid as well as the vehicle doo rs closed when not in use.
- Never close the rear lid inattentively or with
out checking first. Although the closing
force of the rear lid is lim ited, you can still
seriously injure yourse lf or others.
-Always ensure that no one is within range of the rear lid when it is moving, in particular
close to the h inges and the upper and lowe r
edges -fingers or han ds can be pinched.
- Never try to interfere w ith the rear lid or
help it when it is being opened or closed a u
tomat ica lly.
(D Tips
- The setti ngs i n the Infota inment system de
termine if the l uggage compartment lid can
be opened using t he handle
Q page 33.
-When the vehicle is locked, the luggage
compartmen t lid can be unlocked separately
by p ressing the b utton
l= I on the remote
contro l key. W hen the luggage compart
ment lid is closed aga in, it locks a utomati
ca lly.
- You can close the luggage compartment lid
us ing the maste r key (veh icles with conven -
38
ience key*) up to a distance of approximate
ly 9
ft (3 m).
- Th e luggage compartment lid can be oper
ated by hand if the vehicle battery is low . It
is necessa ry to use more force w hen doing
this. Move the lid s low ly to reduce the
amount of force needed.
Luggage compartment with movement
activated opening
Applies to vehicles : wit h convenience key and sensor -control
led luggage comp artm en t lid
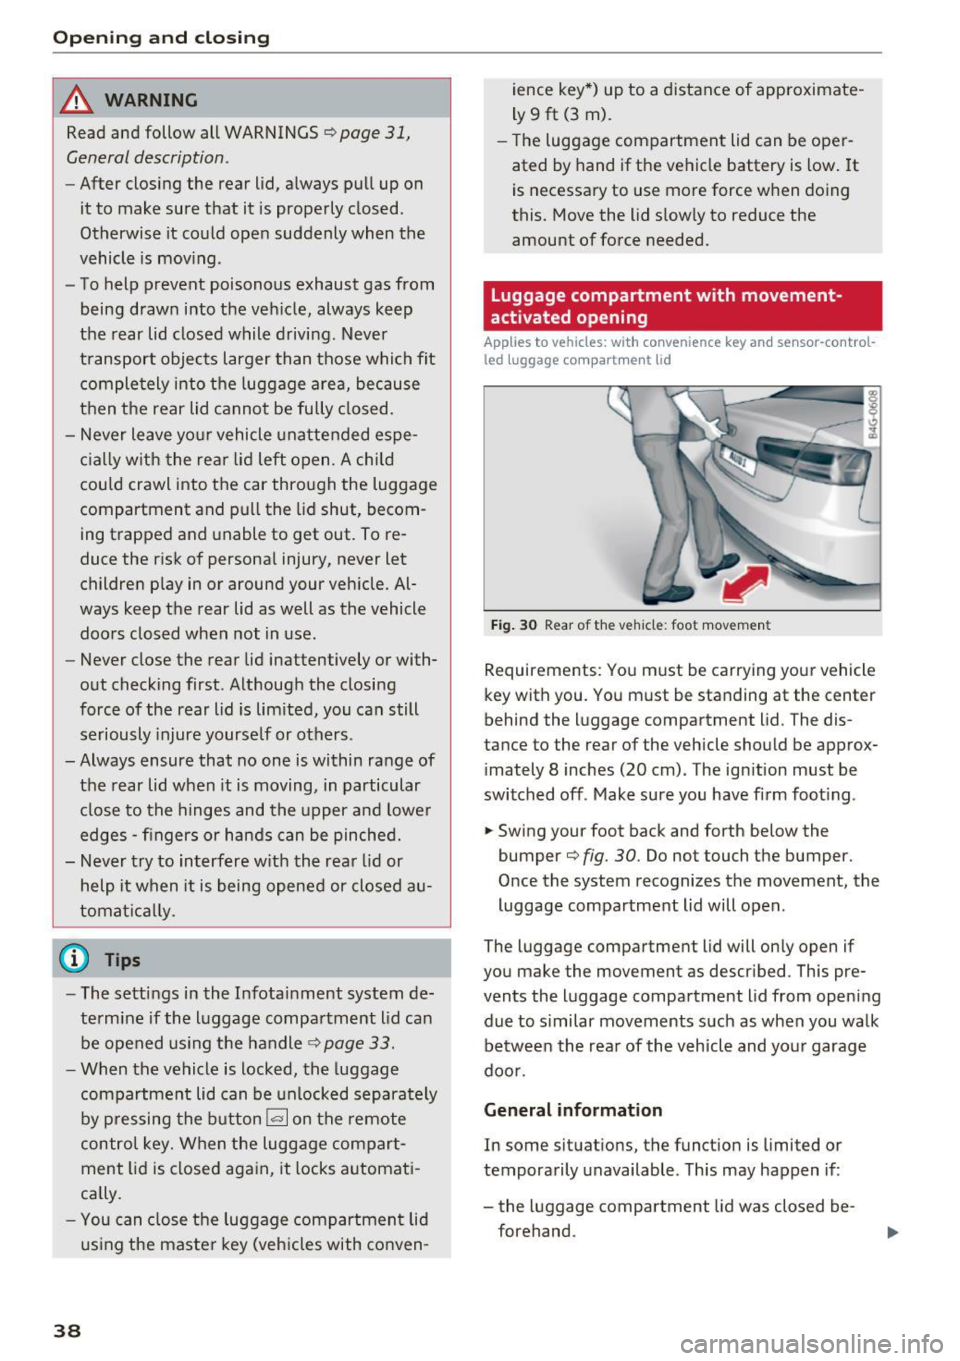
F ig . 30 Rear of the vehicle: foot movemen t
Requirements: You m ust be carrying your vehicle
key with you . You must be standing at the center
behind the luggage compartment lid. The dis
tance to the rear of the vehicle should be approx
i mately 8 inches (20 cm) . The ignition must be
switched off . Make sure you have firm foot ing .
.. Swing your foot back and forth below the
bumper¢
fig. 30. Do not touch the bumper.
O nce the system recognizes the movement, the
luggage compartment lid will open .
The luggage compartment lid will only open if
you make the movement as descr ibed . This pre
vents the luggage compartment lid from opening
due to s imilar movements such as when you walk
be tween the rea r of the v eh icle and yo ur garage
doo r.
General information
In some situat ions, the funct ion is limited or
temporarily unavailable . Th is may happen if :
- the luggage compartment lid was closed be
forehand.
Page 43 of 294
.... N
0 CJ '
Correcting power window malfunctions
After disconnecting the vehicle battery, the one
touch up and down feature must be activated
again .
.,. Pull the powe r window switch until the window
is completely ra ised.
.,. Release the switch and pull it aga in for at least
one second.
Valet parking
The valet parking feature protects the luggage
compartment from unauthorized access .
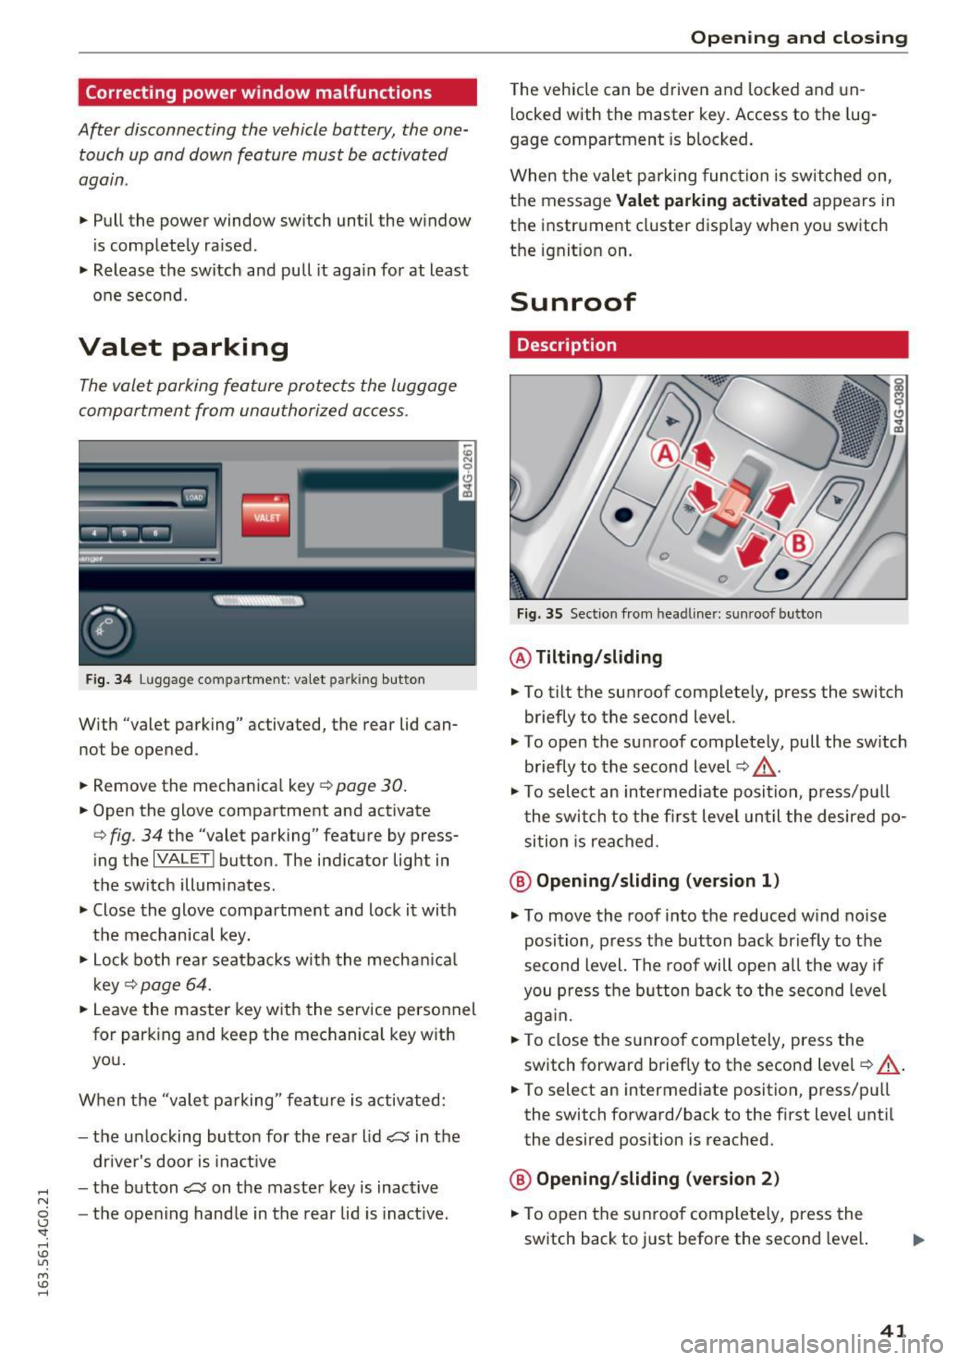
Fig. 34 Lu gg age comp artment : v a let parkin g button
W ith "valet parking" activated, the rea r lid can
no t be opened .
.,. Remove the mechanical key
Q page 30.
.,. Open the glove compartment and activate
Q fig . 34 the "valet parking" feature by press
ing the
I VA LETI button . The indicator light in
the switch illuminates .
.,. Close the glove compartment and lock it with
the mechanical key.
.,. Lock both rear seatbacks w ith the mechanical
key
Q page 64 .
.,. Leave the master key with the service personnel
for park ing and keep the mechanical key with
you .
When the "valet parking" feature is activated:
- the un locking button for the rear lid
~ in the
driver's door is inact ive
- the button~ on the master key is inactive
- the opening handle in the rear lid is inactive.
Opening and closing
The vehicle can be driven and locked and un
locked with the master key. Access to the lug
gage compartment is blocked.
When the valet parking function is switched on ,
the message
Valet parking activated appears in
the instrument cluster display when you switch
the ignition on .
Sunroof
Description
Fig. 35 Section from hea dline r: sun roo f b utton
@ Tilting /sliding
.,. To tilt the sunroof completely, press the switch
briefly to the second level.
"' To open the sunroof completely, pull the sw itch
briefly to the second level¢,&. .
.. To select an intermediate position , press/pu ll
the switch to the first level until the desired po
sition is reached .
@ Opening /sliding (version 1)
"'To move the roof into the reduced wind noise
position, press the button back briefly to the
second level. The roof will open all the way if
you press the button back to the second level
again.
.,. To close the sunroof completely, press the
switch forward briefly to the second level
Q ,&..
.. To select an intermediate position, press/pull
the switch forward/back to the first level until
the desired position is reached.
@ Opening/sliding (version 2)
.,. To open the sunroof complete ly, press the
switch back to just before the second level.
41