acc AUDI A7 2018 User Guide
[x] Cancel search | Manufacturer: AUDI, Model Year: 2018, Model line: A7, Model: AUDI A7 2018Pages: 274, PDF Size: 42.77 MB
Page 24 of 274
Driver i nformation system
You can call up the following information in the
on-board comp uter:
- Date
- Driving time from the short-term memory
- Average consumpt ion from the short-term
memory
- Average speed from the short-term memory
- Distance driven from the short-term memory
-Current f uel consumption
-Short-term memory overview
- Long-term memo ry overview
The s ho rt-term memory collects driving info rma
tion from the t ime the ignition is switched on un
til it is swit ched off. If yo u con tinue driv ing wi th
i n t wo ho urs after switching the ignition off, the
new val ues are incl uded when calculating the cur
rent trip information .
U nlike t he short-term memo ry, the long -term
memory is not erased automa tica lly . Yo u can se
lec t the time period for eval uat ing tr ip informa
tion yourself.
F or some ve hicle functions, you can access the
driving information from the short -term memory
i n t he line
(D ¢ page 20, fig . 5.
Fuel consumption
The cu rrent fuel co nsump tion can be shown us
i n g a bar g raph
¢ fig. 8. The ave rage consump
tion stored in the short-term memory is also dis
p laye d. I f the bar is green, your vehicle is savi ng
fue l throug h one o f th e following functions:
- Re cuperation : electrical ene rgy can be stored i n
the ve hicle bat tery when the ve hicl e is coasting
or driv ing downhi ll. The bar w ill move toward
0 .
-Cylinder on demand sy stem* : the engine auto
matically switches four cylinde rs off when low
er powe r output is required and othe r condi
tions are met . This change is not noticeab le to
the passengers.
(D Tips
The date, time of day and t ime and date for
mat can be set in the Infotainment system
¢page 23.
22
Efficiency program
App lies to: vehicles wi th eff ic iency prog ra m
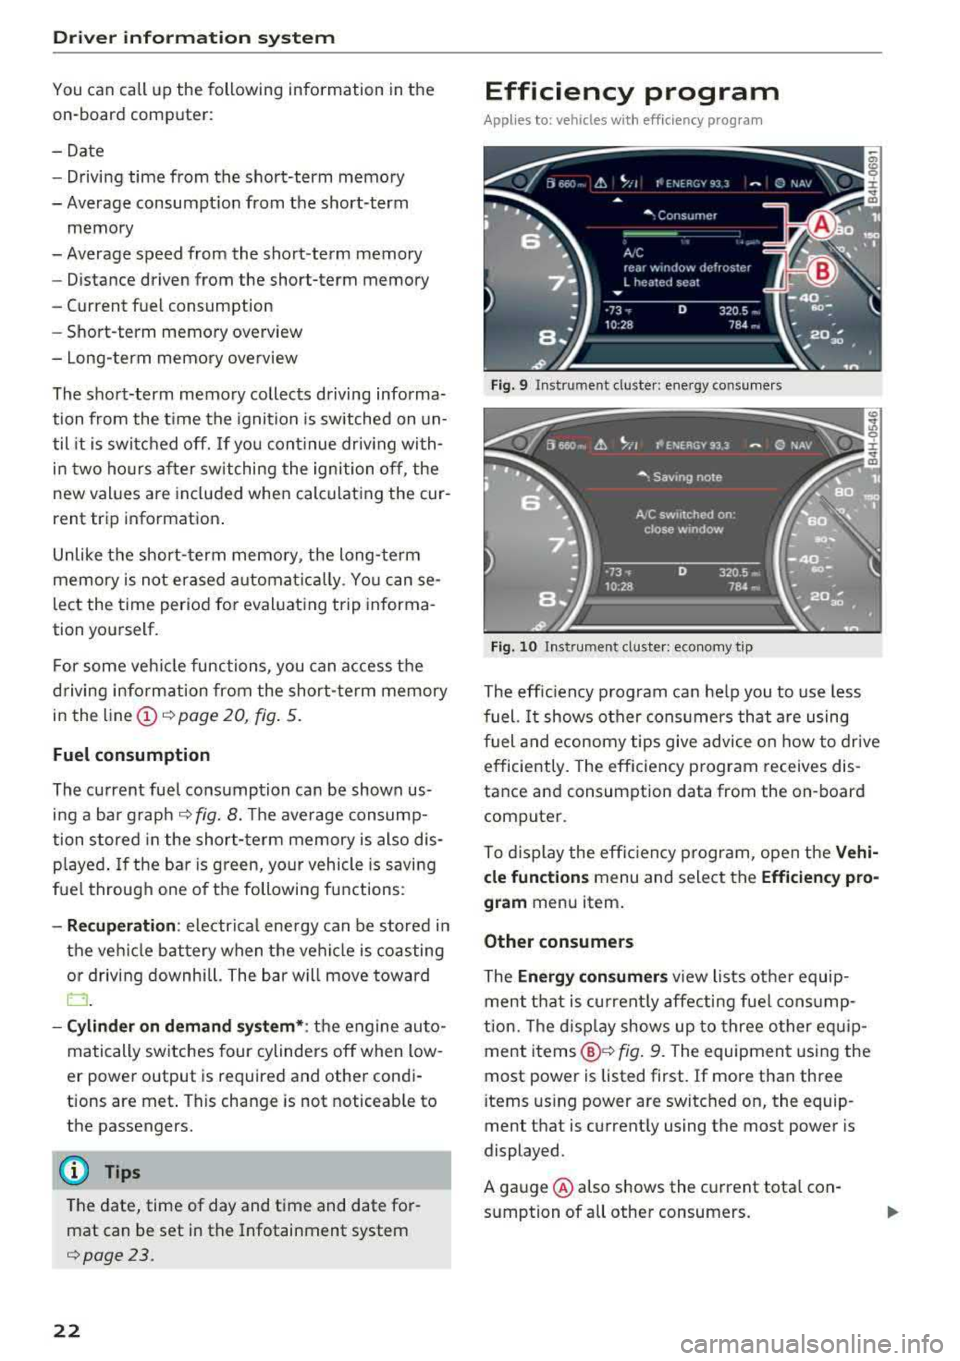
Fig. 9 Instrument cluster: energy consumers
Fi g. 10 In strument cluster: eco nomy tip
The eff ic ien cy p rogram can he lp you to use less
fuel.
It shows other cons umers that are using
fuel and economy tips give advice on how to drive
efficiently. The efficiency p rogram receives dis
tance and consumption data from the on -board
computer.
To display the eff iciency p rogr am, open the
Vehi
cle functions
menu and select the Efficienc y pro
gram
menu item .
Other consumers
The Energy con sumer s view lists other equip
ment t hat is cu rrent ly affecting fue l cons ump
tion. The d isp lay shows up to three o ther equip
ment
items @¢fig. 9. The equipment using the
most power is listed first. If more than three
i tems us ing power are switc hed on, the equip
ment that is current ly using the most power is
displayed.
A ga uge @ also shows the c urrent tota l con
s u mption of all other consumers.
Page 28 of 274

Opening and clo sing
Opening and closing
Central locking
Description
You can lock and un lock the veh icle centrally . You
have the following options:
-Remote control key <=> page 29,
-Sensors in the door hand les" <=> page 29,
-Lock cylinder on the dr iver 's door <=> page 31,
or
-Interior central locking switch <=> page 30.
Turn signals
The turn s ignals flas h twice when yo u un loc k the
ve hicl e and flash on ce when you lock the veh icle.
If th e b linking continues, one of the doo rs or the
luggage compartment lid/hood is not closed or
the ignition is still switched on .
Auto Lock
The Auto Lock f unct io n loc ks all doors and the
luggage compartment lid on ce the speed has ex
ceeded approximately
9 mph (15 km/ h).
The vehicle ca n be unlo cked if the openi ng func
t ion in the centra l loc kin g sys tem sw itch is used
or one of the door handles is pulled.
The Auto Lock funct ion can be switched on and
off in the Infotai nment
system ¢ page 31.
In the event of a crash with a irbag deployment,
the doo rs will a lso automa tical ly unlock to allow
access to t he veh icle.
Selecti ve door unlocking
The doors and luggage compartment lid w ill lock
when they close. You can set in the Infotainment
system whether
only the driver's door or the en
tire ve hicle should be unlocked w hen unlocking
<=>
page 31.
Unintentionally locking yourself out
Only lock your vehicle when all of the doors and
the luggage compartment lid are closed and the
remote control key is not i n the vehicle . This
he lps to prevent you from locking yourse lf o ut
accidentally .
26
The following conditions prevent yo u from lock
ing yo ur remote contro l key in the ve hicle:
-If the d river's door is o pen, the vehi cle ca nnot
be locked by press ing t he
Iii button on the re
mote contro l key or by to uching the locking
sensor* on a door .
-If the most recently used conven ience key* is
detected in the luggage compartment, the lug
gage compartment lid automatica lly unloc ks
aga in after closing it.
-If the convenience key* that was last used is de
tected ins ide the veh icle, then the vehicle can
not be locked from the o utside.
Closing aid on the doors*
The veh icle doors are equipped wi th closing aids.
When closi ng a door, yo u only have to let it fall
li ght ly into the latch . It then closes automatically
¢ ,& .
A WARNING -
-When you lock yo ur vehicle from outs ide,
nobody - espec ially children - sho uld rema in
inside the vehicle . Remember, when you
lock the vehicle from the outside the win
dows cannot be opened from the inside.
-When you leave the vehicle, always take the
ign it ion key with yo u. This will prevent pas
sengers (c hildren, for examp le) from acci
dent ally being lo cked in the vehicle should
they a cciden tally p ress the power locking
sw itch in the doors .
-Do not le ave children insi de the vehicle un
supervised. In an emergency it would be im
possible to open the doors from the outside
w ithout the key .
-Applies to vehi cles w ith power s ide doo r
closer* :
-When closing a door , make sure nothing
can inte rfere wi th the door. Th is could
cause ser ious personal in jury.
-You can stop the door from closing at any
time by pulling on the inside o r outside
door handle .
Page 31 of 274

a co ,...,
N
" N ,...,
0 00 <..:l '
The replacement battery must meet the same
specifications as the original battery in the re
mote control key .
Unlocking/locking by remote control
Fig. 18 Remote control key: button programming
.,. To unlock the vehicle, press the~ button
¢fig. 18.
.,. To lock the vehicle, press the~ button one
time ¢_& .
.,. To unlock the luggage compartment lid, press
the~ button briefly .
.,. To trigger the alarm, press the I PANIC ! button.
The vehicle horn and emergency flashers are
activated .
.,. To turn the alarm off, press the red I PANIC!
button again.
If you unlock the vehicle and then do not open
any of the doors, the lu ggage compartment lid ,
or hood are opened within 60 seconds, the vehi
cle will lock again automatically. This feature
prevents the vehicle from being accidentally left
unlocked over a long period of time.
The settings in the Infotainment system deter
mine if the entire vehicle or on ly the driver's door
is unlocked when unlocking the vehicle
¢page 31.
A WARNING
Read and heed all WARNINGS ¢.&. in Descrip
tion on page 26 .
Opening and closing
(D Tips
-Only use the remote control key when you
are within view of the vehicle.
- The vehicle can only be locked when these
lector lever is in the P position .
- Do not use the remote control when you are
inside the vehicle. Otherwise, you could un
intentionally lock the vehicle. If you then
tried to start the engine or open a door, the
alarm would be triggered . If this happens,
press
the @ unlock button.
- Only use the panic function in an emergen
cy.
Locking and unlocking with the
convenience key
Applies to: vehicles with convenience key
The doors and luggage compartment lid can be
unlocked/locked without using the remote con
trol key .
Fig. 19 Door han d le : l ocking t he veh icle
Unlocking the vehicle
.,. Grip the door handle. The door unlocks auto-
matica lly .
.,. Pull on the door handle to op en th e door.
Locking the vehicle
g M 0 (!)
"' m
.,. Place the selector lever in the "P" position ; oth
erwise, the vehicle cannot be locked .
.,. To lock the vehicle, close the door and touch
the sensor in the door handle
once ¢ fig. 19,
q _&. . Do not hold the door handle while doing
this .
..,.
29
Page 32 of 274

Opening and clo sin g
You can unlock/lock the vehicle at every door .
The remote control key cannot be more than
ap
proximately 4 ft (1.5 m) away from the door han
d le. It ma kes no difference whether the master
key is in your jacket pocket or in your briefcase,
for example.
The door cannot be opened for a br ief period di
rectly after locking it. This way you have the
op
portun ity to check if the doors locked correctly.
The settings in the Infotainment system deter
mine if the entire vehicle or only one of the doors
is unlocked when unlocking the vehicle
c::;,page 31.
A WARNING
Read and heed all WARNINGS c::;, & in Descrip
tion on page 26 .
(D Tips
If your vehicle is left standing for a long peri
od of time, note the following:
- The proximity sensor switches off after a few days to save energy. You then have to
pull once on the door handle to unlock the
vehicle a nd a second t ime to open it.
- The energy management system gradually
turns off unnecessary convenience functions
to prevent the vehicle battery from draining
and to mainta in the vehicle's ab ility to sta rt
fo r as long as possib le. You may not be able
to unlock yo ur vehicle usi ng the convenie nce
key .
Central locking switch
Fig . 20 Driver's doo r: central locking switch
30
Fig. 21 Rear doo r: centra l locking sw itch
.,. To lock the vehicle, press the ~ button c::;, ,&.
.,. To unlo ck the vehicle, p ress the Im bu tton.
When locki ng the vehicle with t he central lock ing
switch, the following app lies:
- Opening the door and the luggage compart
ment lid from the
outside is not possible (for
security reasons, such as when stopped at a
light) .
- The LED in the centra l locking sw itch turns on
when all doors are closed and locked .
- Applies to: front doors: you can open the doors
ind ividually from the inside by pull ing the door
handle.
- Rear doors: to un lock the doors, pull on the
door handle
one time . To open the doors, pull
on the door handle
again .
-In the event of a crash with a irbag deployment,
the doors unlock a utomat ically to allow access
to the vehicle .
A WARNING
-The ce ntral locking swi tch a lso wor ks when
the ignition is switched off and automatical
ly locks the entire vehi cle when
the ~ but
ton is pressed.
- The central lock ing switch is inope ra ti ve
when the vehicle is locked from the ou tside.
- L ocked doors ma ke it more diffic ult for
emergency workers to get in to the vehicle,
which p uts lives at r isk. Do not leave anyone
behind in the veh icle, especially children .
(D Tips
Your vehi cle lo cks au tom atically when it
r eaches a speed of 9 mph ( 15 km/h) (A uto
Page 36 of 274

Opening and closing
convenience key*) up to a distance of
approximately 9 feet (3 m) .
- The luggage compartment lid can be oper
ated manually if the vehicle battery is low.
It is necessary to use more force when doing
this. Move the lid slowly to reduce the
amount of force needed.
Luggage compartment with movement
activated opening
A ppl ies to: ve hicles w ith conve nien ce key a nd sensor -con tro l
l e d lu ggage compartment li d
Fig. 26 Rear o f th e ve hicle: foot movement
Requirements: you must be carrying your vehicle
key with you . You must be standing at the center
behind the luggage compartment lid. You should
be approximately 8 in (20 cm) from the rear of
the vehicle . The ign ition must be switched off.
Make sure you have firm footing.
~ Move your foot back and forth below the bump
er
c> fig. 26 . Do not touch the bumper. Once the
system recognizes the movement, the luggage
compartment lid w ill open .
The luggage compartment lid will only open if
you make the movement as described. This pre
vents the luggage compartment lid from opening
due to similar movements, such as when you
walk between the rear of the vehicle and your ga
rage door.
General information
In some situations, the function may be limited
or temporar ily unava ilable. This may happen if :
- the luggage compartment lid was closed imme
diately before.
34
- you park close to a hedge and the branches
move back and forth under the vehicle for a long period of ti me
- you clean your vehicle, for example with a pres
sure washer or in a car wash
- there is heavy rain
- the bumper is very dirty, for example after dr iv-
ing on salt-covered roads
- there is interference to the radio signal from
the vehicle key, such as from cell phones or re
mote controls
Luggage compartment lid emergency
release
The luggage comportment lid can be released
from inside the luggage comportment in an
emergency.
Fig. 27 Inner luggage compartment lid : access to the
emergency release
~ Remove the mechanical key c> page 28.
~ Pry the cover off using the mechanical key
¢fig. 27.
~ Press the lever in the direction of the arrow to
release the luggage compartment lid .
M N 0 9
Page 37 of 274

a co ..... N
" N ..... 0 co <..:l '
The child safety lock prevents the rear doors
from being opened from the inside and the rear
power windows from be operated.
Fig. 28 Section of dr iver's door: child safety lock buttons
~ M 0
::'i a, IIl
.,. To activate/deactivate the inner door handle
and the power window switch for the respective
rear door, press the left/right
[II button in the
driver's
door~ fig. 28. The indicator light in the
button turns on/blinks.
.,. To activate/deactivate the child safety lock on
both sides, you must press the
1±1 buttons one
after the other.
..&, WARNING
Always take the veh icle key with you when
leaving the vehicle, even for a short period of
time. This applies particularly when children
remain in the vehicle. Othe rwise child ren
could start the engine or operate electrical
equipment (such as power windows), which
increases the risk of an accident.
Opening and closing
Power windows
Controls
The driver can control all power windows.
Fig. 29 Driver's door: power win dow controls
All power window switches are equipped with a
two -stage function:
Opening and closing the windows
(0 ~ M 0
::'i (0 m
.,. To open or close the window completely, press
the switch down or pull the switch up brief ly to
the second level. The operat ion will stop if the
sw itch is pressed/pulled again.
.,. To select a position in between opened and
closed, press/pull the switch to the first level
until the des ired window position is reached .
Power window switches
CD Left front door
@ Right front door
® Left rear door
@ Right rear door
.&_ WARNING
--==
-Always take the vehicle key with you when
leaving the vehicle, even for a short period
of time. This applies particularly when chil
dren remain in the vehicle. Otherwise chil
dren cou ld start the engine or operate elec
tr ical equipment (such as power windows),
which increases the risk of an acc ident. The
power windows continue to function until
the driver's door or front passenger's door
has been opened.
- Pay careful attention when closing the win
dows. Pinching could cause serious injuries .
35
Page 41 of 274

a co ,...,
N
" N ,...,
0 00 <.,;) '
Exterior Lighting
Switching lights on and off
F ig. 33 Instrument panel: l ig ht switc h w ith all-weather
lights
Light switch -t;..-
T u rn the switch to the co rresponding posi tion.
When t he lig hts are sw itched on, the
:oo: symbo l
turns on.
0 - The lights a re off or the daytime running
l ights are on:
- USA models: The daytime runn ing lig hts will
come on automatically when the ignition is on
and the light sw itch
q fig . 33 is in the O posi
t ion or the
AUTO pos ition (only i n day light con
di tions). The
Daytime running lights func tion
ca n be turned on and off in the MM I
qpage41, q _& .
-Canada models : The daytime runn ing lights
will come on au toma tically when t he ignit ion is
on a nd the light swi tch
q fig . 33 is in the O po
sition, the
: oo: position or the AUTO position
(only in daylig ht conditions)
q ,& .
AUTO -automa tic headligh ts sw itc h on and off
depending on brigh tness, fo r example in tw ilight,
d uring rain or in tunne ls.
:oo : -Parking lights
~D -Low beam headlights
~ -All-weather lights
@il -Rea r fo g lights
Lights and V ision
All-weather lights
T he front lig hts a re adjus ted au toma tic a lly so
t h at there is less glare fo r th e driver from his o r
her own lights, fo r example when roads are wet.
Automatic dynamic headlight range control
system
Yo ur vehicle is equipped with a headlight ra nge
contro l system so that there is less g lare for on
coming traff ic if the vehicle load changes . The
headlig ht range also adjusts automatically when
braking and accelerat ing .
Light functions
The following light funct ions may be ava ila ble
depending on vehicle eq uipment and only f unc
tio n when the lig ht switch is in the AUTO posi
t ion.
Static cornering light* -the corne ring light
switches on automatically at speeds up to ap
prox imately 44 mph (70 km) when the steering
whee l is at a certain ang le. The area to t he side of
the vehicle is illuminated better when turning.
A WARNING
-- Automatic headlights are only intended to
assist the driver. They do not relieve the
driver of respons ibi lity to check the head
lights and to t urn them on manu ally b ased
on the curre nt ligh t and v is ib ility conditions .
For examp le, fog canno t be detected by the
light sensors. So always switch on the low
beams under these weather conditions and
when driving in the dark
~D.
- To prevent glare fo r traffic be hind yo ur vehi
cle, the rear fog lights should only be turned
on in accordance with traff ic regulat ions.
- Always observe legal regulations when us
ing the lighting systems desc ribed.
(D Tips
- T he lig ht sensor for the automat ic he ad
lights is located in the rea rview mirror
mount. Do not p lace a ny st icke rs in this area
on the windshie ld.
- Some exter io r l ight ing funct io ns can be ad
justed
q page 41.
39
Page 42 of 274

Lights and Vi sion
-If you turn off the ignition wh ile the exter ior
li ghts are on and open the door, a wa rning
tone so unds.
-In cool or damp weather, the inside of the
headlights, turn signals and tai l lights can
fog over d ue to the temperature d ifference
between the inside and outs ide. They will
clear s hort ly after sw itch ing them o n. This
does not affect the serv ice life of the light
ing .
Turn signal and high beam lever
The turn signal lever operates the turn signals,
the high beams and the headlight flasher .
Fig. 34 Turn s ig nal an d hig h bea m lev er
Turn signals ¢ c:::>
N 0 ,.._ 0 ±
" a,
The tu rn s ignals activa te when you move the lev
er into a tu rn s ignal position w hen the ign ition is
switched on.
(D -Right turn signa l
@-Left turn signal
The turn s ignal b links three times if you tap the
lever (conven ience turn signal).
High b eams and headlight flasher ~D
M ove the lever to the corresponding pos it ion :
@ -High beams on (vehicles w ith High beam as
sis tant*
9 page 40)
© -High beams off or headlight flasher
The
ii indicator light in the instrument cluster
turns on .
40
A WARNING
High beams can cause gla re for other dr ivers,
which inc reases the risk of an acc ident . For
this reason, only use the high beams or the
h eadligh t flasher when t hey will no t crea te
g la re fo r ot her dr ive rs.
High beam assistant
App lies to : vehicles wi th high beam ass istan t
A camer a on t he rearv iew mirror mou nt can de
tec t light sources from o ther road use rs. The high
beams switch on or off automatically depending
on the position of vehicles driving ahead and on
coming v ehicl es, the vehicle speed and oth er en
v ironmental and traffic cond itions.
Activating high beam assistant
Requireme nt: the light sw itch mus t be set to the
A UTO posit ion and the hig h beam ass istant must
be switched on in the Infotai nment system
9 page 41 .
.,. To act ivate the hig h be am ass ista nt, t ap the
lever forwa rd @ . Th e
El indicator light ap
pea rs in the instrument cluster disp lay and the
high beam headlights are sw itched on/off auto
matically . The
ii indicator lig ht also turns on if
the high beams are switched on.
Switching the high beams on/off manually
If the high beams did not switch on/off automat
ica lly as expected, yo u may switc h them on o r off
manua lly instead :
.,. To switch t he hi gh beams on manua lly, tap the
lever fo rwa rd @ . Th e
ii indicator light turns
on.
.,. To switch t he hi gh beams off manua lly, pull the
lever
back @. The high beam assistant is deac
tivated .
Operating the headlight flasher
.,. To operate the headlig ht flashe r when the high
beam assistant is activated and hig h beams a re
sw itched off, pull the lever
bac k@ . The high
beam ass istant remains active.
Page 45 of 274
a co ,...,
N
" N ,...,
0 00 <..:l '
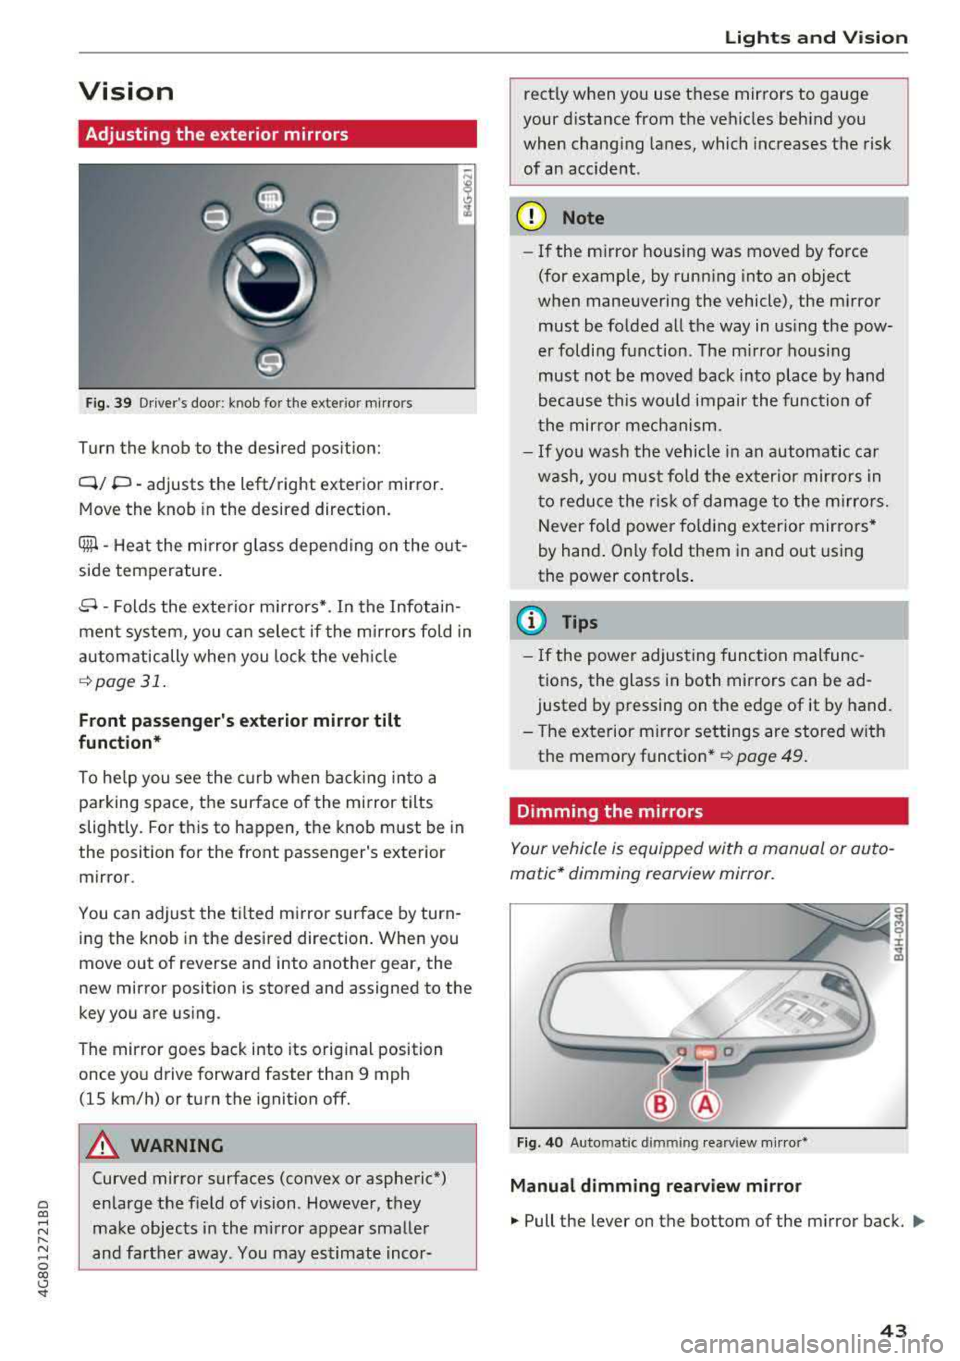
Adjusting the exterior mirrors
Fig. 39 Driver's door : kn ob for the exte rior mirro rs
Turn the knob to the desired position:
Q/ P -adjusts the left/right exterior mirror.
Move the knob in the desired direction.
Ciiil -Heat the mirror glass depending on the out
side temperature .
8 -Folds the exterior mirrors* . In the Infotain
ment system, you can select if the mirrors fold in
automatically when you lock the vehicle
¢page 31.
Front passenger's exterior mirror tilt
function*
To he lp you see the curb when backing into a
parking space, the surface of the mirror tilts
slightly. For th is to happen, the knob must be in
the position for the front passenger 's exterior
mirror.
You can adjust the tilted mirror surface by turn ing the knob in the desired direction. When you
move out of reverse and into another gear , the
new mirror position is stored and assigned to the
key you are using .
The mirror goes back into its original position
once you drive forward faster than 9 mph
(15 km/h) or turn the ignition off.
A WARNING
Curved mirror surfaces (convex or aspheric*)
enlarge the field of vision . However, they
make objects in the mirror appear smaller
and farther away. You may estimate incor-
Lights and Vision
rectly when you use these mirrors to gauge
your distance from the vehicles behind you
when changing lanes, which increases the risk
of an accident.
({I) Note
- If the mirror housing was moved by force
(for example, by running into an object
when maneuvering the vehicle), the mirror must be folded all the way in using the pow
er folding function. The mirror hous ing
must not be moved back into place by hand
because this would impair the function of
the mirror mechanism.
- If you wash the vehicle in an automatic car
wash, you must fold the exter ior mirrors in
to reduce the risk of damage to the mirro rs.
Never fold power fo lding exterior mirrors*
by hand. On ly fold them in and out using
the power controls .
(D Tips
-If the power adjusting function malfunc
tions, the glass in both mirrors can be
ad
justed by pressing on the edge of it by hand.
- The exterior m irror settings are stored w ith
the memory function *
~ page 49.
Dimming the mirrors
Your vehicl e is equipped with a manual or auto
matic* dimming rearview mirror.
Fig. 40 Auto matic dimmin g rearv iew mirro r*
Manual dimming rearview mirror
.,. Pull the lever on the bottom of the mirror back. Ill>
43
Page 47 of 274

a co ,...,
N
" N ,...,
0 00 <.,;) '
Do not use the sunshade to secure cargo. The
luggage compartment cover is not a surface
for storing objects. Objects placed on the cov er could endanger all veh icle occupants dur
ing sudden braking maneuvers or in a crash .
Windshield wipers
Switching the windshield wipers on
Fig. 43 W indshie ld wiper lever
Move the windshield wiper lever to the corre
sponding position:
@ -Windshield wipers off
~ M 0 ± ..,. CD
(D -Rain sensor mode . The windshield wiper s
switch on once the vehicle speed exceeds approx imately 2 mph (4 km/h) and it is raining . The
higher the sensitivity of the rain sensor that is set
(switch
@ to the right) , the earl ier the wind
shield wipers react to moisture on the wind
shie ld. You can deactivate the rain sensor mode
in the Infotainment system , which switches the
intermittent mode on . Select:
!CAR I function but
ton
> (Car)* systems control button > Dr ive r as
sistance > Rain sensor> Off.
In intermittent
mode, you can adjust the interval time using the
switch @.
@· Slow wiping
@ -Fast wiping
@·Single wipe. If you hold the lever in th is posi
tion longer, the wipers switch from s low wiping
to fast w iping .
® -Clean the windshield . The wipers wipe one
time after several seconds of dr iving to remove
Lights and Vision
water droplets. You can switch this function off
by moving the lever to position ® within 10 sec
onds of the afterwipe. The afterwipe function is
reactivated the next time you switch the ignition
on.
Clean the headlights*. The headlight washer sys
tem* operates only when the low beam head lights are on. If you move the lever to position
@, the headlights and the night vision assist
camera* are cleaned at intervals.
_& WARNING
--The rain sensor is only intended to ass ist the
driver . The driver may sti ll be responsible
for manually switching the wipers on based
on visibility cond itions .
- The windsh ield may not be treated w ith wa
ter-repelling w indshield coating agents. Un
favorable conditions, such as wetness, dark
ness or low sun, can result in increased
g lare , which increases the risk of an acci
dent. Wiper blade chatter is also possible.
- Properly functioning windshield wiper
b lades are required for a clear view and safe
driving
¢ page 46, Replacing windshield
wiper blades.
(D Note
- If there is frost, make sure the windshield
wiper blades are not frozen to the wind
shield. Switching on the windshield wipers
when the blades are frozen to the wind
shield can damage the wiper blades.
- The windshield wiper system must be switched off (lever in position 0) before us
ing a car wash. Th is prevents the wipers
from switching on un intentionally and caus
ing damage to the windsh ield wiper system .
(D Tips
-The windshield wipers switch off when the
ign ition is switched off. You can activate the
windshield wipers after the ignition is
switched back on by moving the w indshield
w iper lever to any position.
""
45