acc AUDI A7 2018 Owner's Manual
[x] Cancel search | Manufacturer: AUDI, Model Year: 2018, Model line: A7, Model: AUDI A7 2018Pages: 274, PDF Size: 42.77 MB
Page 48 of 274

Lights and Vi sion
-Worn or dirty windshield wipe r blades result
in streaking. This can affect the rain sensor
funct ion . Check your winds hield wiper
blades regularly.
-The washer fluid nozzles for the windshie ld
washer system are heated at low tempera
tures when the ignition is on .
-When stopping temporarily, such as at a
traffic light, the speed of the windshie ld
wipers automatically reduces by one level.
Cleaning windshield wiper blades
Clea n the w iper blades when you see wiper
streaks . Use a soft cloth and a glass cleaner .
.. Place the windshield wiper arms in the service
pos ition
¢ page 46.
.. Fold the windshield wiper arms away from the
windsh ield .
.&_ WARNING
Dirty w indshield wipe r blades can impair v i
sion , which increases the risk of a n accident .
Replacing windshield wiper blades
Fig . 44 Re mov ing w indshi eld w iper blades
Windshield wiper service position /blade
replacement po sition
-
:::
9 J: ... a,
.. Switch the ign ition off and move the winds hield
wipe r leve r to posit ion @
briefly ¢ page 45,
fig. 43. The w indshie ld w ipers move in to the
service pos ition .
.. To bring the windshield wipers back to the nor
mal position, switch the ignition on and hold
the windshie ld wiper lever in position @ until
the windshie ld w ipers go back to the normal
pos ition, or dr ive faster than 8 mph (12 km/h) .
46
You can also turn the service pos ition on or off in
the Infotainment system:
.. Switch the windshie ld w ipers off (posit ion @
¢ page 45, fig. 43).
.. Select: the I CAR I funct ion button > ( Car) * Sys
t e m s
control button > Servic e & control > Wip·
er change po sition.
> On /Off
Remo ving th e wipe r blade
.. Fold the windshie ld wiper arm away from the
w indshield .
.. Press the locking knob (D ¢ fig. 44 on the w iper
blade . Hold the wiper blade firmly .
.. Remove the wiper blade in the d irection of the
ar row .
Installing the w ipe r blade
.. Insert the new wiper blade into the mount on
the wiper arm @until it clicks into place.
.. Place the w iper arm back on the windsh ield .
.. Turn the service pos ition off .
.&_ WARNING -
Fo r safety reasons, the wi ndshield wipe r
b la des should be rep laced once o r twice eac h
year .
(Llj) Note
-Only fold the w indshie ld w ipers away when
they a re in the se rvice pos ition. Otherwise,
yo u r isk damag ing the pa int on the hood o r
the winds hield wiper motor .
-You should not move your ve hicle or operate
the winds hield wipe r leve r whe n the w iper
arms are folded away from t he windshie ld .
Th e windshie ld wipers would move back in
to their original position and co uld damage
the hood and w indshie ld.
(D Tips
-You can also use the service position, for ex
ample, if you want to protect the windshield
from icing by using a cover .
-You cannot activate the service position
when the hood is open.
Page 49 of 274

a co ,...,
N
" N ,...,
0 00 <.,;) '
General information
A WARNING
-
Refer to c:::> page 129, Driving safety for im
portant information, tips, suggestions and
warnings that you should read and follow for
your own safety and the safety of yo ur pas
senge rs.
Front seats
Power seat adjustment
Applies to vehicles with power adjustable seats
Fig . 45 Front seat: adj usting the seat
0 N M '? ::c .,. a,
@ -Moving the sea t fo rward/back: press the but
ton forward/back .
@-Moving the seat up/down: p ress the button
up/down. To adjust the fron t seat cush ion, p ress
the front button up/down. To adjust the rear sea t
cushion, press the rear button up/down.
@ -Switching the massage function * on/off . Se
l ec t the type of massage with the mult if u nct ion
button
c:::> page 47.
© - adjusting the backrest angle : press the but
ton forward/back.
@ -lumbar support or mult ifunction button*
c> page 47 . To adjust the lumbar support, press
the button in the applicable location .
A WARNING
-The power fron t seats can also be ad justed
when the ig nition is swi tched off. For this
reason, children should never be left unat-
S eats and storag e
tended i n the vehicle because they could be
in jured.
-To reduce the risk of an accident, only adjust
the dr iver's seat when the vehicle is station
ary.
-Exercise caution when adjusting the seat
he ight. Unsupe rvised or careless seat ad
justment can pinch fingers or hands causing inj uries .
-The front seat backrests must not be re
clined too far back when driving, because
this impa irs the effect iveness of the safety
be lts and airbag system, which inc reases
the r isk of inj ury .
Multifunction button
Applies to: vehicles with multifunctio n button
You can adjust the massage function , lumbar
support, side bolsters and upper thigh support
using the multifunction button.
Fig. 4 6 Infotainme nt sys te m : seat sett ings
Operating
"I f you turn the mul tifunction button (D
c> page 47 , fig. 45 to the lef t or to the r ight,
the poss ible seat settings @are shown in the
I nfotainment system
c:::> fig. 46.
" To select a seat setting, turn the multifunction
button
(D in the corresponding direction unti l
the desired seat setting is outlined in red.
" The arrows @ represent the possib le adjust
ments . For example, to lower the lumbar sup
port, press the multifunction button
(D down .
The corresponding a rrow © lights up.
The following seat settings @are poss ible:
IJi,
47
Page 52 of 274
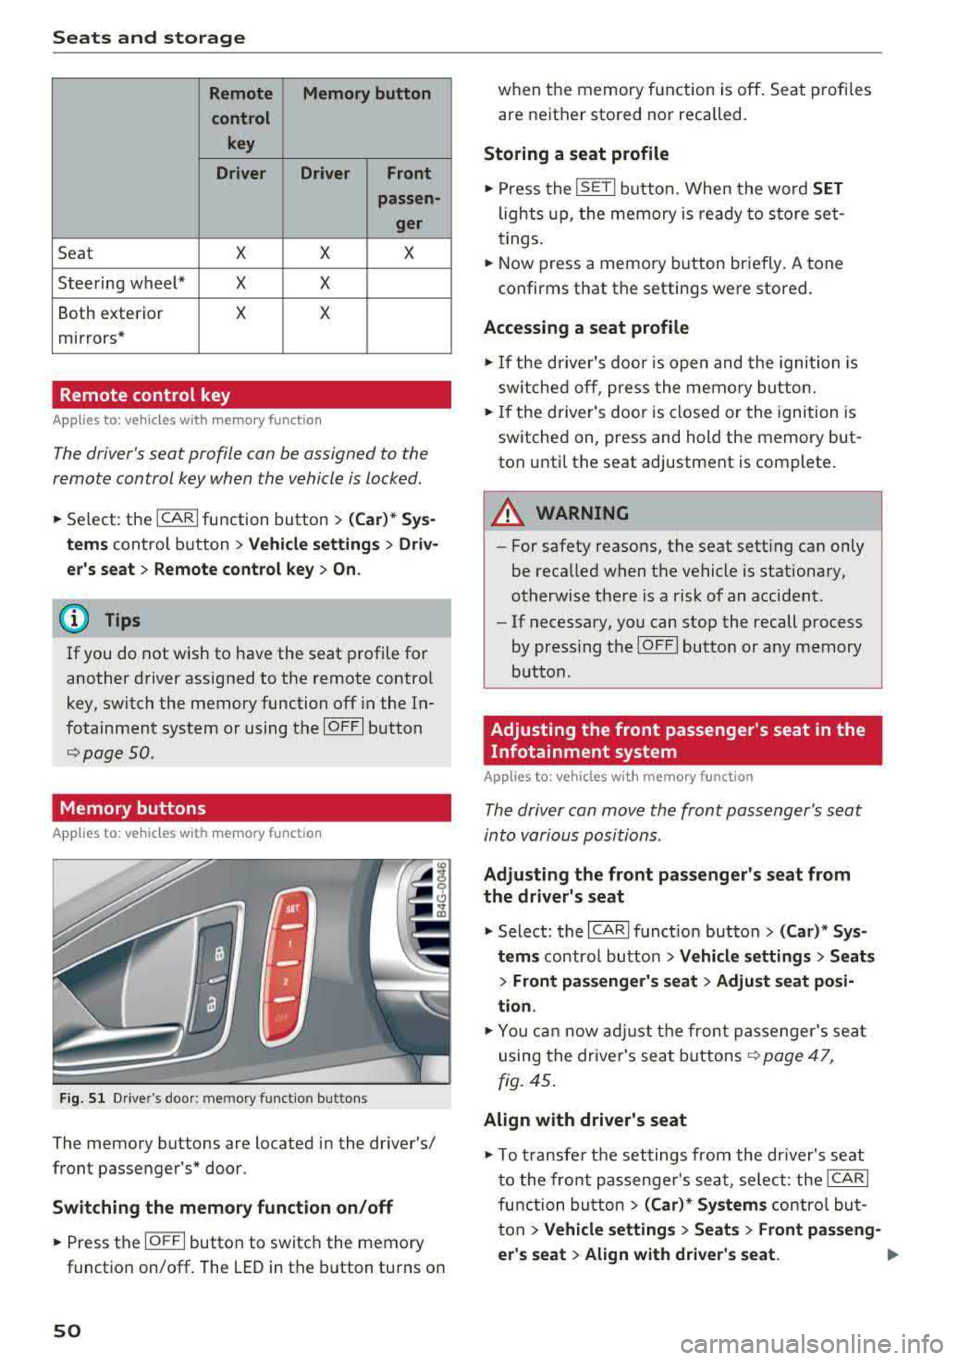
Seats and storage
Remote Memory button
control key
Driver Driver
Front
passen-
ger
Seat X X X
Steering wheel* X X
Both exterior X X
mirrors*
Remote control key
Applies to: vehicles with memory function
The driver 's seat profile can be assigned to the
remo te control key when the vehicle is locked.
.,.. Se lect : the ICARI function button > (Car)* Sys
tems
control button > Vehicle settings > Driv
er 's seat
> Remote control key > On.
(D Tips
If you do not wish to have the seat profile for
another driver assigned to the remote contro l
key, switch the memory function off in the In
fotainment system or using the
IOFFI button
r::::;, page 50 .
Memory buttons
App lies to: vehicles with memory function
Fig. 51 Drive r's door : m em ory functio n bu ttons
The memory buttons are located in the driver's/
front passenger 's* door.
Switching the memory function on/off
.,.. Press the IO FF I button to switch the memory
functio n on/off. The LED in the button turns on
50
when the memory function is off . Seat profiles
are neither stored nor recalled.
Storing a seat profile
.,.. Press the ISET I button . When the word SET
lights up, the memory is ready to store set
tings.
.,.. Now press a memo ry button briefly. A tone
confirms that th e settings were stor ed.
Accessing a seat profile
.,.. If the driver's door is open and the ignition is
sw itched off, press the memory button.
.,.. If the driver's door is closed or the ignition is
switched on, press and hold the memory but
ton until the seat adjustment is complete .
A WARNING
-For safety reasons, the seat setting can only
be recalled when the vehicle is stationary,
otherwise there is a risk of an accident .
-If necessary, you can stop the recall process
by press ing the
IOF FI butto n or any memory
button .
Adjusting the front passenger's seat in the
Infotainment system
Applies to: vehicles with memory function
The driver can move the front passenger's seat
into various positions .
Adjusting the front passenger's seat from
the driver's seat
.,. Select: the I CARI function button > (Car)* Sys
tems
control butto n > Vehicle settings > Seats
> Front passenger's seat > Adjust seat posi
tion .
.,.. You can now adjust the front passenger's seat
using the driver's seat buttons
r:::;, page 47,
fig. 45.
Align with driver's seat
.,. To trans fer the settings from the dr iver's seat
to the front passenge r's seat, select: the
I CAR I
function button > (Car)* Systems control but
ton
> Vehicle settings > Seats > Front passeng-
er 's seat
> Align with driver 's seat. .,..
Page 54 of 274

Seats and stor age
12 Volt sockets
Applies to: veh icles with 12 volt sockets
0
-0
~ m
F ig . 55 Luggage compartment s ide trim : socket
F ig. 56 Example of a rear ce nter conso le : sockets*
• T o reach the 12-volt socket in the luggage com
partmen t, press the net down o r remove the
br acket from the
mounts ¢ fig. 55.
There are additional 12 Vo lt socket in the center
console u nder the ce nte r arm rest* and in the rear
<=? fig. 56.
The 12-volt sockets can be used for electrical ac
cessories . The power usage must not exceed
120 watts .
&, WARNING
The sockets and the electrical accesso ries con
nec ted to t hem only function when the igni
tion is switched on. Incorrect usage can lead
to ser ious injuries or burns. To reduce the risk
of injur ies, never leave ch ildren unattended in
the vehicle with the vehicle key.
(D Note
- To reduce the risk of damage to t he vehicle
electr ica l system, never attempt to charge
the vehicle battery by connecting accesso ries that prov ide power, such as solar panels
52
or battery chargers, to the 12 Volt sockets
or the cigarette lighter.
- T o reduce the risk of damage to the sockets,
only use plugs that fit correctly.
Storage
Cup holders
I
I
Fig. 57 Cente r co nso le : fr ont cu p ho ld er
Fig. 58 Rear arm rest : cu p ho lder*
Front cup holder s
• Tap on the cover in the center conso le to open
the cup holders.
Rear cup holders*
• To open the cup holder, tap on the cover ('i
symbo l) @ r:?fig . 58.
• To adjust the cup holder to fit the beverage
container, push the correspond ing arm @ in
the direction of the arrow.
• Place the cup in the holder and release the arm.
The arm sw ings back by itself and secures the
beverage.
• T o close the cup holders, press the center piece
between both arms and push the cup holders
all the way back in to the slot .
..,.
Page 55 of 274

a co ,...,
N
" N ,...,
0 00 <..:l '
-Do not put any hot beverages in the cup
holder while the vehicle is moving. Hot bev
erages could spill, which can cause injury.
- Do not use any breakable beverage contain
ers (for example, made out of glass or por
celain). You could be injured by them in the
event of an accident.
(D Note
Beverage containers in the cup holders should
always have a lid. If not, beverages could spill
and cause damage to vehicle equipment, such
electronics or seat covers.
Cooled glove compartment
Appl ies to: vehicles with cooled glove compartment
The cooled glove compartment only functions
when the
AIC system is switched on.
Fig. 59 Glove compartment: sw itching cooling mode on/
off
... Turn the knob@ counter-clockwise to switch
the cooling on. The symbols on the knob indi
cate the correct position.
""Turn the knob @ clockwise to switch the cool-
ing off.
The glove compartment cooling mode only func
tions when the vehicle A/C system is switched on.
If the heat ing is switched on, switching the glove
compartment cooling mode off is recommended.
Other storage compartments
You will find a range of storage compartments
and holders at different locations in the vehicle.
Seats and storage
- Compartments in the doors
- Compartment in the glove compartment
(coo led*). The glove compartment can be
locked using the mechanical key.
- Glasses holder* in the headliner (near the rear
view mirror)
- Storage compartment under the front center
armrest*
- Compartments* on the backrests of the front
seats
- Garment hooks on the sides of the pillars in the
rear of the vehicle and in the rear grab handles
- Compartment in the rear center armrest
- Bag hooks in the luggage compartment
_& WARNING
-
-To reduce the risk of personal injury in an
accident or sudden stop, always keep the
glove compartment closed while driving.
-Always keep the lid of the compartment for
(sun)glasses* closed while driving to reduce
the risk of injury during a sudden braking
maneuver or in the event of an accident.
-Any articles of clothing that you have hung up must not interfere with the driver's view.
The coat hooks are designed only for light
weight clothing. Never hang any clothing
with hard, pointed or heavy objects in the
pockets on the coat hooks. During sudden
braking or in an accident - especially if the
airbag is deployed
-these objects could in
jure any passengers inside the vehicle.
- Read and follow all WARNINGS
~ page 166, Important safety instructions
on the side airbag system.
- Hang clothes in such a way that they do not
impair the driver's vision.
- The coat hooks must only be used for light
weight clothing. Do not leave any heavy or
sharp edged objects in the pockets which
may interfere with the side curtain airbag
deployment and can cause personal injury in
a crash.
-Do not use coat hangers for hanging cloth
ing on the coat hooks as this can interfere
with proper deployment of the side curtain airbags in an accident.
53
Page 56 of 274
Seats and stor age
-Do not hang heavy objects on the coat
hooks, as they could cause personal injury in
a sudden stop.
CD Note
Objects on the rear shelf that rub against the
rear window can damage the rear window
heating wires.
Roof rack
Applies to: ve hicles w ith roo f rack
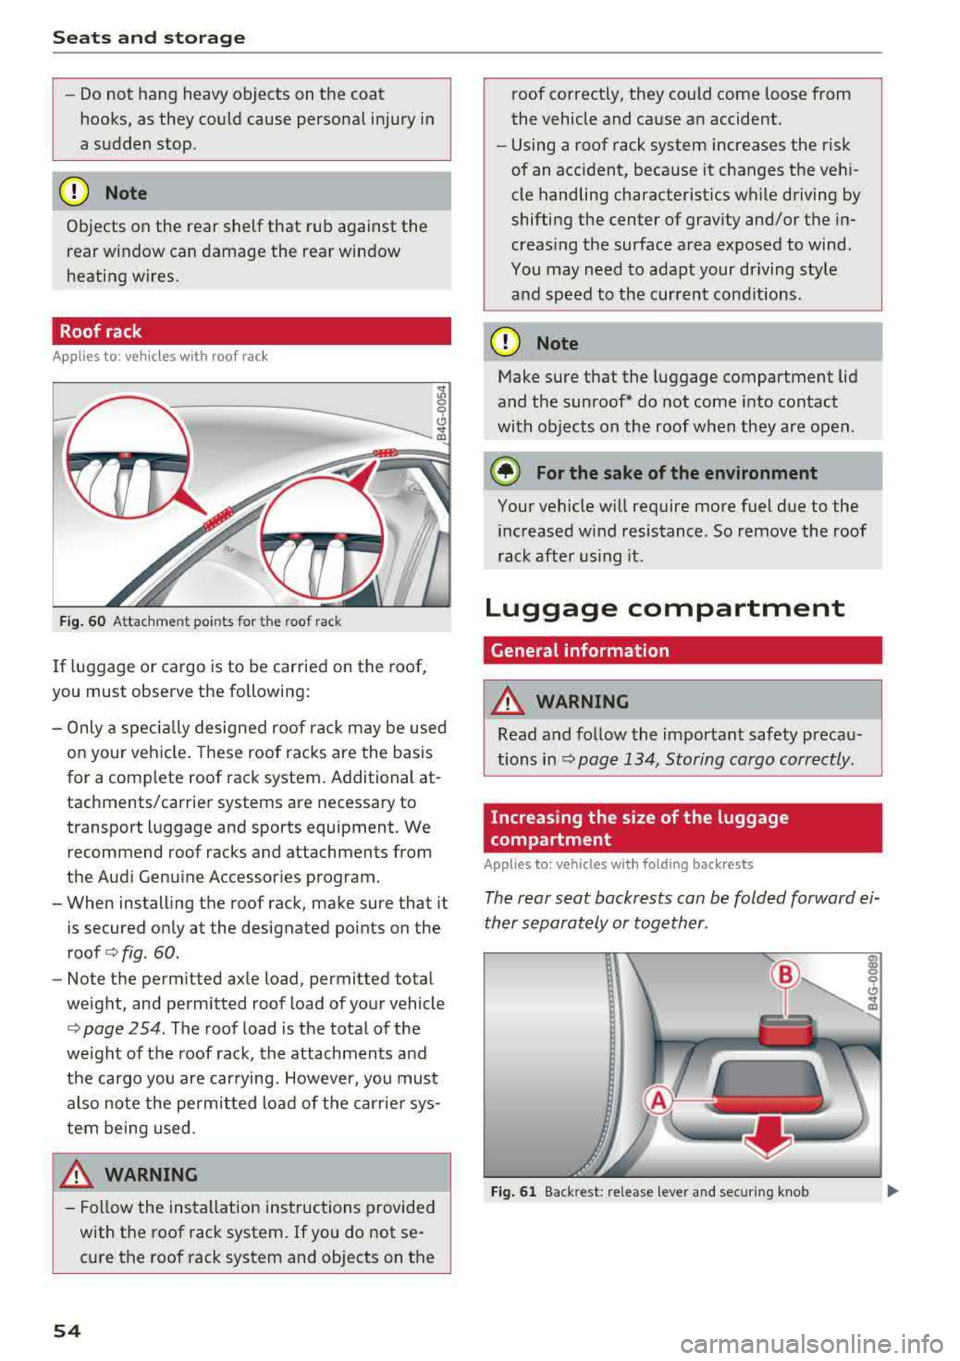
Fig . 60 Attac hment poi nts for the roof rack
If luggage or cargo is to be carried on the roof,
you must observe the following:
- Only a specia lly designed roof rack may be used
on your veh icle. These roof racks are the basis
for a complete roof rack system. Additional at
tachments/carrie r systems are necessary to
transport luggage and sports equipment. We recommend roof racks and attachments from
the Audi Genu ine Accessor ies program.
-When installing the roof rack, make sure that it
is secured only at the designated po ints on the
roof <=>
fig. 60.
- Note the permitted axle load, permitted total
weight, and permitted roof load of you r vehicle
<=> page 254. The roof load is the total of the
weight of the roof rack, the attachments and
the cargo you are car rying. However, you must
also note the permitted load of the carrie r sys
tem being used.
_& WARNING
-Follow the installation instructions provided
with the roof rack system.
If you do not se
cure the roof rack system and objects on the
54
roof correctly, they could come loose from
the vehicle and cause an accident .
-Using a roof rack system increases the risk
of an accident, because it changes the vehi
cle handling characteristics wh ile driving by
shifting the center of grav ity and/or the
in
creas ing the surface area exposed to wind.
You may need to adapt your driving sty le
a nd speed to the cur rent cond itions.
CD Note
Make sure that the luggage compartment lid
and the sunroof* do not come into contact
with objects on the roof when they are open .
@ For the sake of the environment
Your vehicle will require more fuel due to the
increased wind resistance . So remove the roof
rack after us ing it.
Luggage compartment
General information
_& WARNING
Read and follow the important safety precau
tions in<=>
page 134, Storing cargo correctly.
Increasing the size of the luggage
compartment
Appl ies to : vehicles wi th fo lding back rests
The rear seat backrests can be folded forward ei
ther separately or together.
Fig . 61 Back rest: release lever and secu ring knob
Page 58 of 274
Seats and stor age
Luggage compartment cover
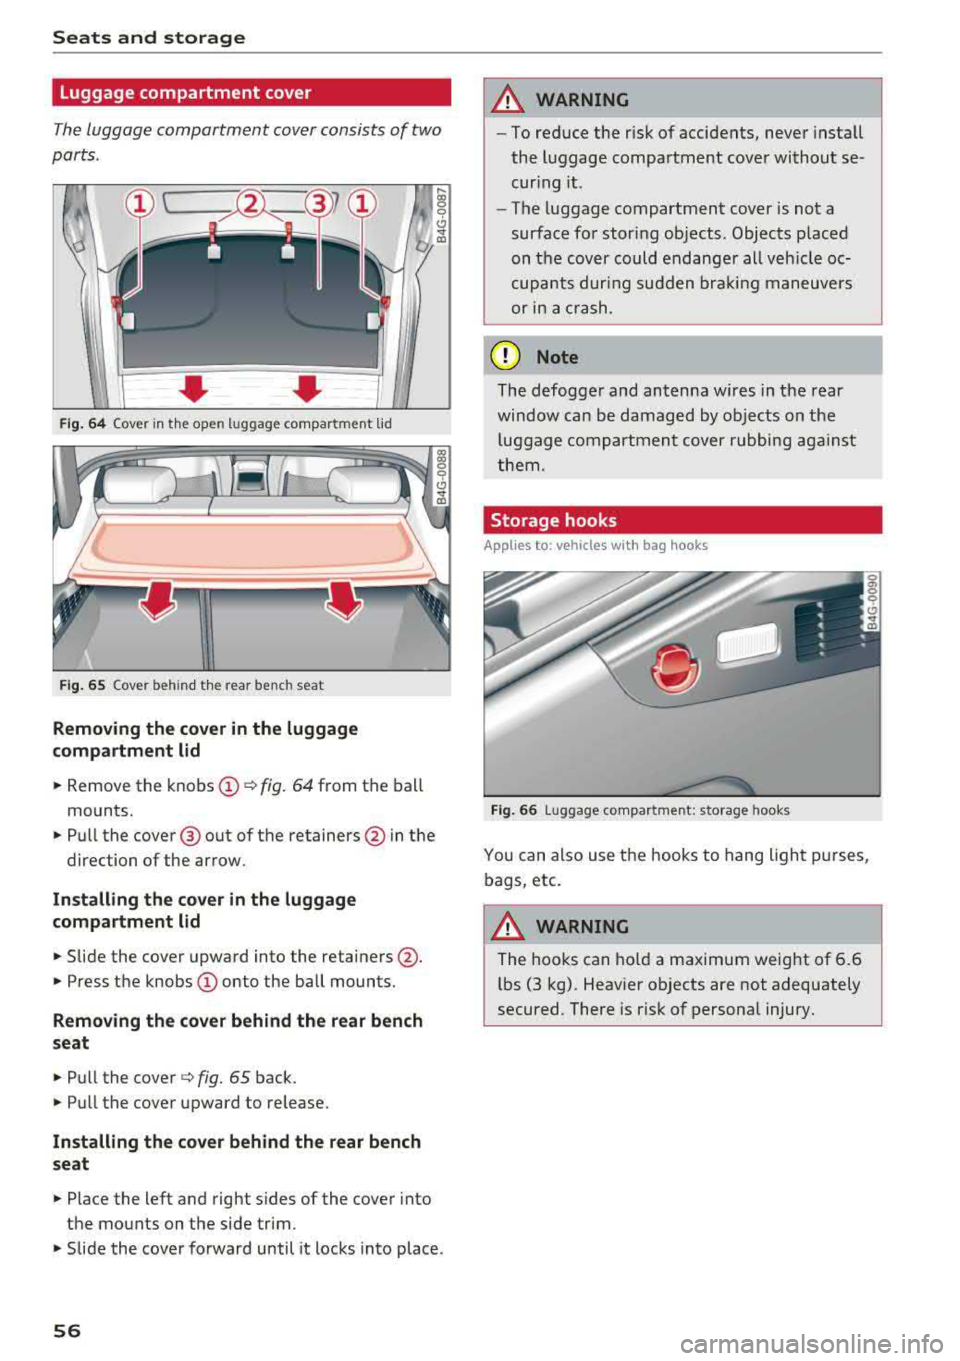
The luggage compartment cover consists of two
parts .
• Fig . 6 4 Cover in the open luggage compartment lid
F ig . 6 5 Cover behind the rear bench seat
Removing th e cover in the luggage
compartment lid
.. Remove the knobs @¢ fig. 64 from the ball
mounts.
" Pull the cover@out of the retainers @ in the
direction of the arrow.
In stall ing th e cov er in the luggage
c ompa rtment lid
" Slide the cover upward into the retainers @.
"Press the knobs (D onto the ball mounts.
Removing the c over beh ind the rear bench
s eat
" Pull the cover ¢ fig. 65 back.
"Pull the cover upward to release.
Install ing th e co ver beh ind the r ear bench
s eat
" Place the left and right s ides of the cover into
the mounts on the side trim.
9 C) ..,. ID
" Slide the cover forward until it locks into place.
56
A WARNING
,-
- To reduce the r isk of accidents, never install
the luggage compartment cover without se
curing it.
- The luggage compartment cover is not a
surface for stor ing objects . Objects p laced
on the cover could endanger all veh icle oc
cupants dur ing sudden bra king maneuvers
or in a crash.
(D Note
The defogger and antenna w ires in the rear
window can be damaged by objects on the
l uggage compartment cover rubbing aga inst
them.
Storage hooks
App lies to: vehicles wi th bag hooks
Fig . 66 Luggage compa rtment: storage hooks
You can also use the hooks to hang light purses,
bags, etc.
A WARNING
The hooks can ho ld a maximum weight of 6.6
lbs (3 kg). Heavier objects are not adequately
secured. There is r isk of personal injury.
Page 59 of 274
a co .-, N
" N .-, 0 00 <..:l '
Applies to: vehicles with pass-through and ski bag
Long objects, such as skis or snowboards, can be
transported in the ski bag*.
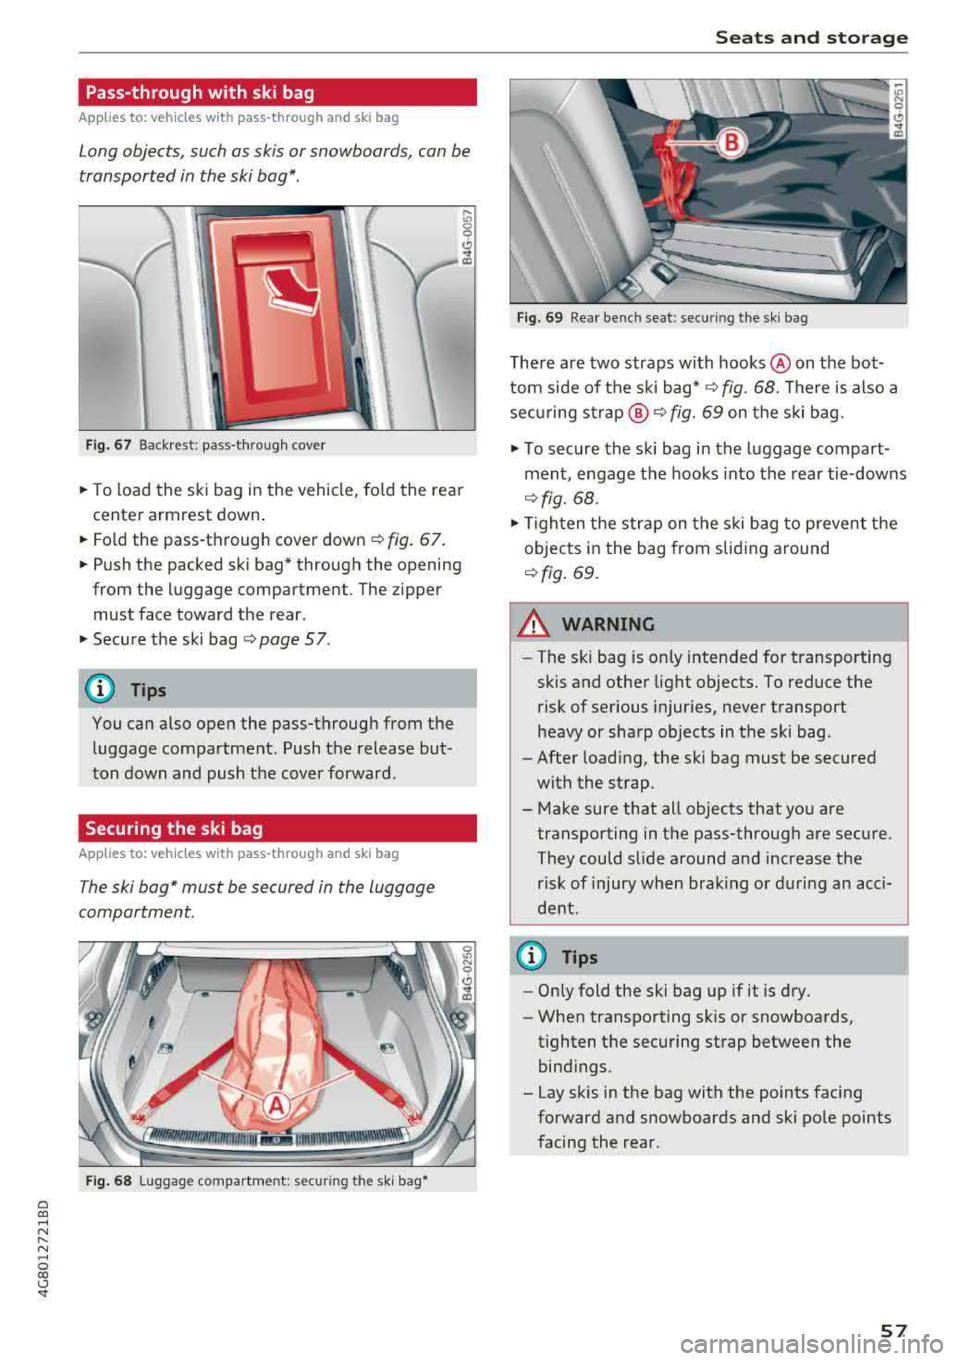
Fig . 67 Backrest: pass-through cover
.,. To load the ski bag in the vehicle, fo ld the rear
center armrest down.
.,. Fold the pass-through cover down C) fig. 67.
.,. Push the packed ski bag* through the opening
from the luggage compartment. The zipper
must face toward the rear .
.,. Secure the ski bag C) page 5 7.
(D Tips
You can also open the pass-through from the
luggage compartment. Push the release but
ton down and push the cover forward.
Securing the ski bag
Applies to: vehicles with pass-through and ski bag
The ski bag* must be secured in the luggage
compartment.
Fi g. 68 Luggage compartment: securing the sk i bag•
S eats and storag e
Fig. 69 Rear bench seat: securing the sk i bag
There are two straps with hooks @on the bot
tom side of the ski
bag* ¢ fig. 68. There is also a
securing
strap @¢ fig. 69 on the ski bag .
.,. To secure the ski bag in the luggage compart
ment, engage the hooks into the rear tie-downs
¢ fig. 68 .
.,. Tighten the strap on the ski bag to prevent the
objects in the bag from slid ing around
C) fig. 69.
A WARNING
- The ski bag is only intended for transporting
skis and other light objects. To reduce the
risk of serious injuries, never transport
heavy or sharp objects in the ski bag.
- After loading, the ski bag must be secured
with the strap.
- Make sure that all objects that you are
transporting in the pass-through are secure.
They could slide around and increase the risk of injury when brak ing or during an acci
dent .
(D Tips
-Only fold the ski bag up if it is dry.
- When transporting sk is or snowboards,
tighten the securing strap between the
bind ings.
- Lay skis in the bag with the points facing
forward and snowboards and ski pole points
facing the rear.
57
Page 60 of 274

Warm and cold
Warm and cold
Climate control system
Description
The climate control system warms, cools and re moves humidity from the air in the vehicle interi
or. It is the most effective when the windows and
sunroof* are closed. If there is a bui ld-up of heat
inside the vehicle, ventilation can he lp to speed
up the cooling process.
I n all heating mode functions, except for defrost,
the blower only switches to a higher speed once
the engine coolant has reached a sufficient tem
perature.
Pollutant filt er
The po llutant filter removes poll utants such as
dust and pollen from the a ir .
Ke y re cognition
A pp lies to: ve hicles w ith de luxe au toma tic clima te co ntrol
The blower sett ing and air distribution are stored
automatically and ass igned to the remote control
key that you are using.
A pp lies to: ve hicles w ith 4 -zo ne del uxe automatic c limate
co ntrol
The climate control set tings are automatically
stored and assigned to the remote control key
that is in use.
A WARNING
Poor visibility can lead to accidents.
- For safer driving, keep all windows free of
ice, snow and fog .
- Become familiar as quickly as possible with
the correct use and function of the climate contro l system, especially with the defrost
ing and defogg ing function.
58
- When the temperature is below freezing,
only use the windshield washer system after
the windshield has been warmed by the cli mate control system . The washer fluid could
freeze on the w indsh ield and impair v isib il i
ty .
@ Note
-If you suspect that the climate contro l sys
tem is damaged, switch the system
off to
prevent further damage and have it checked
by an authorized Aud i dea ler or authorized
Audi Serv ice Facility.
- Repa irs to t he Aud i climate control system
require special techn ical know ledge and
special tools. See an aut ho rized Aud i dea le r
or authorized Aud i Serv ice Fac ility .
@) For the sake of the environment
To save fue l, turn off cooling mode by press
i ng the
IA/Cl button. This will a lso reduce
emissions.
(D Tips
- T o prevent i nterference with t he heat ing
and cooli ng outpu t and to p revent the win
dows from fogging over, the a ir intake in
front of the windshie ld must be free of ice,
snow or leaves.
- C ondensation from the coo ling system can
drip and form a pudd le o f water under the
vehicle . This is norma l and does not mean
there is a leak.
- Th e energy management system may tem
porarily switc h
off certain functions, such as
the seat heating* or rear window defogger.
These systems are ava ilable again as soon
as the energy supply has been restored.
Page 62 of 274
Warm and cold
The maximum amo unt of air flows ma inly from
the vents below the windshield. Recircu lation
mode switches off . The temperature should be
set to approximately 72
°F (22 °() .
The IAUTO I button switches the defroster off .
IClill REAR I Switching the rear window defogger
on /off
T he re a r window heate r on ly operates when t he
engine is r unning . It sw itches of f automat ica lly
afte r a few minutes, depe nding on the outs ide
temperature .
T o preven t the rear w indow hea ter from swit ch
i n g off automatically, p ress and ho ld the
I Qiil REARI
button fo r more than 2 seconds . This is stored
until the ignit io n is switched o ff.
[i] Adjusting seat heating*
P ress ing t he b utton swi tches the se at heati ng on
at the highes t set ting (level 3). The LEDs indicate
the tempe ra tu re level. To reduce the tempera
ture, press the button again. To switch the seat heating off, press the butto n repeatedly until the
LED turns off.
After 10 minutes, t he seat hea ting au tomatically
sw itches from leve l 3 to leve l 2 .
4-zone deluxe automatic climate control
A pp lies to: ve hicles with 4-zo ne deluxe auto matic cl imate cont rol
Air vents
You can open o r close the center and re a r ve nts in
t h e co ckpit and the vents in the rear center con
so le using the ridged thumbw heels . The leve rs
adjust the direction of the airflow from the vents .
.&_ WARNING
- You sho uld not use the recirc ulation mode
for an extended period of time since no
fresh air is drawn in . W ith the air-condition
ing sw itched off, the windows can fog up,
which inc reas es th e risk of an acc ident.
- Individ uals with red uced sensit iv ity to pa in
or temperature could develop b urns when
using the seat h eating f unction. To re duce
t he risk of injur y, t hese i ndividu als s ho uld
no t u se se at h eating .
(D Note
To avoid damage to the hea ting elements in
th e se ats , d o no t kne el on th e seats or place
h eavy lo ad s on a small a rea of the se at.
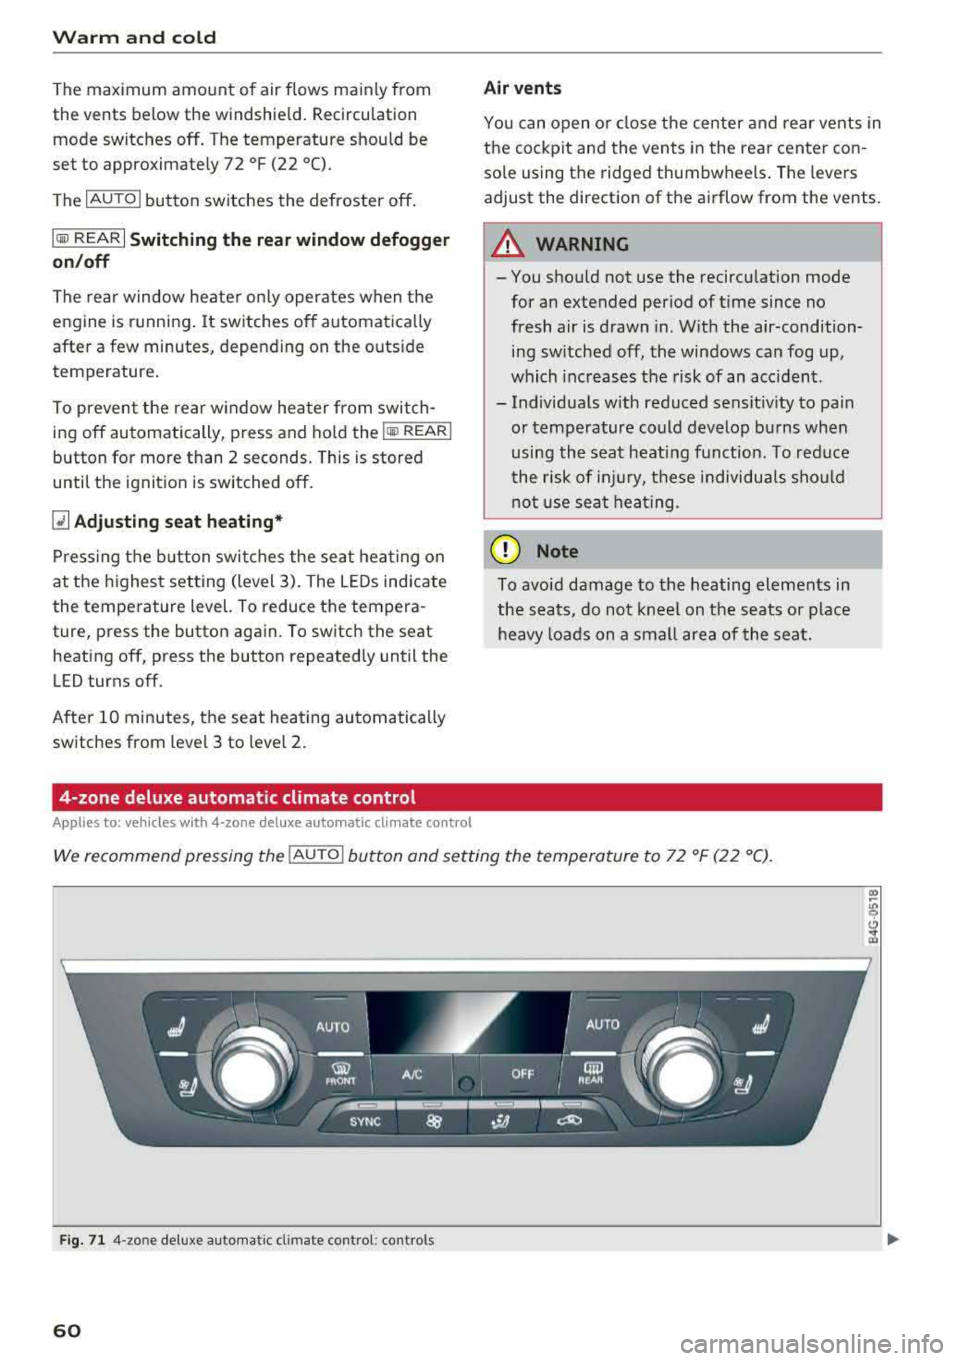
We recommend pressing the !AU TO I button and se tting the temperatu re to 72 ° F (2 2 °C).
Fig. 71 4-zo ne deluxe a uto mat ic cl imate contro l: cont rols
60