weight AUDI A8 2013 Service Manual
[x] Cancel search | Manufacturer: AUDI, Model Year: 2013, Model line: A8, Model: AUDI A8 2013Pages: 318, PDF Size: 79.34 MB
Page 257 of 318
The correct tire pressure for the spare wheel is
l ocated on a label on the driver's side B-pillar.
Because tec hnical changes may be made to
veh icle equ ipment dur ing the model yea r, a l
ways compare the tire size designation on the
tire pressure label on your vehicle wit h the
tires on your vehicle . Make s ure that the tire
size information on the veh icle label is the
same as the s ize of the t ires on the vehicle.
This is especially important if the vehicle be
longs to someone else or you bought the veh i
cle with different rims/tires or you boug ht the
ve hicle as a previously owned vehicle.
Remember, your safety and that of your pas
sengers also depends on mak ing su re that
l oad l imits are not exceeded. Vehicle load in
cludes everybody and everything in and on the
veh icle. These load limits are technically refer
red to as the vehicle's Gross Vehicle Weight
Rating ("GVWR") . The Gross Ax le Weight Rat
ing ("GAWR") is the maximum load that can
be app lied at each of the veh icle's two axles.
The Gross Vehicle Weight Rating and the
Gross Axle We ight Rating are listed on the
safety compliance st icker label located on the
driver's side B-p illar . The t ire pressure label on
your Aud i lists the maximum combined
weight of a ll of the occupants and luggage or
other cargo that the vehicle can carry. For the
l ocat ion of the tire pressure labe l
c;, fig. 204.
A WARNING
Overloading a vehicle can cause loss of ve
hicle control, a crash or other accident, se
rious personal injury, and even death.
- Car rying more weight than yo ur vehicle
was designed to carry will prevent the
vehicle from handling properly and in
crease the risk of a loss of veh icle con
trol.
- The brakes on a veh icle that has been
overloaded may not be able to stop the
vehicle within a safe distance .
- Tires on a vehicle that has been overload
ed can fail suddenly causing loss of con
t rol and a crash.
Tire s an d wheel s 255
-Always make sure that the total load be
ing transported - includ ing the weight of
a trailer hitch and the tongue we ight of a
loaded trailer -does not make the vehi
cle heavier than the vehicle's Gross Vehi
cle Weight Rating.
A WARNING
- Inco rrect tire pressures and/or underin
flation can lead to a ser ious or fatal acci
dent.
- Inco rrect tire pressures and/or underin
flation cause increased tire wear and can
affect the handling of the vehicle.
- Inco rrect tire pressures and/or underin
flation can a lso lead to sudden t ire fail
ure, including a blowou t and sudden de
flation, caus ing loss of veh icle contro l.
Checking tire pressure
The correct tire pressure for the tires original
ly installed on your vehicle is listed on the tire
pressvre label located on driver's side 8-pil
lar.
T he recommended tire pressures are on the
ti re pressure label and in the table
c;, page 253, Cold tire inflation pressure .This
means that the pressure m ust be checked and
adjusted when the tire has not been dr iven for
more than a couple of miles (kilometers) at
low speeds during the previous three hours.
Air in the tires expands when the tire heats up
as a result of internal frict ion as it flexes in
use. The tire pressure is h igher when the tire
has warmed up t han when it is "cold."
It is the inflation pressure in a "cold" t ire that
counts. Therefore, you should never let a ir out
of a warm tire to match "Cold t ire inflat ion
pressure" recommendat io ns
c;, page 253 . The
ti res wo uld then be unde rinfl ated and co uld
fail suddenly.
T he tire pressure label on your Audi lists the
recommended co ld tire inflation pressures at
max imum capacity for the new, or ig inal
equipment tires that were on your vehi cle at
1J1>
•
•
Page 259 of 318
-Only when a ll tires on the vehicle are fi l
led to the correct pressure, the tire pres
sure monitoring* system can work cor rect ly.
- The use of incorrect tire pressure values
can lead to accidents or other damage.
Therefore it is essential that the d river
observe the specif ied tire pressure values
for the tires and the co rrect p ress ures for
the f un ct ion of t he tire pressure mo nitor
ing sy stem*.
- Always inflate ti res to the recommended
and co rrec t tire pressu re befo re dr ivi ng
off.
- Driv ing wi th under infla ted ti res bend
more, letti ng them get too ho t res ulting
in t read separation, sudden t ire fail ure
and loss of control.
- Excessive spee d and/ove rloading can
ca use heat bui ld -up, sudden tire fa il ur e
and loss of control.
- If the t ire pressure is too low or too high,
the tires w ill wea r prematu rely an d the
vehicle will not hand le we ll.
-If the t ire is no t flat and you do no t have
to change a w heel imme diate ly, drive at
reduced speed to the nearest service sta
t ion to check the tire pressure and add
air as required.
(D Note
Driving without va lve stem caps ca n cause
damage to the t ire va lves. To prevent this,
always make s ure that facto ry installed
valve stem caps on all wheels a re secure ly
mounted on the va lve .
@) For the sake of the environment
Underinflated tires will a lso increase the
fue l consumption .
Tires and vehicle load limits
There are limits to the amount of load or
weight that any veh icle and any t ire can carry .
A vehicle that is ove rloaded w ill not ha ndle
well and is more difficult to stop . Overload ing
can no t on ly lead to loss o f vehi cle con tro l,
Tire s an d wheel s 257
but can also damage important parts of the
vehicle and ca n lead to sud den tire fai lure, in
clud ing a b lowout and s udden def lation that
can cause the vehicle to cras h.
Your safety and that of your passengers also depends on making sure that load limits are
not exceeded . Vehicle load includes everybody
and everything in and on the veh icle. These
load lim its are technically referred to as the
vehicle's
Gross Vehicle We ight Rating
("GVWR ") .
The "GVWR" includes the weight of the basic
vehicle, all factory installed accessories, a full
tank of fuel, o il, coo lant and other fluids plus
maximum load . The max imum load includes
the number of passenge rs that th e vehicle is
i n tended to car ry ("seat ing capa city") wi th an
ass umed we igh t of 150 lbs (68 kg) fo r each
passenger at a designated seating posi tion
and t he tota l weight of any luggage i n the ve
hicle . If you tow a trai ler, the weight of the
tra iler hitch and the tongue weight of the
loaded tra iler must be included as part of the
vehicle load.
T he
Gro ss Axle Weight Rating ("GAWR") is
the maximum load that can be applied at each
of the vehicle's two axles.
T he Gross Vehicle Weight Rating and the
G ross Ax le Weig ht Rating are listed on the
safety comp liance sticker label located on the
driver's side B-pillar. Your Audi has 5 seat ing
pos itions, 2 in the front and 3 in the rea r fo r
total seating capacity of 5 . Vehicles with pow
er ind iv idual rea r seats* have 4 seat ing pos i
tions, 2 in the front and 2 in the rea r fo r total
seat ing capac ity o f 4. Each seating position
has a safety belt~
page 144, Safety belts.
The fact that there is a n uppe r limit to you r
vehicle's G ross Vehicle We ight Rating means
t h at the to tal weig ht of whatever is bei ng car
ried in the vehicle ( in cl ud ing t he weight of a
trai ler hitch and the tongue weigh t of t he
loa ded trai le r) is limite d. The more passen
gers in the vehicle or passengers who are
heavier than the standard we ights assumed
•
•
Page 260 of 318
258 Tires and wheels
mean that less weight can be carried as
luggage.
The tire pressure label on your Audi also lists
the maximum combined weight of all of the
occupants and luggage or other cargo that
the vehicle can carry. For the location of the
label ¢
page 253, fig. 204.
.&_ WARNING
Overloading a vehicle can cause loss of ve
hicle control, a crash or other accident, se
rious personal injury, and even death.
- Carrying more weight than your vehicle
was designed to carry will prevent the
vehicle from handling properly and in
crease the risk of the loss of vehicle con
trol.
- The brakes on a vehicle that has been
overloaded may not be able to stop the
vehicle within a safe distance.
- Tires on a vehicle that has been overload
ed can fail suddenly, including a blowout
and sudden deflation, causing loss of
control and a crash.
- Always make sure that the total load be
ing transported -including the weight of
a trailer hitch and the tongue weight of a
loaded trailer -does not make the vehi
cle heavier than the vehicle's Gross Vehi
cle Weight Rating.
Determining correct load limit
Use the example below to cal
culate the total weight of the
passengers and luggage or oth
er things that you plan to trans
port so that you can make sure
that your vehicle will not be overloaded.
Steps for Determining
Correct Load Limit
1. Locate the statement "THE
COMBINED WEIGHT OF QC
CU PANTS AND CARGO
SHOULD NEVER EXCEED XXX KG OR XXX LBS" on your ve
hicle's placard (tire inflation
pressure label)¢
page 253,
fig. 204.
2. Determine the combined
weight of the driver and passengers that will be riding in
your vehicle.
3. Subtract the combined
weight of the driver and pas
sengers from "XXX" kilo
grams or "XXX" pounds
shown on the sticker
¢ page 253, fig. 204.
4. The resulting figure equals the available amount of cargo and luggage load capaci
ty. For example, if the "XXX"
amount equals 1400 lbs.
and there will be five 150 lbs. passengers in your vehi
cle, the amount of available
cargo and luggage load ca
pacity is 650 lbs. (1400-7 50
(5
X 150) = 650 lbs.)
5. Determine the combined weight of luggage and cargo ..,
Page 264 of 318
262 Tire s and wheels
Speed rating (letter code)
The speed rating letter code on the wheels in
dicates the maximum pe rmissib le road speeds
¢ & in Winter tires on page 265 .
p up to 93 mph (150 km/h)
Q up to 99 mph (158 km/h)
R up to 106 mph (170 km/h)
s up to 110 mph (180 km/h)
T up to 118 mph (190 km/h)
u up to 124 mph (200 km/h)
H up to 130 mph (210 km/h)
V up to 149 mph (240 km/h)1l
z over 149 mph (240 km/h)1l
w up to 168 mph (270 km/h)1l
y up to 186 mph (298 km/h)1l
Your vehicle is normally factory equipped with
tires, which possess excellent driving charac
teristics and give your Audi optimum driving
comfort. An electronic speed limiter
<=> page 29 will normally prevent your vehicle
from go ing faster than the tire speed rating
<=> & .
U.S . DOT Tire Identification Numbe r (TIN)
and tire manufacture date
This is the t ire's "serial number". It begins
with the letters "DOT" and indicates that the
tire meets all federal standards. The next two
numbers or letters indicate the plant whe re it
was manufactured, and the last four numbers
represent the week and year of manufacture.
F or example, the numbers 2212 mean the tire
was produced in the 22nd week of 20 12. The
other numbers are marketing codes that may
or may not be used by the t ire manufacturer.
This information is used to contact consumers
if a tire defect requires a recall.
Audi original tire
Tires with the identification "AO" or "RO" have
been specially matched with your Audi. We
recommend using only these tires because
they meet the highest standards regarding
ll For tires wit h a max imum speed capab ility over 149
mph (240 km/h), tire man ufactur ers sometimes use
the letters "ZR."
safety and driving characterist ics when used
correct ly . Your authorized Audi dealer will
gladly provide you w ith more information.
Tire ply composition and materials used
The number of plies indicates the number of
layers of rubber-coated fabric in the tire. In
genera l, the greater the number of plies, the
more weight a tire can support. Tire manufac
turers also must indicate the materials in the
tire, which include steel, nylon, polyester, and
others.
Maximum Load Rating
This number indicates the maximum load in
kilograms and pounds that can be carried by
the tire.
Tire quality grading for treadwear,
traction , and temperature resistance
Tread wear, traction and temperat ure grades
<=> page 2 63.
Maximum Permissible Inflation Pressure
Th is number is the greatest amount of air
pressure that should ever be put in the tire
under normal driving conditions.
A WARNING
-Using incorrect or unmatched tires and/
or wheels or improper tire and wheel
comb inat ions can lead to loss of control,
coll is ion and serious personal injury.
- Always use tires, rims and wheel bolts
that meet the specif ications of original
factory- installed tires or other combina
tions that have been specifically ap
proved by the vehicle manufacturer.
- T ires age even if they are not being used
and can fail suddenly, especially at high
speeds. Tires that are more than 6 years
old can only be used in an emergency
and then with specia l care and at lower
speeds.
Page 290 of 318
288 Emergency situations
@ Tips
Check carefully to make sure the hook- up
is secure before moving the car up the flat
bed truck ramp.
Vehicle transport
Whenever you have your vehicle transported ,
be sure to note the following:
(D Note
Mou nt the tie-down cha ins/cab les over the
r u nning surface (c ircumference) of the
tires. Never secure the vehicle by the ax le,
the suspension struts or the front or rear
towline eye . For technical reaso ns, the
pressure i n the suspension struts may
change during the t ransport and this will
adve rsely affe ct vehicle handling.
Lifting vehicle
Lifting with workshop hoist and with
floor jack
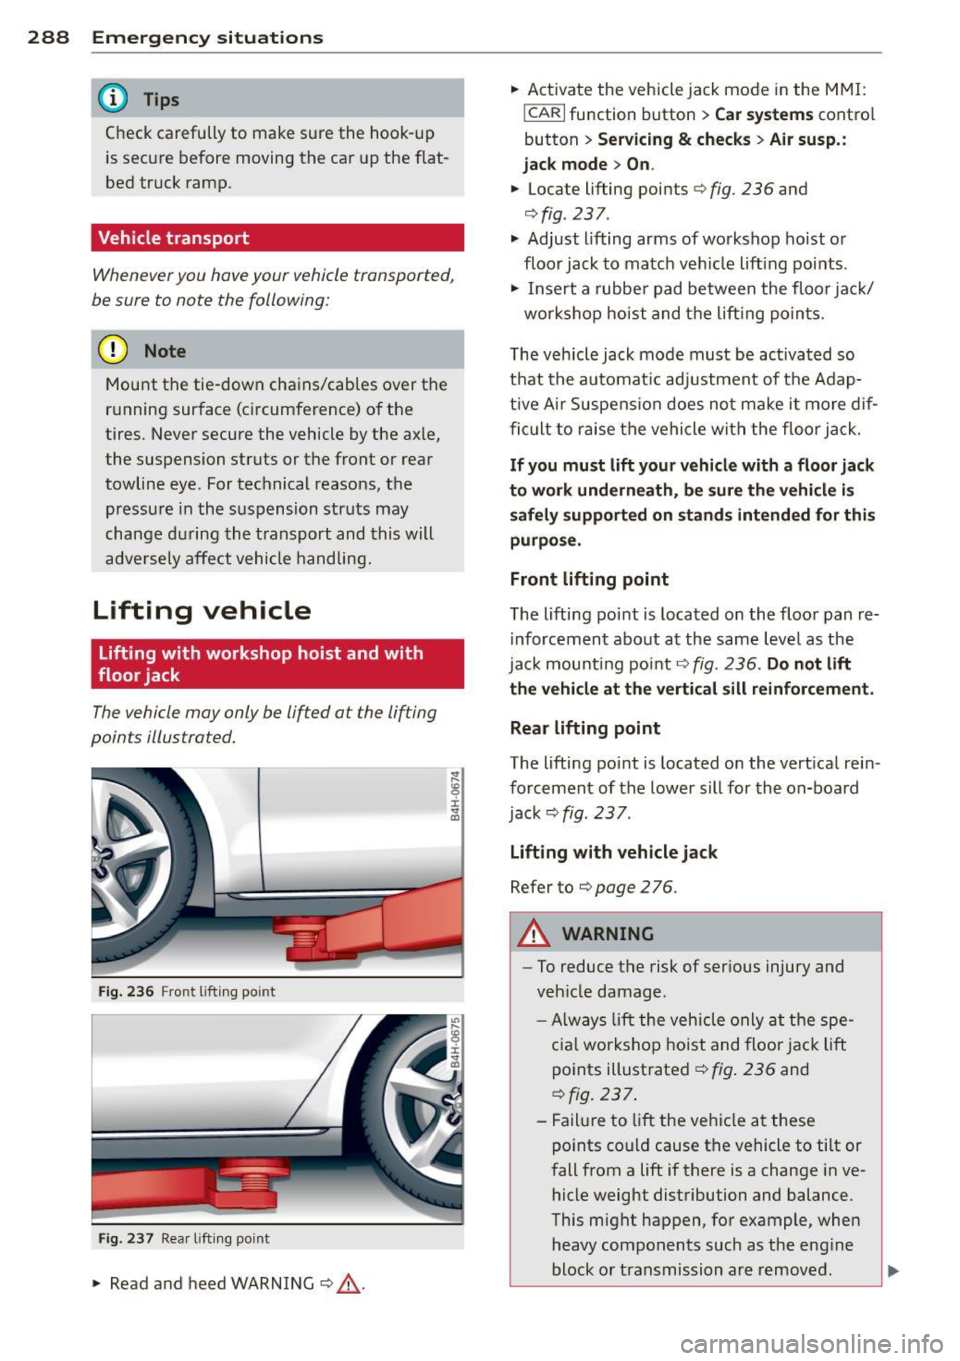
The vehicle may only be lifted at the lif ting
poin ts illustra ted.
F ig . 23 6 Fro nt lift in g po int
Fi g. 237 Rea r lift in g point
.,. Read and heed WARNING ¢ _& .
.,. Ac tivate the vehicle jack mode in the M MI:
!CARI fu nction button > Car systems cont ro l
button
> Servicing & checks > Air susp. :
jack mode
> On .
.,. Locate lifting poi nts ¢ fig . 236 and
¢fig . 237 .
.,. Adjust lifting arms of worksho p hoist o r
floo r jack to match ve hicle lift ing poi nts .
.,. In sert a rubbe r pad be tween the floo r ja ck/
w or ksho p hoist and t he lift ing poin ts.
The veh icle jack mode must be ac tiva ted so
t h at the au tomat ic ad justment of the Adap
t ive A ir Suspens io n does not ma ke i t more dif
ficu lt to raise t he vehicle wit h the floor ja ck.
If you must lift your veh icle with a floor jack
to work underneath, be sure the vehicle is
safel y supported on stand s intended for thi s
purpo se.
Front lifting point
T he lifti ng poi nt is located o n the floor pan re
i nforcement abo ut at the same l eve l as the
ja ck mount ing poi nt
¢ fig . 236 . Do not lift
the vehicle at the verti cal sill reinforcement.
Rear lifting point
The lifting po int is located on the vert ica l rein
fo rcement of the lower s ill for the on-boa rd
jack
¢ fig . 237 .
Lifting with vehicle jack
Refer to ¢page 276.
A WARNING ,= -
-To reduce the risk of ser ious injury and
veh icle damage .
- Alw ays li ft the vehicle o nly at the spe
c ia l workshop hoist and floor jac k lift
points illustrated
¢ fig. 236 and
¢fig. 237 .
-Fail ure to lift the ve hicl e at these
po ints co uld cause the vehicle to tilt or
fall from a lift if there is a change i n ve
hicle weight dist ributi on and balance .
This might happen, fo r example, when
heavy components such as the eng ine
block o r transmission a re remove d .
Page 291 of 318
-When removing heavy components like
these, anchor vehicle to hoist o r add cor
respond ing weig hts to mai nta in the cen
ter of g ravity. Otherwise, the vehicle
m ight tilt o r slip off the hois t, causi ng
ser ious persona l injury .
Q) Note
-Be awa re of the fo llow ing points befo re
li fting t he vehicle:
- The vehicle should never be lifted or
jacked up from underneath the engine
oil pan, the transmission housing , the
front or rear axle or the body side members. This could lead to serious
damage.
- To avoid damage to the underbody or
chassis frame, a rubber pad must be
i nserted between the floor jack and
the lift points .
- Before driv ing over a workshop hoist,
check that the veh icle weight does not
exceed the permissibl e lifting capacity
of the hoist.
- Before driving over a workshop hoist,
ensure that there is sufficient clear ance between the hoist and low parts
of the vehicle.
Emergency situations 289
•
•
Page 292 of 318
2 90 General information
General information Explanation of
technical data
Some of the technical data listed in this man
ual requires further explanation .
The technical data for your vehicle is listed in
the charts starting on
r:::> page 292. This sec ·
tion provides general information, notes and restrictions which apply to this data .
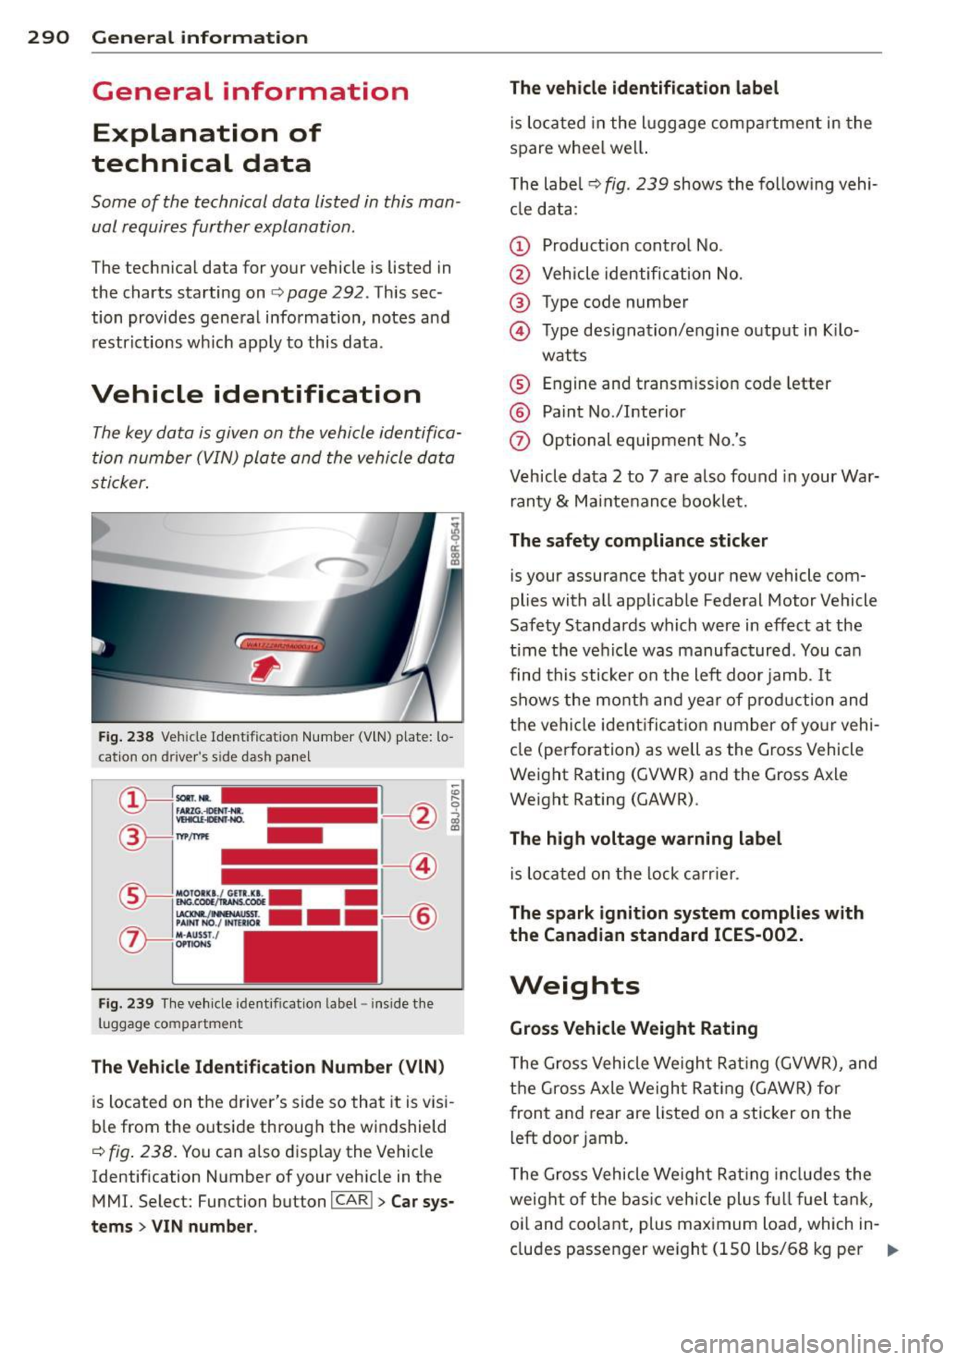
Vehicle identification
The key data is given on the vehicle identifica·
tion number (VIN) plate and the vehicle data
sticker.
Fig. 238 Veh icle Ide ntific atio n Number (VlN) p late: lo
cation on driver 's sid e das h panel
Fig. 239 The vehicle identi fication label -inside the
luggage co mpa rtmen t
The Vehicle Identification Number (VIN)
is located on the driver's side so that it is visi
b le from the outside through the windshield
r:::> fig . 238. You can also display the Vehicle
Identification Number of your vehicle in the
MMI. Select: Function button
ICAR ! > Car sys
tems
> VIN number . The
vehicle identification label
is located in the luggage compartment in the
spare wheel wel l.
The label¢
fig. 239 shows the following vehi
cle data :
(D Production control No .
@ Vehicle identification No.
® Type code number
@ Type designation/engine output in Kilo·
watts
® Engine and transmission code letter
@ Paint No./Interior
(f) Optional equipment No.'s
Vehicle data 2 to 7 are also found in your War·
ranty
& Maintenance booklet.
The safety compliance sticker
is you r assurance that your new vehicle com
plies with all applicable Federal Motor Vehicle
Safety Standards which were in effect at the
time the vehicle was manufactured . You can
find this sticker on the left door jamb.
It
shows the month and year of production and
the ve hicle ident ification number of your vehi ·
cle (perforation) as well as the Gross Vehicle
Weight Rating (GVWR) and the Gross Axle
Weight Rating (GAWR) .
The high voltage warning label
is located on the lock carr ier .
The spark ignition system complies with
the Canadian standard ICES-002.
Weights
Gross Vehicle Weight Rating
The Gross Vehicle Weight Rating (GVWR), and
the Gross Axle Weight Rating (GAWR) for
front and rear are Listed on a sticker on the
left door jamb.
The Gross Vehicle Weight Rating includes the
weight of the basic vehicle plus full fuel tank,
oi l and coolant, plus maximum load, wh ich in·
eludes passenger weight (lSO lbs/68 kg per
Ill>
Page 293 of 318
designated seating position) and luggage
weight~&. .
Gros s Axle W eight Rating
The G ross Axle Weight Rating is the maximum
l oad that can be applied at each axle of the
vehicle
q .&. .
Vehicle capacit y weight
The vehicle capac ity we ight (max. load) is list
ed either on the dr iver's side B-pillar or inside
the fuel filler flap.
Roof weight
The maximum perm issible roof weight is 220
lb (100 kg ).
The roof weight is made up of
the we ight of the roof rack system and the
weight of the object be ing transported
q page 72, Loading the roof rack .
.&, WARNING
- T he ac tual Gross Axle Weight Rat ing at
the front and rear axles shou ld not ex
ceed the permiss ible weights, and their
combination must not exceed the Gross
Vehicle Weight Rat ing .
- Exceeding permissib le weight ratings can
result in vehicle damage, accidents and
personal injury.
(D Note
- The vehicle capacity weight figures apply
when the load is distributed evenly in the
vehicle (passengers and luggage). When
transporting a heavy load in the luggage
compartment, carry the load as near to
the rear axle as possib le so that the veh i
cle's handling is not impa ired.
- Do not exceed the maximum permissible
axle loads or the maximum gross vehicle
weight. Always remember that the vehi
cle's handling will be affected by the ex
tra load. Therefore, adjust you r speed ac
cord ingly.
- Always observe loca l regu lations.
-
G ene ral in formation 29 1
Dimensions
The specifications refer to the basic model.
Differences may occur depending on the mod
el type and options ordered, for example, tire
sizes.
l) Fig ures were not avai lab le at time of pub li
cation.
@ Note
When dr iv ing up steep ramps, on rough
r oads, over curbs, etc. it is important to re
member that some parts of your vehicle,
such as spoi lers or exhaust system compo
nents, may be close to the ground. Be
careful not to damage them.
•
•
Page 303 of 318
A
A/C (automatic climate control) . ... .. .. 7 9
ABS
refer to Anti-lock braking system .. .. . 198
Accessories .. ............. .... .. ... 298
Adapt ive a ir s uspension/sport .. .. .. .. . 109
Adapt ive cruise control ................ 93
C leaning sensors/camera ........... 218
M essages . . . . . . . . . . . . . . . . . . . . . . . . 100
Request for drive r in terven tion .. .. .. .. 98
S top-and-go traffic ................. 97
Adapt ive Lig ht (defect ive) ............. 21
Adding Eng ine coolant ........... .. .. .. ... 241
Eng ine oil .. ............. .... .. ... 238
W indshield washer fluid ... .. .. .. .. . 247
Addit ives
Engine oi l .. .. .... .... ... .. .. .. ... 238
Ad justab le steer ing colum n ............ 82
Adjusting Air distribution (automatic climate con-
trol) ..... ... ...... ........ ........ 80
Front seats ........................ 57
Inst rument illum ina tion ... .. .. .. .. .. SO
S teer ing colu mn .......... .. .. .. .. .. 8 2
Tempe rature (automat ic climate control) 80
A irbag system ................ . 152,17 1
Advanced Airbag System ....... ... .. 156
Adva nced A irbag System components . 159
Ca re . .. .. .. .. ............. .. .. ... 165
Ch ild ren . .. ............. .... .. .. . 17 7
C hild restraints . ... .... ... .. .. .. ... 178
Components (front airbags) . ... .. .. . 159
Danger of fitting a child seat on the front
passenger seat . . . . . . . . . . . . . . . . . . . . 154
Disposal . .. .. ........... .. .. .. ... 165
Front airbags . . . . . . . . . . . . . . . . 156, 157
H ow do the front airbags wo rk? .. ... . 16 1
H ow many airbags does my vehicle
h ave? . .. .. ................. .. ... 159
H ow the Advan ced Airbag Sys tem com-
ponents wor k together . ... .. .. .. .. . 160
Important safety instructions on the
knee airbag system .... ... .. .. .. .. . 169
Important things to know .. .. .. .. .. . 152
Knee airbags . . . . . . . . . . . . . . . . . . . . . . 167
Mo nitoring ... ........... .. .. .. ... 163
Inde x 301
PASS ENG ER A IR BAG OF F light ... .. .. 163
Repairs ... .. .. .... . ... ...... ... .. 165
•
Safety instr uctions . .. .. ..... ... .. .. 165 •
Side a irbags . .. .. ................. 170
S ide curtain airbags ................ 173
Warning/ind icator lights ........... .. 18
Warning/Indicator lights ......... .. 163
Weight-sensing mat ............... 177
When must the sys tem be inspected? 163
A ircraft
Transporting your vehicle ........... 288
A lloy whee ls . ..... .. . .. .. ..... ... .. 221
A ll Wheel Drive .. .. .... ........... .. 203
Winter tires . .. .. .. .. ........... .. 264
A lternator
refer to Generator .. .............. .. 16
Ambience lighting ... . ... .... ... .. .. . 49
Ant i-freeze
refer to E ng ine coola nt ......... .. .. 240
Anti- lock braking system ......... .... 198
Warning/ind icator lights ........ ..... 19
Anti-slip regulation . .. ... .... ... .. .. 198
Anti-theft systems El ec tronic immob ilizer .......... .. .. . 31
ASR
refer to A nti-slip regulation 198
Audi braking guard
refer to Braking guard . ......... .. .. . 93
Audi drive selec t
refer to Drive se lect .. .. ..... ... .. .. 109
Audi Se rv ice Repair Manuals and Litera-
tu re ......... .. .. .. .. ........... .. 296
AUTO Automat ic climate control . . . . . . . . . . . . 79
Automat ic head lights ............. .. 45
A uto Lock . ... .. .... . ... ...... ... .. . 32
Automa tic be lt ret ractor ............. 14 7
Automat ic car wash ............. .... 216
A utomat ic climate control
Air vents . ... .... .. . .. .. ..... ... .. . 80
A utomat ic recirc ulation . ..... ... .. .. . 81
Operation . . . . . . . . . . . . . . . . . . . . . . . . . 79
Setup ............................ 81
A utomat ic climate cont rol system
synchronizing .... .. . .. .. ..... ... .. . 80
Page 308 of 318
306 Index
Front seats . ............... ... .... .. 57
Adjusting . ................. ..... . 136
Child restraints in the front seat ... .. . 154
Fuel Addit ives . .... ........... .. .. .... . 228
Bl ended gasoline .......... ... .... . 228
Current consumption . . . . . . . . . . . . . . . . 24
Economy messages (efficiency program) 25
Fuel filler flap emergency relea se .. .. . 231
Fuel filler neck ............. .. .... . 229
Fuel gauge . . . . . . . . . . . . . . . . . . . . . . . . 11
Gasoline ... ... ... .... ......... .. . 228
Gasoline additives ............ .. ... 229
L ow fuel level symbo l . . . . . . . . . . . . . . . 21
Octane rating .......... .. .. .. .. .. . 228
Recommendation .......... ... .... . 228
Refue lling . ................. ..... . 230
Reserve .................... ..... .. 11
Tank capacity . . . . . . . . . . . . . . . . . 11,292
Fuses Assignment ...................... 279
Replacing .. ................ ..... . 279
G
Garage door opener (Homelink®) . .. .. . 132
Garment hooks .. ... .... ......... .. .. 75
Gas discharge lamps ......... ... .. .. . 283
Gauges Engine coolant temperature .. .. .. .... 10
Fuel gauge . . . . . . . . . . . . . . . . . . . . . . . . 11
Speedometer . . . . . . . . . . . . . . . . . . . . . . 26
Tachometer . . . . . . . . . . . . . . . . . . . . . . . 11
Trip odometer . . . . . . . . . . . . . . . . . . . . . 26
General illustration ............ .... ... 8
Generator . ................. .. .... .. 16
Glossary of tire and loading terminology 250
Glove compartment (cooled) ...... ..... 74
Gross Vehicle Weight Rating (GVWR) ... 290
H
Headlights
Cleaning system ............ .. .... .. 52
Defective . . . . . . . . . . . . . . . . . . . . . . . . . 21
He adlig ht range contro l . . . . . . . . . 21, 45
High beam assist .............. ... .. 48
Washer reservoir ............. .. ... 247 Head
restraints . . . . . . . . . . . . . . . . . 64, 138
Adjusting ..... .. ................. 138
H eated
exter ior mirrors . . . . . . . . . . . . . . . . . . . . 54
rear window ... .. ............. .... . 80
seats ......... .. .. .............. .. 80
windshield washer spray nozz les . . . . . . 52
H eating .. .. .. .. .. .. ............. .. . 78
Heavy clothing and safety belts ........ 147
High beam . ..... .. ............. ..... 47
High voltage warning label ..... .. .. .. 290
Hill descent contro l ................ . 118
Homelink ® un iversal remote control ... 132
Hood (release lever) ... .......... .. .. 232
Horn ..... ..... .. .. .............. ... 8
How are child restraint system anchors re-
lated to child safety ............. .. .. 189
How many air bags does my vehicle have? 159
How often should I check my tire pres-
sures? ......... .. .. .............. . 256
How safety belt pretens ioners work .. .. 150
Hydroplaning ... .. ............. .... 260
I
Immobilizer . . . . . . . . . . . . . . . . . . . . . . . . 26
Important things to do before driving .. 134
Improperly worn safety belts .......... 150
Indicator lights
refer to Warning/indicator lights ..... . 11
Infant seats .. .. .. ... .......... .... 182
Installing child safety seats Safety belts . . . . . . . . . . . . . . . . . . . . . . 186
Installing the upper tether strap on the
anchorage . ..... .. ................. 194
Instruments Adjusting the light ing .......... .... . 50
Instruments and controls
General illustration . . . . . . . . . . . . . . . . . . 8
Instrument cluster .................. 10
Interior lighting
Ambience lighting ............. .. .. . 49
Front and rear ... .. ..... ...... .. .. . 49
Intermittent (windshield wipers) ... ... . 52