display AUDI A8 2017 Repair Manual
[x] Cancel search | Manufacturer: AUDI, Model Year: 2017, Model line: A8, Model: AUDI A8 2017Pages: 354, PDF Size: 88.68 MB
Page 140 of 354
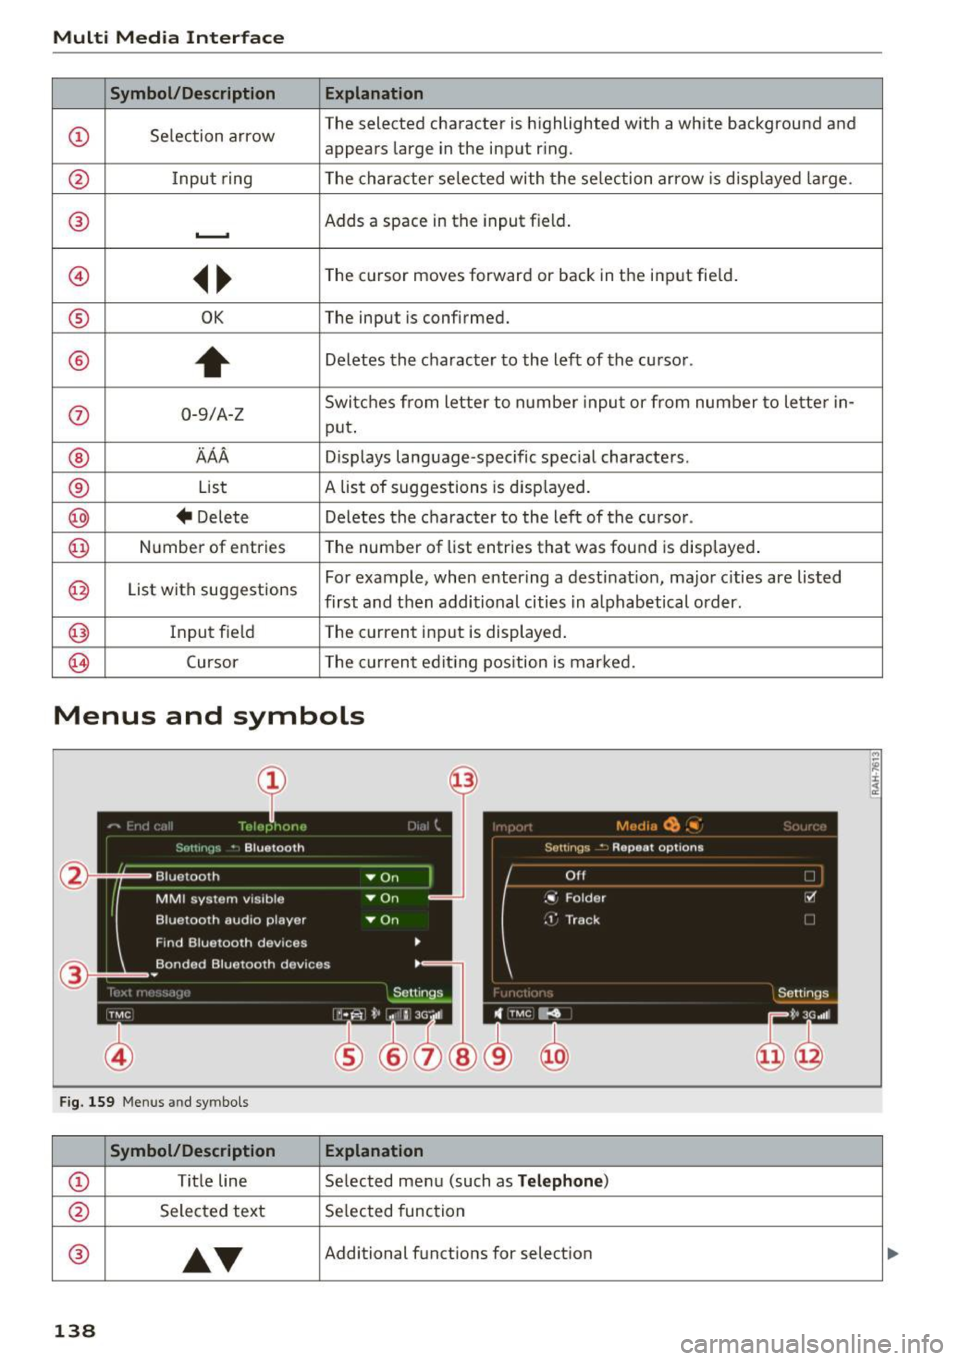
Multi Media Interface
Symbol /Description E xplanation
CD Se lection arrow The selected character is highlighted with a white background and
appears large in the input r
ing .
@ Input ring The character selected with the selection arrow is displayed large .
® Adds a space in the input field . ..........
@ ~~
The cursor moves forward or back in the input fie ld.
® OK The input is confirmed.
®
+
Deletes the character to the left of the cursor .
0 0-9/A-Z Switches from letter to numbe
r input or from number to lette r in-
put .
® AAA Displays language -specific special characters .
® List A list of suggestions
is displayed.
@ + Delete Deletes the character to the left of
the cursor .
@) Number of entries The number of
list entries that was found is displayed .
@ List with suggestions For example, when entering a destinat
ion, major cities are listed
first and then additional cities in alphabetical order.
@ Input field The current input is displayed.
0 Cursor The current editing position is marked.
Menus and symbols
Fig. 159 Men us an d sy mbols
Symbol/Description Explanation
CD Title line Selected menu (such as Telephone)
@ Selected text Se lected function
®
•T
Additional functions for selection ...
138
Page 145 of 354
0 co .... N ,..... N .... 0 0 :c '
Correcting the phone number that
was entered
Displaying call lists
Calling the last number dialed
List ening to messages
(D Tips
Voice recognition system
Say :
Delete number
I Correction
Dialed numbers
I Received calls I Missed calls
Redial
Call voice mail
- Name tags can only be stored using the
voi ce recogni tion system.
- You can assign up to SO additional name
tags for address cards. - Name
tags can only be deleted using the
MMI control panel.
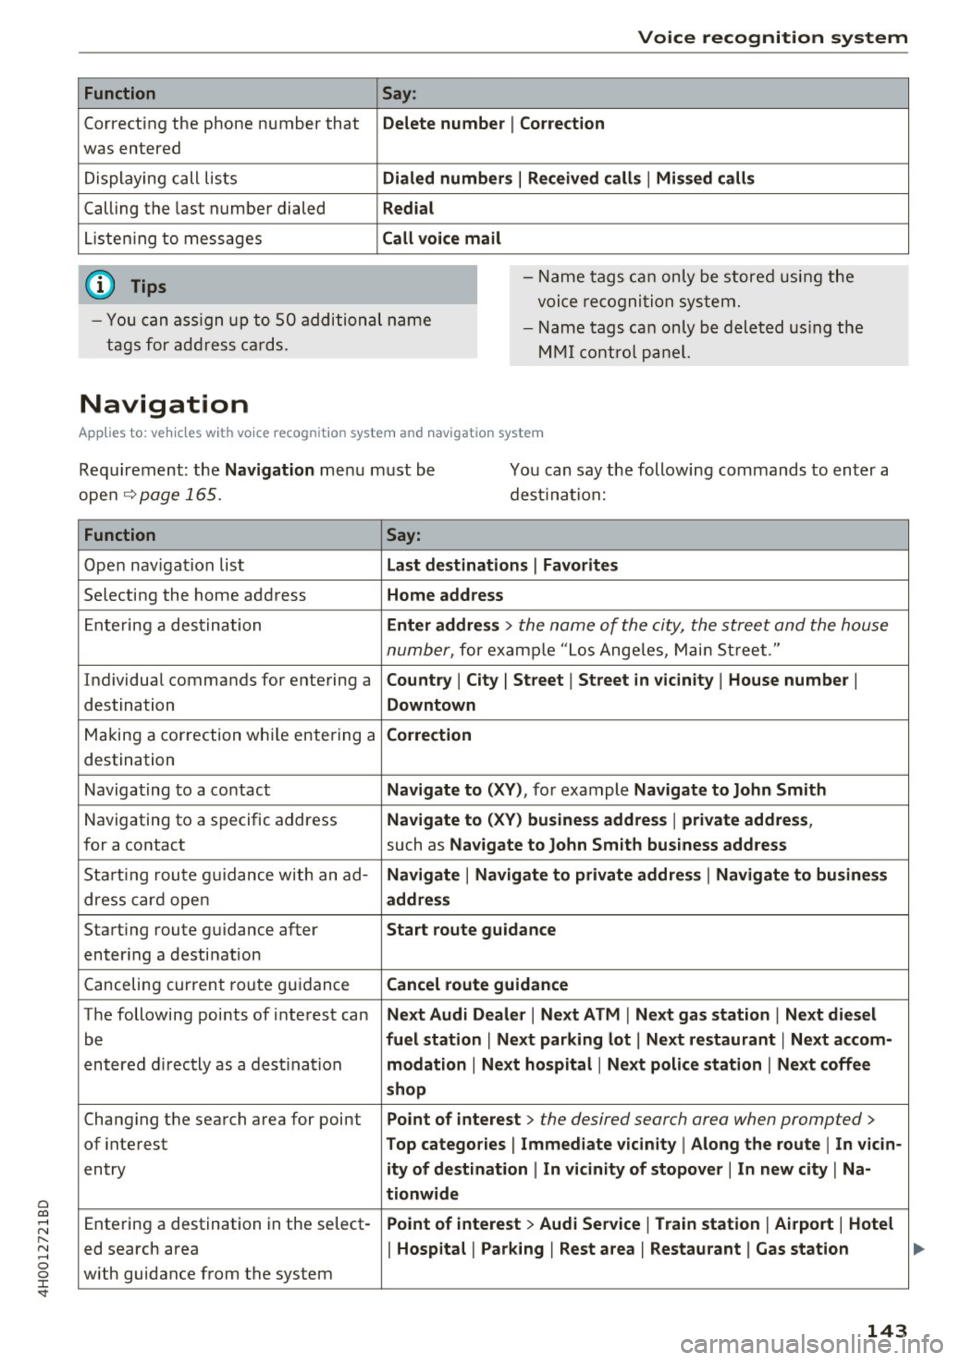
Navigation
Applies to: vehicles with voice recognition system and navigation system
Requirement: the Navigation menu must be
open
~ page 165.
You can say the following commands to enter a
dest ination:
Function Say:
Open navigat ion list Last destinations I Favorites
Selecting the home address Home address
Entering a destination Enter address > the name of the city, the street and the house
number,
for examp le "Los Ange les, Main Street ."
Individual commands for entering a
Country I City I Street I Street in vicinity I House number I
destination Downtown
Making a correction while entering a Correction
destination
Navigating to a contact
Navigate to (XV), for example Navigate to John Smith
Navigating to a specific address Navigate to (XV) business address I private address,
for a contact such as Naviigate to John Smith business address
Sta rt ing route guidance with an ad-Navigate I Navigate to private address I Navigate to business
dress card open address
Starting route guidance after Start route guidance
entering a destination
C anceling current route gu idance
Cancel route guidance
The following points of inte res t can Next Audi Dealer I Next ATM I Next gas station I Next diesel
be fuel station I Next parking lot I Next restaurant I Next accom-
entered directly as a destination modation I Next hospital I Next police station I Next coffee
shop
Changing the search area for point Point of interest > the desired search area when prompted>
of interest Top categories I Immediate vicinity I Along the route I In vicin-
entry ity of destination I In vicinity of stopover I In new city I Na-
tionwide
Entering a destination in the select -Point of interest > Audi Service I Train station I Airport I Hotel
ed search area I Hospital I Parking I Rest area I Restaurant I Gas station
with guidance from the system
143
Page 149 of 354

C) C0 ....
"' " "' .... 0 0 :r
• Select the ITEL I button > Sea rc h for new cell
phone
¢ fig . 161 . The avai lab le Bluetooth devi
ces are shown in the Infotainment system dis
play.
Or : search for the MMI using the B lue
tooth device search on your cell phone.
• Select and confirm the desired cell phone from
the list of displayed Bluetooth devices.
.. Select and confirm
Hand sfre e. The MMI gener
ates a PIN for the connection setup¢
fig. 161 .
• Se lect and confirm Y es.
• Ente r th e PI N for connecting on your ce ll
phone.
Or : if the P IN is already d isp layed on
your ce ll phone, confirm it in the cell phone and
in the MMI. The time a llowed for entering the
PIN is limited to approximately 30 seconds .
P ay at ten tion to any additional system prompts
displayed on your cell phone, for example if the
system should connect automatically in the fu
ture . Depending on the cell phone, you may have
to conf irm download ing the directory separately.
After connec ting successfull y
After connecting successfully, the s ignal strength
symbo l® ¢
page 138, fig. 159 and the Blue
tooth symbo l@ appear i n the status line of the
Infotainment disp lay. In addition, the cell phone
contacts are automatically loaded in the MMI di rectory. This process can take several minutes,
depend ing on the number of contacts.
If all of the memory capacity is fi lled, you will be
asked to replace the contacts from one cell phone when connect ing another cell phone. With
the opt ion
Restri cted use of t ele ph one , only con
tacts in the cell phone and the local MMI memory
are available ¢
page 150.
0 Note
Always follow the informat ion found in ¢ (Din
Wi-Fi hotspot on page 160.
(D Tips
- You only have to pair your dev ice one t ime.
Bluetooth dev ices that a re already pa ired
a utomat ically connect to the MMI whe n
t h ey are within range and t he ignit ion is
swi tched on.
Teleph one
- Authoriz ing the MMI connection in your cell
phone wi ll speed up the a utomatic connec
tion .
- Several cell phones can be paired to the
MMI, but only one cell phone can be actively
connected.
- A B luetooth device that is already paired
with the MMI will be d isconnected if anoth
er device is paired .
- When leaving the veh icle, the Bluetooth
connect ion to the cell phone will automati
cally disconnect .
- You can obtain more information from your
cell phone service provider or from yo ur cell
phone user gu ide. For informat ion on us ing
the te lephone , visit
www .aud iusa .com /
bluetooth
or contact your authorized Audi
dea ler or authorized Audi Se rvice Facility .
Opening the telephone
Applies to: vehicles wit h telepho ne
Fig . 163 Telephone functions
Requirement: a ce ll phone must be connected to
the MMI
¢page 146.
.. Select the ITE LI button.
T he last ac tive te lephone menu is s hown in the
Infotainment display . Press the
ITEL ! button in
the
Telephone menu again to access the tele
phone functions .
T he following telephone functions are available
¢ fig. 163:
@ List of received calls .......... .
@ List of missed ca lls .. ... ...... .
@ List of d ialed numbers . .... ... .
@ Directory .... .. .. .. ..... ..... .
148
148
148
150 ..,_
147
Page 151 of 354
Storing a phone number
Storing a new phone number
Applies to: vehicles with telephone
You can store a new phone number as a contact
in the directory
¢page 153.
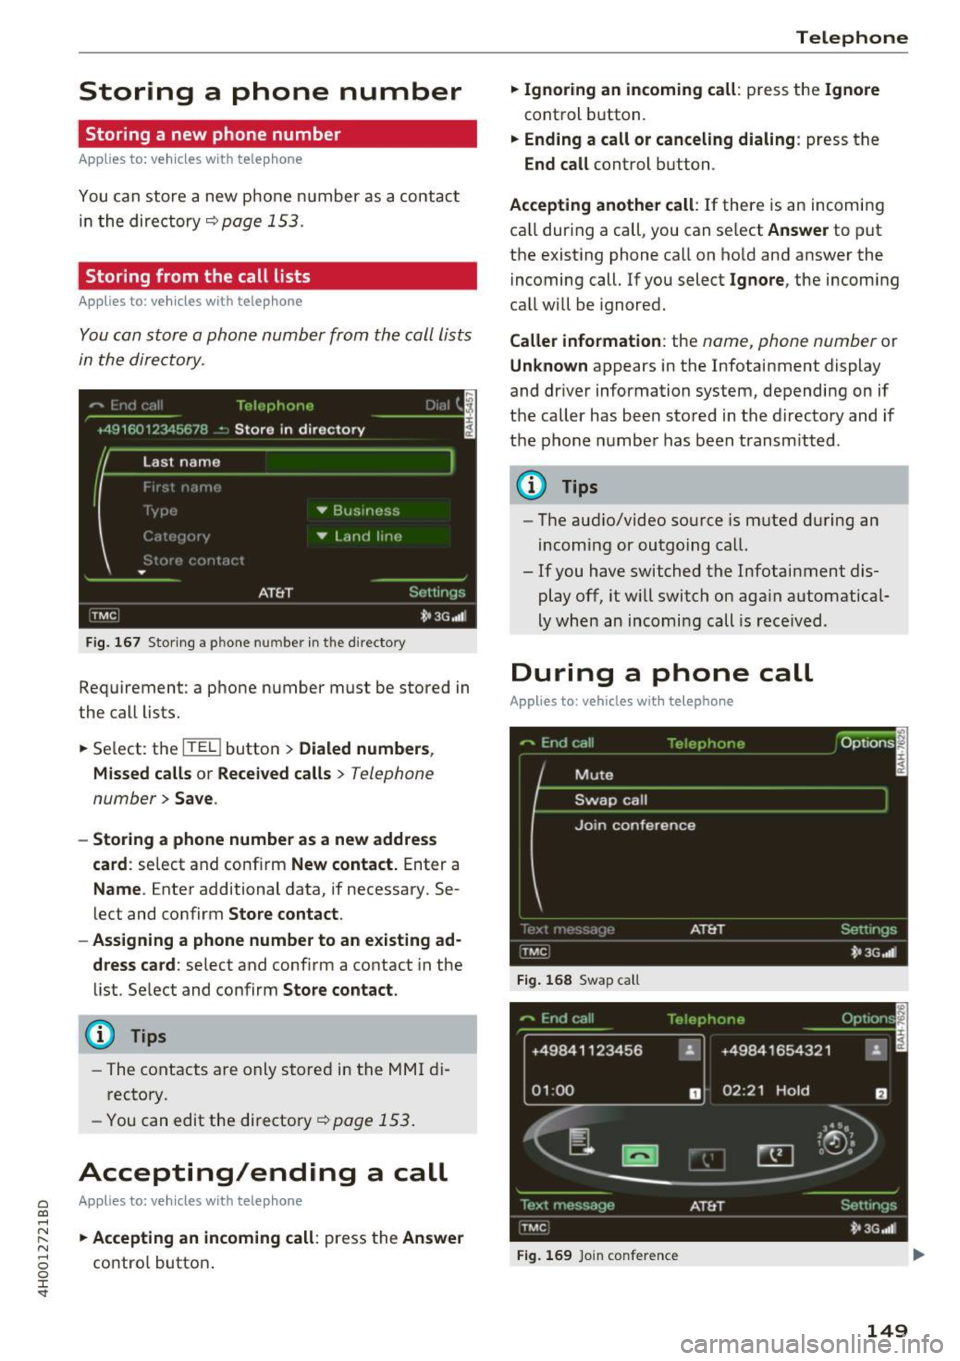
Storing from the call lists
Applies to: vehicles with telephone
You can store a phone number from the call lists
in the directory .
Fig. 167 Stor ing a p hone nu mbe r in the directory
Requirement: a phone number must be stored in
the call lists.
• Select: the
ITKl button > Dialed numbers ,
Missed calls
or Received calls> Telephone
number>
Save .
- Storing a phone number as a new address
card :
select and confirm New contact. Enter a
Name . Enter additional data, if necessary. Se
lect and confirm
Store contact.
- Assigning a phone number to an existing ad
dress card :
select and confirm a contact in the
list. Select and confirm
Store contact.
@ Tips
-The contacts are only stored in the MMI di
rectory .
- You can edit the directory¢
page 153 .
Accepting/ending a call
0 Applies to: vehicles with telephone C0 ....
~ • Accepting an incoming call: press the Answer N
8 contro l button . 0 :r
• Ignoring an incoming call: press the Ignore
control button.
• Ending a call or canceling dialing : press the
End call control button.
Accepting another call : If there is an incoming
ca ll during a call, you can select
Answer to put
the existing phone call on hold and answer the
incoming call. If you select
Ignore, the incom ing
call will be ignored.
Caller information : the name, phone number or
Unknown appears in the Infotainment display
and driver information system, depending on if
the caller has been stored in the directory and if
the phone n umber has been transm itted .
@ Tips
-The audio/video source is muted during an
incoming or outgoing call.
- If you have switched the Infotainment dis play off, it will switch on aga in automatical
ly when an incoming call is received .
During a phone call
Applies to: vehicles with telephone
Fig. 168 Swap ca ll
+49841123456 ~
01 :00 D
Fig. 169 Join conference
149
Page 152 of 354
Telephone
Requirement: the re must be a call in progress.
.,. Se lect the
Option s control button.
-Making an additional call : select Additional
call
> Directory or a call list> an entry in the
list.
- Accepting an incom ing call when there i s an
active call and a call on hold :
select Answer.
The act ive call is repla ced with the incoming
ca ll.
Add it ional functions include:
Mute : if you se lect and confirm this function, the
other person on the phone cannot hea r you. You
can hear the other person .
Hold/Resume : you can put an active phone call
on hold and resume it.
On hold and the d uration
of the phone call is shown in the Infota inment
d isplay .
Swap call : you can alternate between two phone
calls at t he same time . One of the calls w ill be on
hold.
End call ends the active phone call. A phone
call that is on hold stays on hold and can be re
sumed us ing the
Options control bu tton and Re
sume .
Join conference :
a party on hold and up to five ac
tive parties (depending on the network) ca n be
added to a confe rence cal l. To make an add itiona l
call , put all pa rticipants i n the curren t confe rence
call on hold using
Hold . Press the Options con
trol bu tton. Se lect and co nfirm
Additional call
a nd se lec t a phone number from the Call list o r
t he
D irectory , or select Enter number. To add
this party to the conference call, select
Join con
ference .
With Resume , all part icipants are taken
off hold .
Show conference participants shows a ll
partic ipants.
(D Tips
- To be notified of an incoming call during a
phone ca ll, t he
Call waiting funct ion in your
cell phone must be switched on when us ing
the ha ndsfree p rofile
( Handsfree ).
-The display of an incoming phone call in the
Infotainment system d isp lay may still be
v is ible for a few seconds de pending on t he
ce ll phone in use . If you use t he
Replace or
150
Ignore fu nctions in the MMI whil e the dis
play is still visib le, the active phone call may
end .
Emergency call functions
Applies to: vehicles with telephone
Requirement: a ce ll phone must be connected to
the MMI
c!;> page 146.
.,. Sele ct: !T ELi bu tton > Enter number > Enter
emergency call number (for example, 911)
>
OK.
.. Setting an automatic emergency call* : select
the
ITEL I button> Sett ings control button>
Telephone settings > Auto. emerg. call.
A WARNING -
- Because yo ur phone works with rad io sig
na ls, a co nnection cannot be guaranteed un
de r all ci rcumsta nces. Do not rely o n only
y o ur p ho ne w hen it co mes to essenti al co m
m uni cat io n (s uch as a medical emer gen cy).
- Always follow t he inst ru cti ons give n by the
em ergen cy pe rsonne l dur ing an e merg ency
c a ll and only end the call when they instruc t
you to do so.
(D Tips
E mergen cy nu mbe rs a re n ot t he same every
whe re. Find o ut wh ich emergency n umber is
u se d in your cur ren t loc ation .
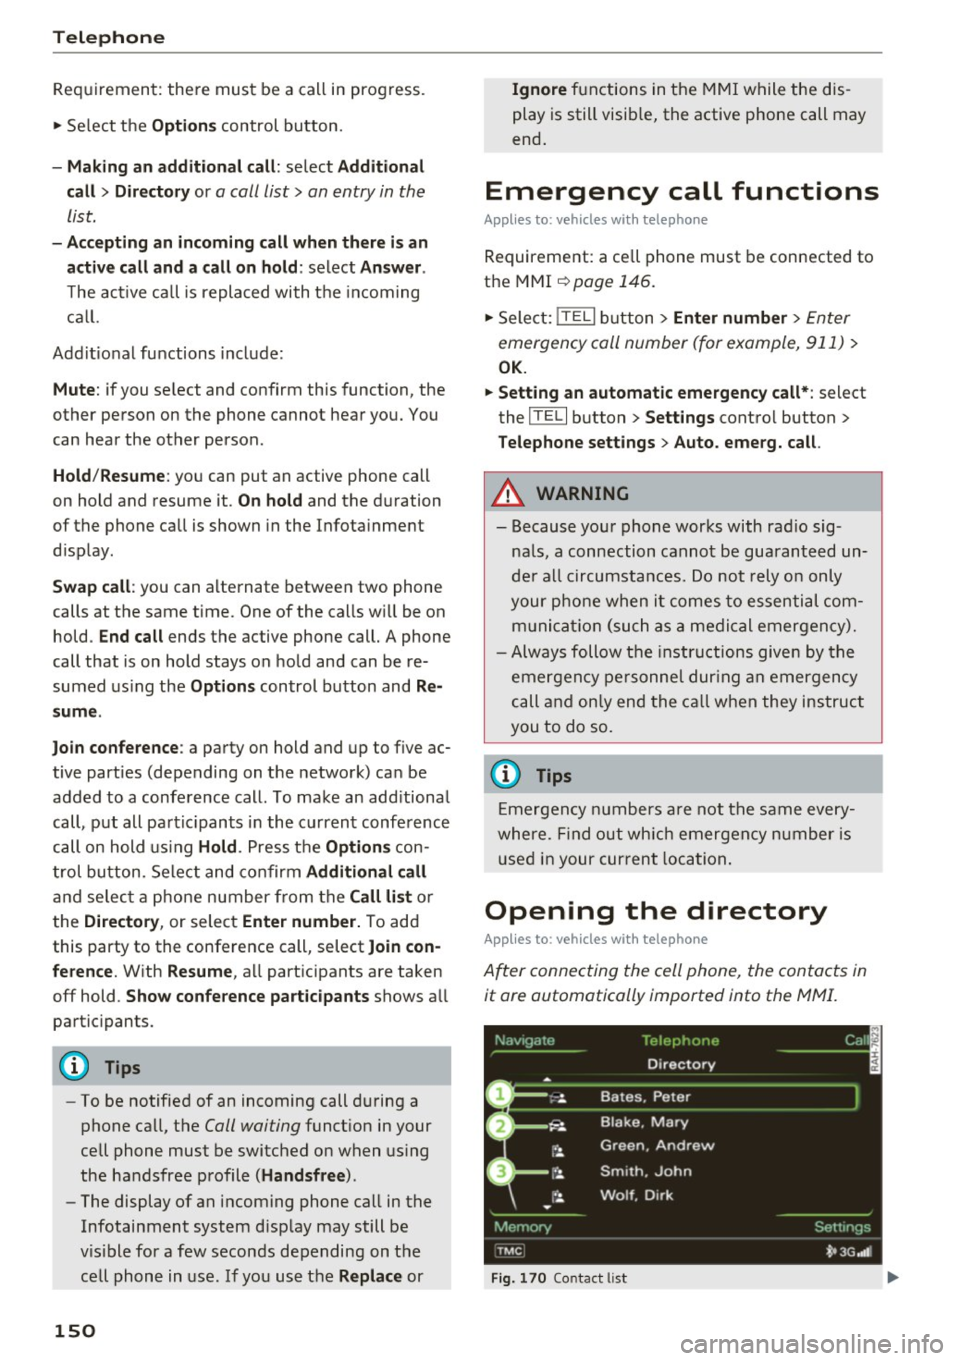
Opening the directory
Applies to: vehicles with telephone
After connecting the cell phone, the contacts in
it are automatically imported into the MMI .
Fig. 170 Contactlist
Page 153 of 354

0 co .... N ,..._
N .... 0 0 :c '
- Selecting a contact :
select and confir m a con
t a ct from the direc tory. The address card is dis
played.
Contacts a re d isplayed in alphabetical order and
can be so rted according to fi rst or last name
¢
page 156 and are ident ified w ith a symbol to
tell the location where they are s tored
¢ fig. 17 0:
(D Private MMI directory: these co ntacts a re on
l y vis ible whe n the ce ll phone i s conn ected.
You can pair up to four different cell phones w ith
the M MI and ma nage up to fo ur private directo
ries.
@ Public MMI directory : these contacts are visi
b le to all users and can be used by all users re
g ar dless of the cell phone that is connec ted .
No cell phone connected : each new contact will
be stored in the p ublic d irectory
¢ page 153.
Cell phone connected : to store a contact in the
p ublic directory so that all users can access it, the
contact must be marked as a
Publ ic contact
¢page 152.
@ Cell phone : th ese contacts are stored in the
cell phone and are only v is ib le when the cor re
spond ing ce ll phone is connected.
I f all of the memory capacity is fi lled, you will be
asked to replace the contacts from one cell phone when connect ing another cell phone. With
the opt ion
Rest ricted use of telephone , only con
tacts in the ce ll phone and the local MMI memory
(pu blic) are ava ilable .
The directory can be opened through the
Tele·
phone *
menu as well as th rough the Navigation *
menu.
{!) Tips
-Check for a possible request to synchron ize
on your cell p hone. Requests to synchronize
the di recto ry must be confirmed so that
you r ce ll phone contacts can be loaded into
t he MM I.
- The contact display in the M MI depe nds on
the cell p hone us ed. For more informa tion
Telephone
on the supported cell phones, v is it
www .audiusa.com/bluetooth or contact an
authorized Audi dealer or authorized Au di
Service Facility.
- The contacts from the cell p hone may not
be t ransfe rred in a lphabetical order. If there
are too many entries, contacts with differ
ent first letters may be miss ing in the MMI.
- The p ublic contacts in the local MMI memo
ry are a lways v is ible and can be accessed by
ot her users.
Searching for a contact
App lies to : vehicles wit h telepho ne
~ Select: the ITEL I button> Directory .
-Select an d confirm Find contact . Enter the
name.
Or : select and conf irm the contact using
the
List .
Both the fi rst and last names are sea rched.
(D Tips
- Y ou c an s croll thro ugh lo ng lis ts qui ckly by
tu rni ng the cont rol knob qui ckly .
- Y ou can go dire ctly to th e fir st le tt er o f the
con tact you are se ar ching for by en tering
t he first letter on the MMI tou ch control
pad * using your finger¢
page 136 . Enterin g
add itiona l lette rs narrows down the list of
found contacts .
151
Page 155 of 354
C) C0 ....
"' " "' .... 0 0 :r
contacts
Applies to: vehicl es with telep hone
Contacts in vCard format(. vcf) can be imported
into the directory or exported .
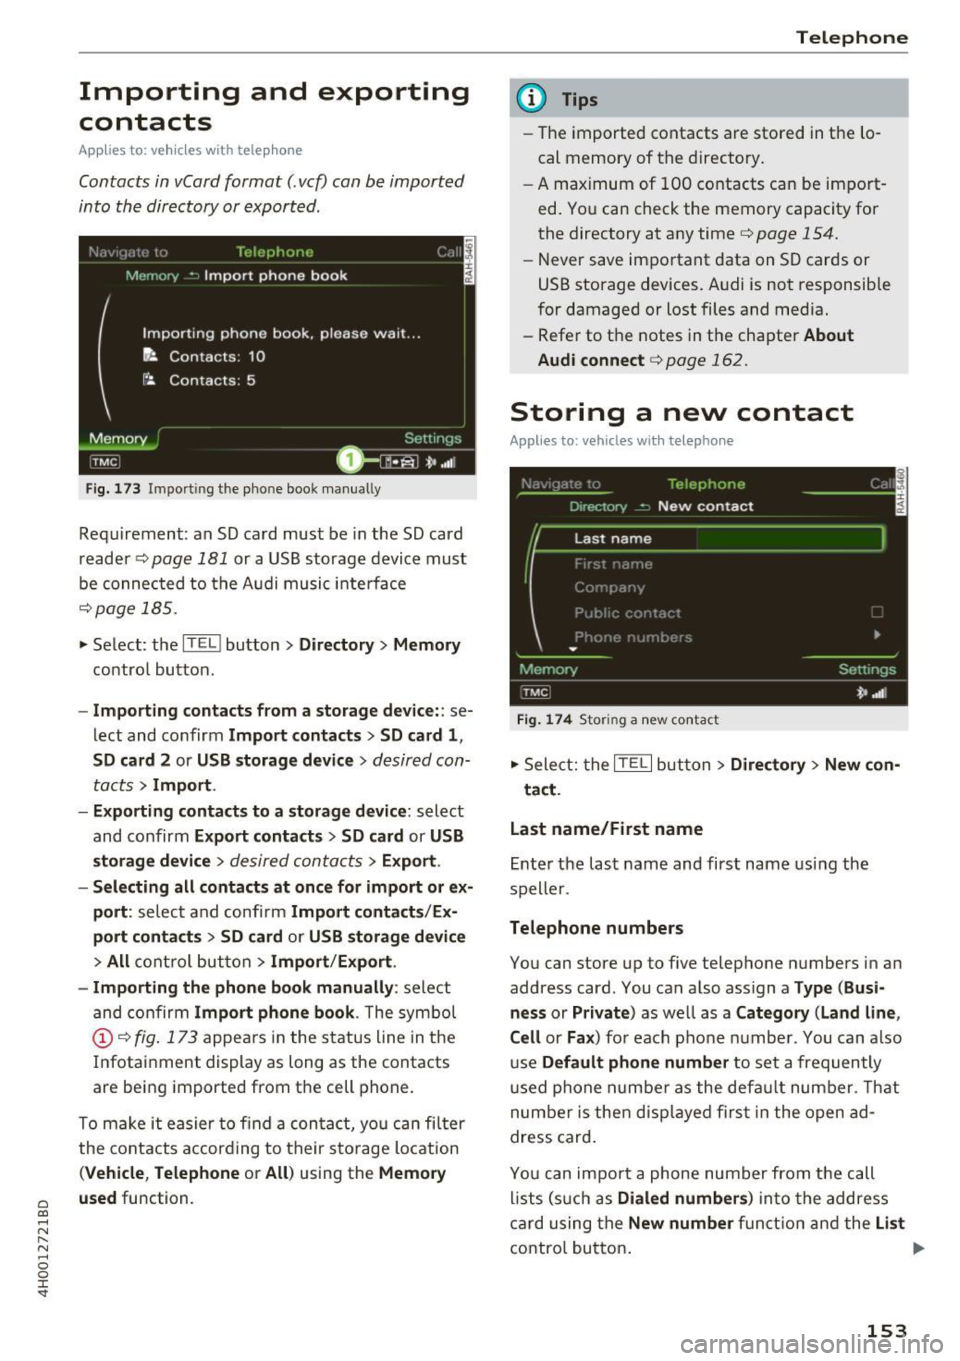
Fig. 173 Importing the phone book manually
Requirement: an SD card must be in the SD card
reader
c=;, page 181 or a USB storage device must
be connected to the A udi music inte rface
c:> page 185 .
.. Select: the lffilJ button > Directory > Memory
contro l button.
- Importing contacts from a sto rage device: : se
lect and confirm
Import conta cts > SD card 1 ,
SD c ard
2 or USB stora ge device > desired con
tacts
> I mport .
- Ex po rting contact s to a stor age d evice:
select
and confirm
Ex port conta cts> SD card or USB
storag e device
> desired contacts > Export .
- Se lecting all contact s at once for import or ex
port :
select and confi rm Import contact s/Ex
port conta ct s
> SD card or USB sto rage devi ce
> All control but ton > Import /Export .
- Importing the ph one b ook manually :
select
and confirm
Import phone book . The symbol
© c:> fig . 173 appea rs in the status line in the
Infotainment display as long as the contacts
are being imported from the cell phone.
To make it easier to find a con tact, you can filter
the contacts according to their sto rage location
(Vehi cle, Telep hone or All ) using the Memor y
u sed
function.
Teleph one
(D Tips
- The imported contacts are stored in the lo
cal memory of the directory.
- A maximum of 100 contacts can be import
ed. You can check the memory capacity for
the directory at any time
c:> page 154.
- Never save important data on SO cards or
USB storage devices. Audi is not responsible
for damaged or lost files and media.
- Refer to the notes in the chapter
About
Audi connect
c:> page 162.
Storing a new contact
Applies to: vehicles with telephone
F ig . 1 74 Stor ing a new contact
.,. Select: the IT ELI but ton> Directory > New con -
t ac t.
Last name/First n ame
Ente r the last name and first name using the
speller .
Telephone numbers
You can store up to five telephone numbers in an
address card. You can also assign a
Type (Busi
n ess
or Private ) as well as a Category (Land line ,
C ell
or Fa x) for each phone numbe r. You can also
use
Default phone numb er to set a frequently
u sed phone numbe r as the defa ult number. That
number is then disp layed firs t in the open ad
dress card .
You can import a phone number from the call l ists (such as
Di aled number s) into the address
card using the
New number f u nct ion and the List
contro l button . Ill>
153
Page 157 of 354

Call options
Automati c redial :
when the func tion is swi tched
On , a phone number wi ll be au toma tic ally re
d ialed up to five times if it is busy. Automatic re
d ia l can be canceled with
End call . The function is
only active when the network gives a b usy signa l.
Auto answer : when the func tion is switche d On,
incom ing ca lls are automatically answered afte r
a brief t ime.
Three-way conference (GSM)
- On :
you can answe r an incoming call while an
othe r call is in progress by selecti ng
Answer.
T he fi rst call is pu t on hold. Using the Hold op
ti on, you c an also put an ac tive c all on hold and
sta rt an other call o r a con ference ca ll.
-Off : you can repla ce a c all w ith an in com ing c all
by se lecting
Replace. Yo u can ignore an in com
ing ca ll using the
Ignore op tion . You ca nnot
p ut an active ca ll on ho ld or sta rt a new ca ll.
Telephone settings
Volume settings
1
): fo r the Ring tone volume /
Call volume, refer to~ p age 20 5.
Voice mail : the voicemai l number can be en tere d
or ed ited i n the
Number in pu t fie ld using th e
spe ller. W hen a voicemail nu mber is stored, t he
voicema il c an be a cces se d wi th the ® sym bol in
the speller. The
Delete number func tion deletes
the stored voicemail number.
Invert call lists : the phone number s in t he call
l is ts ar e sorted accor ding to t he time the call
too k place . When the f unct io n is swi tched
On,
the so rting orde r is reverse d.
Bluetooth
Bluetooth :
the MMI Bluetoot h fu nct io n can be
sw itched
On or Off. The Blu etoo th symbol @
~page 138, fig. 159 appears in the In fo ta in
men t display when the fu nct ion is swi tched
on.
Visible :
the visibili ty of the MM I in cell phones o r
in B lu etoo th audio players ca n be switc hed
On o r
Off . When Auto is selec ted, the M MI w ill rema in
~ visib le for cell phones or a Blu etoo th a udio player .... N ,..._
N .... 0 0
~ 1) Depends on the conn ected cell phone.
Telephone
fo r ab out five minu tes when the vehicle is sta
t iona ry and the ignition is switched on. The visi
bility sw itches o ff after that. Howeve r, it is still
poss ible to estab lish a B luetooth connection with
ce ll phones or devices that have already been
paired when the vis ibility is switched off . The visi
bility of the MMI automatically swi tches
Off
wh en aud io fi les are be ing pla yed using a con
ne cted Bluetooth aud io player to avo id pro blems
du ring playb ack .
Bluetooth audio player : the Bluetooth audio
player
func tion must be switched On to be ab le
t o selec t th e
Bluetooth audio player as the
sou rce in t he
Media men u. S w itch the Bluetooth
audio player
f u nct io n Off if you are no t usi ng it
to preven t mal funct ions i n the
Telephone or Me
dia
men us.
Find Bluetooth devices : the system sea rches for
and lists Bluetooth devi ces th at are with in range .
Bonded Bluetooth devices : the Bluetoot h dev ic es
c o nn ecte d t o the MMI are lis ted. The cur rently
conn ecte d B lueto o th device is labele d wi th the
Bl uetoot h symbo l. To dele te con necte d Blu e
tooth devices individually, se lect the device and
delete it with the
Delete Bluetooth device func
t ion. To disconnect or connect pa ired cell phones
individ uall y, select the B luetoot h dev ice and
c h ange the profi le using the
Connect funct io n
wh ile the vehicle is stat io na ry . U se
Disconnect to
disco nnect the paired Bluetoot h dev ice.
Known Bluetooth devices : up to 50 known devi
ces can be listed. These Bluetooth dev ices may no
longer be in ra nge when searc hing to connect.
Bluetooth name : the Bluetooth name of the MMI
(for example, "AUDI M MI 2613") is shown and
can be cha nged.
Delete Bluetooth devices : all connected Blue
tooth devices can be deleted by confirming with
Yes .
Wi-Fi settings
See~ page 160.
155
Page 158 of 354
Telephone
Connection s
See ~page 161.
([) Note Sort order
You can so
rt the cont acts in you r d irec tory alpha
be tica lly acco rding to
Las t name /First name .
Always follow the info rmation found in ~CD in
Wi-Fi hotspot on page 160.
Display public contacts
You can show o r hide the public contacts . With
Yes , all the contacts in the local M MI memory
(p ubli c) a re s hown, and with
No , th ey a re hidde n. (D Tips
- Several ce ll phones can be paired to the
MM I, but only one cell p hone can be act ively
con nected. Delete private contacts /Delete public
contacts
You can delete a ll pr ivate contacts in t he local
memo ry using t he
Delete private conta ct s fu nc
tion. Yo u ca n de lete the p ublic con tacts in the lo
ca l memory using the
Delete public contacts
funct io n.
-
To delete all connected Bl uetooth devices,
the
Bluetooth f u nction can be reset to t he
fa ctory settings~
page 206.
Directory settings
Applies to: vehicles with telephone
~ Select: the ITEL ! button > Directory > Settings
contro l button .
Troubleshooting
Applies to: vehicles with telephone
Problem Solution
Connecting
t h e cell phone to the Check if the Bluetooth visibility o n the cell phone and MMI is
MMI failed. switched on. For some ce ll phones, the v is ibility turns off auto-
mat ically after a short period.
O r: restart your cell phone.
For more information on this, refe r to the user g uide for your cell
phone.
After pairing,
not all contact s/no Avoid using special characters in names .
contacts are loaded in the MMI. Avoid using contact groups.
Certai n
telephone functions are The te lephone f unctions depend o n the cell phone servi ce p rovider
grayed out o r not availab le. a nd the cell p ho ne you are using. Yo u can ob tain more i nfo rma -
tion from your cell p hone se rvi ce p rovide r, in your cell phone use r
guide or in the d atabase for mobi le devices at
www.aud iusa.com /
bluetooth.
156
Page 159 of 354
0 co .... N ,..._
N .... 0 0 :c '
Applies to: vehicles with Audi connect
With Audi connect services, on line information is
transmitted and integrated direct ly in the vehi
cle.
A mob ile end dev ice can be used to access the In
ternet through a Wi- Fi hotspot, either when the
vehicle is stationary or from the rear seat when
the vehicle is in motion.
A sepa rate S IM c ard prov ided by Aud i connect is
used to access Audi connect services .
A WARNING
-
-To reduce the risk of an accident, on ly use
Audi connect services when road and traffic condit ions perm it. Read and follow the
guidelines provided in
¢ page 134.
- Use the Audi connect serv ices w ith a Wi-Fi
hotspot only in the rear seat when the veh i
cle is in mot ion or only when the vehicle is
stationary to reduce the risk of an accident.
(D Note
Aud i connect is designed for use only with the
prov ided Audi SIM card. Aud i AG is not liable
for the consequences of using other SIM
cards .
@ Tips
Read and follow the notes about Aud i con
nect
before start ing it ¢page 162 .
Setup
Requirements for Audi connect
An Internet connection is req uired to use Audi
connect. The following requ irements must be
m et to establish a connection:
- You m ust be in an area tha t is covered by yo ur
provider .
- You r A udi S IM card m ust be inserted in the
MM I SIM card reader ¢page
157 .
Audi c onn ect
- A data connection must be configured for Audi
connect services ¢ page
161.
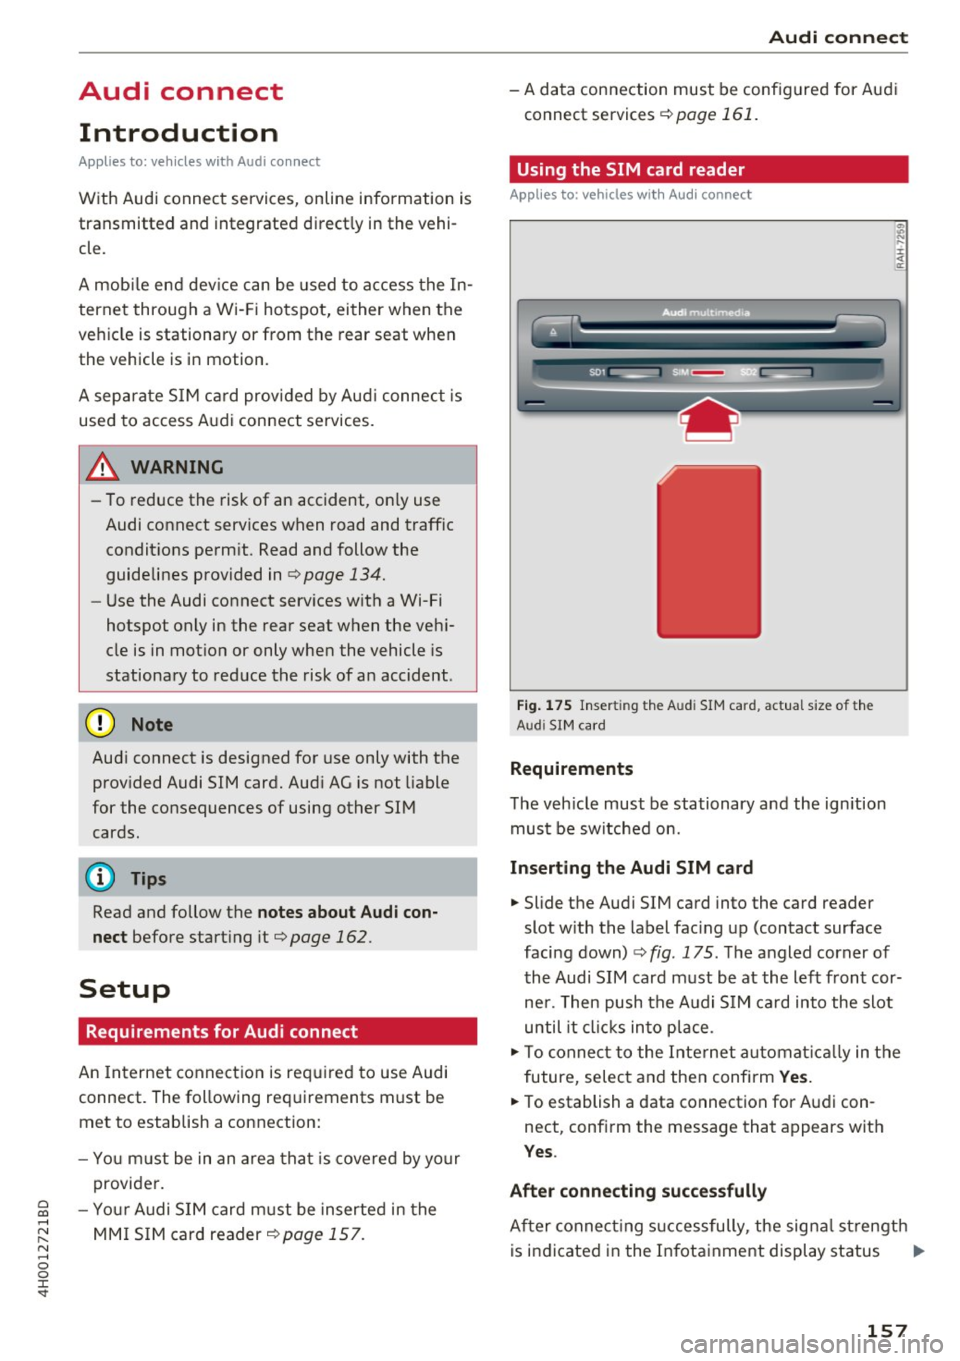
Using the SIM card reader
Applies to: vehicles with Audi connect
Fig . 1 7S Inser ting the A udi SIM ca rd, actual s ize of the
A ud i SIM card
Requirem ents
T he veh icle must be stationary and the ign ition
must be switched on.
Inserting th e Audi SIM card
.,. Slide the Audi SIM card into the card reader
slot w ith the label fac ing up (contact surface
facing down) <::;>
fig. 175 . The angled corner of
the Audi SIM card must be at the left front cor ne r. Then push the A udi S IM ca rd into the slot
until it cl icks into place .
.,. To conne ct to the Inte rnet a utoma tica lly in the
future, select and then confirm
Ye s.
.,. To establish a data connection for Audi con
nect, confirm the message that appears wit h
Yes.
Afte r connecting successfully
After connect ing s uccessfully , the signa l st rength
is indicated in the In fotainment display status ..,.
157