display AUDI A8 2017 Workshop Manual
[x] Cancel search | Manufacturer: AUDI, Model Year: 2017, Model line: A8, Model: AUDI A8 2017Pages: 354, PDF Size: 88.68 MB
Page 122 of 354
Parking systems
Switching on or off
Applies to: ve hicles w ith per ip heral cameras
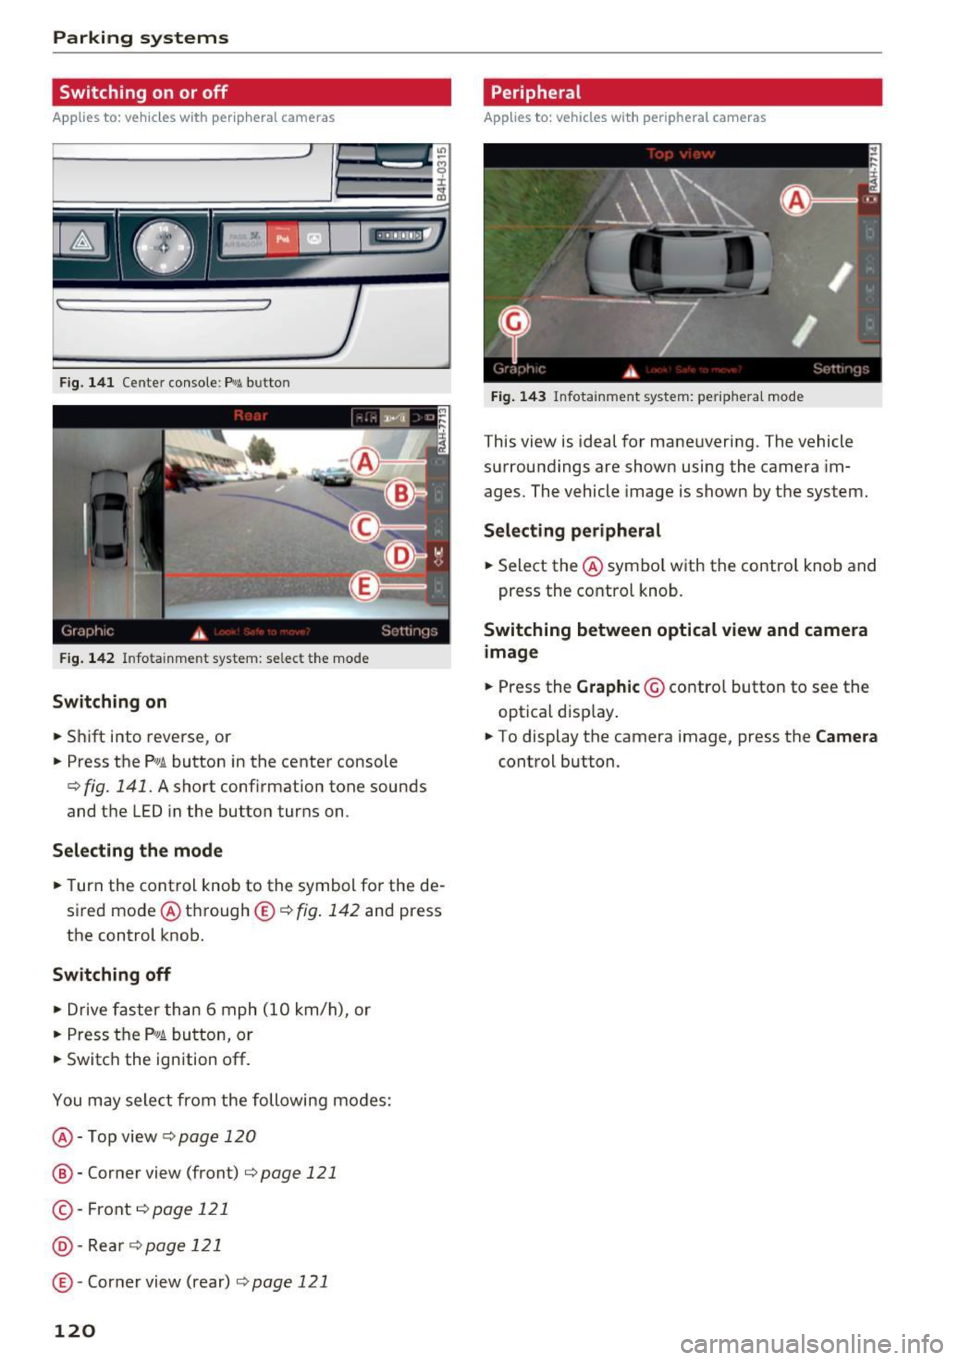
Fig. 141 Center console: Pw.!. button
F ig . 142 Infotainment system: select the mode
Switching on
.. Shift into reverse, or
.. Press the P"'A button in the center console
c> fig. 141. A short confirmation tone sounds
and the LED in the button turns on.
Selecting the mode
.. Turn the cont rol knob to the symbol for the de
sired mode @ through ®¢
fig. 142 and press
the control knob.
Switching off
.. Drive faster than 6 mph (10 km/h), or
.. Press the
P1#~ button, or
.. Switch the ign ition off.
You may select from the following modes:
@ -Top view
c> page 120
® -Corner view (front) c> page 121
© -Front¢ page 121
@-Rea rc> page121
® -Corner view (rear)¢
page 121
120
Peripheral
Applies to : vehicles wit h per ipheral cameras
Fig. 143 Infota inment system: periphera l mode
This view is ideal for maneuvering. The vehicle
surroundings are shown using the camera im
ages. The vehicle image is shown by the system.
Selecting peripheral
.. Select the@ symbo l with the contro l knob and
press the control knob.
Switching between optical view and camera
image
.. Press the Graphic © control button to see the
optical display .
.. To display the camera image, press the
Camera
control button .
Page 123 of 354
C) C0 ....
"' " "' .... 0 0 :r
Applies to: vehicles with peripheral cameras
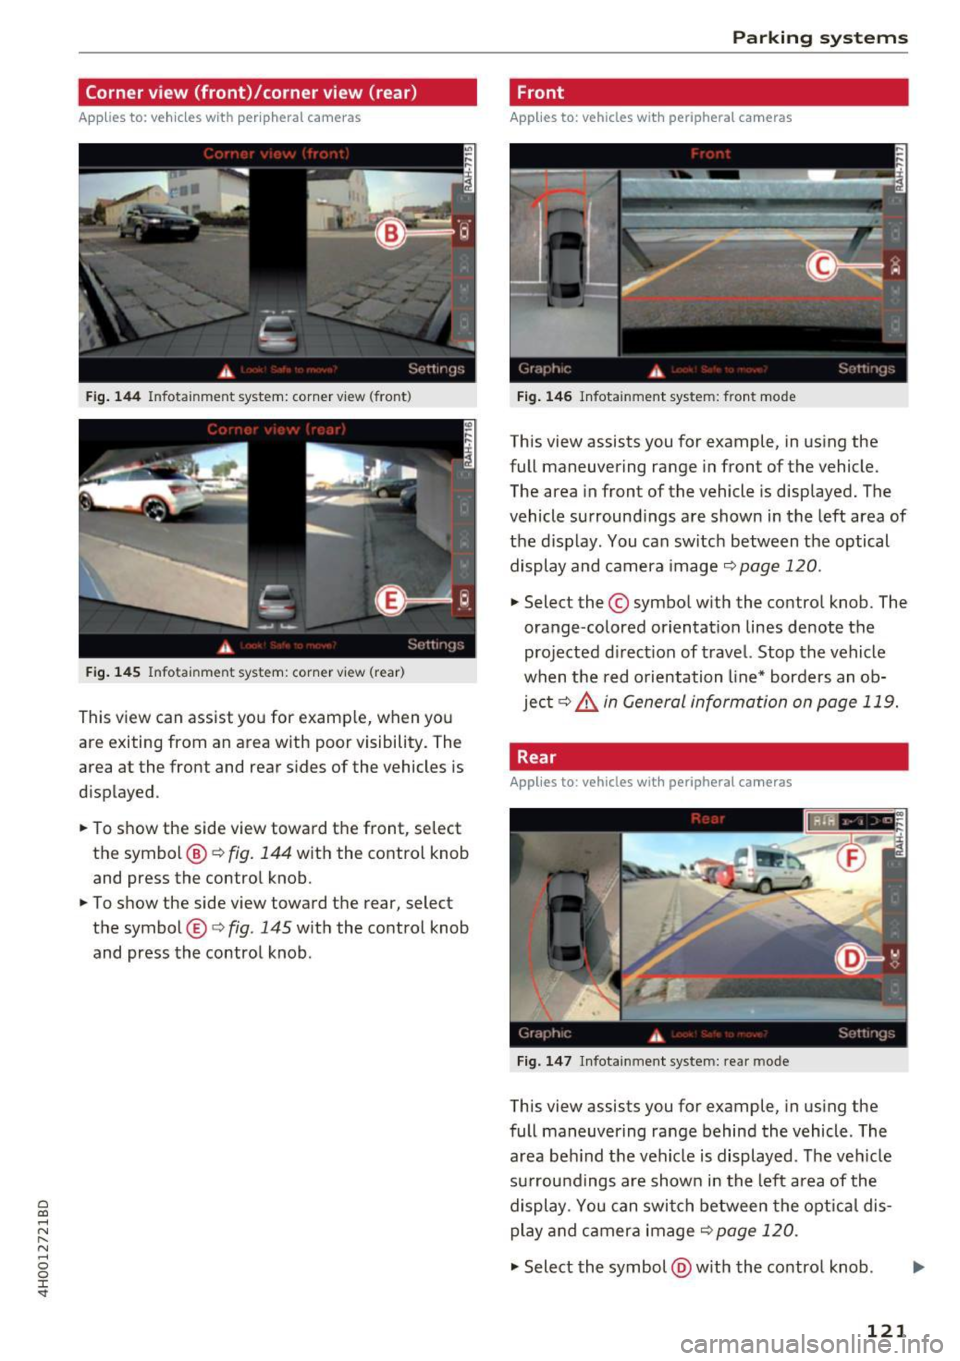
Fig . 144 Infotainment system: corner v iew (front)
Fig . 145 Infotainment system: corner view (rear)
This view can assist you for examp le, when you
are exiting from an area w ith poor visibility. The
area at the front and rear s ides of the vehicles is
displayed .
.. To show the side view toward the front, select
the symbol ®~
fig. 144 with the contro l knob
and press the control knob .
.. To show the side view toward the rear, select
the symbol ®
q fig. 145 with the control knob
and press the control knob .
Parking systems
Front
Applies to: vehicles with peripheral cameras
Fig. 146 Infot ainme nt system: front mode
This view assists you for example, in using the
full maneuvering range in front of the vehicle.
The area in front of the vehicle is displayed. The
vehicle surround ings are shown in the left area of
the display . You can switch between the optical
display and camera image
qpage 120 .
.. Select the © symbol with the control knob. The
orange-colored orientat ion lines denote the
projected direction of travel. Stop the vehicle
when the red o rientation line* borders an ob
jec t
q _&. in General information on page 119.
Rear
Applies to: vehicles with peripheral cameras
Fig. 147 Infotainme nt system: rea r mo de
This view assists you for example, in using the
full maneuvering range behind the vehicle. The
area be hind t he vehicle is displayed. The vehicle
s ur rou ndings are shown in the left area of the
display. You can switch between the optical dis
play and ca mera image
qp age 120.
.. Select the symbol @with the contro l knob . Ill>-
121
Page 125 of 354
.. Turn the Infotainment system on and shift into
reverse gear. The parking system is turned on
and the
Cross park ing view is displayed.
.. Press the control button on the Infotainment
unit @¢
page 118, fig. 138. The Para llel pa rk
ing
view is displayed .
.. Back up and align your vehicle so the blue area
@ borders on the rear end of the vehicle be
hind you or on the parking space line¢.,&.
in
General information on page 119, ¢(Din Gen
eral information on page 119 .
The blue area
rep resents an extension of the vehicle's outline
by approximately 16 ft (5 meters) to the rear .
The long s ide of the blue area should be on the
curb. The entire b lue area must f it into the
parking space .
.. With the vehicle stopped, turn the steering
wheel to the r ight as far as it w ill go .
.. Back into the parking space until the b lue curve
¢
fig . 151 touches the cu rb ¢.,&. in General in
formation on page 119, ¢(Din General infor
mation on page 119.
Stop the vehicle .
.. With the vehicle stopped, turn the steering
whee l to the left as far as it will go.
.. Continue to back into the parking space until
the vehicle is parked parallel to the curb¢
/A
in General information on page 119, ¢(Din
General information on page 119.@
repre
sents the rear bumper . At the very latest, stop
the vehicle when the red o rie ntation line@
bo rders an object . Keep an eye on the front of
you r vehicle while doing this.
Parking next to obstacles
If there is an obstacle (such as a wall) next to the
parking space, pos ition the vehicle so t here is
mo re space on that side. Position the long s ide of
the blue area so that there is s ufficient space
from the obje ct. The area must not be on the ob
stacle . You will also need to start tu rning the
steering whee l earlier. The blue curve
¢
page 118, fig . 139 must n ot touch the obsta
cle, but rather there should be enough distance.
@ Tips
C)
~ The left or right orientation lines and surfaces
"' ~ w ill be displayed, depending on the turn sig-
8 na l being used. 0 :r
Trailer mode
Applies to : vehicles wit h peripheral cameras a nd tra iler hitch
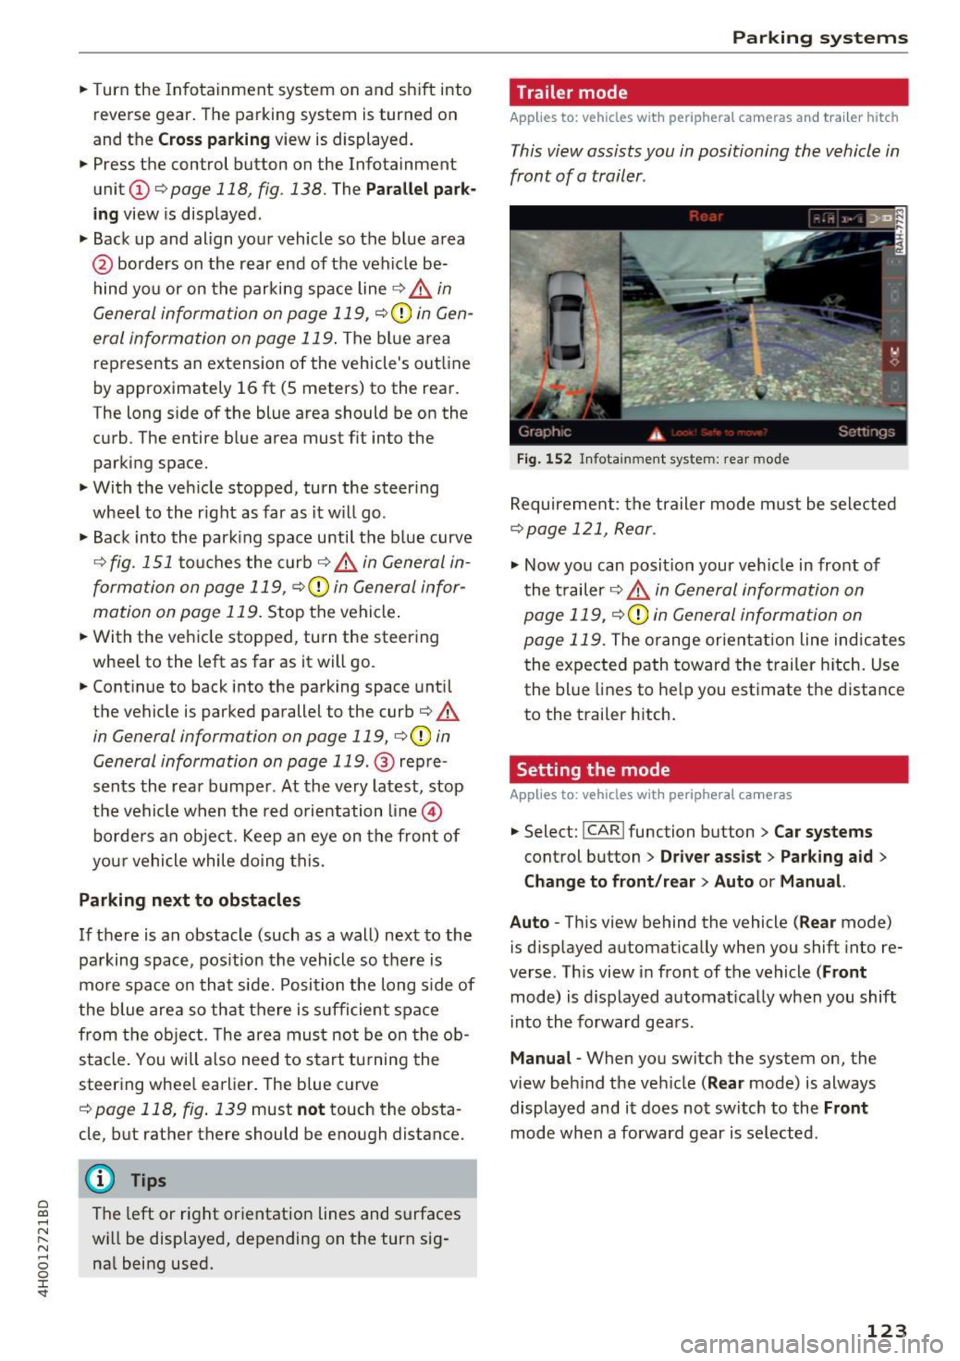
This view assists you in positioning the vehicle in
front of a trailer .
Fig. 15 2 In fotainment system: rear mo de
Requirement: the trailer mode m ust be selected
¢page 121, Rear .
.,. Now yo u can posit ion your ve hicle in front of
the t railer
¢ .,&. in General information on
page 119,
¢ (Din General information on
page 119.
The orange orient ation line indicates
the expected path toward the trailer h itch. Use
the blue lines to help you est imate the distance
to the trailer hitch.
Setting the mode
Applies to : vehicles wit h peripheral ca meras
.,. Select: !CAR ! function button> Car systems
control button > Driver assi st > Pa rking aid >
Change to front /re ar > Auto or Manual.
Auto -
This view behind the vehicle (Rear mode)
is d isplayed automat ically when you shift into re
verse. Th is view in front of the vehicle
( Front
mode) is d isplayed automat ica lly when you shift
i n to the forward gea rs.
Manu al -When you switch the system on, the
view beh ind the ve hicle
(Rear mode) is always
displayed and it does not switch to the
Front
mode when a forward gear is se lected .
123
Page 126 of 354

Parking systems
Adjusting the display
and the warning tones
Applies to: vehicl es with parking system plus/rearview cam
era/per ipheral came ra
The display and warning tones can be adjusted in
the Infotainment.
~ Select: the ICARI function button > Car systems
control button > Driver assist > Parking aid.
Display
On* -
An optical display is shown for the parking
system plus, a rearview camera image is shown
for the rearview camera*.
Off -When the parking system is switched off,
only audib le signals are given.
Signal tones
Front volume -
volume for the front area
Rear volume -volume for the rear area
Front frequency -frequency for the front area
Rear frequency -frequency for the rear area
Entertainment volume -when the parking sys
tem is turned on, the volume of the audio/video
source is lowered.
The new ly selected level is demonstrated briefly
by the sound generator.
{!) Tips
- The warning tones can also be adjusted di
rectly by the v isual disp lay or the picture
from the camera. Simply press the
Settings
contro l button .
- Changed settings are act ivated when the
parking system is switched on aga in.
- The settings for volume and frequency are automat ically saved and assigned to the re
mote control key being used.
Error messages
Applies to: ve hicles w ith parking system plus/rearview cam
era/peripheral came ra
There is an error in the system if the LED in the
P,YA button is blinking and you hear a continuous
alarm for a few seconds after switching on the
124
parking system or when the pa rking system is al
ready activated . If the error is not corrected be
fore you switch off the ignition, the LED in the
P wA
button will blink the next time you switch on the
parking system by shifting into reverse.
Parking system plus*
If a sensor is faulty, the~ symbol will appear in
front of/behind the vehicle in the Infotainment display. If a rear sensor is faulty, on ly obstacles
that are in areas @and @ are displayed
c>page 115, fig . 130. If a front sensor is faulty,
only obstacles that are in areas © and @are dis
played. There is a lso a system malfunction if all
segments around the vehicle are red or if no seg
ments are disp layed.
Peripheral cameras*
There is a system malfunc tion if the ~· symbol
appears and the corresponding display area is
shown in blue. The camera is not working in this
a rea.
Drive to an authorized Audi dealer or authorized
Audi Service Facility immediately to have the
malfunction corrected .
Trailer hitch
Applies to: vehicles with parking system plus/rearv iew cam
era/peripheral cameras and t ra iler hitc h
For vehicles using the trailer socket, the parking
system rear sensors are not activated when you
shift into reverse gear or when you press the P
1
1.A
button . This results in the following restrictions .
Parking system plus*
There is no distance warning for the rear. The
front sensors remain activated. The visual display
switches to trailer mode.
Rearview camera* /Peripheral cameras*
There is no distance warning for the rear. The
front senso rs remain activated . The visua l display
switches to trailer mode . The rearview camera
image will not show the orientation lines and the
blue surfaces .
Ill-
Page 132 of 354

Intelligent Technology
The stee ring wheel will be easy to move after
starting the engine . Re-initialization might be
necessary if the steering whee l was moved hard
t o the lef t and right wh ile the vehicle was not
mov ing. The display turns off if the initialization
was successful.
(D Tips
- If the. or
1;:r- ij ind icator light only stays on
for a short time, you may continue driving.
- The dynamic steering stability systems
c> page 126 are not available in the event of
a system ma lfunction.
- For additional informat ion on dynamic
steering, refer to
c> page 110.
All wheel drive (quattro)
In all wheel drive, all four wheels are powered .
General information
In a ll wheel drive, the driving power is divided be
tween a ll four wheels . T his happens automatical
ly depending on your driving behavior as well as
t he current road cond itions. Also see
c> page 126, Electronic Stabilization Control
(ESC) .
With the sport differential*, power distri
bution to the rear whee ls is variable and can be
ad ju sted using the dr ive select
c> page 110.
The all wheel drive concept is designed for h igh
eng ine power. Your ve hicle is exceptionally pow
erful and has excellent driving characterist ics
both under norma l dr iv ing condit ions and on
snow a nd ice. Always read and fo llow safety pre
cautions
c> .&. .
Winter tires
By us ing all w heel d rive , yo ur vehicle has good
forward mot ion w ith standa rd t ires in winter con
d itions . However, in winter we recommend us ing
w in ter o r all season t ires o n all fo ur wheels, be
cause this will improve the b raking effect .
Snow chains
If there are snow chai n laws, snow chains must
a lso be used on vehicles with all w heel d rive
c> page 298, Snow chains .
130 Replacing tires
Fo
r vehicles wi th a ll wheel d rive, o nly wheels with
the same ro ll ing circ umfe rence sho uld be used .
Avo id using tires with different tread depths
c> page 290, New tires or wheels .
Offroad vehicle?
You r A udi is not an off road vehicle -there is not
enough ground clearance. For th is reason, avoid
difficult terrain .
A WARNING
- Also, in ve hicles with all wheel drive, adapt
your driving sty le to the current road and
traffic conditions. Do not let the increased
safety provided tempt you into taking r isks,
because this increases the risk of an acc i
dent.
- The braking ab ility of your vehicle is limited
to the traction of the wheels . In this way, it
is not different from a two wheel d rive vehi
cle. Do not be tempted to accelerate to a high speed when the road is s lippery, be
c a use th is i ncreases the r is k of an accident.
- Note that on wet st reets, the front wheels
c a n " hydroplane " if driv ing at speed s tha t
are too high. Unlike front wheel drive
vehicles, t he engine does not rev higher sud
de nly when the vehicle begins hydroplan ing.
For this reason, adapt yo ur speed to the
road conditions to reduce the risk of an acci
dent.
Energy management
The starting ability is optimized
The energy management system manages the
electrical energy distribution and optimizes the
availability of electrical energy for starting the
engine.
When a vehicle with a conventiona l energy sys
tem is no t drive n for a long t ime, the veh icle bat
te ry is drained by equ ipment (fo r example, the
i mmob ilizer). In certa in circ umstances, there
could may not be enough energy to start the en
gine.
Page 133 of 354
0 co .... N ,..... N .... 0 0 :c '
gy management system for distributing electrici
ty. This s ignif icantly improves the starting abi lity
and increases the vehicle battery life.
The energy management system Is made up of
batt ery diagno sis , idling current management ,
and dynam ic energ y man agement.
Battery diagnosis
The batte ry diagnosis de termines the vehicle bat
tery charge level. The sensors determ ine the bat
tery voltage, the battery current, and the battery
temperature. The current charge level and the performance of the vehicle battery are deter
mined based on th is.
Idling curr ent manag ement
The idling current management decreases the
energy used whi le parked . With the engine
switched off, it manages the energy distribution
to the different electrical components. Data from
the battery diagnosis is taken into account for
this .
Depending on the vehicle battery charge level,
e lectrical equipment is sw itched off one item af
ter the other to prevent the vehicle battery from
draining and to maintain the starting ability .
Dynamic en erg y manag ement
While driving, dynamic energy management dis
tr ibutes the appropriate amount of energy to the
e lectrical equipment. It controls the battery
charge level so that the amount of energy is not
greater than the amount being generated in or
der to ma inta in an optimal veh icle battery charge
l evel.
(D Tips
- Energy management cannot overcome the
laws of physics . Note that the charge level
and length of the vehicle battery life a re
limited .
- When the start ing ability is endangered, the
(•) indicator light turns on
9 page 21.
Intellig ent Technology
What you should know
Maintaining the starting ability is the highest
priority .
A lot of stress is placed on the veh icle battery
when driving short distances, during city driving, and at cold times of the year . A lot of energy is
used but little is generated. It is also critical
whe n the eng ine is not r unni ng but elect rical
equipmen t is switched on . In this case, energy is
u sed but none is generated.
In situat ions like th is, energy management w ill
active ly regulate the distrib ution of energy.
Long period s without use
If you do not drive your vehicle for severa l days or
weeks, electrical equ ipment is gradually scaled
back or sw itched off. This reduces energy use and
ensures the vehicle will be ab le to start after long
per iods of time. Some conven ience f unctions,
s u ch as interio r lig hting or power seat adjust
ment, may no t be av ailable under certain circum
stances . These conven ience f unctions wi ll be
available again once you sw itch the ignition on
and start the engine.
With the engine switched off
T he veh icle ba tte ry w ill dr ain if you use Info tain
ment functions such as listening to the radio
whi le the engine is switched off.
If the sta rting abili ty is impaired by the energy
u se, the following message will appear in the In
fotainment system display:
Please start the engine , otherwi se the system
will turn off shortl y.
This message indicates that the system will
switch off automatically after 3 m inutes . If you
would like to continue us ing the funct ions, you
must start the engine.
With the engine running
Although e lectr ica l energy is generated while
driv ing, the ve hicle battery can drai n. This can
happen if litt le energy is generated b ut much is
used , and the charge level of the vehicle battery
is not optimal. .,.
131
Page 136 of 354

Multi Media Interface
Multi Media Interface
Traffic safety information
Audi recommends performing certain Infotain
ment system functions, such as entering a desti nation, only when the vehicle is stationary . Al
ways be prepared to stop operat ing the Infotain
ment system in the interest of your safety and
the safety of other road users.
_& WARNING
Only use the Infotainment system when traf
fic cond itions permit and always in a way that
allows you to maintain complete control over
your vehicle.
Introduction
The Multi Media Interface, or MMI for short ,
combines various systems for communication ,
navigation and entertainment in your Audi. You
can operate the MMI using the MMI control pan
el, the multifunction steering wheel or the voice
recognition system*.
F ig. 154 MMI control panel with MMl touch control pad
MMI control panel overview
(D MMI touch control pad . . . . . . . . . 136
@ Buttons for open ing menus
directly . . . . . . . . . . . . . . . . . . . . . . 135
@ On/Off knob . . . . . . . . . . . . . . . . . 134
@ Arrow buttons . . . . . . . . . . . . . . . . 135
® Control buttons . . . . . . . . . . . . . . . 135
@ Control knob . . . . . . . . . . . . . . . . . 135
(J) IBACK!bu tton . . . . . . . . . . . . . . . . 135
134
Switching the MMI on
and off
The MMI switches on and off automatically with
the ignition. It can also be switched on or off
manually .
-Switching on manually : press the On/Off knob
@ briefly
c;, page 134, fig. 154. Or: press the
! MENU ! button or one of the buttons to directly
open the menus @,=;,
page 135, fig . 155.
When the system is switched on, the last menu
that was selected is displayed and the last audio
source that was selected begins play ing .
-Switching off manually: press and hold the
On/Off knob @
c;, page 134, fig. 154 until the
MMI switches off. If the MMI has been switch
ed off manually, it does
not switch on again au
tomatically the next time the ignition is switch
ed on .
The MMI can still be operated for approximately
ten minutes after switching the ignition off. If
you do not press any buttons or the control knob
on the MMI control panel with in this t ime, the
MMI switches off automatically.
(D Tips
-The MMI switches off automatically if the
engine is not running and the vehicle bat
tery is low.
- There may be delays when extending or re
tracting the display.
Adjusting the volume
The volume of an audio source or a system mes
sage (for example, from the voice recognition
system) can be adjusted directly while the sound
is ploying using the On/Off knob.
- Increasing or decreasing the volume: turn the
On/Off knob@¢
page 134, fig. 154 to the
right or left .
-Muting or pausing: press the On/Off knob@
c;, page 134, fig. 154 briefly . Or: turn the On/
Off knob to the left . ..,.
Page 137 of 354
C) C0 ....
"' " "' .... 0 0 :r
@ c:>
page 134, fig. 154 briefly . Or: turn the
On/Off knob to the r ight.
@ Tips
Volumes that are too high or too low are au
tomatically adjusted to a set level when the
MMI is switched on .
Infotainment display
The Infotainment display switches on automati
cally when the MMI folds out . T he MMI folds in
automatically when it is switched off.
Adjusting the Infotainment display brightnes s:
see c:> page 206.
(D Tips
- If the vehicle has a cell phone prep*, the In
fotainment system display will automatical
l y extend whenever there is an incoming
phone cal l.
- Use the
arrow buttons to switch stations,
for example, when listening to the radio, af
ter the disp lay has retracted in.
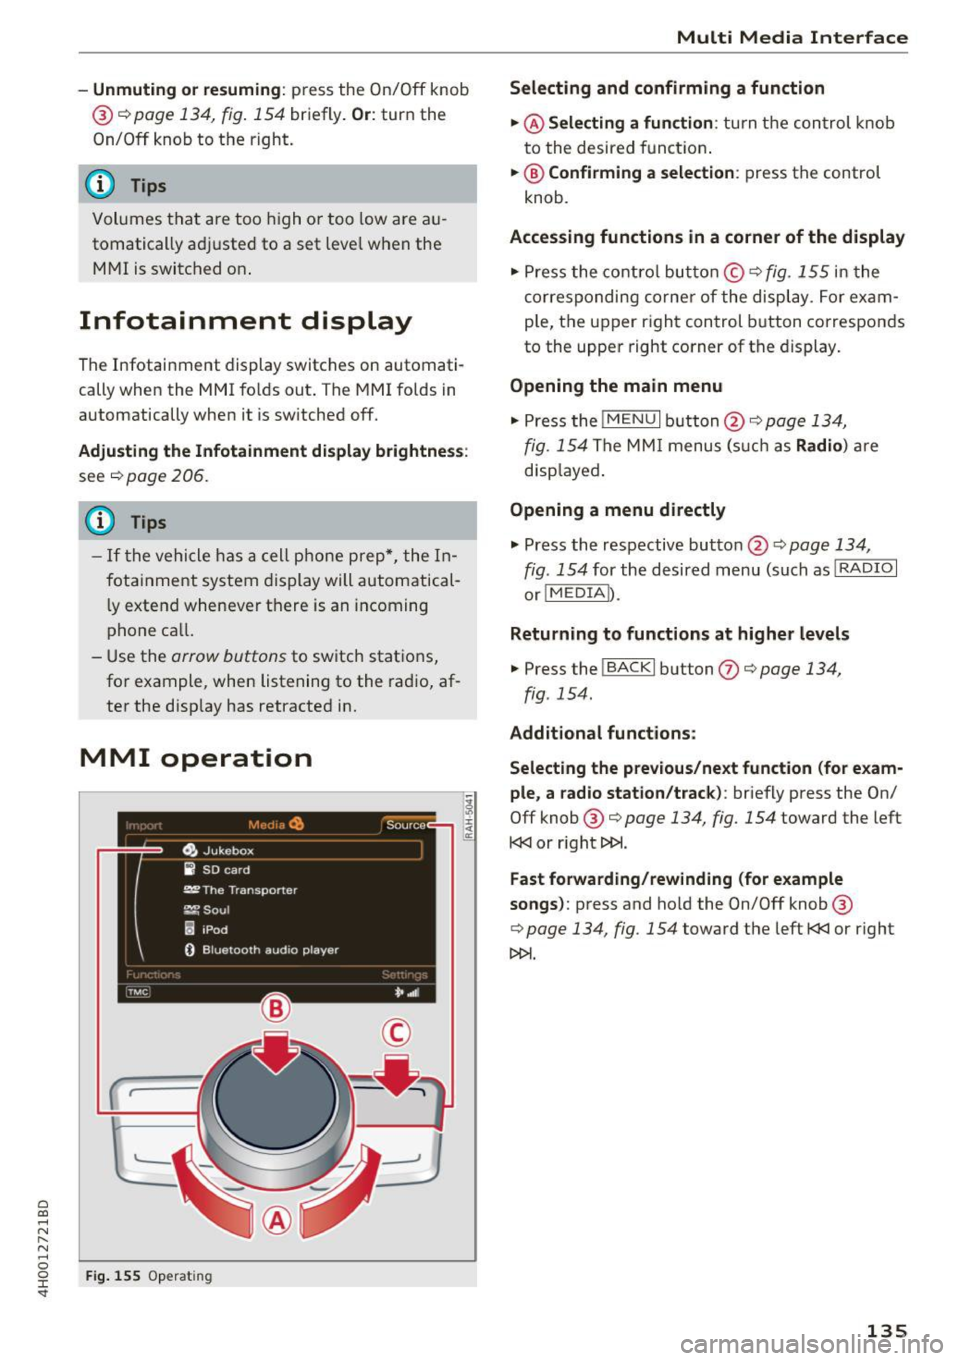
MMI operation
(
'---
Fig. 155 Opera ting
Multi Media Interface
Selecting and confirming a function
.,. @ Selecting a function :
turn the control knob
to the desired funct ion .
.,. @ Confirming a selection: press the control
knob .
Accessing functions in a corner of the display
.,. Press the control button© ~ fig. 155 in the
corresponding corner of the display . For exam
ple, the upper right control button corresponds
to the upper right corner of the display.
Opening the main menu
.,. Press the !M ENU I button @c:> page 134,
fig. 154 The MMI menus (such as Radio ) are
disp layed .
Opening a menu directly
.,. Press the respective button @¢ page 134,
fig. 154 for the desired menu (such as l RADIO I
or! MEDIA I).
Returning to functions at higher levels
.,. Press the !BACKI button (J) c:> page 134,
fig . 154 .
Additional functions :
Selecting the previous/next function (for exam
ple , a radio station/track) :
briefly press the On/
Off knob @ c:>
page 134, fig. 154 toward the left
l
Fast forwarding/rewinding (for example
songs):
press and ho ld the On/Off knob @
c:>
page 134, fig . 154 toward the left l
135
Page 138 of 354
Multi Media Interface
MMI touch
Applies to: vehicles with MMI touch cont rol pad
The MMI touch allows you to enter data on the
MMI touch control pod using handwriting recog
ni tion.
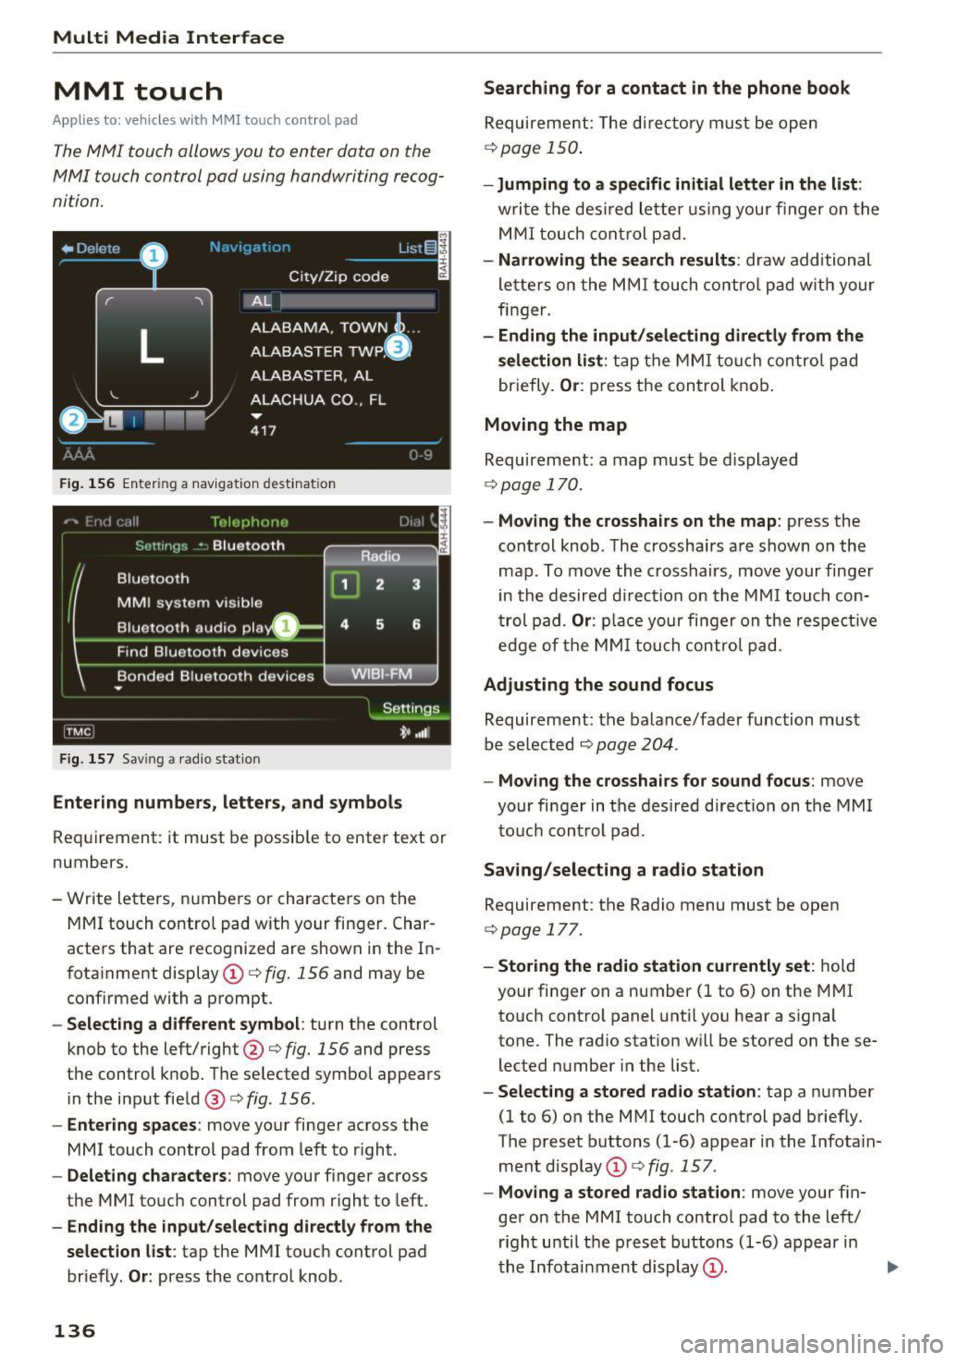
F ig. 1 56 Ente rin g a nav iga tion dest inat ion
F ig . 15 7 Sav ing a rad io st atio n
Entering number s, letters , and symbol s
Requirement: it must b e possib le to enter text or
numbers.
- Write lette rs, numbers or characters on t he
MM I touch contro l pad with your finger. Char
acters that are recog nized are shown i n the In
fotainment display © c:>
fig. 156 and may be
confirmed with a prompt .
-Selecting a different symbol : turn the control
knob to the left/right@c:>
fig. 156 and press
the control knob. T he se lected symbol appear s
in the input fie ld @ c:>
fig. 156 .
-Entering spaces : move your finger ac ross the
MMI touch control pad from left to r ight.
- Delet ing characters : move your finger across
the MMI touc h control pad from r ight to left.
- Ending the input /selecting directly from the
selection list :
tap the MMI touch control pad
briefly.
O r: press the control knob .
136
Searching for a contact in the phone book
Requirement: The di re ctory must be open
c:> poge 150.
-Jumping to a specifi c initial letter in the list :
writ e the des ired lette r using your finger on t he
M MI touch cont rol p ad.
- Narrowing the se a rch result s: draw additional
le tte rs o n the MMI touch co ntro l p ad w it h your
finger.
- Ending the input/selecting directly from the
selection list :
tap the MM I touch control pad
briefly.
Or : press t he control knob .
Moving the map
Requirement: a map must be displayed
c:>
page 1 70.
- Moving the cro sshairs on the map: press the
cont rol knob . T he crossha irs are shown on the
map . To move the crosshairs, move your finger
in the desired d irection on the MM I touch con
t rol pad .
Or : place your fi nger on the respe ct ive
edge of the MM I tou ch control pa d.
Adjusting the sound focus
Requireme nt: the balance/fader function must
be se lected c:>
page 204 .
-Moving the crossha irs for sound focus : move
your finger in the desired d irect ion on the MM I
to uc h control pad .
Saving /selecting a rad io st a tion
Requirement: the Radio menu must be open
c:>
page 177.
- Storing the radio station currently set : hold
your fi nger on a number (1 to 6) on the MMI
to uch control panel unti l you hear a s ignal
tone. The rad io stat ion w ill be stored on these
lected number in the list.
- Select ing a stored radio station : tap a number
(1 to 6) on the M MI touch control pad briefly.
The preset buttons (1-6) appear in the Infota in
ment disp lay © c:>
fig . 157 .
-Moving a stored radio station : move your fin
ger on the MMI touch contro l pad to the left/
r ight unti l th e p reset buttons (1-6) appear i n
the Infota inment display
(D . ..,.
Page 139 of 354
C) C0 ....
"' " "' .... 0 0 :r
Req uirement: the Media menu must be open and
a so urce must be selected
<:}page 189 .
-Browsing through album cover s: move you r
finger across the MMI touch control pad from
left to right .
Or: place your fi nger on the re
spective
arrow edge of the MMI touch control
pad .
-Selecting an album cover: tap the MMI touch
contro l pad briefly.
Using the DVD main menu
Requirement : a DVD must be play ing
<:} page 181.
Letter/number speller
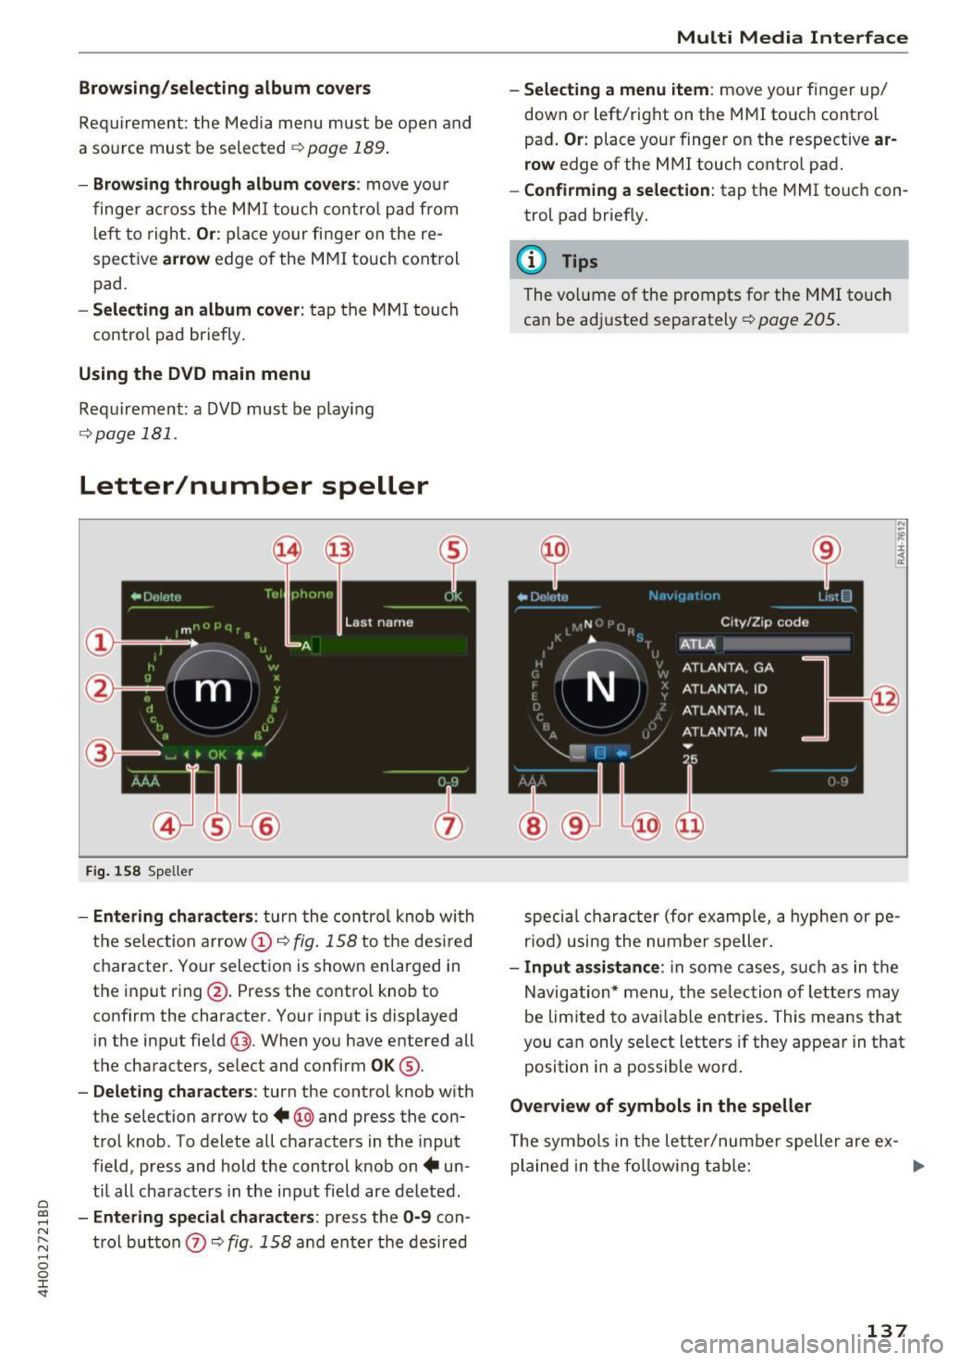
Fig. 158 Speller
-Entering characters: turn the control knob wi th
the selection arrow@<>
fig. 158 to the desired
character. Your selection is shown enlarged in
the input ring@. Press the contro l knob to
confirm the character. Your input is displayed
in the input field @ . When you have entered all
the characters, select and confirm
OK @.
-Deleting characters: turn the control knob with
the selection arrow to +@ and press the con
trol knob . To delete all characters in the input
field, press and hold the control knob on+ un
t il all characters in the input field are deleted.
-Entering special characters: press the 0-9 con
trol button
(i) I::} fig . 158 and enter the desired
Multi Media Interface
- Selecting a menu item :
move your finger up/
down or left/right on the MMI touch control
pad .
Or: place your finger on the respective ar
row
edge of the MMI touch control pad.
- Confirming a selection: tap the MMI touch con
trol pad briefly.
(D Tips
The volume of the prompts for the MMI touch
ca n be adjusted separately
c::> page 205.
special character (for example, a hyphen or pe
r iod ) using the number speller.
-Input assistance : in some cases, such as in the
Navigation* menu, the selection of letters may
be limited to avai lable entries. This means that
you can only select letters if they appear in that
position in a possible word .
Overview of symbols in the speller
The symbo ls in the letter/number speller are ex-
plained in the follow ing table:
1111>
137