navigation AUDI A8 2018 User Guide
[x] Cancel search | Manufacturer: AUDI, Model Year: 2018, Model line: A8, Model: AUDI A8 2018Pages: 356, PDF Size: 54.71 MB
Page 147 of 356
u. co .... N
" N .... 0 0 :c '
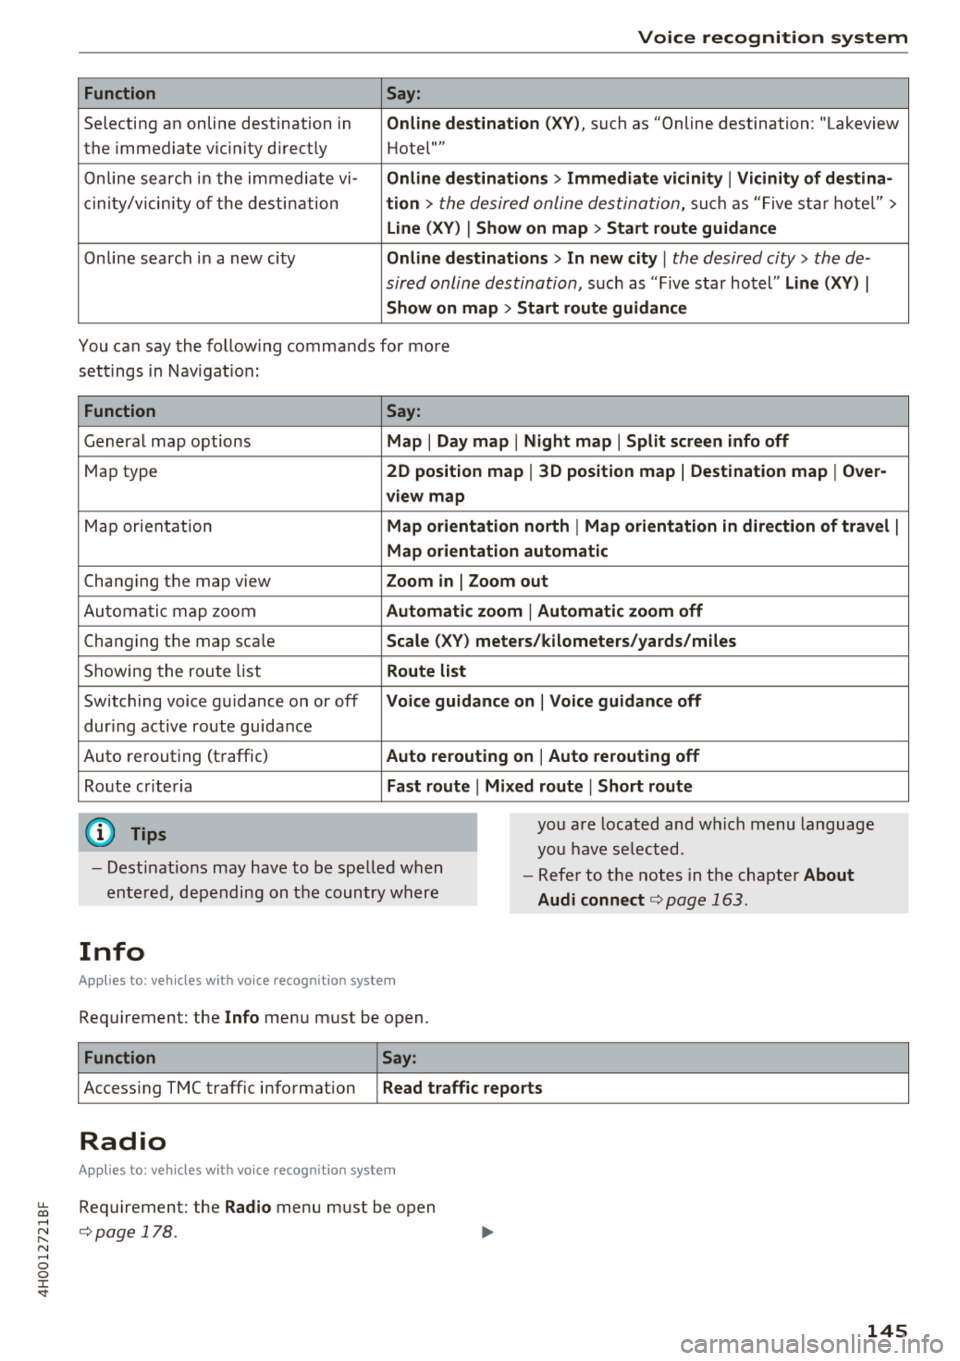
Function Say:
Selecting an online destination in Online destination (XV) , such as "Online destination: "Lakeview
the immediate v ic ini ty direct ly Hotel'"'
Online search in the immediate vi-
Online dest inations > Immediate vicinity I Vicinity of destina-
cin ity/vic inity of the destination tion > the desired online destination, such as "F ive star hotel">
Line (XV) I Show on map > Start route guidance
Online search in a new city Online dest inations > In new city I the desired city> the de-
sired online destination,
such as "Five star hotel" Line (XV) I
Show on map > Start route guidance
You can say the following commands for more
settings in Navigation:
Function Say:
General map options Map I Day map I Night map I Split screen info off
Map type 2D position map I 3D position map I Destination map I Over-
view map
Map orientation Map orientation north I Map orientation in direction of travel I
Map orientation automatic
Changing the map view Zoom in I Zoom out
Automatic map zoom Automatic zoom I Automatic zoom off
Changing the map scale Scale (XV) meters/kilometers/yards/miles
Showing the route list Route list
Switching voice guidance on or off Voice guidance on I Voice guidance off
during active route guidance
Auto rerouting (traffic)
Auto rerouting on I Auto rerouting off
Route criteria Fast route I Mixed route I Short route
(0 Tips you are located and which menu language
you have selected.
- Destinations may have to be spelled when
entered, depending on the country where
Info
A ppl ies to : ve hicl es w ith vo ice recogni tion sys te m
Requirement: the Info menu must be open.
Function Say:
-Refer to the notes in the chapter About
Audi connect
c::> page 163.
Accessing TMC traffic information Read traffic reports
Radio
Appl ies to : ve hicl es w ith vo ice recogni tion sys te m
Requirement: the Radio menu must be open
c::> page 178.
145
Page 154 of 356
Telephone
Opening the directory
Applies to: vehicles with telephone
After connecting the cell phone, the contacts in
it are automatically imported into the
/\1/\11.
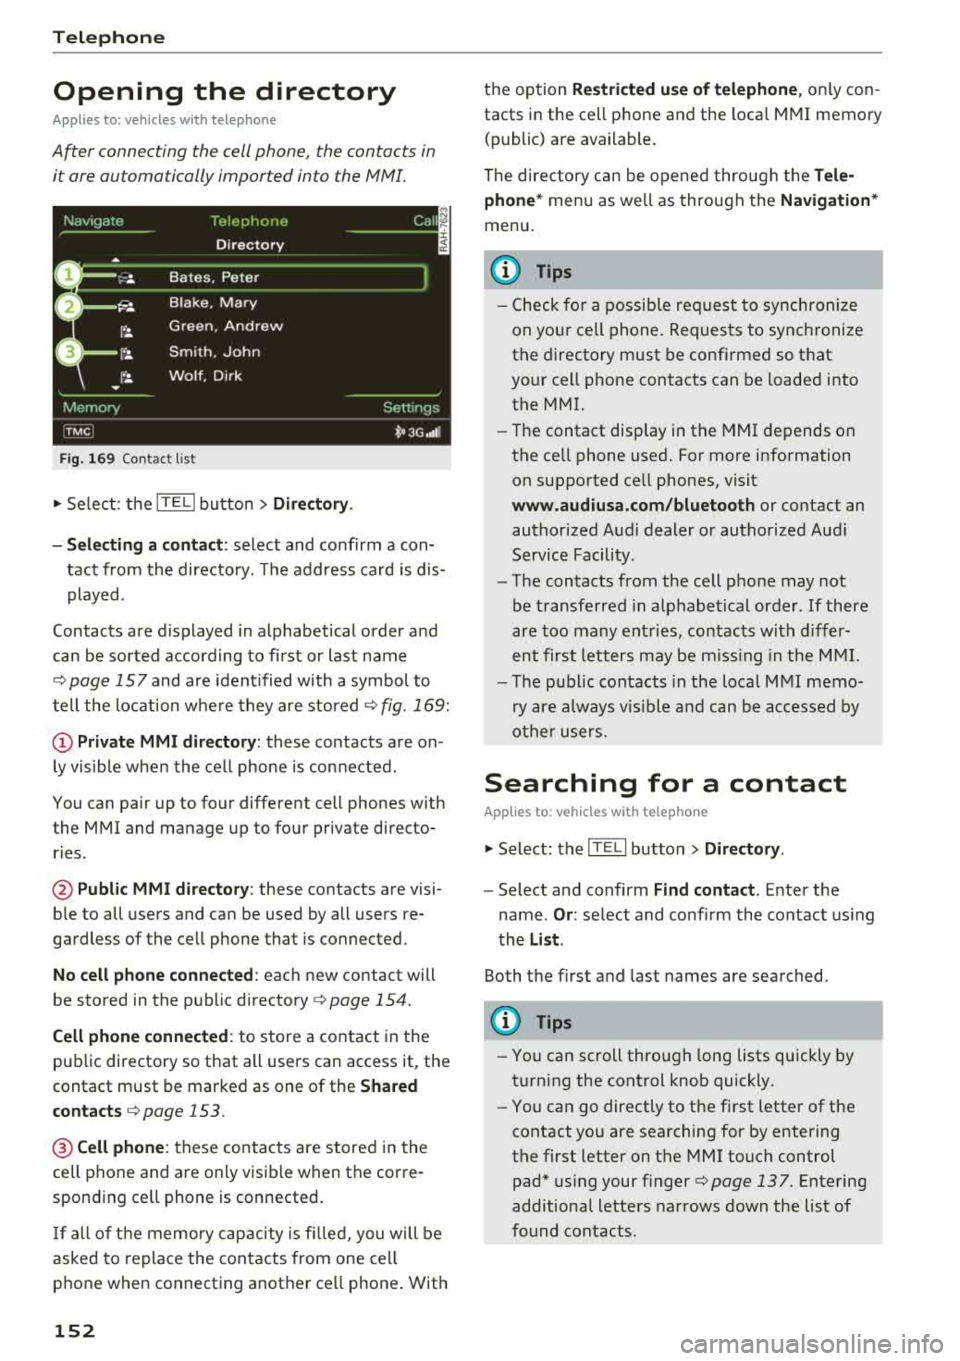
Fig. 169 Contact list
.,. Select: the ITEL! button> Directory .
- Selecting a contact :
select and confirm a con
tact from the directory. The address card is dis
played.
Contacts are displayed in alphabetical order and
can be sorted according to first or last name
¢page 157 and are ident ified with a symbol to
tell the location where they are stored
¢ fig . 169:
(D Private MMI directory: these contacts are on
ly vis ible when the cell phone is connected .
You can pair up to four different cell phones with
the MMI and manage up to four private directo
ries .
@Public MMI directory: these contacts are visi
ble to all users and can be used by all users re
gardless of the cell phone that is connected.
No cell phone connected : each new contact will
be stored in the public
directory ¢ page 154.
Cell phone connected : to store a contact in the
public directory so that all users can access it, the
contact must be marked as one of the
Shared
contacts
¢ page 153 .
@Cellphone : these contacts are stored in the
cell phone and are only visible when the corre
sponding ce ll phone is connected.
If all of the memory capacity is filled, you will be
asked to replace the contacts from one cell
phone when connecting another ce ll phone . With
152
the option Restricted use of telephone , only con
tacts in the cell phone and the loca l MMI memory
(public) are available.
The directory can be opened through the
Tele
phone*
menu as we ll as through the Navigation*
menu.
(D Tips
- Check for a possib le req uest to synch ronize
on your ce ll phone. Requests to synchronize
the directory must be confirmed so that
your cell phone contacts can be loaded into
the MMI.
- Th e contact disp lay in the MMI depends on
the ce ll phone used. For more information
on supported ce ll phones, visit
www.audiusa.com/bluetooth or contact an
authorized Audi dealer or authorized Audi
Service Facility.
- The contacts from the cell phone may not
be transferred in alphabetical order . If there
are too many entries, contacts with differ
ent first letters may be missing in the MMI.
- The publ ic contacts in the local
MMI memo
ry are always vis ible and can be accessed by
other users.
Searching for a contact
Applies to: vehicles with telephone
.,. Select: the ITELI button > Directory .
-Select and confirm Find contact. Enter the
name .
Or: select and conf irm the contact using
the
List .
Both the first and last names are searched.
(D Tips
- You can scroll through long lists quickly by
turning the control knob quickly.
- You can go directly to the first letter of the
contact you are searching for by entering
the first letter on the MMI touch control
pad* using your
finger¢ page 137. Entering
additional letters narrows down the list of
found contacts .
Page 155 of 356
lL t:0 ....
"' ......
"' .... 0 0 :c '
Applies to: veh icles wit h te lephone
Fig. 170 Calling a con tact
Fig. 171 Selec ting a destina tion
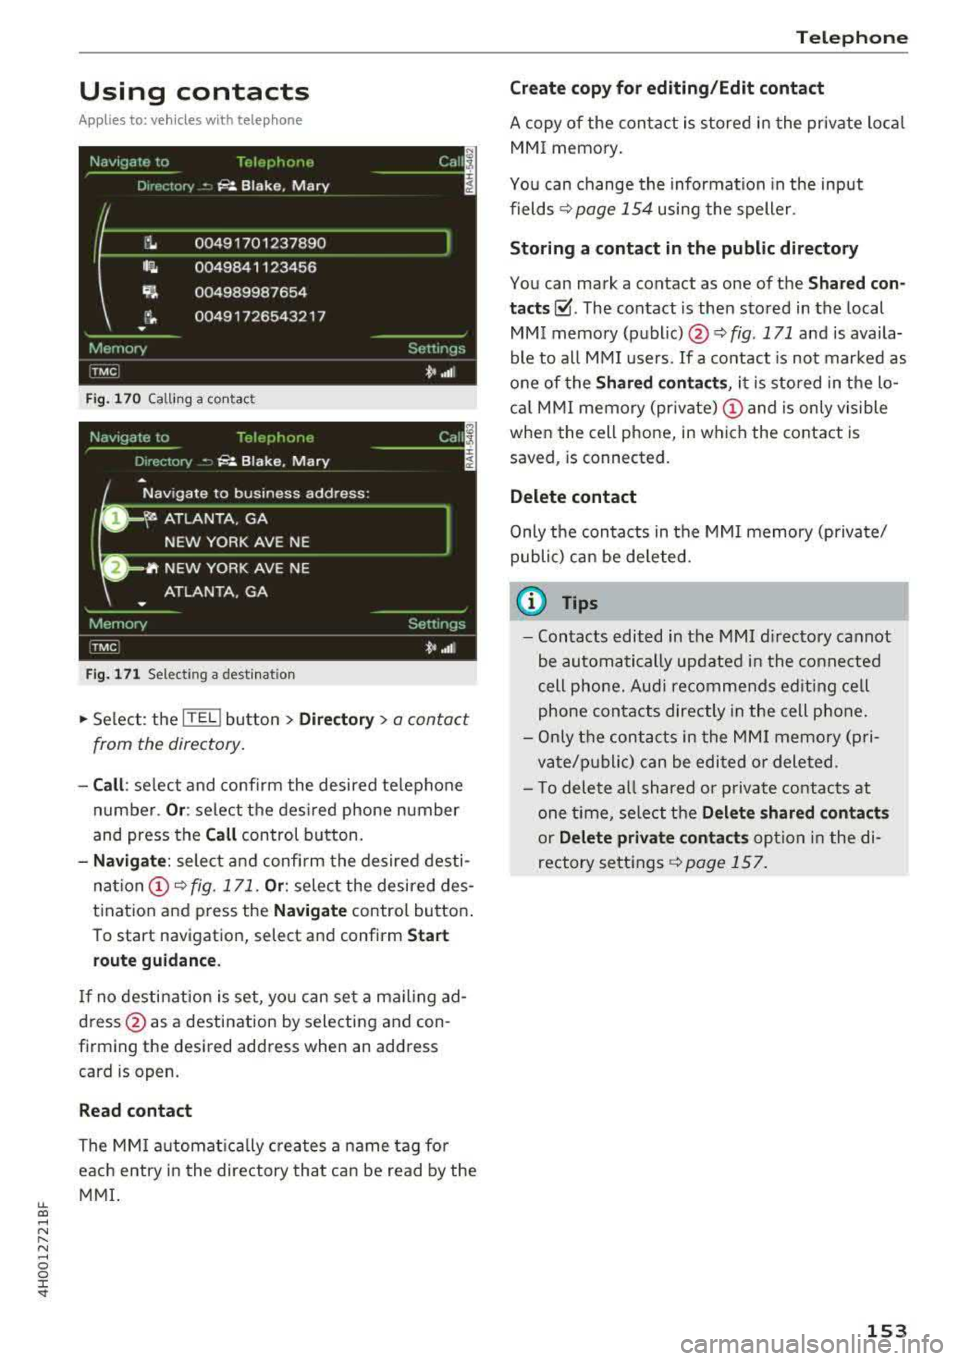
.,. Select : the ITEL ! button > Directory> a contact
from the directory.
- Call : select and confirm the desired telephone
number.
Or : select the desired phone number
and press the
Call control button.
-Navigate: select and confirm the desired desti
nation (!)¢ fig. 171. Or: select the desired des
tination and press the
Navigate control button.
To start navigation, select and confirm
Start
route guidance.
If no destination is set, you can set a mailing ad
dress @as a destination by selecting and con
firming the desired address when an address
card is open.
Read contact
The MMI automatically creates a name tag for
each entry in the directory that can be read by the
MMI.
Telephone
Create copy for editing/Edit contact
A copy of the contact is stored in the private local
MMI memory.
You can change the information in the input
fields
¢ page 154 using the speller.
Storing a contact in the public directory
You can mark a contact as one of the Shared con
tacts~ -The contact is then stored in the local
MMI memory
(public) @¢ fig. 171 and is availa
ble to all MMI users. If a contact is not marked as
one of the
Shared contacts, it is stored in the lo
cal MMI memory (private)
(D and is only visible
when the cell phone, in which the contact is saved, is connected.
Delete contact
Only the contacts in the MMI memory (private/
public) can be deleted.
u) Tips
- Contacts edited in the MMI directory cannot
be automatically updated in the connected
cell phone. Audi recommends editing cell
phone contacts directly in the cell phone .
- Only the contacts in the MMI memory (pri
vate/public) can be edited or deleted .
- To delete all shared or private contacts at
one time, select the
Delete shared contacts
or Delete private contacts option in the di
rectory settings
r::!;> page 157.
153
Page 157 of 356
u. co .... N
" N .... 0 0 :c '
Two navigation des tina tions, Private /Business ,
can be assigned to e ach con tact. Yo u can access
the stored navigation destinations in the
Naviga
tion
menu using the Route guidance control but
ton
c> page 170.
A sto red pr ivate/business m ailing address is a u
tomatically downloaded into the
Address inp ut
fiel d for eac h nav igation destinat io n. You ca n
sto re these eas ily as navigation destinations us
i n g
Set address .
You can find t he next rest sto p, gas stat io n, Aud i
dea le r or hospita l unde r the
Top categories menu
item . The
Point of inte rest men u item contains
addit io nal submenus that yo u can use to c reate
n av igation desti nat ions. For more in fo rmat io n
a bout the submenus, refe r to
c> page 168 .
Business mailing address/Private mailing
address
You can spec ify a busi ness and private address in
a n add ress ca rd . With the
Delete mailing ad
dress
fu nction, you can dele te the busi ness or
pr iva te address .
St ructured addresses from a cell p hone that have
in fo rmation regard ing cou ntry, ZIP code , city a nd
s treet name ca n be impo rted directly in to the di
r ectory.
(0 Tips
- Th e public contac ts in the local MM I memo
r y are always visibl e and can be accessed by
other use rs.
- Th e new con tact w ill be s tored in th e memo
r y in th e di re ctory that is currently b eing
us ed.
- Th e imp orti ng of n ew address es d epends on
th e cell p hone.
- Up to 100 con tac ts can be stor ed in memory
i n a p riva te or p ublic directory.
- Contacts edited in t he MM I dir ectory cannot
b e a utomat ically updat ed in the connect ed
ce ll phone. Audi recommends editing cell
p hone conta cts d irec tly in t he ce ll p hone.
Telephone
Name tags
Applies to: veh icles w ith telephone
The MMI automatically creates a name tag for
each contact in the directory. You can also assign
up to 50 personal name tags for contacts using
th e voice recognition system .
.. Select: the ITELI button >Directory > Settings
cont rol button .
-Playing personal name tags : select and con
firm
Read name tags > contact from the list.
-Deleting name tags : select and confirm Delete
name tags > Delete individually /Delete all
>
Yes .
(D Tips
-You can only ass ign and store pe rsona l
name tags using the vo ice recogn it ion sys
tem.
- You can only delete pe rsonal name tags you
hav e recorded.
Memory capacity
Applies to: veh icles w ith telephone
.. Select: t he ITE LI button >Directory > Memory
cont rol b utton > Memory capacity .
The Memory capacity fo r each directo ry and for
t h e e nti re memo ry is d isp layed .
Yo u ca n ma nage up to 5, 000 co ntact s with the
dire ctory. Yo u can load up to 2 ,00 0 co ntacts
from your cell phone into each private di re ctory .
In ad dition to this, you can store up to 1 00 pri
vate contacts an d up to 100 public contacts into
the MMI memory .
Additional settings
Telephone settings
Applies to: veh icles w ith te lep hone
.. S ele ct: th e ITE LI butt on > Settings co ntrol but -
t on.
~
155
Page 162 of 356
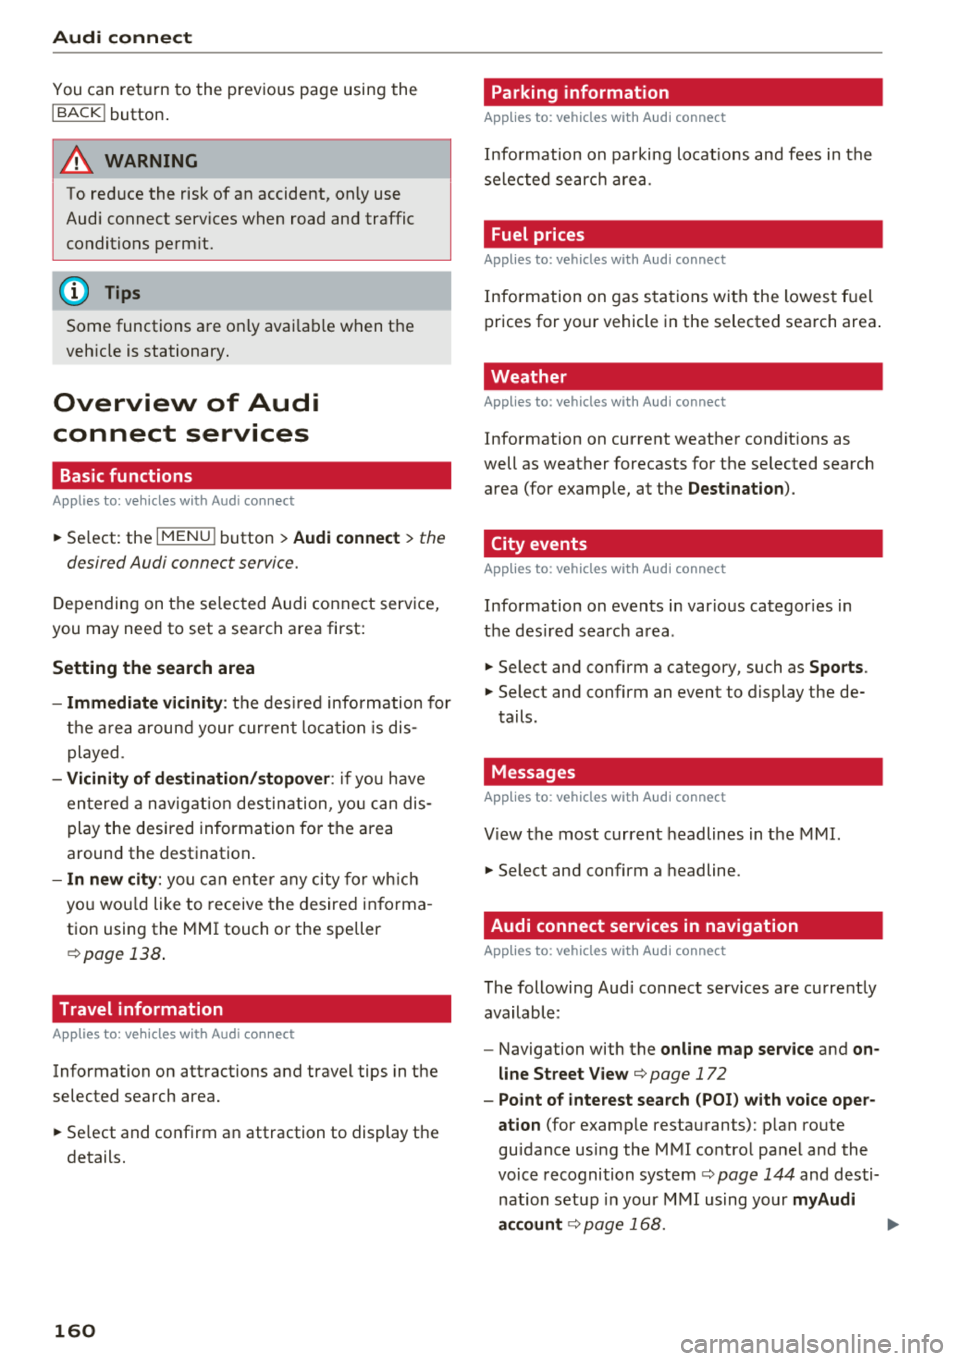
Audi connect
You can return to the previous page using the
I BACK ! button.
A WARNING
To red uce the risk of an accident, only use
Audi connect services when road and traffic
conditions perm it.
(D Tips
Some functions are only avai lab le when the
vehicle is stationary.
Overview of Audi
connect services
Basic functions
Applies to: vehicles with Audi connect
-
~ Se lect: the IMENU ! button> Audi connect > the
desired Audi connect service.
Depending on the selected Audi connect service,
you may need to set a search area first:
Setting the search area
- Immediate vicinity :
the desired information for
the area around your current locat ion is dis
played .
-Vicinity of destination/stopover : if you have
entered a nav igat ion destination, you can dis
play the desired information for the area
around the destination .
-In new city: you can ente r any city for which
you wou ld like to receive the desired informa
tion using the
M MI touch or the speller
¢page 138 .
Travel information
Applies to: vehicles with Audi connect
Information on attractions and travel tips in the
selected search area.
~ Se lect and confirm an attraction to display the
details.
160 Parking information
Applies
to: vehicles with Audi connect
Information on parking locations and fees in the
selected searc h area .
Fuel prices
Applies to: vehicles with Audi connect
Information on gas stations with the lowest fuel
prices for your vehicle in the selected search area .
Weather
Applies to: vehicles with Audi connect
Information on current weather conditions as
well as weather forecasts for the selected search
area (for examp le, at the
Destination ).
City events
Applies to: vehicles with Audi connect
Information on events in various categor ies in
the desired search area .
~ Select and confirm a category, such as Sports.
~ Select and confirm an event to display the de-
tails.
Messages
Applies to: vehicles with Audi connect
V iew the most current headlines in the MMI.
~ Select and confirm a headline.
Audi connect services in navigation
Applies to: vehicles with Audi connect
The following Audi connect serv ices are currently
available:
- Navigation with the
online map service and on
line Street
View ¢ page 172
-Point of interest search (POI) with voice oper
ation
(for examp le restaurants): p lan route
guidance using the
MMI control panel and the
voice recognition system
ca:> page 144 and desti
nation setup in your
MMI using your myAudi
account
¢ page 168. .,..
Page 168 of 356
Navigation
Navigation
Opening navigation
Applies to: vehicles with navigation system
The navigation system directs you to your desti
nation , around traffic incidents and on alterna
tive routes, if desired .
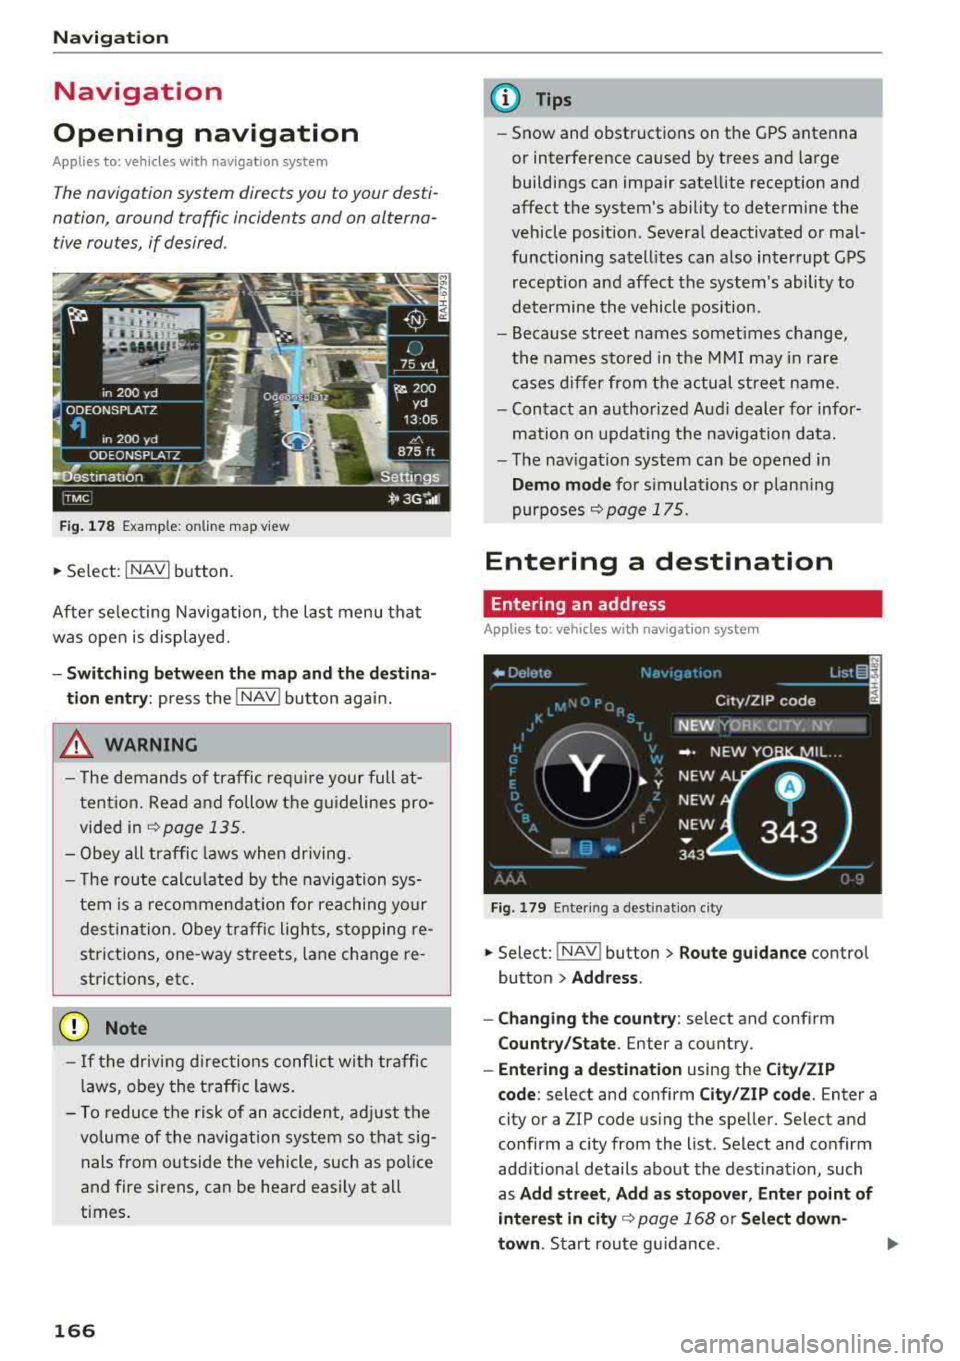
Fig. 178 Example: on lin e map v iew
.. Select : INAVI button.
After selecting Navigation, the last menu that
was ope n is displayed.
- Switching between the map and the destina
t ion entry:
press the !NAV ! button again.
,&. WARNING
-The demands of traffic require your full at
tention. Read and follow the guidelines pro
vided in
i=;,poge 135.
-Obey all traffic laws when driving.
- The route calcu lated by the navigation sys-
tem is a recommendat ion for reaching your
destination. Obey traffic lights, stopping re
strictions, one-way streets , lan e change re
strictions, etc.
@ Note
- If the driving directions conflict with traffic
laws, obey the traffic laws.
- To reduce the risk of an accident, adjust the
volume of the navigation system so that sig
nals from outside the vehicle, such as police
and fire sirens, can be heard easily at all
times.
166
.
@ Tips
- Snow and obstructions on the GPS antenna
or interference caused by trees and large
buildings can impair satellite reception and
affect the system's ability to determine the
vehicle position. Several deactivated or mal
functioning satellites can also interrupt GPS reception and affect the system's ability to
determine the vehicle position .
- Because street names somet imes change,
the names stored in the MMI may in rare
cases differ from the actual street name.
- Contact an authorized Audi dealer for infor
mation on updating the navigation data.
- The navigation system can be opened in
Demo mode for s imulations or plann ing
purposes
re;, page 175.
Entering a destination
Entering an address
Applies to : vehicles with navigat ion system
Fig . 179 En ter ing a destina tion city
.. Select: !NAV ! button > Route guidance contro l
button
> Address .
- Changing the country:
select and conf irm
Country/State . Enter a country .
- Entering a destination using the City/ZIP
code:
select and confirm City/ZIP code. Enter a
city or a ZIP code using the spe ller. Select and
confirm a city from the list. Select and confirm
add itional details about the dest ination, such
as
Add street , Add as stopover, Enter point of
interest in
city re;, page 168 or Select down
town .
Start route guidance.
Page 169 of 356
lL t:0 ....
'"" ......
'"" .... 0 0 :c '
and confirm
Street. Select and confirm a city
from the list. Enter a street . T o enter a street
regardless of the city, turn the contro l knob to
In
all cities and press the control knob . Se lect
and confirm additional details about the desti
nation such as
House number or Intersection.
Start route guidance .
Assistance when entering an address: when en
tering an address, locations that have been en
tered in the past are prov ided as suggestions in
the input field . By press ing the
List control but
ton, you can accept the suggested loca tion as a
destination. Additional cities that match your en
try are listed below. The number of locations
found is also
listed @¢ fig. 179.
When the des ired city is shown in the spe ller in
put field or the list below, you can press and hold
the control knob to switch to the city list.
Destination on the map
You can se lect a new destination from the map
by mov ing the crosshairs horizontally, vertically
or diagonally using the MMI touch
¢ page 137
¢page 167.
Coordinates
Display of the geocoord inates where the cross
hairs are located (latitude and longitude).
Storing in the directory
Individual destinations can be stored d irect ly in
the directory after they are entered. Two naviga
tion destinations,
Private /Business , can be as
signed to each contact .
Navigation
Setting a destination from the map
A pp lies to : vehicles wi th navigat ion syste m
A location on the map can be used as a destina
tion or be entered in the directory.
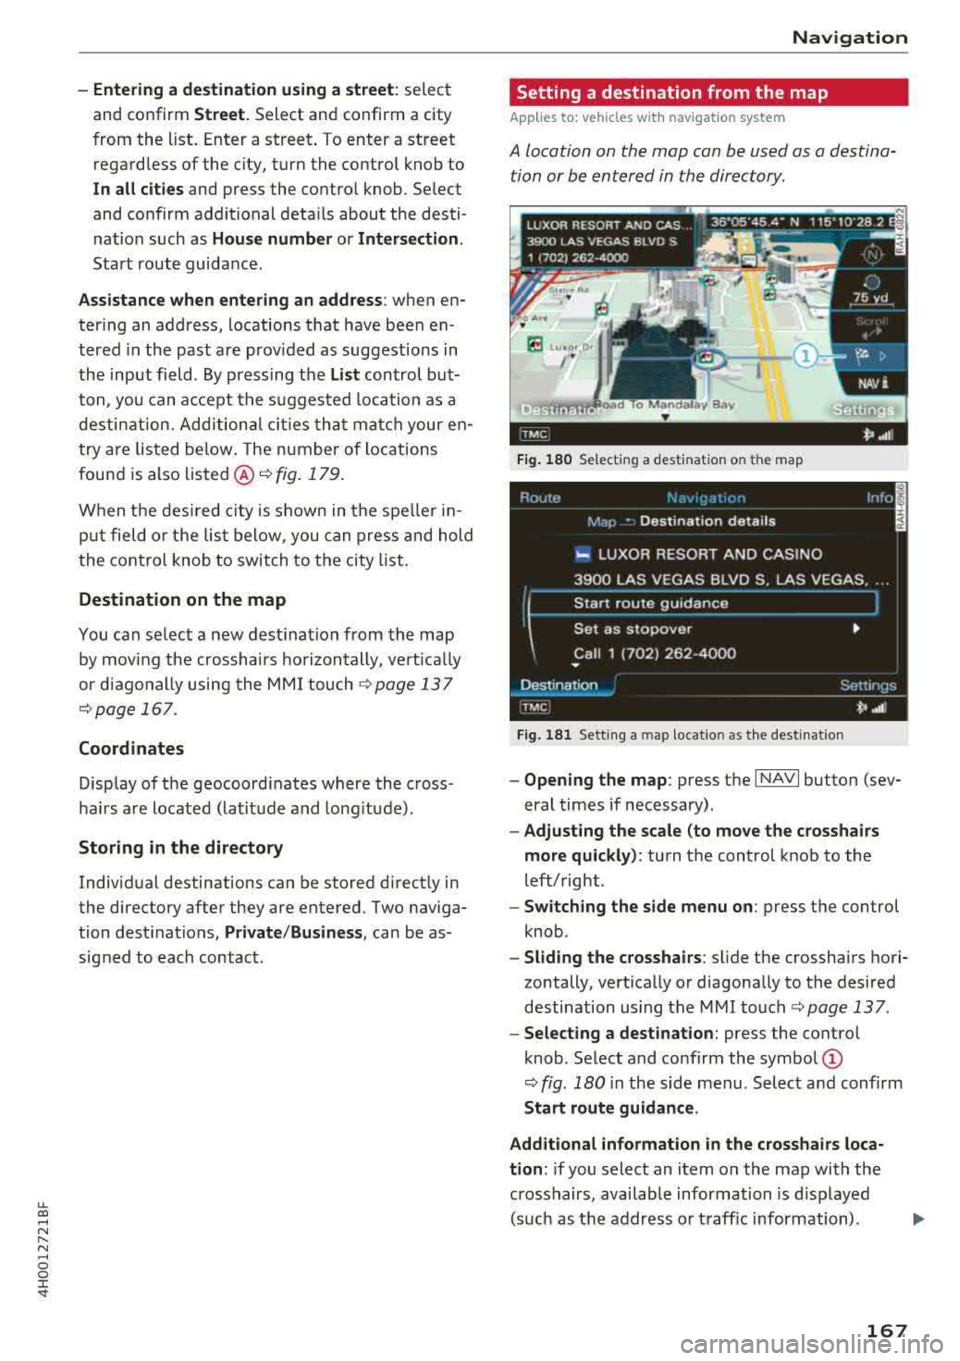
E Lu•o, O,
1·
Fig. 180 Select ing a destination on t he map
Fig . 181 Sett ing a ma p locatio n as the destinat ion
- Opening the map : press the I NAVI button (sev
eral times if necessary).
- Adjusting the scale (to move the crosshairs
more quickly) :
turn the control knob to the
left/right .
-Switching the side menu on : press the control
knob .
-Sliding the crosshairs : slide the crosshairs hori
zontally, vertically or diagonally to the desired
destination using the MMI
touch¢ page 137.
-Selecting a destination: press the control
knob . Select and confirm the
symbol @
¢ fig. 180 in the side menu. Select and confirm
Start route guidance .
Additional information
in the crosshairs loca
tion :
if you select an item on the map with the
crosshairs, available information is d isp layed
(such as the address or traffic information) .
167
Page 171 of 356
u. co .... N
" N .... 0 0 :c '
services must be met¢
page 158.
.,. Select : I NAVI button> Route guidance control
button >
Online destinations.
- Search at location or vicinity of destination/
stopover
1> : select and confirm Search in imme
diate vicinity or Search at destination/stop
over.
Enter a search term, s uch as restaurant,
and confirm the inp ut with
OK. Select and con
firm a point of interest>
Start route guidance.
- Search in new
city l): select and confirm In new
city > Find city.
Enter the name of the city and
confirm the input with
OK . Enter a search term,
such as restaurant, and confirm the input with
OK . Select and confirm a point of interest>
Start route guidance.
- Finding destinations from myAudi account
2>:
select and confirm Find destination from
myAudi account .
Enter the myAudi PIN for
your myAud i account, if necessary . The contacts
stored in the myAudi account a re displayed.
You only need to enter the
myAudi PIN one
time . You will rece ive the
myAudi PIN in yo ur
myAudi account once you have assigned a vehi
cle to the account. Select and confirm a con
tact. Se lect and confirm a private or business
navigation destination >
Start route guidance .
You can display additional information about on
line destinations in the
Destination details menu
¢fig . 182.
(D Tips
- For additional information on the myAudi
account, visit
www .audi.com/myAudi.
- Refer to the notes in the chapter About
Audi connect
¢ page 163.
1> Prov ider at time of printing .
2> Requ irement : yo u must have a m yAudi account set up at
my .audiusa .com. You must have a vehicle stored in your
my Audi accou nt and you must have a destinat io n sto red .
Navigation
Setting a favorite/home address as the
destination
Applies to : vehicles wi th navigat ion syste m
Favorites make it easier to enter a destination
that you use often.
Requirement: a favorite or home address must
be stored ¢
page 173.
.,. Select: !NAV ! button> Route guidance contro l
button >
Favorites.
.,. Select and confirm a favorite or t he home ad-
dress . Start route g uidance .
You can store up to ten ind iv idual desti nat ions
and your
Home address as favorites ¢ page 173.
(D Tips
- You can disp lay, find, ed it and delete your
stored favorites and home address on the
map
¢ page 173.
- Favor ites are displayed on the map at a
scale up to l.S miles (2.S km) .
Loading the last destination
Applies to: vehicles wit h navigat ion system
Your previous destinations are stored automati
cally and can be loaded directly as destinations.
.,. Select: ! NAV ! button> Route guidance contro l
button >
Last destinations .
.,. Select and confirm a previous destination from
the list. Start route guidance .
(D Tips
The list of last destinations can be deleted
¢pag e 175.
169
Page 172 of 356
Nav igatio n
Setting the home address as the
destination
A pplies to: ve hicles w ith navigation system
Start route guidance to the home address you
set simply and quickly .
Requirement: a home address must be stored
Qpoge 173 .
.. Selec t: I NAVI button > Route gu id anc e control
button
> Hom e address .
.. Start route guidance .
Transferring a destination from the
directory
A pplies to: ve hicles w ith naviga tion system
You con navigate directly to destinations in the
directory.
Requirement: the directory must contain con
tacts w ith private/bus iness addresses stored as
destinations.
.. Se le ct: I NAVI button > Ro ut e guidance control
button >
Dir ectory .
.. Select and confirm a contact . If a contact con
ta ins two navigation destinations (private and
business) , se lect and confirm one destination .
Start route guidance.
Entering a destination using geo
coordinates
A pp lies to : ve hicles w ith navigation system
.. Se lect : I NAVI button > Route gu idan ce control
button >
Addr ess > Coordin ates .
.. Select and confirm the Latitude and Long itud e.
Start route guida nce.
170
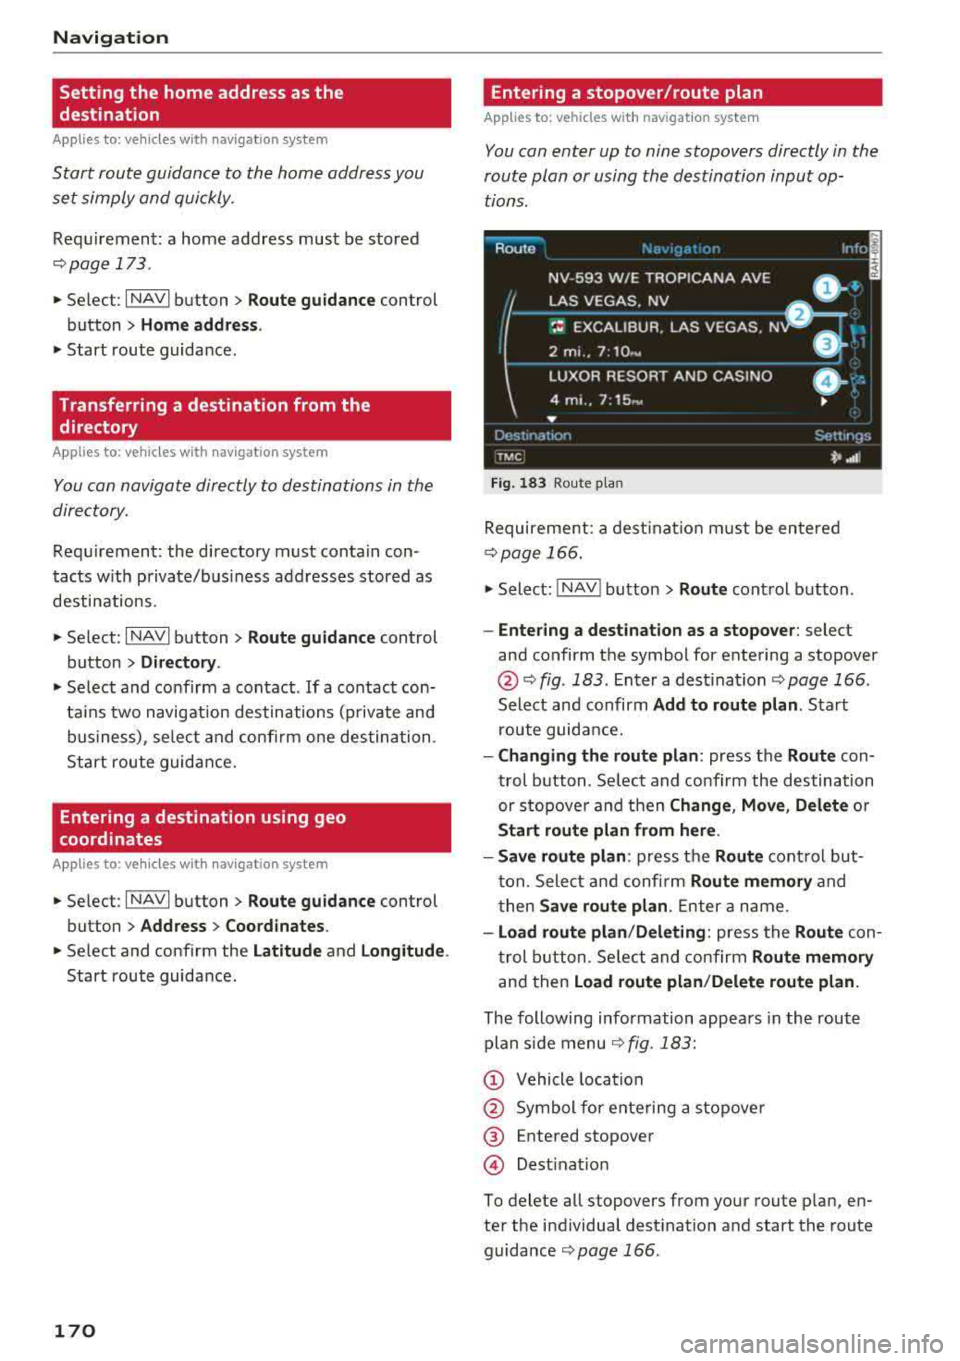
Entering a stopover/route plan
App lies to : vehicles wit h navigat ion system
You con enter up to nine stopovers directly in the
route pion or using the destination input op tions .
Route
NV-593 W/E
::~~;~~ 'NA AVE -ln :o l
LAS VEGAS . NV ,--------- B:i----
~= EXCALIBUR . LAS VEGAS . N D I .
2 mi. , 7:10 .y
LUXOR RESORT AND CASINO • ; ·.
4 mi .. 7 : 15~, •
...
Dest1nat 1or l
TMC
Fi g. 183 Rou te p lan
Sett rr 1ys
*' .• 1
Requirement: a dest inat ion must be entered
¢ page 166.
.. Select: !N A V ! button > Route control button .
-Ente ring a de stination as a s topo ver: select
and confirm the symbol for entering a stopover
@ Q fig. 183 . Enter a dest inat ion Q page 166 .
Select and confirm Add to route plan. Start
route guidance.
- Cha nging the route plan : press the Route con
trol b utton . Se lect and confirm the destination
or s topove r and then
Change , Mo ve, Delete or
Start route plan from here .
- Save route plan :
press the Route control but
t on. Select and confi rm
Route mem ory and
t hen
S ave rout e plan . Enter a name .
-Load route plan /D ele ting : press the Route con
t rol b utton . Se lect and confirm
Route memory
and then Load route pl an/D elete rout e plan.
The following information appea rs in the route
plan s ide menu
¢ fig. 183:
Q) Vehicle location
@ Symbol for ente ring a stopove r
@ Entered stopover
@ Destinat ion
To dele te all stopove rs from your route p lan , en
ter the i ndividual dest ination and start the route
guidance
¢ page 166 .
Page 173 of 356
lL t:0 ,..,
"" ......
"" ,..,
0 0 :c '
guidance
Applies to: ve hicles with navigation system
You can a lso cancel route guidance by enter ing a
new destination
¢ page 166 .
-Starting route guidance when entering a new
destination :
select the I NAVI button > Route
guidance
control button > Enter a des tination
> Start route guidance .
- Restarting/canceling last route guidance :
se
lect the
I NAVI but ton> Route guidance control
button
> Start /Cance l.
The fo llow ing additional functions are ava ilable
when enter ing a new destination:
Display alternative routes: three route s ugges
tions are calcu lated for the destination that is
currently entered. The side menu shows informa
tion about the alternative routes , such as dis
tance to the dest inat ion and the calculated arriv
a l time .
Alternat ive routes can only be calcu lated for indi
vidual destinations .
Enter point of interest in city : allows you to
search for attractions and public places around
the specified locat ion, such as hospitals , mov ie
theaters , recreation areas, etc. The po ints of in
terest can be selected direct ly as a destination.
Select downtown : the navigation system ca lcu
l ates the ro ute to the center of the city or distr ict
that is entered .
Display destination on map : the destination en
tered is disp layed on the map.
1l O nly appl ies to vehicles w ithou t camer a-based speed lim it
d isp lay .
Navigation
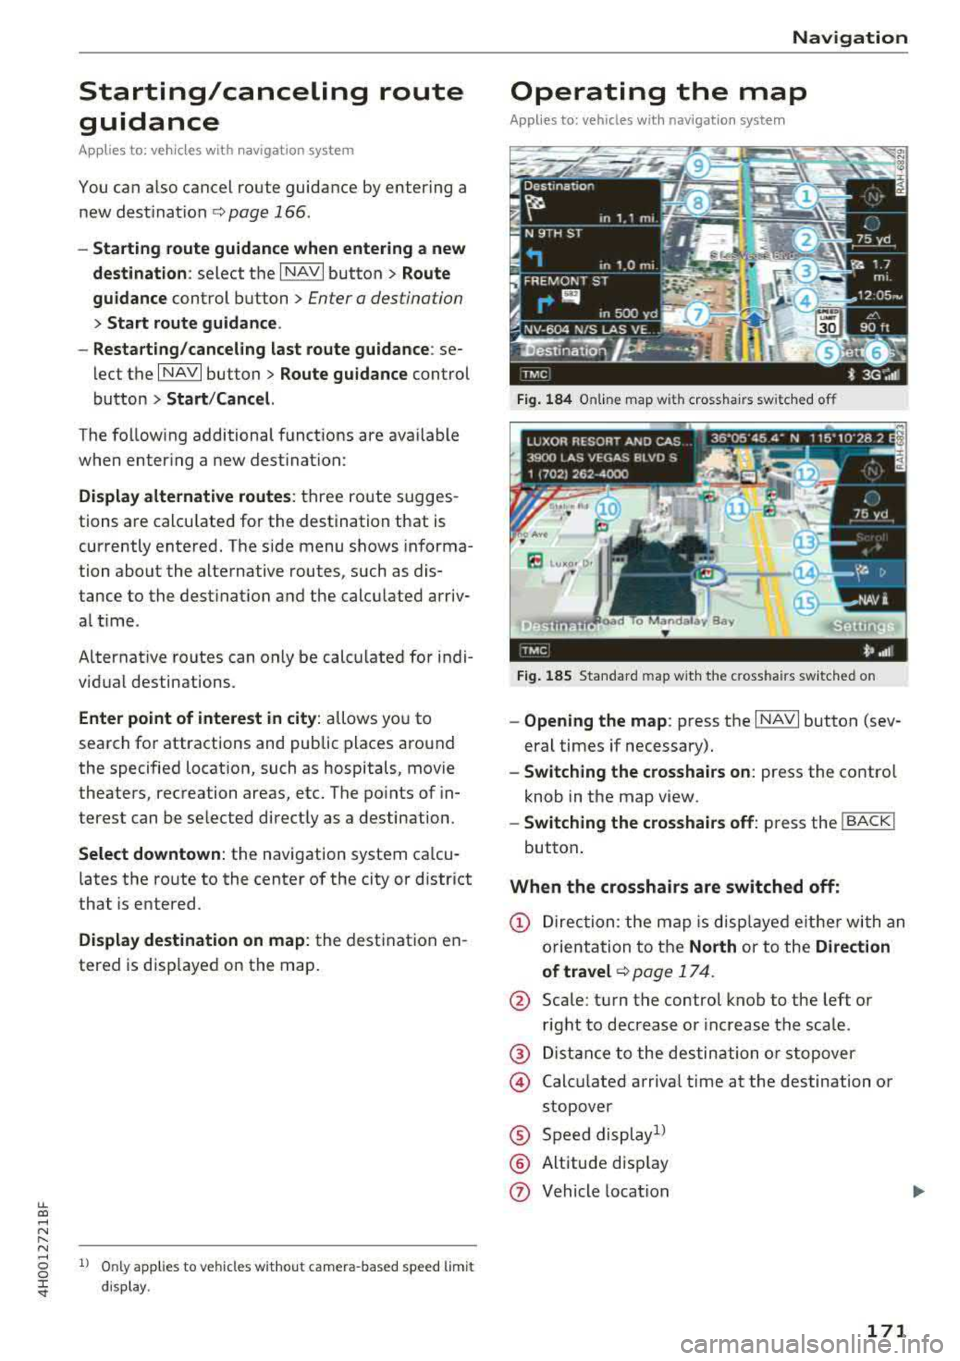
Operating the map
Appl ies to: vehicles with navigation system
Fig. 184 Online map wit h crossha irs sw itched off
Fig. 185 Standard map wit h the c ross hair s sw itched o n
-Opening the map : press the I NAVI button (sev
eral times if necessary).
- Switching the crosshairs on: press the contro l
knob in the map view.
- Switching the crosshairs off: press the I BACK I
button.
When the crosshairs are switched off:
(D Direction : the map is displayed eith er with an
orientation to the
North or to the Direction
of
travel ¢ page 174.
@ Scale: turn the control knob to the left or
right to decrease or increase the scale .
@ Distance to the destination or stopover
@ Calcu lated arriva l time at the destination or
stopover
® Speed display1l
® Altitude d isp lay
(J) Vehicle location
171