tow AUDI A8 2018 Owner's Guide
[x] Cancel search | Manufacturer: AUDI, Model Year: 2018, Model line: A8, Model: AUDI A8 2018Pages: 356, PDF Size: 54.71 MB
Page 126 of 356
Parking systems
,.. Turn the Infotainment system on and shift into
reverse gear. The parking system is turned on
and the
Cross parking view is displayed.
,.. Press the control button on the Infotainment
unit @ Q page 119, fig . 13 7. The Parallel park
ing
view is displayed .
,.. Back up and align your vehicle so the blue area
@ borders on the rear end of the vehicle be
hind yo u or on the parking space line
Q .&. in
General information on page 120,
Q (Q) in Gen
eral information on page 120 .
The blue area
rep resents an extension of the vehicle's out line
by approximately 16 ft (5 meters) to the rear.
The long s ide of the blue area should be on the
curb . The entire blue area must f it into the
parking space.
,.. With the vehicle stopped, turn the steering
wheel to the right as far as it w ill go .
,.. Back into the parking space until the b lue curve
Q fig. 150 touches the curb-=?.&. in General in
formation on page 120, ¢@ in General infor
mation on page 120.
Stop the vehicle .
,.. With the vehicle stopped, turn the steering
whee l to the left as far as it will go.
,.. Continue to back into the parking space until
the vehicle is parked parallel to the
curb¢ &.
in General information on page 120, ¢@ in
General information on page 120 .
® repre
sents the rear bumper. At the very latest, stop
the vehicle when the red orientation
line ©
borde rs an object . Keep an eye on the front of
your vehicle while doing this.
Parking next to obstacles
If there is an obstacle (such as a wall) next to the
parking space, position the vehicle so there is
mo re space on that side. Position the long side of
the blue area so that there is sufficient space
from the object. The area must not be on the
ob
stacle. You will a lso need to start turning the
steering whee l earlier. The blue curve
¢ page 119, fig . 138 must not touch the obsta
cle , but rather there should be enough distance.
@ Tips
The left or right orientation lines and surfaces
will be displayed, depending on the turn
sig
nal being used.
124
Trailer mode
Applies to: vehicles with peripheral cameras and trailer hitch
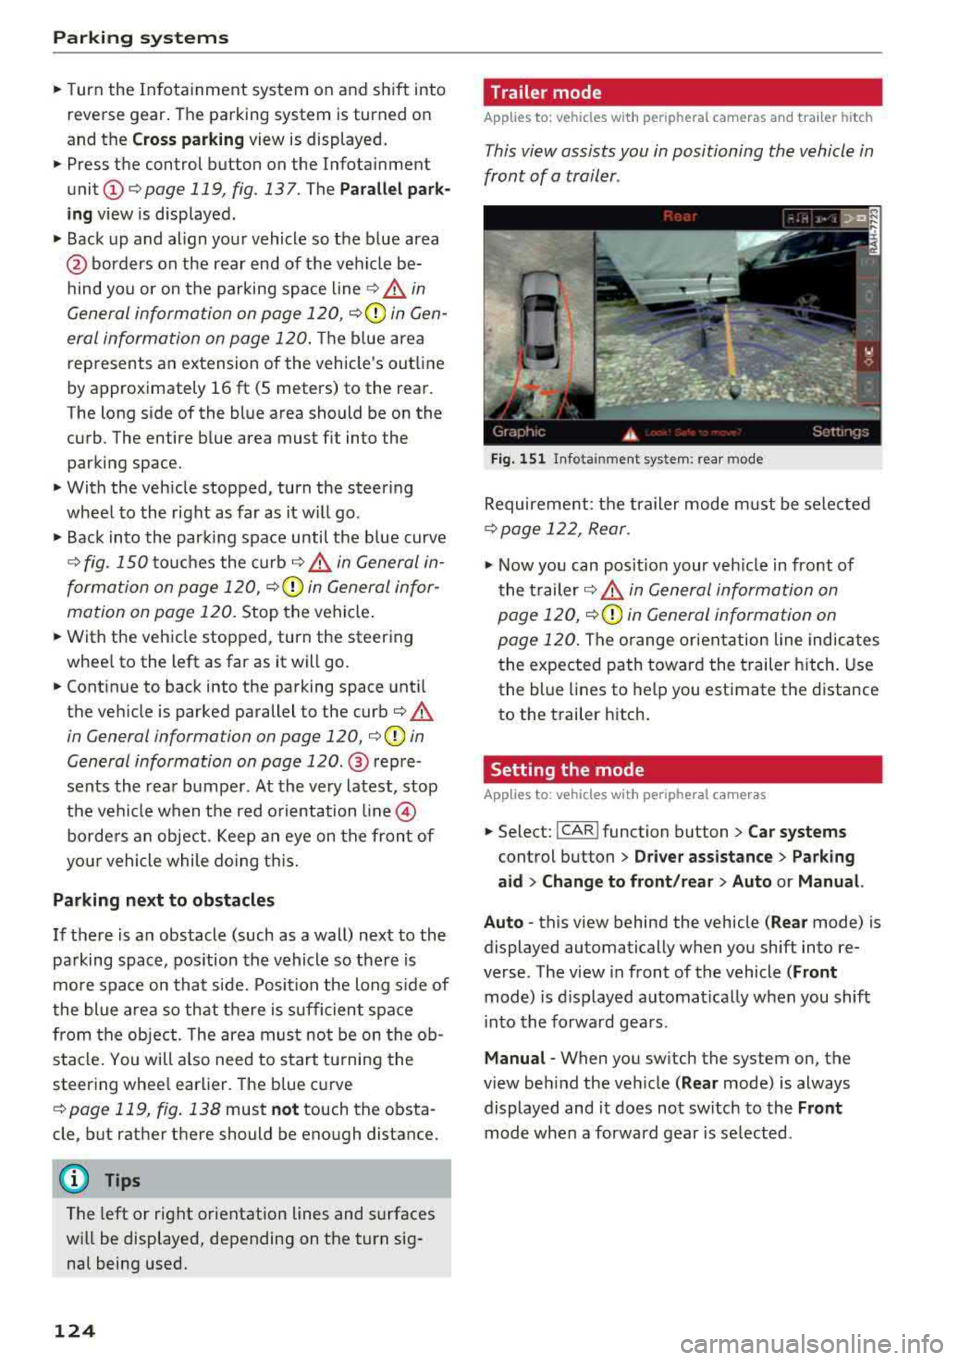
This view assists you in positioning the vehicle in
front of a trailer .
Fig. 151 In fota inment system: rear mode
Requirement: the trailer mode must be selected
¢ page 122, Rear.
.,. Now you can posit ion your veh icle in front of
the trailer
c::;, .&. in General information on
page 120,
c::;, (Q) in General information on
page 120.
The orange or ientation line indicates
the expected path toward the trailer hitch. Use
the blue lines to help you estimate the d istance
to the trailer hitch.
Setting the mode
Applies to : vehicles with peripheral cameras
,.. Select: !CAR ! function button> Car systems
control button > Driver assistance > Parking
aid > Change to front/rear > Auto or Manual.
Auto
-this view behind the vehicle ( Rear mode) is
displayed automatically when you shift into re
verse. The view in front of the vehicle
(Front
mode) is d isplayed automat ically when you shift
i nto the forward gears .
Manual -When you switch the system on, the
view beh ind the veh icle
( Rear mode) is always
displayed and it does not switch to the
Front
mode when a forward gear is se lected.
Page 132 of 356
Intellig ent T echn olo gy
- New brake pads do not achieve their full
braking effect during the first 250 mi
(400 km). They must be "broken in" first.
However, you can compensate for the
sl ightly reduced brak ing force by pressing
firmly on the brake pedal. Avoid heavy brak
i ng dur ing t he break- in per iod.
- Certa in weather and operat ing cond it ions
such as dr iv ing through water, driving in
heavy ra in or driving after washing your ve
hicle can impair the effectiveness of the
brakes . In the winter, ice may build up on
the brake pads, rotors and drums . Check
these components by braking carefu lly. Ap
plying the brakes carefully severa l times
dr ies the brakes and removes ice bu ild-up.
- The effic iency of the brakes can also be im
paired by driving for long stretches on roads
covered w ith salt w ithout using the brakes.
You can remove salt deposits from the brake rotors and pads by carefully applying
the b rakes severa l t imes .
- If the front spo iler is damaged or you install
another spoiler, make sure the front wheel
bra kes are vent ilated properly. Otherwise,
the brake system could ove rheat, w hich re
duces the ir effectiveness.
- Failure of a b rake circuit impa irs b raking
perfo rmance, which inc reases brak ing dis
tance . Avoid driving the vehicle and have it
towed it to the nearest authorized Audi
dealer or authorized Audi Service Facility .
- If the brake booster is not working, you will
have to press m uch harder on the brake
peda l to compensate for the lack of the
booster.
@ Note
- Never let the brakes " rub" by pressing the
pedal light ly when braking is not actually
necessary. This causes the brakes to over
heat and increases braking distance and
causes wear.
- Before driving downhill a long distance on a
steep hill, decrease your speed and select a l ower gear. This makes use of the engine
braking effect and relieves the brakes. If
130
you need to brake add itiona lly, brake in in
terva ls and not continuous ly .
(D Tips
- If the bra ke boos ter is not wor king, you
must press the brake peda l with much more
force than normal.
- If you retrof it your vehicle with a front spoi l
er, wheel covers or simi lar items, make sure
that the air flow to the front wheels is not interrupted. Otherwise the brake system
can become too hot.
Electromechanical
steering, dynamic
steering
The electromechonicol steering supports the
driver's steering movements.
Power steering adapts electronically based on
the vehicle speed .
Indicator lights and messages
• Do not drive vehi cle: S tee rin g defect ive
If this indicator light turns on and stays on and
th is message appears, the power steering may
have failed .
Stop the vehicle in a safe location as soon as pos
s ible. Do
not conti nue driving. See an authorized
Audi dealer or authorized Audi Service Fac il ity for
ass istance.
l;rfl St ee ring: System faul t You ca n cont inue
dr ivi ng
If the indicator light turns on and the message
appears, the steering wheel may be more diffi
cu lt to move or more sensitive than usual. The
steering wheel may also be at an angle when driv ing stra ight .
Drive slowly to an authorized Audi dea ler or au
thori zed Audi Serv ice Facility to have the mal
funct io n corrected.
'-r-ij Dynamic stee ring: Init ializing
If the indicato r light is blinking and this message
appears, dynamic steering* is being initialized.
IJ>-
Page 139 of 356
lL t:0 ....
"" ......
"" .... 0 0 :c '
Selecting the previous /next function (for exam
ple, a radio st a tion/track) :
briefly press the On/
Off knob @
c::> page 135, fig . 153 toward the left
l
Fast forw arding/rewinding (for example
songs ):
press and hold the On/Off knob @
c::> page 135, fig. 153 toward the left l
MMI touch
Applies to: vehicles with MMI touch control pad
The MMI touch allows you to enter data on the
MMI touch control pad using handwriting recog
nition.
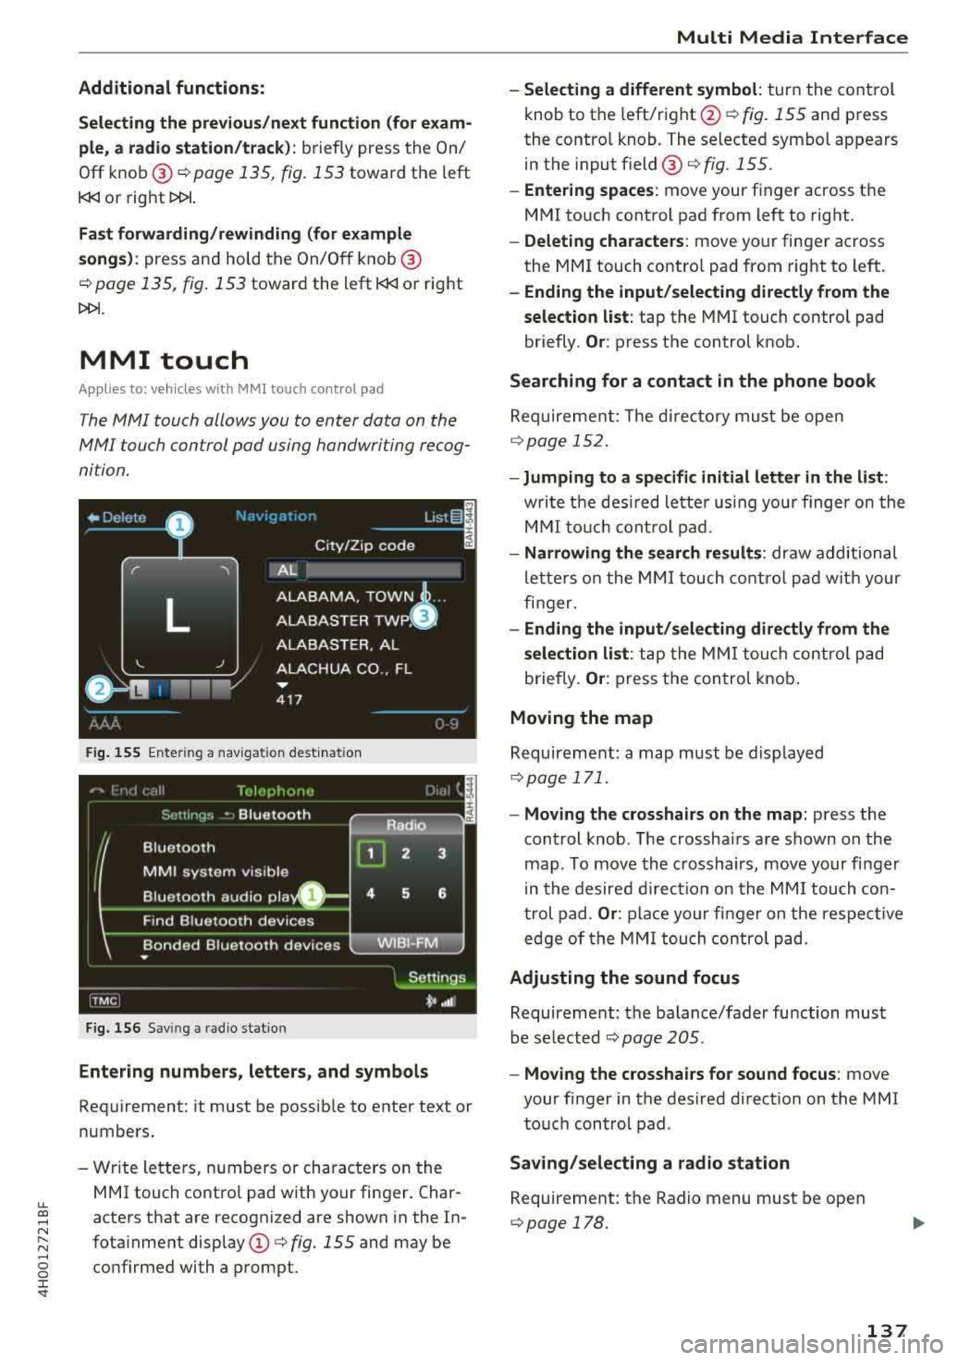
F ig. 155 Ente ring a nav igat ion dest inat io n
Fig. 156 Sav ing a rad io stat io n
Entering numbers, letters, and symbol s
Requirement: it must be possib le to enter text or
numbers .
- Wr ite lette rs, numbers or characte rs on the
MMI touch co ntro l pad with your finger. Char
acters that are recognized are shown i n the In
fota inment display
(D <=> fig. 155 and may be
co nfirmed with a prompt.
Multi Media Inte rface
- Selecting a different symbol : turn the co ntro l
knob to the left/right @<=>
fig. 155 and press
the contro l knob. The selected symbol appears
in the input field @<=>
fig. 155.
-Entering spaces : move your finger across t he
MMI touch control pad from left to right .
-Delet ing characters : move your finger across
the MMI touch contro l pad from right to left.
- Ending the input /selecting directl y from the
selection list :
tap the MMI touch contro l pad
briefly.
Or : press the control knob.
Searching for a contact in the phone book
Requireme nt: The d irecto ry must be open
c::> page 152 .
-Jumping to a specifi c initial letter in the list :
writ e t he des ired lette r using your finge r on the
M MI to uch cont rol pad.
- Narrowing the search results : draw additional
le tte rs o n the MMI touch co ntro l pad w it h your
fin ger.
- Ending the input /sele cting directl y from the
selection list :
ta p the MM I tou ch co ntrol pad
briefly.
Or : press the con trol knob .
Moving the map
Requireme nt: a map must be d isplayed
c::> page 171.
- Moving the crosshairs on the map: press the
cont rol knob . T he crossha irs are shown on the
map . To move the crosshairs, move your fi nger
in the desired d irec tion on the MM I touch con
t rol pad .
Or : place your fi nger o n the respec tive
edge of the MM I tou ch contro l pad.
Adjusting the sound focus
Requireme nt: the balance/fader fu nction must
be se lected
c::> page 205.
- Moving the crosshairs for sound focus : move
your finger in the desired direct io n on the MMI
to uch con trol pad .
Saving /selecting a radio station
Requirement: the Radio menu must be open
c::> page 178 .
137
Page 143 of 356
LL
"' .... N ,.._ N .... g :r st
• TELEPHONE
• NAVIGATION
• INFO
• RADIO
• MEDIA
• HELP
•
HELP VOICE RECOGNmON
• HELP TELEPHONE
• HELP NAVIGATION
• HELP MAP
• HELP INFO
•
HELP RADIO
• HELP MEDIA
TELE ~HONE
• ENTER NUMBER
• DIAL
• REPEAT
• CORRECTION
• DELETE NUMBER
• REDIAL
• CALL (XV)
(BUSINESS/ PRIVATE/ LANO LINE/ CELL)
NAVI GAT:ION
• ENTER ADDRESS
• ENTER COUNTRY
• ENTER ZIP CODE/ CITY
• ENTER STREET
• ENTER HOUSE NUMBER
• ENTER DOWNTOWN
• START/ CANCEL ROUTE GUIDANCE
• NAVIGATE TO
(XV)
• LAST DESTINATIONS
• FAVORITES
• HOME ADDRESS
• SHORT / FAST/ ECONOMY ROUTE
• DYNAMIC ROUTE ON/ OFF
• ROUTE UST
• VOICE GU I DANCE ON/ OFF
• ROUTE INFO ON/ OFF
• SCALE (XV) MILES / VAROS
• READ TRAFFIC REPORTS
RADIO
• SET STATION
• STATION (XY)
• SET FREQUENCY
• SET BAND
• FM/ AM/ SIRIUS
• STATION LIST
• READ STA
TYON LIST
• PRESETS
• READ PRESETS
• UPDATE STATION LIST
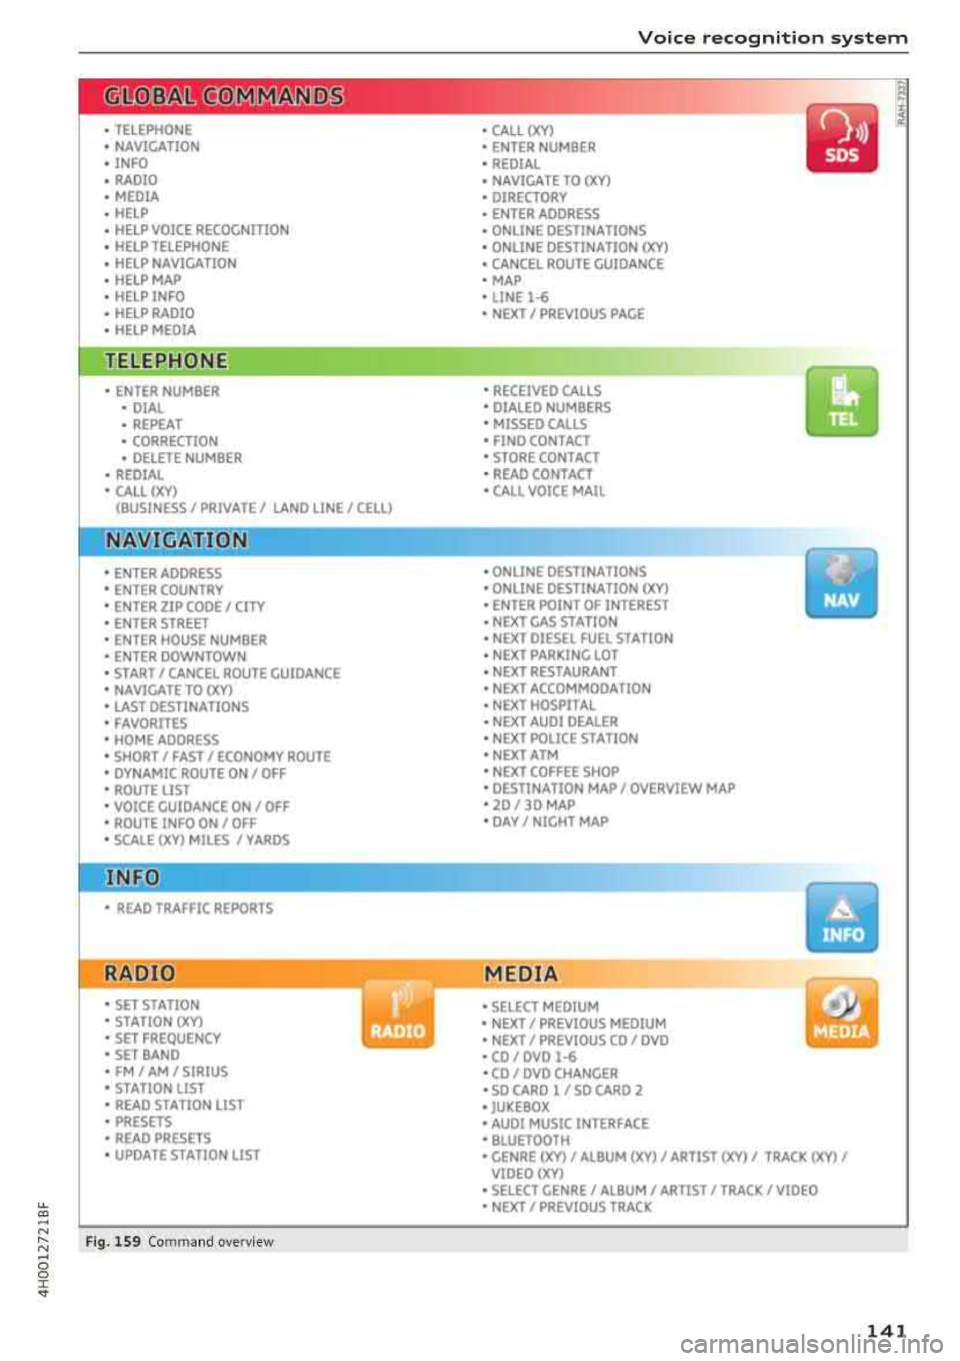
Fig. 1S9 Com mand o verv iew
Voice recognition system
• CALL (XV)
• ENTER NUMBER
• REDIAL
• NAVIGATE TO
(XV)
• DIRECTORY
• ENTER ADDRESS
• ONLINE DESTINATIONS
• ONLINE DESTINATION
(XV)
• CANCEL ROUTE GUIDANCE
• MAP
• LINE
1·6
• NEXT/ PREVIOUS PAGE
•
RECEIVED CALLS
• DIALED NUMBERS
• MISSED CAll5
• FINO CONTACT
• STORE CONTACT
• READ CONTACT
•
CALL VOICE MAIL
• ONLINE DESTINATIONS
• ONLINE DESTINATION (XV)
• ENTER POINT OF INTEREST
• NEXT GAS STATION
• NEXT DIESEL FUEL STATION
• NEXT PARKING LOT
• NEXT RESTAURANT
• NEXT ACCOMMOOA TION
• NEXT HOSPITAL
• NEXT AUDI DEALER
• NEXT POLICE ST A TION
• NEXT ATM
• NEXT COFFEE SHOP
• DESTINATION MAP/ OVERVIEW MAP
• 20 / 30 MAP
• DAY/ NIGHT MAP
MEDIA
• SELECT MEDIUM
• NEXT/ PREVIOUS MEDIUM
• NEXT/ PREVIOUS CO/ DVD
• CO/ DVD
1·6
•CO/ DVD CHANGER
• SO CARO l / SO CARO 2
• JUKEBOX
• AUDI MUSIC INTERFACE
• BLUETOOTH
y
• GENRE (XV)/ ALBUM (XV)/ ARTIST (XV)/ TRACK (XV)/
VIOEO()(Y)
• SELECT GENRE/ ALBUM/ ARTIST/ TRACK/ VIDEO
• NEXT/ PREVIOUS TRACK
141
Page 144 of 356
Voice recognition s ystem
Voice recognition system
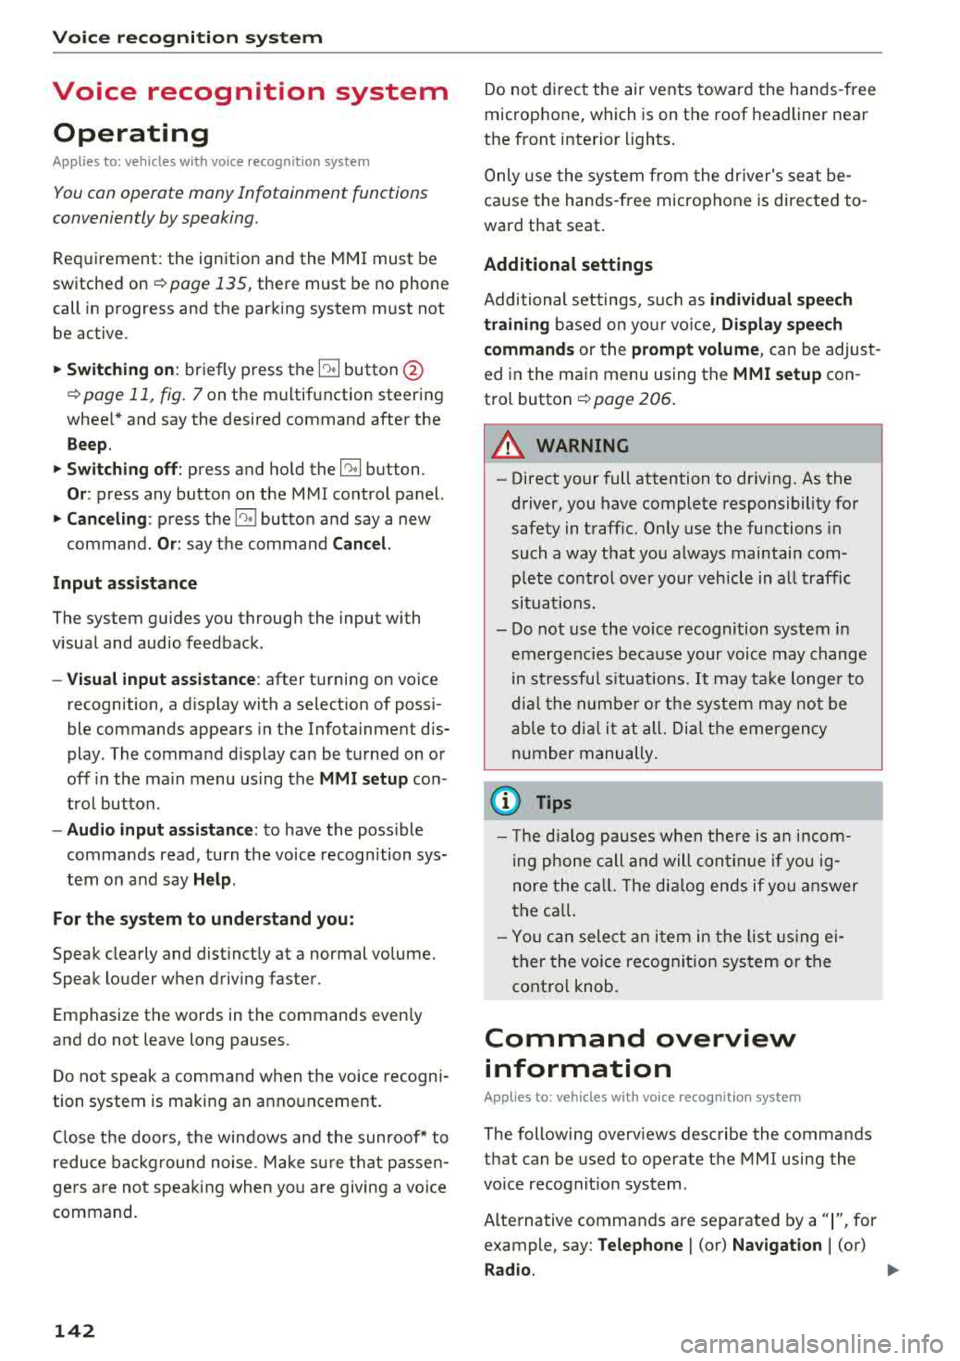
Operating
A pplies to: ve hicles w ith vo ice recognition system
You con operate many Infotainment functions
conveniently by speaking.
R equirement: the ignition and the MM I must be
switched
on <=> page 135, there must be no phone
call in progress and the parking system m ust not
be active .
~ Switching on : briefly press th e ~ button @
<=> page 11, fig. 7 on the multifunction steering
whee l* and say the desired command after the
Beep .
~ Sw itching off : press and hold the~ button.
Or: press any button on the MMI control panel.
~ Canceling : press the~ button a nd say a new
command.
Or: say the command Cancel.
Input assis tance
The system gu ides you through the input with
visual and audio feedback .
-Vi sual inpu t as sistan ce : after t urning on voice
recognition, a d isp lay with a select ion of possi
ble commands appears in the Infotainment dis
play . The command d isplay can be turned on or
off in the ma in menu using the
MMI setup con
trol button .
-Audio input a ssistance : to have the poss ible
comma nds read, turn the voice recogn ition sys
tem on and say
Help.
For the s ystem to understand you:
Speak clearly and dist inct ly at a normal volume.
Speak louder when driving faster.
Emphasize the words in the commands even ly
and do not leave long pauses.
Do not speak a command when t he voice recogni
tion system is making an anno uncement.
C lose t he doors, the windows a nd the sunroof* to
reduce bac kg round noise . Make s ure t hat passen
gers a re not speaking when yo u are giving a voice
command.
142
Do not d irect the air vents toward the hands -free
microp hone, which is on the roof headliner nea r
t h e front interior lights .
Only use the system from the dr ive r's seat be
ca use the hands -free microphone is directed to
ward that seat .
Additional settings
Additional settings, s uch as individual speech
training
based on yo ur voice, Display sp eech
command s
or the prompt volume , can be adjust
ed in the main menu using the
MMI setup con
tro l button
<=> page 206.
A WARNING
- Direct your full attention to dr iv ing. As the
driver, you have complete responsibility for
safety in traff ic. On ly use the functions in
such a way that you a lways maintain com
p lete co ntro l over your veh icle in all traff ic
situat ions.
- Do not use the voice recognition system in
emergencies beca use your voice may change
in st ressfu l situ at ions.
It may t ake longe r to
d ial t he number or th e sys tem m ay no t be
a bl e to d ial it a t all. Dia l th e emer gen cy
number manually.
© Tips
- Th e dia log pauses w hen the re is a n in com
ing pho ne call and will con tinue if you ig
nore the call. T he dialog en ds if yo u answer
t h e ca ll.
- Yo u ca n sele ct an i tem in the list using ei
ther the vo ice recognit ion sys tem o r the
cont ro l knob .
Command overview
information
App lies to: vehicles wit h voice recog nitio n syste m
The following overv iews describe the commands
that can be used to operate the MMI using the
vo ice recog nition system .
A lternative commands are separated by a
" I" , for
example, say:
Telephone I (or) Na vigation I (or)
R adio .
Page 146 of 356
Voice recognition system Function
Correcting the phone number that
was entered
Displaying call lists
Calling the last number dialed
Listening to messages
(D Tips Say
:
Delete number
I Correction
Dialed numbers
I Accepted calls I Missed calls
Redial
Call voicemail
- Name tags can only be stored using the
voice recogni tion system.
- You can assign up to SO additional name
tags for address cards. -
Name tags can only be deleted using the
MMI control panel.
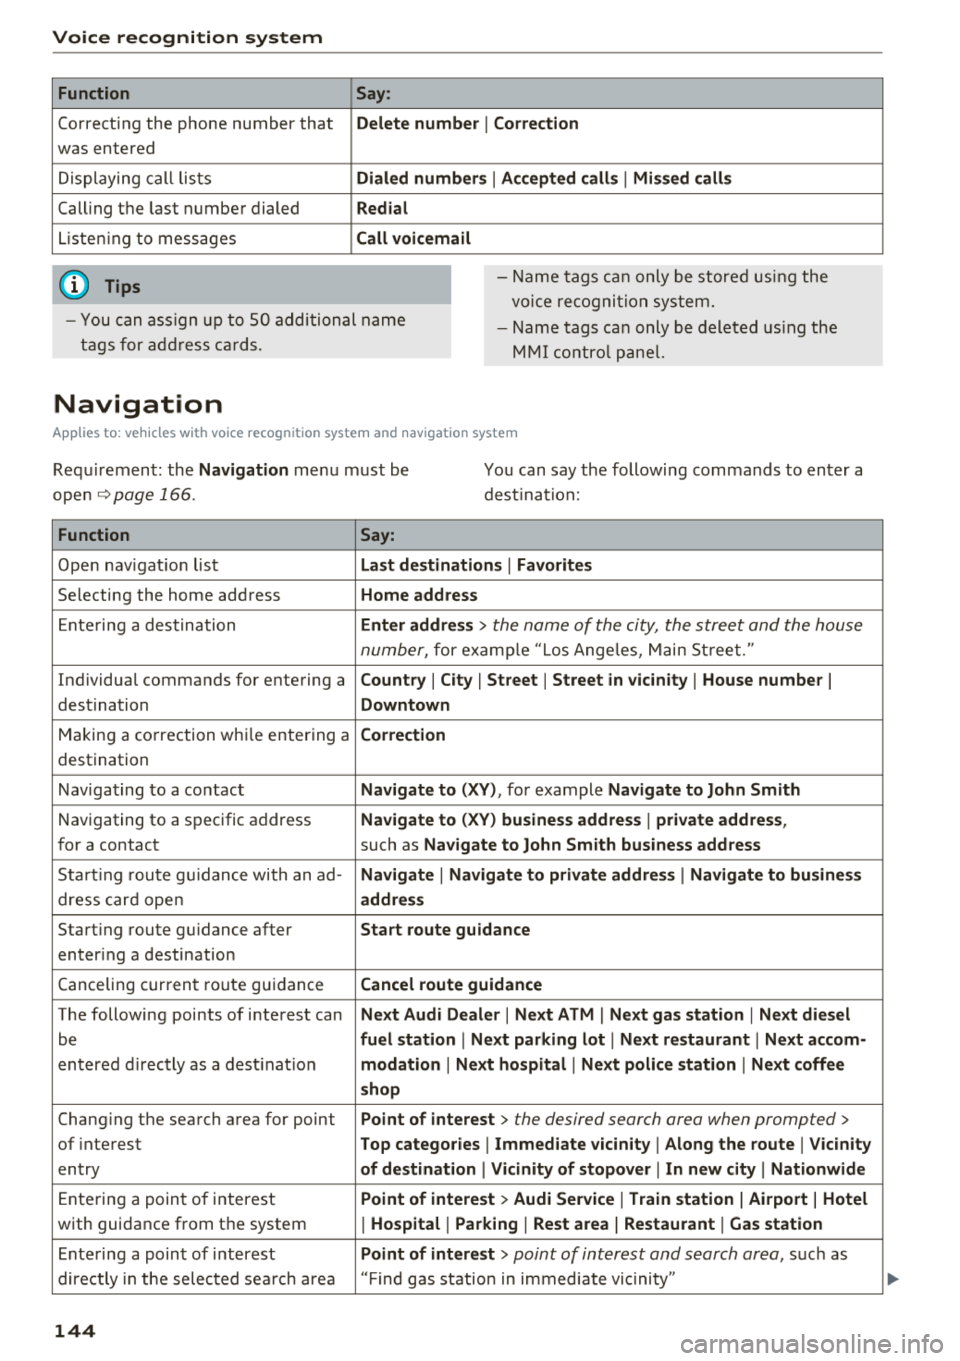
Navigation
Applies to: vehicles with voice recognition system and navigation system
Requirement: the Navigation menu must be
ope n
.!)page 166 .
You can say the following commands to enter a
dest ination:
Function Say:
Open navigation list Last destinations I Favorites
Selecting the home address Home address
Entering a destination Enter address > the name of the city, the street and the house
number,
for examp le "Los Angeles, Main Street."
Individual commands for entering a
Country I City I Street I Street in vicinity I House number I
destination Downtown
Making a correction while entering a Correction
destination
Navigating to a contact
Navigate to (XY), for example Navigate to John Smith
Navigating to a specific address Navigate to (XY) business address I private address,
for a contact such as Navigate to John Smith business address
Starting route guidance with an ad-Navigate I Navigate to private address I Navigate to business
dress card open address
Starting route guidance after Start route guidance
entering a destination
C anceling current route gu idance
Cancel route guidance
The following points of interest can Next Audi Dealer I Next ATM I Next gas station I Next diesel
be fuel station I Next parking lot I Next restaurant I Next accom-
entered directly as a destinat io n modation I Next hospital I Next police station I Next coffee
shop
Chang ing the search area for point Point of interest > the desired search area when prompted>
of interest Top categories I Immediate vicinity I Along the route I Vicinity
entry of destination I Vicinity of stopover I In new city I Nationwide
Entering a point of interest Point of interest > Audi Service I Train station I Airport I Hotel
with guidance from the system I Hospital I Parking I Rest area I Restaurant I Gas station
Ente ring a point of interest Point of interest > point of interest and search area, suc h as
directly in the selected search area "Find gas station in immediate vic inity"
144
Page 168 of 356
Navigation
Navigation
Opening navigation
Applies to: vehicles with navigation system
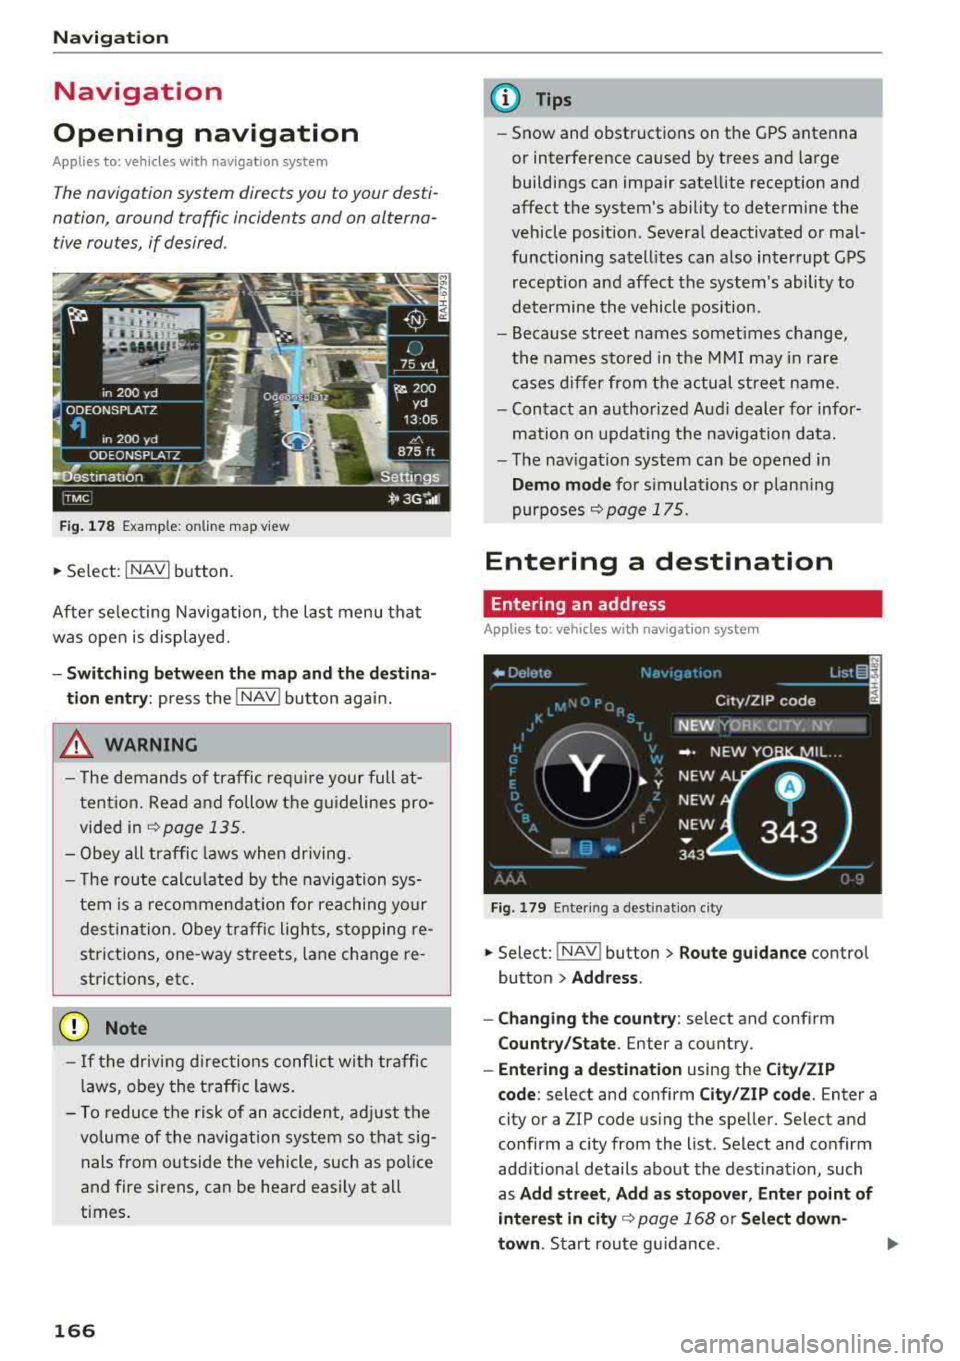
The navigation system directs you to your desti
nation , around traffic incidents and on alterna
tive routes, if desired .
Fig. 178 Example: on lin e map v iew
.. Select : INAVI button.
After selecting Navigation, the last menu that
was ope n is displayed.
- Switching between the map and the destina
t ion entry:
press the !NAV ! button again.
,&. WARNING
-The demands of traffic require your full at
tention. Read and follow the guidelines pro
vided in
i=;,poge 135.
-Obey all traffic laws when driving.
- The route calcu lated by the navigation sys-
tem is a recommendat ion for reaching your
destination. Obey traffic lights, stopping re
strictions, one-way streets , lan e change re
strictions, etc.
@ Note
- If the driving directions conflict with traffic
laws, obey the traffic laws.
- To reduce the risk of an accident, adjust the
volume of the navigation system so that sig
nals from outside the vehicle, such as police
and fire sirens, can be heard easily at all
times.
166
.
@ Tips
- Snow and obstructions on the GPS antenna
or interference caused by trees and large
buildings can impair satellite reception and
affect the system's ability to determine the
vehicle position. Several deactivated or mal
functioning satellites can also interrupt GPS reception and affect the system's ability to
determine the vehicle position .
- Because street names somet imes change,
the names stored in the MMI may in rare
cases differ from the actual street name.
- Contact an authorized Audi dealer for infor
mation on updating the navigation data.
- The navigation system can be opened in
Demo mode for s imulations or plann ing
purposes
re;, page 175.
Entering a destination
Entering an address
Applies to : vehicles with navigat ion system
Fig . 179 En ter ing a destina tion city
.. Select: !NAV ! button > Route guidance contro l
button
> Address .
- Changing the country:
select and conf irm
Country/State . Enter a country .
- Entering a destination using the City/ZIP
code:
select and confirm City/ZIP code. Enter a
city or a ZIP code using the spe ller. Select and
confirm a city from the list. Select and confirm
add itional details about the dest ination, such
as
Add street , Add as stopover, Enter point of
interest in
city re;, page 168 or Select down
town .
Start route guidance.
Page 173 of 356
lL t:0 ,..,
"" ......
"" ,..,
0 0 :c '
guidance
Applies to: ve hicles with navigation system
You can a lso cancel route guidance by enter ing a
new destination
¢ page 166 .
-Starting route guidance when entering a new
destination :
select the I NAVI button > Route
guidance
control button > Enter a des tination
> Start route guidance .
- Restarting/canceling last route guidance :
se
lect the
I NAVI but ton> Route guidance control
button
> Start /Cance l.
The fo llow ing additional functions are ava ilable
when enter ing a new destination:
Display alternative routes: three route s ugges
tions are calcu lated for the destination that is
currently entered. The side menu shows informa
tion about the alternative routes , such as dis
tance to the dest inat ion and the calculated arriv
a l time .
Alternat ive routes can only be calcu lated for indi
vidual destinations .
Enter point of interest in city : allows you to
search for attractions and public places around
the specified locat ion, such as hospitals , mov ie
theaters , recreation areas, etc. The po ints of in
terest can be selected direct ly as a destination.
Select downtown : the navigation system ca lcu
l ates the ro ute to the center of the city or distr ict
that is entered .
Display destination on map : the destination en
tered is disp layed on the map.
1l O nly appl ies to vehicles w ithou t camer a-based speed lim it
d isp lay .
Navigation
Operating the map
Appl ies to: vehicles with navigation system
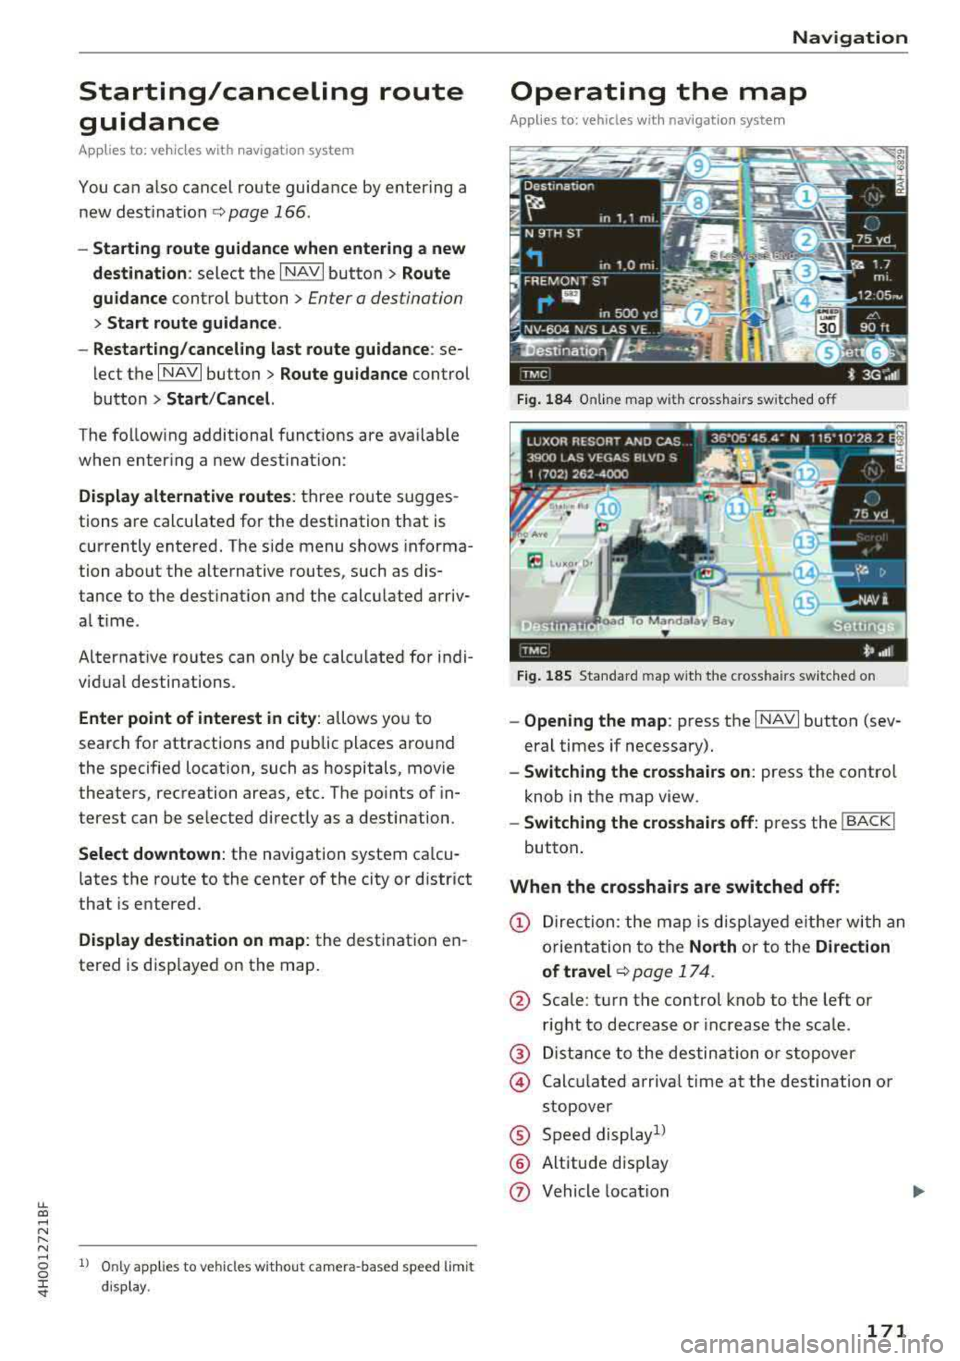
Fig. 184 Online map wit h crossha irs sw itched off
Fig. 185 Standard map wit h the c ross hair s sw itched o n
-Opening the map : press the I NAVI button (sev
eral times if necessary).
- Switching the crosshairs on: press the contro l
knob in the map view.
- Switching the crosshairs off: press the I BACK I
button.
When the crosshairs are switched off:
(D Direction : the map is displayed eith er with an
orientation to the
North or to the Direction
of
travel ¢ page 174.
@ Scale: turn the control knob to the left or
right to decrease or increase the scale .
@ Distance to the destination or stopover
@ Calcu lated arriva l time at the destination or
stopover
® Speed display1l
® Altitude d isp lay
(J) Vehicle location
171
Page 184 of 356
Media dri ve s and connection s
protection switch is installed to protect the CD/
DVD and the laser.
L a se r d evice s: laser dev ices are d iv ided into safe
ty classes 1 to 4 in accordance with DIN IEC 76
(CO) 6/VDE 0837 . The various types of audio
equipment installed conform to safety class
1.
The laser uses so little power or is sh ielded so
there is no danger when it is used correctly.
De vice co ver: do not remove the cover from the
device . The device does not contain any parts that
the owner can repair.
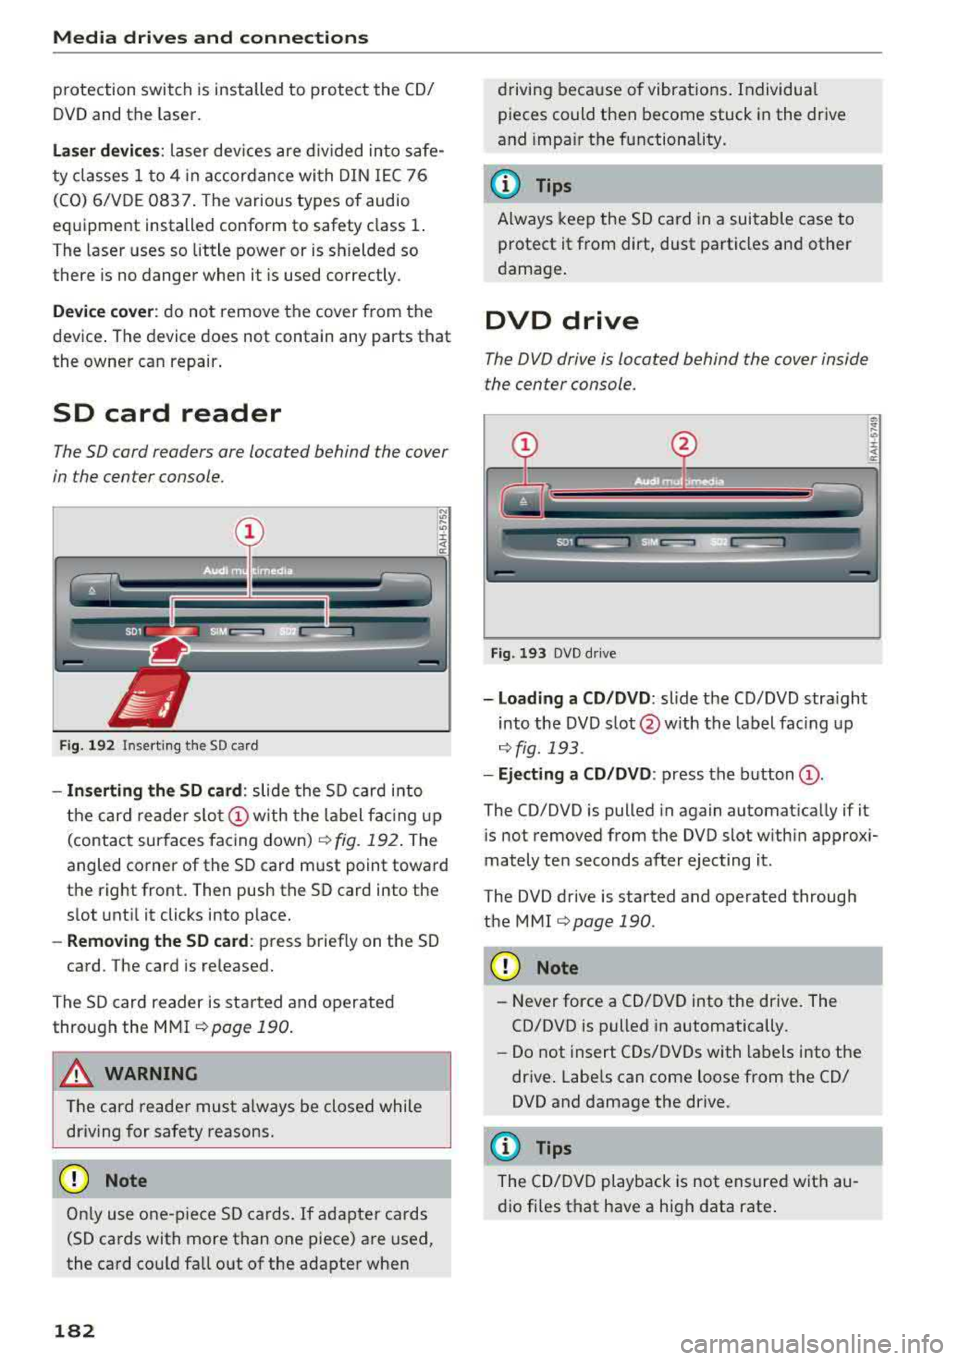
SD card reader
The SD cord readers ore located behind the cover
in the center console.
Fig. 192 Inserting the SD card
- In serting the SD card : slide the SD card into
the card reade r
slo t(!) w ith the label fac ing up
(contact surfaces facing down)
r:!> fig. 192 . The
angled corner of the SD card must point toward
the right front. Then push the SD card into the
slot unt il it clicks into place.
- Remo ving the SD ca rd: press briefly on the SD
card. The card is re leased.
The S D card reader is started and operated
through the MMI
r::;,poge 190.
A WARNING
The card reader must a lways be closed while
driving for safety reasons.
CD Note
On ly use one-piece SD cards. If adapter cards
(SD cards with more than one piece) are used,
the card could fa ll out of the adapter when
182
driving because of vibrat ions . Individua l
pieces could then become stuck in the drive
and impa ir the functionality.
(D Tips
A lways keep the SD card in a suitable case to
protect it from dirt, dust particles and other
damage .
DVD drive
The DVD drive is located behind the cover inside
the center console.
Fig . 193 DVD d rive
- Loading a CD /DVD : slide the CD/DVD stra ight
into the DVD s lot @ with the label fac ing up
¢ fig. 193 .
-Eject ing a CD /DVD : press the b utton (D .
The CD/DVD is pulled in again automat ica lly if it
is not removed from the DVD slot w ith in approx i
mately ten seconds after ejecting it.
The DVD drive is started and operated through
the MMI
r::;,poge 190 .
CD Note
-Never force a CD/DVD into the drive. The
CD/DVD is pulled in automatically.
- Do not insert CDs/DVDs with labels into the
drive . Labe ls can come loose from the CD/
DVD and damage the drive.
@ Tips
The CD/DVD playback is not ensured with au
dio fi les that have a high data rate .
Page 208 of 356
System settings
sound di stribu tion)/ Driver (sound dis tribution
aime d towa rd the d river) or
All /Front /Rear.
- Surround level* :
you can a dju st the vo lume of
t h e sur round effect by tu rning the contro l
k no b.
-AudioPilot (dynamic road noise compensa
tion)* :
select and confirm Active /Inactive.
When t he f unct io n is act ive, the vo lume is auto
matically ad justed depending on t he leve l o f
noise ins ide the ve hicle.
- Sound focus * (adjusting the sound distribu
tion ):
select and confi rm All (symmet rical
sound d istr ibutio n)/ Movie (optima l so und dis
tribution fo r playing a
movie)/ Front/Rear .
- Volume balancing *:
the dynamic road noise
compensation ca n be ad justed by turning the
contro l knob.
@ Subwoofer* I @ Bass/ @Treble
You can a djust the Subwoofer *, Bass and Treble
sett ings by turning the contro l kno b. The
cha nged settings only apply fo r the aud io so urce
that is active at the t ime . This allows you to ad
jus t th e sound se tt in gs for eac h aud io so urce sep
ara tely.
® Balance/Fader (sound focus)
- Adjusting the sound distribution using the
MMI touch :
move your finger on the MMI t ouch
contro l pane l in the des ired d irec tion.
Adjusting the system
volume
.,. Se le ct: the IMENU ! butto n> Tone .
Navigation* control button
Voice guidance volume /Music volume during
nav. prompts:
vol ume o f navigation prompts
d ur ing ac tive ro ute g uidance . Mu sic volume dur
i n g nav iga tion prom pts mea ns tha t th e vol ume
of audio playb ack is te m porar ily lowered whe n
t he p arkin g sys tem or v oic e gu idance i s act ive.
Voice guidance: se e ¢page 175.
Voice guidance during call : see ¢ page 175.
206
Telephone* control button
Ringtone volume /Phone call volume :
you ca n
adjus t the sele cte d r ing tone vo lume or call vol
u me by tu rnin g the cont ro l knob. The
Phone call
volume
can on ly be adjusted durin g a call.
Systems control button
Speech dialog system volume :
you can adju st
th e vol ume o f th e ann ounc emen ts by tur ning the
contro l kno b.
MMI touch volume *: the vo lu m e of the MM I
tou ch pro mpts can be adjus ted by tur ning the
c on tro l k no b.
Other settings
.,. Sele ct: th e I M ENU I button > MMI setup contro l
bu tton.
Language
The language can be changed fo r the Info ta in
men t display, t he dr iver i nfo rm ation system dis
play, voice guid ance* and t he voice recogn itio n
sys te m* .
En glish, French and Spanish are ava ila bl e.
Measurement units
The following meas urement u nits ca n be set in
the Infotainment d isp lay a nd dr iver info rmat ion
system.
- Speed (mph o r km/ h)
- Distance (miles o r kilomete rs)
- Temperature (°For 0
( )
-Fuel consumption (l/l0 0km, mpg (US), mpg
(U K) or k m/l)
- Volume (lite rs, ga llons ( UK) o r gallo ns (US))
Speech dialog system
App lies to : vehicles wi th voice recog nitio n syste m
Display speech commands : th e d isplay of poss i
ble commands dur ing vo ice input can be switc h
ed
On or Off .
Short dialog :
prompts in a s horter format can be
switc hed
On or Off .
Input signal :
the beep input signa l dur ing a dia-
l og can be switc hed
On or Off. ..,.