display AUDI A8 2020 Owners Manual
[x] Cancel search | Manufacturer: AUDI, Model Year: 2020, Model line: A8, Model: AUDI A8 2020Pages: 360, PDF Size: 95.38 MB
Page 281 of 360

4N0012721BD
Checking and Filling
> Wait approximately two minutes. — Because all these variables play a role, it is
> Applies to: MMI: Select on the home screen: not possible to define an oil consumption
VEHICLE > Settings & Service > Oil level. standard. Therefore, the oil level must be
> Applies to: Audi tablet: Select on the home checked regularly.
screen: VEHICLE > Oil level. — If you believe that your engine has in-
> Read the oil level in the display. Add engine oil creased its oil consumption, contact an au-
if the bar in the oil level indicator is just below thorized Audi dealer or authorized Audi
“min” > page 279. Service Facility to determine the cause.
Please note that an exact oil consumption
@) Note measurement must be done with the neces-
sary care and accuracy and may take time.
An authorized Audi dealer or authorized
Audi Service Facility is trained in accurately
@ Tips measuring the oil consumption.
— You can find information on engine oil and
engine oil capacities for the USA at www.
audiusa.com/help/maintenance, or for Can-
ada at www.audi.ca/ca/web/en/
customer-area/care-and-maintenance/
audi-service-schedules.html, or call
800-822-2834.
If the engine oil level is too low or too high,
there is a risk of engine damage.
The oil level indicator in the display is only an
informational display. If the oil level is too
low, a minimum oil warning appears in the in-
strument cluster. Add oil and close the hood.
The current oil level will be displayed on the
MMI the next time the ignition is switched on.
@ Tips
The engine oil consumption may be up to oscil NT UII
0.5 quart/600 miles (0.5 liter/1,000 km), de-
pending on driving style and operating condi-
tions. Consumption may be higher during the
first 3,000 miles (5,000 km). The engine oil
level must be checked regularly. It is best to
check each time you refuel your vehicle and
before long drives.
— Because of the lubrication and cooling of
the engine, combustion engines consume
oil. The oil consumption varies depending
RAZ-0013|
Fig. 184 Engine compartment: engine oil filling opening
on the engine and may change during the cover (example)
service life of the engine. Engines generally
consume more oil at the beginning during Follow the safety precautions > page 274, Gener-
the break-in period. Then oil consumption al information.
stabilizes after the break-in period.
— Under normal conditions, oil consumption
depends on the quality and viscosity of the
oil, the engine RPM, the climate conditions,
and the road conditions. The dilution of oil
from condensation or fuel residue as well as oil > page 277.
the age of the oil also play a role. Because > Close the engine oil filler opening cap.
engine wear increases with mileage, oil con- > Close the hood & page 276.
sumption will increase again over time until
it may be necessary to replace worn compo-
nents.
> Turn the engine off.
> Open the hood > page 276.
» Unscrew the cap %~ for the engine oil filler
opening > fig. 184.
> Carefully add 0.5 quart (0.5 liter) of the correct
279
Page 287 of 360
4N0012721BD
Checking and Filling
Multiple batteries with different technologies
may be installed in your vehicle:
— Vehicle battery (for example, for starting the
engine, basic power supply) > page 285, 12
Volt vehicle battery or > page 286, Other bat-
tery types
— Auxiliary battery (for example, for recuperation
or optional equipment) > page 286, Other bat-
tery types
— Applies to: Plug-in hybrid drive: High-voltage
battery (for example, for electric driving)
= page 136, Introduction.
Not running the vehicle for long periods of
time
The battery will gradually drain if the vehicle
does not run for long periods of time. To ensure
that the vehicle can still be started, the electrical
equipment will be limited or switched off. Some
convenience functions, such as interior lighting
or power seat adjustment, may not be available
under certain circumstances. The convenience
functions will be available again when you start
the
engine.
Even when electrical equipment is switched off,
the equipment can still drain the battery if the
vehicle is not driven for Long periods of time.
Deep draining results in a chemical reaction that
destroys the inside of the battery. The battery
must be charged every month to prevent this
= page 286. Contact an authorized Audi dealer or
authorized Audi Service Facility for more infor-
mation.
Winter operation
Cold weather places an especially high load on
the 12 Volt vehicle battery. Have the battery
checked by an authorized Audi dealer or author-
ized Audi Service Facility before cold weather be-
gins.
authorized Audi dealer or authorized Audi
Service Facility.
— Never connect a charging cable or jump
start cable directly to the 12 Volt vehicle
battery. Only use the connections in the en-
gine compartment > page 286.
Z\ WARNING
California Proposition 65 Warning:
— Battery posts, terminals and related acces-
sories contain lead and lead compounds,
chemicals known to the State of California
to cause cancer and reproductive harms.
Wash hands after handling.
@) Note
— If the vehicle will be parked for long periods
of time, protect the battery against the cold
so that it will not be destroyed by “freezing”
=> page 286, Charging the 12 Volt vehicle
battery.
— There are electrical components under the
cargo floor behind a trim panel that warm
up during operation. To reduce the risk of
the components overheating, do not store
objects such as blankets under the cargo
floor. If the components overheat, they will
switch off temporarily. This will be indicated
by a message that will be displayed in the
instrument cluster until the temperature re-
turns to normal.
PAO A Ula wer Lasley,
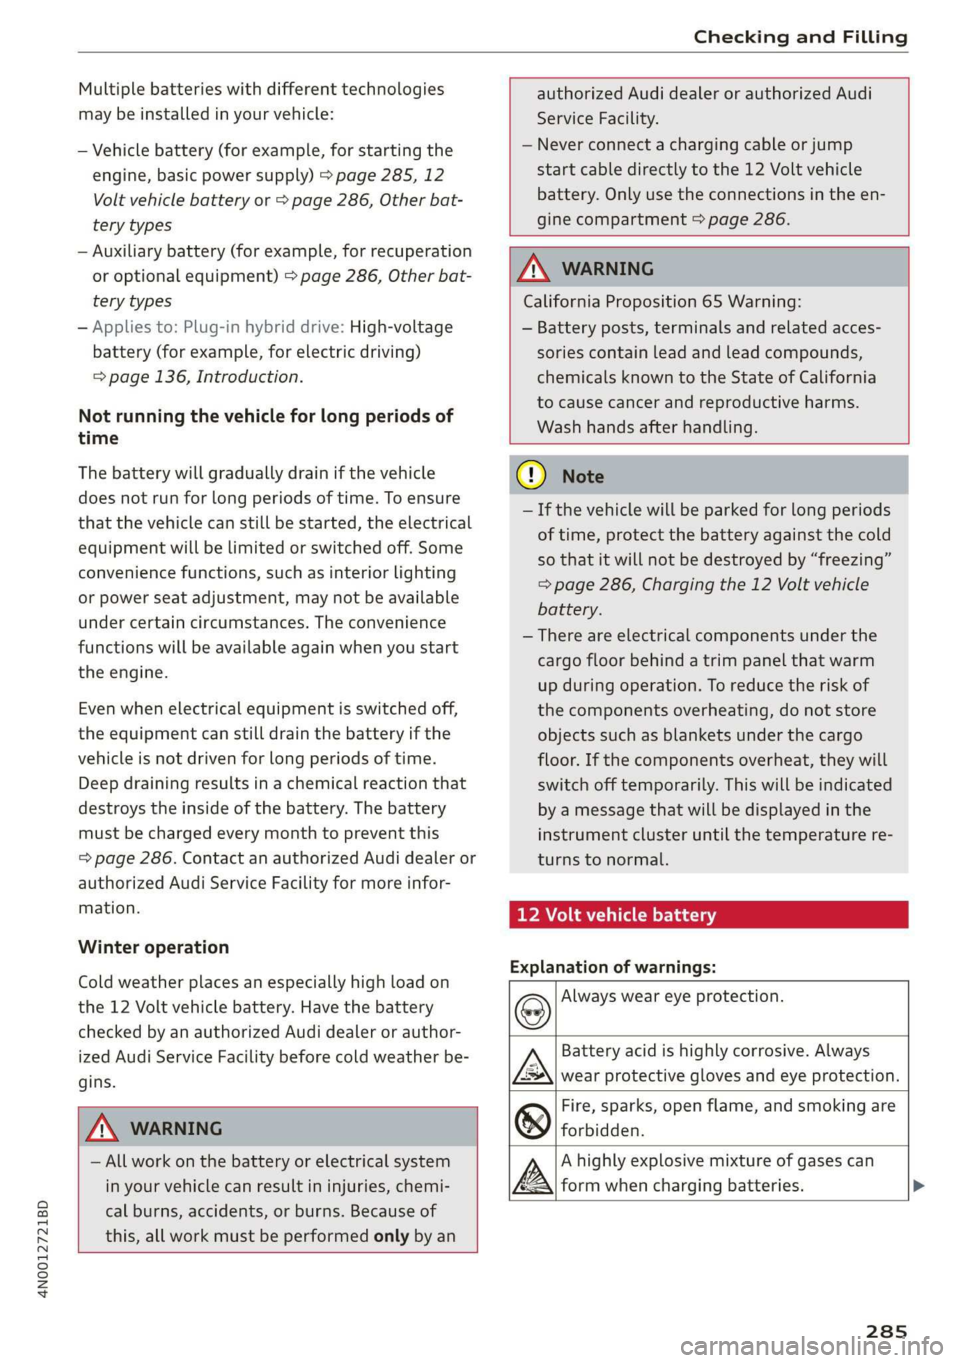
Explanation of warnings:
Always wear eye protection.
ZA\ WARNING
— All work on the battery or electrical system
in your vehicle can result in injuries, chemi-
cal burns, accidents, or burns. Because of
this, all work must be performed only by an
Fire, sparks, open flame, and smoking are
forbidden.
Battery acid is highly corrosive. Always
wear protective gloves and eye protection.
A highly explosive mixture of gases can
form when charging batteries. >
285
Page 289 of 360
4N0012721BD
Checking and Filling
AN WARNING
— Never connect a charging cable or jump
start cable directly to the 12 Volt vehicle
battery. Only use the connections in the en-
gine compartment > page 286.
— A highly explosive mixture of gases can form
when charging batteries. Only charge the
battery in well-ventilated areas.
— A drained battery can freeze at tempera-
tures around 32 °F (0 °C). Do not charge or
use a frozen or thawed battery. If ice forms,
the battery housing can crack and battery
electrolyte can leak out, which increases the
risk of an explosion and chemical burns.
Contact an authorized Audi dealer or author-
ized Audi Service Facility for more informa-
tion.
— Do not connect or disconnect the charging
cable while charging because this increases
the risk of an explosion.
@) Tips
Read all of the manufacturer's instructions
for the charger before charging the battery.
Windshield washer
system
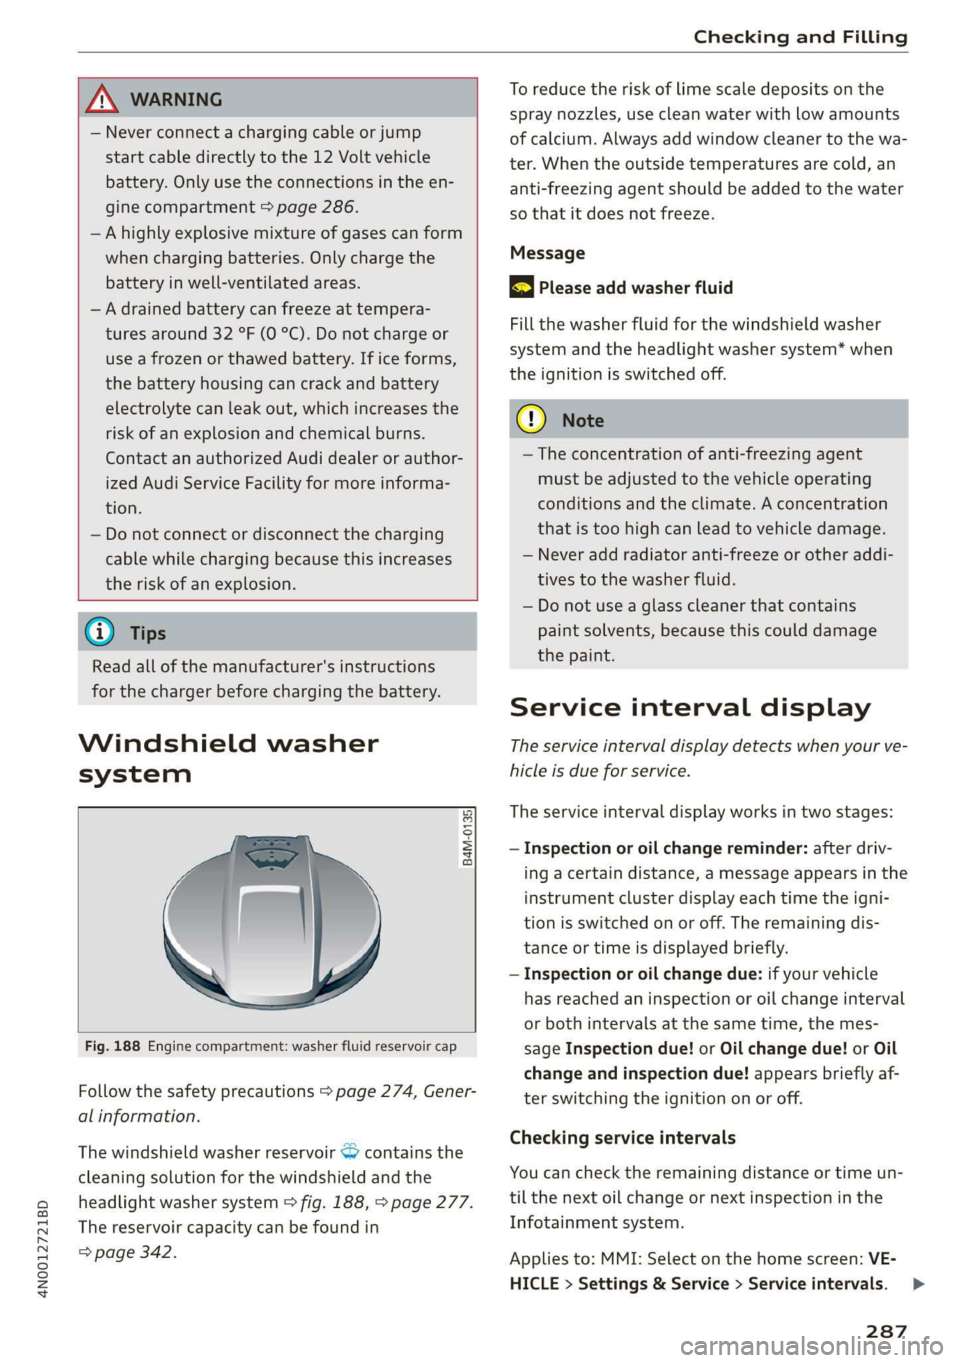
B4M-0135,
Fig. 188 Engine compartment: washer fluid reservoir cap
Follow the safety precautions > page 274, Gener-
al information.
The windshield washer reservoir > contains the
cleaning solution for the windshield and the
headlight washer system > fig. 188, > page 277.
The reservoir capacity can be found in
=> page 342.
To reduce the risk of lime scale deposits on the
spray nozzles, use clean water with low amounts
of calcium. Always add window cleaner to the wa-
ter. When the outside temperatures are cold, an
anti-freezing agent should be added to the water
so that it does not freeze.
Message
gS Please add washer fluid
Fill the washer fluid for the windshield washer
system and the headlight washer system* when
the ignition is switched off.
() Note
—The concentration of anti-freezing agent
must be adjusted to the vehicle operating
conditions and the climate. A concentration
that is too high can lead to vehicle damage.
— Never add radiator anti-freeze or other addi-
tives to the washer fluid.
— Do not use a glass cleaner that contains
paint solvents, because this could damage
the paint.
Service interval display
The service interval display detects when your ve-
hicle is due for service.
The service interval display works in two stages:
— Inspection or oil change reminder: after driv-
ing a certain distance, a message appears in the
instrument cluster display each time the igni-
tion is switched on or off. The remaining dis-
tance or time is displayed briefly.
— Inspection or oil change due: if your vehicle
has reached an inspection or oil change interval
or both intervals at the same time, the mes-
sage Inspection due! or Oil change due! or Oil
change and inspection due! appears briefly af-
ter switching the ignition on or off.
Checking service intervals
You can check the remaining distance or time un-
til the next oil change or next inspection in the
Infotainment system.
Applies to: MMI: Select on the home screen: VE-
HICLE > Settings & Service > Service intervals.
287
>
Page 290 of 360
Checking and Filling
Applies to: Audi tablet: Select on the home
screen: VEHICLE > Service intervals.
Resetting the indicator
An authorized Audi dealer or authorized Audi
Service Facility will reset the service interval dis-
play after performing service.
If you have changed the oil yourself, you must re-
set the oil change interval.
Applies to: MMI: To reset the display, select on
the home screen: VEHICLE > Settings & Service
> Service intervals.
@) Note
— Only reset the oil change indicator if the oil
was changed.
— Following the service intervals is critical to
maintaining the service life and value of
your vehicle, especially the engine. Even if
the mileage on the vehicle is low, do not ex-
ceed the time for the next service.
288
Page 306 of 360
Wheels
exceed the available cargo and
luggage load capacity calculat-
ed in Step 4.
6. If your vehicle will be towing a
trailer, load from your trailer
will be transferred to your vehi-
cle. Consult this manual to de-
termine how this reduces the
available cargo and luggage
load capacity of your vehicle.
> Check the tire sidewall
(=> page 290, fig. 189) to deter-
mine the designated load rating
for a specific tire.
Wheel bolts and rims
Wheel bolts
Wheel bolts must be clean and loosen/tighten
easily. You will need a special adapter to loosen
the anti-theft wheel bolts* > page 319.
Rims
Rims with a bolted rim ring* or with bolted wheel
covers* consist of multiple pieces. These compo-
nents were bolted together using special bolts
and a special procedure. You must not repair or
disassemble them > A\.
ZA WARNING
Wheel bolts that are tightened or repaired in-
correctly can become loose and result in loss
of vehicle control, which increases the risk of
an accident. For the correct tightening specifi-
cation, see > page 322, Finishing.
— Always keep the wheel bolts and the threads
in the wheel hub clean and free of grease.
— Only use wheel bolts that fit the rim.
— Always have damaged rims repaired by an
authorized Audi dealer or authorized Audi
Service Facility. Never repair or disassemble
304
rims yourself, because this increases the risk
of
an accident.
Loose wheel warning
Applies to: vehicles with loose wheel warning
Within the limits of the system, the loose wheel
warning in the instrument cluster warns you if
one or more wheels are loose.
Using the ABS sensors, the loose wheel warning
system compares the vibration characteristics of
the individual tires. If one or more wheels are
loose, it will be indicated in the instrument clus-
ter display with the fi indicator light and a mes-
sage. If only one wheel is affected, the location
of that wheel will be indicated.
Messages
fi Wheel bolts loose. Please safely stop the ve-
hicle and check all wheel bolts!
Loose wheel warning for at least one wheel > A\.
Check the wheel bolts on all wheels with the
wheel wrench (vehicle tool kit). Have the tighten-
ing specification checked as soon as possible with
a torque wrench. Drive carefully until then. For
the correct tightening specification, see
=> page 322, Finishing.
fi Wheel assessment active. Please continue
driving carefully
After this message appears and you have checked
the wheel bolts, the assessment phase begins
when the vehicle is in motion. This may take sev-
eral minutes.
& Loose wheel warning: malfunction! See
owner's manual
There is a system malfunction. Drive immediately
to an authorized Audi dealer or authorized Audi
Service Facility to have the malfunction repaired.
ZA\ WARNING
Wheel bolts that are tightened incorrectly can
become loose and result in loss of vehicle con-
trol, which increases the risk of an accident.
— If a message appears, reduce your speed im-
mediately and avoid any hard steering or >
Page 309 of 360

4N0012721BD
Wheels
AN WARNING
The traction grade assigned to this tire is
based on straight-ahead braking traction
tests, and does not include acceleration, cor-
nering, hydroplaning or peak traction charac-
teristics.
ZA\ WARNING
The temperature grade for this tire is estab-
lished for a tire that is properly inflated and
not overloaded. Excessive speed, underinfla-
tion, or excessive loading, either separately or
in combination, can cause heat buildup and
possible tire failure.
Z\ WARNING
Temperature grades apply to tires that are
properly inflated and not over or underinflat-
ed.
Tire pressure monitoring
system
(1) General notes
Each tire, including the spare (if provided),
should be checked monthly when cold and inflat-
ed to the inflation pressure recommended by the
vehicle manufacturer on the vehicle placard or
tire
inflation pressure label. (If your vehicle has
tires of a different size than the size indicated on
the vehicle placard or tire inflation pressure la-
bel, you should determine the proper tire infla-
tion pressure for those tires).
As an added safety feature, your vehicle has been
equipped with a tire pressure monitoring system
(TPMS) that illuminates a low tire pressure tell-
tale when one or more of your tires is significant-
ly under-inflated. Accordingly, when the low tire
pressure telltale illuminates, you should stop and
check your tires as soon as possible, and inflate
them to the proper pressure. Driving on a signifi-
cantly under-inflated tire causes the tire to over-
heat and can lead to tire failure. Under-inflation
also reduces fuel efficiency and tire tread life,
and may affect the vehicle's handling and stop-
ping ability.
Please note that the TPMS is not a substitute for
proper tire maintenance, and it is the driver's re-
sponsibility to maintain correct tire pressure,
even if under-inflation has not reached the level
to trigger illumination of the TPMS low tire pres-
sure telltale.
Your vehicle has also been equipped with a TPMS
malfunction indicator to indicate when the sys-
tem is not operating properly. The TPMS mal-
function indicator is combined with the low tire
pressure telltale. When the system detects a
malfunction, the telltale will flash for approxi-
mately one minute and then remain continuously
illuminated. This sequence will continue upon
subsequent vehicle start-ups as long as the mal-
function exists.
When the malfunction indicator is illuminated,
the system may not be able to detect or signal
low
tire pressure as intended. TPMS malfunctions
may occur for a variety of reasons, including the
installation of replacement or alternate tires or
wheels on the vehicle that prevent the TPMS
from functioning properly. Always check the
TPMS malfunction telltale after replacing one or
more tires or wheels on your vehicle to ensure
that the replacement or alternate tires and
wheels allow the TPMS to continue to function
properly.
ee emule Melle
appears
Applies to: vehicles with Tire Pressure Monitoring System
The tire pressure indicator in the instrument
cluster informs you if the tire pressure is too low
or if there is a system malfunction.
Using the ABS sensors, the tire pressure monitor-
ing system compares the tire tread circumference
and vibration characteristics of the individual
tires. If the pressure changes in one or more
tires, this is indicated in the instrument cluster
display with an indicator light @ and a message.
If only one tire is affected, the location of that
tire will be indicated.
The tire pressures must be stored again each
time you change the pressures (switching be-
tween partial and full load pressure) or after
307
>
Page 310 of 360

Wheels
changing or replacing a tire on your vehicle
=> page 308. The tire pressure monitoring system
only monitors the tire pressure you have stored.
Refer to the tire pressure label for the recom-
mended tire pressure for your vehicle
=> page 299, fig. 192.
Tire tread circumference and vibration character-
istics can change and cause a tire pressure warn-
ing if:
— The tire pressure in one or more tires is too low
— The tires have structural damage
— The tire was replaced or the tire pressure was
changed and it was not stored > page 308
— Tires that are only partially used are replaced
with new tires
Indicator lights
® - Loss of pressure in at least one tire > A\.
Check the tires and replace or repair if necessary.
Check and correct the pressures of all four tires
and store the pressure again > page 308.
is (Tire Pressure Monitoring System) Tire pres-
sure: malfunction! See owner's manual. If fi
appears after switching the ignition on or while
driving and the @ indicator light in the instru-
ment cluster blinks for approximately one minute
and then stays on, there is system malfunction.
Try to store the correct tire pressures
= page 308. In some cases, you must drive for
several minutes after storing the pressures until
the indicator light turns off. If the indicator light
does turn off or turns on again after a short peri-
od of time, drive to an authorized Audi dealer or
authorized Audi Service Facility immediately to
have the malfunction corrected.
ZA WARNING
— If the tire pressure indicator appears in the
display, reduce your speed immediately and
avoid any hard steering or braking maneu-
vers. Stop as soon as possible and check the
tires and their pressure.
— The driver is responsible for maintaining the
correct tire pressure. You must check the
tire pressure regularly.
— Under certain conditions (such as a sporty
driving style, winter conditions, or unpaved
308
roads), the tire pressure monitoring system
indicator may be delayed.
@ Tips
—The tire pressure monitoring system can al-
so stop working when there is an ESC mal-
function.
— Using snow chains may result in a system
malfunction.
—The tire pressure monitoring system in your
Audi was calibrated with “Audi Original
Tires” > page 296. Using these tires is rec-
ommended.
Storing tire pressures
Applies to: vehicles with Tire Pressure Monitoring System
If the tire pressure changes or a tire is replaced,
it must be confirmed in the MMI.
> Before storing the tire pressures, make sure the
tire pressures in all four tires meet the speci-
fied values and are adapted to the load
=> page 299.
> Switch the ignition on.
> Applies to: MMI: Select on the home screen:
VEHICLE > Settings & Service > Tire pressure
monitoring > Store tire pressure > Yes, store
now.
@ Tips
Do not store the tire pressures if snow chains
are installed.
Page 314 of 360

Care and cleaning
Component Situation Solution
Plastic parts Deposits Damp cloth
Heavier deposits Mild soap solution ®), detergent-free plastic cleaning solu-
tion, if necessary
Water-based deposits
such as coffee, tea,
blood, etc.
Displays/instru- | Deposits Soft cloth with LCD cleaner; dust in the lower area of the
ment cluster instrument cluster can be removed using a soft brush.
Controls Deposits Soft brush, then a soft cloth with a mild soap solution®)
Safety belts Deposits Mild soap solution ®), allow to dry before letting them re-
tract
Textiles, Deposits adhering to | Vacuum cleaner
artificial leather, |the surface
Alcantara Absorbent cloth and mild soap solution®
Oil-based deposits
such as oil, make-up,
etc.
Apply a mild soap solution ®), blot away the dissolved oil or
dye, treat afterward with water, if necessary
Certain types of de-
posits such as ink,
nail polish, latex
paint, shoe polish,
etc.
Special stain remover, blot with absorbent material, treat
afterward with mild soap solution, if necessary®)
Natural leather
Fresh stains Cotton cloth with a mild soap solution®
Water-based deposits
such as coffee, tea,
blood, etc.
Fresh stains: absorbent cloth
Dried stains: stain remover suitable for leather
Oil-based deposits
such as oil, make-up,
etc.
Fresh stains: absorbent cloth and stain remover suitable
for leather
dried stains: Oil cleaning spray
Certain types of de-
posits such as ink,
nail polish, latex
paint, shoe polish,
etc.
Spot remover suitable for leather
Care
Regularly apply conditioning cream that protects from
light and penetrates into the material. Use special colored
conditioning cream, if necessary.
312
Page 316 of 360

Care and cleaning
—To reduce the risk of damage, do not use
any rough powder or abrasive cleaning
products.
—To reduce the risk of damage, do not pol-
ish decorative decals that have a matte or
printed finish.
— Due to the risk of damage, do not use an
ice scraper to remove snow and ice on win-
dows with decorative decals on them.
— Displays and instrument cluster
— Make sure that the display and instrument
cluster are switched off and have cooled
down before cleaning. To switch off the
upper and lower display, select on the
MMI home screen: SETTINGS > Display &
brightness > MMI > Screen cleaning.
— Displays, the instrument cluster, and the
trim surrounding it must not be cleaned
with dry cleaning methods because they
could become scratched.
— Make sure no fluids enter the spaces be-
tween the instrument cluster and the
trim, because that could cause damage.
— Controls
— Make sure that no fluids enter the con-
trols, because this could cause damage.
— Safety belts
— Do not remove the safety belts to clean
them.
— Never clean safety belts or their compo-
nents with chemicals or with corrosive flu-
ids or solvents and never allow sharp ob-
jects to come into contact with the safety
belts. This could cause damage to the belt
webbing.
—If there is damage to the webbing, the
connections, the retractors, or the buck-
les, have them replaced by an authorized
Audi dealer or authorized Audi Service Fa-
cility.
— Textiles, artificial leather, and Alcantara
— Never treat artificial leather or Alcantara
with leather care products, solvents, floor
polish, shoe polish, spot remover, or simi-
lar products.
— Have a cleaning specialist remove stub-
born stains to reduce the risk of damage.
314
— Never use steam cleaners, brushes, hard
sponges, etc. when cleaning.
— Do not turn on the seat heating* to dry
the seat.
— Objects with sharp edges, such as zippers
or rivets on clothing or belts, can cause
damage to the surface.
— Open hook and loop fasteners, for exam-
ple on clothing, can damage seat covers.
Make sure hook and loop fasteners are
closed.
— Natural leather
— Never treat leather with solvents, floor
polish, shoe polish, spot remover or simi-
lar products.
— Objects with sharp edges, such as zippers
or rivets on clothing or belts, can cause
damage to the surface.
— Never use steam cleaners, brushes, hard
sponges, etc. when cleaning.
— Do not turn on the seat heating* to dry
the seat.
— To help prevent the leather from fading,
do not leave the vehicle in direct sunlight
for long periods of time. If leaving the ve-
hicle parked for long periods of time, you
should cover the leather to protect it from
direct sunlight.
— Refrigerator
— Do not try to speed up the defrosting
process by applying heat.
—To help prevent health risks or damage to
the refrigerator, do not use any abrasive
cleaners, solvents, wax, or strongly scent-
ed or aggressive cleaning products.
— Do not clean the refrigerator with rough
cleaning tools such as steel wool.
— Wall mount clip
— Do not us any abrasive cleaning products
or any that contain alcohol, because these
increase the risk of discoloration.
G) Tips
— Insects are easier to remove from paint that
has been freshly waxed.
— Regular waxing can prevent rust spots from
forming.
Page 330 of 360
Fuses and bulbs
This can cause damage to the electrical sys-
tem and increases the risk of fire.
(G) Note
If a new fuse burns out again shortly after you
have installed it, have the electrical system
checked as soon as possible by an authorized
Audi dealer or authorized Audi Service Facili-
- The following table does not list fuse loca-
tions that are not used.
— Some of the equipment listed in the follow-
ing tables applies only to certain model ver-
sions or certain optional equipment.
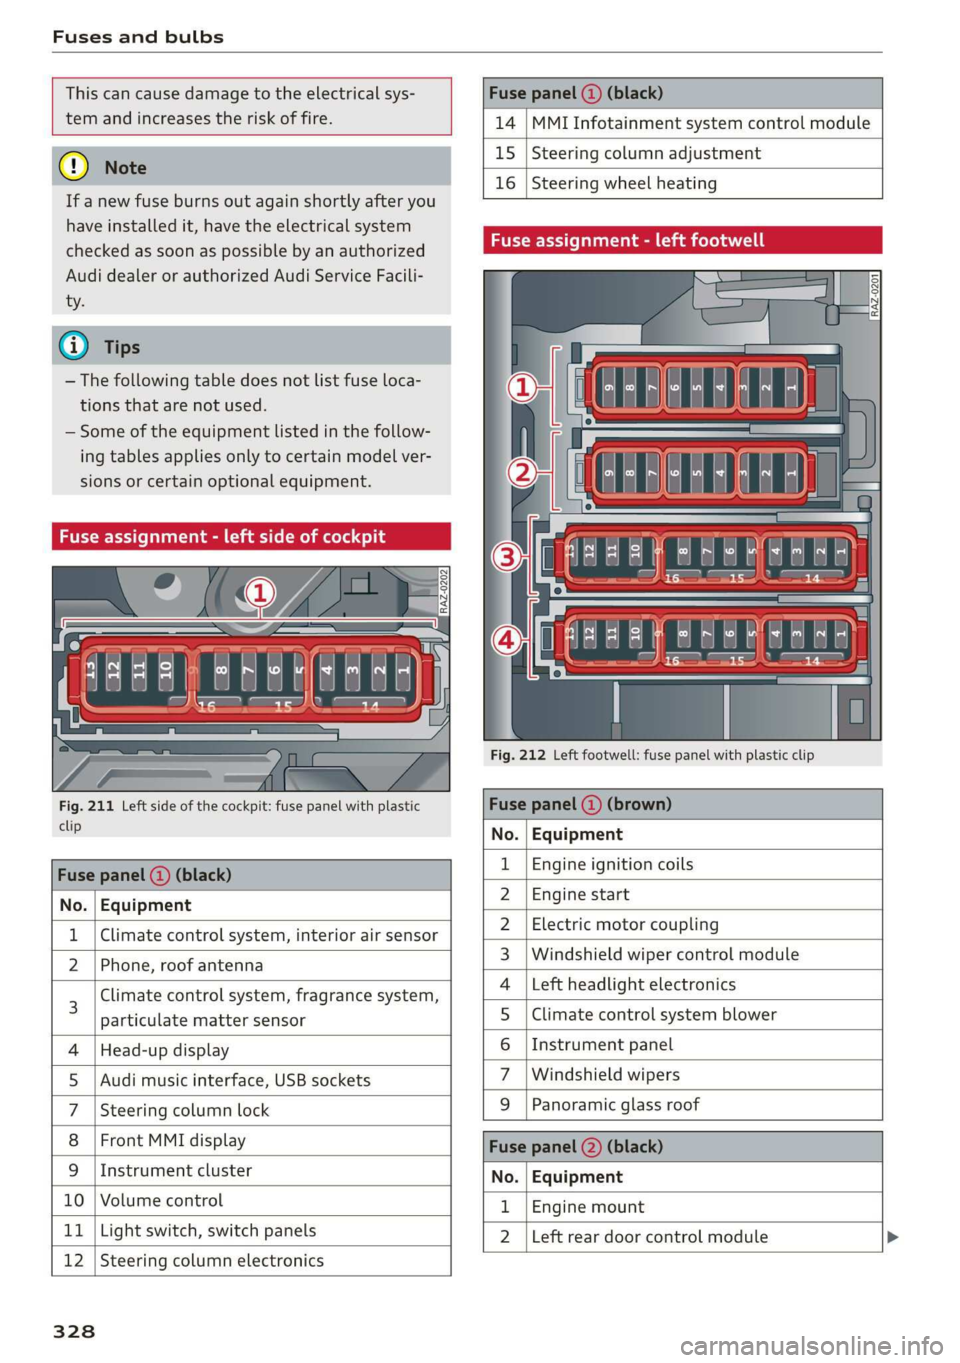
Fuse assignment - left side of cockpit
Fig. 211 Left side of the cockpit: fuse panel with plastic
clip
Fuse panel (2) (black)
No. | Equipment
Climate control system, interior air sensor
N Phone, roof antenna
Climate control system, fragrance system,
particulate matter sensor
Head-up display
Audi music interface, USB sockets
Steering column lock
Front MMI display
Instrument cluster
Ol/aOIN/uys
10 | Volume control
11 | Light switch, switch panels
12 | Steering column electronics
328
Fuse panel (@ (black)
14 MMI Infotainment system control module
15 Steering column adjustment
16
Steering wheel heating
Fuse assignment - left footwell
lo} | He
ia i, L
. | Equipment
Engine ignition coils
Engine start
Electric motor coupling
Windshield wiper control module
Left headlight electronics
Climate control system blower
Instrument panel
Windshield wipers
OND)
OMA)
WININI]
eR
Panoramic glass roof
Fuse panel (2) (black)
No. Equipment
Engine mount
Left rear door control module