tow AUDI A8 2020 User Guide
[x] Cancel search | Manufacturer: AUDI, Model Year: 2020, Model line: A8, Model: AUDI A8 2020Pages: 360, PDF Size: 95.38 MB
Page 36 of 360
Touch displays
Switching between Audi applications and
non-vehicle applications
To switch between the home screens of both sec-
tions, press the buttons @) or @).
@) Tips
— AUDI AG merely provides access to non-ve-
hicle applications and does not assume any
responsibility for the content.
— Do not install any applications from unoffi-
cial or unknown sources.
Connecting to the MMI
Applies to: vehicles with Audi tablet
To use Audi tablet functions in connection with
the vehicle (for example, using MMI media sour-
ces), you can connect the Audi tablet to the MMI.
Requirement: the ignition must be switched on.
> To connect the Audi tablet to the MMI, secure it
in the retainer > page 30.
When a connection to the MMI is active, the &—
symbol is displayed in the status bar.
G) Tips
The connection to the MMI is also maintained
if you remove the Audi tablet from the holder.
For this to happen, the ignition must be
switched on and the Audi tablet must be with-
in range of the activated vehicle Wi-Fi hot-
spot.
Applies to: vehicles with Audi tablet
The task manager displays all active applications.
You have the option to close them or switch be-
tween active applications.
Opening the task manager
> Press L]@ © page 33, fig. 28.
Switching to an active application
> If necessary, use your finger to drag upward/
downward in the task manager until the de-
sired application is displayed as a thumbnail.
> Press on the application thumbnail.
34
Closing the application
> Press X in an application thumbnail, or
> Pull an application thumbnail toward the left/
right edge of the screen until the application
closes, or
> Press & to close all applications at once.
Closing the task manager
> Press LJ or <1.
G) Tips
The Audi tablet automatically closes any ap-
plications in the background to optimize de-
vice performance.
Adjusting the audio output
Applies to: vehicles with Audi tablet
The sound from the active audio source can be
played through the vehicle speakers or the head-
phones connected to the Audi tablet.
The audio output through the vehicle speakers
can be switched on for the left or right Audi tab-
let. The audio output for the other Audi tablet
can run through the headphones at the same
time.
Requirement: the Audi tablet must be connected
to the MMI & page 34. Audi tablet access to the
speakers must be permitted > page 35.
> To open the quick access @) > page 33, fig. 28,
use
your finger to swipe downward from the
top of the screen
> Select ‘@) Activate audio via MMI or (>t Audio
through headphones.
The following table gives an overview of the au-
dio output status. The respective symbol is dis-
played in the quick access:
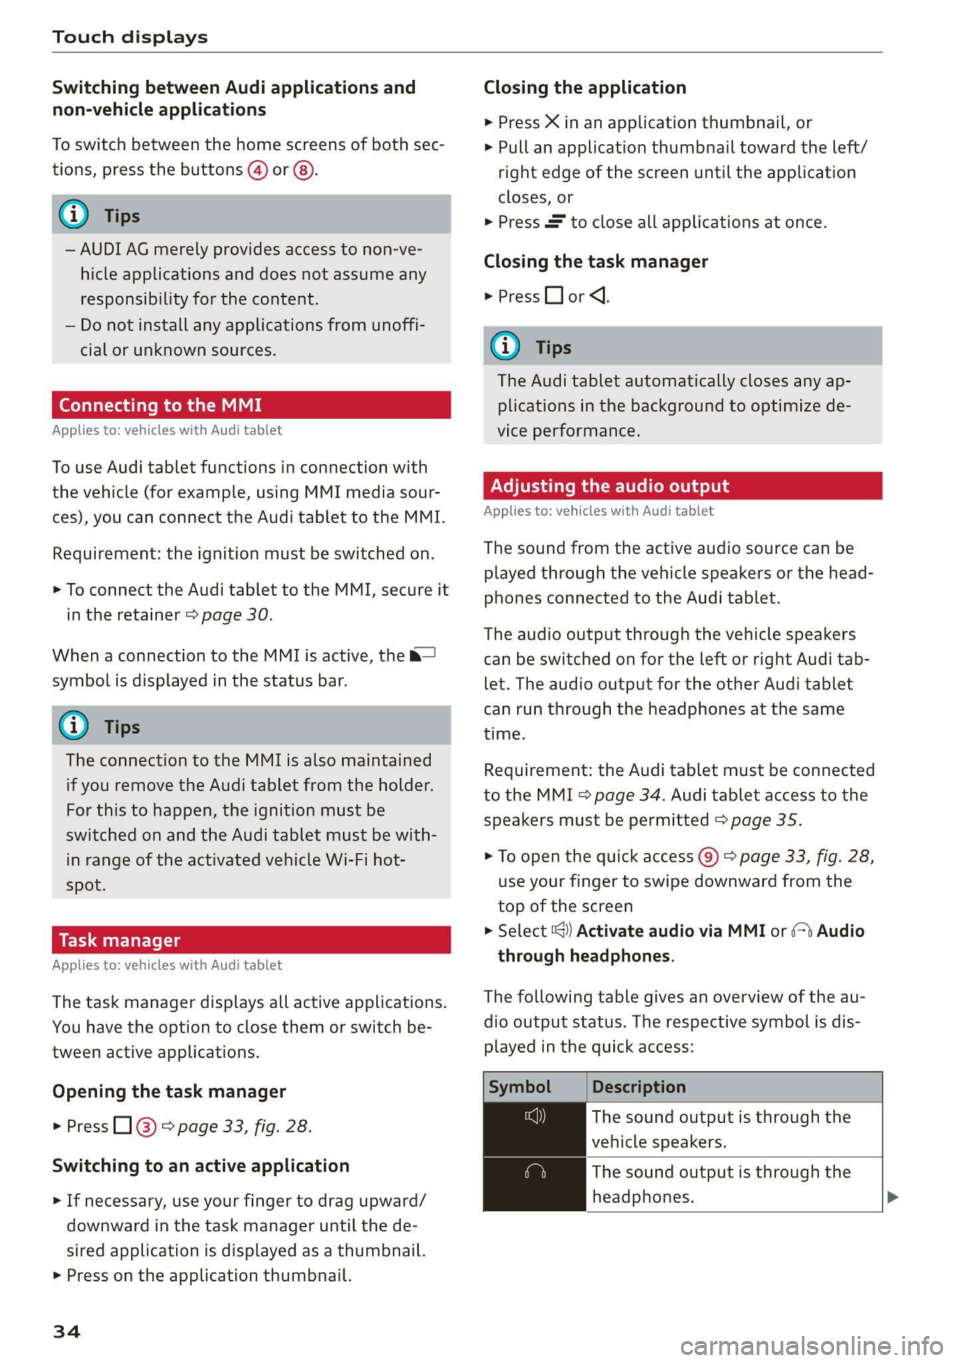
Symbol Description
The sound output is through the
vehicle speakers.
The sound output is through the
headphones. >
Page 40 of 360
Voice recognition system
Voice recognition system
General information
Applies to: vehicles with voice recognition system
You can operate many functions in the vehicle
easily using voice commands.
Using the voice recognition system optimally
> Speak clearly and distinctly at a normal volume.
Speak louder when driving faster.
> Emphasize the words in the commands evenly
and do not leave long pauses.
> Close the doors, the windows, and the sunroof*
to reduce background noise. Make sure that
passengers are not speaking when you are giv-
ing a voice command.
> Do not direct the vents toward the hands-free
microphone, which is in the roof headliner near
the front interior lights.
> Only the driver should speak to the system, be-
cause the handsfree microphone is aimed to-
ward this seating position.
ZA\ WARNING
— Direct your full attention to driving. As the
driver, you have complete responsibility for
safety in traffic. Only use the functions in
such a way that you always maintain com-
plete control over your vehicle in all traffic
situations.
— Do not use the voice recognition system in
emergencies because your voice may change
in stressful situations. The system may take
longer to dial the number or may not be
able to dial it at all. Dial the emergency
number manually.
G) Tips
There are no voice guidance* prompts when a
dialog is active.
38
Operating
Applies to: vehicles with voice recognition system
See
Dat)
Where is a
Connect
Diala
coy
Es
ea
cog
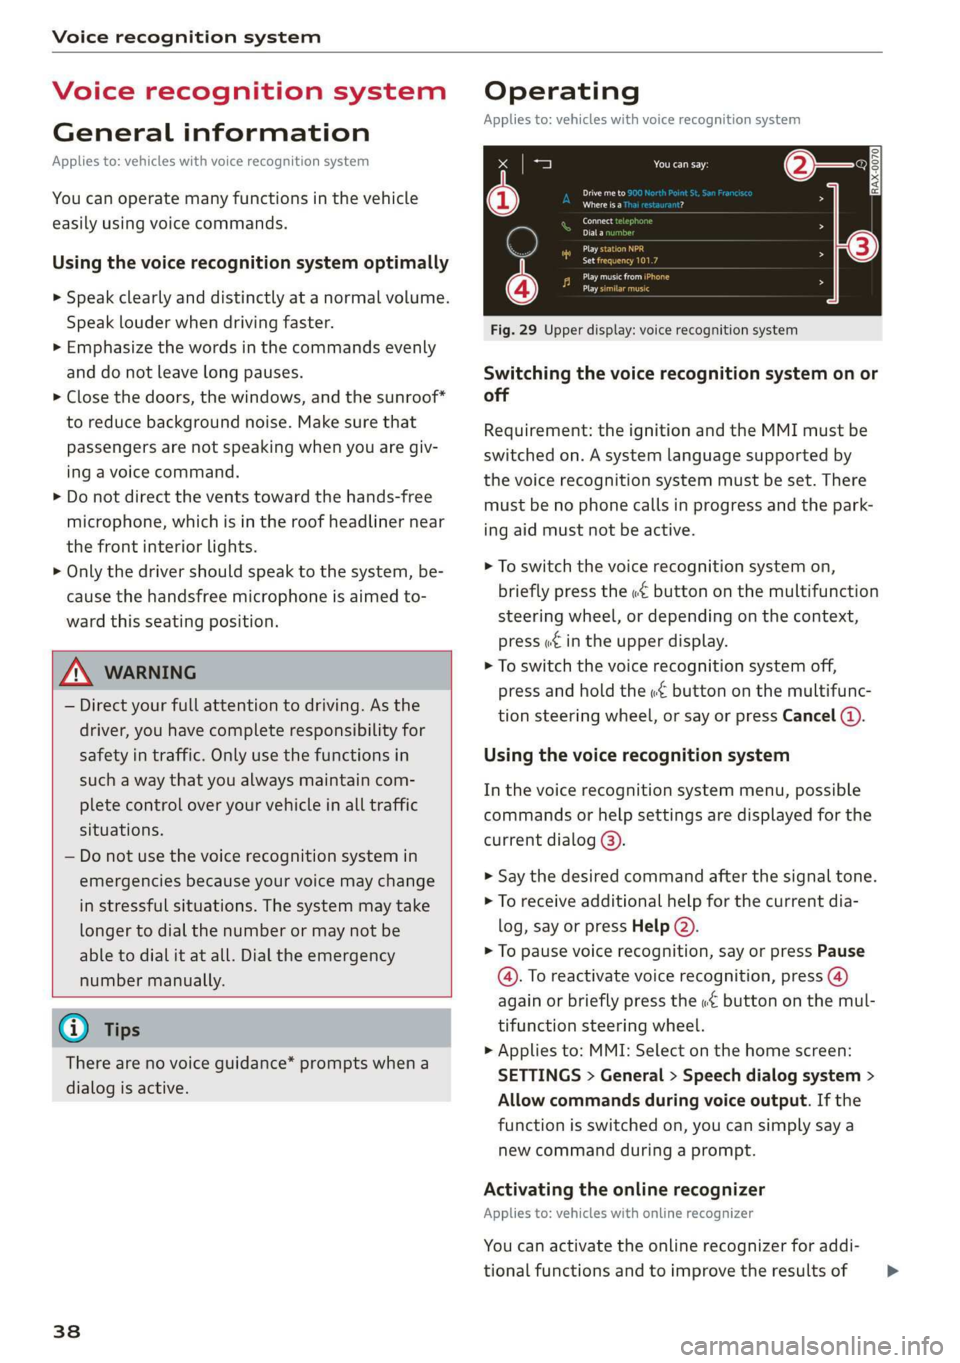
Fig. 29 Upper display: voice recognition system
Switching the voice recognition system on or
off
Requirement: the ignition and the MMI must be
switched on. A system language supported by
the voice recognition system must be set. There
must be no phone calls in progress and the park-
ing aid must not be active.
> To switch the voice recognition system on,
briefly press the «€ button on the multifunction
steering wheel, or depending on the context,
press w¢ in the upper display.
> To switch the voice recognition system off,
press and hold the « button on the multifunc-
tion steering wheel, or say or press Cancel (a).
Using the voice recognition system
In the voice recognition system menu, possible
commands or help settings are displayed for the
current dialog @).
> Say the desired command after the signal tone.
> To receive additional help for the current dia-
log, say or press Help (2).
> To pause voice recognition, say or press Pause
@. To reactivate voice recognition, press (@)
again or briefly press the «€ button on the mul-
tifunction steering wheel.
> Applies to: MMI: Select on the home screen:
SETTINGS > General > Speech dialog system >
Allow commands during voice output. If the
function is switched on, you can simply say a
new command during a prompt.
Activating the online recognizer
Applies to: vehicles with online recognizer
You can activate the online recognizer for addi-
tional functions and to improve the results of >
Page 49 of 360
4N0012721BD
Opening and closing
Interior/towing protection monitor
The alarm will be triggered if there are move-
ments detected in the vehicle interior (for exam-
ple, by animals) or if there is a change in the vehi-
cle angle (for example, when the vehicle is being
towed).
You can prevent the alarm from being triggered
by deactivating the interior/towing protection
monitor.
Deactivating the interior/towing protection
monitor
There are the following options for deactivating
the interior/towing protection monitor:
> Press the @ button on the vehicle key a second
time within two seconds. Or
» Applies to: vehicles with convenience key:
Touch the sensor on the door handle a second
time within two seconds. Or
> Turn the mechanical key in the door lock to the
close position a second time within 2 seconds.
If you lock the vehicle, then the interior/towing
protection monitor will stay off until the next
time the vehicle is unlocked.
ZA WARNING
No one, especially children, should stay in the
vehicle when it is locked from the outside, be-
cause the windows can no longer be opened
from the inside. Locked doors make it more
difficult for emergency workers to enter the
vehicle, which puts lives at risk.
@) Tips
The interior/towing protection monitor only
functions correctly when the windows and the
panorama glass roof* are closed.
=
.
:
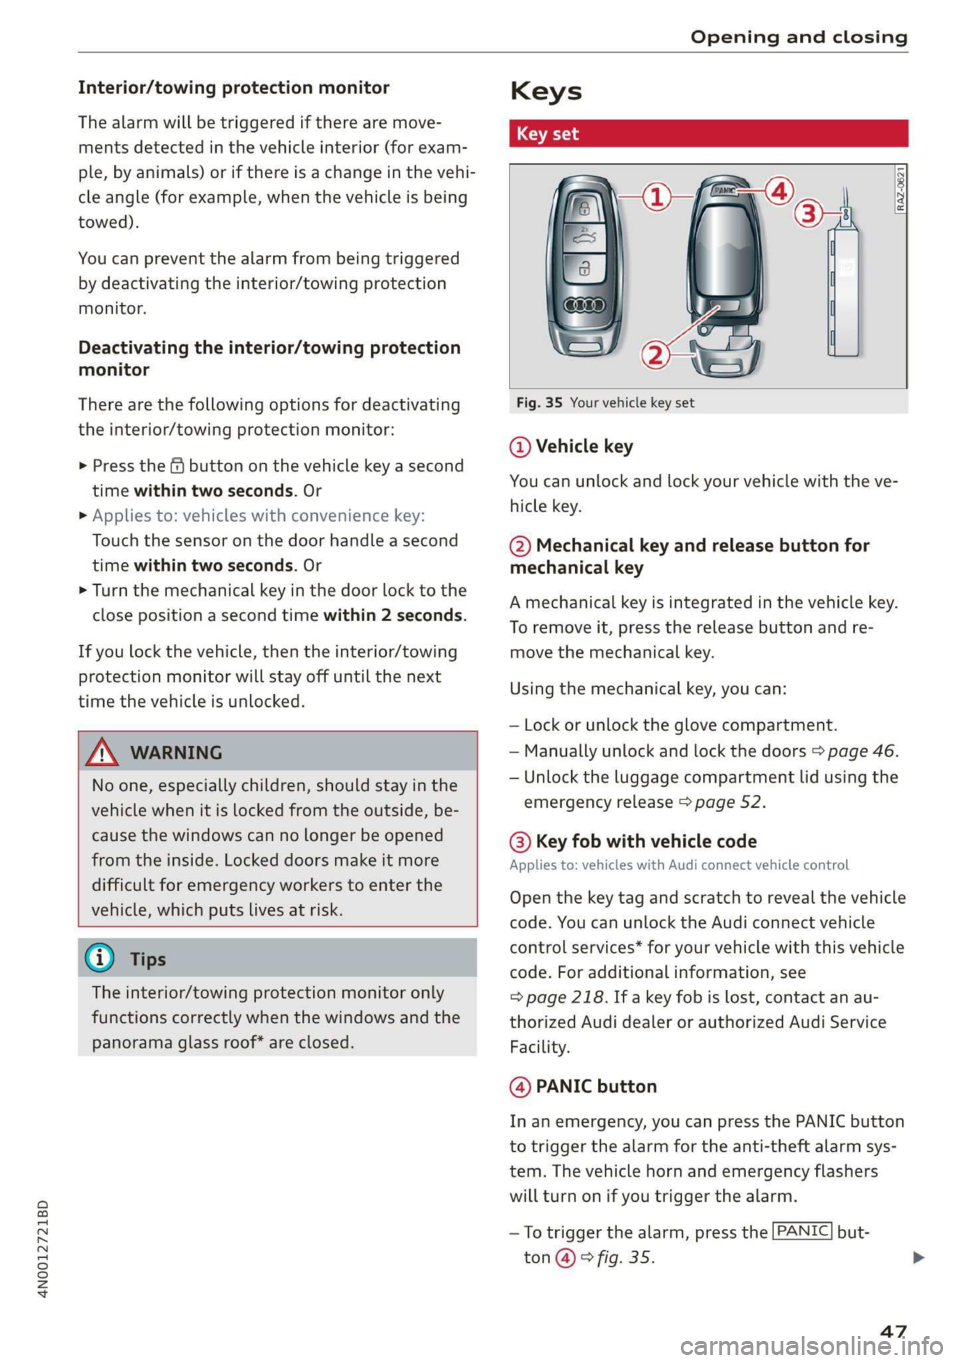
Fig. 35 Your vehicle key set
@ Vehicle key
You can unlock and lock your vehicle with the ve-
hicle key.
@ Mechanical key and release button for
mechanical key
A mechanical key is integrated in the vehicle key.
To remove it, press the release button and re-
move the mechanical key.
Using the mechanical key, you can:
— Lock or unlock the glove compartment.
— Manually unlock and lock the doors > page 46.
— Unlock the luggage compartment lid using the
emergency release > page 52.
@ Key fob with vehicle code
Applies to: vehicles with Audi connect vehicle control
Open the key tag and scratch to reveal the vehicle
code. You can unlock the Audi connect vehicle
control services* for your vehicle with this vehicle
code. For additional information, see
= page 218. If a key fob is lost, contact an au-
thorized Audi dealer or authorized Audi Service
Facility.
@ PANIC button
In an emergency, you can press the PANIC button
to trigger the alarm for the anti-theft alarm sys-
tem. The vehicle horn and emergency flashers
will turn on if you trigger the alarm.
— To trigger the alarm, press the [PANIC but-
ton @ © fig. 35.
47
Page 57 of 360
![AUDI A8 2020 User Guide 4N0012721BD
Opening and closing
Convenience opening and closing the
sunshade*
Applies to: vehicles with power blinds
You can open or close all of the sunshades at
once.
> Press and hold [2:] AUDI A8 2020 User Guide 4N0012721BD
Opening and closing
Convenience opening and closing the
sunshade*
Applies to: vehicles with power blinds
You can open or close all of the sunshades at
once.
> Press and hold [2:]](/img/6/57606/w960_57606-56.png)
4N0012721BD
Opening and closing
Convenience opening and closing the
sunshade*
Applies to: vehicles with power blinds
You can open or close all of the sunshades at
once.
> Press and hold [2:] on the lower display. Or:
> Press and hold the [2:] button in the rear door.
Or:
> Applies to: Rear Seat Remote: Select on the
home screen: Blinds. Press on the picture of
the sunshade to operate it.
ZA WARNING
— Never close the windows or panoramic glass
roof* carelessly or in an uncontrolled man-
ner, because this increases the risk of injury.
— For security reasons, the windows and the
panoramic glass roof* can only be opened
and closed with the vehicle key at a maxi-
mum distance of approximately 6.5 feet
(2 m) from the vehicle. Always pay attention
when using the f button to close the win-
dows and the panoramic glass roof* so that
no one is pinched. The closing process will
stop immediately when the ff button is re-
leased.
Panoramic glass roof
Operating the panoramic glass roof and
coe) mee dar-Le(-)
Applies to: vehicles with panoramic glass roof and roof sun-
shade
Fig. 45 Headliner: panoramic glass roof and sunshade*
buttons
The control buttons are equipped with a two-
stage function. Depending on the equipment, it
RAZ-0027
may also be possible to operate the roof and the
roof sunshade from the rear.
When tilting or opening the roof, the roof sun-
shade will open partially or completely if the sun-
shade is closed.
Operating the front roof sunshade
Requirement: the roof must be closed.
> Opening and closing the sunshade: push the
2D switch in the headliner @) briefly toward
the rear or forward to the second level. Or:
Push or pull the &> switch in the rear briefly
downward or upward to the second level.
> Partially opening the sunshade: press the A>
switch to the first level until the sunshade
reaches the desired position. Or:
> Applies to: Rear Seat Remote: Open or close the
sunshade: select on the home screen: Blinds.
Press on the picture of the sunshade to operate
it.
Operating the rear roof sunshade*
> Opening and closing the sunshade: push the -&
switch in the headliner @) briefly forward or to-
ward the rear to the second level. Or:
> Push or pull the switch in the rear door
briefly downward or upward to the second lev-
el.
> Partially opening the sunshade: press the
switch to the first level until the sunshade
reaches the desired position. Or:
> Applies to: Rear Seat Remote: Select on the
home screen: Blinds. Press on the picture of
the sunshade to operate it.
Operating the roof from the cockpit
> Tilting the roof: press the A> switch in the
headliner briefly upward to the second level (@).
> Closing the tilted roof: pull the 2> switch
downward briefly to the second level.
> Opening the roof: slide the 2s switch back
briefly twice in a row to the second level @).
> Closing the roof: push the 2> switch forward
briefly to the second Level.
> Opening or closing partially: slide the A>
switch to the first level and hold it there until
the roof reaches the desired position.
55
Page 66 of 360
Lights and Vision
Emergency flashers
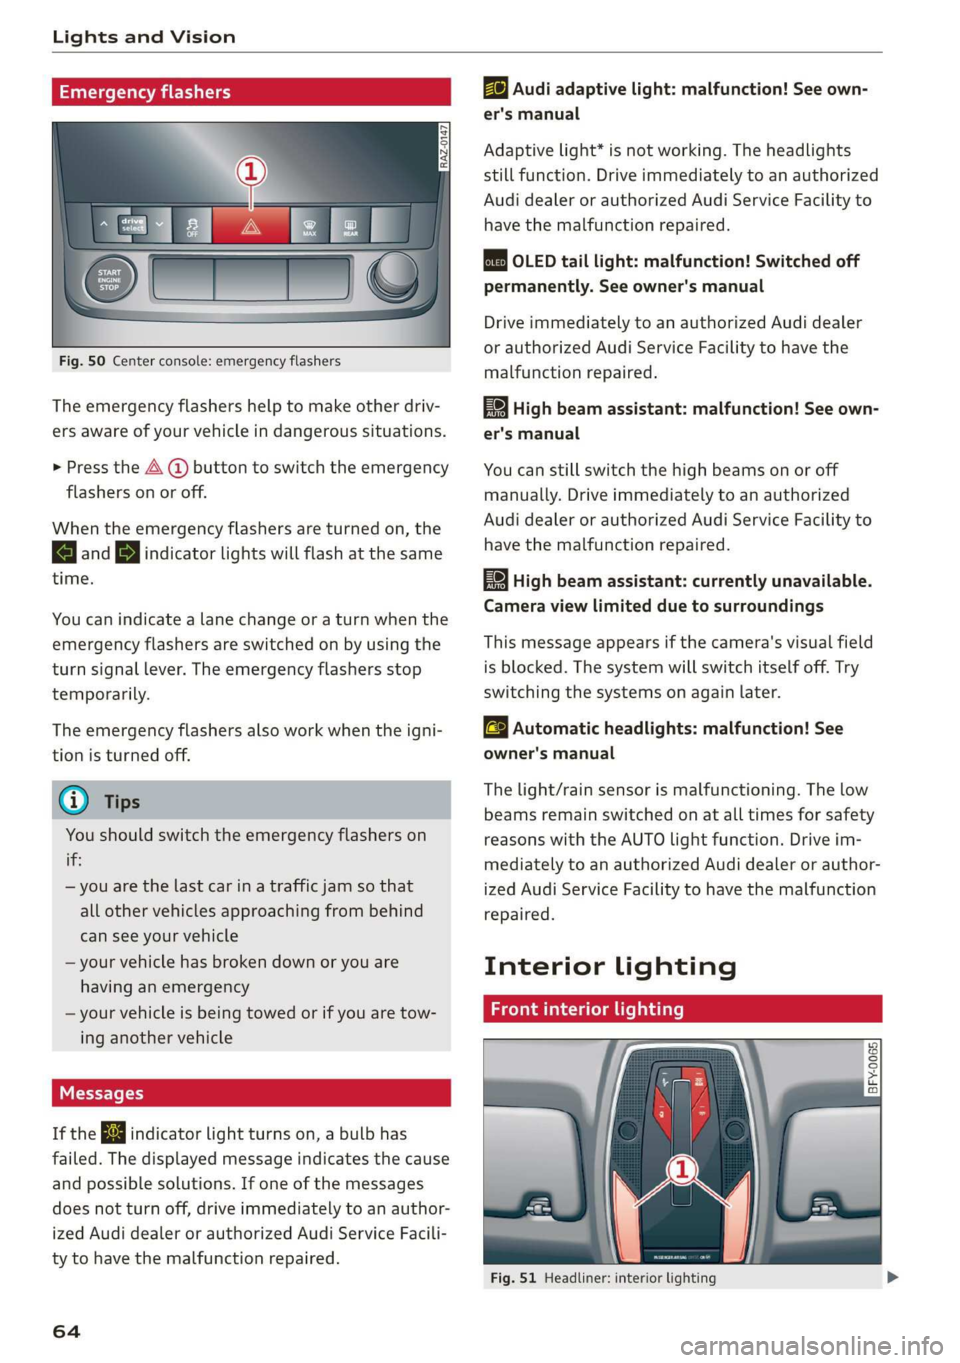
Fig. 50 Center console: emergency flashers
The emergency flashers help to make other driv-
ers aware of your vehicle in dangerous situations.
> Press the A button to switch the emergency
flashers on or off.
When the emergency flashers are turned on, the
a and B&B indicator lights will flash at the same
time.
You can indicate a lane change or a turn when the
emergency flashers are switched on by using the
turn signal lever. The emergency flashers stop
temporarily.
The emergency flashers also work when the igni-
tion is turned off.
@ Tips
You should switch the emergency flashers on
if:
— you are the last car in a traffic jam so that
all other vehicles approaching from behind
can see your vehicle
— your vehicle has broken down or you are
having an emergency
— your vehicle is being towed or if you are tow-
ing another vehicle
Messages
If the Ea indicator light turns on, a bulb has
failed. The displayed message indicates the cause
and possible solutions. If one of the messages
does not turn off, drive immediately to an author-
ized Audi dealer or authorized Audi Service Facili-
ty to have the malfunction repaired.
64
Bg) Audi adaptive light: malfunction! See own-
er's manual
Adaptive light* is not working. The headlights
still function. Drive immediately to an authorized
Audi dealer or authorized Audi Service Facility to
have the malfunction repaired.
oue0} OLED tail light: malfunction! Switched off
permanently. See owner's manual
Drive immediately to an authorized Audi dealer
or authorized Audi Service Facility to have the
malfunction repaired.
High beam assistant: malfunction! See own-
er's manual
You can still switch the high beams on or off
manually. Drive immediately to an authorized
Audi dealer or authorized Audi Service Facility to
have the malfunction repaired.
High beam assistant: currently unavailable.
Camera view limited due to surroundings
This message appears if the camera's visual field
is blocked. The system will switch itself off. Try
switching the systems on again later.
& Automatic headlights: malfunction! See
owner's manual
The light/rain sensor is malfunctioning. The low
beams remain switched on at all times for safety
reasons with the AUTO light function. Drive im-
mediately to an authorized Audi dealer or author-
ized Audi Service Facility to have the malfunction
repaired.
Interior lighting
Front interior lighting
2 8 S
© > a o
Fig.
51 Headliner: interior lighting
Page 83 of 360
4N0012721BD
Sitting correctly and safely
Head restraints
General information
Applies to: vehicles with adjustable head restraints
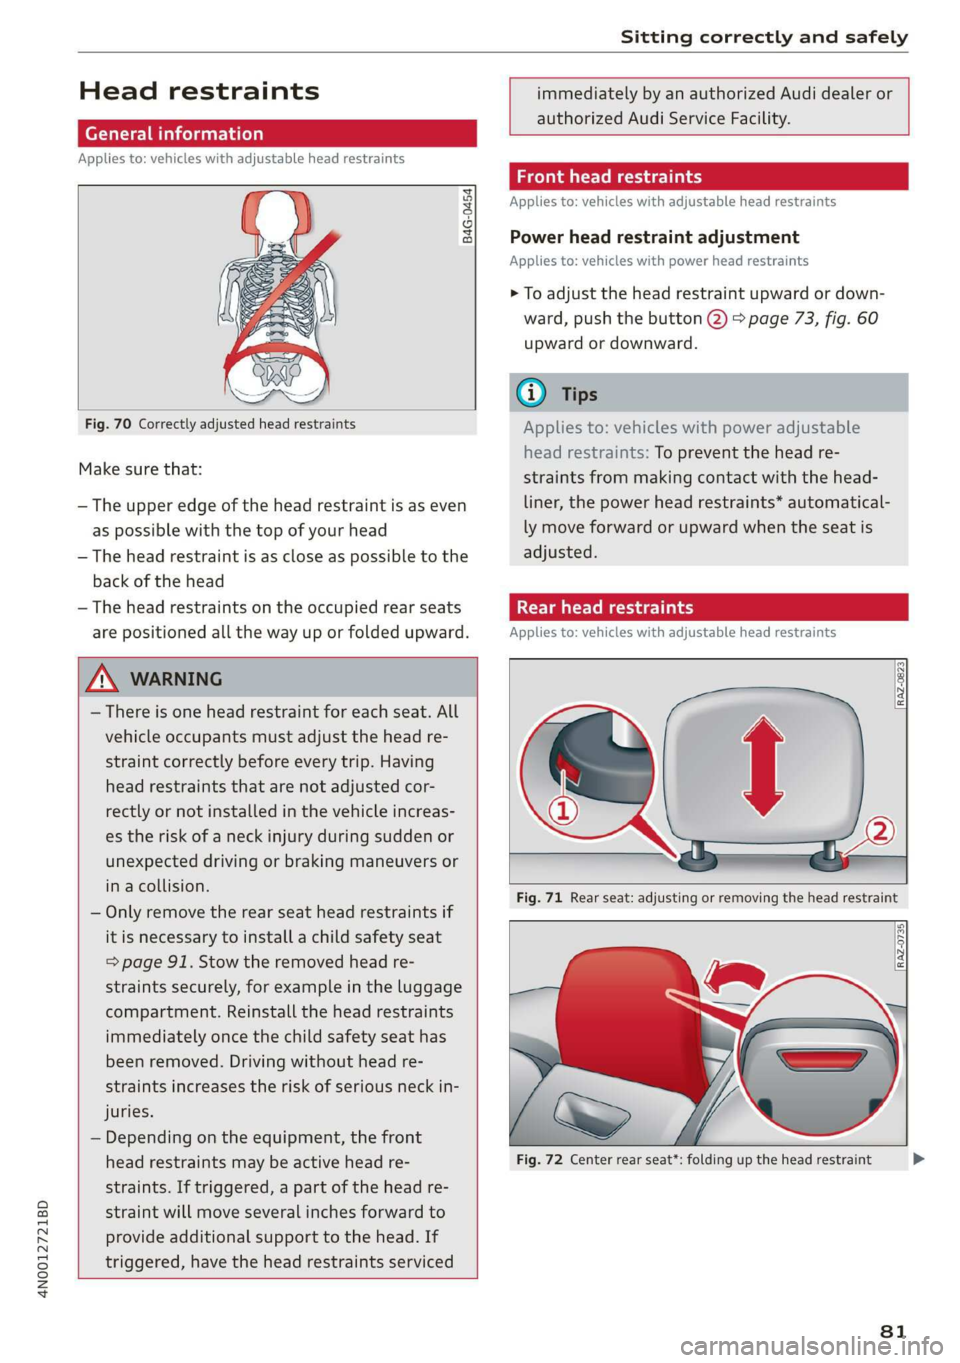
B4G-0454
Fig. 70 Correctly adjusted head restraints
Make sure that:
— The upper edge of the head restraint is as even
as possible with the top of your head
— The head restraint is as close as possible to the
back of the head
— The head restraints on the occupied rear seats
are positioned all the way up or folded upward.
immediately by an authorized Audi dealer or
authorized Audi Service Facility.
Front head restraints
Applies to: vehicles with adjustable head restraints
Power head restraint adjustment
Applies to: vehicles with power head restraints
> To adjust the head restraint upward or down-
ward, push the button @) > page 73, fig. 60
upward or downward.
@) Tips
Applies to: vehicles with power adjustable
head restraints: To prevent the head re-
straints from making contact with the head-
liner, the power head restraints* automatical-
ly move forward or upward when the seat is
adjusted.
Taal eM ary
Applies to: vehicles with adjustable head restraints
Z\ WARNING
— There is one head restraint for each seat. All
vehicle occupants must adjust the head re-
straint correctly before every trip. Having
head restraints that are not adjusted cor-
rectly or not installed in the vehicle increas-
es the risk of a neck injury during sudden or
unexpected driving or braking maneuvers or
in a collision.
— Only remove the rear seat head restraints if
it
is necessary to install a child safety seat
= page 91. Stow the removed head re-
straints securely, for example in the luggage
compartment. Reinstall the head restraints
immediately once the child safety seat has
been removed. Driving without head re-
straints increases the risk of serious neck in-
juries.
— Depending on the equipment, the front
head restraints may be active head re-
straints. If triggered, a part of the head re-
straint will move several inches forward to
provide additional support to the head. If
triggered, have the head restraints serviced
Fig. 71 Rear seat: adjusting or removing the head restraint
Fig. 72 Center rear seat*: folding up the head restraint
81
>
Page 93 of 360

4N0012721BD
Sitting correctly and safely
which increases the risk of serious or fatal
injury. Always secure child safety seats on
the rear seats. If special circumstances re-
quire the use of a child safety seat on the
front passenger's seat, always make sure
that PASSENGER AIR BAG OFF 3; re-
mains on while driving. If
PASSENGER AIR BAG OFF #¥; does not
turn on, remove the child safety seat and in-
stall it again according to the child safety
seat manufacturer instructions. If
PASSENGER AIR BAG OFF %% still does
not turn on, the front passenger's seat must
not be used. Drive to an authorized Audi
dealer or authorized Audi Service Facility
and have the airbag system inspected.
— Fluids, electronic devices, or mechanical
damage on the front passenger's seat may
cause the front passenger seat occupant de-
tection to malfunction. The system may
then incorrectly detect if the front passeng-
er's seat is occupied. As a result, it could de-
ploy the front passenger’s airbag incorrectly
or fail to deploy it, which increases the risk
of serious or fatal injury. Make sure that no
wet objects (such as a wet hand towel) and
no fluids come into contact with the front
passenger's seat cushion. If the front pas-
senger's seat becomes wet, dry it immedi-
ately. Make sure no electronic devices (such
as a laptop or a retrofitted seat heater) are
on the front passenger's seat. Do not trans-
port any objects on or under the front pas-
senger's seat.
— Seat covers or protective covers may prevent
the advanced airbag system from correctly
detecting child safety seats or passengers in
the front passenger's seat. You must not use
seat covers or protective covers on the front
passenger's seat that are not specifically ap-
proved for use on Audi seats with an ad-
vanced airbag system.
Child safety seats
General information
When installing and using child safety seats, fol-
low the information in this Owner's Manual, the
applicable state and federal regulations, and the
manufacturer instructions for the child safety
seat.
You can also obtain useful and current informa-
tion from the following sources:
U.S. National Highway Traffic Safety Adminis-
tration
http://www.nhtsa.gov
http://www.safercar.gov
National SAFE KIDS Campaign
http://www.safekids.org
SafetyBeltSafe U.S.A.
http://www.carseat.org
Transport Canada Information Centre
http://www.tc.gc.ca/roadsafety
Audi Customer Experience Center
https://www.audiusa.com/help/contact-us
https://www.audi.ca/ca/web/en/models/layer/
contact.html
ZA WARNING
To reduce the risk of serious or fatal injuries,
children must always be secured in the vehicle
with a child safety seat that is appropriate for
their body size, weight, and age.
— Children ages 12 and under must be trans-
ported using the appropriate child safety
seat. Note differences in regulations be-
tween states and countries.
— Child safety seats secured incorrectly in the
vehicle may cause serious or fatal injuries in
the event of an accident. Always secure the
child safety seat according to the manufac-
turer instructions.
— Children or babies must not under any cir-
cumstances be held on the lap of the driver
or other passengers while driving.
— Do not secure more than one child in a child
safety seat.
— Never allow a child to sit in a child safety
seat unsupervised.
— Never allow children to ride unsecured in the
vehicle or to stand or kneel on the seats
while driving. In the event of an accident, a
child could be propelled through the vehicle.
91
Page 97 of 360
4N0012721BD
Sitting correctly and safely
ZA WARNING
— A safety belt that is not locked by the belt
retractor lock or a locking device cannot se-
cure a child safety seat while driving or in
the event of an accident, which increases the
risk of fatal injury. Always make sure the
belt retractor lock on the safety belt is acti-
vated if the child safety seat manufacturer
instructions require it.
— Due to the risk of fatal injury, never place a
rear-facing child safety seat on the front
passenger's seat when the front passenger's
airbag is switched on.
— For the child safety seat to offer the maxi-
mum protection, it is especially important
to route the vehicle safety belt correctly. Al-
ways follow the instructions from the child
safety seat manufacturer for routing the
safety belt correctly. Incorrectly fastened
safety belts can cause injuries, even during
minor accidents.
Ad
onally securing a child safety seat to
the top tether anchor
RAZ-0091
Follow the safety precautions > page 91.
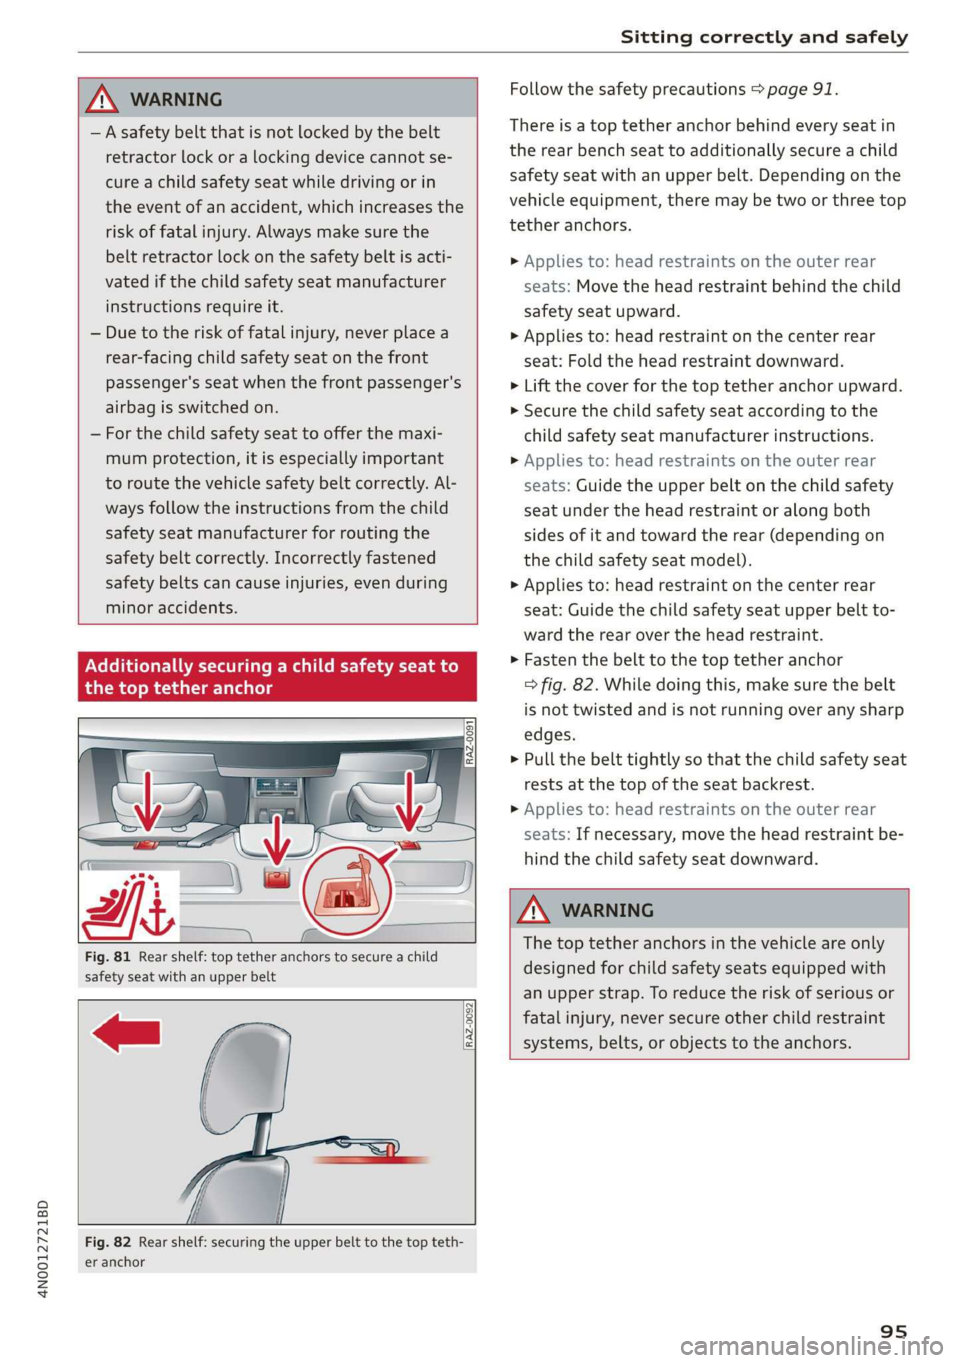
There is a top tether anchor behind every seat in
the rear bench seat to additionally secure a child
safety seat with an upper belt. Depending on the
vehicle equipment, there may be two or three top
tether anchors.
> Applies to: head restraints on the outer rear
seats: Move the head restraint behind the child
safety seat upward.
> Applies to: head restraint on the center rear
seat: Fold the head restraint downward.
> Lift the cover for the top tether anchor upward.
> Secure the child safety seat according to the
child safety seat manufacturer instructions.
> Applies to: head restraints on the outer rear
seats: Guide the upper belt on the child safety
seat under the head restraint or along both
sides of it and toward the rear (depending on
the child safety seat model).
> Applies to: head restraint on the center rear
seat: Guide the child safety seat upper belt to-
ward the rear over the head restraint.
>» Fasten the belt to the top tether anchor
=> fig. 82. While doing this, make sure the belt
is not twisted and is not running over any sharp
edges.
> Pull the belt tightly so that the child safety seat
rests at the top of the seat backrest.
> Applies to: head restraints on the outer rear
seats: If necessary, move the head restraint be-
hind the child safety seat downward.
Fig. 81 Rear shelf: top tether anchors to secure a child
safety seat with an upper belt
RAZ-0092
Z\ WARNING
The top tether anchors in the vehicle are only
designed for child safety seats equipped with
an upper strap. To reduce the risk of serious or
fatal injury, never secure other child restraint
systems, belts, or objects to the anchors.
Fig. 82 Rear shelf: securing the upper belt to the top teth-
er anchor
95
Page 99 of 360
4N0012721BD
Stowing and using
Stowing and using
Power sources
When the ignition is switched on, you may be
able to use multiple power sources for external
devices, depending on the vehicle equipment.
12 volt sockets
You can connect electrical accessories to the 12
volt sockets. The power usage must not exceed
120 watts.
The 12 volt sockets are labeled with the 12V
symbol. They are located in the front center con-
sole, in the rear* and on the side trim panel in the
luggage compartment*.
USB ports
Applies to: vehicles with USB port
You can charge mobile devices using the USB
ports. The USB ports are labeled with the «<> or
(4 symbol or CHARGE ONLY.
115 volt socket
Applies to: vehicles with 115 volt socket
The socket is located in the center console in the
rear and can be used for electrical devices > A\.
The power usage must not exceed 150 watts.
When you push the device connector all the way
into the socket, the child safety mechanism re-
leases and there is electric current.
—If the LED on the socket is green or flashes
slowly, then the socket is ready for use.
—If the LED is red and flashes quickly, there is a
malfunction in the connected device or the
socket is too hot. The socket will switch off for
safety reasons. To reactivate the socket, remove
the device connector. Connect the device after
correcting the malfunction or reconnect after a
brief cool-down period.
— Incorrect usage can lead to serious injuries
or burns. To reduce the risk of injuries, never
leave children unattended in the vehicle
with the key.
Z\ WARNING
Applies to: vehicles with 115 volt socket
—To reduce the risk of fatal injury, do not in-
sert any conductive objects, such as knitting
needles, into the contacts on the socket.
—To reduce the risk of fatal injury, do not spill
any fluids on the socket. Should any mois-
ture enter the socket, make sure that it has
dried out completely before using the socket
again.
— If devices or connectors that are heavy (such
as a power supply unit) are attached directly
to the socket, the holder can become dam-
aged, which increases the risk of injury.
— Using adapters and extension cables in-
creases the risk of injury because they over-
ride the safety devices for the socket.
—To reduce the risk of injury, remove the con-
nector of the connected device if the socket
has switched off due to a malfunction.
Z\ WARNING
—To reduce the risk of fatal injury, store all
connected devices securely when driving so
that they do not move around inside the ve-
hicle when braking or in the event of an acci-
dent.
@) Note
— Read the operating manuals for the con-
nected devices.
—To reduce the risk of damage to the vehicle
electrical system, never attempt to charge
the vehicle battery by connecting accesso-
ries that provide power to the power sour-
ces.
— Do not connect any device whose network
class (voltage) does not match the network
class designed for the socket.
— Disconnect the connectors from the power
sources carefully to reduce the risk of dam-
aging them.
(i) Tips
Applies to: vehicles with 115 volt socket
— Devices that are not shielded or devices near
the rear window antenna can cause mal-
functions in the radio, TV, or vehicle electri-
cal system.
97
Page 100 of 360

Stowing and using
— The functions on some devices may be limit-
ed due to the low power output.
— With some power supply units, the integrat-
ed overcurrent protection may prevent it
from switching on. In this case, disconnect
the power supply unit from the electrical
equipment and reconnect after approxi-
mately 10 seconds.
Cup holders
Applies to: vehicles with cup holders
AN WARNING
— Do not put any hot beverages in the cup
holder while the vehicle is moving. Hot bev-
erages could spill, which increases the risk
of injury.
— Do not use any breakable beverage contain-
ers (for example, made out of glass or por-
celain). You could be injured by them in the
RAZ-0745
Fig. 85 Center armrest and rear center console: cup holder
Front center console cup holders
> The cup holder (2) may be under a cover. To
open the cup holder, tap on the strip on the
cover.
Rear center armrest* cup holders
> Fold the center armrest* downward.
> To open the cup holder, tap on front of the cov-
er Q).
> To close the cup holder, push the cup holder all
the way back into the slot.
Rear center console cup holders
> To open the cup holders in the center console,
tap on the cover @).
98
event of an accident.
@) Note
Beverage containers in the cup holders should
always
have a lid. Otherwise, the liquid inside
could spill and cause damage to vehicle
equipment.
Storage and
compartments
Cooled glove compartment
Applies to: vehicles with cooled glove compartment
Sf
RAZ-0036|
Fig. 86 Glove compartment: cooling mode knob
> To switch the refrigeration function on, turn the
knob counterclockwise until the symbols indi-
cate that refrigeration is switched on @).
> To switch the refrigeration function off, turn
the knob clockwise until the symbols indicate
that refrigeration is switched off @).
@ Tips
The glove compartment cooling mode only
functions when the vehicle A/C system is
switched on.