audio AUDI A8 2020 Owners Manual
[x] Cancel search | Manufacturer: AUDI, Model Year: 2020, Model line: A8, Model: AUDI A8 2020Pages: 360, PDF Size: 95.38 MB
Page 5 of 360
4N0012721BD
Table of contents
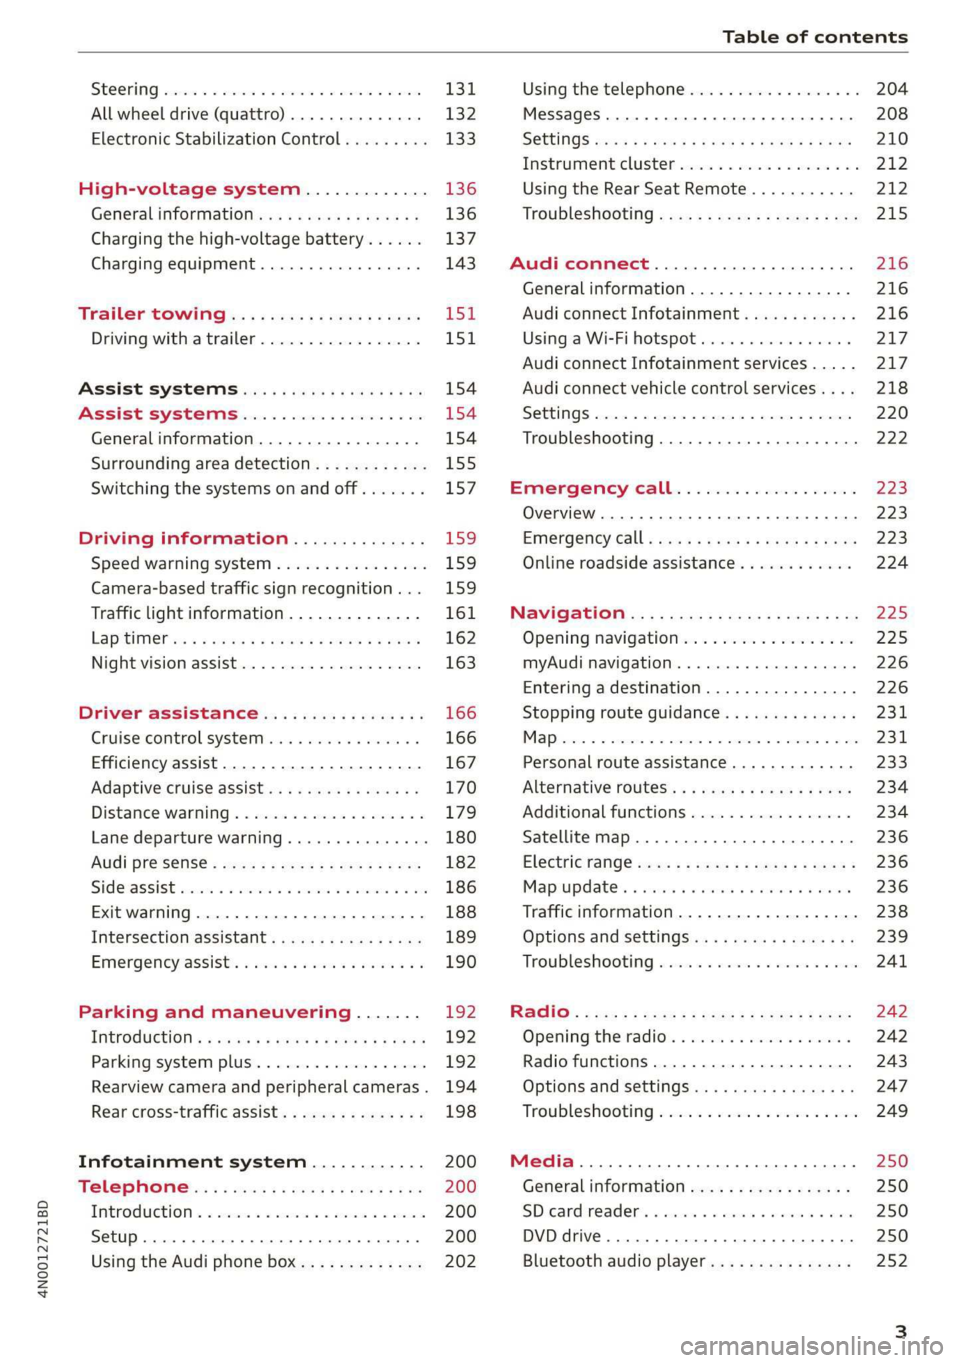
SEOOKING assess © & secwens + + anes ww ceawien Hewes 131
All wheel drive (quattro).............. 132
Electronic Stabilization Control......... 133
High-voltage system............. 136
General information...........0..5.5 136
Charging the high-voltage battery...... 137
Charging equipment................. 143
TANS COWINIG ss 5 & cews 4c ous ce ewe LSL
Driving with atrailer................. 151
Assist systems.................0. 154
Assist systems................... 154
Generalinformation................. 154
Surrounding area detection............ 155
Switching the systems on and off....... 157
Driving information.............. 159
Speed warning system................ 159
Camera-based traffic sign recognition... 159
Traffic light information.............. 161
LAP Mer as « 2 eons x = nevos ¢ 6 aus ¢ 8 em 162
Night vision assist..............-.04. 163
Driver assistance................. 166
Cruise control system.............0-5 166
Efficiency assist.............02--004. 167
Adaptive cruise assist............00-. 170
Distance Warning « « wse« 6 3 sone se eee oa LID:
Lane departure warning.............4. 180
Audi presense............-.22+--05- 182
Side@rassist esses: sv vows © v ememe © 2 suman 2 eae 186
Exit warning ...........-.....2.0000. 188
Intersection assistant................ 189
Emergeneyassists. «ican & wacen 3 3 woes ¥ 5 190
Parking and maneuvering....... 192
INEFODUCKION « » sey: x « caus 4 2 wasn 4 & Rees 192
Parking system plus...............00. 192
Rearview camera and peripheral cameras. 194
Rear cross-traffic assist... 2.2.2.0... 198
Infotainment system............ 200
TELEBNOMEs: 5 «ees & Cees 4 e oeew eee 200
IMtrOdUGEION « 2 asaces < a asomee x a wma Sewanee 200
Setup... eee eee ee eee 200
Using the Audi phone box............. 202
Using the telephone.................. 204
MessageS ... 0... cece cece eee eee 208
SOCtinGS eva 3 x espa o Kae 5s BER Bo ee 210
Instrument:cluster css vo evn ee ween eae 212
Using the Rear Seat Remote........... 212
Troubleshooting «<< <= eccn ss yews sp es 215
Audi connect..................0.. 216
Generalinformation................. 216
Audi connect Infotainment............ 216
Using a Wi-Fi hotspot................ 217
Audi connect Infotainment services..... 217
Audi connect vehicle control services.... 218
SCttINGS come
EMe@ngency CALL. « «ccc 6 i cs 6 vee « 223
Overview... ... 0. eee eee eee 223
Emergency Call « cas « wean s + gee os pee 223
Online roadside assistance............ 224
Navigation....................005- 225
Opening navigation.................. 225
myAudi navigation...............000% 226
Entering adestination................ 226
Stopping route guidance.............. 231
MapPinceins i + cxanees i ¥ scree © sammee @ =m ommeae #0 oe 2231.
Personal route assistance............. 233
Alternative routes...............000- 234
Additional functions................. 234
Satellite map......... 0... eee eee eee 236
Eleetric'rangeé acc sv sees 5 ¢ eee se Hews: 236
Mapiupdater, « sss + a cssmee + & nen «5 enaens 236
Traffic information................00- 238
Options aNd 'SEtNGS is « x see s x sews 4 vs 239
Troubleshooting wees «= wer = o wees ov eee 241
Ragios: sce ¢ = nae ¢ ¢ seuss 2 2 eeu 2 2 eee 242
Opening the radio...............000. 242
Radio functions.................0-4. 243
Options and settings...............0. 247
Troubleshooting esc 2 2 wee ts wie oo wee 249
Media............ cc eee eee 250
Generalinformation................. 250
SD card reader... ..... cc eee eee eee 250
DVD drive... 2... eee eee eee 250
Bluetooth audio player............... 252
Page 24 of 360
Touch displays
> To adjust the placement of the buttons in the
quick access bar, pull them to the desired posi-
tion in the bar.
> Press Done to complete the configuration.
@ Tips
The position of © cannot be adjusted.
Display area
You can freely change the location of the buttons
on the home screen display area.
Configuring the display area
> Press and hold a button on the home screen
display area.
> To adjust the placement of the buttons, pull
them to the desired locations.
> Press Done to complete the configuration.
Switching between menu pages
If a menu contains multiple menu pages, fabatm |S
displayed in the display area. The white bar
shows the location of the current menu page.
> To switch between menu pages, swipe your fin-
ger to the right or left.
Off Of o8
O88 of af
C8 Oo of
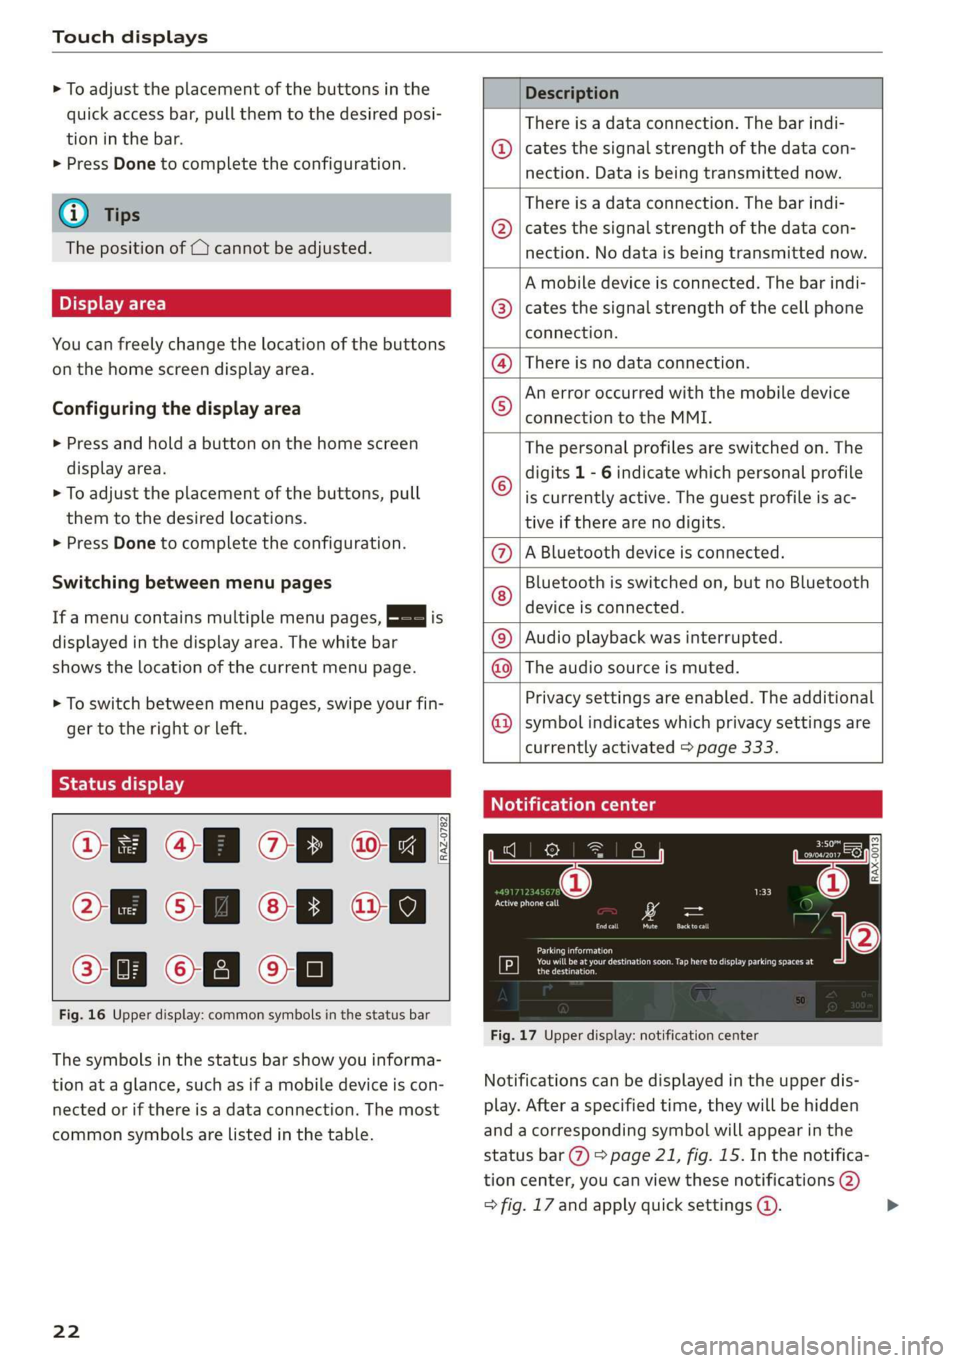
Fig. 16 Upper display: common symbols in the status bar
[RAZ-0782
The symbols in the status bar show you informa-
tion at a glance, such as if a mobile device is con-
nected or if there is a data connection. The most
common symbols are listed in the table.
22
Description
There is a data connection. The bar indi-
cates the signal strength of the data con-
nection. Data is being transmitted now.
There is a data connection. The bar indi-
cates the signal strength of the data con-
nection. No data is being transmitted now.
A mobile device is connected. The bar indi-
cates the signal strength of the cell phone
connection.
® There is no data connection.
An error occurred with the mobile device
connection to the MMI. @
The personal profiles are switched on. The
digits 1 - 6 indicate which personal profile
is currently active. The guest profile is ac-
tive if there are no digits.
A Bluetooth device is connected.
Bluetooth is switched on, but no Bluetooth
device is connected. ©®e
©
Audio playback was interrupted.
The audio source is muted. @|©
Privacy settings are enabled. The additional
symbol indicates which privacy settings are ©
currently activated > page 333.
Notification center
ll
RAX-0013
reuse
Sear)
You will be at your destination soon. Tap here to display parking spaces at
[P] eesti
Fig. 17 Upper display: notification center
Notifications can be displayed in the upper dis-
play. After a specified time, they will be hidden
and a corresponding symbol will appear in the
status bar (2) > page 21, fig. 15. In the notifica-
tion center, you can view these notifications @)
> fig. 17 and apply quick settings @. >
Page 35 of 360
4N0012721BD
Touch displays
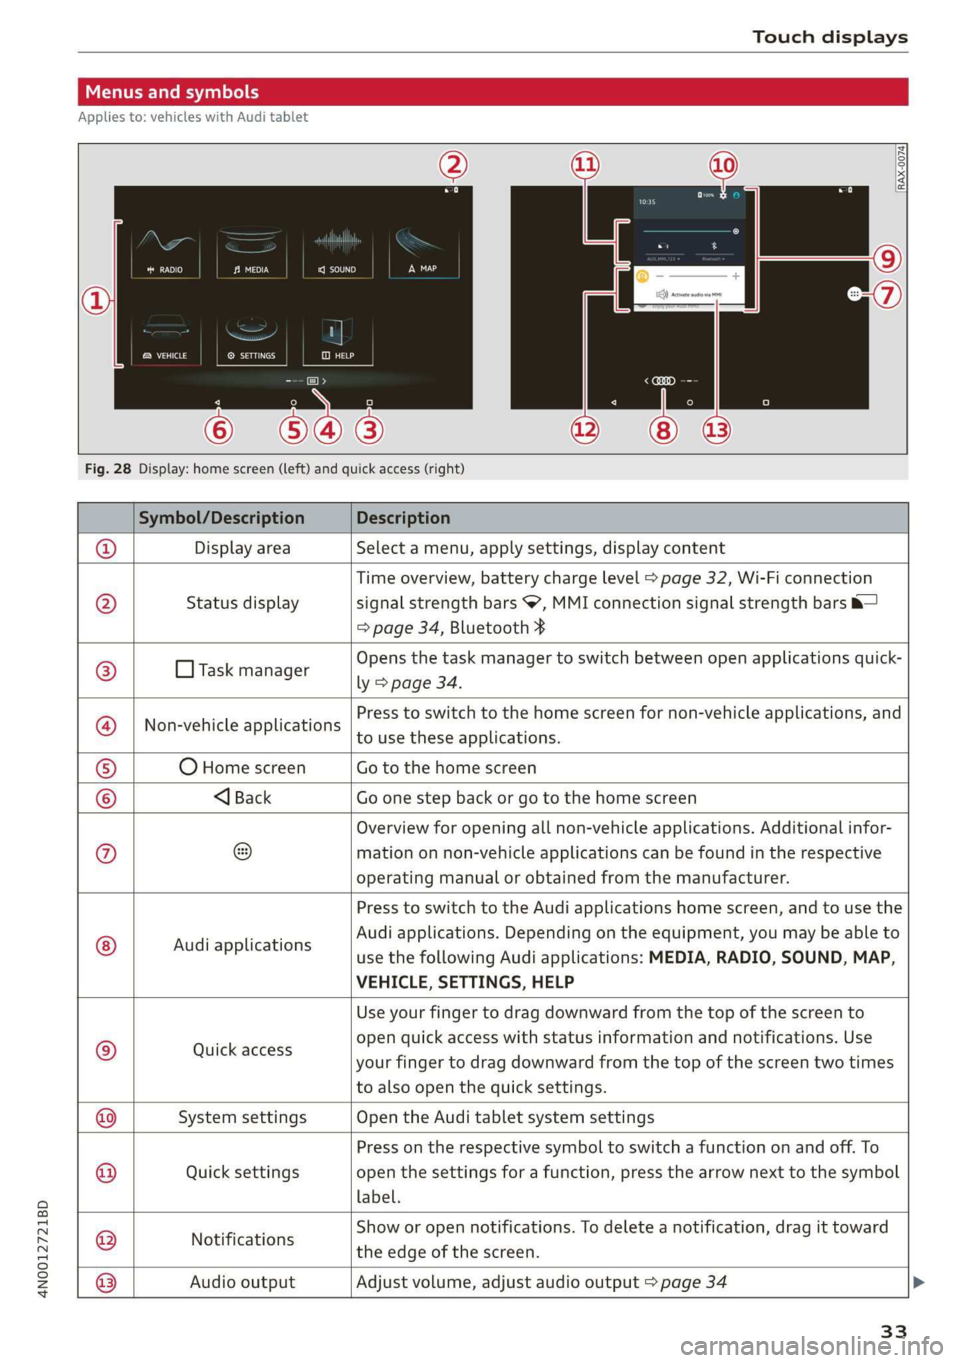
Menus and symbols
Applies to: vehicles with Audi tablet
emsa || | cea
Rats ® SETTINGS
Cy
Fig. 28 Display: home screen (left) and quick access (right)
Symbol/Description Description
Display area Select a menu, apply settings, display content
Status display
Time overview, battery charge level > page 32, Wi-Fi connection
signal strength bars , MMI connection signal strength bars &—
=> page 34, Bluetooth ¥
O Task manager
Opens the task manager to switch between open applications quick-
ly > page 34.
Non-vehicle applications
Press to switch to the home screen for non-vehicle applications, and
to use these applications.
O Home screen Go to the home screen
®@
Ef
©|e|
©
|}
<1 Back Go one step back or go to the home screen
Overview for opening all non-vehicle applications. Additional infor-
mation on non-vehicle applications can be found in the respective
operating manual or obtained from the manufacturer.
© Audi applications
Press to switch to the Audi applications home screen, and to use the
Audi applications. Depending on the equipment, you may be able to
use the following Audi applications: MEDIA, RADIO, SOUND, MAP,
VEHICLE, SETTINGS, HELP
Quick access
Use your finger to drag downward from the top of the screen to
open quick access with status information and notifications. Use
your finger to drag downward from the top of the screen two times
to also open the quick settings.
@|
©
System settings Open the Audi tablet system settings
Quick settings
Press on the respective symbol to switch a function on and off. To
open the settings for a function, press the arrow next to the symbol
label.
Notifications
Show or open notifications. To delete a notification, drag it toward
the edge of the screen.
@|O|]
©
Audio output
Adjust volume, adjust audio output > page 34
33
Page 36 of 360
Touch displays
Switching between Audi applications and
non-vehicle applications
To switch between the home screens of both sec-
tions, press the buttons @) or @).
@) Tips
— AUDI AG merely provides access to non-ve-
hicle applications and does not assume any
responsibility for the content.
— Do not install any applications from unoffi-
cial or unknown sources.
Connecting to the MMI
Applies to: vehicles with Audi tablet
To use Audi tablet functions in connection with
the vehicle (for example, using MMI media sour-
ces), you can connect the Audi tablet to the MMI.
Requirement: the ignition must be switched on.
> To connect the Audi tablet to the MMI, secure it
in the retainer > page 30.
When a connection to the MMI is active, the &—
symbol is displayed in the status bar.
G) Tips
The connection to the MMI is also maintained
if you remove the Audi tablet from the holder.
For this to happen, the ignition must be
switched on and the Audi tablet must be with-
in range of the activated vehicle Wi-Fi hot-
spot.
Applies to: vehicles with Audi tablet
The task manager displays all active applications.
You have the option to close them or switch be-
tween active applications.
Opening the task manager
> Press L]@ © page 33, fig. 28.
Switching to an active application
> If necessary, use your finger to drag upward/
downward in the task manager until the de-
sired application is displayed as a thumbnail.
> Press on the application thumbnail.
34
Closing the application
> Press X in an application thumbnail, or
> Pull an application thumbnail toward the left/
right edge of the screen until the application
closes, or
> Press & to close all applications at once.
Closing the task manager
> Press LJ or <1.
G) Tips
The Audi tablet automatically closes any ap-
plications in the background to optimize de-
vice performance.
Adjusting the audio output
Applies to: vehicles with Audi tablet
The sound from the active audio source can be
played through the vehicle speakers or the head-
phones connected to the Audi tablet.
The audio output through the vehicle speakers
can be switched on for the left or right Audi tab-
let. The audio output for the other Audi tablet
can run through the headphones at the same
time.
Requirement: the Audi tablet must be connected
to the MMI & page 34. Audi tablet access to the
speakers must be permitted > page 35.
> To open the quick access @) > page 33, fig. 28,
use
your finger to swipe downward from the
top of the screen
> Select ‘@) Activate audio via MMI or (>t Audio
through headphones.
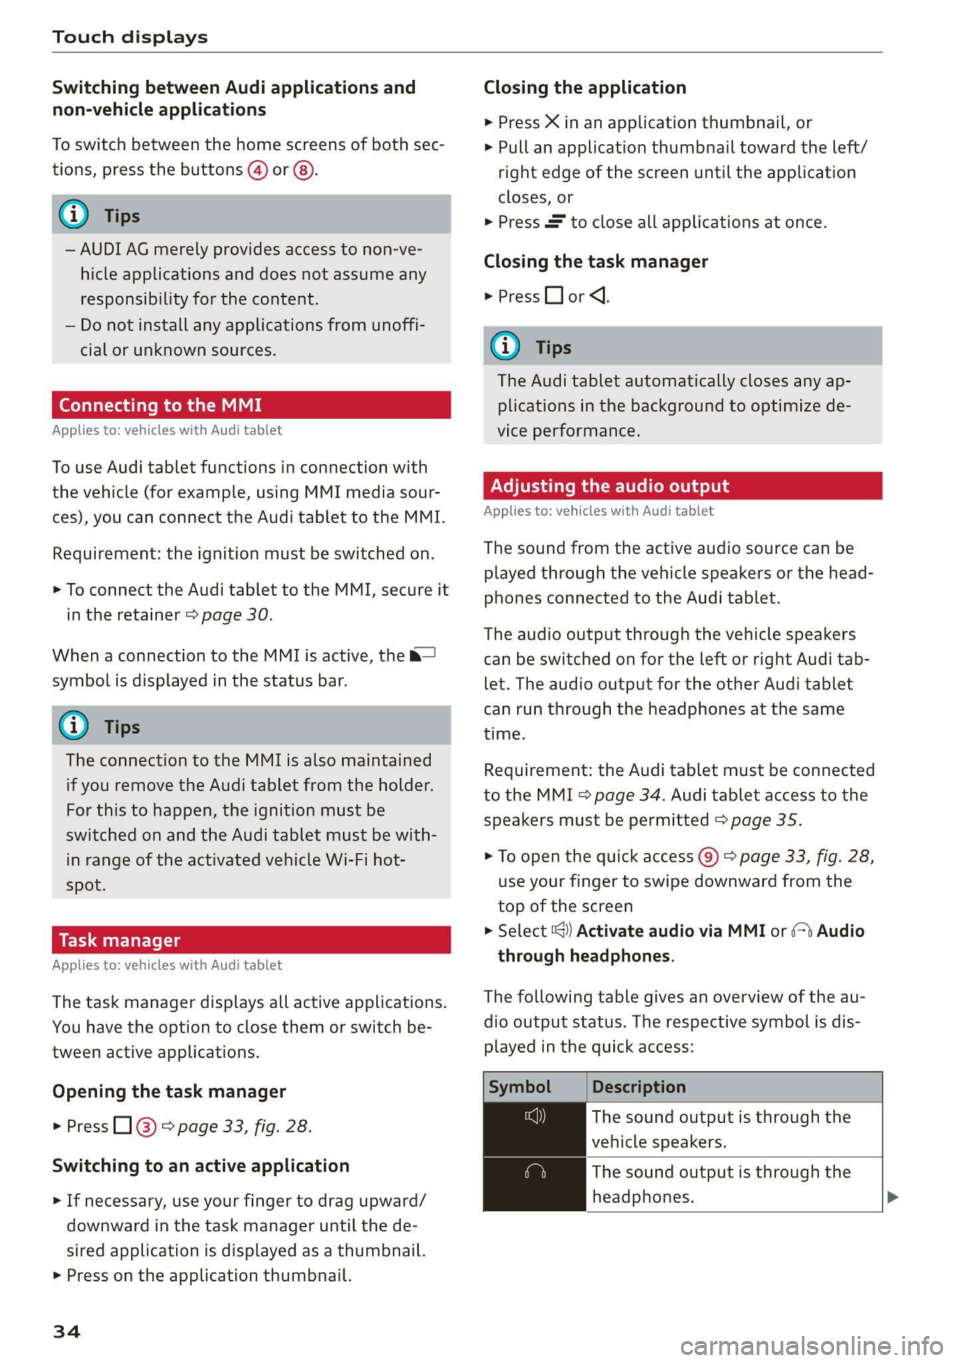
The following table gives an overview of the au-
dio output status. The respective symbol is dis-
played in the quick access:
Symbol Description
The sound output is through the
vehicle speakers.
The sound output is through the
headphones. >
Page 37 of 360
4N0012721BD
Touch displays
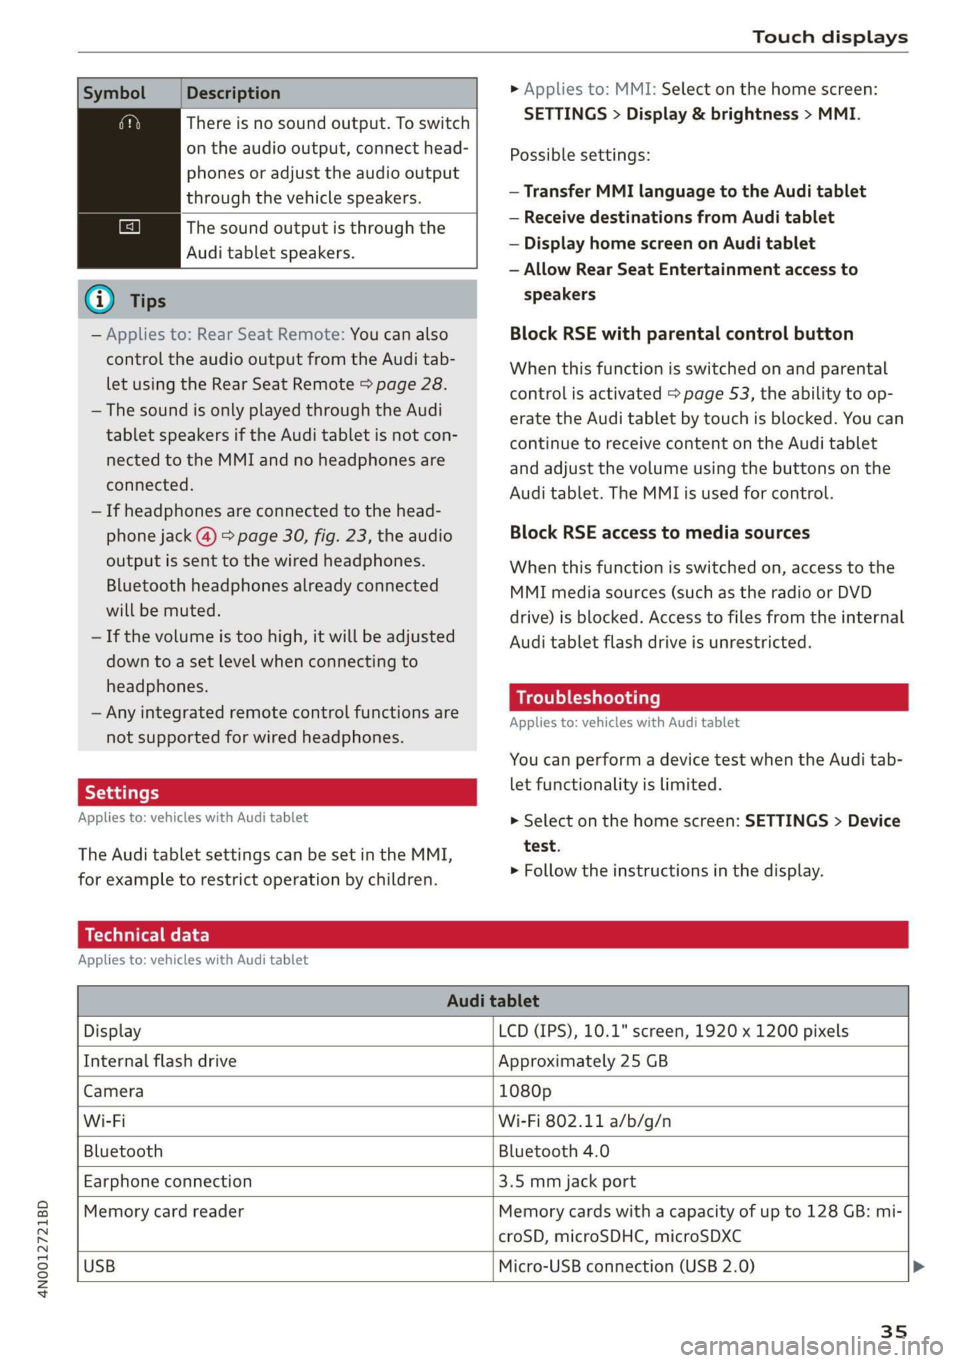
Symbol Description
There is no sound output. To switch
on the audio output, connect head-
phones or adjust the audio output
through the vehicle speakers.
The sound output is through the
Audi tablet speakers.
G) Tips
— Applies to: Rear Seat Remote: You can also
control the audio output from the Audi tab-
let using the Rear Seat Remote > page 28.
— The sound is only played through the Audi
tablet speakers if the Audi tablet is not con-
nected to the MMI and no headphones are
connected.
— If headphones are connected to the head-
phone jack (@) > page 30, fig. 23, the audio
output is sent to the wired headphones.
Bluetooth headphones already connected
will be muted.
— If the volume is too high, it will be adjusted
down to a set level when connecting to
headphones.
— Any integrated remote control functions are
not supported for wired headphones.
Applies to: vehicles with Audi tablet
The Audi tablet settings can be set in the MMI,
for example to restrict operation by children.
> Applies to: MMI: Select on the home screen:
SETTINGS > Display & brightness > MMI.
Possible settings:
— Transfer MMI language to the Audi tablet
— Receive destinations from Audi tablet
— Display home screen on Audi tablet
— Allow Rear Seat Entertainment access to
speakers
Block RSE with parental control button
When this function is switched on and parental
control is activated > page 53, the ability to op-
erate the Audi tablet by touch is blocked. You can
continue to receive content on the Audi tablet
and adjust the volume using the buttons on the
Audi tablet. The MMI is used for control.
Block RSE access to media sources
When this function is switched on, access to the
MMI media sources (such as the radio or DVD
drive) is blocked. Access to files from the internal
Audi tablet flash drive is unrestricted.
Troubleshooting
Applies to: vehicles with Audi tablet
You can perform a device test when the Audi tab-
let functionality is limited.
> Select on the home screen: SETTINGS > Device
test.
> Follow the instructions in the display.
Technical data
Applies to: vehicles with Audi tablet
Audi tablet
Display LCD (IPS), 10.1" screen, 1920 x 1200 pixels
Internal flash drive Approximately 25 GB
Camera 1080p
Wi-Fi Wi-Fi 802.11 a/b/g/n
Bluetooth Bluetooth 4.0
Earphone connection 3.5 mm jack port
Memory card reader Memory cards with a capacity of up to 128 GB: mi-
croSD, microSDHC, microSDXC
USB
Micro-USB connection (USB 2.0) >
35
Page 42 of 360
![AUDI A8 2020 Owners Manual Global functions
Global functions
Additional function
buttons
Fig. 30 Right side of the multifunction steering wheel
| 58-0431]
Fig. 31 MMI On/Off knob with joystick function
Adjusting AUDI A8 2020 Owners Manual Global functions
Global functions
Additional function
buttons
Fig. 30 Right side of the multifunction steering wheel
| 58-0431]
Fig. 31 MMI On/Off knob with joystick function
Adjusting](/img/6/57606/w960_57606-41.png)
Global functions
Global functions
Additional function
buttons
Fig. 30 Right side of the multifunction steering wheel
| 58-0431]
Fig. 31 MMI On/Off knob with joystick function
Adjusting the volume
You can adjust the volume of an audio source or a
system message (for example, from the voice
recognition system) when the sound is playing.
> To increase or decrease the volume, turn the
right thumbwheel @) © fig. 30 upward or
downward, or turn the On/Off knob @) ° fig. 31
to the right or left.
> To mute, push the right thumbwheel or the
On/Off knob.
Selecting the previous/next track or station
> Press the lJ / DD button @ or briefly press
the On/Off knob to the Left or right.
Fast forward/rewind
> Press and hold the ld<1/ DD] button @, or
press the On/Off knob to the left or right until
the desired playback position is reached.
40
Quick access steering wheel button
Depending on vehicle equipment, the button @)
may provide quick access to various functions.
You can program the >K button with various func-
tions.
> To bring up the function that is currently set,
press the >K button.
> To perform the function that is currently set,
press and hold the >K button, or:
> Applies to MMI: Select on the home screen: VE-
HICLE > Settings & Service > Steering wheel
button assignment.
» Select and confirm the desired function.
Switching the voice recognition system on or
off
w£ button @), see > page 38.
Using the telephone functions
button @), see > page 204.
ZA WARNING
Adjust the volume of the audio system so that
signals from outside the vehicle, such as po-
lice and fire sirens, can be heard easily at all
times.
Page 47 of 360
4N0012721BD
Opening and closing
Fold mirrors
You can select if the exterior mirrors automatical-
ly fold in when locking.
Tone
when locking)
You can select if an audio signal sounds when
locking the vehicle.
Open with convenience key
Applies to: vehicles with convenience key
You can deactivate the feature for unlocking us-
ing the sensor. The function for locking via the
sensor will still be enabled > page 48.
G@) Tips
The settings are automatically stored and as-
signed to the active personal profile.
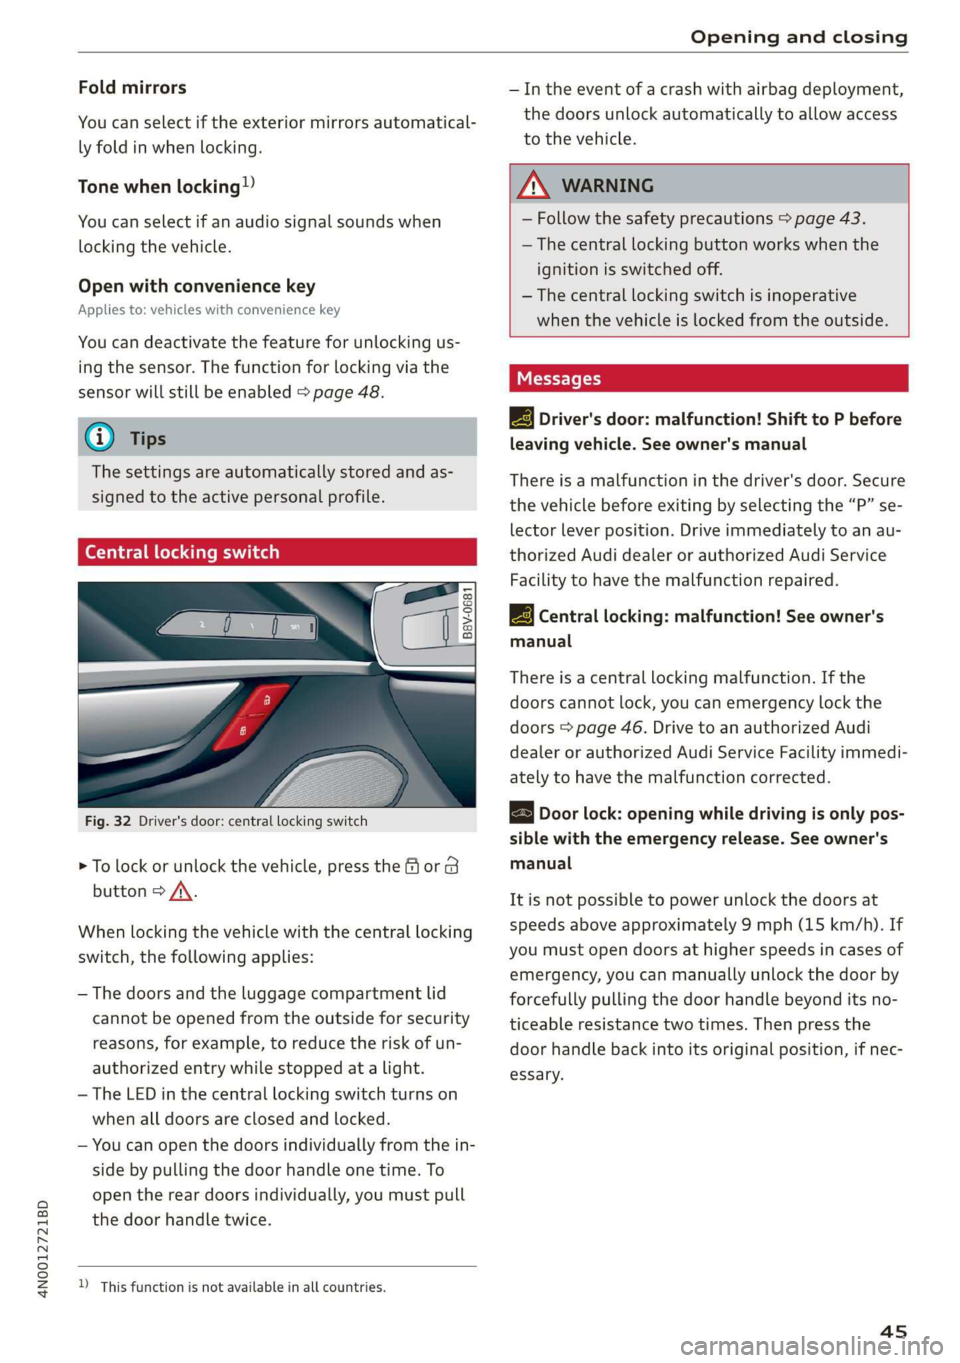
Central locking switch
B8V-0681
Fig. 32 Driver's door: central locking switch
> To lock or unlock the vehicle, press the or 8
button > /\.
When locking the vehicle with the central locking
switch,
the following applies:
— The doors and the luggage compartment lid
cannot be opened from the outside for security
reasons, for example, to reduce the risk of un-
authorized entry while stopped at a light.
—The LED in the central locking switch turns on
when all doors are closed and locked.
— You can open the doors individually from the in-
side by pulling the door handle one time. To
open the rear doors individually, you must pull
the door handle twice.
)_ This function is not available in all countries.
— In the event of a crash with airbag deployment,
the doors unlock automatically to allow access
to the vehicle.
Z\ WARNING
— Follow the safety precautions > page 43.
— The central locking button works when the
ignition is switched off.
— The central locking switch is inoperative
when the vehicle is locked from the outside.
Messages
EB Driver's door: malfunction! Shift to P before
leaving vehicle. See owner's manual
There is a malfunction in the driver's door. Secure
the vehicle before exiting by selecting the “P” se-
lector lever position. Drive immediately to an au-
thorized Audi dealer or authorized Audi Service
Facility to have the malfunction repaired.
|-3} Central locking: malfunction! See owner's
manual
There is a central locking malfunction. If the
doors cannot lock, you can emergency lock the
doors > page 46. Drive to an authorized Audi
dealer or authorized Audi Service Facility immedi-
ately to have the malfunction corrected.
B Door lock: opening while driving is only pos-
sible with the emergency release. See owner's
manual
It is not possible to power unlock the doors at
speeds above approximately 9 mph (15 km/h). If
you must open doors at higher speeds in cases of
emergency, you can manually unlock the door by
forcefully pulling the door handle beyond its no-
ticeable resistance two times. Then press the
door handle back into its original position, if nec-
essary.
45
Page 48 of 360
Opening and closing
Mechanically unlocking and locking the
(efoto ey
If the central locking fails, you must unlock or
lock the doors separately.
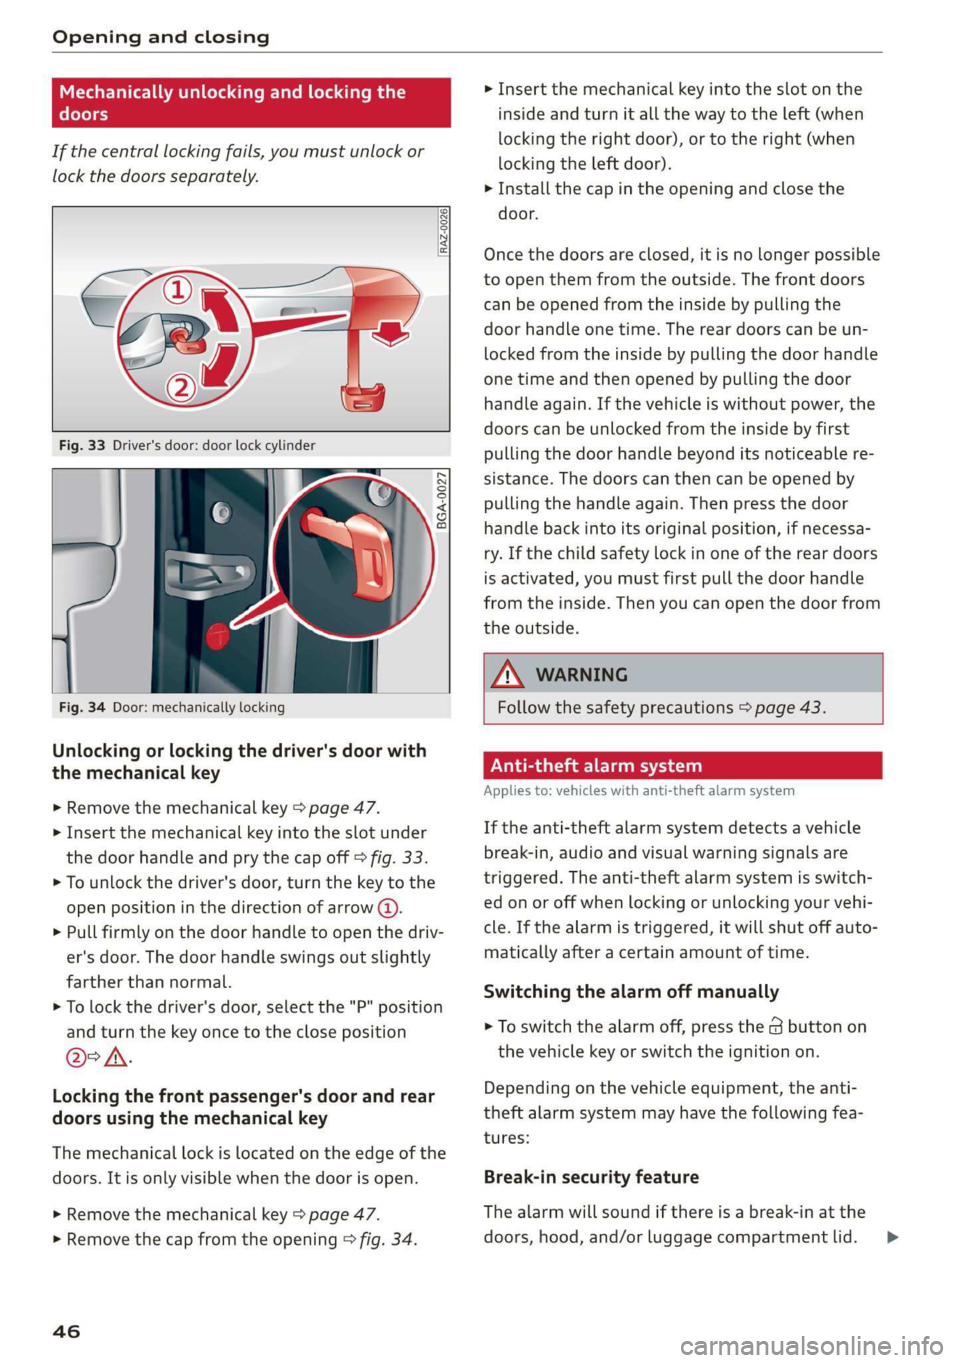
[RAz-0026|
5 a S 3
Fig. 34 Door: mechanically locking
Unlocking or locking the driver's door with
the mechanical key
> Remove the mechanical key > page 47.
> Insert the mechanical key into the slot under
the door handle and pry the cap off > fig. 33.
> To unlock the driver's door, turn the key to the
open position in the direction of arrow @).
> Pull firmly on the door handle to open the driv-
er's door. The door handle swings out slightly
farther than normal.
> To lock the driver's door, select the "P" position
and turn the key once to the close position
@°A.
Locking the front passenger's door and rear
doors using the mechanical key
The mechanical lock is located on the edge of the
doors. It is only visible when the door is open.
> Remove the mechanical key > page 47.
> Remove the cap from the opening > fig. 34.
46
> Insert the mechanical key into the slot on the
inside and turn it all the way to the left (when
locking the right door), or to the right (when
locking the left door).
> Install the cap in the opening and close the
door.
Once the doors are closed, it is no longer possible
to open them from the outside. The front doors
can be opened from the inside by pulling the
door handle one time. The rear doors can be un-
locked from the inside by pulling the door handle
one time and then opened by pulling the door
handle again. If the vehicle is without power, the
doors can be unlocked from the inside by first
pulling the door handle beyond its noticeable re-
sistance. The doors can then can be opened by
pulling the handle again. Then press the door
handle back into its original position, if necessa-
ry. If the child safety lock in one of the rear doors
is activated, you must first pull the door handle
from the inside. Then you can open the door from
the outside.
ZX WARNING
Follow the safety precautions > page 43.
rae Le)
Applies to: vehicles with anti-theft alarm system
If the anti-theft alarm system detects a vehicle
break-in, audio and visual warning signals are
triggered. The anti-theft alarm system is switch-
ed on or off when locking or unlocking your vehi-
cle. If the alarm is triggered, it will shut off auto-
matically after a certain amount of time.
Switching the alarm off manually
> To switch the alarm off, press the G button on
the vehicle key or switch the ignition on.
Depending on the vehicle equipment, the anti-
theft alarm system may have the following fea-
tures:
Break-in security feature
The alarm will sound if there is a break-in at the
doors, hood, and/or luggage compartment lid. >
Page 127 of 360
4N0012721BD
Driving
“P” gear or pressing the brake pedal. Make sure
the indicator light is off before you start driving.
Automatically releasing the parking brake
when starting to drive
Requirement: the driver's door must be closed
and the driver’s safety belt must be fastened.
> Press the accelerator pedal to start to drive.
ZA\ WARNING
—To reduce the risk of an accident, always
make sure the vehicle is situated safely
while stationary.
— If the parking brake is set, it can release au-
tomatically when the accelerator pedal is
pressed. To reduce the risk of an accident,
do not inadvertently press the accelerator
pedal and always shift into “P” when the ve-
hicle is stopped.
— If the power supply fails, you cannot set the
parking brake once it is released, or release
it if it is set. In this case, park the vehicle on
level ground and secure it by engaging the
"P” gear. Contact an authorized Audi dealer
or authorized Audi Service Facility for assis-
tance.
@) Tips
— On steep inclines, especially when in trailer
mode, the vehicle may roll backwards unin-
tentionally when starting to drive. To re-
duces the risk of this happening, pull and
hold the ©) switch while pressing the accel-
erator pedal. If enough drive power has
built up at the wheels and the vehicle does
not roll backwards, then release the switch
to start to drive.
— If you leave the vehicle when “D” or “R” are
engaged, the parking brake will be set auto-
matically.
— Noises when the parking brake is set and re-
leased are normal and are not a cause for
concern.
— The parking brake goes through a self-test
cycle at regular intervals when the vehicle is
stopped. Any noises associated with this are
normal.
Emergency braking function
Emergency braking should only be used in an
emergency, if the standard brake pedal is mal-
functioning or obstructed. When the emergency
braking function is activated, the braking effect is
similar to a heavy braking maneuver.
> Pull and hold the ©) switch while driving.
> An audio warning signal will sound and emer-
gency
braking will begin.
> If you press the accelerator pedal, emergency
braking will be canceled.
ZA WARNING
Heavy
braking while driving through curves or
in poor road or weather conditions can cause
the vehicle to slide or the rear of the vehicle to
swerve, which increases the risk of an acci-
dent.
Messages
EG / @ Parking brake: malfunction! Safely
stop vehicle. See owner's manual
There is a malfunction in the parking brake. If the
message appears while stationary, check if the
parking brake is released and can be reset. If this
is the case, switch the ignition off and back on.
If the message continues to appear, if the park-
ing brake cannot be released, or if the message
appears while driving, then stop the vehicle on
level
ground and shift to “P”. Do not continue
driving. See an authorized Audi dealer or author-
ized Audi Service Facility for assistance.
GG / @ Parking brake: malfunction! Please
release parking brake
There
is a malfunction in the parking brake. If the
message appears while stationary, check if the
parking brake is released and can be reset. If this
is the case, switch the ignition off and back on.
If the message continues to appear, if the park-
ing brake cannot be released, or if the message
appears while driving, then stop the vehicle on
level
ground and shift to “P”. Do not continue
driving. See an authorized Audi dealer or author-
ized Audi Service Facility for assistance.
125
>
Page 177 of 360

4N0012721BD
Driver assistance
— The driver's hands are not on the steering
wheel
Steering intervention request
If no steering activity is detected or the steering
power is not sufficient, the driver steering inter-
vention request will alert the driver using audio
and visual signals. Take over the steering and
keep your hands on the steering wheel so that
you will be ready to steer at any time. The system
will become inactive after a short time and will
only be active again later.
If the driver does not take over steering, adaptive
cruise assist will be canceled. If the vehicle is
equipped with emergency assist and it is ready to
function, it will be activated > page 190.
ZA WARNING
Follow the safety precautions and note the
limits of the assist systems, sensors, and
cameras > page 154.
@ Tips
— Always keep your hands on the steering
wheel. The driver is always responsible for
adhering to the regulations applicable in
the country where the vehicle is being oper-
ated.
— It is recommended to only switch on lane
guidance on well-constructed roads.
— Certain settings are stored automatically in
the active personal profile.
—The & fig. 131 button switches lane guid-
ance availability and the lane departure
warning on or off simultaneously, if lane
guidance is preset in the adaptive cruise as-
sist settings.
Setting the distance
Applies to: vehicles with adaptive cruise assist
B4M-0234
Fig. 132 Operating lever: setting the distance
If you adjust the speed, you must also change the
time gap to the vehicle driving ahead. The higher
the speed, the greater the distance that is need-
ed.
> Tap the rocker switch to display the distance
that is currently set.
> To increase or decrease the distance in incre-
ments, tap the switch again toward G) or ().
The newly-set distance will be shown briefly, for
example with the indicator light. In the Driv-
er assistance display, a graphic display is shown
instead of the indicator lights > page 172,
fig. 128. The display matches the functions of
the indicator lights.
When approaching a vehicle driving ahead, the
adaptive cruise assist brakes to the set speed and
then maintains the set distance. If the vehicle
driving ahead accelerates, then the adaptive
cruise assist will also accelerate up to the speed
that you have set.
The following distances can be set:
175