audio AUDI A8 2020 User Guide
[x] Cancel search | Manufacturer: AUDI, Model Year: 2020, Model line: A8, Model: AUDI A8 2020Pages: 360, PDF Size: 95.38 MB
Page 179 of 360

4N0012721BD
Driver assistance
Driving in stop-and-go traffic
Applies to: vehicles with adaptive cruise assist
> Press the brake pedal to slow your vehicle
down.
S 3 S z
ee
Fig. 134 Instrument cluster: safe start monitor
Stopping with adaptive cruise assist
The adaptive cruise assist also assists you in stop-
and-go traffic. Within the limits of the system,
your vehicle may brake and remain at a stop if a
vehicle driving ahead stops.
Starting to drive with adaptive cruise assist!)
As long as the message ready to drive and aA is
displayed, your vehicle will begin driving when
the vehicle ahead starts to move > /\.
If you are stopped for several seconds, your vehi-
cle will no longer drive autonomously for safety
reasons, and the message will turn off.
> To extend ready to drive for several seconds or
reactivate, pull the lever briefly towards you in
the direction of the arrow > page 176, fig. 133.
> To resume manual control of the vehicle, tap
the accelerator pedal.
Safe start monitor
The vehicle can still start to drive even if certain
obstacles are detected when starting to drive
=> /\. For example, if an obstacle is detected by
the camera behind the windshield, the a indica-
tor light will warn you of the danger.
If you are in the Driver assistance display, the
display @) © fig. 134 and the message Warning!
will also appear. An audio signal will also sound.
Your vehicle will drive more slowly when starting.
This may also occur in some situations when
there is no apparent obstacle.
D_ This is not available in some countries.
Z\ WARNING
— Follow the safety precautions and note the
limits of the assist systems, sensors, and
cameras > page 154.
— If the message ready to drive!) appears,
your vehicle will start driving even if there is
an obstacle between your vehicle and the ve-
hicle ahead. To reduce the risk of an acci-
dent, always make sure there are no obsta-
cles between your vehicle and the vehicle
driving ahead.
G) Tips
For safety reasons, adaptive cruise assist is
only active if:
— The driver's safety belt is fastened
— All doors and the hood are closed
— Your vehicle is not stopped for a long period
of time
Tamia e cme [sid
Applies to: vehicles with adaptive cruise assist
Fig. 135 Instrument cluster: request for driver interven-
tion
The request for driver intervention instructs you
to resume manual control of the vehicle if the
adaptive cruise assist braking function is not able
to maintain a sufficient distance to the vehicle
ahead. The system will warn you of the hazard
with the A indicator light and the message Dis-
tance!.
177
>
Page 183 of 360

4N0012721BD
Driver assistance
Display or in- | Meaning on the corresponding
dicator light side
@ White The lane departure warning is
lines switched on but not ready to pro-
vide warnings.
@ Green Lane departure warning is
line switched on and ready to provide
warnings on that side.
@ Red The lane departure warning will
line warn you with corrective steering
before exiting the lane.
The steering wheel can also vi-
brate to warn you if lane bounda-
ries are detected during a pass-
ing maneuver.
The lane departure warning is ready to provide
warnings if an object is detected on at least one
side of the individual lane.
If the Hi indicator light turns on, the lane depar-
ture warning is not ready to provide warnings.
This may be due to the following reasons:
— The necessary lane marker lines have not been
detected (for example, in a construction zone
or because the lines are obstructed by snow,
dirt, water, or lighting)
— The speed is below the activation speed
— The lane is too narrow or too wide
— The curve is too narrow
— The driver's hands are not on the steering
wheel
— Visibility is obstructed by a rise or dip.
Steering intervention request
If no steering activity is detected or the steering
power from the system is not sufficient, the driv-
er steering intervention request will alert the
driver using audio and visual signals. Take over
the steering and keep your hands on the steering
wheel so that you will be ready to steer at any
time. The system will become inactive after a
short time and will only be active again later.
If the driver does not take over steering, the lane
departure warning will be switched off. If the ve-
hicle is equipped with emergency assist and it is
ready to function, it will be activated > page 190.
ZA WARNING
— Follow the safety precautions and note the
limits of the assist systems, sensors, and
cameras > page 154.
— The system warns the driver that the vehicle
is leaving the lane using corrective steering.
The
driver is always responsible for keeping
the vehicle within the lane.
— Corrective steering may not occur at all in
certain situations, such as during heavy
braking. Always be ready to intervene.
(i) Tips
— Always keep your hands on the steering
wheel. The driver is always responsible for
adhering to the regulations applicable in
the country where the vehicle is being oper-
ated.
— The system does not provide any corrective
steering or steering wheel vibrations if it de-
tects that you are passing another vehicle.
Ode mM Ke lad Claire)
Applies to: vehicles with lane departure warning
You can switch the optional steering wheel vibra-
tion warning for the lane departure warning on
and off. The settings depend on the vehicle
equipment.
— Applies to: MMI: Select on the home screen:
VEHICLE > Driver assistance > (<3) > Lane de-
parture warning > Vibration warning.
@ Tips
Certain settings are stored automatically in
the active personal profile.
Applies to: vehicles with lane departure warning
ry or is displayed when there is a malfunc-
tion, the lane departure warning and lane guid-
ance functions of the adaptive cruise functions
may be unavailable or limited.
A message that indicates the cause and possible
solution may appear with some displays. The
weather conditions may be too poor or the
181
>
Page 184 of 360

Driver assistance
camera may be covered. Clean the area in front of
the camera > page 156, fig. 118 and try to turn
on the systems again later.
If the malfunction remains, drive to an author-
ized Audi dealer or authorized Audi Service Facili-
ty immediately to have the malfunction correct-
ed.
Audi pre sense
Introduction
Applies to: vehicles with Audi pre sense
Within the limits of the system, the Audi pre
sense functions can initiate measures in certain
driving situations to protect the vehicle occu-
pants and other road users. Depending on the ve-
hicle equipment, various Audi pre sense systems
may
be installed:
— Audi pre sense basic can react during emergen-
cy and dangerous braking maneuvers and un-
stable driving situations (such as oversteering
or understeering).
— Audi pre sense front”) can detect an impending
frontal impact and react with warnings, braking
interventions, and preemptive safety measures
for the vehicle occupants.
— Audi pre sense rear monitors the rear traffic
behind your vehicle and can react to an impend-
ing rear impact.
— Audi pre sense side can detect an impending
side impact from cross-traffic and vehicles com-
ing from the side, and can initiate preemptive
safety measures.
— The swerve assist can assist during an evasive
maneuver recognized as critical with steering
movement and by braking individual wheels in-
dividually.
— The turn assist can detect vehicles in the oppo-
site lane and react with braking maneuvers.
D_ This is not available in some countries.
182
Audi pre sense preemptive safety measures
Applies to: vehicles with Audi pre sense
Depending on the vehicle speed and the vehicle
equipment, the following functions may be initi-
ated in certain situations:
— Visual and audio warnings
— Activation of the emergency flashers)
— Reversible tensioning of safety belts
— Closing the windows and panoramic glass roof
— Adjusting the seats
— Other preemptive safety measures by individual
systems
ZA WARNING
Follow the safety precautions and note the
limits of the assist systems, sensors, and
cameras > page 154.
(i) Tips
— Depending on the risk situation that is de-
tected and the selected Audi drive select*
mode, not all preemptive safety measures
may be initiated under certain circumstan-
ces. Certain functions can be adjusted or
skipped if necessary.
— Audi pre sense may be restricted or unavail-
able under certain circumstances, for exam-
ple if:
— There are passengers with unfastened
safety belts
— It has only been several seconds since the
ignition was switched on The ndicator
light turns on.
— When driving in reverse
— There is an airbag control module mal-
function
— System functions may not be available if
the ESC is limited or switched off, or if
there is a malfunction.
Page 194 of 360
Parking and maneuvering
Parking and
maneuvering
Introduction
Depending on the vehicle equipment, various
parking aids will help you when parking and ma-
neuvering.
Parking system
The parking system plus assists you while park-
ing using audio and visual signals to warn you
about objects detected in front of, behind, and at
the sides* of the vehicle > page 192.
The rearview camera shows the area behind the
vehicle in the MMI display. The lines in the rear-
view camera image help you to park and maneu-
ver > page 194.
The peripheral cameras are an addition to the
rearview camera and help you to see various
areas around the vehicle while parking and ma-
neuvering > page 194.
The rear cross-traffic assist can warn you of ap-
proaching cross traffic when driving in reverse or
exiting a parking space > page 198.
Settings options
You can adjust parking system functions individu-
ally. The adjustment options depend on the vehi-
cle equipment.
— Activating automatically > page 192
— Front and rear volume > page 193
— Entertainment fader > page 193
— Clean rearview camera > page 195
— View > page 197
— Rear cross-traffic assist > page 198
_ WARNING
Follow the safety precautions and note the
limits of the assist systems, sensors, and
cameras > page 154.
G) Tips
Practicing parking in a traffic-free location or
parking lot to become familiar with the sys-
tems is recommended. Practice parking in
good light and weather conditions.
192
Parking system plus
Activating/deactivating
Applies to: vehicles with parking system plus
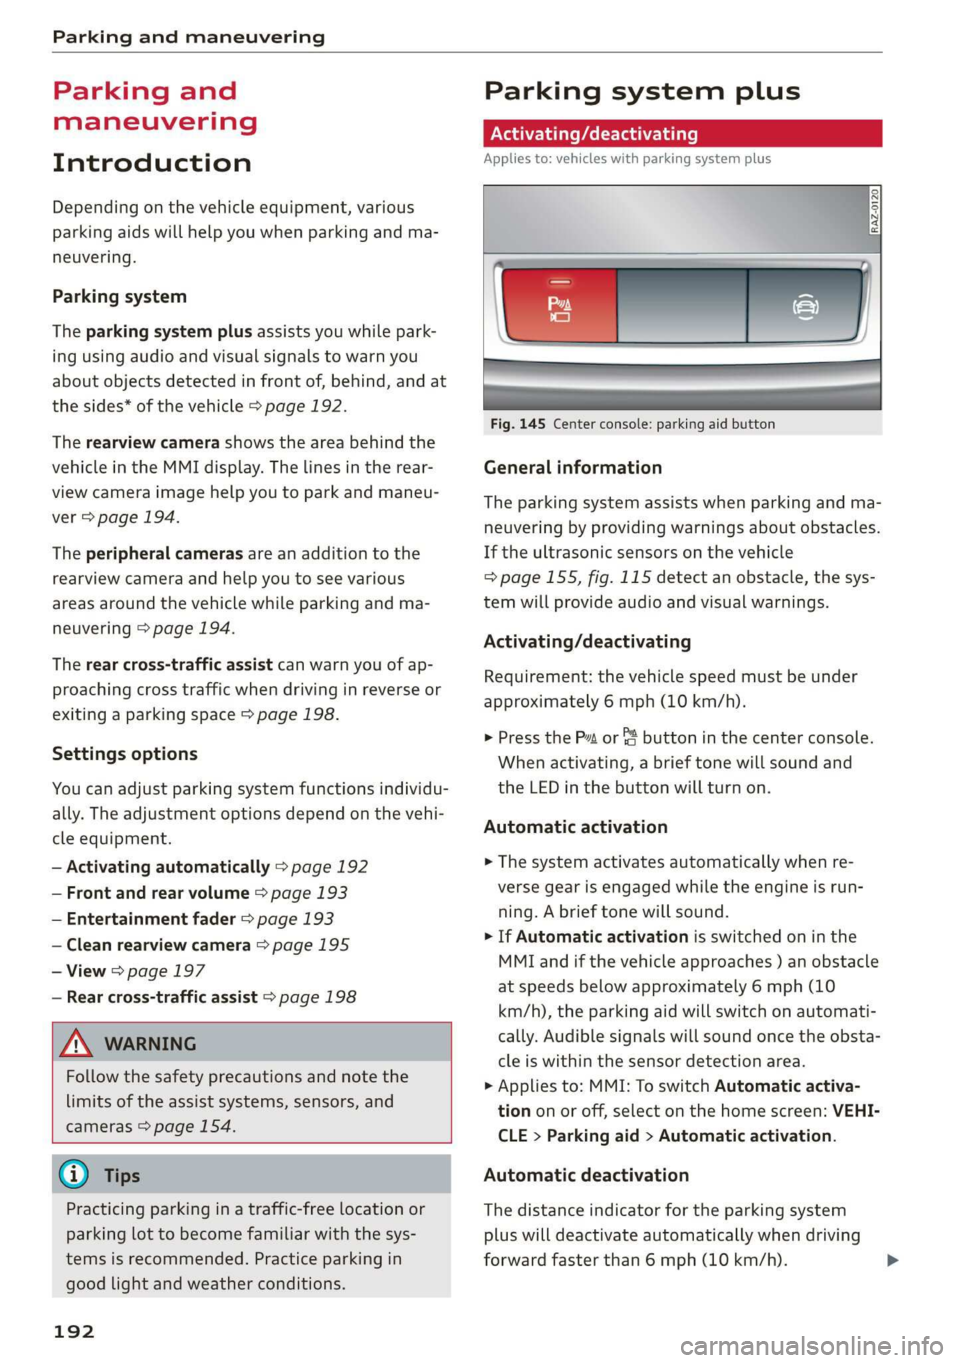
Fig. 145 Center console: parking aid button
General information
The parking system assists when parking and ma-
neuvering by providing warnings about obstacles.
If the ultrasonic sensors on the vehicle
=> page 155, fig. 115 detect an obstacle, the sys-
tem will provide audio and visual warnings.
Activating/deactivating
Requirement: the vehicle speed must be under
approximately 6 mph (10 km/h).
> Press the Pt or & button in the center console.
When activating, a brief tone will sound and
the LED in the button will turn on.
Automatic activation
> The system activates automatically when re-
verse gear is engaged while the engine is run-
ning. A brief tone will sound.
> If Automatic activation is switched on in the
MMI and if the vehicle approaches ) an obstacle
at speeds below approximately 6 mph (10
km/h), the parking aid will switch on automati-
cally. Audible signals will sound once the obsta-
cle is within the sensor detection area.
> Applies to: MMI: To switch Automatic activa-
tion on or off, select on the home screen: VEHI-
CLE > Parking aid > Automatic activation.
Automatic deactivation
The distance indicator for the parking system
plus will deactivate automatically when driving
forward faster than 6 mph (10 km/h).
Page 195 of 360
4N0012721BD
Parking and maneuvering
ZA\ WARNING
Follow the safety precautions and note the
limits of the assist systems, sensors, and
cameras > page 154.
@) Note
Keep enough distance from the curb to avoid
damage to the rims.
@) Tips
— Certain settings are stored automatically in
the active personal profile.
— If the parking aid is deactivated, it can only
be reactivated automatically when one of
the following conditions is met:
— The vehicle speed exceeds 6 mph
(10 km/h)
— The ignition is switched off and back on
again
— The parking brake is set and then released
—The “P” gear is engaged and released
again
Applies to: vehicles with parking system plus
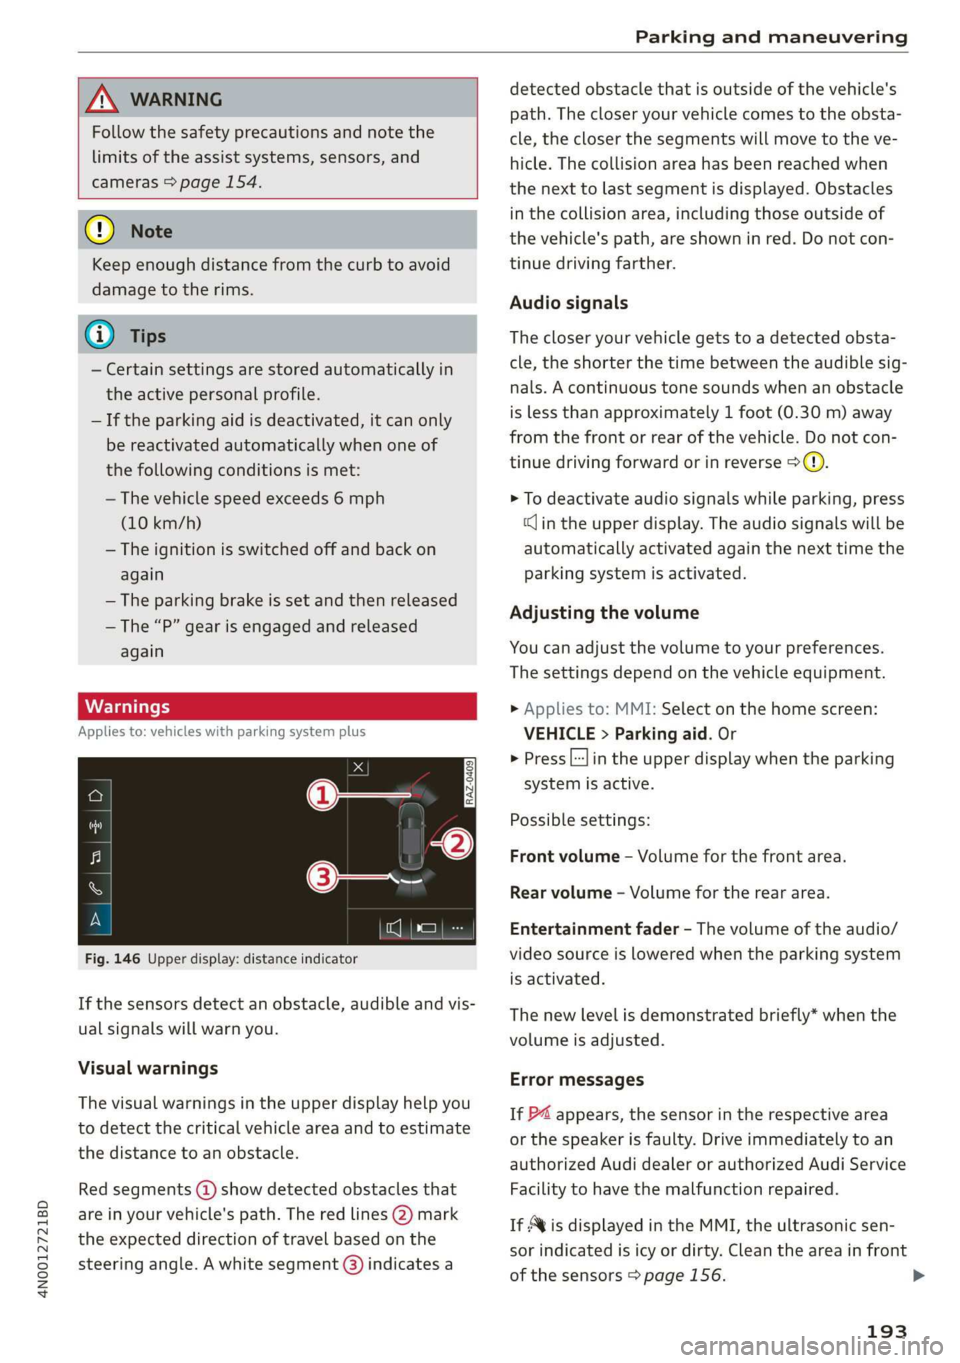
Fig. 146 Upper display: distance indicator
If the sensors detect an obstacle, audible and vis-
ual signals will warn you.
Visual warnings
The visual warnings in the upper display help you
to detect the critical vehicle area and to estimate
the distance to an obstacle.
Red segments (4) show detected obstacles that
are in your vehicle's path. The red lines (2) mark
the expected direction of travel based on the
steering angle. A white segment (3) indicates a
detected obstacle that is outside of the vehicle's
path. The closer your vehicle comes to the obsta-
cle, the closer the segments will move to the ve-
hicle. The collision area has been reached when
the next to last segment is displayed. Obstacles
in the collision area, including those outside of
the vehicle's path, are shown in red. Do not con-
tinue driving farther.
Audio signals
The closer your vehicle gets to a detected obsta-
cle, the shorter the time between the audible sig-
nals. A continuous tone sounds when an obstacle
is less than approximately 1 foot (0.30 m) away
from the front or rear of the vehicle. Do not con-
tinue driving forward or in reverse >(@).
> To deactivate audio signals while parking, press
«Jin the upper display. The audio signals will be
automatically activated again the next time the
parking system is activated.
Adjusting the volume
You can adjust the volume to your preferences.
The settings depend on the vehicle equipment.
> Applies to: MMI: Select on the home screen:
VEHICLE > Parking aid. Or
> Press |---| in the upper display when the parking
system is active.
Possible settings:
Front volume - Volume for the front area.
Rear volume - Volume for the rear area.
Entertainment fader - The volume of the audio/
video source is lowered when the parking system
is activated.
The new level is demonstrated briefly* when the
volume is adjusted.
Error messages
If P4 appears, the sensor in the respective area
or the speaker is faulty. Drive immediately to an
authorized Audi dealer or authorized Audi Service
Facility to have the malfunction repaired.
If Avis displayed in the MMI, the ultrasonic sen-
sor indicated is icy or dirty. Clean the area in front
of the sensors > page 156. >
193
Page 197 of 360
4N0012721BD
Parking and maneuvering
> Press the & button in the center console. When
activating, a brief tone will sound and the LED
in the button will turn on. Or
> Press bin the upper display if the visual dis-
tance indicator is shown > page 193, fig. 146.
Automatic activation
The system activates automatically when reverse
gear is engaged while the engine is running. A
brief tone will sound.
Automatic deactivation
The system deactivates automatically when driv-
ing forward faster than 6 mph (10 km/h).
ZA WARNING
Follow the safety precautions and note the
limits of the assist systems, sensors, and
cameras > page 154.
(era Wael]
Applies to: vehicles with rearview camera/peripheral cameras
You can manually start the cleaning of the rear-
view camera. The settings depend on the vehicle
equipment.
> Select |---| > Clean rearview camera in the upper
display when the parking system is active.
Z\ WARNING
Follow the safety precautions and note the
limits of the assist systems, sensors, and
cameras > page 154.
Applies to: vehicles with rearview camera/peripheral cameras
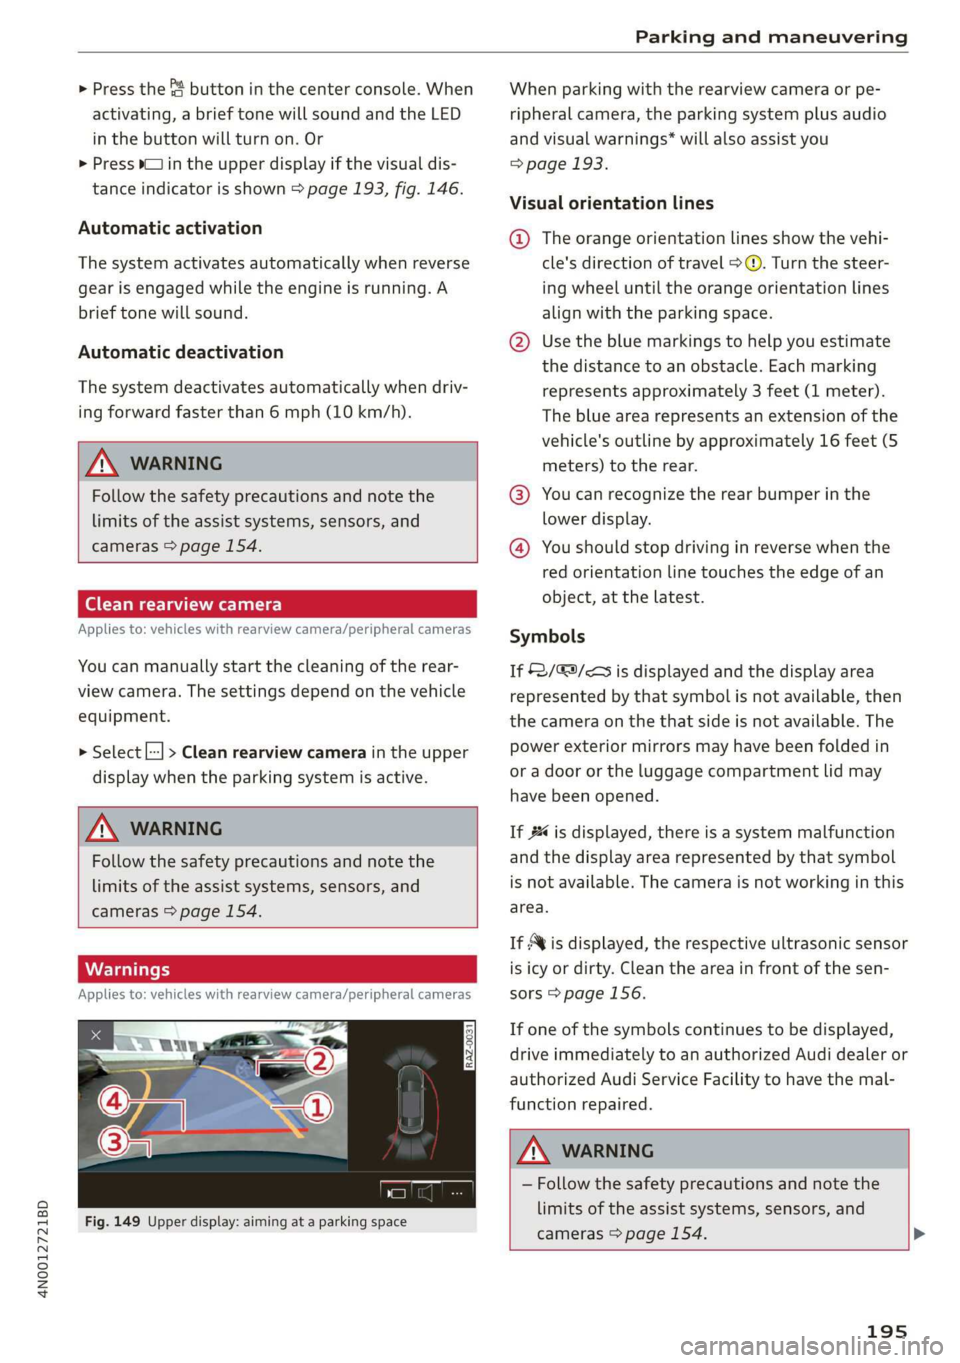
Fig. 149 Upper display: aiming at a parking space
When parking with the rearview camera or pe-
ripheral camera, the parking system plus audio
and visual warnings* will also assist you
=> page 193.
Visual orientation lines
@ The orange orientation lines show the vehi-
cle's direction of travel > ©. Turn the steer-
ing wheel until the orange orientation lines
align with the parking space.
@ Use the blue markings to help you estimate
the distance to an obstacle. Each marking
represents approximately 3 feet (1 meter).
The blue area represents an extension of the
vehicle's
outline by approximately 16 feet (5
meters) to the rear.
@® You can recognize the rear bumper in the
lower display.
@ You should stop driving in reverse when the
red orientation line touches the edge of an
object, at the latest.
Symbols
If $2/&9/< is displayed and the display area
represented by that symbol is not available, then
the camera on the that side is not available. The
power exterior mirrors may have been folded in
or a door or the luggage compartment lid may
have been opened.
If #4 is displayed, there is a system malfunction
and the display area represented by that symbol
is not available. The camera is not working in this
area.
If Avis displayed, the respective ultrasonic sensor
is icy or dirty. Clean the area in front of the sen-
sors > page 156.
If one of the symbols continues to be displayed,
drive immediately to an authorized Audi dealer or
authorized Audi Service Facility to have the mal-
function repaired.
ZA\ WARNING
— Follow the safety precautions and note the
limits of the assist systems, sensors, and
cameras > page 154. >
195
Page 200 of 360
Parking and maneuvering
A WARNING
— Follow the safety precautions and note the
limits of the assist systems, sensors, and
cameras > page 154.
— The Surroundings and 3D surroundings are
created from the individual camera images.
The vehicle image is shown by the system.
Objects and obstacles above the camera are
not displayed.
@) Note
Only use the images provided by the camera
on the rear of the vehicle when the luggage
compartment lid is completely closed. Make
sure any objects you may have mounted on
the luggage compartment lid do not block the
rearview camera.
iG) Tips
— Depending on the selected gear, it will auto-
matically switch between the Front and
Rear views. If you switch the view manually,
the automatic front/rear camera change will
be temporarily deactivated.
— When first activated while a forward gear is
engaged, the Front corner is displayed.
Rear cross-traffic assist
Applies to: vehicles with rear cross-traffic assist
7]
s
g
= = a
Fig. 151 Sensor detection range for rear cross-traffic assist
198
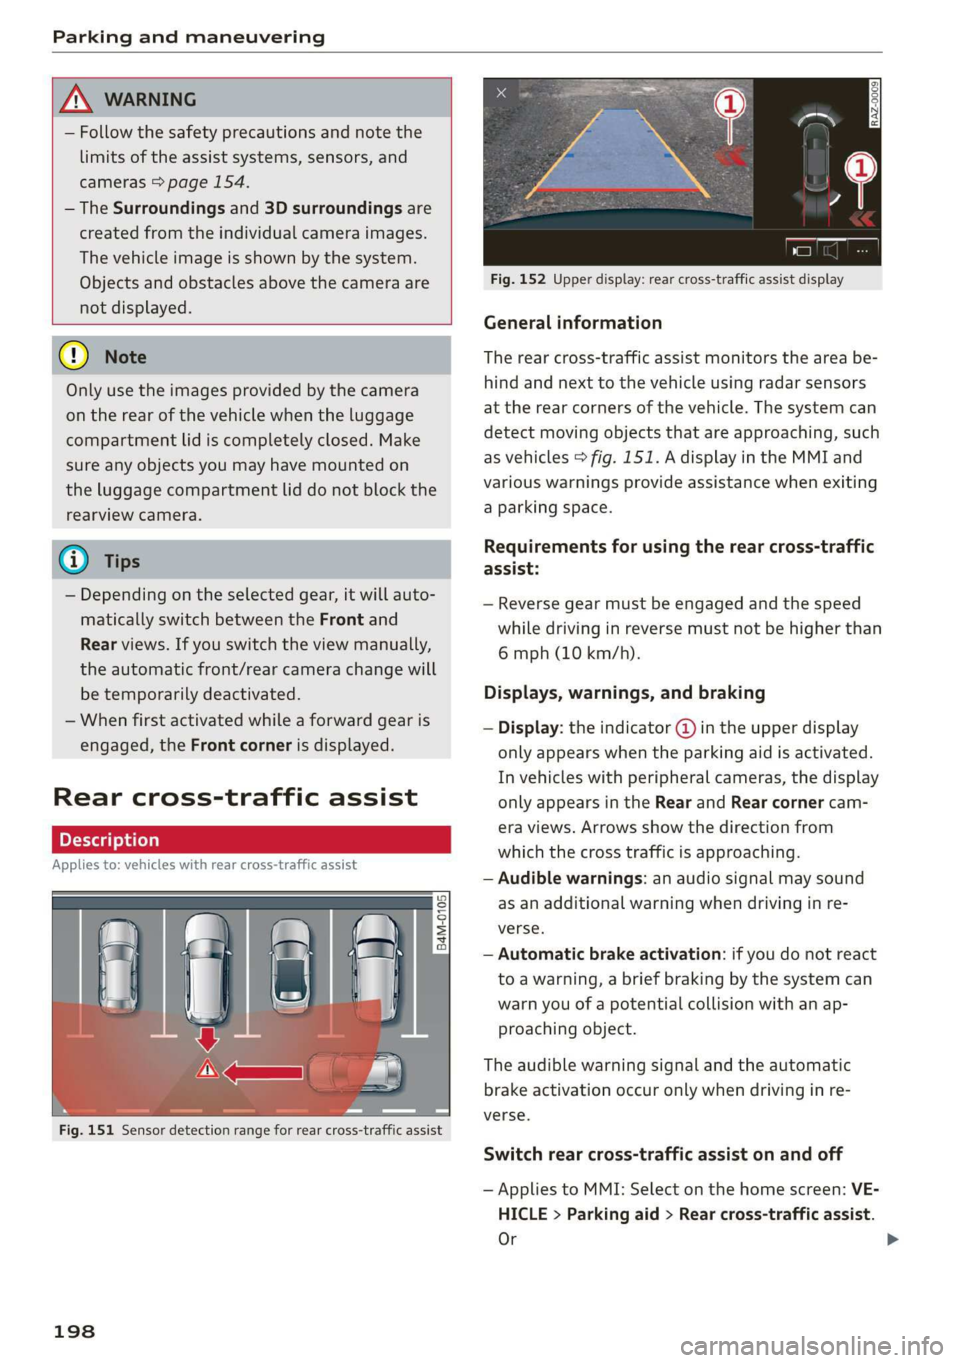
Fig. 152 Upper display: rear cross-traffic assist display
General information
The rear cross-traffic assist monitors the area be-
hind and next to the vehicle using radar sensors
at the rear corners of the vehicle. The system can
detect moving objects that are approaching, such
as vehicles > fig. 151. A display in the MMI and
various warnings provide assistance when exiting
a parking space.
Requirements for using the rear cross-traffic
assist:
— Reverse gear must be engaged and the speed
while driving in reverse must not be higher than
6 mph (10 km/h).
Displays, warnings, and braking
— Display: the indicator @ in the upper display
only appears when the parking aid is activated.
In vehicles with peripheral cameras, the display
only appears in the Rear and Rear corner cam-
era views. Arrows show the direction from
which the cross traffic is approaching.
— Audible warnings: an audio signal may sound
as an additional warning when driving in re-
verse.
— Automatic brake activation: if you do not react
to a warning, a brief braking by the system can
warn you of a potential collision with an ap-
proaching object.
The audible warning signal and the automatic
brake activation occur only when driving in re-
verse.
Switch rear cross-traffic assist on and off
— Applies to MMI: Select on the home screen: VE-
HICLE > Parking aid > Rear cross-traffic assist.
Or
Page 209 of 360
4N0012721BD
Telephone
Making an emergency call
Applies to: vehicles with telephone
Requirement: a mobile device must be connected
to the MMI via Bluetooth.
> Applies to: MMI: Select on the home screen:
PHONE > Dial number > the emergency call
number specific to the country (for example,
911) > Dial.
ZA WARNING
— Because your phone works with radio sig-
nals, a connection cannot be guaranteed un-
der all circumstances. Do not rely on only
your phone when it comes to essential com-
munication (such as during a medical emer-
gency).
— Always follow the instructions given by the
emergency personnel during an emergency
call and only end the call when they instruct
you to do so.
Answering/ending a call
Applies to: vehicles with telephone
> To accept or end a call, press the @ button on
the multifunction steering wheel. Operating
=> page 13.
You can use the following options on the MMI
when there is an incoming call:
> Answering an incoming call: press Answer.
> Declining a call: press Decline.
> Declining a call with a text message”: Require-
ment: the function must be enabled in the set-
tings. Press Decline with text message.
> Silencing the ringtone: press Mute.
@ Tips
The radio or media playback is muted during a
phone call.
During a phone call
Applies to: vehicles with telephone
The following options may be possible during a
call depending on the mobile device being used
and the type of connection:
— End call: end the current phone call.
— Mute: the other person on the call will no lon-
ger be able to hear you. You will still be able to
hear the other person. To switch the micro-
phone back on, press Unmute.
— Hold/Resume: place your current phone call on
hold and answer another.
— Send tone sequence: press Numbers. You can
enter tone sequences (DTMF) and send them to
the other party on the call.
— Accepting an incoming call: if a phone call
comes in during another call, you can either Re-
place the current call with the incoming call, or
use Answer to put the current call on hold. The
incoming call will be answered.
— Ignoring an incoming call: If you select De-
cline, the incoming call will be declined.
— Muting the incoming call: press Mute.
— Other call options: press More.
Requirement: two phone calls must be in prog-
ress.
— Conference call*: add a call on hold and up to
five active parties (depending on the cell phone
service provider) to the conference call.
— Swap call: alternate between two phone calls
while one of the calls is on hold. Press on the
respective call. Selecting End call will end the
active phone call. A call that was placed on hold
stays on hold and can be taken off hold with Re-
sume.
— Accepting an incoming call: if a phone call
comes in during another call and when there is
a call on hold, you can either Replace the cur-
rent call with the incoming call, or use Answer
to put the current call on hold. The incoming
call will be answered.
Press More.
— Transferring a call*: press Transfer call to mo-
bile device to transfer the existing call from the
MMI to your mobile device or Bluetooth® head-
set”.
— Transfer audio to Rear Seat Remote”: press
Transfer audio to Rear Seat Remote to transfer
the current phone call from the MMI or Blue-
tooth® headset* to the Rear Seat Remote.
— Switch to hands-free mode*: Requirement: you
must have a phone call in progress on your
207
>
Page 215 of 360

4N0012721BD
Telephone
> Enable the Bluetooth function and visibility on
the MMI > page 267 and the cell phone.
> Applies to: Rear Seat Remote: Select on the
home screen: SETTINGS > Connect > ©.
> In the Connected devices menu, press on the
desired mobile device in the list.
A PIN for a secure Bluetooth connection will be
generated.
> Confirm the PIN on your mobile device, or
> Enter the PIN for connecting on your cell
phone. The time allowed for entering the PIN is
limited to approximately 30 seconds.
> If you would like to prevent the MMI from ac-
cessing your call list and contacts, enable Pri-
vate mode > page 215 / => page 210.
> Follow the system instructions.
> Pay attention to any additional system prompts
displayed on your mobile device or the Rear
Seat Remote, for example if the PIN should be
saved for future use.
Connecting another mobile device
Requirement: a connected mobile device must be
displayed on the Rear Seat Remote.
> Applies to: Rear Seat Remote: Select on the
home screen: SETTINGS > [? > Connect.
Switching between two mobile devices
Requirement: two connected mobile devices
must be displayed on the Rear Seat Remote.
> Applies to: Rear Seat Remote: Select on the
home screen: PHONE > {J
ZA WARNING
Follow the safety precautions > page 25, Rear
Seat
Remote.
Using the telephone
Applies to: vehicles with Rear Seat Remote and telephone
The following possible phone functions will be
available:
— Search
— Call list > page 204
— Contacts > page 214
— Favorites > page 205
— Voicemail > page 206
— Select number > page 206
Possible functions during an incoming call:
— Answering an incoming call: press Answer.
— Declining a call: press Decline.
— Declining a call with a text message”: press
A.
— Silencing the ringtone: press Mute.
Requirement: there must be a call in progress.
The following options may be possible during a
call depending on the mobile device being used
and the type of connection:
— End call: you can end a phone call.
— Mute: the other person on the call will no lon-
ger be able to hear you. You will still be able to
hear the other person. To switch the micro-
phone back on, press Unmute.
— Hold/Resume: you can place the existing call
on hold and resume it again.
— Accepting an incoming call: if a phone call
comes in during another call, you can either Re-
place the current call with the incoming call, or
use Answer to put the current call on hold. The
incoming call will be answered.
— Ignoring an incoming call: If you select De-
cline, the incoming call will be declined.
— Send tone sequence: press Numbers. You can
enter tone sequences (DTMF) and send them to
the other party on the call.
Press More.
Possible options depending on whether you are
holding the Rear Seat Remote or it is in the hold-
St;
— Transfer call*: press Transfer audio to MMI or
Transfer call to mobile device.
— Hands-free*: requirement: a call must be in
progress on your mobile device, headset, or the
MMI. Press Hands-free to transfer the call back
to the Rear Seat Remote.
— Adding an additional call: press Additional call
Select: Search/Call list/Contacts/Favorites >
select an entry from the list, or press Dial
phone number and enter a phone number.
Then the active call will be on hold.
213
Page 252 of 360
Media
Media
General information
There may be different media drives and connec-
tions available depending on the vehicle equip-
ment. For example, you can play media files us-
ing the SD card reader or connect your mobile de-
vices to the Audi music interface and operate
them through the MMI.
Media and format restrictions: the MMI (includ-
ing the SD card reader and the USB storage de-
vice connection) was tested with a variety of
products and media on the market. However,
there may be cases where individual devices or
media and audio/video files may not be recog-
nized, may play only with restrictions, or may not
play at all.
Restricted functionality: reset the Media to the
factory default settings if functionality is restrict-
ed.
Digital Rights Management: please note that
the audio/video files are subject to copyright pro-
tection.
The media drives do not play files that are pro-
tected by DRM and are identified with the symbol
&.
Data security: never store important data on SD
cards, CDs/DVDs, or mobile devices. Audi is not
responsible for damaged or lost files and media.
Loading times: the more files/folders/playlists
there are on a storage medium, the longer it will
take to load. To reduce the amount of time it
takes the audio/video files to load, use a storage
medium that only contains audio/video files, and
create subfolders (for example, for each artist or
album).
Additional information: when playing, audio
files are automatically displayed with any addi-
tional information that is stored (such as the ar-
tist, track and album cover). If this information is
not available on the storage medium, the MMI
will check the Gracenote metadata database.
However, in some cases, the additional informa-
tion may not be displayed.
250
C@) Note
Read the information about Audi connect, and
be sure to note the connectivity costs section
=>@ in General information on page 216.
SD card reader
The SD card reader is in the storage compartment
under the front center armrest.
Inserting the SD card
> The angled corner of the SD card must face to-
ward the right front side when being inserted.
> Slide the SD card into the card reader slot until
the SD card clicks into place.
The SD card reader is accessed and operated
through the MMI = page 255.
@) Note
— Only use one-piece SD cards. If adapter
cards (SD cards with more than one piece)
are used, the card could fall out of the
adapter when driving because of vibrations.
Individual pieces could then become stuck
in the drive and impair the functionality.
—To reduce the risk of damaging drives and
data carriers, always keep data carriers ina
sleeve and never expose them to direct sun-
light.
DVD drive
General information
Applies to: vehicles with a DVD drive
The functionality of individual storage mediums
may be limited due to the variety of blank CDs/
DVDs available and the various capacities. Audio
CDs or video DVDs with copy protection, CDs/
DVDs that do not conform to the standard, and
multisession CDs may have limited playback or
may not play at all. Audi recommends finalizing
the recording process when creating multisession
CDs. Multisession DVDs are not supported.
C) Note
To reduce the risk of damaging the drive and
data carriers: