remote start AUDI A8 2021 Owners Manual
[x] Cancel search | Manufacturer: AUDI, Model Year: 2021, Model line: A8, Model: AUDI A8 2021Pages: 362, PDF Size: 99.29 MB
Page 4 of 362
Table of contents
About this Owner's Manual......
SUMIMAry: < = exe : eens: Seen cs sens
QutckeaeCe ssh: «i esis se ois a eaves @
Cockpit. ...... 0... eee eee eee eee
Indicator lights overview...........4..
Display and operation...........
Instrument cluster...............
Instrument cluster overview...........
Operating. ecccuse w+ were oo wens oo ayes 9 ¥
Adjusting the display.................
Coolant temperature display...........
Tachometer’ series i ewe so snes ¥ & ome
Power meter...............0 00000005
QUOOMEtEr as + 2 ame < gas = papas s ¥ HERS &
Outside temperature display...........
Engine oil temperature indicator.......
Boost indicator’: 2 2c« «= sesa ¢ x sews «x 2x8
Vehicle functions « seis ss emis ee mes ee
Touch displays....................
General touch display operation........
Multi Media Interface................
Rear Seat Remote...............2...
Screens (NPCs « s wees s eae se wee as ee
Head-up display..................
Descriptionis: ss gem = x eames ¢ eee ge eee
Voice recognition system........
General information.................
DeSeriptionis = ssssas « « wens s + eres « + aes
External voice operation..............
Global functions.................
Additional function buttons...........
Starting and driving.............
Personalization..................
Luggage compartment lid.............
Child safety lock.............0...000.
POWEr WIKdOWS 6: «oxen se aes ye eee
NOD
OO
12 12 12
13
13
14 14
15
15
15
15
16
16
18 18
20
26
29
33 33
34 34
34
35
3F 37 38 38 38
Al 41 45
48
51
52
Panoramic glass roof................. 53
Valet parking............... 0c eee eee 55
Garage door opener.........60..e sees 55
Lights and Vision................. 58
Exterior lighting « sce ss ees se eea se ees 58
Interior lighting wiv «= ssw 2 6 ese = 3 ese 62
ViSION. 0. ee eee eee 64
Windshield wipers............-..00-- 66
Digitalcomipass’s ss gos « s wasn x & were 8 3 68
Sitting correctly and safely...... 70
Correct passenger seating position...... 70
FROMUSOAES!, «areas ao axoniva 5 & aumeane wa savers 70
Rear seats... 2... eee 74
SECeriig WHEEL su: s x wou 4 x naaee ee ee 77
Head restraintsisn: «+ cscs vo asceine vo wen ws 78
Safety belts........ 0.0... cee eee eee 80
Memory function..............-.000+ 83
Aitbag System sms: «+ suscens oe sowie «5 voeusic 84
Child safety seats................000- 88
Storage and convenience........ 94
POWEPrSOUICES wece ae ete ee ore ne 94
Cup holders..............00--0 eee ee 95
Storage and compartments............ 95
Luggage compartment............... 97
Roof rack... eee eee 99
WWarmitanGicolediics «6 scien «6 eve 6 6 on 100
Climate control system............... 100
Steering
wheel heating.............-. 104
Auxiliary climate control.............- 104
Fluids in the A/C system.............. 105
BXRIMIIG)). 5 sccces 6 ase wo moms 3 o OOM 8 Ho 107
Starting the vehicle.................. 107
When driving.......-..e0ceeeee sees 108
Drive SYStC Mises oo scene +o em oo omen oo 114
Start/Stop system............00 0 eee 117
Brakes... 2.0.0... eee eee ee eee eee 119
Electromechanical parking brake....... 121
Special driving situations.............. 122
Driving dynamic.................. 124
Audi driverselectis « was «+ cine 2 6 navies a 0 124
Suspension..............0 0.02.0 000. 125
StCGKitig + scm ss caus a e seen se Sees 4 eee 127
Page 43 of 362
4N0012721BF
Opening and closing
Opening and closing
Central locking
General information
Z\ WARNING
— If you leave the vehicle, switch the ignition
off and take the key with you. This applies
particularly when children remain in the ve-
hicle. Otherwise, children could start the ve-
hicle or operate electrical equipment (such
as power windows), which increases the risk
of an accident.
— Applies to vehicles with anti-theft alarm sys-
tem: When the vehicle is locked from the
outside, no one - especially children - should
remain in the vehicle, because the windows
can no longer open from the inside
=> page 44, Anti-theft alarm system.
Locked doors make it more difficult for
emergency workers to enter the vehicle,
which puts lives at risk.
All doors and the luggage compartment lid can
be centrally unlocked and locked at once. You can
select in the MMI if the entire vehicle or only the
driver's door should unlock when unlocking the
vehicle > page 42. The turn signals flash twice
when you unlock the vehicle and flash once when
you lock the vehicle. If they do not flash when
locking, check if all doors and lids are closed.
Depending on the vehicle equipment, you may
have different options for centrally unlocking and
locking your vehicle.
— Vehicle key > page 46
— Sensors in the door handles > page 46
— Lock cylinder in the driver's door > page 44
— Interior central locking switch > page 43
Vehicle key
The term “vehicle key” refers to the remote con-
trol key or convenience key*. The convenience
key* is a remote control key with special func-
tions > page 46 and > page 107.
Power closing*
When closing a door or the luggage compart-
ment lid, you only have to Let it fall lightly into
the latch. It then closes automatically > A.
Automatic locking
If you unlock the vehicle but then do not open
any of the doors, the luggage compartment, or
the hood within a short period time, the vehicle
locks again automatically. This feature prevents
the vehicle from being accidentally left unlocked
for a long period of time.
Automatic locking (Auto Lock)
The Auto Lock function locks all doors and the
luggage compartment lid once the speed has ex-
ceeded approximately 9 mph (15 km/h). The ve-
hicle will unlock again if the unlock function in
the central locking switch is pressed, the “P” gear
is engaged, or the ignition is switched off.
You can open the doors individually from the in-
side by pulling the door handle one time. To open
the rear doors individually, you must pull the
door handle twice.
In the event of a crash with airbag deployment,
the doors will also automatically unlock to allow
access to the vehicle.
Unintentionally locking yourself out
Only lock your vehicle when all of the doors and
the luggage compartment lid are closed and
there is no key in the vehicle. This reduces the
risk of locking yourself out accidentally.
The
following features help to reduce the risk of
locking your vehicle key in the vehicle:
— If the driver's door is open, the vehicle cannot
be locked by pressing the & button on the re-
mote control key or by touching the locking
sensor* on a door.
— If the vehicle key that was used most recently is
inside the luggage compartment, the luggage
compartment lid will automatically open again
after it closes > ©.
— If the vehicle key that was last used is detected
inside the vehicle, then the vehicle cannot be
locked from the outside > ©.
41
Page 77 of 362
4N0012721BF
Sitting correctly and safely
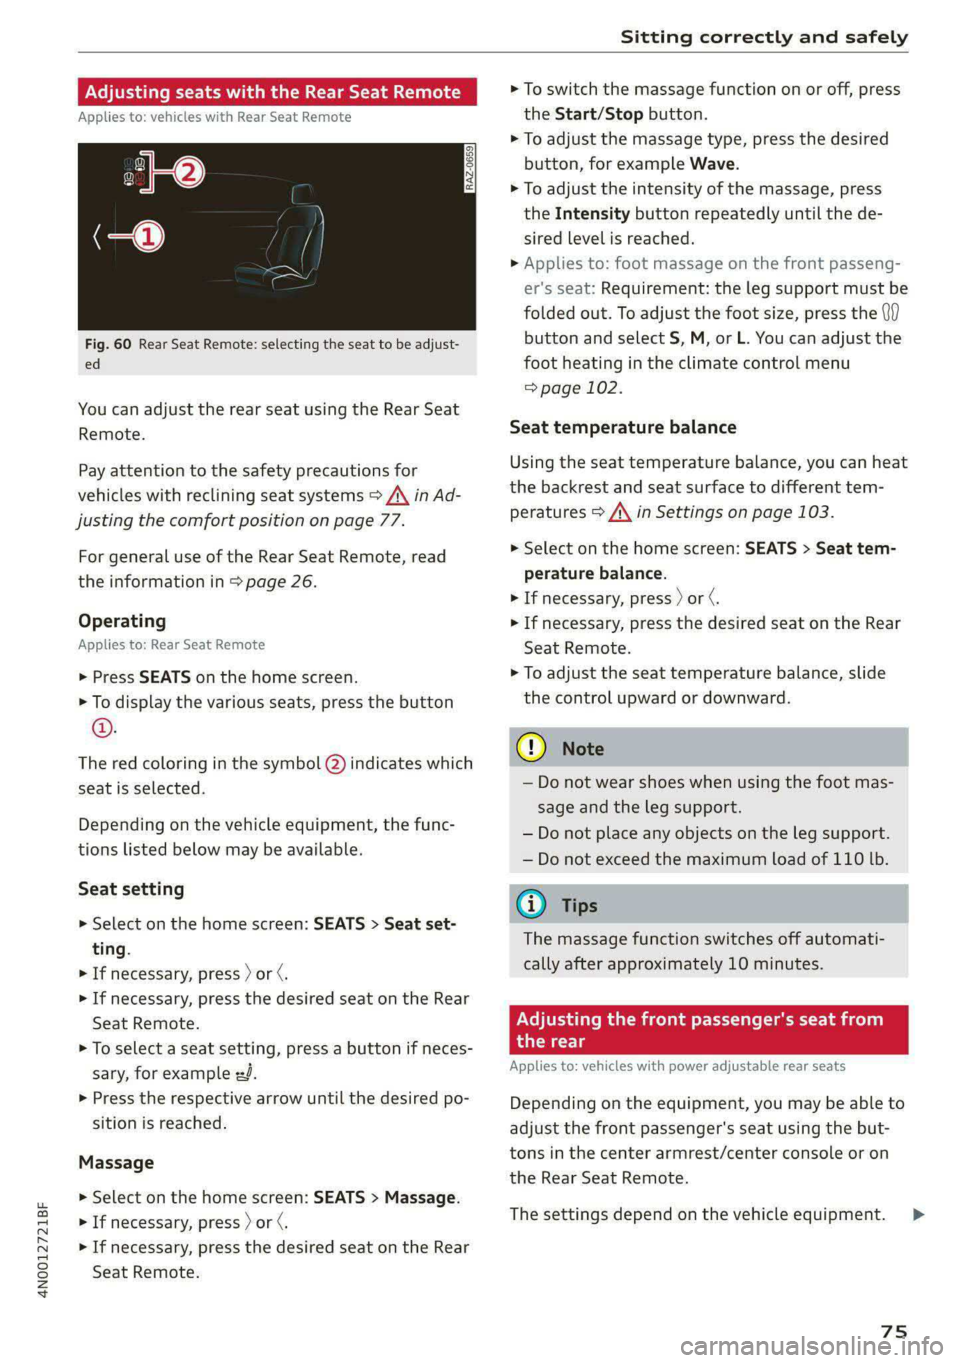
Adjusting seats with the Rear Seat Remote
Applies to: vehicles with Rear Seat Remote
Fig. 60 Rear Seat Remote: selecting the seat to be adjust-
ed
You can adjust the rear seat using the Rear Seat
Remote.
Pay attention to the safety precautions for
vehicles with reclining seat systems > A\ in Ad-
justing the comfort position on page 77.
For general use of the Rear Seat Remote, read
the information in > page 26.
Operating
Applies to: Rear Seat Remote
> Press SEATS on the home screen.
> To display the various seats, press the button
©.
The red coloring in the symbol Q) indicates which
seat is selected.
Depending on the vehicle equipment, the func-
tions listed below may be available.
Seat setting
> Select on the home screen: SEATS > Seat set-
ting.
> If necessary, press ) or ¢.
> If necessary, press the desired seat on the Rear
Seat Remote.
> To select a seat setting, press a button if neces-
sary, for example #J.
> Press the respective arrow until the desired po-
sition is reached.
Massage
> Select on the home screen: SEATS > Massage.
> If necessary, press ) or ¢.
> If necessary, press the desired seat on the Rear
Seat Remote.
> To switch the massage function on or off, press
the Start/Stop button.
> To adjust the massage type, press the desired
button, for example Wave.
> To adjust the intensity of the massage, press
the Intensity button repeatedly until the de-
sired level is reached.
> Applies to: foot massage on the front passeng-
er's seat: Requirement: the leg support must be
folded out. To adjust the foot size, press the (if)
button and select S, M, or L. You can adjust the
foot heating in the climate control menu
=> page 102.
Seat temperature balance
Using the seat temperature balance, you can heat
the backrest and seat surface to different tem-
peratures > A\ in Settings on page 103.
> Select on the home screen: SEATS > Seat tem-
perature balance.
> If necessary, press ) or ¢.
> If necessary, press the desired seat on the Rear
Seat Remote.
> To adjust the seat temperature balance, slide
the control upward or downward.
C@) Note
— Do not wear shoes when using the foot mas-
sage and the leg support.
— Do not place any objects on the leg support.
— Do not exceed the maximum load of 110 lb.
@ Tips
The massage function switches off automati-
cally after approximately 10 minutes.
Adjusting the front passenger's seat from
the rear
Applies to: vehicles with power adjustable rear seats
Depending on the equipment, you may be able to
adjust the front passenger's seat using the but-
tons in the center armrest/center console or on
the Rear Seat Remote.
The settings depend on the vehicle equipment.
75
Page 110 of 362
Driving
usual may increase the risk of accidents and
serious injuries.
— Secure the vehicle against rolling before ex-
iting the vehicle > page 108.
@) Note
— Avoid high engine speed, full throttle, and
heavy engine load if the engine has not
reached operating temperature yet. You
could damage the engine.
— If the engine has been under heavy load for
an extended period of time, heat builds up
in the engine compartment after the engine
is switched off and there is a risk of damag-
ing the engine. For this reason, let the en-
gine run at idle for approximately two mi-
nutes before shutting it off.
@ Tips
— Brief noises are normal when starting and
stopping the vehicle and are no cause for
concern.
— For up to 10 minutes after stopping the en-
gine, the radiator fan may turn on again au-
tomatically or it may continue to run, even if
the ignition is switched off.
— It may not be possible to start the vehicle in
extremely low temperatures.
— Power will be fully available once the engine
is at operating temperature.
Messages
Hj Engine start system: malfunction! Please
contact Service
Do not switch the ignition off because you may
not be able to switch it on again. Drive to an au-
thorized Audi dealer or authorized Audi Service
Facility immediately to have the malfunction cor-
rected.
B Engine start system: malfunction! Please
contact Service
There is a malfunction in the engine start system.
Drive immediately to an authorized Audi dealer
or authorized Audi Service Facility to have the
malfunction repaired.
108
B Remote control key: key not detected. Is the
key still in the vehicle?
The vehicle key was removed from the vehicle
while the engine is running. If the vehicle key is
no longer in the vehicle, you cannot switch the ig-
nition on or start the engine once you stop it. You
also cannot lock the vehicle from the outside.
Remote control key: hold back of key
against the designated area. See owner's man-
ual
The battery in the vehicle key may be drained or
there may be a malfunction. To start the vehicle,
you must also hold the vehicle key against the lo-
cation shown ?) > page 107, fig. 91.
If the malfunction remains, drive immediately to
an authorized Audi dealer or authorized Audi
Service Facility to have the malfunction correct-
ed.
When driving
Starting to drive, stopping, and parking
Starting from a stop
> Press and hold the brake pedal.
> Start the engine.
> Select a gear.
> Release the parking brake.
> Release the brake pedal. The vehicle may roll.
> Press the accelerator pedal to accelerate.
Securing the vehicle against rolling
Secure your vehicle to prevent it from rolling be-
fore exiting the vehicle.
> Set the parking brake.
> Select the “P” selector lever position.
> If parking on a steep road, turn the steering
wheel so that your vehicle will roll against the
curb in case it should start to move.
If one of these measures is not possible, for ex-
ample because there is no vehicle power, you
must secure your vehicle against rolling using ad-
ditional measures.
> Only park the vehicle on a level surface.
> Use suitable objects to block the front and rear
wheels.
Page 199 of 362
4N0012721BF
Parking and maneuvering
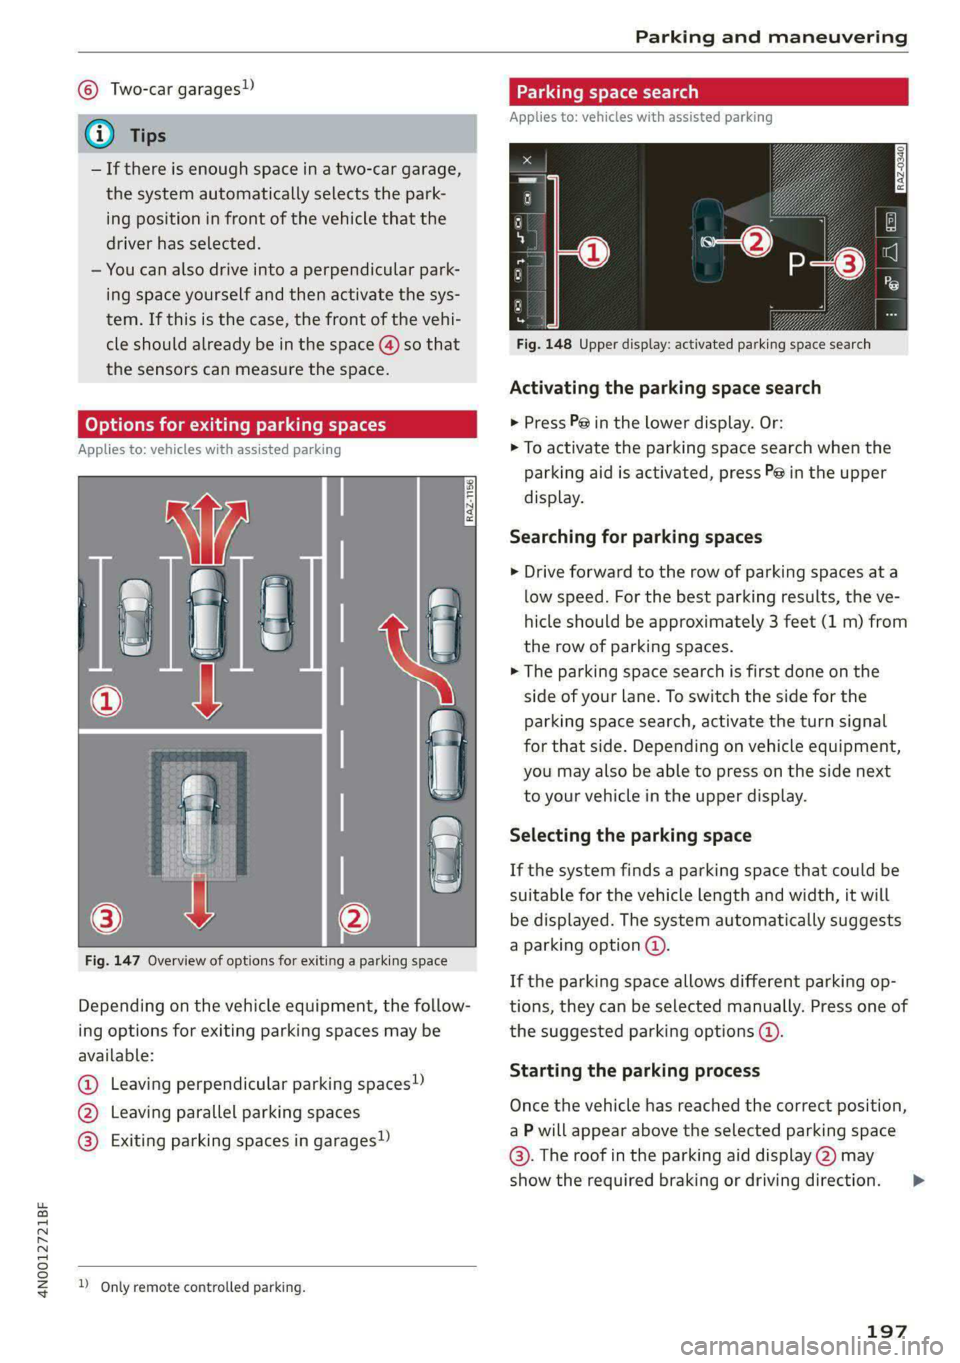
© Two-car garages”
@ Tips
— If there is enough space in a two-car garage,
the system automatically selects the park-
ing position in front of the vehicle that the
driver has selected.
— You can also drive into a perpendicular park-
ing space yourself and then activate the sys-
tem. If this is the case, the front of the vehi-
cle should already be in the space () so that
the sensors can measure the space.
(oy oy a] for exiting parking spaces
Applies to: icles with assisted parking
Fig. 147 Overview of options for exiting a parking space
Depending on the vehicle equipment, the follow-
ing options for exiting parking spaces may be
available:
@ Leaving perpendicular parking spaces»)
@ Leaving parallel parking spaces
@® Exiting parking spaces in garages)
2 Only remote controlled parking.
Parking space search
Applies to: vehicles with assisted parking
S g 3
3]
&
Fig. 148 Upper display: activated parking space search
Activating the parking space search
> Press P@ in the lower display. Or:
> To activate the parking space search when the
parking aid is activated, press Pe in the upper
display.
Searching for parking spaces
> Drive forward to the row of parking spaces at a
low speed. For the best parking results, the ve-
hicle should be approximately 3 feet (1 m) from
the row of parking spaces.
> The parking space search is first done on the
side of your lane. To switch the side for the
parking space search, activate the turn signal
for that side. Depending on vehicle equipment,
you may also be able to press on the side next
to your vehicle in the upper display.
Selecting the parking space
If the system finds a parking space that could be
suitable for the vehicle length and width, it will
be displayed. The system automatically suggests
a parking option @.
If the parking space allows different parking op-
tions, they can be selected manually. Press one of
the suggested parking options @).
Starting the parking process
Once the vehicle has reached the correct position,
a P will appear above the selected parking space
©. The roof in the parking aid display @) may
show the required braking or driving direction.
197
>
Page 200 of 362
Parking and maneuvering
> Keep the vehicle as parallel as possible to the
parked vehicles or to the side of the road.
> Make sure that the parking space is suitable for
your vehicle >@).
Depending on vehicle equipment and the applica-
ble legal regulations, you may start the assisted
parking process after selecting the parking space
@:
— In the vehicle: parking with the park assist plus
and the |>>P] button > page 199.
— Outside of the vehicle: remote controlled park-
ing with a mobile device > page 202
Maneuvering area
The vehicle can go off course during the parking
process
> A\. If there are obstacles within the
maneuvering area that block or endanger the
parking process, for example on the opposite
side of the street, a message may appear. You
may need to drive farther forward and stay closer
to the row of parking spaces.
ZA WARNING
— Observe the safety precautions and note the
limits of the assist systems, sensors, and
cameras > page 150.
— The driver is always responsible when enter-
ing or exiting a parking space and during
similar maneuvers.
— Sensors and cameras have spots in which
the surrounding area cannot be detected.
Objects, animals, and people may only be
detected with limitations may not be detect-
ed at all. Always monitor the traffic and the
vehicle's surroundings directly and do not
become distracted.
@) Note
— Parking spaces classified as suitable by the
system may have been detected incorrectly.
The driver must decide if the parking space
displayed is suitable for the vehicle.
)_ system availability may be limited depending on the mar-
ket.
2) In preparation at the time of printing.
198
— Certain conditions near the parking space
may cause the parking process to fail, such
as if the parking space is near trees or posts,
or if the ground is covered, for example,
with gravel, snow, or ice.
G) Tips
— If you did not drive past a suitable parking
space
too quickly, the system can also be ac-
tivated afterward by pressing Pe.
— The Electronic Stabilization Control (ESC)
must not be switched off during the parking
process. If the ESC intervenes, the parking
process will be canceled.
— You can also drive into a perpendicular park-
ing space yourself and then activate the sys-
tem. If this is the case, the front of the vehi-
cle should already be in the space @)
=> page 196, fig. 145 so that the sensors
can measure the space.
— The system is not available when certain as-
sist systems are switched on.
—If there are suitable parking spaces on both
sides of the street, for example, on a one-
way street, you can change the side where
the system is searching for parking spaces
by activating the turn signal for the other
side or by pressing on that side in the upper
display.
— The park systems do not provide support for
assisted parking on tight curves.
Park assist plus!)2)
General information
Applies to: vehicles with park assist plus
Park assist plus parks the vehicle after the park-
ing space search and also exits the parking space.
While the driver presses and holds the [>>P] but-
ton and monitors the vehicle's surroundings, park
assist plus controls the steering, gear selection,
acceleration, and braking.
Page 205 of 362
4N0012721BF
Parking and maneuvering
the vehicle is too far. Make sure the connec-
tion is sufficient, and when in doubt, resume
parking the vehicle yourself.
— Blocking notifications, tones, and vibrations
increase the risk of an accident. The myAudi
app can only warn you if dangers are detect-
ed if you make sure that your mobile device
allows all notifications, tones, and vibra-
tions for the myAudi app.
@) Note
— Do not use remote controlled parking when
transporting cargo that projects outside of
the vehicle or when snow chains are mount-
ed.
— Remote controlled parking may guide the
vehicle either away from curbs or onto them
if other vehicles are parked on the curb.
Make sure that your vehicle's tires and rims
are not damaged. Resume control of the ve-
hicle in time or stop the parking process if
needed to prevent damage.
— In parking spaces without curbs, maintain a
distance of at least 19 inches (50 cm) from
walls and buildings in order to reduce the
risk of vehicle damage.
@) Tips
— Follow the legal regulations in the country
where you are operating the vehicle when
using remote controlled parking. Remote
controlled parking may be prohibited in
some countries. The system may be unavail-
able in countries where it has been deacti-
vated in order to comply with legal regula-
tions. Data will not be transmitted to Audi.
The driver is always responsible for adhering
to the regulations applicable in the country
where the vehicle is being operated.
— Any individual that uses the mobile device
for remote controlled parking is considered
the driver and is participating in traffic. The
driver is always responsible for adhering to
the regulations for using remote controlled
)_ System availability may be limited depending on the mar-
ket.
2) In preparation at the time of printing.
parking that are applicable in the country
where the vehicle is being operated.
— Do not endanger any other road users when
using remote controlled parking. Testing re-
mote controlled parking in a parking lot
with minimal traffic is recommended.
— Your mobile device should have a sufficient
battery charge level. If necessary, charge
the mobile device before starting to drive.
— Do not use the remote controlled parking
function with devices that are faulty or dam-
aged or whose function is impaired. Only
use the operating systems approved by the
mobile device manufacturer.
— When using remote controlled parking, al-
ways pay attention to the areas where your
vehicle can be accessed. Check that no one
can enter your vehicle and if the vehicle has
been locked after parking is completed.
Take the vehicle key with you when leaving
the vehicle.
Applies to: vehicles with remote park assist plus
The following steps must be completed before
using for the first time:
> Create a myAudi account by registering in the
myAudi app or at my.audi.com, depending on
your country.
> Add your vehicle to your myAudi account.
> Set the key user > page 38.
> Install the myAudi app on your mobile device
and log in with your access information.
Device compatibility
The mobile device will be checked at the start of
a parking procedure. If an incompatibility is de-
tected, it will be displayed in the myAudi app.
Audi does not recommend using the function if
an incompatibility is detected > A\.
A selection of supported Bluetooth devices can
be found in the database for tested mobile devi-
ces at www.audi.com/bluetooth. Compatibility
203
>
Page 207 of 362
4N0012721BF
Parking and maneuvering
Preparing the vehicle
> To enable the selected parking space (2) for re-
mote controlled parking, press E @ on the up-
per display.
> If you have already approached a parking space
in the vehicle, remote controlled parking can be
activated to continue with the rest of the park-
ing process. To enable remote controlled park-
ing, press [J in the upper display.
> Exit the vehicle while the engine is running and
take the vehicle key with you. Always keep both
the vehicle key and the mobile device with you
during the entire remote controlled parking
process.
> Make sure that all doors and the luggage com-
partment lid are closed.
Starting the parking process
> Start the myAudi app soon, or the function will
be canceled.
> Pay attention to the path of the vehicle. If the
traffic situation permits, park your vehicle in
the parking space using the mobile device
> JX. The vehicle key and the mobile device
cannot be more than approximately 20 feet
(6 m) away from the vehicle.
> Pay attention to the path of the vehicle. In un-
clear situations, pause the parking process us-
ing
the mobile device. For example, this may be
necessary if an obstacle appears or the vehicle
comes very close to an obstacle.
> To resume the parking process, start it again on
the mobile device. The rest of the parking proc-
ess will be recalculated based on the vehicle po-
sition.
End of the parking process
If an obstacle appears, stop the parking process
=> page 206.
The parking process will end automatically once
the vehicle has reached the end point in the park-
ing space. Once parking is successfully complet-
ed, the parking lock will be engaged, the parking
brake will be set, and the engine will switch off.
The vehicle will also be locked.
ZA WARNING
— Observe the safety precautions and note the
limits of the assist systems, sensors, and
cameras > page 150.
— Failing to pay careful attention to the vehi-
cle's surroundings increases the risk of an
accident. Park your vehicle with the mobile
device only if you are sure that no obstacle is
in the vehicle's path or under the vehicle,
and that no obstacles will move into the ve-
hicle's path.
@ Tips
— If the parking space is located in a garage, it
must be detected correctly by the vehicle.
When the parking space is detected com-
pletely, the edges of the space will be high-
lighted @).
— The parking process can only be started if
the vehicle key is located outside the vehicle
after the vehicle is prepared. Always keep
both the vehicle key and the mobile device
with you during the entire remote control-
led parking process.
— Remote controlled parking may be restrict-
ed or unavailable in situations such as the
following:
—If the ESC is restricted or switched off, or
if there is a malfunction.
—If there is another vehicle key inside the
vehicle or nearby.
— The system can incorrectly interpret parking
space barriers (such as parking curbs). Take
over the parking process > page 206 if the
vehicle is not completely inside the parking
space or if the vehicle tries to drive over the
parking space barrier.
205
Page 208 of 362
Parking and maneuvering
Exiting parking spaces with the myAudi
app)2)
Applies to: vehicles with remote park assist plus
> Start the myAudi app.
> Start the engine in the myAudi app soon. When
starting, the vehicle key and mobile device
must not be more than approximately 10 feet
(3 m) away from the vehicle.
> Start the parking process with the mobile de-
vice soon. Otherwise, the function will be can-
celed.
> Pay attention to the path of the vehicle. If the
traffic situation permits, drive the vehicle out of
the parking space using the mobile device
> JX. The vehicle key and the mobile device
cannot be more than approximately 20 feet
(6 m) away from the vehicle during remote con-
trolled parking.
> The process for exiting a parking space ends
when the maximum distance is reached or if ad-
ditional corrective movements are no longer
necessary. Unlock and resume manual control
of the vehicle.
If an obstacle appears, stop the parking process
=> page 206.
Z\ WARNING
— Observe the safety precautions and note the
limits of the assist systems, sensors, and
cameras > page 150.
— Failing to pay careful attention to the vehi-
cle's surroundings increases the risk of an
accident. Park your vehicle with the mobile
device only if you are sure that no obstacle is
in the vehicle's path or under the vehicle,
and that no obstacles will move into the ve-
hicle's path.
@) Tips
You can interrupt the path set by the vehicle,
for example if it will drive very close to an ob-
stacle, by pausing the parking process using
the mobile device. Based on the position of
)_ system availability may be limited depending on the mar-
ket.
2) In preparation at the time of printing.
206
the vehicle, the system then calculates the
additional steering and driving directions for
maneuvering.
Interrupting remote controlled parking)
Applies to: vehicles with remote park assist plus
To stop the vehicle, you can temporarily pause re-
mote controlled parking at any time using your
mobile device.
You can also completely stop the parking process
and come to full stop immediately using the ve-
hicle key by pressing any button on the vehicle
key. Therefore, always keep the vehicle key with
you during the remote controlled parking proc-
ess.
Canceling automatically
The remote controlled parking will be canceled
automatically in the following situations, among
other things:
— If the myAudi app is not started soon after exit-
ing the vehicle,
— If you switch off the system
— If the time limit is exceeded
— The ESC intervenes
Taking over the parking process
After canceling the parking process, the vehicle
will come to a stop and the "P" position will be
engaged. Take over control of the vehicle, end the
parking process manually, and stop the vehicle.
You can also restart the entire parking process
from inside the vehicle.
ZA WARNING
— Observe the safety precautions and note the
limits of the assist systems, sensors, and
cameras > page 150.
— Failing to pay careful attention to the vehi-
cle's surroundings increases the risk of an
accident. Park your vehicle with the mobile
device only if you are sure that no obstacle is
in the vehicle's path or under the vehicle, >
Page 218 of 362
Telephone
Accessing favorites
> Applies to: MMI/Rear Seat Remote: Select on
the home screen: PHONE > Favorites.
Opening favorites using the multifunction
steering wheel
» Select in the instrument cluster: Telephone tab
> ) button > Favorites.
Storing favorites
> Press YY © page 216 in the business card, or
> Press Store as favorite in the options
> page 215.
Deleting favorites
> Press W => page 216 in the business card, or
> Select: Favorites > Z > one or multiple favor-
ites or Select all > Delete > (Done).
i) Tips
The favorites can only be edited via the MMI.
Managing the directory
Applies to: vehicles with telephone
You can manage up to four directories in the
MMI.
Requirement: a mobile device must be connected
to the MMI.
Opening the directory
> Applies to: MMI/Rear Seat Remote: Select on
the home screen: PHONE > Contacts.
The contacts will be displayed. You can change
the sort order > page 219, Sort order.
Deleting imported contacts
Requirement: you must have imported at least
one contact > page 219.
> Select: Contacts > Z > one or more text mes-
sages > Delete > (Done). The imported contacts
are deleted.
Directory options
» Press and hold a contact in the directory until
the Options menu appears.
216
Depending on your mobile device, the following
options may be available:
— Store as favorite > page 215.
— Send contact: you can select Text message or
E-mail > page 219.
— Send text message > page 219.
— Send e-mail > page 220.
— Save as a shortcut > page 24, Shortcuts.
G) Tips
— Pay attention to any synchronization
prompts on your mobile device when down-
loading contacts.
— The contacts from the mobile device may
not be transferred in alphabetical order. If
there are too many entries, contacts with
different first letters may be missing in the
MMI.
— Only the contacts from the active connected
mobile device are displayed.
— The contacts in the local MMI memory are
always visible and can be accessed by other
users.
— After switching off the ignition and exiting
the vehicle, the mobile device directory will
be loaded when the MML is started again if
the mobile device is within range and the
Bluetooth function is switched on in the mo-
bile device and the MMI.
— Only the contacts in the local MMI memory
can be deleted.
Opening business cards
Applies to: vehicles with telephone
The business card shows you details about a con-
tact.
> To open a business card, press on a contact in
the directory, or
> Press @ in the call list ©) > page 215, fig. 156.
Possible options in the business card:
> Call: press on a phone number.
> Storing a favorite: press YW.
> Deleting a favorite: press Ww.
> Sending a text message: press |.
» Starting navigation: press on an address.
> Sending an e-mail: press on an e-mail address. >