charging AUDI E-TRON 2019 Owners Manual
[x] Cancel search | Manufacturer: AUDI, Model Year: 2019, Model line: E-TRON, Model: AUDI E-TRON 2019Pages: 310, PDF Size: 81.91 MB
Page 5 of 310
4KE012721BB
Table of contents
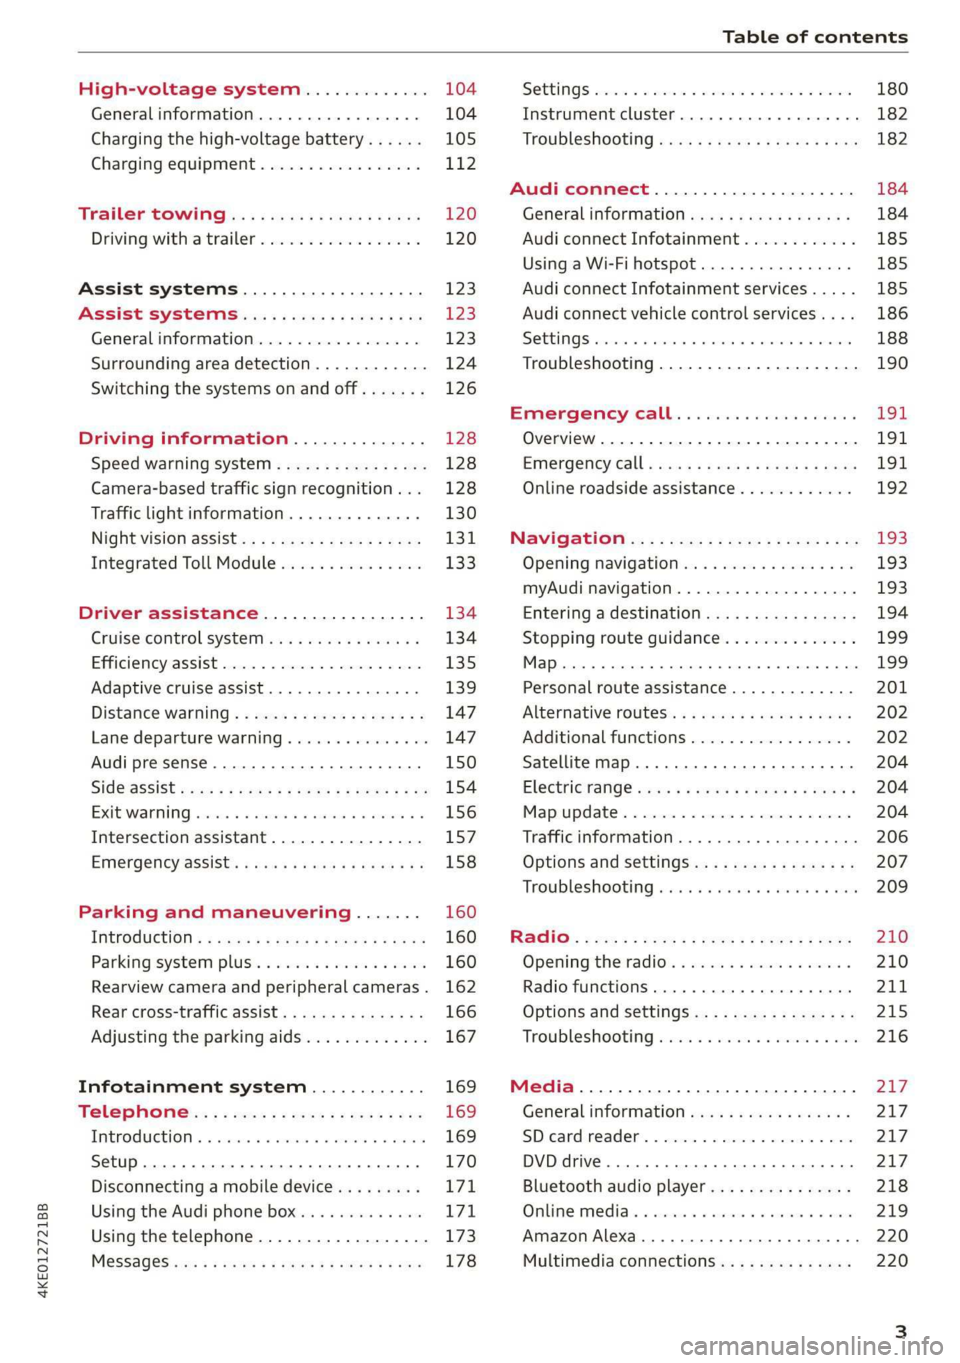
High-voltage system............. 104
Generalinformation................. 104
Charging the high-voltage battery...... 105
Charging equipment................. 112
Trailer towing.................0.-. 120
Driving with atrailer................. 120
Assist systems................... 123
ASSIST SYSTEMS ic: 6 & cas 5c cae 5 ow i238
General information................. 123
Surrounding area detection............ 124
Switching the systems on and off....... 126
Driving information.............. 128
Speed warning system..............-- 128
Camera-based traffic sign recognition... 128
Traffic light information.............. 130
NightiVision aSSistix = «xem : s ases : soe 131
Integrated Toll Module............... 133
Driver assistance................. 134
Cruise control system's.o. « cees ss rows ss 134
Efficiency assist...............--005. 135
Adaptive cruise assist................ 139
Distance warning .............e0e000. 147
Lane departure warning............... 147
Audi presense........... 0. cece eee 150
SIG@iASSISE sew: » 2 cues = y ewe ae AeA Ge we 154
EXIEWAPniNng sive «6 ccerane 2 @ soeee «0 cuesime @ 6 156
Intersection assistant................ 157
Emergency assist... ....:seeceeeevees 158
Parking and maneuvering....... 160
IRCROAWECION « = eas x o sees 5 o eee ge oe 160
Parking system plus...............00. 160
Rearview camera and peripheral cameras. 162
Rear cross-traffic assist............... 166
Adjusting the parking aids............. 167
Infotainment system............ 169
Telephone... - es.s =) gees be eens ces 169
TEROMUCLION 5 scoane a vanes » 6 nani + 6 exeemn 169
Setup... eee eee eee eee 170
Disconnecting a mobile device......... 171
Using the Audi phone box............. 171
Using the telephone.................. 173
M@SSAG@S ves s x sere + & ewe ¢ o eee § eee 178
SOPGINGS sacs +o aeowens w evewens a x euswoe a» eemeoe 180
Instrument cluster...............0008 182
Troubleshooting sacs ss sews + ¢ wae 3 x ew 182
Audi connect..................... 184
Generalinformation..............05- 184
Audi connect Infotainment............ 185
Using a Wi-Fi hotspot................ 185
Audi connect Infotainment services..... 185
Audi connect vehicle control services.... 186
SQECINOS cccssin ws eseuwie x priesens wm sores w 6 syenne 188
Troubleshooting..................5-. 190
Emergency call..................- 491,
Overview... .... 0... eee eee eee 191
EM@rgency Call + wsws « zaen 3 = suze 3 2 reR 191.
Online roadside assistance............ 192
Navigation. « : ssc < : soos sp eens ss 193
Opening navigation.................. 193
myAudi navigation.................0. 193
Entering adestination................ 194
Stopping route guidance.............. 199
MAP ieccsie 9 2 wxotiose 1 ssumene of 9 enwEem 4 ot tase & Oo we 199
Personal route assistance............. 201
‘Alternative roUtes:: « + wean 2 & wane 2 & eevwe 202
Additional functions................. 202
Satellite map.......... cc cece 204
Electric:range sass s x meas 5 ¢ cues ¥ ¢ mes 204
Mapruipdates. 2 caus + x res ao nenene 2 9 one 204
Traffic information...............0005 206
Options and settings................. 207
Troubleshooting wisi. cs vere ewer sv ere 209
RaGIO:: » acs ¢ = seen ¢ » ees y ¢ eS EE eee 210
Opening theradio'. « sas a 6 ssn s & sess 210
Radio functions..............0000005 211
Options and settings................. 215
Troubleshooting sis «6 ween oo wane 6 + eae 216
Media................. 0 eee eee eee 217
General information................. 217:
SD card reader.............-00000005 217
DVD drive... 2. . eee ee eee 217
Bluetooth audio player............... 218
Online media.......... ee eee eee eee 219
Amazon Alexa....... 0.00.0 ee eee eae 220
Multimedia connections.............. 220
Page 9 of 310
4KE012721BB
Quick access
Cup Holders: « sesccces < ence wo esenene 75
— Audi phone box ............... 171
— Starting the motor when there is
@ MMALRUNCHION: ¢ « sais 9 v nara x 2 ae 87
Socket ........00002 cece ee eee 75
@ Electromechanical parking brake
button ....... 0... 0c eee 93
@0 Selector lever ................. 88
@) [START STOP] button ............ 86
@) Steering wheel adjustment ...... 59
@3) Lever for:
— Cruise control system ......... 134
— Adaptive cruise assist .......... 139
@ Data link connector for On Board
Diagnostic System (OBD) ........ 283
@3) Hood release ................-. 236
@8 Memory function buttons ........ 63
@) Buttons for:
—Lights ...............2..000. 44
—All-weather lights ............ 44
— Rear fog lights ............... 44
Luggage compartment lid button . 35
@9) Exterior mirror adjustment ...... 48
G9 Buttons for:
— Power windows .............. 39
— Child safety lock .............. 39
@ Tips
Some the equipment listed here is only instal-
led in certain models or is available as an op-
tion.
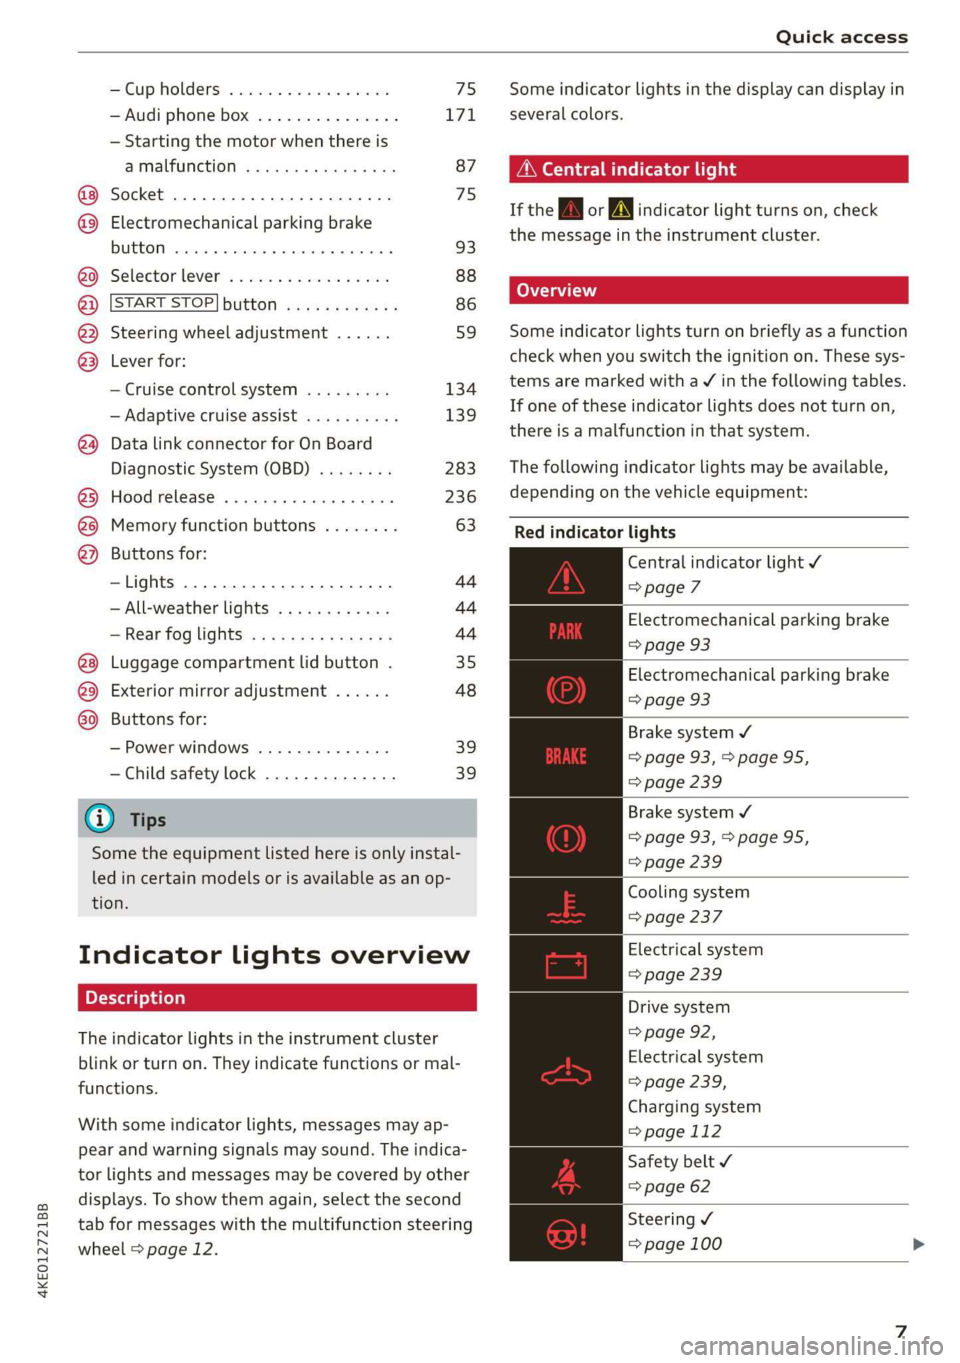
Indicator lights overview
The indicator lights in the instrument cluster
blink or turn on. They indicate functions or mal-
functions.
With some indicator lights, messages may ap-
pear and warning signals may sound. The indica-
tor lights and messages may be covered by other
displays. To show them again, select the second
tab for messages with the multifunction steering
wheel © page 12.
Some indicator lights in the display can display in
several colors.
A\ Central indicator light
If the wA or indicator light turns on, check
the message in the instrument cluster.
Some indicator lights turn on briefly as a function
check when you switch the ignition on. These sys-
tems are marked with a V in the following tables.
If one of these indicator lights does not turn on,
there is a malfunction in that system.
The following indicator lights may be available,
depending on the vehicle equipment:
Red indicator lights
Central indicator light ¥
=> page 7
Electromechanical parking brake
=> page 93
Electromechanical parking brake
=> page 93
Brake system ¥
=> page 93, > page 95,
=> page 239
Brake system 4
=> page 93,>page 95,
=> page 239
Cooling system
=> page 237
Electrical system
=> page 239
Drive system
=> page 92,
Electrical system
=> page 239,
Charging system
=>page 112
Safety belt
=> page 62
Steering ¥
=> page 100
Page 10 of 310
Quick access
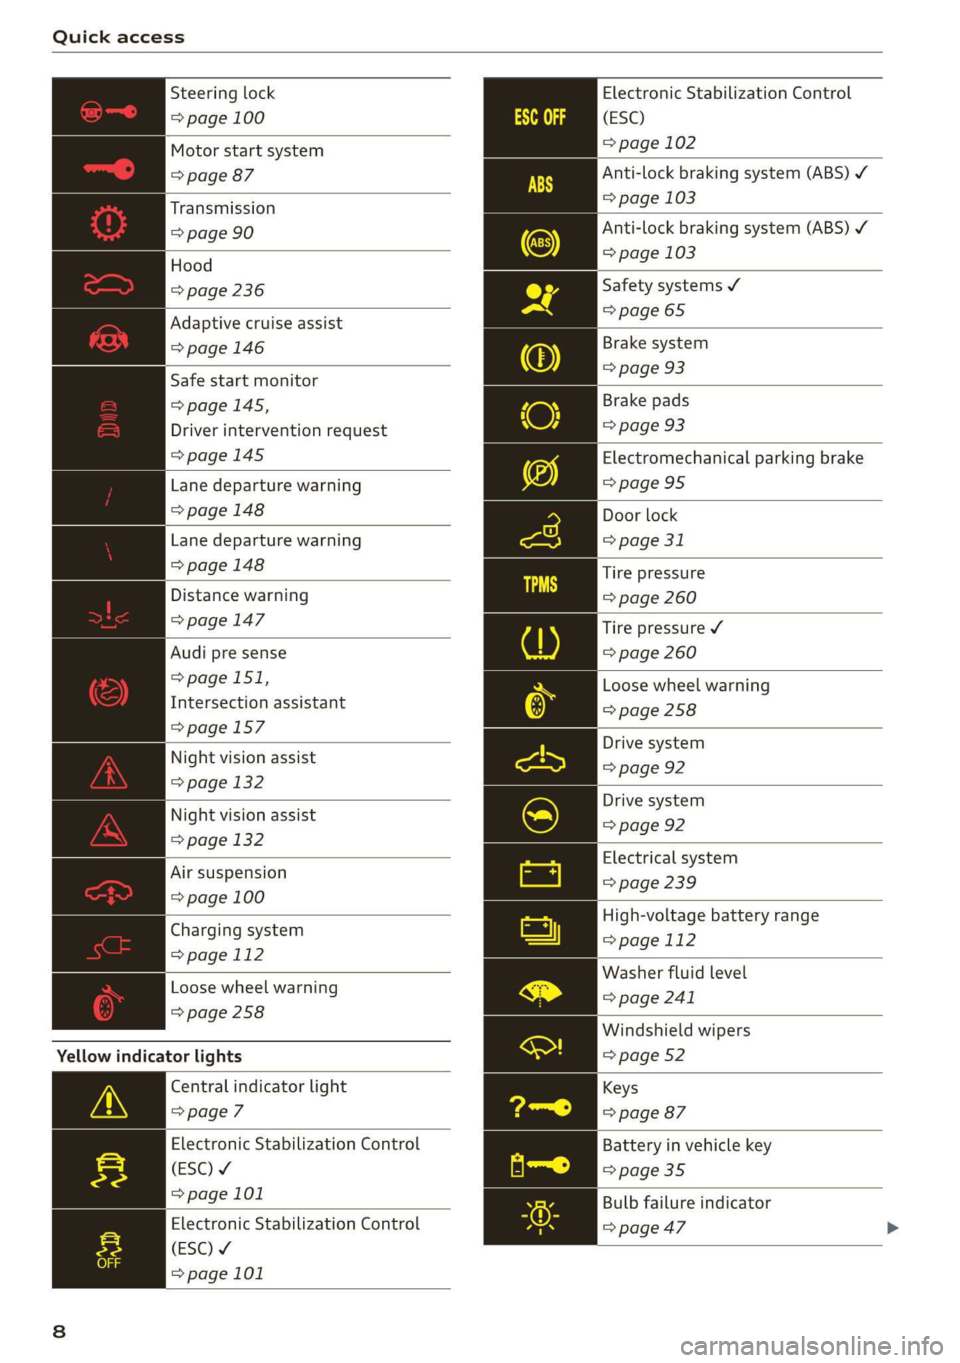
Electronic Stabilization Control
(ESC)
= page 102
Anti-lock braking system (ABS) ¥
=> page 103
Anti-lock braking system (ABS) ¥
=> page 103
Steering lock
=> page 100
Motor start system
=> page 87
Transmission
=> page 90
| Hood
=> page 236 Safety systems ¥
> 65
Adaptive cruise assist page
= page 146 Brake system
=> page 93
Safe start monitor pag
=> page 145,
Driver intervention request
=>page 145
Brake pads
=> page 93
Electromechanical parking brake
Lane departure warning =>page 95
=> page 148 Door lock
Lane departure warning => page 31
=> page 148 Tire pressure
Distance warning => page 260
> page 147 Tire pressure ¥
Audi pre sense => page 260
=> page 151,
Intersection assistant
=>page 157
Loose wheel warning
=> page 258
Drive system
Night vision assist => page 92
=> page 132
Drive system
Night vision assist => page 92
=> page 132
Electrical system
Air suspension => page 239
=> page 100
High-voltage battery range
=> page 112
Washer fluid level
=> page 241
Charging system
=> page 112
Loose wheel warning
=>page 258
Windshield wipers
=> page 52
Yellow indicator lights
Central indicator light
=> page 7
Electronic Stabilization Control
(ESC) ¥
=>page 101
Keys
=> page 87
Battery in vehicle key
= page 35
Bulb failure indicator
Electronic Stabilization Control > page 47
(ESC) ¥
=> page 101
Page 12 of 310
Quick access
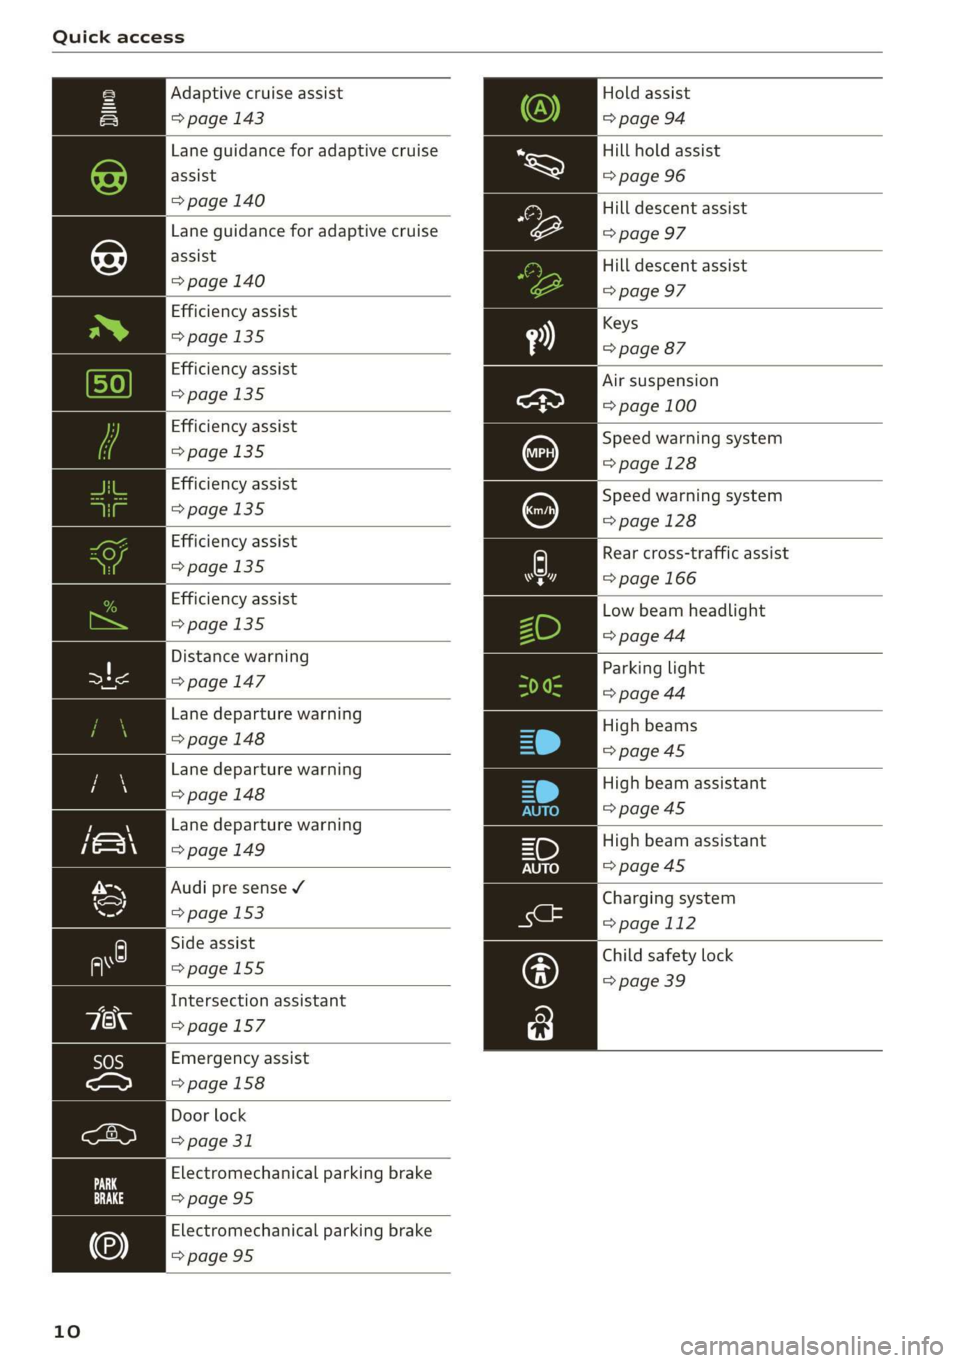
Hold assist
=> page 94
Hill hold assist
=> page 96
Adaptive cruise assist
=> page 143
Lane guidance for adaptive cruise
assist
> page 140 Hill descent assist
Lane guidance for adaptive cruise => page 97
assist
=> page 140
Hill descent assist
=> page 97
Efficiency assist
Keys
>page 135
=> page 87
Efficiency assist
>page 135
Efficiency assist
>page 135
Efficiency assist
=>page 135
Air suspension
=> page 100
Speed warning system
=> page 128
Speed warning system
=>page 128
Low beam headlight
=> page 44
Efficiency assist
>page 135
Distance warning
a => page 147
Lane departure warning
=>page 148
Parking light
=> page 44
High beams
=>page 45
Lane departure warning
> page 148 High beam assistant
=>page 45
Lane departure warning
=> page 149 High beam assistant
=>page 45
Audi pre sense ¥
Charging system
=> page 153 ang
=> page 112
Child safety lock
=> page 39
Side assist
=>page 155
Intersection assistant
=>page 157
Emergency assist
=>page 158
Door lock
> page 31
Electromechanical parking brake
=>page 95
Electromechanical parking brake
=>page 95
10
Efficiency assist A Rear cross-traffic assist
=> page 135 7] => page 166
Page 16 of 310
![AUDI E-TRON 2019 Owners Manual Instrument cluster
> Press the =] button on the multifunction steer-
ing wheel.
— On-board computer > page 14
— Charging > page 108
— Reduced display > page 13
— Reset trip odometer > AUDI E-TRON 2019 Owners Manual Instrument cluster
> Press the =] button on the multifunction steer-
ing wheel.
— On-board computer > page 14
— Charging > page 108
— Reduced display > page 13
— Reset trip odometer >](/img/6/57624/w960_57624-15.png)
Instrument cluster
> Press the =] button on the multifunction steer-
ing wheel.
— On-board computer > page 14
— Charging > page 108
— Reduced display > page 13
— Reset trip odometer > page 13
On-board computer
Resetting values to zero
Requirement: the Consumption, Short-term
memory, or Long-term memory display must be
selected.
> To reset the values in one of the memories to
zero, press and hold the left thumbwheel on
the multifunction steering wheel for one sec-
ond, or
> Select on the instrument cluster: vehicle func-
tions tab > [=] button > Reset mi.
Depending on the vehicle equipment, you can call
up the following displays in the on-board com-
puter one at a time by turning the left thumb-
wheel on the multifunction steering wheel:
—Time and date > page 231
— Range display > page 91
— Average consumption > page 14
— Short-term memory overview
— Long-term memory overview
— Driver assistance
— Traffic sign recognition > page 128
Short-term memory and long-term memory
The short-term memory collects driving informa-
tion from the time the ignition is switched on un-
til it is switched off. If you continue driving within
two hours after switching the ignition off, the
new values will be included when calculating the
current trip information.
Unlike the short-term memory, the long-term
memory is not erased automatically. You can se-
lect the time period for evaluating trip informa-
tion yourself.
14
Average consumption
The current consumption can be shown using a
bar graph. The average consumption stored in
the short-term memory is also displayed. If the
bar is green, your vehicle is saving energy using
the following methods:
— Recuperation: electrical energy can be stored in
the battery when the vehicle is coasting or driv-
ing downhill. The bar drops down into the neg-
ative part of the scale.
G) Tips
The date, time of day, and time and date for-
mat can be set in the Infotainment system
= page 231.
Page 36 of 310
Opening and closing
near the vehicle working in the same fre-
quency range (such as a mobile device or ra-
dio equipment). Always check if your vehicle
is locked.
— Applies to: MMI: You can view the number
of keys programmed to the vehicle by se-
lecting on the home screen: VEHICLE > Set-
tings & Service > Vehicle information.
— For an explanation on conformity with the
FCC regulations in the United States and the
Industry Canada regulations, see
=> page 289.
Vehicle key
RAZ-0025)
my
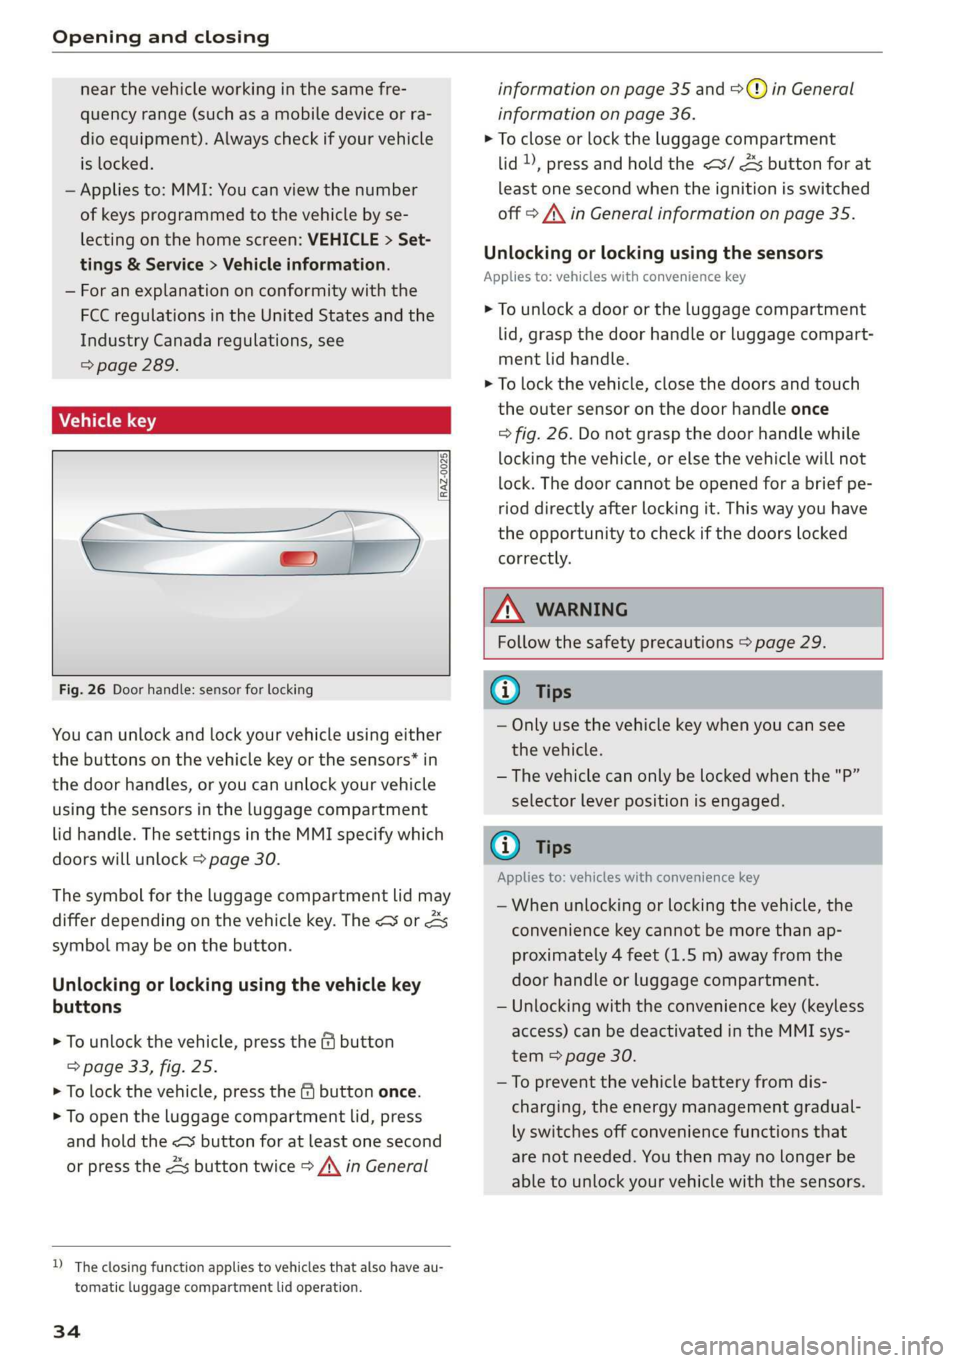
Fig. 26 Door handle: sensor for locking
You can unlock and lock your vehicle using either
the buttons on the vehicle key or the sensors* in
the door handles, or you can unlock your vehicle
using the sensors in the luggage compartment
lid handle. The settings in the MMI specify which
doors will unlock > page 30.
The symbol for the luggage compartment lid may
differ depending on the vehicle key. The <¥ or 4S
symbol may be on the button.
Unlocking or locking using the vehicle key
buttons
> To unlock the vehicle, press the f button
=> page 33, fig. 25.
> To lock the vehicle, press the f9 button once.
> To open the luggage compartment lid, press
and hold the < button for at least one second
or press the 4S button twice > A\ in General
)) The closing function applies to vehicles that also have au-
tomatic luggage compartment lid operation.
34
information on page 35 and >@) in General
information on page 36.
> To close or lock the luggage compartment
lid ), press and hold the <3/ As button for at
least one second when the ignition is switched
off > A\ in General information on page 35.
Unlocking or locking using the sensors
Applies
to: vehicles with convenience key
> To unlock a door or the luggage compartment
lid, grasp the door handle or luggage compart-
ment lid handle.
> To lock the vehicle, close the doors and touch
the outer sensor on the door handle once
=> fig. 26. Do not grasp the door handle while
locking the vehicle, or else the vehicle will not
lock. The door cannot be opened for a brief pe-
riod directly after locking it. This way you have
the opportunity to check if the doors locked
correctly.
ZA\ WARNING
Follow the safety precautions > page 29.
@) Tips
— Only use the vehicle key when you can see
the
vehicle.
— The vehicle can only be locked when the "P”
selector lever position is engaged.
G@) Tips
Applies to: vehicles with convenience key
—When unlocking or locking the vehicle, the
convenience key cannot be more than ap-
proximately 4 feet (1.5 m) away from the
door handle or luggage compartment.
— Unlocking with the convenience key (keyless
access) can be deactivated in the MMI sys-
tem > page 30.
—To prevent the vehicle battery from dis-
charging, the energy management gradual-
ly switches off convenience functions that
are not needed. You then may no longer be
able to unlock your vehicle with the sensors.
Page 46 of 310
Lights and Vision
Lights and Vision
Exterior lighting
Sitar MeL Lats eal
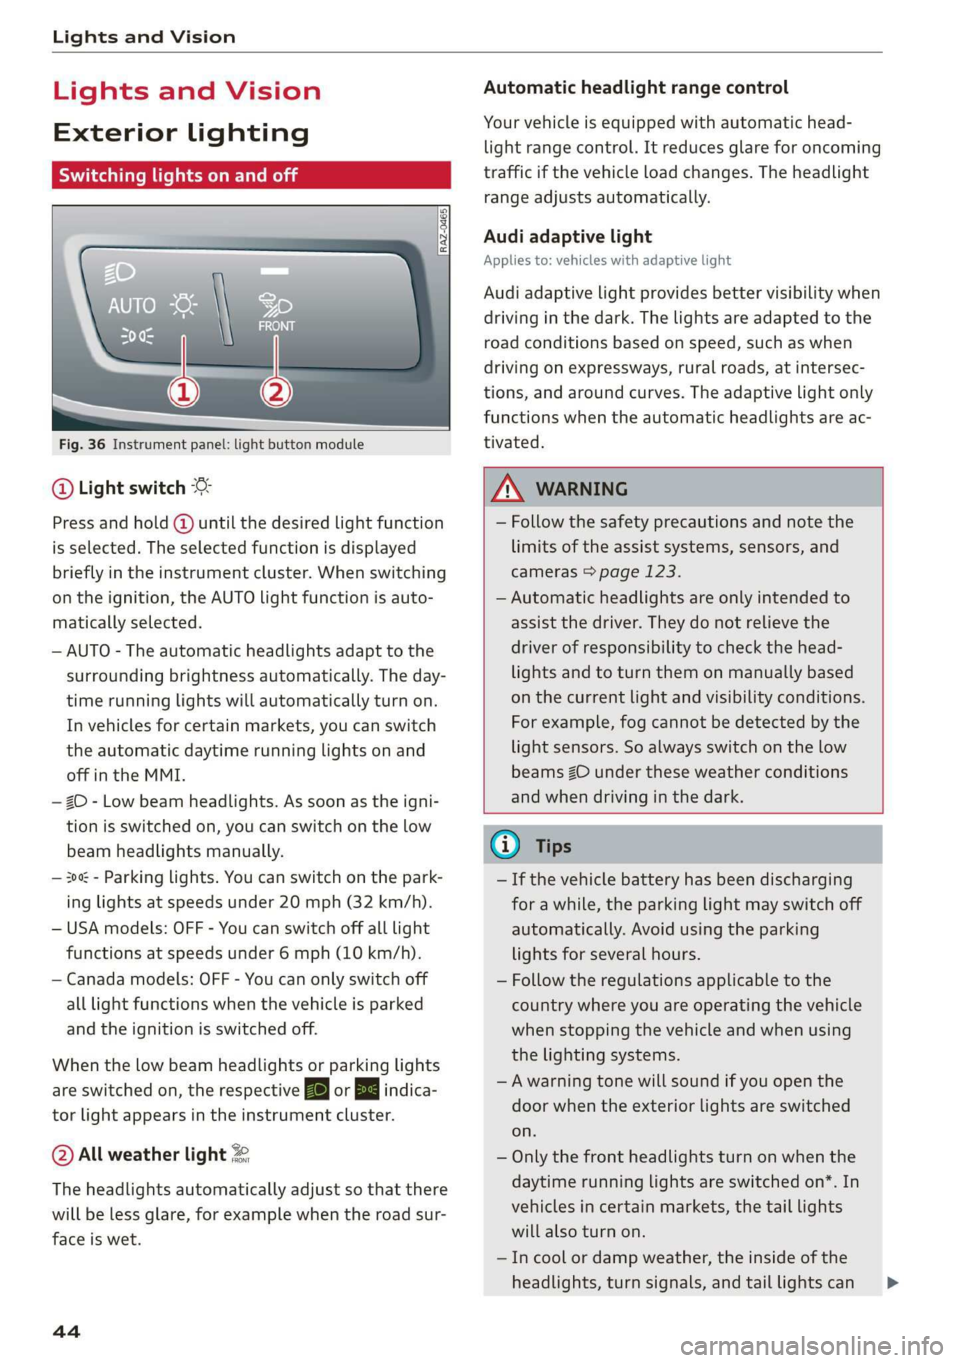
Fig. 36 Instrument panel: light button module
@ Light switch &
Press and hold @ until the desired light function
is selected. The selected function is displayed
briefly in the instrument cluster. When switching
on the ignition, the AUTO light function is auto-
matically selected.
— AUTO - The automatic headlights adapt to the
surrounding brightness automatically. The day-
time running lights will automatically turn on.
In vehicles for certain markets, you can switch
the automatic daytime running lights on and
off in the MMI.
— 20 - Low beam headlights. As soon as the igni-
tion is switched on, you can switch on the low
beam headlights manually.
— 30a - Parking lights. You can switch on the park-
ing lights at speeds under 20 mph (32 km/h).
— USA models: OFF - You can switch off all light
functions at speeds under 6 mph (10 km/h).
— Canada models: OFF - You can only switch off
all light functions when the vehicle is parked
and the ignition is switched off.
When the low beam headlights or parking lights
are switched on, the respective Ba or Ea indica-
tor light appears in the instrument cluster.
@ All weather light 2
The headlights automatically adjust so that there
will be less glare, for example when the road sur-
face is wet.
44
Automatic headlight range control
Your vehicle is equipped with automatic head-
light range control. It reduces glare for oncoming
traffic if the vehicle load changes. The headlight
range adjusts automatically.
Audi adaptive light
Applies to: vehicles with adaptive light
Audi adaptive light provides better visibility when
driving in the dark. The lights are adapted to the
road conditions based on speed, such as when
driving on expressways, rural roads, at intersec-
tions, and around curves. The adaptive light only
functions when the automatic headlights are ac-
tivated.
A WARNING
— Follow the safety precautions and note the
limits of the assist systems, sensors, and
cameras > page 123.
— Automatic headlights are only intended to
assist the driver. They do not relieve the
driver of responsibility to check the head-
lights and to turn them on manually based
on the current light and visibility conditions.
For example, fog cannot be detected by the
light sensors. So always switch on the low
beams ZO under these weather conditions
and when driving in the dark.
@ Tips
— If the vehicle battery has been discharging
for a while, the parking light may switch off
automatically. Avoid using the parking
lights for several hours.
— Follow the regulations applicable to the
country where you are operating the vehicle
when stopping the vehicle and when using
the lighting systems.
—Awarning tone will sound if you open the
door when the exterior lights are switched
on.
— Only the front headlights turn on when the
daytime running lights are switched on*. In
vehicles in certain markets, the tail lights
will also turn on.
—Incool or damp weather, the inside of the
headlights, turn signals, and tail lights can >
Page 78 of 310
Stowing and using
® Note
Beverage containers in the cup holders should
always
have a lid. Otherwise, the liquid inside
could spill and cause damage to vehicle
equipment.
Roof rack
Applies to: vehicles with roof rack
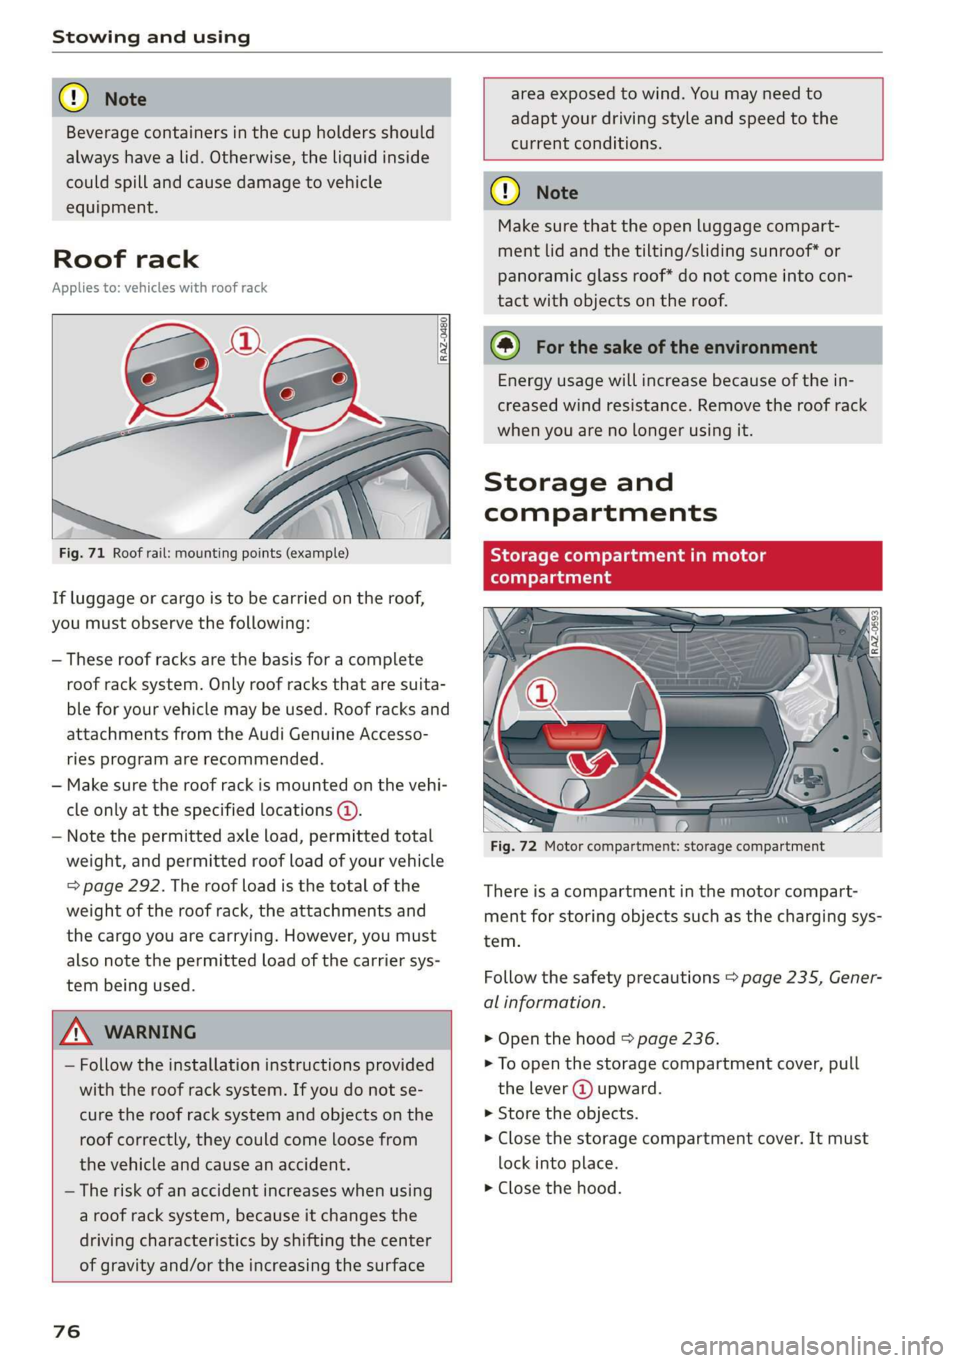
Fig. 71 Roof rail: mounting points (example)
If luggage or cargo is to be carried on the roof,
you must observe the following:
— These roof racks are the basis for a complete
roof rack system. Only roof racks that are suita-
ble for your vehicle may be used. Roof racks and
attachments from the Audi Genuine Accesso-
ries program are recommended.
— Make sure the roof rack is mounted on the vehi-
cle only at the specified locations @.
— Note the permitted axle load, permitted total
weight, and permitted roof load of your vehicle
=> page 292. The roof load is the total of the
weight of the roof rack, the attachments and
the cargo you are carrying. However, you must
also note the permitted load of the carrier sys-
tem being used.
area exposed to wind. You may need to
adapt your driving style and speed to the
current conditions.
ZA WARNING
— Follow the installation instructions provided
with the roof rack system. If you do not se-
cure the roof rack system and objects on the
roof correctly, they could come loose from
the vehicle and cause an accident.
— The risk of an accident increases when using
a roof rack system, because it changes the
driving characteristics by shifting the center
of gravity and/or the increasing the surface
76
o Note
Make sure that the open luggage compart-
ment lid and the tilting/sliding sunroof* or
panoramic glass roof* do not come into con-
tact with objects on the roof.
@) For the sake of the environment
Energy usage will increase because of the in-
creased wind resistance. Remove the roof rack
when you are no longer using it.
Storage and
compartments
Storage compartment in motor
(tonal oy Tada
Fig. 72 Motor compartment: storage compartment
There is a compartment in the motor compart-
ment for storing objects such as the charging sys-
tem.
Follow the safety precautions > page 235, Gener-
al information.
> Open the hood = page 236.
> To open the storage compartment cover, pull
the lever @ upward.
» Store the objects.
> Close the storage compartment cover. It must
lock into place.
> Close the hood.
Page 86 of 310
Warm and cold
between switching the ignition off and on
again.
— Only use the fragrance function* in modera-
tion and take any other passengers and ani-
mals into consideration when using the
function.
— An overlap of different scents or odors could
cause discomfort.
— If there is discomfort, reduce the intensity
or switch the fragrance function* off.
— Only use fragrances that are approved by
Audi.
Adjusting the vents
You can open and close the vents using the
thumbwheels. The levers adjust the direction of
the airflow from the vents.
Additional settings
You can adjust additional settings.
> Applies to: MMI: Select on the home screen:
VEHICLE > Air conditioning > ©.
Fragrance
Applies to: vehicles with fragrance function
Using Fragrance selection, you can select the fra-
grance and see the fill level of the fragrance.
You can select the strength of the scent with Fra-
grance level.
Footwell temperature*
You can adjust the footwell temperature for the
driver and front passenger.
NIM ia alee
Applies to: vehicles with air quality display
You can display information about the air quality.
> Applies to: MMI: Select on the home screen:
VEHICLE > Air conditioning > Air quality.
Pollutant filter
A pollutant filter cleans the air in the vehicle inte-
rior when the blower is switched on.
A schematic display represents the effectiveness
of the filter. The display visualizes the amount of
pollutant particles in the vehicle interior in com-
parison to the surroundings.
G) Tips
For optimal air quality in the vehicle interior,
close all windows and doors and activate A/C
cooling mode, the AUTO function, and recircu-
lation mode.
Auxiliary climate control
Applies to: vehicles with auxiliary climate control
The auxiliary climate control switches on depend-
ing on the outside temperature and the tempera-
ture set in the climate control system. You can
switch the climate control on or off immediately
as well as set a timer in the MMI.
Requirement: the charge level of the high-volt-
age battery must be sufficient.
G) Tips
— The temperature that the auxiliary climate
control adjusts to depends on the last tem-
perature that was set.
— Using the auxiliary climate control while
charging can also reduce the charge level of
the high-voltage battery.
— Starting or stopping the vehicle will not
switch off the auxiliary climate control auto-
matically.
Applies to: vehicles with auxiliary climate control
Select on the home screen: VEHICLE > Air condi-
tioning > F
Immediate start
You can immediately switch the auxiliary climate
control on and off using the F button. When this
function is switched on, a colored bar lights up
over the button and the remaining time is dis-
played.
Page 87 of 310
4KE012721BB
Warm and cold
The auxiliary climate control will run for a maxi-
mum of 30 minutes after the immediate start.
Timer programming
You can set up to two timers for the departure
time. Each one of the timers can be activated.
> Select one timer.
> Set the date and select Next.
>» Set the time (departure time) and select OK.
> Activate the timer with CD.
By setting the departure time, you determine
when your vehicle should reach the desired tem-
perature. The departure time can be a maximum
of six days in the future. The auxiliary climate
control will continue to run approximately ten
minutes after the departure time is reached.
After switching off the ignition
Information about the active timer(s) will appear
on the upper display after switching off the igni-
tion. You can start the set climate control set-
tings immediately with the § button, or go to the
auxiliary climate control menu with the > button.
@ Tips
— Make sure the time and date match in the
system settings so that the timer can func-
tion correctly > page 231.
— The auxiliary climate control can also be
switched on and off immediately when a
timer is set.
— The auxiliary climate control can continue to
run after the departure time is reached.
— You can operate the climate control in the
vehicle interior using the charging timer
while the high-voltage battery is charging.
The climate control output depends on the
power socket capacity.
Additional settings
> Applies to: MMI: Select on the home screen:
VEHICLE > Air conditioning > Auxiliary air con-
ditioning > ©.
Start air conditioning after unlocking*
If this function is activated, the climate control
will continue to run for five minutes after the ve-
hicle has been unlocked.
Comfort auxiliary air conditioning*
Applies to: vehicles with comfort auxiliary climate control
You can set if the steering wheel heating* and
seat heating or seat ventilation should also be
automatically activated with auxiliary climate
control. You can select the respective zones.
Automatic glass surface defogging*
Applies to: vehicles with comfort auxiliary climate control
You can set if the rear window and mirrors should
also be heated during auxiliary climate control.
2 There is a malfunction in the auxiliary air
conditioning.
If this message appears, there is a system mal-
function. Drive immediately to an authorized Au-
di dealer or authorized Audi Service Facility to
have the malfunction repaired.
8s