AUDI Q2 2021 Owner´s Manual
Manufacturer: AUDI, Model Year: 2021, Model line: Q2, Model: AUDI Q2 2021Pages: 364, PDF Size: 87.77 MB
Page 341 of 364

Fuses and bulbs
CO
rN
IV
rN
•-i
00
Changing bulb for main beam headlight
Applies to: vehicles with halogen headlights
Removing cover (wheel housing liner)
Applies to: vehicles with halogen headlights
y33pTCk
• **•** --•__
«flj \\
ÛV\-^
^L M
i
in
CO
ro
o
3
CO
m
k
|
Fig.
284 Headlight: Plastic connector for main beam
headlight
Fig.
285 Headlight: Fitting plastic connector for main
beam headlight
Removing
• Pull the plastic connector together with the
bulb out of the headlight housing
*Fig.
284.
• Disconnect the plastic connector from the base
of the bulb
^/K
in General notes on page 334.
Installing
• Push the new bulb into the plastic connector so
that it is securely seated
<=>^
in General notes
on page 334.
• Insert the bulb into the headlight housing.
• Press the plastic connector
*Fig.
285 into the
housing until it engages.
• Check that the bulb is seated correctly by look
ing through the headlight itself.
• Put the cover back on.
• Check whether the new bulb is working.
Fig.
286 Wheel housing liner: Access to daytime running
light and dipped headlight bulbs
Fig.
287 Headlight: Cover for daytime running light and
dipped headlight
• Turn the steering all the way to the right.
• Switch off the ignition and the lights.
• Reach into the opening
©*Fig.
286 and pull
in the direction of the arrow to open the cover
in the wheel housing Liner.
• Move the metal bar downwards -arrow-
*Fig.
287 and remove the plastic cover
*/^
in
General notes on page 334.
• Change the bulb for the daytime running light
©
*
page 338
or
the dipped headlight©
*
page 338.
337
Page 342 of 364

Fuses and bulbs
Changing bulb for daytime running light
Applies to: vehicles with halogen headlights
Changing bulb for dipped headlight
Applies to: vehicles with halogen headlights
Fig.
288 Wheel housing liner: Plastic connector for
day
time running light
Fig.
289 Wheel housing liner: Fitting plastic connector for
daytime running light
Removing
• Pull the plastic connector together with the
bulb out of the headlight housing
*Fig.
288.
• Disconnect the plastic connector from the base
of the bulb
*^
in General notes on page 334.
Installing
• Push the new bulb into the plastic connector so
that it is securely seated
*/^
in General notes
on page 334.
• Insert the bulb into the headlight housing.
• Press the plastic connector
*Fig.
289 into the
housing until it engages.
• Put the covers back on the headlight and the
wheel housing liner.
• Check whether the new bulb is working.
Fig.
290 Wheel housing liner: Plastic connector for dipped
headlight
Fig.
291 Wheel housing liner: Fitting plastic connector for
dipped headlight
Removing
• Pull the plastic connector together with the
bulb out of the headlight housing
*Fig.
290.
• Disconnect the plastic connector from the base
of the bulb
*^
in General notes on page 334.
Installing
• Push the new bulb into the plastic connector so
that it is securely seated
*^in
General notes
on page 334.
• Insert the bulb into the headlight housing.
• Press the plastic connector
*Fig.
291 into the
housing until it engages.
• Check that the bulb is seated correctly by look
ing through the headlight itself.
• Put the covers back on the headlight and the
wheel housing liner.
• Check whether the new bulb is working.
338
Page 343 of 364
Fuses
and
bulbs
CO
rN
IV
rN
•-i
00
Changing bulbs
for
rear
Lights
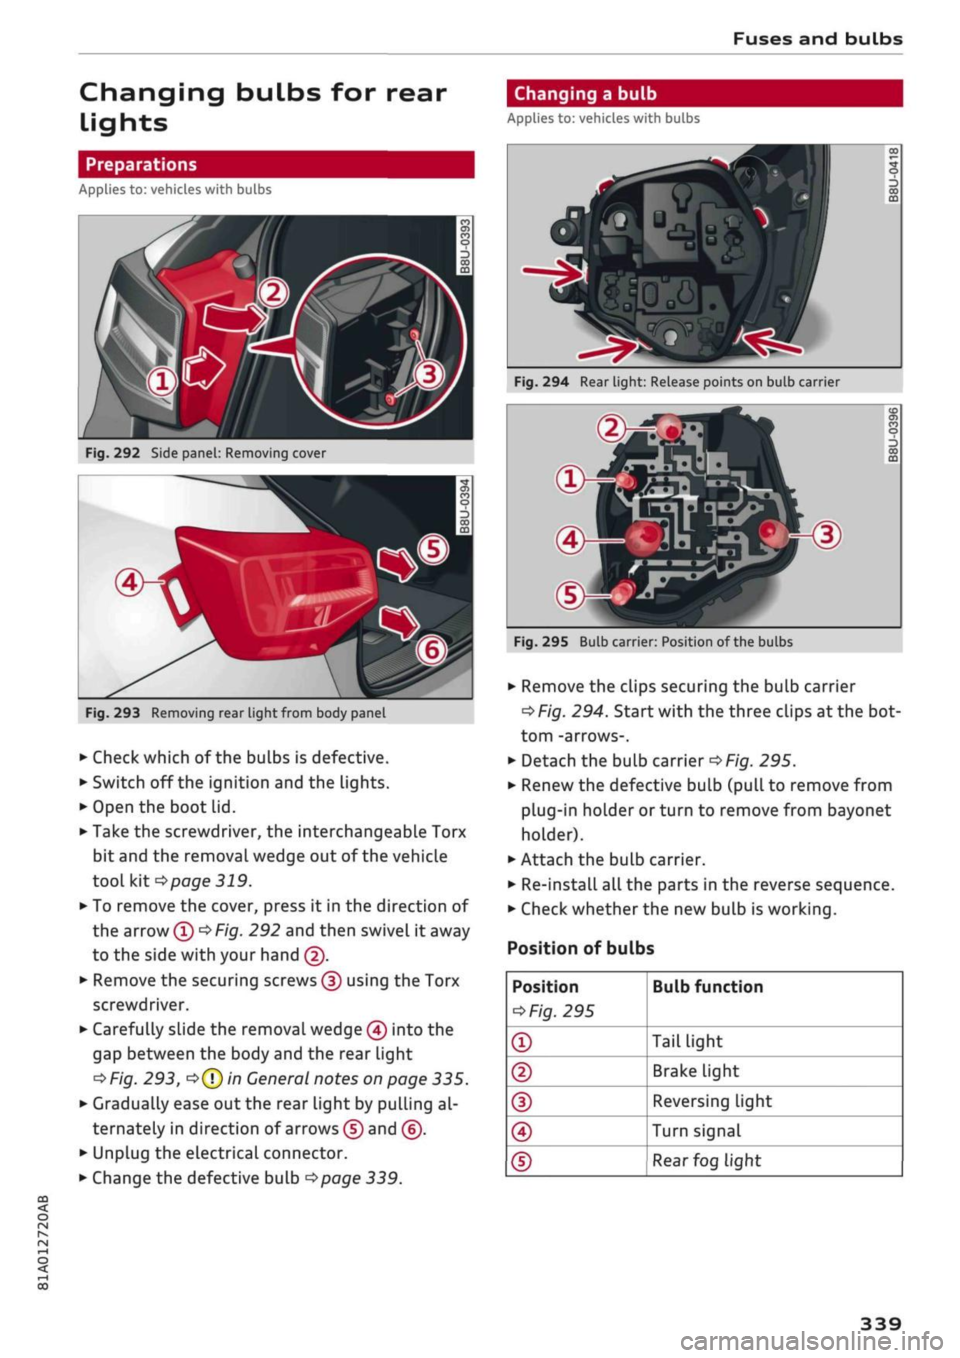
Preparations
Applies
to: vehicles with bulbs
Changing
a
bulb
Applies
to: vehicles with bulbs
Fig.
292
Side
panel:
Removing cover
Fig.
293
Removing rear light from body panel
• Check which
of
the bulbs
is
defective.
• Switch
off
the ignition and
the
lights.
• Open
the
boot lid.
• Take
the
screwdriver,
the
interchangeable Torx
bit and
the
removal wedge
out of
the vehicle
tool
kit
*page
319.
• To remove
the
cover, press
it in the
direction
of
the arrow
©
*
Fig.
292
and then swivel
it
away
to
the
side with your hand
©.
• Remove the securing screws
©
using
the
Torx
screwdriver.
• Carefully slide
the
removal wedge
©
into
the
gap between
the
body and
the
rear light
•=>
Fig.
293,
o©
in
General notes on page
335.
• Gradually ease out the rear light
by
pulling
al
ternately
in
direction
of
arrows
©
and
©.
• Unplug
the
electrical connector.
• Change the defective bulb
*page
339.
1
u
f"
00
o
00 m
Fig.
294 Rear light: Release points on bulb carrier
^
®-g
Fig.
295
Bulbcarr
4B
&fï|
STPJ
ml
»Wm
er: Position
sio^
P*^^^HP^
of the bulbs
O)
CO
o
OQ
• Remove the clips securing
the
bulb carrier
*Fig.
294.
Start with
the
three clips
at
the bot
tom -arrows-.
• Detach
the
bulb carrier
*Fig.
295.
• Renew the defective bulb (pull
to
remove from
plug-in holder
or
turn
to
remove from bayonet
holder).
• Attach
the
bulb carrier.
• Re-install all the parts
in the
reverse sequence.
• Check whether the new bulb
is
working.
Position
of
bulbs
Position
*
Fig.
295
®
®
(D
©
®
Bulb function
Tail light
Brake light
Reversing Light
Turn signal
Rear
fog light
339
Page 344 of 364

Accessories
and
modifications
to the
vehicle
Accessories
and
modifi
cations
to the
vehicle
Accessories,
replacement parts
and
repairs
Always
ask
your dealer
or
specialist retailer
for
advice before purchasing accessories
and
re
placement parts.
Your
car is
designed
to
offer
a
high standard
of
active and passive safety. For this reason,
we
rec
ommend that you ask your Audi dealer
for
advice
before fitting accessories
or
replacement parts.
Audi dealers have
the
latest information from
the manufacturer and
can
recommend accesso
ries and replacement parts which
are
suitable
for
your requirements. They can also answer
any
questions you might have regarding official
regu
lations.
We recommend you
to
use only Audi accessories
and Audi Genuine Parts. Audi has tested these
products
for
suitability, reliability and safety.
Audi dealers have
the
necessary experience
and
facilities
to
ensure that
the
parts
are
installed
properly.
Although
the
market
is
constantly scrutinised,
Audi
cannot
judge
or
assume responsibility
for
the reliability, safety and suitability
of
non-genu
ine products
-
even though
in
some instances,
these parts
may
have been approved
by
an
offi
cially recognised technical testing authority
or
accompanied
by
an official approval certificate.
Any retro-fitted equipment which has a direct
ef
fect on
the
vehicle and/or
the
way
it is
driven
(e.g.
cruise control system
or
electronically-con
trolled suspension) must
be
approved
for
use
in
your vehicle and bear
the e
mark
(the
European
Union's approval symbol).
If any additional electrical components are fit
ted which
do not
serve
to
controL
the
vehicLe
it
self
(for
instance a refrigerator box, laptop
or
ventilator
fan,
etc.), these must bear the C€ mark
(manufacturer conformity declaration
in the Eu
ropean Union).
A,
WARNING
Never attach accessories (such
as cup
holders
or telephone brackets)
to the
surfaces cover
ing
the
airbag units
or the
areas around
the
airbags: this could cause injury
if
the airbag
is
triggered.
Modifications
Modifications must always
be
carried
out
accord
ing
to our
specifications.
Unauthorised modifications
to the
electronic
components, software, wiring
or
data transfer
in
the vehicLe may cause malfunctioning. Due
to the
way
the
electronic components
are
linked togeth
er
in
networks, other systems
may be
affected
by
the faults. This can seriously impair safety, lead
to excessive wear
of
components,
and
also inva
lidate
the
type approval
for
your vehicle.
You will appreciate that your Audi dealer cannot
be held liable
for
any damage caused
by
modifi
cations and/or work performed incorrectly.
We recommend that
all
work should
be
per
formed
by
an Audi workshop using Audi Genuine
Parts.
/K
WARNING
- Incorrectly performed modifications
or
oth
er work
on
your vehicLe can lead
to
malfunc
tions and cause accidents.
-
Do not
use an additional
or
replacement
number plate holder other than
the
original
one fitted
at the
front
of
the vehicle.
Radio transmitters
and
business equipment
Transmitters
An external aerial
is
required
in
order
to
operate
radio equipment inside
the
vehicle. The maxi
mum range
of
the equipment can only
be
ach
ieved with
an
external aerial.
Retrofit installations
of
radio transmitters
in the
vehicle
are
subject
to
official approval and can
af
fect
the
type approval
for
your vehicle.
In •
340
Page 345 of 364
Accessories and modifications to the vehicle
CO
< o rN
iv
rN
t-H
o < 00
extreme cases this could mean
that
you lose the
type approval
for
your vehicle.
Qualified workshops will be able to inform you
about options for installing and operating radio
transmitters.
Business equipment
Retrofit installation of business or other equip
ment in the vehicle is permitted, provided the
equipment cannot interfere with the driver's im
mediate controL of the vehicle. Any such equip
ment must carry the
CC
mark. Any retrofit equip
ment that could influence the driver's control of
the vehicLe must have a type approval for road
vehicles and must carry the e mark.
A WARNING
- Loose or incorrectly secured radio equip
ment could be catapulted through the
vehi
cle during sudden driving/braking manoeu
vres or in the event of an accident. This
poses a risk of injury to occupants.
- Always ensure that radio equipment is prop
erly secured outside the deployment area of
the airbags or stowed safely while the
vehi
cle is moving.
- Mobile telephones or radio equipment
which are operated inside the vehicle
with
out
a
correctly installed external aerial can
create excessive magnetic fields that could
cause a health hazard.
© CAUTION
If
you
use radio equipment in the car without
an external aerial, the electromagnetic radia
tion in the vehicle could exceed the recom
mended limits. This also applies to external
aerials which have not been correctLy instal
led.
- Do not operate radio equipment in the
vehi
cle unless an external aerial is properly
con
nected.
Please observe the relevant regulations and
follow the instructions in the operating
man
ual for the radio equipment.
341
Page 346 of 364
Technical data
Technical data
Vehicle identification
data
®-
®-
(D-
®-
®-
XXXXX XX
X
XXXX
XXX
XX
"I
-K-S1
xxxxxxxx
XX
x
XXXXXXXX
XXX
XXX
XX
XXXXXXX
XX
XX XX
XXX
KW
XXX
-MOTORKB./GETB.KB.
VVYV
YYV YYV
ENG.C00E/TBANS.C0DE
AAAA
AAA AAA
'»""
XXXX/XXXX
XXX/XX
M.-AUSSI./OPTIONS
EOA
7D5 4UB 6XM 5SG 5RW
2EH
JOZ
ILB
IAS
IBA
3FC
5MU
7X1
FOA
9G3
OG7
OYH OJF
TL6
3KA 8EH UlA X9B
QZ7
IXW
8Q3
9Q8
8Z4 D2D
7T6
CV7
7KO
4X3
2K2
3L4
4KC
3YO
413
5D2
ISA
7GB
QIA 4GQ
XX.
X
XX
X
XX
X
XXXX
®
&
é é
5
o
CO
00
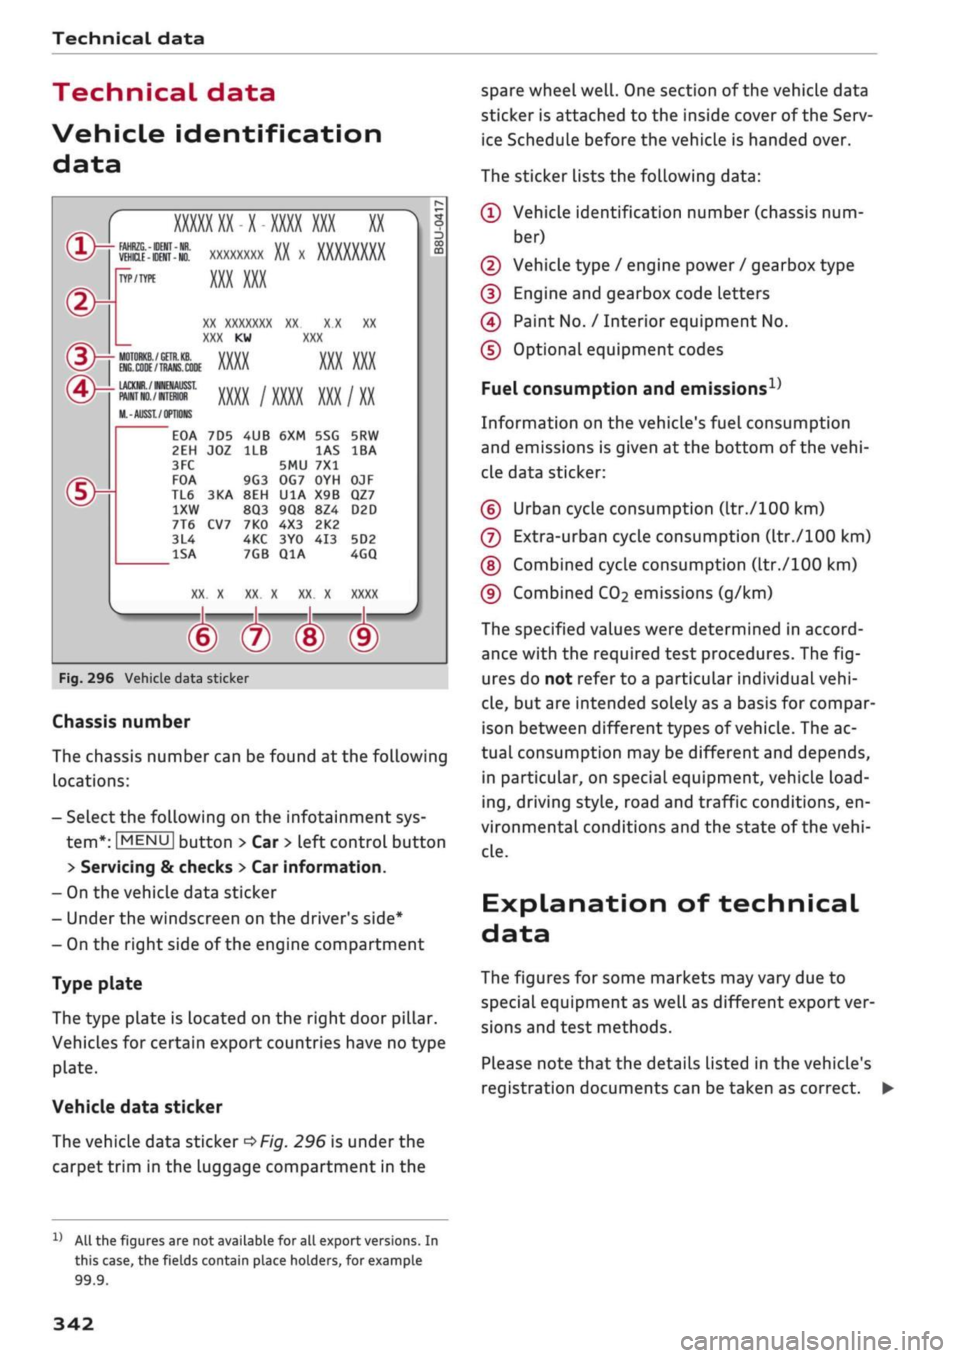
Fig.
296 Vehicle data sticker
Chassis number
The chassis number can be found at the following
locations:
- Select the following on the infotainment sys
tem*:
|MENU|
button > Car
>
left control button
> Servicing & checks > Car information.
- On the vehicle data sticker
- Under the windscreen on the driver's side*
- On the right side of the engine compartment
Type plate
The type plate is located on the right door pillar.
Vehicles for certain export countries have no type
plate.
Vehicle data sticker
The vehicLe data sticker
*Fig.
296 is under the
carpet trim in the luggage compartment in the
spare wheel
well.
One section of the vehicle data
sticker is attached to the inside cover of the Serv
ice Schedule before the vehicle is handed over.
The sticker lists the following data:
© Vehicle identification number (chassis num
ber)
© Vehicle type / engine power / gearbox type
© Engine and gearbox code letters
© Paint No. / Interior equipment No.
© Optional equipment codes
Fuel consumption and
emissions1'
Information on the vehicle's fuel consumption
and emissions is given at the bottom of the
vehi
cle data sticker:
© Urban cycle consumption (ltr./100 km)
© Extra-urban cycle consumption (ltr./100 km)
©
Combined cycle consumption (ltr./100 km)
© Combined
CO2
emissions (g/km)
The specified values were determined in accord
ance with the required test procedures. The
fig
ures do not refer to a particular individual
vehi
cle,
but are intended solely as a basis for compar
ison between different types of
vehicle.
The ac
tual consumption may be different and depends,
in particular, on special equipment, vehicle
load
ing,
driving style, road and traffic conditions, en
vironmental conditions and the state of the
vehi
cLe.
Explanation of technical
data
The figures for some markets may vary due to
special equipment as well as different export ver
sions and test methods.
PLease note that the details Listed in the vehicle's
registration documents can be taken as correct. •
11
All the figures are not available for all export versions. In
this case, the fields contain place holders, for example
99.9.
342
Page 347 of 364
Technical data
In cases where technical data are not listed,
the figures were not available at time of pub
lication.
CO
< o rN
iv
rN
t-H
o < 00
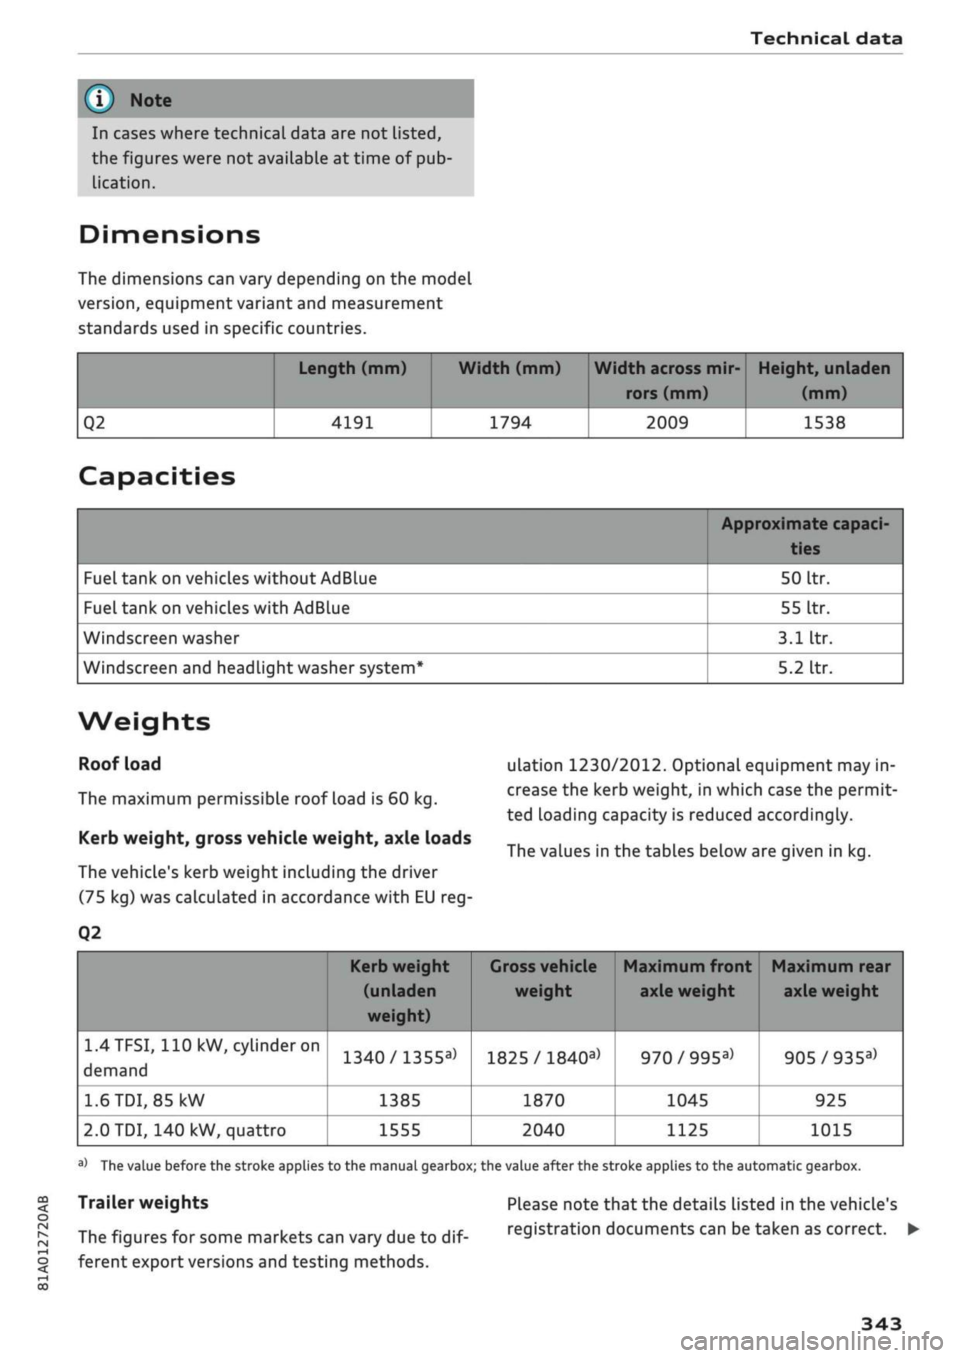
Dimensions
The dimensions can vary depending on the model
version,
equipment variant and measurement
standards used in specific countries.
Q2
Length (mm)
4191
Width (mm)
1794
Width across mir
rors (mm)
2009
Height, unladen
(mm)
1538
Capacities
Fuel tank on vehicles without AdBlue
Fuel tank on vehicles with AdBlue
Windscreen washer
Windscreen and headlight washer system*
Approximate capaci-
50
Itr.
55
Itr.
3.1
Itr.
5.2
Itr.
Weights
Roof load
The maximum permissible roof load is 60 kg.
Kerb weight, gross vehicle weight, axle loads
The vehicle's kerb weight including the driver
(75 kg) was calculated in accordance with EU reg-
Q2
ulation 1230/2012. Optional equipment may in
crease the kerb weight, in which case the permit
ted loading capacity is reduced accordingly.
The values in the tables below are given in kg.
1.4TFSI,
110 kW,
cylinder
on
demand
1.6
TDI,
85 kW
2.0 TDI, 140 kW, quattro
Kerb weight
(unladen
weight)
1340/1355a>
1385
1555
1
Gross vehicle Maximum front Maximum rear
weight axle weight axle weight
1825 /
1840a)
1870
2040
970/995a)
1045
1125
905/935a)
925
1015
a)
The value before the stroke applies to the manual gearbox; the value after the stroke applies to the automatic gearbox.
Trailer weights
The figures for some markets can vary due to
dif
ferent export versions and testing methods.
Please note that the details listed in the vehicle's
registration documents can be taken as correct. •
343
Page 348 of 364
Technical data
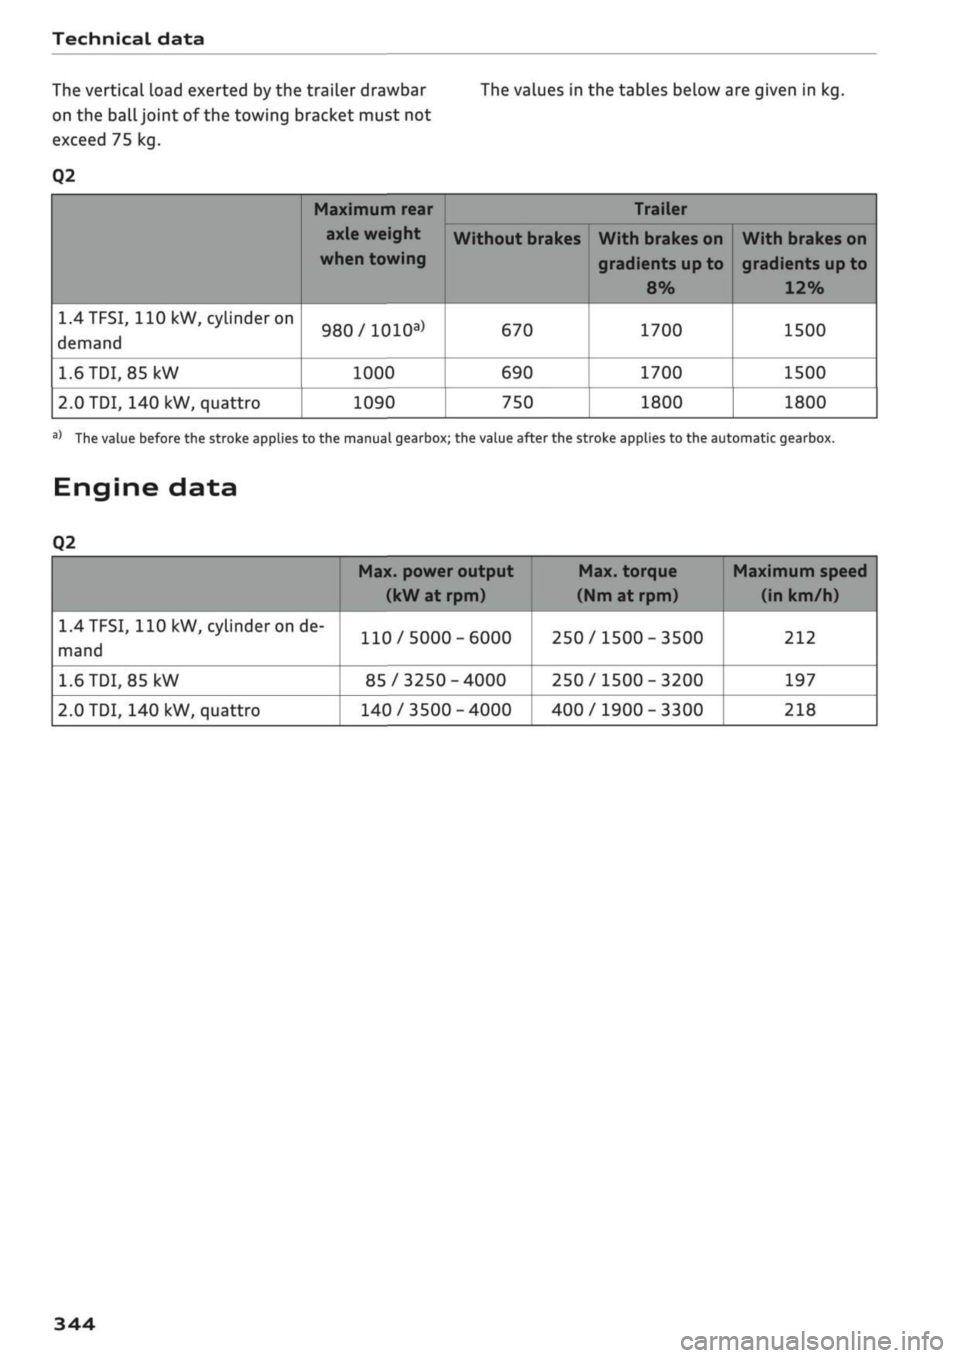
The vertical load exerted by the trailer drawbar The values in the tables below are given in kg.
on the
ball
joint of the towing bracket must not
exceed 75 kg.
Q2
1.4TFSI,
110
kW, cylinder on
demand
1.6
TDI,
85 kW
2.0
TDI, 140 kW, quattro
Maximum rear
axle weight
when towing
980/1010a)
1000
1090
Without brakes
670
690
750
Trailer
With brakes on
gradients up to
8%
1700
1700
1800
With brakes on
gradients
up
to
12%
1500
1500
1800
a)
The value before the stroke applies to the manual gearbox; the value after the stroke applies to the automatic gearbox.
Engine data
Q2
1.4
TFSI,
110 kW, cylinder on de
mand
1.6
TDI,
85
kW
2.0
TDI, 140 kW, quattro
Max. power output
(kW at rpm)
110/5000-6000
85/3250-4000
140/3500-4000
Max. torque
(Nm
at rpm)
250/1500-3500
250/1500-3200
400/1900-3300
Maximum speed
(in km/h)
212
197
218
344
Page 349 of 364
Index
A
A/C (automatic air conditioner) 69
A/C (manual air conditioner) 67
ABS
see Anti-lock brake system (ABS) 145
Accelerator pedal 272
Accessories 60
Active Lane assist
see Audi active lane assist 123
Adaptive cruise control
see Audi adaptive cruise control
Ill
Adaptive light
see Audi adaptive light 49
AdBlue 292
Driver messages 292
Refilling 293
Remaining range 292
Additional phone 175, 257
Advanced key
see Convenience key 76
Airbag
Deactivating front passenger's airbag ... 288
Air conditioner (automatic) 66
Adjusting air outlets 71
AUTO (automatic mode) 69
Controls 69
Default settings 66
Description 66
Drive select 131
Key-coded settings 66
Supplementary heater 66
Synchronisation 69
Air conditioner (manual) 66
Adjusting air outlets 71
Controls 67
Default settings 66
Description 66
Key-coded settings 66
Supplementary heater 66
Air distribution, adjusting
Automatic air conditioner 70
Heating/ventilation system and manual air
conditioner 67
CO
rN
IV
rN
i-H
00
Air outlets, adjusting 71
Automatic air conditioner 70
Heating/ventilation system and manual air
conditioner 67
Air recirculation mode
Automatic air conditioner 70
Heating/ventilation system and manual air
conditioner 68
Alarm system
see Anti-theft alarm system 42
All-season tyres
see All-weather tyres 308
All-weather Lights 49
All-weather tyres 308
Alterations to the vehicle 340
AMI
see Audi music interface 240, 241
Android Auto
see Audi smartphone interface 253
Announcements (traffic programme)
Volume 261
Anti-dazzle interior mirror 54
Anti-freeze
Coolant 299
Windscreen washer system 303
Anti-lock brake system (ABS) 145
Anti-theft alarm system 42
Anti-theft wheel bolts 321
Apple CarPlay
see Audi smartphone interface 253
Armrest (front centre) 58
Ashtray 59
ASR
see Traction control system (ASR) 145
Audi active lane assist 123
Cleaning area around camera 313
Driver messages 125
Audi adaptive cruise control
Ill
Cleaning sensor 313
Distance indicator, distance warning .... 118
Driver messages 119
Traffic
jam assist 117
Audi adaptive light 49, 131
Audi connect (infotainment) 191,203
Data protection 205
Overview of services 197
345
Page 350 of 364
Index
Personal hotspot 195
Setting up 196
Setup 191
Topping up data plan 197
Audi drive select 131
Audi magnetic ride
see Suspension control
131
Audi music interface 240
Audi music stream
see Wi-Fi 238
Audio files 243
Audio players
Bluetooth audio players 237
Wi-Fi audio players 238
Audio track 246
Audi phone box 177
Audi pre sense 120
Driver messages 119, 122
Settings 122
Audi side assist 127
Cleaning sensors 313
Driver messages
131
Rear cross-traffic assist 130
Audi smartphone interface 253, 258
Audi virtual cockpit
see Instrument cluster 12
AUTO
Automatic air conditioner 69
Automatic headlights 49
Auto Lock (central locking system) 37
Automatic air conditioner
see Air conditioner (automatic) 66, 69
Automatic gearbox 85
Back-up programme 92
DownhilL
speed control 89
Driving tips 88
Kick-down 90
Launch control programme 91
Malfunction 86
Manual gear selection (tiptronic mode) ... 90
Manual release of selector Lever (left-hand
drive) 93
Manual release of selector Lever (right-hand
drive) 94
Paddle levers 90
Selector lever 88
Selector lever Lock 86
Selector lever positions 86
AUX input
241,
242
Average fuel consumption 19, 20
Average speed 19, 20
Axle loads 343
B
BACK button 152
Background lighting 53
Balance (sound) 260
Bandages
see First-aid kit 318
Bass box 325, 326
Bass (sound) 260
Battery 302
Charge 149
Charging 303
In key 38
Winter conditions 302
Battery, charging (mobile devices) 177
Belts
see Seat belts 275
Bicycle racks (rear carrier systems) 99
Biodiesel 289
Bioethanol (fuel) 289
Blower
Automatic air conditioner 70
Heating/ventilation system and manual air
conditioner 67
Bluetooth
Audio players 237
Connecting a mobiLe phone 173
Remote SIM Access Profile 193
Settings 258
Boot
see Luggage compartment 272
Boot lid
Close button 44
Opening/dosing
electrically 44
Brakes 147
Brake assist system 145
Brake fluid 301
Brake pedal 272
Electro-mechanical parking brake 82
346