fuse AUDI Q2 2021 Owner´s Manual
[x] Cancel search | Manufacturer: AUDI, Model Year: 2021, Model line: Q2, Model: AUDI Q2 2021Pages: 364, PDF Size: 87.77 MB
Page 6 of 364
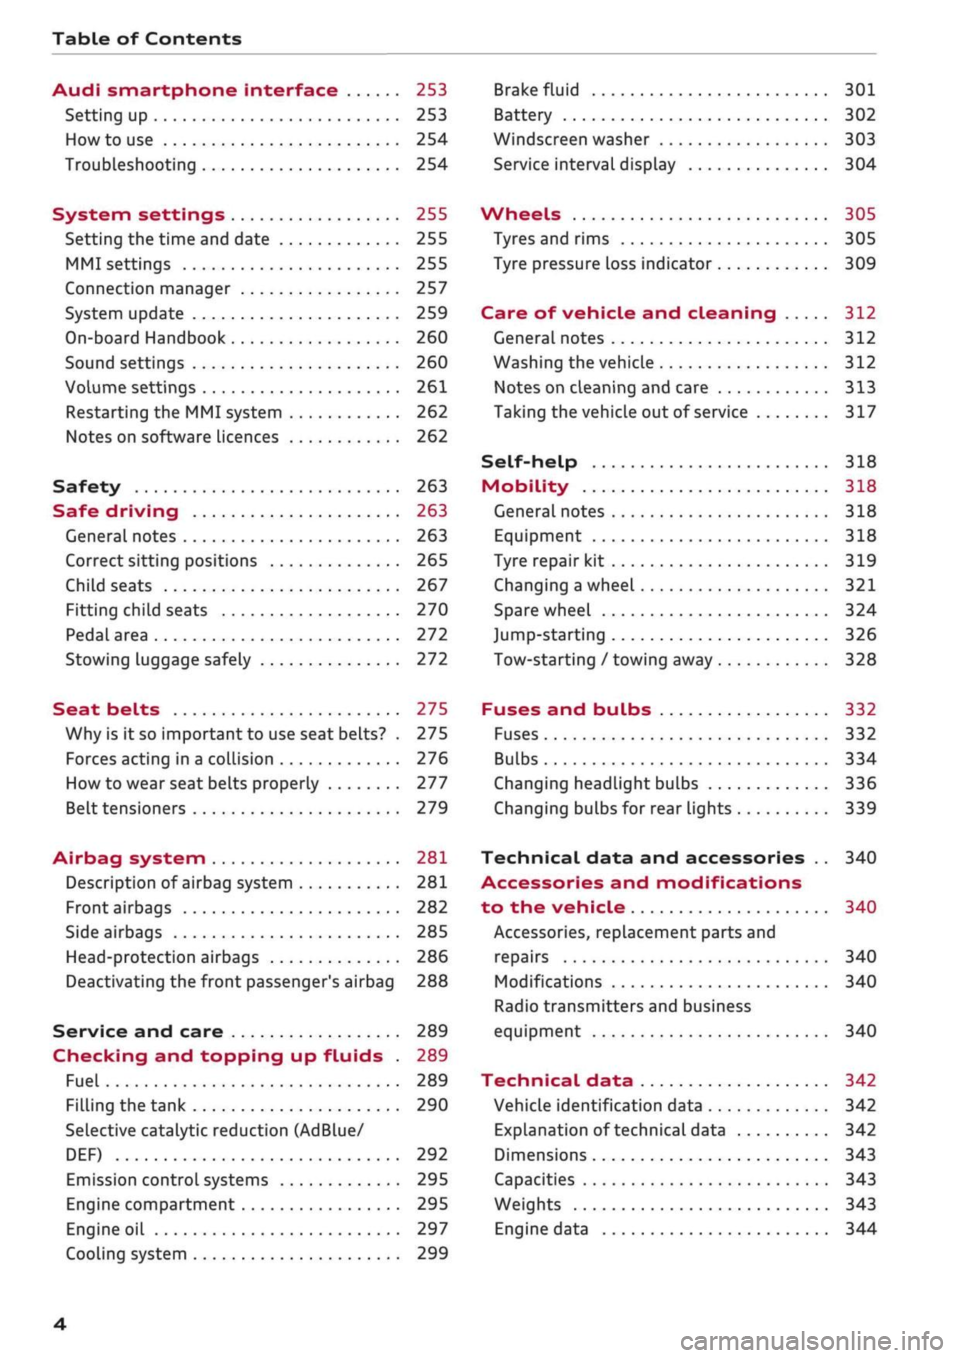
Table of Contents
Audi smartphone interface 253
Setting up
253
How to use 254
Troubleshooting 254
System settings 255
Setting the time and date 255
MMI settings 255
Connection manager 257
System update 259
On-board Handbook 260
Sound settings 260
Volume settings 261
Restarting the MMI system 262
Notes on software licences 262
Safety 263
Safe driving 263
General notes 263
Correct sitting positions 265
Child seats 267
Fitting child seats 270
Pedal area 272
Stowing luggage safely 272
Seat belts 275
Why is it so important to use seat belts? . 275
Forces acting in a collision 276
How to wear seat belts properly 277
Belt tensioners 279
Airbag system 281
Description of airbag system 281
Front airbags 282
Side airbags 285
Head-protection airbags 286
Deactivating the front passenger's airbag 288
Service and care 289
Checking and topping up fluids . 289
Fuel 289
Filling the tank 290
Selective catalytic reduction (AdBlue/
DEF) 292
Emission control systems 295
Engine compartment 295
Engine oil 297
Cooling system 299
Brake fluid 301
Battery 302
Windscreen washer 303
Service interval display 304
Wheels 305
Tyres and rims 305
Tyre pressure loss indicator 309
Care of vehicle and cleaning 312
General notes 312
Washing the vehicle 312
Notes on cleaning and care 313
Taking the vehicle out of service 317
Self-help 318
Mobility 318
General notes
318
Equipment 318
Tyre repair kit 319
Changing a wheel 321
Spare wheel 324
Jump-starting 326
Tow-starting / towing away 328
Fuses and bulbs 332
Fuses 332
Bulbs 334
Changing headlight bulbs 336
Changing bulbs for rear lights 339
Technical data and accessories .. 340
Accessories and modifications
to the vehicle 340
Accessories, replacement parts and
repairs 340
Modifications 340
Radio transmitters and business
equipment 340
Technical data 342
Vehicle identification data 342
Explanation of technical data 342
Dimensions 343
Capacities 343
Weights 343
Engine data 344
4
Page 301 of 364
Checking and topping up fluids
A WARNING
- To avoid the risk of being scalded, never
open the bonnet if
you
see steam or coolant
escaping from the engine compartment.
Wait until no steam or coolant can be seen
before opening the bonnet.
- For safety reasons the bonnet must always
be completely closed when the vehicle is
moving.
After closing it always check that it
is properly secured. It should not be possi
ble to
lift
the front edges of the bonnet.
Should you notice that the bonnet is not
safely secured when the vehicle is moving,
stop the vehicle immediately and close the
bonnet properly, otherwise it could cause an
accident.
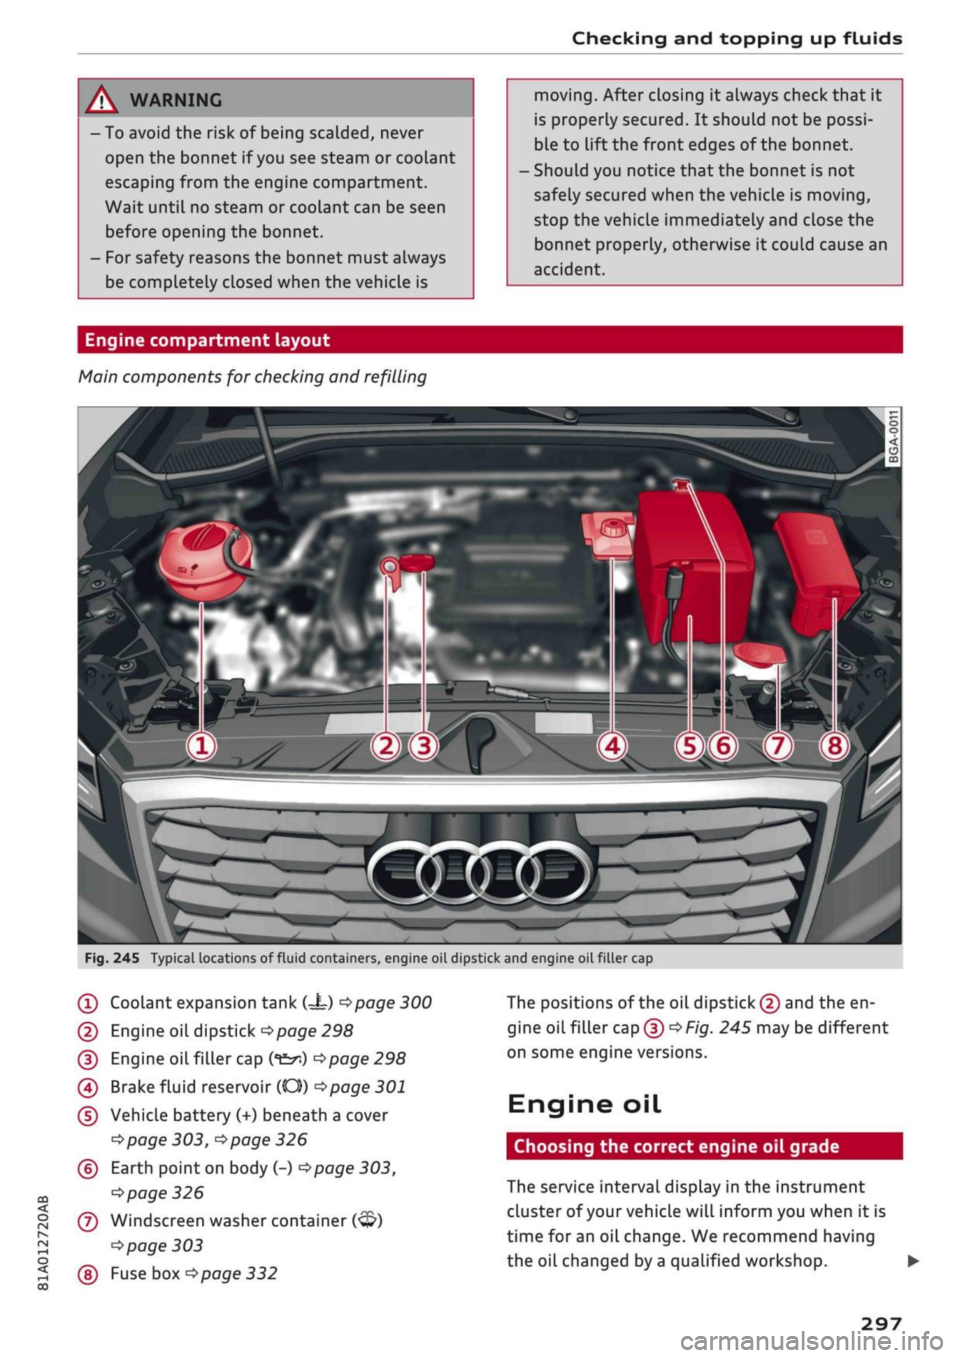
Engine compartment layout
Main components for checking and refilling
CO
< o rN
iv
rN
t-H
o <
?
Fig.
245 Typical locations of fluid containers, engine oil dipstick and engine
oilfiller
cap
(T)
Coolant expansion tank
C=t)
<^page
300
(2) Engine oil dipstick
Opage
298
(3) Engine
oilfiller
cap
(*&*)
Opage
298
(4) Brake fluid reservoir (CO))
^>page
301
(5) Vehicle battery (+) beneath a cover
^page
303,
^page
326
(?) Earth
point
on
body
(-)•=>page
303,
^>page
326
(7) Windscreen
washer
container
(<3?)
^>page
303
(§)
Fuse box
^page
332
The positions of the oil
dipstick
(2) and the en
gine
oilfiller
cap(D^F/'g.
245 may be different
on some engine versions.
Engine oil
Choosing the correct engine oil grade
The service interval display in the instrument
cluster of your vehicle will inform you when it is
time for an oil change. We recommend having
the oil changed by
a
qualified workshop. •
297
Page 336 of 364
Fuses and bulbs
Fuses and bulbs
Fuses
Changing fuses
To see whether a fuse has blown, check whether
the metal strip has melted.
3
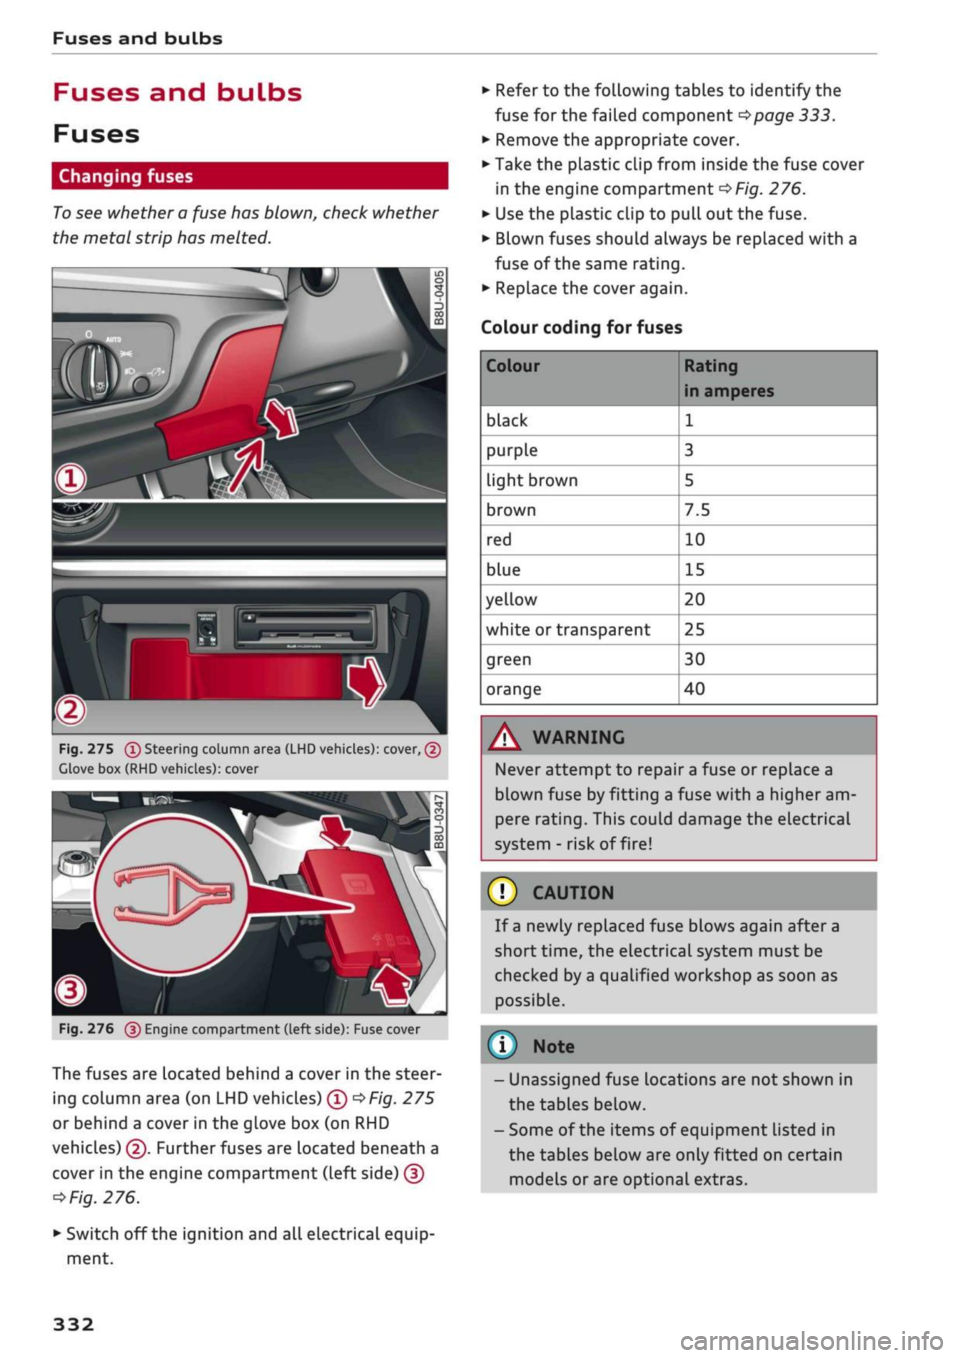
Fig.
275
(T)
Steering column area (LHD vehicles): cover, (2)
Clove box (RHD vehicles): cover
Fig.
276
@
Engine compartment (left side): Fuse cover
The fuses are located behind a cover in the steer
ing column area (on LHD vehicles) ©
*Fig.
275
or behind a cover in the glove box (on RHD
vehicles) ©. Further fuses are located beneath a
cover in the engine compartment (Left side) ©
*
Fig.
276.
• Switch off the ignition and all electrical equip
ment.
• Refer to the following tables to identify the
fuse for the failed component
*page
333.
• Remove the appropriate cover.
• Take the plastic clip from inside the fuse cover
in the engine compartment
*Fig.
276.
• Use the plastic clip to pull out the fuse.
• Blown fuses should always be replaced with a
fuse of the same rating.
• Replace the cover again.
Colour coding for fuses
Colour
black
purple
light brown
brown
red
blue
yellow
white or transparent
green
orange
Rating
in amperes
1
3
5
7.5
10
15
20
25
30
40
A WARNING
Never attempt to repair a fuse or replace a
blown fuse by fitting a fuse with a higher am
pere rating. This could damage the electrical
system - risk of fire!
© CAUTION
If a newly replaced fuse blows again after a
short time, the electrical system must be
checked by a qualified workshop as soon as
possible.
©
- Unassigned fuse locations are not shown in
the tables below.
- Some of the items of equipment listed in
the tables below are only fitted on certain
models or are optional extras.
332
Page 337 of 364
Fuses and bulbs
: -•.
-
i:i
m
R2 R3
F22
F-XII
F31
F30
:-:-.'
'.,
FM F43
F49
F!)3
F52
F51
R!,
a
R6
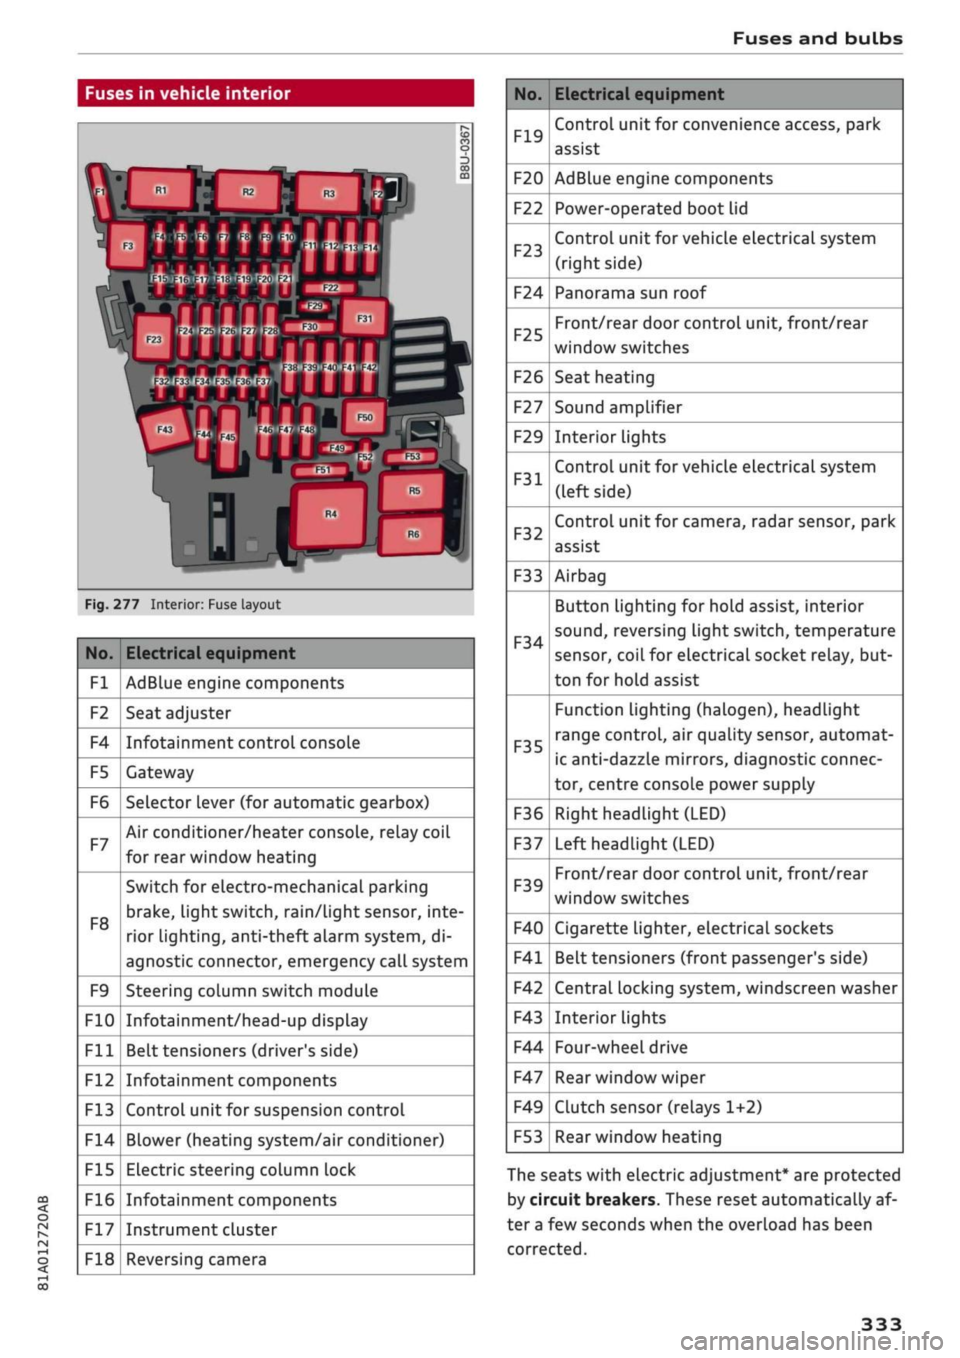
Fig.
277 Interior: Fuse layout
No.
Fl
F2
F4
F5
F6
F7
F8
F9
F10
Fll
F12
F13
F14
F15
F16
F17
F18
Electrical equipment
AdBlue engine components
Seat adjuster
Infotainment control console
Gateway
Selector lever (for automatic gearbox)
Air conditioner/heater console, relay coil
for rear window heating
Switch for electro-mechanical parking
brake,
light switch,
rain/Light
sensor, inte
rior lighting, anti-theft
aLarm
system, di
agnostic connector, emergency call system
Steering column switch module
Infotainment/head-up display
Belt tensioners (driver's side)
Infotainment components
Control unit for suspension control
Blower (heating system/air conditioner)
Electric steering column lock
Infotainment components
Instrument cluster
Reversing camera
No.
F19
F20
F22
F23
F24
F25
F26
F27
F29
F31
F32
F33
F34
F35
F36
F37
F39
F40
F41
F42
F43
F44
F47
F49
F53
Electrical equipment
Control unit for convenience access, park
assist
AdBlue engine components
Power-operated boot lid
Control unit for vehicle electrical system
(right side)
Panorama sun roof
Front/rear door control unit, front/rear
window switches
Seat heating
Sound amplifier
Interior lights
Control unit for vehicle electrical system
(left side)
Control unit for camera, radar sensor, park
assist
Airbag
Button Lighting for hold assist, interior
sound,
reversing light switch, temperature
sensor, coiL for electrical socket reLay, but
ton for hold assist
Function lighting (halogen), headlight
range control, air quality sensor, automat
ic anti-dazzle mirrors, diagnostic connec
tor, centre console power supply
Right headlight (LED)
Left headlight (LED)
Front/rear door control unit, front/rear
window switches
Cigarette lighter, electrical sockets
Belt tensioners (front passenger's side)
Central locking system, windscreen washer
Interior lights
Four-wheel drive
Rear window wiper
Clutch sensor (relays 1+2)
Rear window heating
The seats with electric adjustment* are protected
by circuit breakers. These reset automatically af
ter a few seconds when the overload has been
corrected.
333
Page 338 of 364
Fuses and bulbs
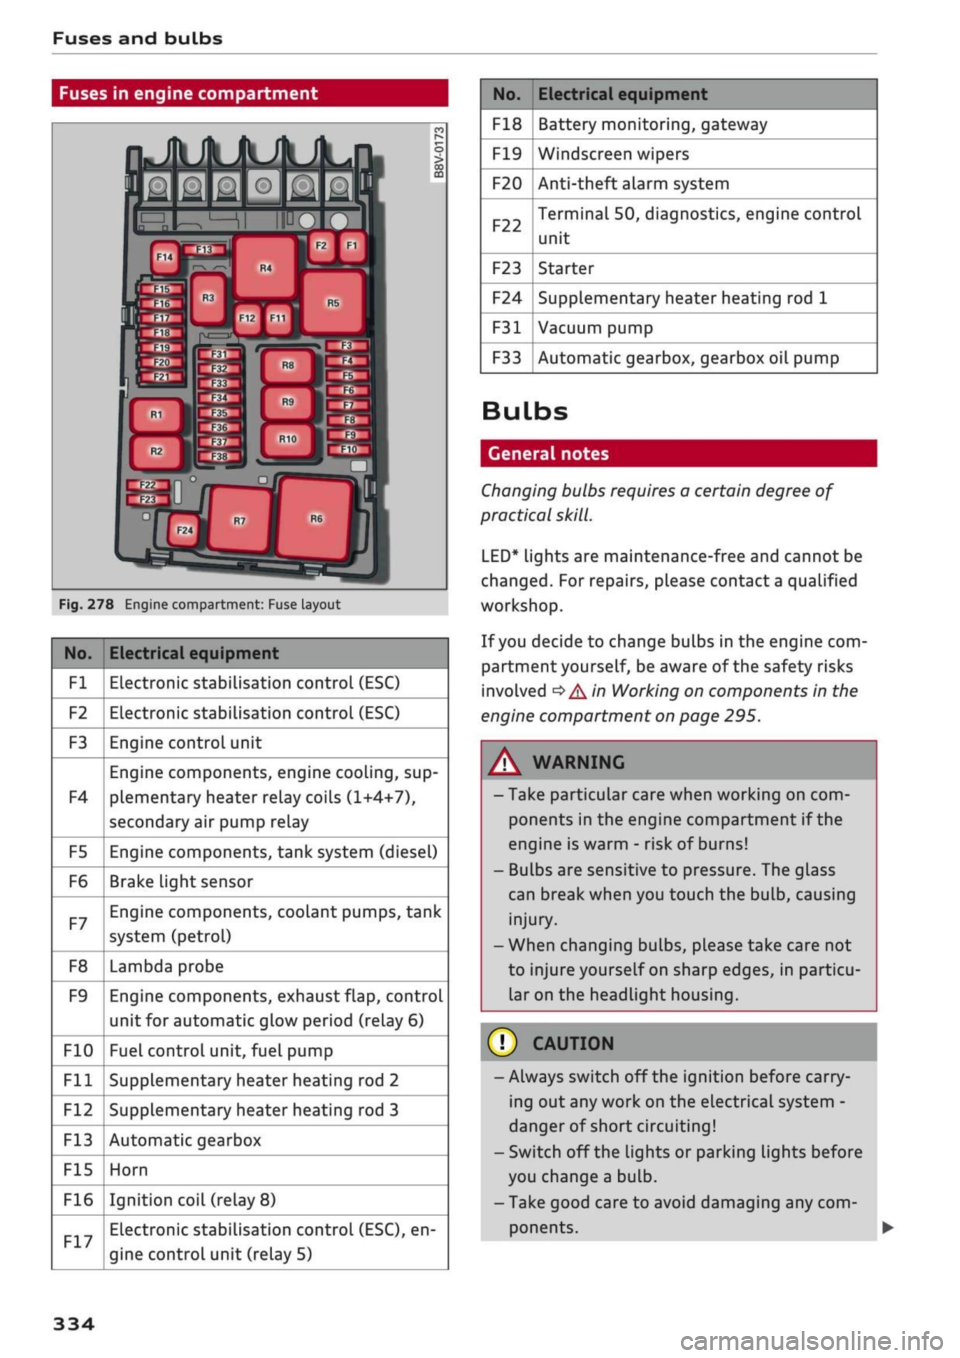
Fuses in engine compartment
Fig.
278 Engine compartment: Fuse layout
No.
Fl
F2
F3
F4
F5
F6
F7
F8
F9
F10
Fll
F12
F13
F15
F16
Electrical equipment
Electronic stabilisation control (ESC)
Electronic stabilisation control (ESC)
Engine control unit
Engine components, engine cooling, sup
plementary heater relay coils (1+4+7),
secondary air pump relay
Engine components, tank system (diesel)
Brake Light sensor
Engine components, coolant pumps, tank
system (petrol)
Lambda probe
Engine components, exhaust flap, control
unit for automatic glow period (relay 6)
Fuel control unit, fuel pump
Supplementary heater heating rod 2
Supplementary heater heating rod 3
Automatic gearbox
Horn
Ignition coil (relay
8)
Electronic stabilisation control (ESC), en
gine control unit (relay 5)
No.
F18
F19
F20
F22
F23
F24
F31
F33
Electrical equipment
Battery monitoring, gateway
Windscreen wipers
Anti-theft alarm system
Terminal 50, diagnostics, engine control
unit
Starter
Supplementary heater heating rod 1
Vacuum pump
Automatic gearbox, gearbox oil pump
Bulbs
General notes
Changing bulbs requires a certain degree of
practical
skill.
LED*
lights are maintenance-free and cannot be
changed.
For repairs, please contact a qualified
workshop.
If
you
decide to change bulbs in the engine com
partment yourself, be aware of the safety risks
involved
*
A in Working on components in the
engine compartment on page 295.
WARNING
- Take particular care when working on com
ponents in the engine compartment if the
engine is warm - risk of burns!
- Bulbs are sensitive to pressure. The glass
can break when you touch the bulb, causing
injury.
- When changing bulbs, please take care not
to injure yourself on sharp edges, in particu
lar on the headlight housing.
© CAUTION
-Always switch off the ignition before carry
ing out any work on the electrical system -
danger of short circuiting!
- Switch off the Lights or parking lights before
you change a bulb.
- Take good care to avoid damaging any com
ponents.
334
Page 339 of 364

Fuses and bulbs
CO
rN
IV
rN
•-i
00
- Make sure that the covers are correctly seat
ed on the headlights and the rear lights.
This will ensure that water cannot enter the
housings and cause the lights to malfunc
tion.
- Do not touch the glass part of the bulb with
your bare hands; use a cloth or paper towel
instead.
Otherwise, the fingerprints left on
the glass will vaporise as a result of the heat
generated by the bulb, be deposited on the
reflector and impair its surface.
© CAUTION
When removing or installing the rear light,
take care not to cause any damage.
- Removing the rear light in particular can
lead to the paintwork or rear light becoming
damaged.
This is another reason why we
recommend having the bulbs changed by a
qualified workshop.
- Never use metal tools (e.g. a screwdriver) or
sharp or pointed plastic tools to lever out
the rear light - risk of damaging the paint.
- Make sure you have a soft cloth ready to
place under the glass on the rear light, to
avoid any scratches.
® For the sake of the environment
A qualified workshop can advise you how to
dispose of used bulbs in the proper manner.
© Note
- Please check at regular intervals that
alL
lighting (especially the exterior Lighting) on
your vehicle is functioning properly. This is
not only in the interest of your own safety,
but also in that of all other road users.
- Before changing a bulb, make sure you have
the correct new bulb.
Bulbs at front of vehicle
Applies to: vehicles with halogen headlights
Fig.
279 Halogen headlights: Overview of left side of
vehi
cle
You must only replace a bulb with a bulb of the
same type. Information regarding e.g. the wat
tage can be found on the base of the bulb.
The description for changing the bulb refers to
the left headlight; the procedure for the right
headlight is similar.
Halogen headlights
The following bulbs can be changed:
Bulb (12 V)
(T)Main
beam headlight
© Dipped headlight
© Daytime running light
© Turn signal
Version
H7LL(55
W)
H7LL(55W)
PW24W
PWY24W
Bulbs at rear of vehicle
Applies to: vehicles with bulbs
Fig.
280
Rear
of
vehicle:
Bulbs on
leftside
of vehicle
335
Page 340 of 364
Fuses and bulbs
You must only replace a bulb with a bulb of the
same type. Information regarding e.g. the wat
tage can be found on the glass or base of the
bulb.
The description for changing the bulb refers to
the Left rear light unit; the procedure for the
right rear Light unit is similar.
You can change the
foLLowing
bulbs yourself:
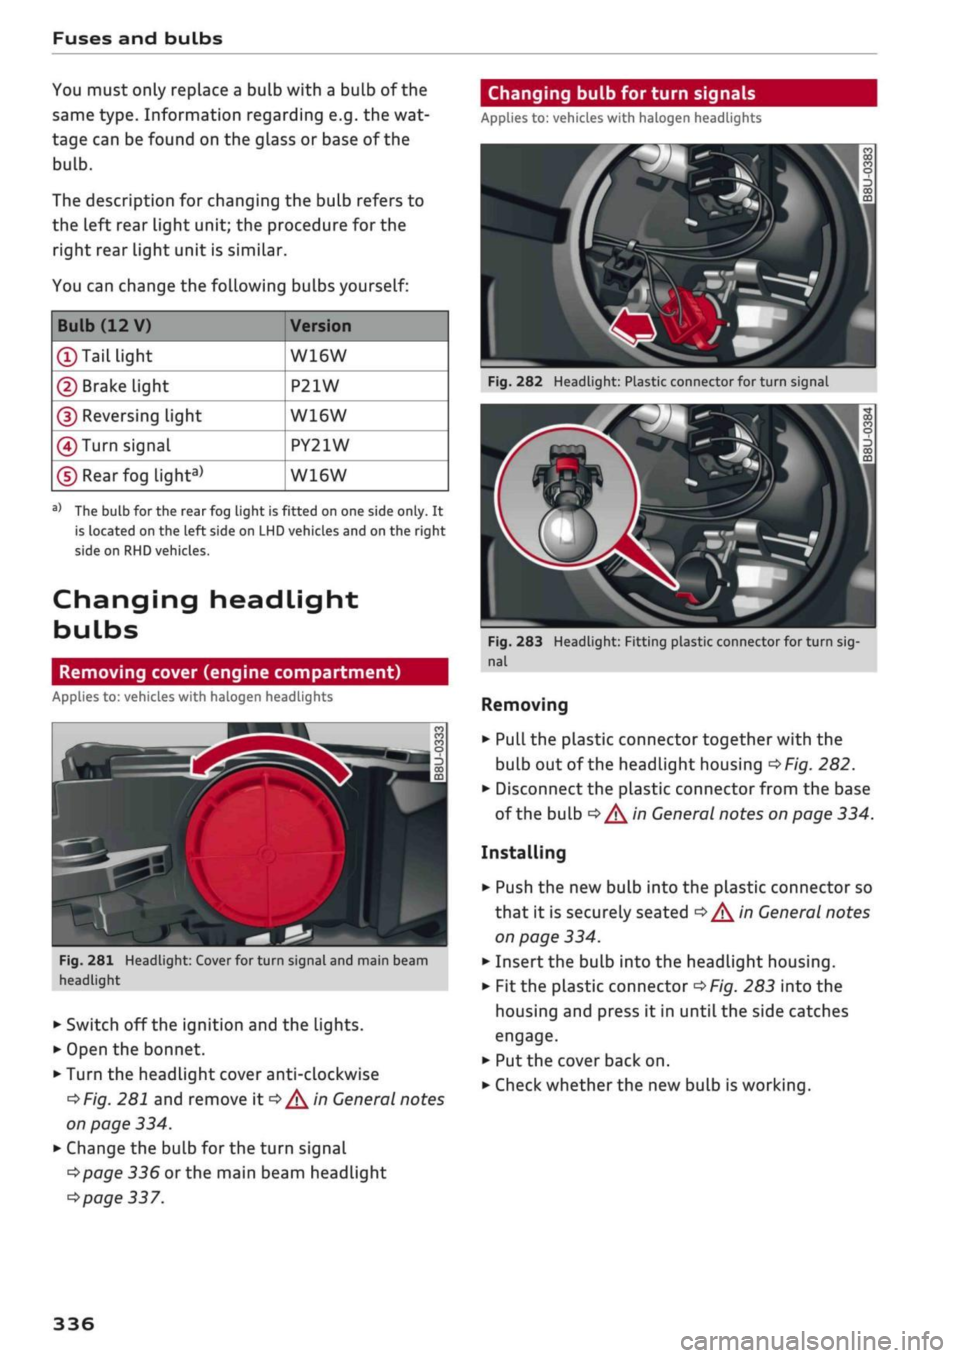
Changing bulb for turn signals
Applies to: vehicles with halogen headlights
Bulb (12 V)
©Tail
light
© Brake light
© Reversing Light
(4)
Turn signal
©Rearfog
light3'
Version
W16W
P21W
W16W
PY21W
W16W
a'
The bulb for the rear fog light is fitted on one side only. It
is located on the left side on LHD vehicles and on the right
side on RHD vehicles.
Changing headlight
bulbs
Removing cover (engine compartment)
Applies to: vehicles with halogen headlights
^
Fig.
281 Headlight: Cover for turn signal and main beam
headlight
• Switch off the ignition and the lights.
• Open the bonnet.
• Turn the headlight cover anti-clockwise
*Fig.
281 and remove it
*/^
in General notes
on page 334.
• Change the bulb for the turn signal
*page
336 or the main beam headlight
*page
337.
Fig.
282 Headlight: Plastic connector for turn signal
Fig.
283 Headlight: Fitting plastic connector for turn
sig
nal
Removing
• Pull the plastic connector together with the
buLb out of the headlight housing
*Fig.
282.
• Disconnect the plastic connector from the base
of the bulb
*^
in General notes on page 334.
Installing
• Push the new bulb into the plastic connector so
that it is securely seated
*^
in General notes
on page 334.
• Insert the bulb into the headlight housing.
•
Fit
the plastic connector
*Fig.
283 into the
housing and press it in until the side catches
engage.
• Put the cover back on.
• Check whether the new bulb is working.
336
Page 341 of 364

Fuses and bulbs
CO
rN
IV
rN
•-i
00
Changing bulb for main beam headlight
Applies to: vehicles with halogen headlights
Removing cover (wheel housing liner)
Applies to: vehicles with halogen headlights
y33pTCk
• **•** --•__
«flj \\
ÛV\-^
^L M
i
in
CO
ro
o
3
CO
m
k
|
Fig.
284 Headlight: Plastic connector for main beam
headlight
Fig.
285 Headlight: Fitting plastic connector for main
beam headlight
Removing
• Pull the plastic connector together with the
bulb out of the headlight housing
*Fig.
284.
• Disconnect the plastic connector from the base
of the bulb
^/K
in General notes on page 334.
Installing
• Push the new bulb into the plastic connector so
that it is securely seated
<=>^
in General notes
on page 334.
• Insert the bulb into the headlight housing.
• Press the plastic connector
*Fig.
285 into the
housing until it engages.
• Check that the bulb is seated correctly by look
ing through the headlight itself.
• Put the cover back on.
• Check whether the new bulb is working.
Fig.
286 Wheel housing liner: Access to daytime running
light and dipped headlight bulbs
Fig.
287 Headlight: Cover for daytime running light and
dipped headlight
• Turn the steering all the way to the right.
• Switch off the ignition and the lights.
• Reach into the opening
©*Fig.
286 and pull
in the direction of the arrow to open the cover
in the wheel housing Liner.
• Move the metal bar downwards -arrow-
*Fig.
287 and remove the plastic cover
*/^
in
General notes on page 334.
• Change the bulb for the daytime running light
©
*
page 338
or
the dipped headlight©
*
page 338.
337
Page 342 of 364

Fuses and bulbs
Changing bulb for daytime running light
Applies to: vehicles with halogen headlights
Changing bulb for dipped headlight
Applies to: vehicles with halogen headlights
Fig.
288 Wheel housing liner: Plastic connector for
day
time running light
Fig.
289 Wheel housing liner: Fitting plastic connector for
daytime running light
Removing
• Pull the plastic connector together with the
bulb out of the headlight housing
*Fig.
288.
• Disconnect the plastic connector from the base
of the bulb
*^
in General notes on page 334.
Installing
• Push the new bulb into the plastic connector so
that it is securely seated
*/^
in General notes
on page 334.
• Insert the bulb into the headlight housing.
• Press the plastic connector
*Fig.
289 into the
housing until it engages.
• Put the covers back on the headlight and the
wheel housing liner.
• Check whether the new bulb is working.
Fig.
290 Wheel housing liner: Plastic connector for dipped
headlight
Fig.
291 Wheel housing liner: Fitting plastic connector for
dipped headlight
Removing
• Pull the plastic connector together with the
bulb out of the headlight housing
*Fig.
290.
• Disconnect the plastic connector from the base
of the bulb
*^
in General notes on page 334.
Installing
• Push the new bulb into the plastic connector so
that it is securely seated
*^in
General notes
on page 334.
• Insert the bulb into the headlight housing.
• Press the plastic connector
*Fig.
291 into the
housing until it engages.
• Check that the bulb is seated correctly by look
ing through the headlight itself.
• Put the covers back on the headlight and the
wheel housing liner.
• Check whether the new bulb is working.
338
Page 343 of 364
Fuses
and
bulbs
CO
rN
IV
rN
•-i
00
Changing bulbs
for
rear
Lights
Preparations
Applies
to: vehicles with bulbs
Changing
a
bulb
Applies
to: vehicles with bulbs
Fig.
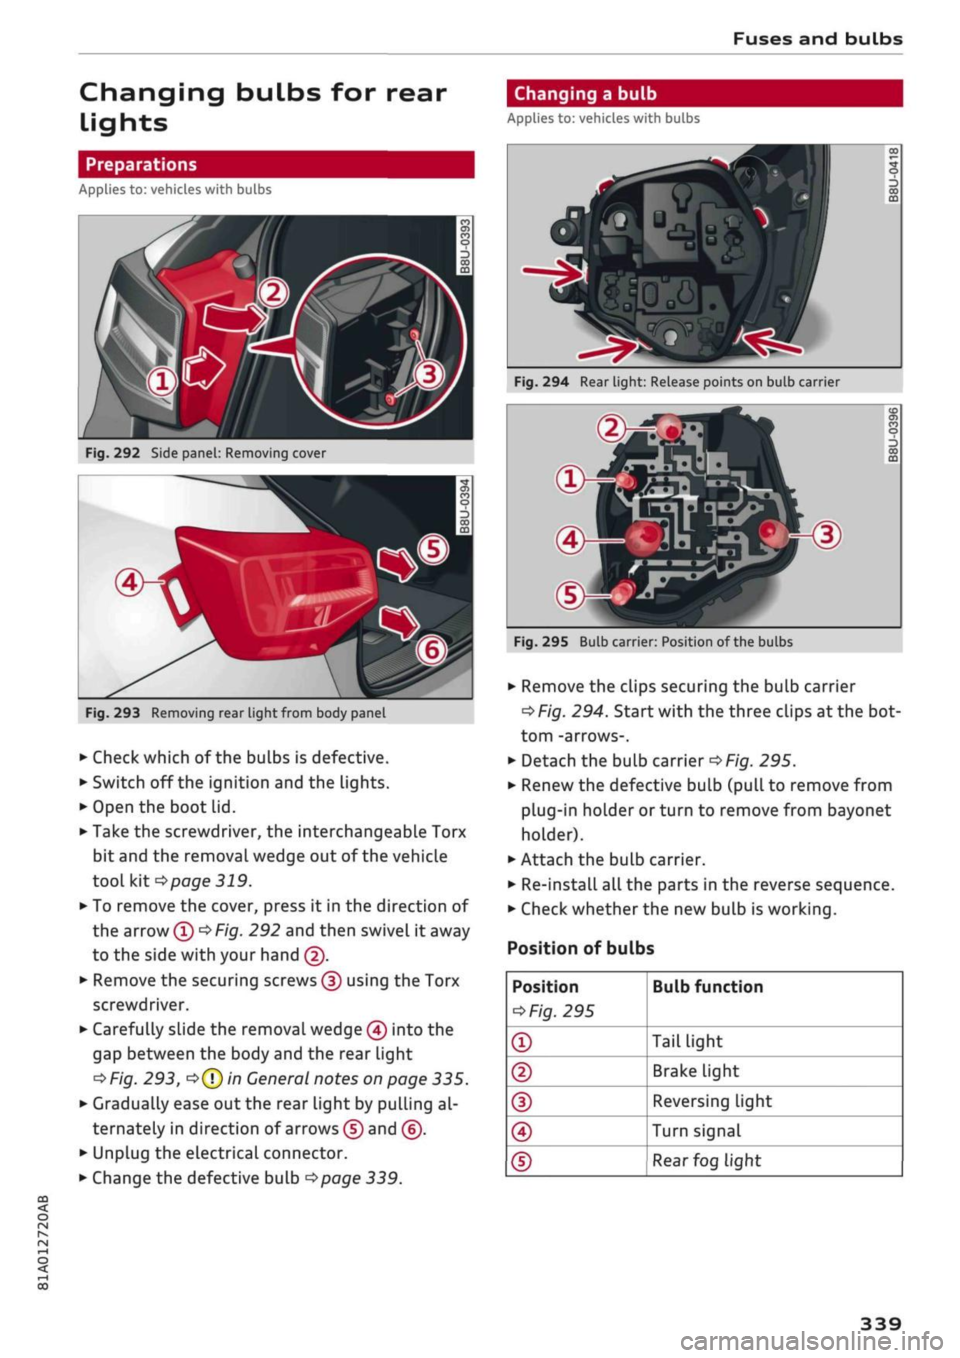
292
Side
panel:
Removing cover
Fig.
293
Removing rear light from body panel
• Check which
of
the bulbs
is
defective.
• Switch
off
the ignition and
the
lights.
• Open
the
boot lid.
• Take
the
screwdriver,
the
interchangeable Torx
bit and
the
removal wedge
out of
the vehicle
tool
kit
*page
319.
• To remove
the
cover, press
it in the
direction
of
the arrow
©
*
Fig.
292
and then swivel
it
away
to
the
side with your hand
©.
• Remove the securing screws
©
using
the
Torx
screwdriver.
• Carefully slide
the
removal wedge
©
into
the
gap between
the
body and
the
rear light
•=>
Fig.
293,
o©
in
General notes on page
335.
• Gradually ease out the rear light
by
pulling
al
ternately
in
direction
of
arrows
©
and
©.
• Unplug
the
electrical connector.
• Change the defective bulb
*page
339.
1
u
f"
00
o
00 m
Fig.
294 Rear light: Release points on bulb carrier
^
®-g
Fig.
295
Bulbcarr
4B
&fï|
STPJ
ml
»Wm
er: Position
sio^
P*^^^HP^
of the bulbs
O)
CO
o
OQ
• Remove the clips securing
the
bulb carrier
*Fig.
294.
Start with
the
three clips
at
the bot
tom -arrows-.
• Detach
the
bulb carrier
*Fig.
295.
• Renew the defective bulb (pull
to
remove from
plug-in holder
or
turn
to
remove from bayonet
holder).
• Attach
the
bulb carrier.
• Re-install all the parts
in the
reverse sequence.
• Check whether the new bulb
is
working.
Position
of
bulbs
Position
*
Fig.
295
®
®
(D
©
®
Bulb function
Tail light
Brake light
Reversing Light
Turn signal
Rear
fog light
339