AUDI Q3 2016 Service Manual
Manufacturer: AUDI, Model Year: 2016, Model line: Q3, Model: AUDI Q3 2016Pages: 252, PDF Size: 62.81 MB
Page 41 of 252
Lights and Vision
Exterior Lighting
Switching lights on and off
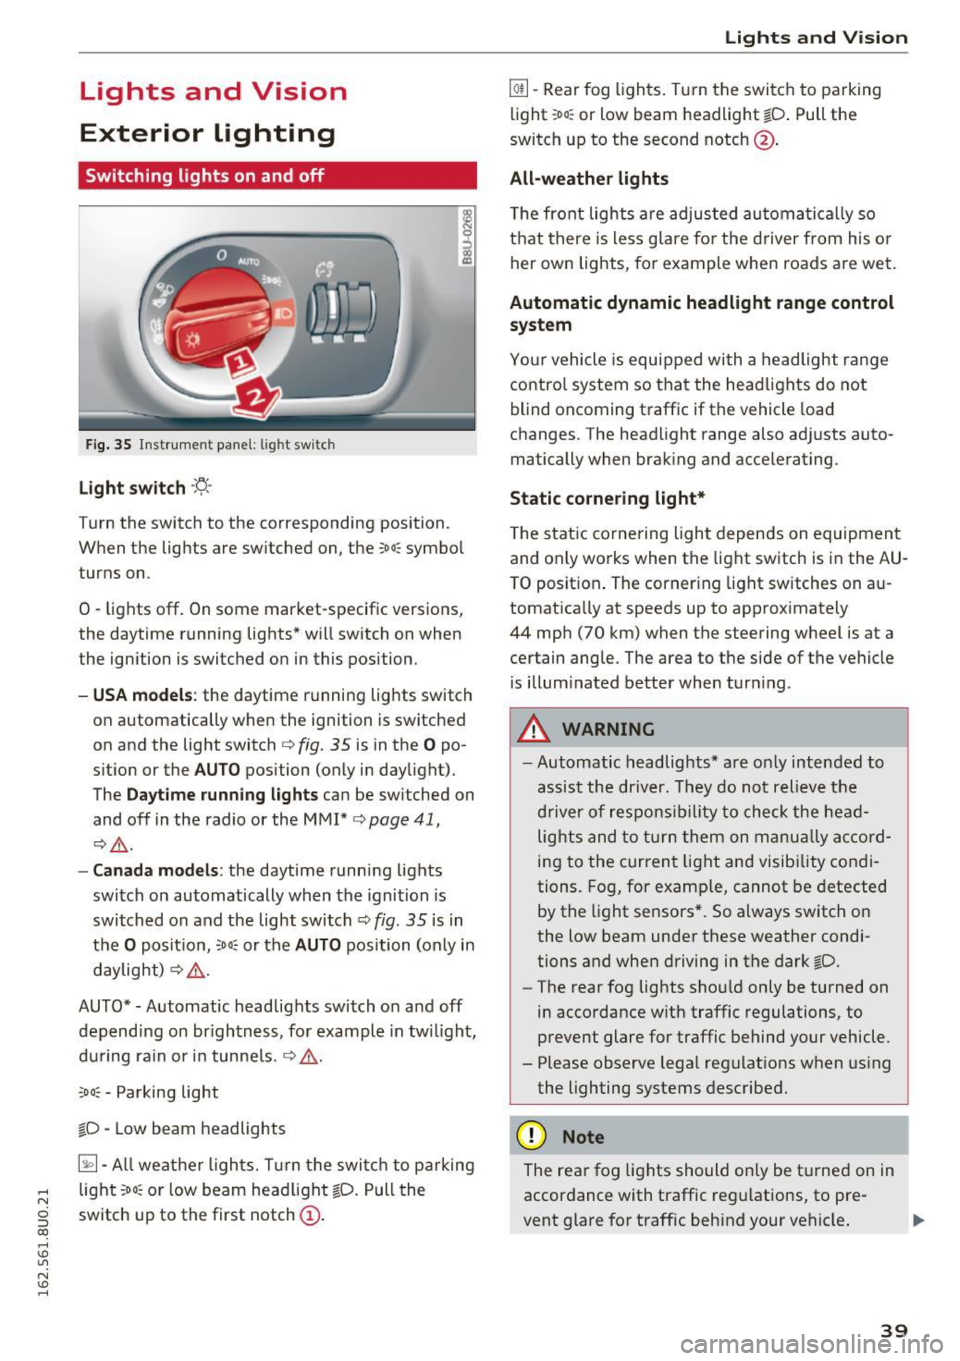
Fig. 35 Instrument panel: l ig ht switc h
Light switch ·'!;5-·
Turn the switch to the corresponding position.
When the lights are switched on, the ;oo: symbol
turns on.
0 -lights off. On some market-specific vers ions,
the daytime running lights* will switch on when
the ignition is switched on in this position .
-USA model s: the daytime running lights switch
on automatically when the ignition is switched
on and the light switch
c::> fig. 35 is in the O po
s it ion or the
AUTO position (only in daylight).
The
Daytime running lights can be switched on
and off in the radio or the MMI*
c::> page 41,
i:::> A .
-Canada models : the daytime runn ing lights
switch on automatically when the ignition is
switched on and the light switch
c::> fig. 35 is in
t h e
O positio n, :oo: or the AUTO position (only in
daylight)
i:::> A .
AUTO*· Automatic headlights switch on and off
depend ing on br igh tness, fo r example in tw ilight,
du ring rain or in tunne ls .
c::> A .
coo: - Parking light
~D · Low beam headlights
~· All weat her ligh ts. T urn the swi tc h to parking
.... light :oo: or low beam head light ~D. Pull the
N
g switch up to the first notch (D.
CX)
.... I.Cl U"I
N I.Cl ....
Lights and V ision
@ii -Rear fog ligh ts. T urn the swi tch to parking
light ;oo : or low beam headlight
tD . Pull the
switch up to the second notch@.
All -weather lights
T he front lights a re adjusted au toma tica lly so
t h at there is less g lare fo r the d river from his o r
her ow n lights, for example whe n roads are we t.
Automatic dynamic headlight range control
system
Yo ur vehicle is equ ipped wi th a headligh t range
contro l system so that the head lig hts do not
blind oncoming traff ic if the vehicle load
changes . The head light range also ad justs auto
matically when brak ing and accelerating .
Static corne ring light*
T he stat ic co rnering light depe nds on equipmen t
and on ly works when the light switch is in the AU
T O posit ion . The corner ing light sw itches on a u
tomat ically at speeds up to approximately
44 mp h (70 km) when the steering wheel is at a
ce rtain ang le . The area to the side of the vehicle
is illum inated better when tur ning .
.,&. WARNING ,~ -- Automatic headlights* are o nly inten ded to
assist the driv er. They do no t reli eve t he
dr iver of resp onsib ility to check the hea d
light s and to tur n them on m anual ly a ccord
i n g to the curren t light an d visib ility condi
tion s. Fog, for examp le, cannot be detected
by the light se nsors *. So always switch o n
the low beam under these weather condi
tions and when driving in the dark ~D.
- The rear fog lights sho uld only be turned on
in acco rdance w ith traffic regulations, to
prevent glare for traffic behind your vehicle.
- Please observe lega l reg ulat ions w hen us ing
the lighting systems desc ribe d.
(D Note
The rea r fog lights shou ld on ly be t urne d on in
accordance with traffic reg ulations, to pre
vent glare for traffic behind your vehicle .
39
Page 42 of 252
Lights and Vision
(D Tips
-The light sensor for the automatic head
lights* is in the rearview m irror mount.
Therefore, do not place any stickers in this
area on the windshield.
- Some of the exterior lighting functions can be adjusted
c:-page 41.
-If you turn off the ignition wh ile the exter ior
lights are on and open the door, you will
hear a warning tone.
- In cool or damp weather, the inside of the
headlights, turn s ignals and tail lights can
fog over due to the temperature d ifference
between the inside and outs ide . They will
clear short ly after sw itch ing them on . This
does not affect the serv ice life of the light
ing .
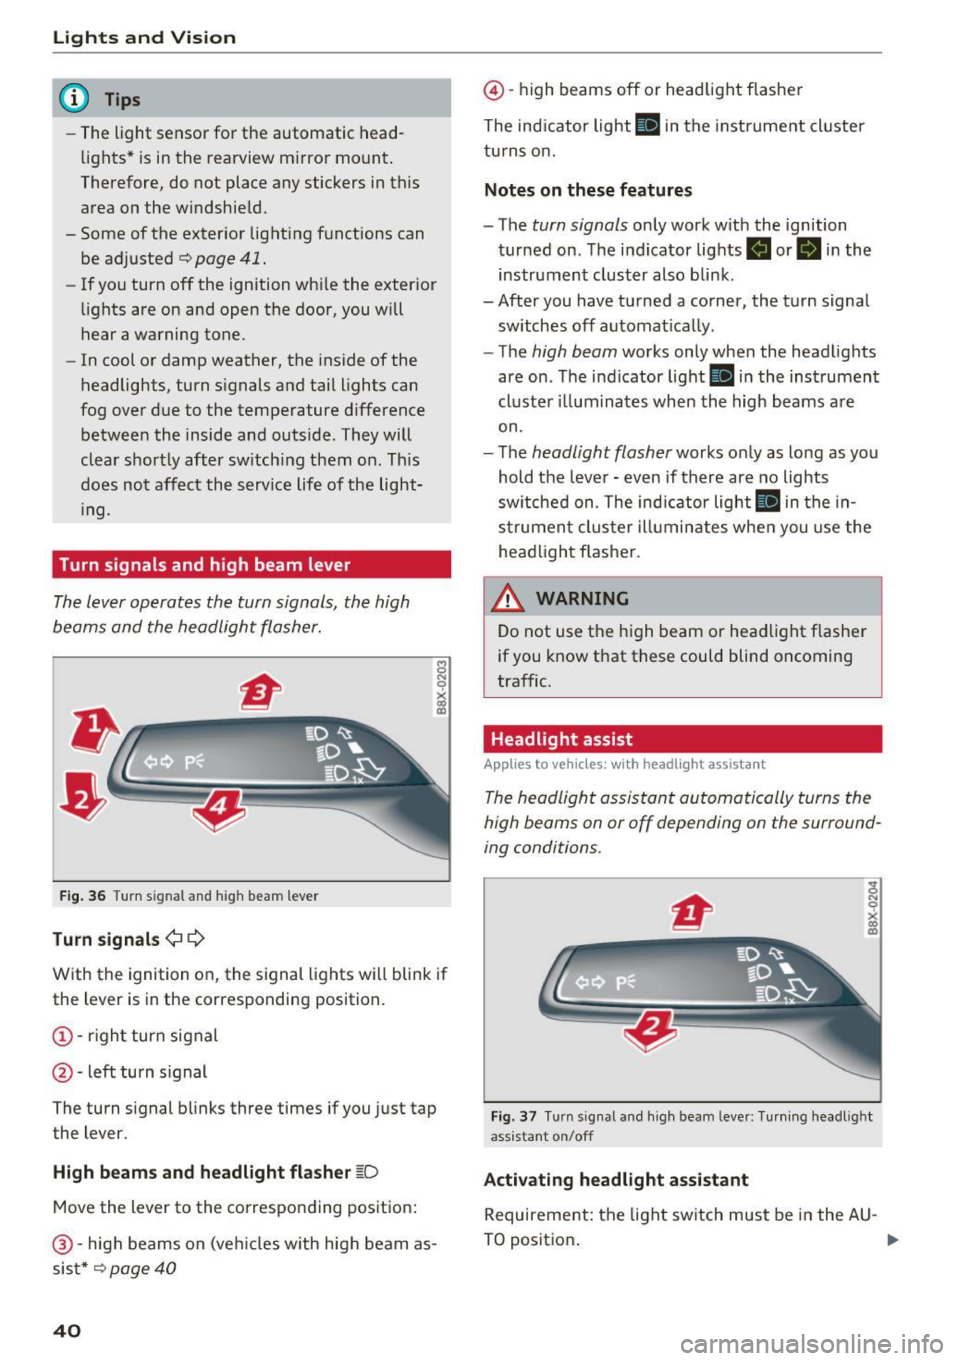
Turn signals and high beam lever
The lever operates the turn signals, the high
beams and the headlight flasher.
8 N 0
~
F ig . 36 Turn s ig nal and h ig h bea m lever
Turn signals ¢ Q
With the ignition on, the signal lights w ill blink if
the lever is in the corresponding position.
(!) -righ t turn signal
@ -left turn s ignal
The turn s ignal blinks three times if you just tap
the lever.
High beam s and headlight flasher ~D
Move the lever to the co rrespo nd ing posit ion:
@ -high beams on (ve hicles w ith high beam as
sis t*
c:-page 40
40
@ -high beams off or headlight flasher
The ind icator light
II in the instrume nt cl uster
turns o n.
Notes on these features
- The turn signals only work w ith the ignition
turned on . T he indicator lights . or
II in the
instrument cluster also bli nk.
- After you have tu rned a corner, the tu rn signa l
sw itches off automat ica lly .
- The
high beam works only when the head lights
are on . Th e ind icator light
Bl in the instrumen t
cl uste r ill um ina tes when the high beams a re
on.
- The
headlight flasher works o nly as long as yo u
hold the leve r - even if there are no lights
sw itched on . The ind icator light
II in the in
s trumen t clus te r i lluminates whe n you use the
head light flasher.
&_ WARNING
D o not use t he high beam or head light f lasher
if you know that these could blind oncoming
traffic.
Headlight assist
Applies to vehicles: wit h headlight assistant
The headlight assistant automatically turns the
high beams on or off depending on the surround
ing conditions .
Fig. 3 7 Turn s ig nal a nd hi gh beam lever: Tu rnin g headl ig ht
ass istant on/off
Activating headl ight assi stant
Requireme nt: the light sw itch must be in the AU -
TO positio n. .,.
Page 43 of 252
~ To activate the headlight assistant, tap the lev
er forward (!). The indicator light
ii appears
in the instrument cluster disp lay and the head
lights are switched on/off automatically. The
SI indicator light also turns on if the high
beams are switched on .
Switching the high beams on/off manually
If the high beams did not switch on/off automat
ically as expected, you may switch them on or off
manually instead:
~ To switch the high beams on manually, tap the
l ever forward (!). The
SI indicator light turns
on.
~ To switch the high beams off manually, pull the
lever back@. The headlight assistant is deacti
vated .
Operating the headlight flasher
~ Pull the lever into position @to operate the
headlight flasher when the headlight assist is
activated. The headlight ass istant remains ac
tive.
Messages in the instrument cluster display
Headlight assist: System fault!
Drive to an authorized Aud i dea ler or a uthorized
Aud i Serv ice Fac ility immediately to have the
malfunction corrected. You can still switch the
high beams on or off manually.
Headlight assist: Unavailable. No camera view
The camera view is blocked, for example by a
sticker or debris .
The sensor is located between the interior rear
view mirror and the windshield . Therefore, do not
place any st ickers in this area on the windshield .
A WARNING
Headlight assistant is only intended to assist
the driver. The driver is still responsible for
controlling the headlights and switching
them manually depending on light and visibil
ity conditions. It may be necessary to operate
them manually in situations such as:
- In adverse weather conditions such as fog,
heavy ra in, b lowing snow or spraying water.
Lights and Vision
-On roads where oncoming traffic may be
partially obscured, such as expressways.
- When there are road users that do not have
sufficient lighting, such as bicyclers or
veh icles with dirty tail lamps.
- In tight curves and on steep slopes.
- In poorly lit areas.
- With strong reflectors, such as signs .
- If the area of the windshield near the sensor
is fogged over, dirty, icy or covered with a
s ticker.
Adjusting exterior lighting
The functions are selected in the radio or MMI*.
~ Select: !CAR ! function button> (Car) Systems*
control button > Vehicle settings> Exterior
lighting .
Coming home (lights when leaving car}*,
Leaving home (lights when unlocking car)*
The coming home function illumi nates the area
around the vehicle when the ignition is switched
off and the driver's door is opened. Depending on
vehicle eq uipment, the function can be switched
on and off or the length of time the lights remain
on* can be adjusted .
T he
leaving home function illuminates the area
around the vehicle when unlock ing it. Thi s func
tion can be switched on and off.
The
coming home and leaving home functions
only operate when it is dark and the light switch
is i n the AUTO posit ion ~
page 39, fig. 35.
Daytime running lights
USA models:
You can switch the daytime running
l ights
on and off .
Canada models:
The function cannot be turned
off. It is activated automatically each time the ig
nition is switched on .
41
Page 44 of 252
Lights and Vision
Emergency flashers
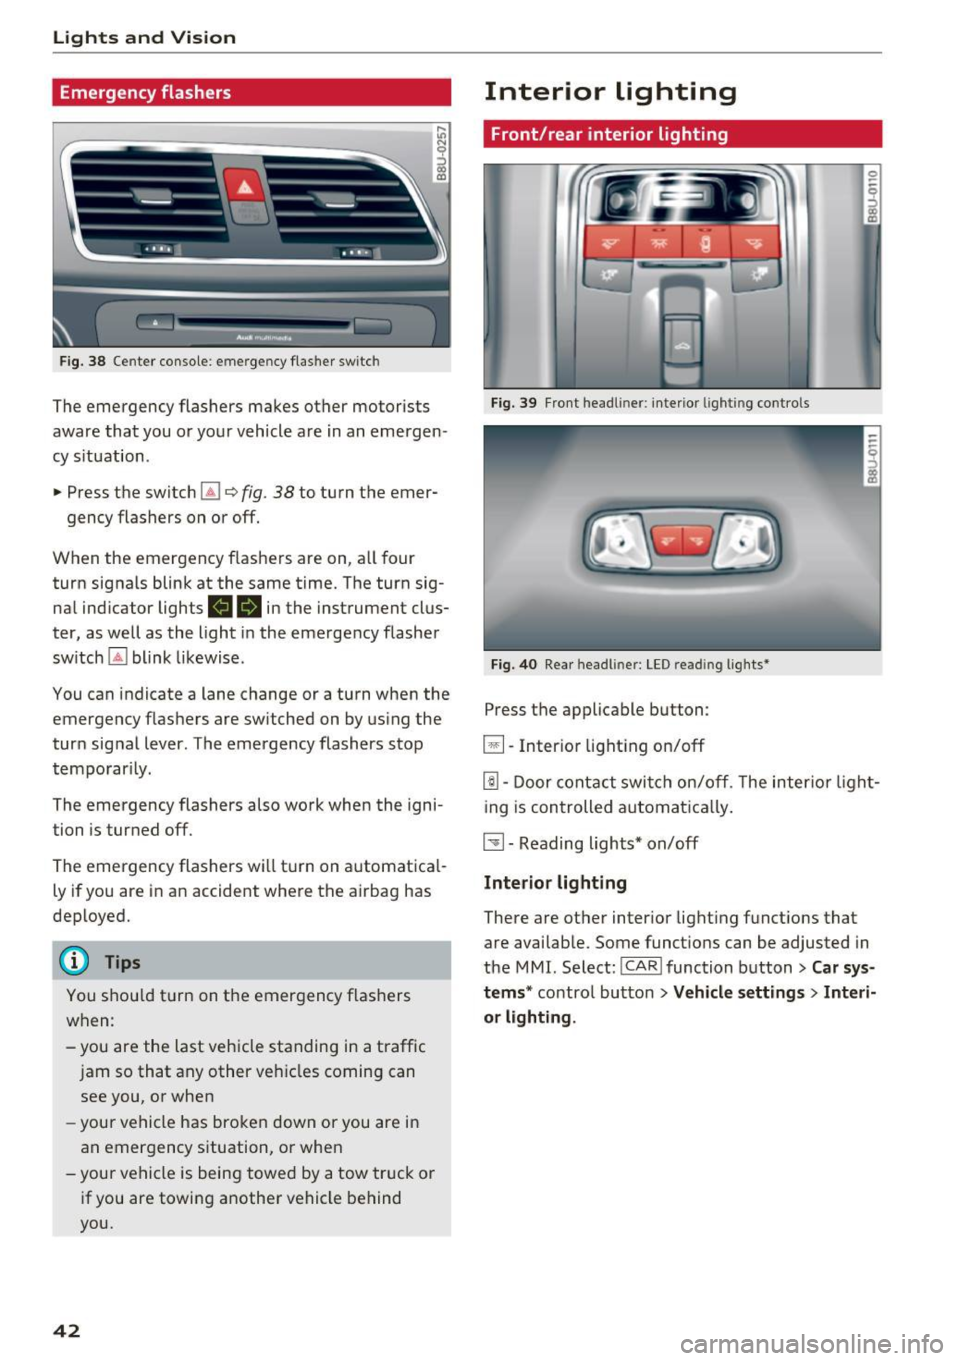
Fig. 38 Cente r console: eme rge ncy flasher sw itc h
The emergency flashers makes other motorists
aware that you or your vehicle are in an emergen
cy s ituation .
.. Press the switch
l1J c> fig. 38 to turn the emer-
gency flashers on or off.
When the em ergency f lashers are on , a ll four
turn signals blink at the same time. The turn sig
na l indicator lights
BIB in the instrument clus
ter, as well as the light in the emerge ncy flasher
sw itch ~ blink likewise .
You can indicate a lane change or a turn when the emergency flashers are sw itched on by using the
turn sig nal lever . The emergency flashers stop
temporar ily.
The emergency flashers also wo rk when the igni
tion is turned off.
The emergency flashers wi ll tur n on a utomat ica l
ly if you are in an accident where th e airbag has
dep loyed.
@ Tips
You s hou ld t urn on the emergency flashers
when :
-you are the last veh icle standing in a traffic
j am so that any other ve hicles coming can
see you, o r when
- your ve hicle has broke n down or you are in
an emergency situation, o r when
-your ve hicle is being towe d by a tow truck or
if you are towing another vehicle behind
you.
42
Interior lighting
Front/rear interior lighting
Fi g. 39 Front head liner: interio r li ghtin g con trols
Fi g. 40 Rea r h eadl iner: LED re ad in g li ghts•
Press t he applicable button :
~ -Inter io r l ight ing on/off
[!] . Door cont act swi tch on/off . T he inter io r li ght
i ng is controlled automa tic a lly .
~- Reading lights* on/off
Interior lighting
There are ot her inter ior light ing f unct ions that
are avai lable. Some funct ions can be adjusted in
the MMI. Select:
l cAR ! function button > Car sys
tems *
contro l butto n > Vehicle settings > Interi
or lighting .
Page 45 of 252

.... N
c:i ::J CX)
.... I.Cl U"I
N I.Cl ......
Instrument illumination
The brightness of the instrument cluster, the
center console lighting and the Infotainment
system display can be set.
F ig . 41 In strum ent illumina tion
• To reduce or increase the brightness, turn the
thumbwheel down or up.
(D Tips
The instrument illumination for the need les
and dia ls turns on when the ignition is turned
on and the lights are turned off. The illumina
tion for the d ials reduces automatically and
eventually turns off as brightness outside in
creases. This function reminds the driver to
turn the headlights on at the approp riate
time.
Vision
Adjusting the exterior mirrors
Fig . 42 D ri ver 's doo r: kn ob for t he ex te ri or m irro rs
T urn the knob to the desired pos it ion:
Q/P -adj usting the left/right exter ior mir ror.
Move the knob in the desired direction .
Lights and Vision
4iil -Heating th e mirror glass depending on the
outside temperature.
8 -Folding exte rior m irrors* .
Front passenger 's exterior mirror tilt
function *
To help you see the curb when backing into a
parking space, the su rface of the mi rro r tilts
s li ght ly. For this to happen, the knob must be in
the position for the front passenger 's outside
mirror.
You can adjust the tilted mirror s urfa ce by turn
i ng the knob in the desired d irect ion. When you
move out of reverse and into another gear, the
new m irror pos ition is stored and assigned to the
key you are using .
The m irror goes back into i ts or iginal pos ition
once you drive forward faster than 9 mph
(15 km/h) or turn the ignition off.
.&_ WARNING
=
C urved mirror surfaces (fo r example convex)
enlarge the field of vision. However, they
make objects in the mirror appear smaller
and farther away . You r may estimate inco r
r ect ly when you use these mirrors to gauge
your d ista nce from the veh icles beh ind you
when chang ing lanes -acciden t risk!
(D Note
- If the m irror housing was moved by force
(for example, by runn ing into an object
when maneuve ring the vehicle), the m irror
must be fo lded a ll the way in us ing the pow-
er folding fun ction . T he m irro r ho us ing
must not be moved back into place by hand
because this wo uld impair the function of
the mirror mechanism.
- If you wash the vehicle in an automatic car
wash, you must fold the exterior mirrors in
to reduce the r isk of damage to the mirro rs.
Never fold power fo ld ing exter ior mirrors *
by hand. Only fold them in and out using
the power controls. ..,.
43
Page 46 of 252
Lights and Vision
@ Tips
If the power adjusting function malfunctions,
the glass in both mirrors can be adjusted by
pressing on the edge of it by hand.
Dimming the mirror
Your vehicle is equipped with o manual or auto
matic dimming rearview mirror.
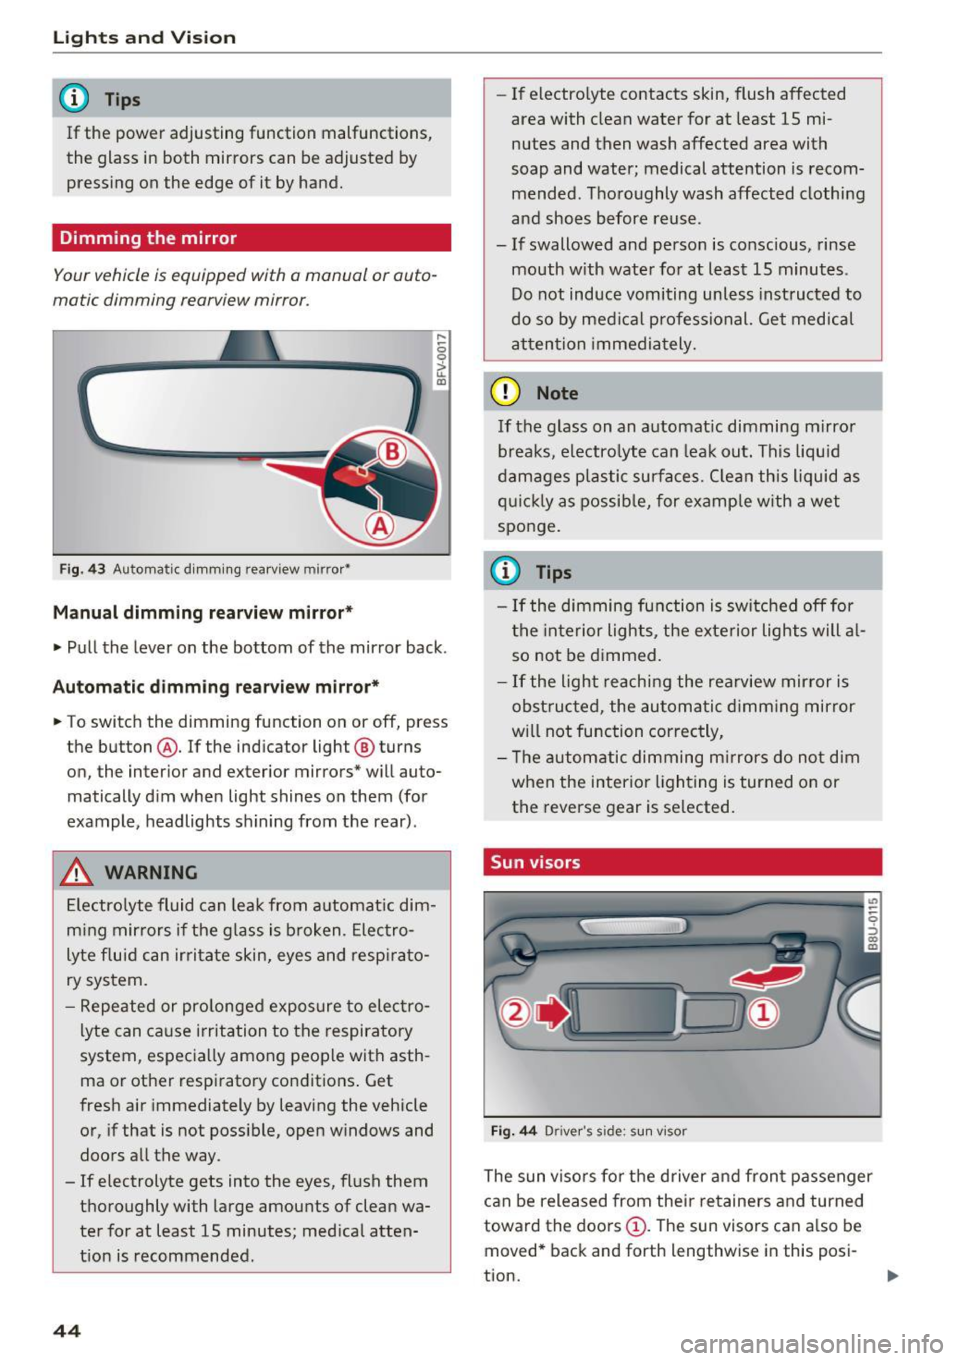
Fig. 43 Automatic dimming rearview mirror•
Manual dimming rearview mirror*
....
0 0
> u. Ill
• Pull the lever on the bottom of the mirror back .
Automatic dimming rearview mirror*
• To switch the dimming function on or off, press
the button @. If the ind icator light @ turns
on, the inter ior and exterior mirrors* will auto
matically dim when light shines on them (for
example, headlights shining from the rear).
A WARNING
Electrolyte fluid can leak from automatic dim
ming mirrors if the glass is broken. Electro
lyte fluid can irritate skin, eyes and respirato
ry system.
- Repeated or prolonged exposure to electro
lyte can cause irritation to the respiratory
system, especially among people with asth
ma or other respiratory conditions. Get
fresh air immediately by leaving the vehicle
or, if that is not possible, open windows and
doors all the way.
- If electrolyte gets into the eyes, flush them
thoroughly with large amounts of clean wa
ter for at least 15 minutes; medical atten
tion is recommended.
44
- If electro lyte contacts skin, flush affected
area with clean water for at least 15 mi
nutes and then wash affected area with
soap and water; medical attention is recom mended . Thoroughly wash affected clothing
and shoes before reuse.
- If swallowed and person is conscious, rinse mouth with water for at least 15 minutes.
Do not induce vomiting unless instructed to
do so by medical professional. Get medical
attention immediately.
(D Note
If the glass on an automatic dimming mirror
breaks, electrolyte can leak out. This liquid
damages plastic surfaces. Clean this liquid as
quickly as possible, for example with a wet
sponge.
(0 Tips
- If the dimming function is switched off for
the interior lights, the exterior lights will al
so not be dimmed.
- If the light reaching the rearview mirror is
obstructed, the automatic dimming mirror
will not function correctly,
- The automatic dimming mirrors do not dim
when the interior lighting is turned on or
the reverse gear is selected.
Sun visors
Fig. 44 Drive r's side ; s un visor
The sun visors for the driver and front passenger
can be released from their retainers and turned
toward the doors
(D. The sun visors can also be
moved* back and forth lengthwise in this posi-
tion. ..,.
Page 47 of 252

The mirror lighting* switches on when the cover
over the vanity mirror@opens.
Windshield wipers
Switching the windshield wipers on
Fig. 45 Windshie ld wiper lever
Fig. 46 Act uate the re ar window w iper
Move the windshield wiper lever to the corre
sponding position:
@ -Windshield wipers off
@ -Interva l mode. To extend/shorten the wipe r
intervals, move the switch @to the left/right. In
vehicles with a rain sensor *, the wipers turn on in
the rain once the vehicle speed exceeds approxi mately 2 mph (4 km/h). The higher the rain sen
sor sensitivity is set (switch @to the right), the
earlier the windshield wipers react to moisture
on the windsh ield .
@ -Slow wiping
@ -Fast wiping
©-Sing le wipe. If yo u hold the leve r in th is posi-
,.... tion longer, the wipers switch from s low wiping
N
g to fast w ip ing.
CX)
~ ® -Clean the windshield . The wipers wipe one U"I
~ time afte r severa l seconds of dr iving to remove
......
Lights and V ision
water droplets . You can switch this function o ff
by moving the lever to position ® within 10 sec
onds of the after-w ipe. The after-wipe funct ion is
reactivated the next time you switch the ignit ion
on.
@ -Wipe the rear window . The rear wiper moves
about every 6 seconds .
{J)-Clean the rear w indow . T he number of wipes
depends on how long the lever is held in position
{J) .
.&_ WARNING
-
-The rain sensor is on ly intended to ass ist the
driver. The driver is still respons ible for
manually switch ing the wipers on according
to the visibility cond it ions .
- The winds hield may not be treated w ith wa
ter-repelling w indshield coating agents. Un
favorable condit ions, such as wet ness, dark
ness o r low sun, can result in inc reased
g lare. Wiper b lade chatter is also poss ible.
- Properly functioning windshield wiper
blades are requ ired for a clea r view and safe
d riving
~ page 46, Replacing front wind
shield wiper blades.
(D Note
- If there is frost, make sure the wi ndshield
w iper blades are not frozen to the wind
shield. Swi tching on the w indshield w ipers
when the blades are frozen to the wind shield can damage the w iper blades.
- Pr ior to using a car wash, the w indshield
w iper system mus t be sw itched off (lever in
position @). This prevents un intentional
switching on and damage to the windshield
wiper system.
(D Tips
- T he windshie ld w ipers switch off when the
ignition is turned off. You can activate the
w indshield wipers after the ignition is
switched back on by moving the w indshield
wiper lever to any position.
- Worn or dirty windshie ld wiper blades resu lt
in streaking. This can affect the rain sensor * .,.
45
Page 48 of 252
Lights and Vi sion
function . Check your windshield wiper
blades regularly.
- The washer fluid nozzles of the windshield
washer system are heated at low tempera
tures when the ignition is on.
- When stopping temporarily, such as at a
traffic light, the speed of the windshie ld
wipers automatically reduces by one level.
Cleaning windshield wiper blades
Clean the wiper blades when you see wiper
streaks. Use a sof t cloth and a glass cleaner .
Windshield wiper
~ Place the windshield wiper arms in the service
position ¢
page 46.
~ Fold the windshield wiper arm away from the
windshield.
Rear window wiper
~ Fold the windshield wiper arm away from the
rear window .
A WARNING
Dirty windshield wiper blades can impair vi
sion, which increases the risk of an accident .
Replacing front windshield wiper blades
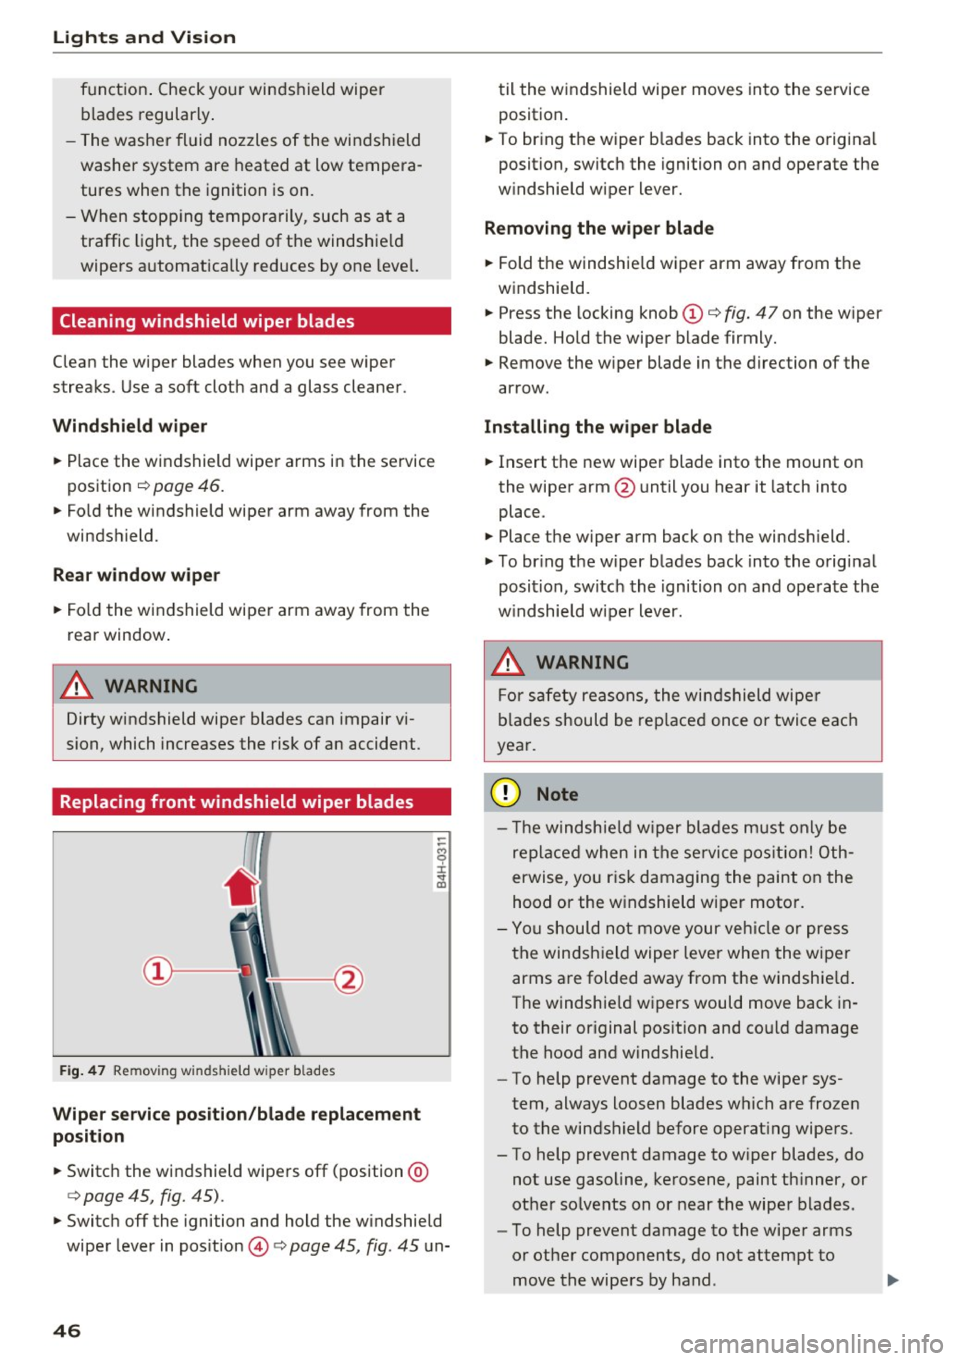
Fig. 47 Remov ing w inds hield w iper b lades
Wiper service position/blade replacement
position
~ Switc h the windshield wipers off (position @
¢ page 45, fig. 45).
-
~ Switch off the ignition and hold the w indshield
wiper lever in pos ition @¢
page 45, fig. 45 un-
46
til the windshield wiper moves into the service
position .
~ To bring the wiper b lades back into the origina l
position, switch the ignition on and operate the
w indshield wiper lever.
Removing the wiper blade
~ Fold the windshie ld wiper arm away from the
windshield.
~ Press the locking knob(!)¢ fig. 47 on the wiper
blade. Hold the wiper blade firmly.
~ Remove the wiper blade in the direction of the
arrow.
Installing the wipe r blade
~ Insert the new wiper blade into the mount on
the wiper arm @until you hear it latch into
place .
~ Place the wiper arm back on the windsh ield.
~ To bring the wiper blades back into the original
position, switch the ignition on and operate the
w indshield w iper lever.
.&_ WARNING
-
For safety reasons, the windshield wipe r
blades should be replaced once or twice each
year.
(UJ Note
- Th e windshie ld wiper blades must only be
replaced when in the service position! Oth
erwise, you ris k damaging the paint on the
hood or the windshield wiper moto r.
- You should not move your vehicle or press
the windsh ield wiper lever when the wiper
arms are folded away from the windshie ld.
The windshie ld wipers would move back in
to their original position and could damage
the hood and windshie ld.
- To help prevent damage to the wiper sys
tem, always loosen blades which are frozen
to the windshield before operating wipers.
- To help prevent damage to wiper blades, do
not use gasoline, kerosene, paint thinner, or
other so lvents on or near the wiper blades.
- To help prevent damage to the wiper arms
or other components, do not attempt to
move the wipers by hand .
Page 49 of 252
.... N
c:i ::J CX)
.... I.Cl U"I
N I.Cl ......
@ Tips
-Commercial hot waxes applied by automatic
car washes affect the how easi ly the glass
surface can be cleaned.
- You can also use the service position, for ex
ample, if you want to protect the windshield
from icing by using a cover.
- You cannot activate the service position
when the front lid is open.
Replacing rear windshield wiper blade
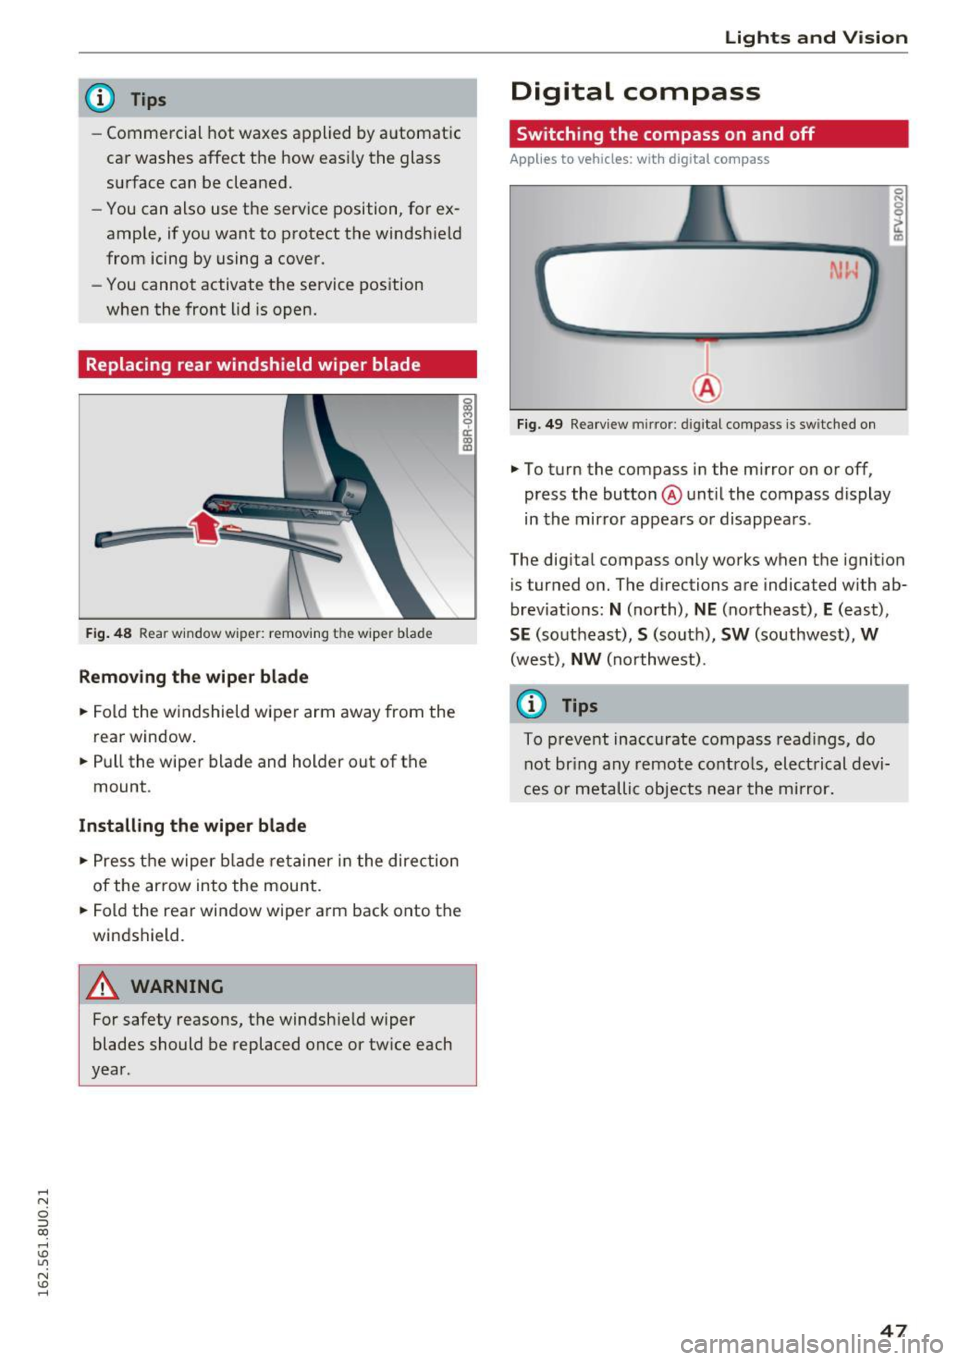
F ig . 48 Rear window wiper: remov ing the wiper blade
Removing the wiper blade
.. Fold the w indshield wiper arm away from the
rea r window .
.. Pull the wiper blade and holder out of the
mount .
Installing the wiper blade
.. Press the wiper blade retainer in the direction
of the arrow into the mount .
.. Fold the rear window wiper arm back onto the
windshield.
A WARNING
~ 9 a::
"' a,
-
For safety reasons, the windshield wiper
blades should be replaced once or tw ice each
year .
Lights and V ision
Digital compass
Switching the compass on and off
Applies to veh icles: w it h dig ita l compass
Fig . 49 Rearview mirror: digi tal compass is sw itched on
.. To turn the compass in the mirror on or off,
press the button @until the compass display
in the mirror appears or disappears .
The digital compass on ly works when the ignition
is tur ned on. The directions are indicated with ab
brev iat ions:
N (north), NE (northeast), E (east),
SE (southeast), S (so uth), SW (southwest), W
(west), NW (northwest).
(0 Tips
To prevent inaccurate compass readings, do
not br ing any remote controls, electrical devi
ces or metallic objects near the mirror.
47
Page 50 of 252
Lights and Vision
Adjusting the magnetic zone
Applies to vehicles: with digital compass
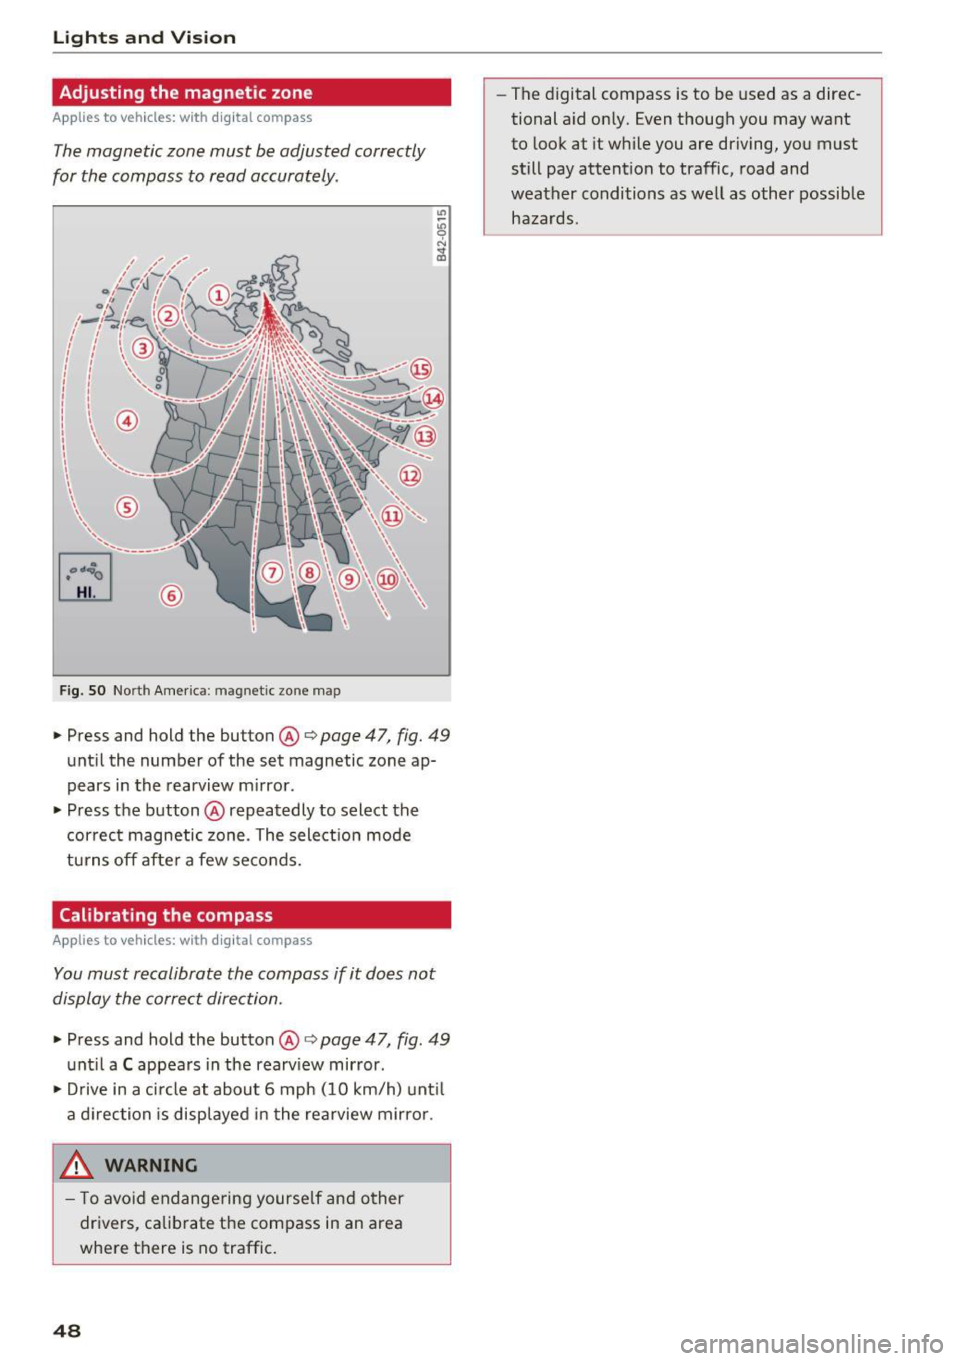
The magnetic zone must be adjusted correctly
for the compass to read accurately .
~
LIU ®
Fig . SO No rt h Amer ica : ma gnetic zo ne m ap
.. Press and hold the button @ q page 47, fig. 49
until the number of the set magnetic zone ap
pears in the rearview m irror .
.. Press the button @ repeatedly to select the
cor rec t magnetic zone . The select ion mode
turns off afte r a few seco nds.
Calibrating the compass
Applies to vehicles: with digital compass
You must recalibrate the compass if it does not
display the correct direction .
.. Press and hold the button @ q page 47, fig. 49
unt il a C appea rs in the rearv iew mirror .
.. Drive in a c ircle at about 6 mph ( 10 km/h) unt il
a d irection is displ ayed in the rea rview mirro r.
,8. WARNING
- T o avo id end ange ring yourse lf an d other
dr ivers, ca librate t he compass in an area
whe re there is no traffic.
48
- The digital compass is to be used as a direc
tional a id on ly. Even though you may want
to look at it while you are driving, you must
still pay attent ion to traffic, road and
weather conditions as well
as other possible
hazards .