driver seat adjustment AUDI Q3 2017 Owner´s Manual
[x] Cancel search | Manufacturer: AUDI, Model Year: 2017, Model line: Q3, Model: AUDI Q3 2017Pages: 236, PDF Size: 58.93 MB
Page 47 of 236
a:,
a:,
...... N r--. N .-< 0 0 ::, a:,
-Exercise caution when adjusting the seat
height. Unsupervised or careless seat ad
justment can pinch fingers or hands causing
injuries.
- The front seat backrests must not be re
clined too far back when driving, because
this impairs the effectiveness of the safety
belts and airbag system, which increases
the risk of injury.
- To minimize the risk of injury during sudden
braking or a collision, the driver and the
front passenger must not drive or r ide with
the backrest in the reclined position. The
safety belts and airbag system can only pro
vide the greatest protection possible when
the backrests are in the upright position and
the safety belts are worn correctly. The more a backrest is reclined, the greater the
risk of injury due to an incorrect seating po
sition and safety belt position .
Front center armrest
Applie s to vehicles with a front center armrest
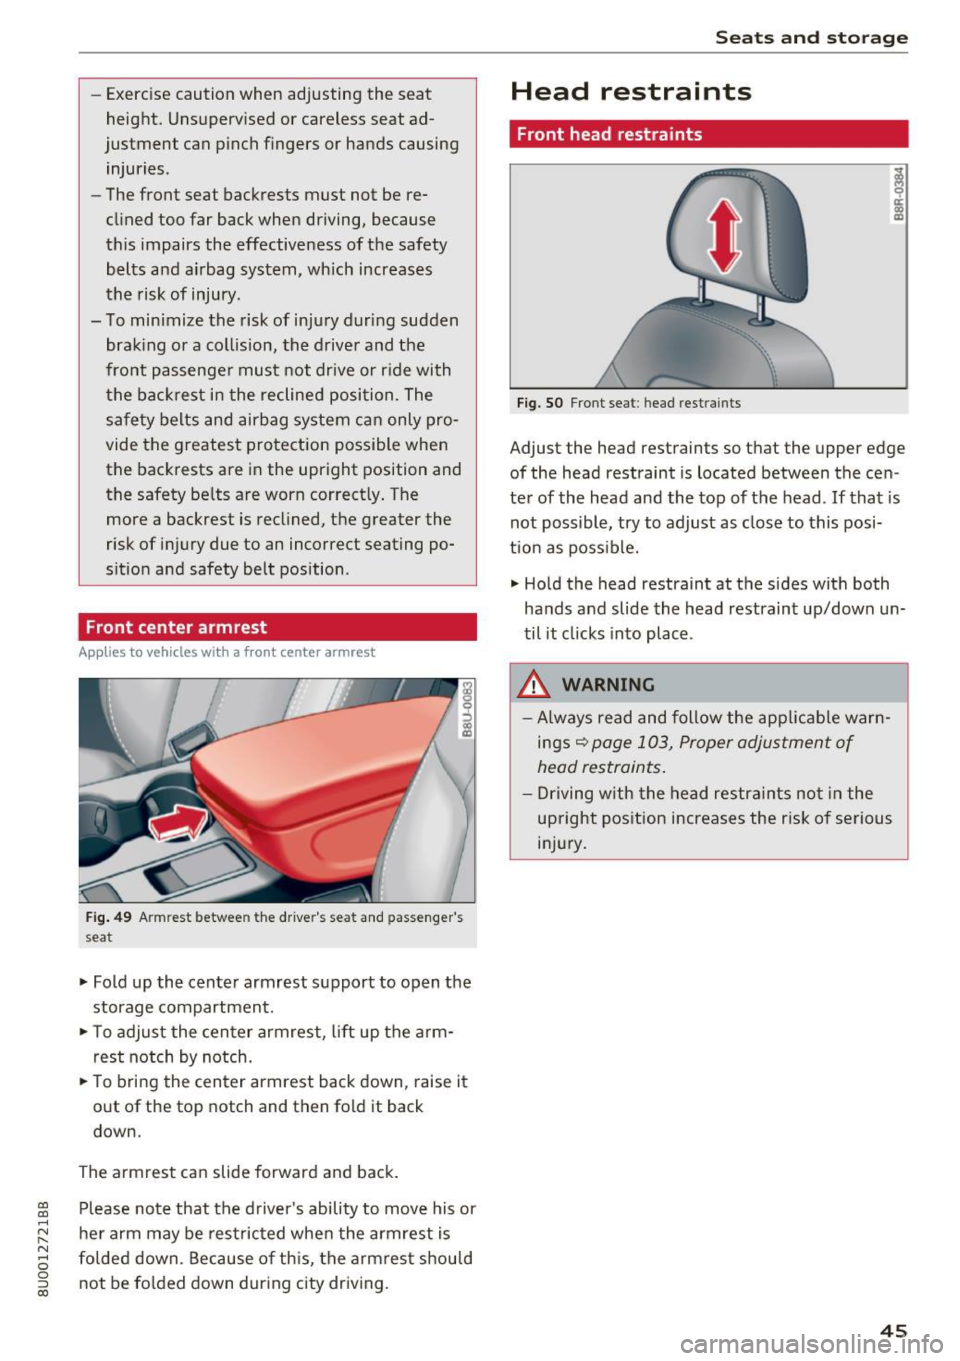
Fig. 49 Armrest between the driver's seat and passenger's
seat
.. Fold up the center armrest support to open the
storage compartment.
.. To adjust the center armrest, lift up the arm
rest notch by notch .
.. To bring the center armrest back down, raise it
out of the top notch and then fold it back
down.
The armrest can slide forward and back. Please note that the driver 's ability to move his or
her arm may be restricted when the armrest is
folded down. Because of this, the armrest should
not be fo lded down during city driving.
Seats and storage
Head restraints
Front head restraints
Fig. SO Front seat: head restraints
Adjust the head restraints so th at the upper edge
of the head restraint is located between the cen
ter of the head and the top of the head. If that is
not possible, try to adjust as close to this posi
tion as poss ible.
.,. Hold the head restraint at the sides with both
hands and slide the head restraint up/down un
til it clic ks into place .
_&. WARNING
-Always read and follow the applicable warn
ings
r:¢, page 103, Proper adjustment of
head restraints .
- Driving with the head restra ints not in the
upright position increases the risk of serious
injury.
45
Page 48 of 236
Sea ts and stor age
Rear head restraints
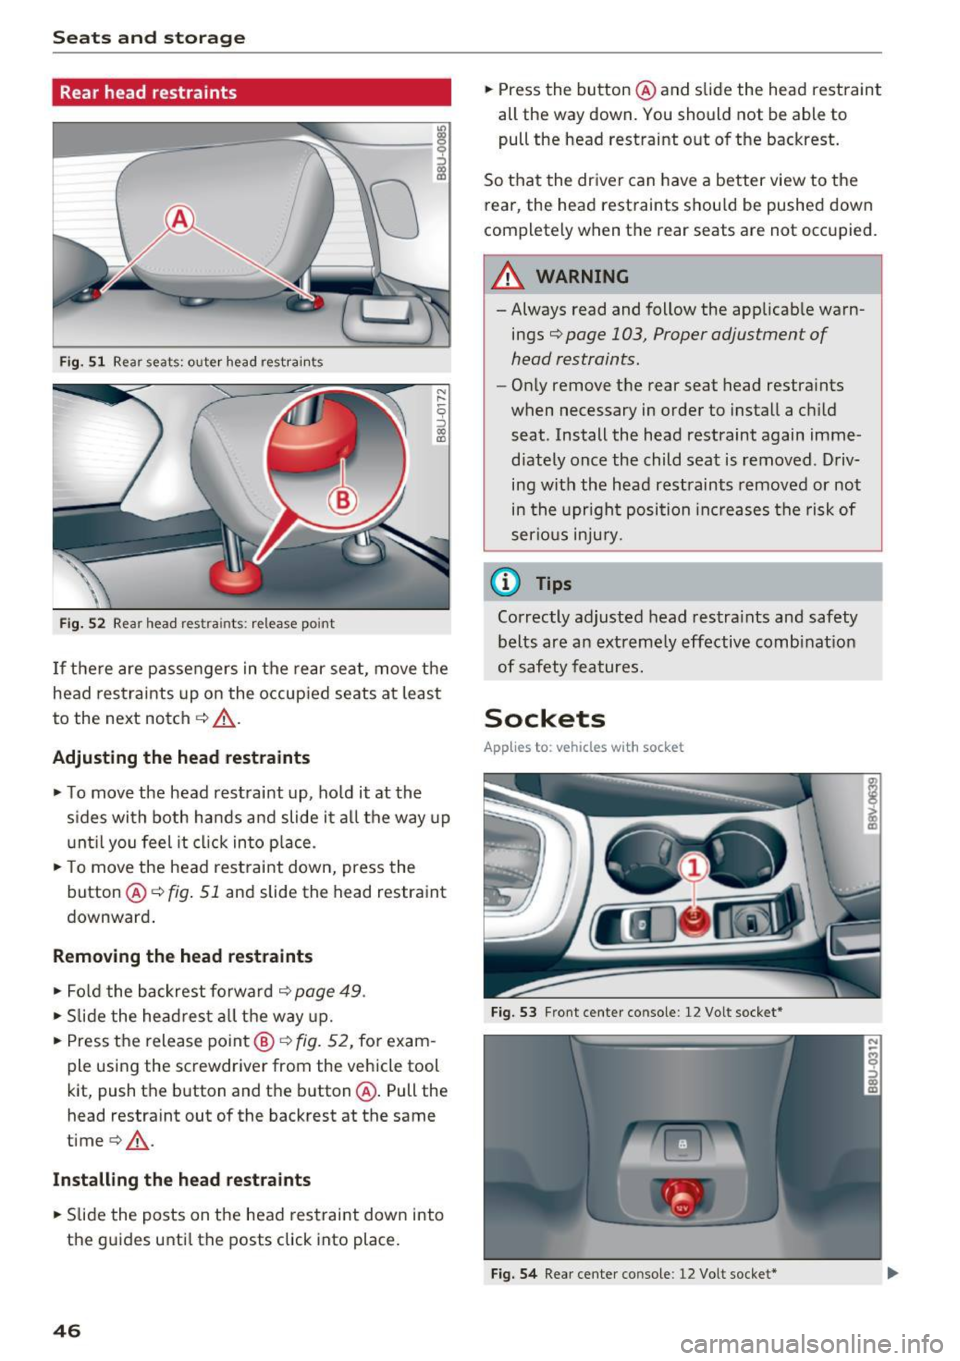
Fig . 51 Rear seats : oute r head restra ints
Fig . 52 Rear head restra ints: release po int
N r-
5 :)
"'
head restrai nts up on the occup ied seats at least
to the next notch
c::> ,&. .
Adjusting the head restraints
• To move the head rest raint up, ho ld it at the
s ides with both hands and slide it al l the way up
u nt il you feel it cl ick in to p lace.
• To move the head restraint down, press the
button @.:::>
fig. 51 and slide the head restraint
downward .
Removing th e head restraints
• Fo ld the backrest forward c::> page 49 .
• Slide the head res t all the way up.
• Press the release point@<=>
fig. 52, for exam
ple using the screwdriver from the vehicle tool
kit, push the button and the button @. Pull the
head restraint out of the backrest at the same
time ¢,&. .
Install ing the h ead re st ra int s
• Slide the posts on the head restraint down into
the guides unti l the posts click into place.
46
• Press the button @ and slide the head restraint
all the way down. You should not be able to
pull the head restraint out of the backrest.
So that the driver can have a better view to the rear, the head restraints shou ld be pushed down
completely when the rear seats are not occupied.
A WARNING
- Always read and follow the applicab le warn
ings¢
page 103, Proper adjustment of
head restraints.
- Only remove the rear seat head restra ints
when necessary in order to install a ch ild
seat . Install the head restraint again imme
diately once the child seat is removed . Driv
ing with the head restraints removed or not
in the upright position inc reases the risk of
ser io us inju ry.
@ Tips
Correctly adjusted head restra ints and safety
belts are an extreme ly effective combinat ion
of safety features.
Sockets
Appl ies to : vehicles with socket
Fig. 53 Front center co nsole : 12 Vo lt socket *
Fig. 54 Rear center console : 12 Volt socket*
Page 62 of 236
Driving
correspond to you r actua l consumption on the
road, which will vary depending upon vehicle
load and speed, road and weather conditions,
trip length, etc.
Steering
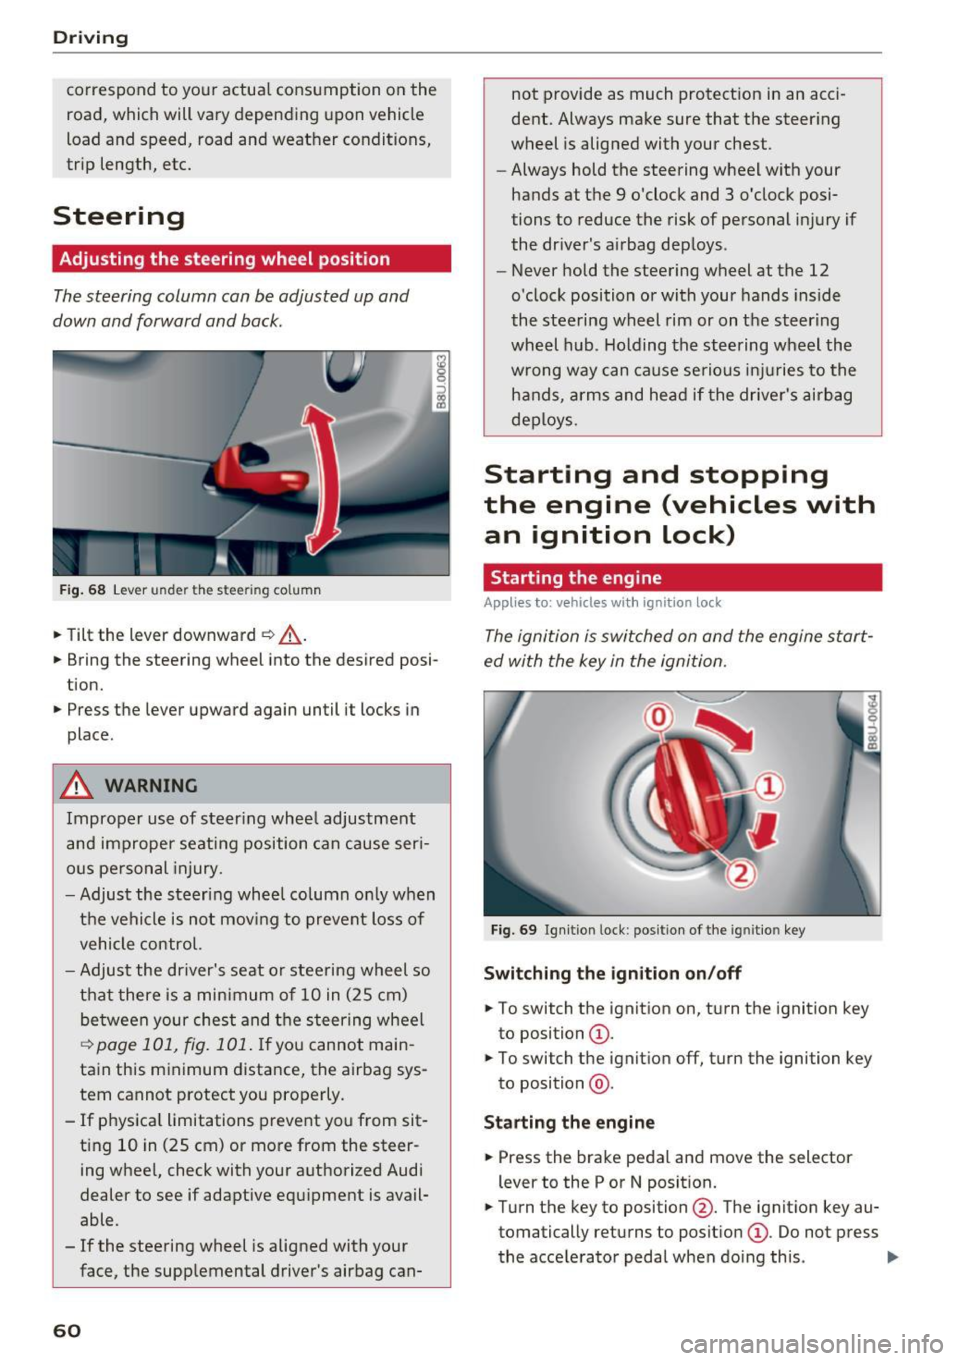
Adjusting the steering wheel position
The steering column can be adjusted up and
down and forward and back.
F ig . 68 Lever u nde r the stee ring column
.,. Tilt the lever downward ¢ _A.
.,. Bring the steering wheel into the desired posi
tion .
.,. Press the lever upward again until it locks in
place .
.&_ WARNING
Improper use of steer ing whee l adjustment
and improper seating position can cause ser i
ous pe rsonal injury.
- Adjust the steering wheel column on ly when
the vehicle is not mov ing to prevent loss of
vehicle control.
- Adjust the driver's seat o r steering wheel so
that there is a minimum of 10 in (25 cm)
be tween your chest and t he s teering wheel
~ page 101, fig. 101 . If yo u cannot main
tain this minimum distance, the airbag sys
tem cannot protect you properly.
- If physica l limitations prevent you from sit
t ing 10 in (25 cm)
or more from the steer
ing wheel, check with your authorized Audi
dealer to see if adaptive equipment is avail
able .
- If the steering wheel is aligned with your
face, the supplemental driver's airbag can-
60
not provide as much protect ion in an acci
dent. Always make sure that the steer ing
wheel is aligned with your chest.
- Always hold the steering wheel with your
hands at the 9 o'clock and 3 o'clock posi
tions to reduce the risk of personal in jury if
the driver's airbag deploys .
- Never hold the steering wheel at the 12
o'clock position or with your hands inside
the steering wheel rim or on t he steering
wheel hub . Holding the steering wheel the
wrong way can cause serious in juries to the
h an ds, arm s and head if the drive r's airbag
deploys.
Starting and stopping
the engine (vehicles with an ignition lock)
Starting the engine
Applies to: vehicles wit h ignition lock
The ignition is switched on and the engine start
ed with the key in the ignition.
Fig. 69 Ign it ion lock : pos ition of the ig ni tio n key
Switching the ignition on/off
.,. To switch the ignition on, turn the ignition key
to position
(D .
.,. To switch the ignit ion off, turn the ignition key
to position @.
Starting the engine
.,. Press the brake pedal and move the selector
lever to the P or N posit ion.
.,. Turn the key to position @. The ignit ion key au
tomatically returns to posit ion
(D . Do not press
the accelerator peda l when doing this . ..,.
Page 102 of 236
Driving sa fe ty
Driving safety
General notes
Safe driving habits
Please remember -safety first!
This chapter contains important information,
tips, instruct ions and warn ings that you need to
read and observe for your own safety, the safety
of your passengers and others. We have summar ized here what you need to know about safety
be lts, a irbags, child restra ints as well as child
safety. Your safety is for us
priority number 1 . Al
ways observe t he i nfo rmation and wa rn ings in
this section - for your own safety as well as tha t
of yo ur passengers.
The information i n this section applies to all
model ve rsions of your vehicle . Some of the fea
tures descr ibed in t his sec tions may be s tanda rd
eq uipment on some models, or may be optional
equipment on others . If yo u are not sure, ask
your author ized Audi dealer.
A WARNING
- Always make sure that you follow the in
structions and heed the WARNINGS in th is
Manual.
It is in your interest and in the in
te rest of your passengers.
-
- Always keep t he comp lete Owner's Litera
ture in your A udi when you lend or se ll your
vehicle so that this important information
will always be available to the d river and
passenge rs.
- Always keep the Owner 's literature handy so
that you can find it easily if you have ques
t ions.
Safety equipment
The safety features are part of the occupant re
straint system and work together to help reduce
the risk of injury in a wide variety of occident si t
uations.
Your safety and the safety of yo ur passenge rs
should not be left to chan ce. Advan ces in tech
nology have made a var iety of features av ail ab le
to help reduce t he risk of injury in an accident .
100
The following is a list of just a few of the sa fety
features in your Audi :
- sophis tic ated safety be lts fo r dr ive r and all pas-
senge r seat ing pos itions,
- belt fo rce limi ters for the front seats,
- be lt pretensione rs fo r the seats,
- belt height adjustment for the front seats,
- head restraints for each seating position,
- front airbags,
- side airbags in the front seats,
- side curtain airbags with eject io n m it igat io n
features,
- special LA TC H anchorages for ch ild rest rai nts,
- adj ustab le steer ing col umn.
These ind iv idual safety features, can work to
gether as a system to he lp protect you and your
passengers in a wide range of acc idents. These
features cannot wo rk as a system if they are not
a lways cor rec tly ad justed and cor rect ly used.
Safety i s everybody' s responsibil ity!
Important things to do before driving
Safety is everybody 's job! Vehicle and occupant
safety always depends on the informed and care
ful driver .
For your safety and the safety of your passen
gers,
before driving always:
.,. Make sure that a ll lights and signals are operat
ing correctly .
.,. Make sure that the tire pressure is correct .
.,. Make sure that a ll w indows are clean and afford
good vis ibility to the outs ide .
.,. Secure all luggage and othe r items ca refully
~ page 105, ~page 47 .
.,. Ma ke sure that noth ing ca n interfere wi th the
pedals.
.,. Adjust front seat, head restraint and mirrors
correctly for yo ur height.
.,. Instruct passenge rs to adjust the head re
straints according to their he ight.
.,. Make sure to use the rig ht child restraint cor
rectly to protect children
r=> page 13 7, Child
safety . ..,.
Page 115 of 236
a:,
a:,
...... N r--. N
"" 0 0 ::, a:,
Automatic safety belt r etractors
Every safety be lt is equ ipped wi th an automatic
be lt retractor on the shoulder belt. Th is feature
l ocks the belt when the belt is p ulled out fast,
during hard braking and in an accident. The belt
may also lock when you drive up or down a steep
h ill or through a sharp curve. During normal driv
ing the belt lets you move freely .
Safety be lt pret en sioner s
The safety belts are equipped with a belt preten
sioner that helps to tighten the safety belt and
remove slack when the pretensioner is activated.
The funct ion of the pretensioner is monitored by
a warning light
r::> page 14 .
Convertibl e loc king retract or
Every safety belt except the one on the driver
seat is equipped with a convertible locking retrac
tor that
must be used when the safety belt is
used to attach a child safety seat. Be sure to read
the important information about this feature
<::> page 147 .
& WARNING
Improperly posit ioned safety be lts ca n cause
ser ious injury in an accide nt
¢ page 113,
Safe ty belt position.
- Safety belts offer optimum protection only
when the seatback is upr ight and belts are
prope rly pos itioned on the body.
- Always ma ke sure tha t the rear sea t ba ck
rest to wh ic h t he cente r re ar safety be lt is
attached is secure ly latched whenever the
rear center safety belt is being used. If the
backrest is not securely latched, the passen
ger will move forward with the backrest dur
ing sudden braking, in a sudden maneuver
and especially in a cras h.
- Never attach the safety belt to the buckle
for another seat. Attaching the belt to the
wrong buckle w ill reduce safety belt effec
t iveness and can cause serious personal in
jury.
- A passenger who is not p roperly restrained
can be seriously in ju red by the safety be lt it
self when it moves from the stronger par ts
Safet y bel ts
of the body into critical areas like the abdo
men .
- Always lock the convertible locking retractor
when yo u are securing a child safety seat in
the vehicle
r::> page 149.
Safety belt position
Correct belt position is the key to getting maxi
mum protection from safety belts.
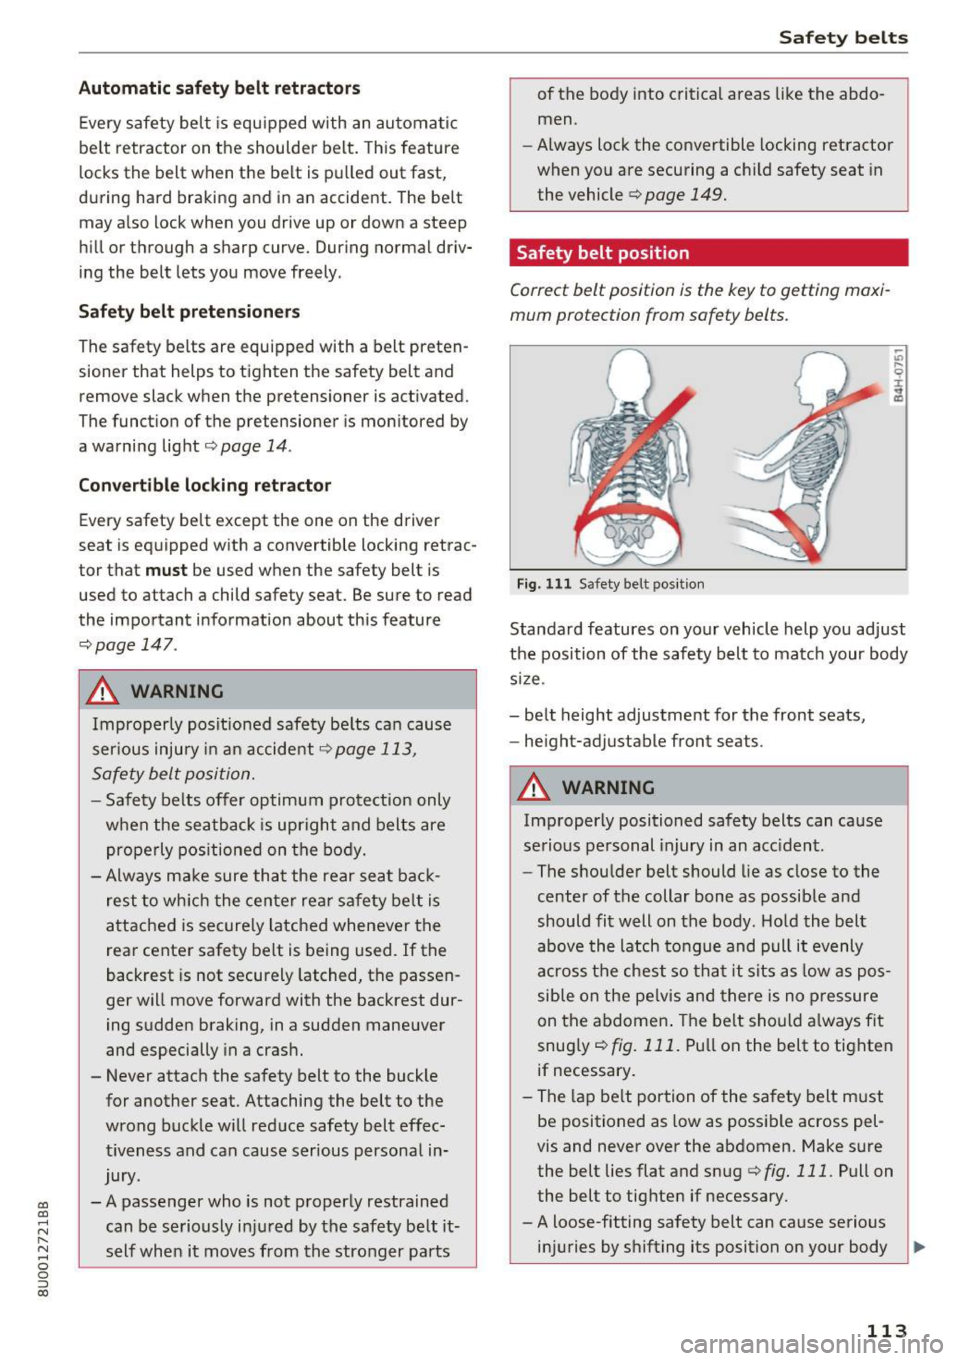
Fig. 111 Safety belt pos it ion
Standard features on your vehicle help you adjust
the position of the safety belt to ma tch your body
s iz e.
- be lt height adjustment for the front seats,
- he ight-adjustable front seats .
& WARNING
Improperly positioned safety belts can ca use
se rious personal injury in an acc ident.
- The shou lder belt should lie as close to the
center of the collar bone as possib le and
should fit well on the body . Ho ld the belt
above the latch to ngue and pull it evenly
across the chest so th at it sits as low as pos
sible on the pe lvis and there is no p ressure
on the abdomen . The belt should a lway s fit
snug ly
r::> fig. 111. Pu ll on the belt to tighten
if necessary .
- The lap be lt portion of the sa fety belt must
be positioned as low as possible across pel
vis and never over the abdomen. Make sure
the belt lies flat and snug
r::> fig. 111 . Pull on
the belt to tighte n if necessary.
- A loose-fitting safety belt can cause serious
in ju ries by shifting its position on your body
~
113
Page 117 of 236
00
00
......
"' ,-...
"' ...... 0 0 :::,
00
The shou lder belt should lie as close to the center
of the collar bone as possib le and should fit well
on the bod y ¢
A in Safety belt position on
page 113.
.. Push
the loop- around fittings up ¢ fig. 114 @,
or
.. squeeze to gether the@ button, and push the
loop-around fittings
do wn@ .
.. Pull the belt to make sure that the upper at
tachment is p roperly engaged .
A WARNING
Always read and heed all WARNINGS and oth
er important informat ion
¢ page 111.
With the front seats, the height adjustment
of the seat can also be used to adjust the po
sition of the safety belts .
Improperly worn safety belts
Incorrectly positioned safety belts can cause se
vere injuries.
Wearing safety belts improperly can cause seri
ous injury or death . Safety belts can only work
when they a re correctly pos itioned on the body .
Improper seating positions reduce the effect ive
n ess of safety be lts and will even inc rease the
ris k of injury and death by mov ing the safety bel t
to cr it ica l areas of the body. Imp roper seating
positions also increase the risk of serious inj ury
and death when an airbag deploys and strikes an
occ upant who is not in the co rrect seat ing posi
tion . A driver is respons ible for the safety of all
vehicle occupants and espec ia lly for children.
Therefore:
.. Never permit anyone to ass ume an incorrect
s itting position in the veh icle wh ile traveling
¢ &, .
A WARNING
Improperly worn safety belts increase the risk
of serious personal injury a nd death wheneve r
a vehicle is be ing used.
S afet y be lts
- Always make sure that all veh icle occupants
are cor rectly restrained and stay in a correct
seating position whenever the vehicle is be ing used .
- Always read and heed all WARNINGS and
other important informat ion¢
page 111.
Belt tensioners
How safety belt pretensioners work
In front, side and rear-end collisions above a
particular severity and in a rollover, safety belts
are tensioned automatically.
The safety belts are equ ipped w it h safety belt
pretens ione rs . The system is activated by sensors
i n front, s ide and re a r-end collisions of great se
ver ity and in a ro llover. This tightens the bel t and
t a kes up belt slack¢.&.
in Service and disposal of
safety belt pretensioner on page 116.
Taking up
the slack he lps to reduce forward occupant
movement during a collision.
(D Note
Neve r let the belt remain over a rea r seatback
that has been folded forwar d.
{D Tips
The safety belt pretensioner can only be ac ti
vated once.
- T he safe ty be lt pretensione rs do no t de ploy
in minor fron tal, side a nd rear -end colli
sions .
- W hen the safe ty belt pretensioners are acti
vated, a fine dust is released . This is normal
and is not caused by a fire in the ve hicle .
- T he relevant safety requirements mus t be
observed when the vehicle or components
of the system are scrapped. An autho rize d
Audi dealer or qua lified workshop is familia r
w ith these reg ulations and will be pleased
to pass on the information to yo u.
- Be sure to observe all safety, environmenta l
and other regulat ions if the vehicle or indi
vidua l parts of the system, particularly the
safety belt or airbag, are to be disposed. We
recommend you have yo ur autho rized Aud i
dea ler perform t his service fo r you.
115
Page 126 of 236
Airbag syste m
adjustment range, as far away from the air
bag as possib le, before insta lling the
forward-facing ch ild restraint. The backrest
must be adjusted to an upright posit ion.
- Make sure that the
PAS SEN GER AIR BA G
OFF
light comes on and stays on all the time
whenever the ignition is switched on.
Advanced Airbag System components
The front passenger seat in your vehicle has a lot
of very important parts of the Advanced Airbag
System in it. These parts include the we ight
sensing mat, sensors, w iring, brac kets, and
mo re. The function of the system in the front
passenger seat is checked by the elec tronic con
trol unit when the ignition is on. The contro l unit
monitors the Advanced Airbag System and turns
the airbag indicator light on when a malfunct ion
in the system components is detected. The func
tion of the airbag indicator light is described in
greater detail below. Because the front passen
ge r seat contains important parts of the Ad
vanced A irbag System, you must take care to p re
vent i t from being damaged. Damage to the seat
may prevent the Advanced Airbag for the fron t
passenger seat from doing its job in a c rash.
The front Advanced Airbag System consists
of th e follow ing :
-Crash sensors in the front of the vehicle that
measure vehicle acceleration/deceleration to
provide information to the Advanced Airbag
System about the severity of the crash.
- An e lectronic control unit, with integrated
crash sensors for front and side impacts. The
contro l unit "decides" whether to fire the front
airbags based on the information received from
the crash sensors . The control unit also "de
c ides" whether the safety belt pretens ioners
sho uld be activated .
- An Advanced Airbag with gas generator and
contro l valve fo r the driver ins ide the steer ing
whee l hub.
-An Advanced Airbag with gas generator and contro l valve inside the instrument pane l for
the front passenger.
124
- A weight -sensing mat under the upholstery
padding of the front passenger seat cushion
that measures the total weight on the seat. The
information reg istered is sent cont inuous ly to
the electronic control unit to regulate deploy
ment of the front Advanced Airbag on the pas
senger s ide .
- An airbag monitoring system and ind icator
light in the instrument cluster
c::;,page 127.
-A sensor in each front seat registers the dis
tance between the respective seat and the
steer ing wheel or instrument panel. The infor
mat ion registered is sent cont inuously to the
elect ronic contro l unit to regu late dep loyment
of the fron t Advanced Airbags.
- The
PASSENGER AIR BAG OFF light comes on
and stays on in the cente r of the ins trument
pa nel
c::;, page 128, fig. 118 and te lls yo u when
the front Advanced Airbag on the passenger
side has been turned
off .
-A sensor below the safety be lt latch for the
front seat passenger to measure the tension on
the safety belt. The tension on the safety belt
and the weight registered by the weight-sens
ing mat help the control unit "decide" whether
the front airbag for the front passenger seat
should be turned off or not
c::;, page 118, Child
restraints on the front seat -some important
things to know.
- A sensor in the safety belt latch for the driver
and for the front seat passenger that senses
whether that safety be lt is latched o r not and
transmits this informa tion to the e lec tronic
cont rol un it.
_&. WARNING
D amage to the front passenger seat can pre
vent the front airbag from working prope rly .
- Improper repair or disassembly of the front
passenger and driver seat will prevent the
Advanced Airbag System from f unctioning
properly.
- Repairs to the front passenger seat must be
performed by qualified and proper ly trained
workshop personnel.
- Never remove the front passenger or driver
seat from the vehicle.
Page 140 of 236
Child safety
A WARNING
Children on the front seat of any car even with
Advanced Airbags can be seriously injured or even killed when an airbag inflates. A child in
a rearward-facing child safety seat installed
on the front passenger seat will be seriously
injured and can be killed if the front airbag in
flates .
- The inflating airbag will hit the child safety
seat or infant carrier with great force and
will smash the child safety seat and child
against the backrest, center armrest, or
door .
- Always install rear-facing child safety seats
on the rear seat.
-If you must install a rearward facing child
safety seat on the front passenger seat in
exceptional circumstances and the
PASSEN
GER AIR BAG OFF
light does not come on
and stay on, immediately install the rear
facing child safety seat in a rear seating po
sition and have the airbag system inspected
immediately by your Audi dealer.
A WARNING
If, in exceptional circumstances, you must in
stall a forward-facing child restraint on the
front passenger's seat:
- Always make sure the forward-facing seat
has been designed and certified by its man
ufacturer for use on a front seat with a pas
senger front and side airbag.
- Always follow the manufacturer's instruc
tions provided with the child safety seat or
carrier .
- Always move the front passenger seat to
the highest position in the up and down ad
justment range and move it back to the
rearmost position in the seat's fore and aft
adjustment range, as far away from the air
bag as possible, before installing the for
ward-facing child restraint.
- Always make sure that the safety belt upper
anchorage is behind the child restraint and
not next to or in front of the child restraint
so that the safety belt will be properly posi
tioned.
138
- Always make sure that the PASSENGER AIR
BAG OFF
light comes on and stays on all the
time whenever the ignition is switched on.
(D Tips
Always replace child restraints that were in
stalled in a vehicle during a crash. Damage to
a child restraint that is not visible could cause
it to fail in another collision situation.
Advanced front airbag system and children
Your vehicle is equipped with a front "Advanced
Airbag System" in compliance with United States
Federal Motor Vehicle Safety Standard (FMVSS)
208, as well as Canada Motor Vehicle Safety
Standard (CMVSS) 208 as applicable at the time
your vehicle was manufactured.
The Advanced Airbag system in your vehicle has
been certified to meet the "low-risk" require
ments for 3- and 6-year old children on the pas
senger side and small adults on the driver side.
The low risk deployment criteria are intended to
reduce the risk of injury through interaction with
the airbag that can occur, for example, by being
too close to the steering wheel and instrument
panel when the airbag inflates. In addition, the
system has been certified to comply with the
"suppression" requirements of the Safety Stand
ard, to turn off the front airbag for infants up to
12 months who are restrained on the front pas
senger seat in child restraints that are listed in
the Standard.
Even though your vehicle is equipped with an Ad
vanced Airbag system, all children, especially
those 12 years and younger, should always ride
in the back seat properly restrained for their age
and size. The airbag on the passenger side makes
the front seat a potentially dangerous place for a child to ride. The front seat is not the safest place
for a child in a forward-facing child safety seat. It
can be a very dangerous place for an infant or a
larger child in a rearward-facing seat.
Page 209 of 236
00
00
......
"' ,....
"' ...... 0 0 :::,
00
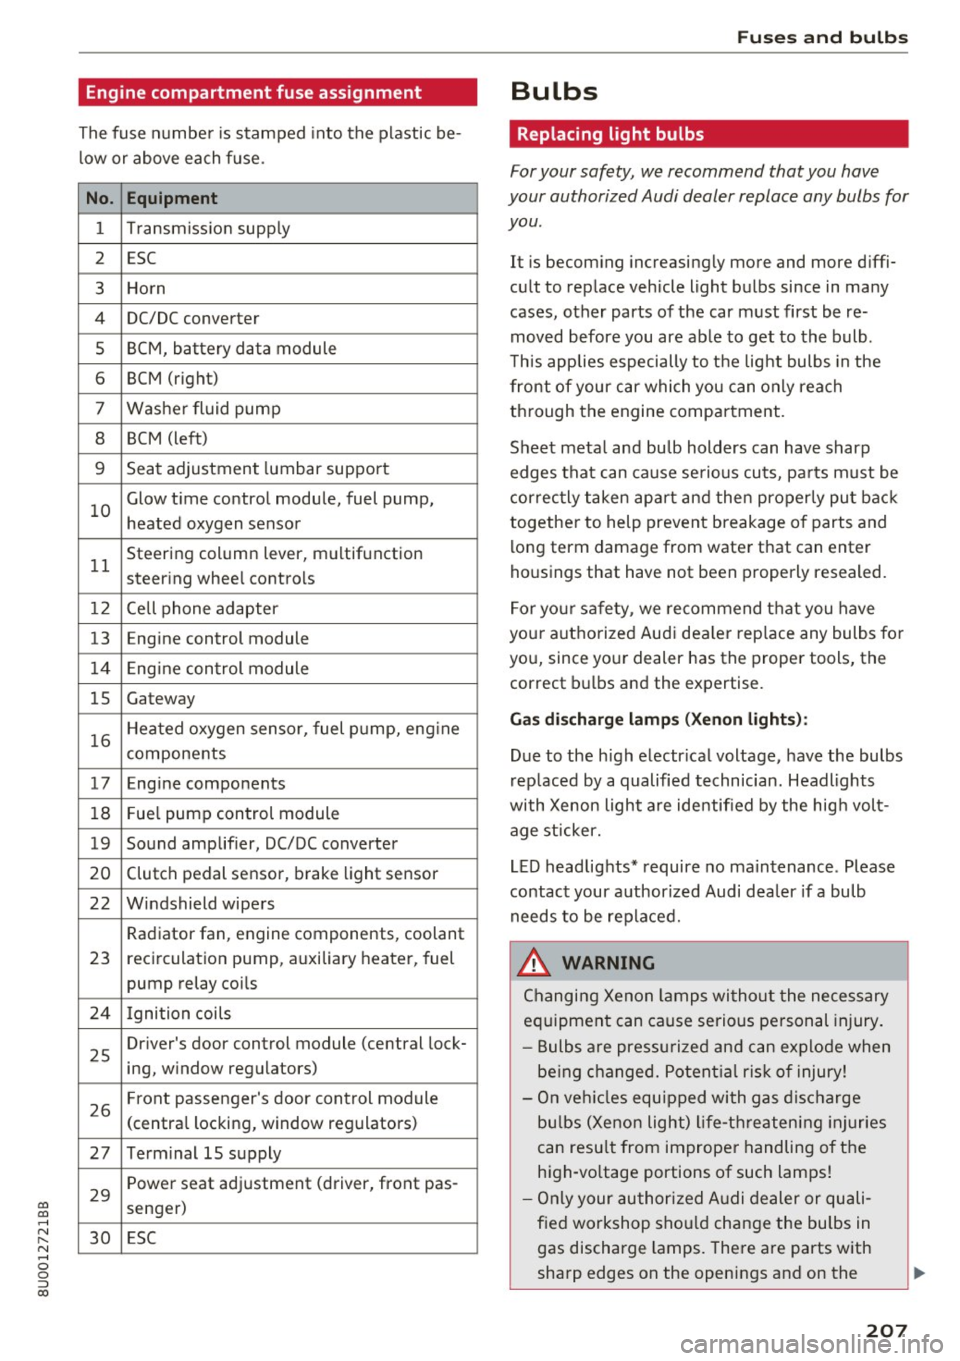
Engine compartment fuse assignment
The fuse number is stamped into the plastic be
low or above each fuse.
No. Equipment
1 Transmiss ion supply
2 ESC
3 Horn
4 DC/DC
converter
5 BCM, battery data module
6 BCM (right)
7 Washer fluid pump
8 BCM (left)
9 Seat adjustment lumbar support
10 Glow time
control module, fuel pump,
heated oxygen sensor
11 Steering
column lever, multifunction
steer ing whee l controls
1 2 Cell phone adapter
13 En
gine control module
14 Engine control module
15 Gateway
16 Heated oxygen sensor, fuel pump, eng
ine
components
17 Engine components
18 Fue
l pump control module
19 Sound amplifier, DC/DC converter
20 Clutch pedal sensor, brake light sensor
22 Windshield wipers Radiator fan, engine components, coolant
23 recirculation pump, auxiliary
heater, fuel
pump relay coils
24 Ignition coils
25 Driver's door
control module (central lock-
ing, window regulators)
26 Front passenger's door control module
(centra
l locking, window regulators)
27 Term inal 15 supply
29 Power seat adjustment (driver,
front pas-
senger)
30 ESC
Fu ses an d bulb s
Bulbs
Replacing light bulbs
For your safety, we recommend that you have
your authorized Audi dealer replace any bulbs for
you .
It is becoming increasingly more and more diffi
cult to replace vehicle light bulbs since in many
cases, other parts of the car must first be re
moved before you are able to get to the bulb .
T his applies especially to the light bulbs in the
front of your car which you can only reach
through the engine compartment .
Sheet metal and bu lb holders can have sharp
edges that can cause serious cuts, pa rts must be
correctly taken apart and then properly put back
together to help prevent breakage o f parts and
long term damage from water that can enter
housings that have not been properly resealed.
For your safety, we recommend that you have
your authorized Aud i dea ler rep lace any bulbs fo r
you, since your dealer has the proper tools, the
correct bulbs and the expertise.
Gas di schar ge la mps (Xe no n ligh ts):
Due to the high electr ical voltage, have the bulbs
rep laced by a qualified technician. Headlights
with Xenon light are identified by the hig h volt
age st icker.
LED headlights* require no maintenance . Please
contact your authorized Audi dea ler if a bulb
needs to be replaced.
_&. WARNING
Changing Xenon lamps wi thout the necessary
equipment can cause serious personal injury .
- Bulbs are pressu rized and can explode when
be ing changed. Potent ial ris k of injury!
- On veh icles equipped with gas disc harge
bu lbs (Xenon light) life-threatening injuries
can resu lt from improper handling of the
high-vo ltage portions of such lamps!
- Only your authorized A udi dealer or quali
f ied workshop sho uld change the bulbs in
gas discharge lamps. There are parts with
sharp edges on the openings and on the
207
Page 232 of 236
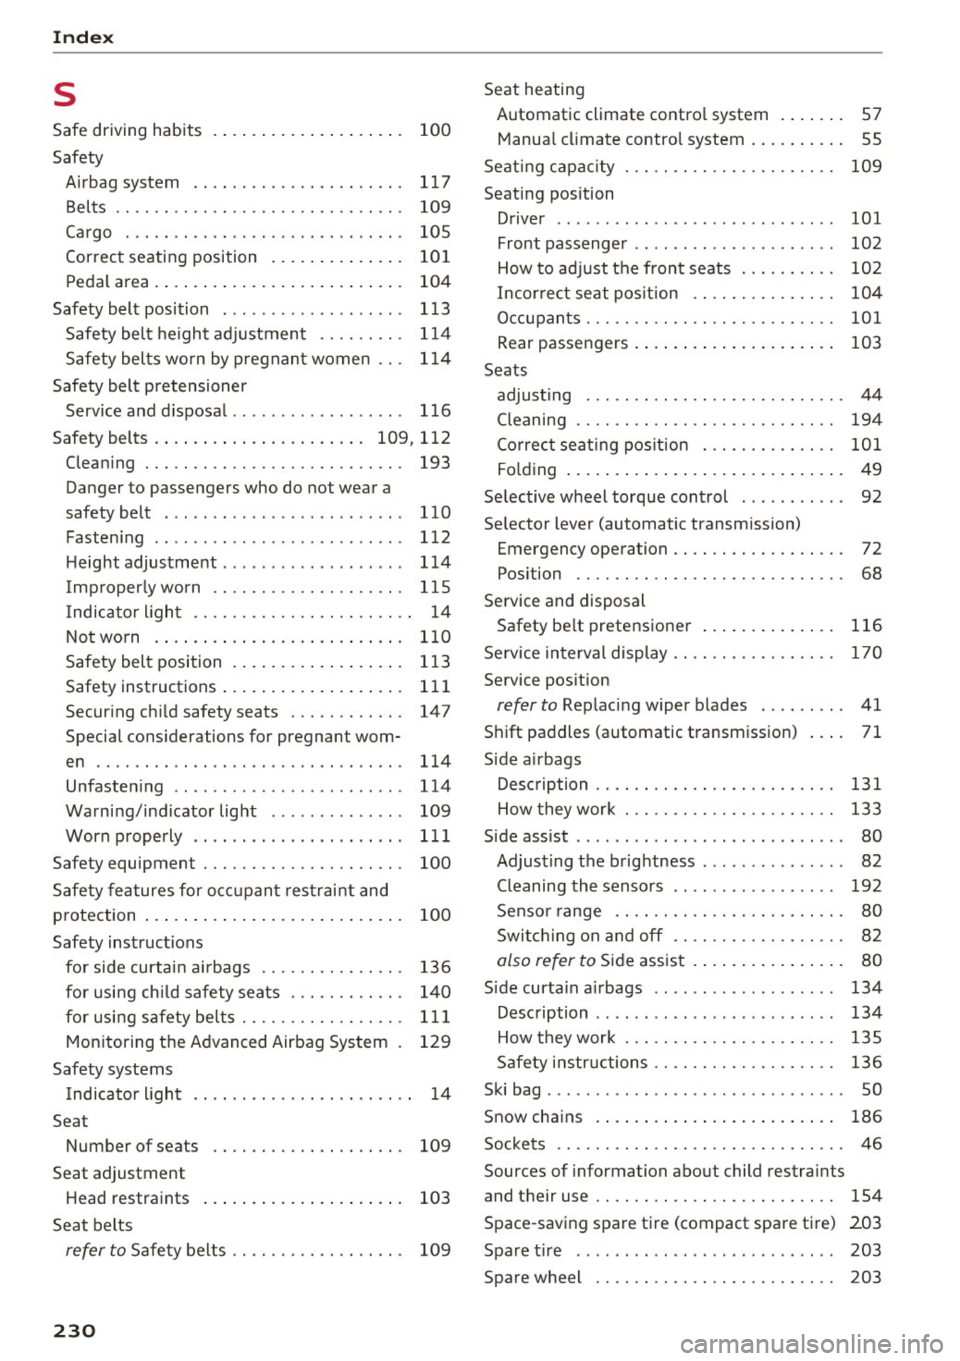
Index
s
Safe driving habits
Safety 100
Airbag system . . . . . . . . . . . . . . . . . . . . . . 117
Belts . . . . . . . . . . . . . . . . . . . . . . . . . . . . . . 109
Cargo . . . . . . . . . . . . . . . . . . . . . . . . . . . . . 105
Correct seating position . . . . . . . . . . . . . . 101
Pedal area . . . . . . . . . . . . . . . . . . . . . . . . . . 104
Safety belt position . . . . . . . . . . . . . . . . . . . 113
Safety belt height adjustment . . . . . . . . . 114
Safety belts worn by pregnant women . . . 114
Safety belt pretensioner Service and disposal ............. .. .. . 116
Safety belts .. .. .. .. .............. 109, 112
Cleaning . . . . . . . . . . . . . . . . . . . . . . . . . . . 193
Danger to passengers who do not wear a
safety belt . . . . . . . . . . . . . . . . . . . . . . . . . 11
O
Fastening . . . . . . . . . . . . . . . . . . . . . . . . . . 112
Height adjustment ............... ... . 114
Improperly worn . . . . . . . . . . . . . . . . . . . . 115
I ndicator l ight . . . . . . . . . . . . . . . . . . . . . . . 14
Not worn .... .. ................ .... 110
Safety belt position . . . . . . . . . . . . . . . . . . 113
Safety instructions . . . . . . . . . . . . . . . . . . . 111
Securing child safety seats . . . . . . . . . . . . 147
Special considerations for pregnant wom-
en . . . . . . . . . . . . . . . . . . . . . . . . . . . . . . . . 114
Unfastening . . . . . . . . . . . . . . . . . . . . . . . . 114
Warning/indicator light . . . . . . . . . . . . . . 109
Worn properly . . . . . . . . . . . . . . . . . . . . . . 111
Safety equipment . . . . . . . . . . . . . . . . . . . . . 100
Safety features for occupant restraint and
protection . . . . . . . . . . . . . . . . . . . . . . . . . . . 100
Safety instructions for side curtain airbags . . . . . . . . . . . . . . . 136
for using child safety seats . . . . . . . . . . . . 140
for using safety belts . . . . . . . . . . . . . . . . . 111
Monitoring the Advanced Airbag System 129
Safety systems Indicator light . . . . . . . . . . . . . . . . . . . . . . . 14
Seat Number of seats
Seat adjustment 109
Head restraints . . . . . . . . . . . . . . . . . . . . . 103
Seat belts
refer to Safety belts . . . . . . . . . . . . . . . . . . 109
230
Seat heating
Automatic climate control system . . . . . . . 57
Manual cl imate control system . . . . . . . . . . 55
Seating capac ity . . . . . . . . . . . . . . . . . . . . . . 109
Seating position Driver . . . . . . . . . . . . . . . . . . . . . . . . . . . . . 101
Front passenger . . . . . . . . . . . . . . . . . . . . . 102
How to adjust the front seats . . . . . . . . . . 102
Incorrect seat position . . . . . . . . . . . . . . . 104
Occupants..... .. .. .. ... .......... .. 101
Rear passengers . . . . . . . . . . . . . . . . . . . . . 103
Seats adjusting . . . . . . . . . . . . . . . . . . . . . . . . . . . 44
Cleaning . . . . . . . . . . . . . . . . . . . . . . . . . . . 194
Correct seating position . . . . . . . . . . . . . . 101
Folding . . . . . . . . . . . . . . . . . . . . . . . . . . . . . 49
Selective wheel torque control . . . . . . . . . . . 92
Selector lever (automatic transmission) Emergency operation . . . . . . . . . . . . . . . . . . 72
Position . . . . . . . . . . . . . . . . . . . . . . . . . . . . 68
Service and disposal Safety belt pretensioner . . . . . . . . . . . . . . 116
Service interval display .. ... .......... .. 170
Service position
refer to Replacing wiper blades . . . . . . . . . 41
Shift paddles (automatic transmission) . . . . 71
Side airbags Description . . . . . . . . . . . . . . . . . . . . . . . . . 131
How they work . . . . . . . . . . . . . . . . . . . . . . 133
Side assist . . . . . . . . . . . . . . . . . . . . . . . . . . . . 80
Adjusting the brightness . . . . . . . . . . . . . . . 82
Cleaning the sensors . . . . . . . . . . . . . . . . . 192
Sensor range . . . . . . . . . . . . . . . . . . . . . . . . 80
Switching on and off . . . . . . . . . . . . . . . . . . 82
also refer to Side assist . . . . . . . . . . . . . . . . 80
Side curtain airbags . . . . . . . . . . . . . . . . . . . 134
Description . . . . . . . . . . . . . . . . . . . . . . . . . 134
How they work . . . . . . . . . . . . . . . . . . . . . . 135
Safety instructions . . . . . . . . . . . . . . . . . . . 136
Ski bag ..... .. .. .. .. .. ........ ..... ... SO
Snow chains . . . . . . . . . . . . . . . . . . . . . . . . . 186
Sockets . . . . . . . . . . . . . . . . . . . . . . . . . . . . . . 46
Sources of information about child restraints
and their use . . . . . . . . . . . . . . . . . . . . . . . . . 154
Space-saving spare tire (compact spare tire) 203
Spare tire . . . . . . . . . . . . . . . . . . . . . . . . . . . 203
Spare wheel . . . . . . . . . . . . . . . . . . . . . . . . . 203