AUDI Q3 2018 Service Manual
Manufacturer: AUDI, Model Year: 2018, Model line: Q3, Model: AUDI Q3 2018Pages: 230, PDF Size: 57.03 MB
Page 41 of 230
0 co ......
"' ,....
"' ...... 0 0 :::,
00
- The washer fluid nozzles for the windshie ld
washer system are heated at low tempera
tures when the ignition is on.
- When stopping temporarily, such as at a
traffic light, the speed of the windshie ld
wipers automatically reduces by one level.
Cleaning the wiper blades
Clean the wiper blades when you see wiper
streaks. Use a soft cloth and a glass cleaner .
Windshield wiper
.. Place the windshield wiper arms in the service
pos ition ¢
page 39.
"'Fold the windshield wiper arms away from the
windshield .
Rear window wiper
.. Fold the wiper arm away from the rear window .
.&_ WARNING
Dirty windshield wiper blades can impair vi
sion, which increases the risk of an accident.
Replacing windshield wiper blades
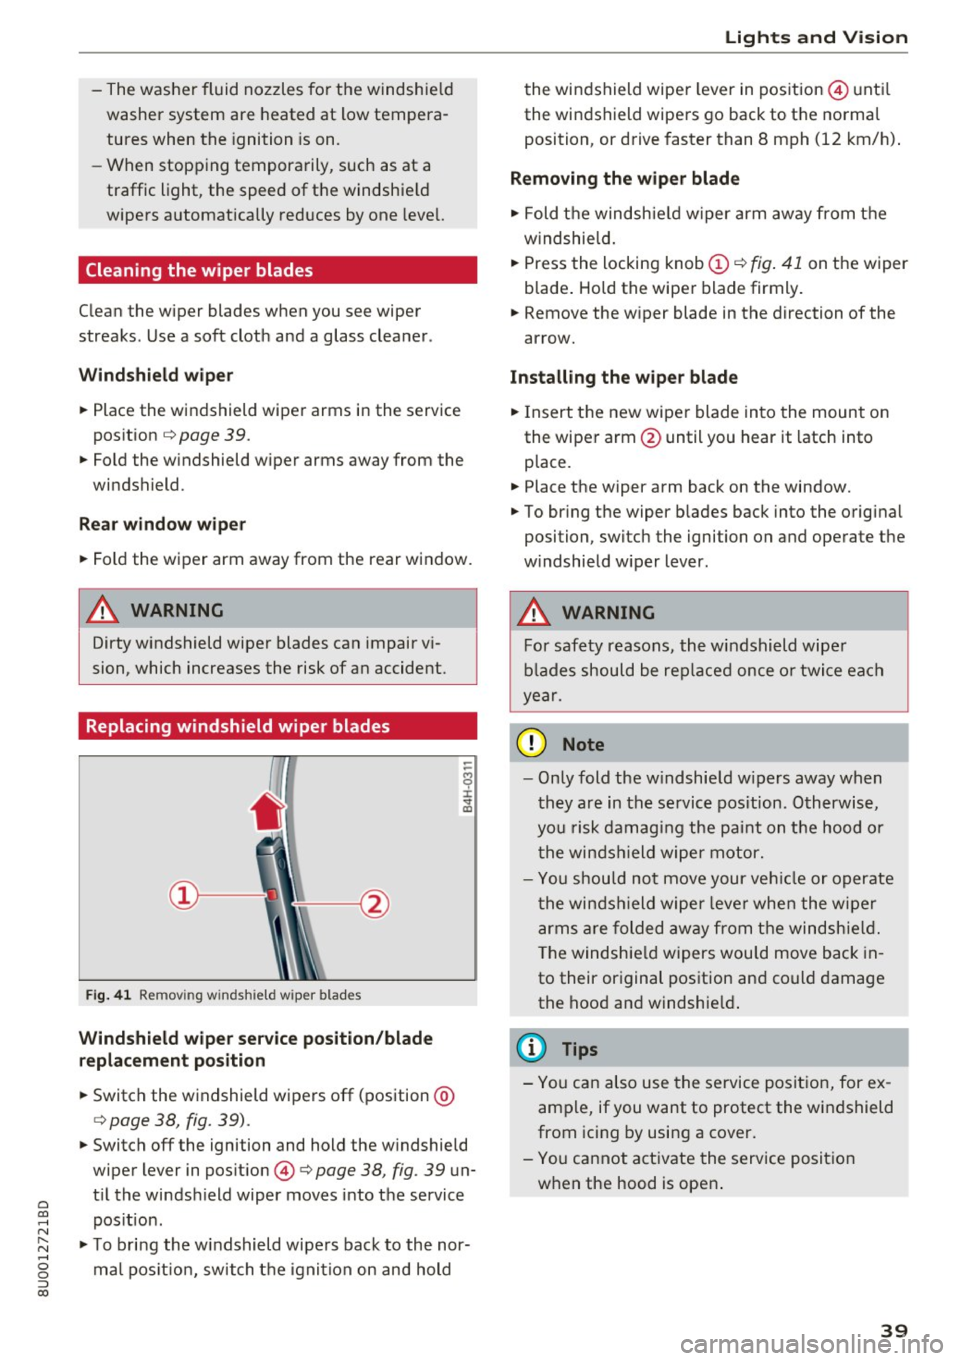
F ig . 41 Remov ing w inds hield w iper blades
Windshield wiper service position/blade
replacement position
.. Switch the windshield wipers off (position @
¢page 38, fig. 39) .
-
"'Switch off the ignition and hold the windshield
wiper lever in position @¢
page 38, fig. 39 un
t il the windsh ield wiper moves into the service
pos ition .
"'T o bring the windshield wipers back to the nor
ma l position, switch the ignition on and hold
Lights and Vision
the windshield wipe r lever in pos ition @until
the windshield wipers go back to the normal
position, or drive faster than 8 mph (12 km/h) .
Removing the wiper blade
"' Fold the windshie ld wiper arm away from the
windshield .
.. Press the locking knob
(D ~ fig . 41 on the wiper
blade . Hold the wiper blade firmly.
.. Remove the w iper blade in the direction of the
arrow.
Installing the wiper blade
"'I nsert the new wiper blade into the mount on
the wiper arm @until you hear it latch into
place.
.. Place the wiper arm back on the window.
"' To bring the wiper blades back into the original
position, switch the ignition on and operate the
w indshield w iper lever .
,&. WARNING
----
For safety reasons, the windshield wipe r
blades should be replaced once or twice each
year.
(D Note
- Only fold the w indshield w ipers away when
they are in the service pos ition . Otherwise,
you risk damaging the paint on the hood or
the windsh ield wiper motor.
- You should not move your veh icle or operate
the windsh ield wiper leve r when the wiper
arms are folded away from the windshie ld.
The windshie ld wipers wou ld move back in
to their original position and could damage
the hood and windshie ld.
(D Tips
-You can also use the service position, for ex
ample, if you want to protect the windshield
from icing by using a cover.
- You cannot activate the service position
when the hood is open .
39
Page 42 of 230
Lights and Vision
Replacing rear wiper blades
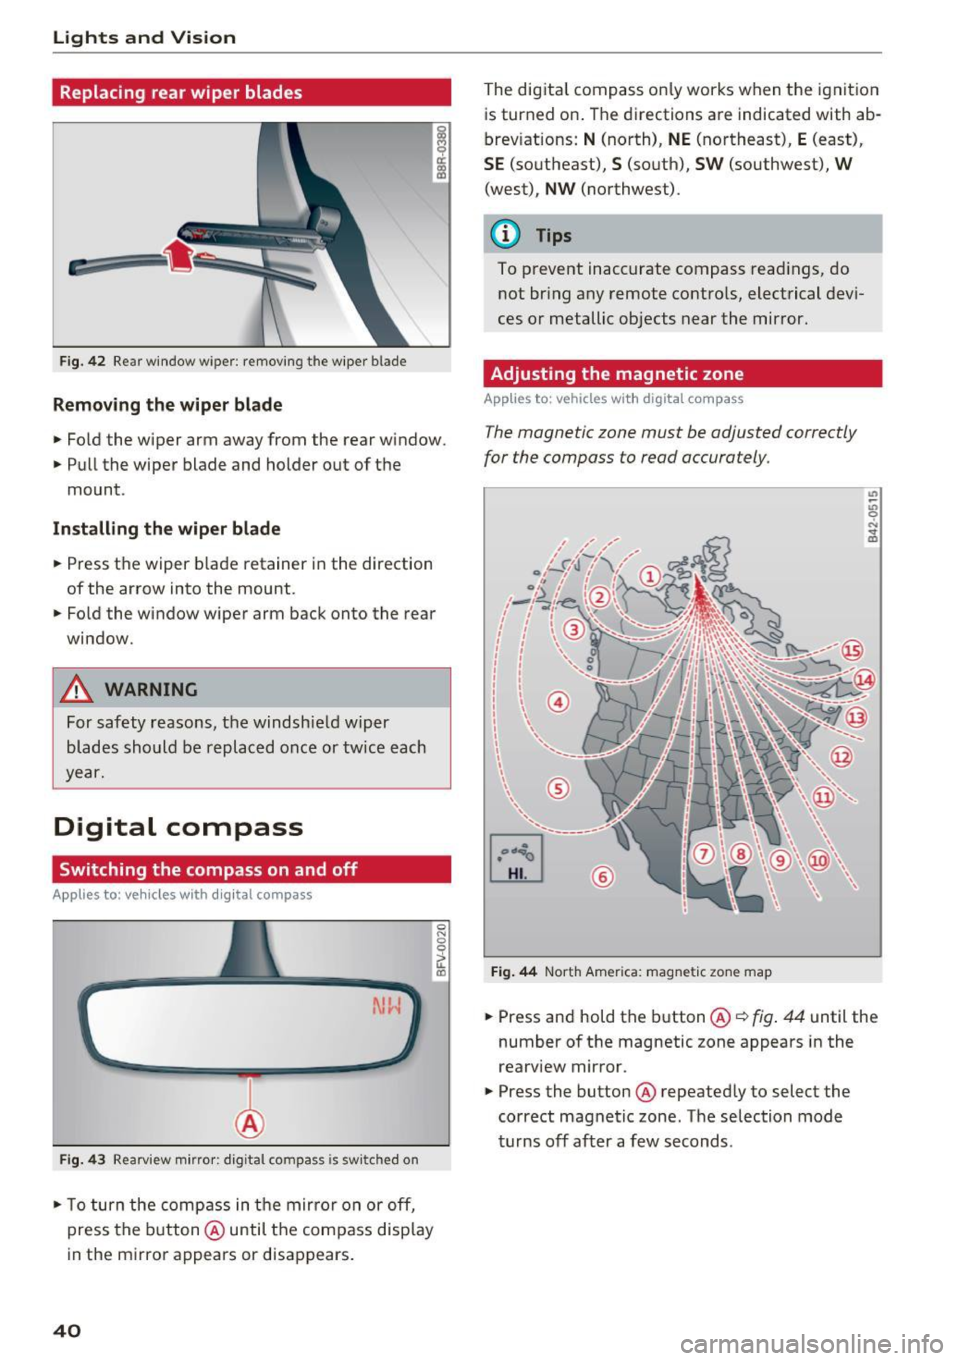
Fig. 42 Rear window wiper: removing the w iper blade
Remov ing the wiper blade
.. Fo ld the wiper arm away from the rear window.
.. Pull the wiper blade and holder out of the
mount.
In stall ing th e wip er blade
.. Press the wiper b lade retainer i n the direction
of the arrow into the mount .
.. Fold the window wiper arm back onto the rear
window .
.,&. WARNING
For safety reasons, the windshie ld wiper
blades should be replaced once or tw ice each
year.
Digital compass
Switching the compass on and off
Applies to: veh icles with d ig ital compass
Fig. 4 3 Rearv iew m irro r: digital compass is sw itched on
.. To turn the comp ass in t he mir ro r on or off,
press the b utton @ until the compass display
in the mirro r appears or disappears .
40
0
fl (0
The dig ital compass on ly works when the ignit io n
is turned on . The directions a re indicated with ab
brev iations:
N (north), NE (northeast), E (east),
SE (so utheast), S (south), SW (southwest), W
(west), NW (northwest).
(l') Tips
To prevent inaccurate compass read ings, do
not br ing any remote contro ls, electrical devi
ces or metallic objects near the mirror.
Adjusting the magnetic zone
App lies to : vehicles with digital compass
The magnetic zone must be adjusted correctly
for the compass to read accurately .
®
Fig. 44 North America: magnetic zone map
.. Press and hold the button @c::> fig . 44 until the
number of the magnetic zone appears in the
rearview mir ror .
.. Press the button @ repeated ly to select the
correct magnetic zone . The selection mode
turns off after a few seconds.
Page 43 of 230
0 co ......
"' ,....
"' ...... 0 0 :::,
00
Calibrating the compass
Appl ies to: vehicl es with digital compass
You must recalibrate the compass if it does not
display the correct direction .
.. Press and hold the button @ ¢ page 40, fig. 43
until a C appears in the interior rearview mirror .
.,. Drive in a circle at about 6 mph (10 km/h) until
a d irection is displayed in the rearview mirro r.
A WARNING
- T o reduce the risk to yourself and othe r driv
ers, cal ibrate the compass in an area where
there is no traffic.
- Always pay attention to the t raff ic and the
area aro und you r vehicle if you are reading
the compass while driving . Light
s and Vision
41
Page 44 of 230
Sea ts and stor age
Seats and storage
General information
A WARNING
See c::> page 9 7, Driving safety for important
information, tips, suggestions and warnings
that you should read and follow for your own
safety and the safety of yo ur passengers .
Front seats
Manual seat adjustment
Appl ies to vehicles with manual adiustable seats
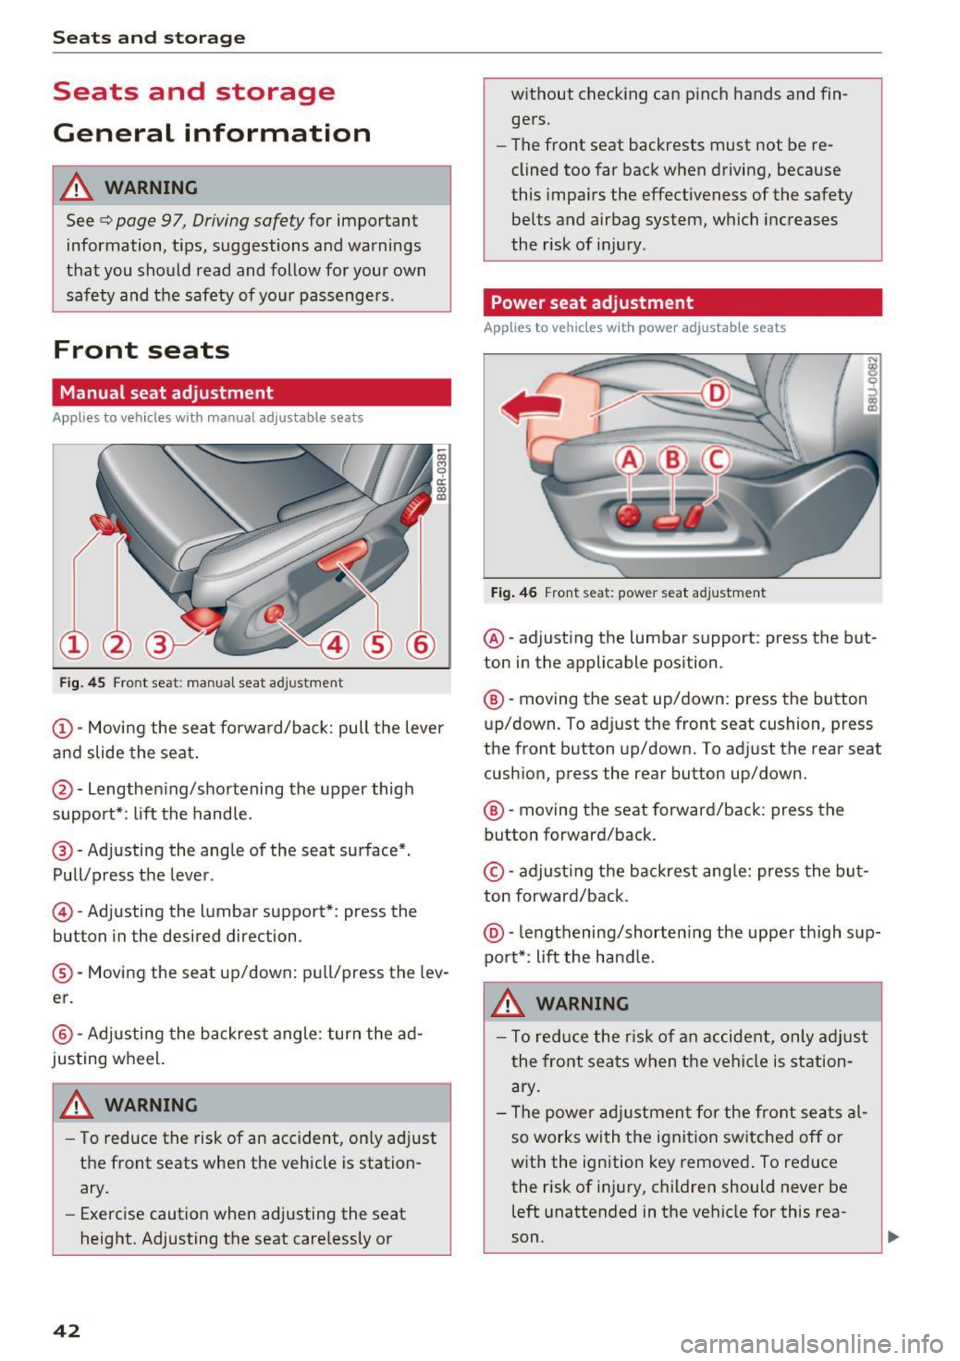
Fig. 45 Front seat: manual seat ad justme nt
@ -Moving the seat fo rward/back: pull the lever
and slide the seat.
@ -Lengthening/shortening the upper thigh
support*: lift the handle.
@ -Adjusting the angle of the seat surface*.
Pull/press the lever.
© -Adjusting the lumbar support*: press the
button in the desired direction .
®-Moving the seat up/down: pull/press the lev
er.
@ -Adjusting the backrest angle : turn the ad
justing wheel.
WARNING
- To reduce the risk of an accident, on ly adjust
the front seats when the vehicle is station
ary.
- Exercise caution when adjusting the seat
height. Adjusting the seat care lessly or
42
w ithout checking can p inch hands and fin
gers.
- The front seat backrests must not be re
clined too far back when driving, because
this impa irs the effectiveness of the safety
belts and airbag system, which increases
the risk of inj ury .
Power seat adjustment
App lies to vehicles w it h power adjustab le seats
Fig . 46 Front seat: power seat adjustment
@ -adjusting the lumbar support : press the but
ton in the applicable position.
® -moving the seat up/down: press the button
up/down. To adjust the front seat cushion, press
the front button up/down. To adjust the rear seat
cushion, press the rear button up/down.
® -moving the seat forward/back : press the
button forward/back.
© -adjust ing the backrest ang le: press the bu t
ton forward/back .
@-leng thening/shorten ing the uppe r thigh sup
port*: li ft the hand le.
A WARNING
- To reduce the r is k of an accident, only adjust
the front seats when t he vehicle is station
ary .
- The power adj ustment for the front seats al
so works wi th the ignit ion sw itched off or
with the ignition key removed . To reduce
the risk of injury, children should never be
left unattended in the vehicle for this rea
son .
Page 45 of 230
a
co
...... N r--. N .-< 0 0 ::, co
-Exercise caution when adjusting the seat
height. Unsupervised or careless seat ad
justment can pinch fingers or hands, which
increases the risk of injury .
- The front seat backrests must not be re
clined too far back when driving, because
this impairs the effectiveness of the safety
belts and airbag system, which increases
the risk of injury.
- To minimize the risk of injury during sudden
braking or a collision, the driver and the
front passenger must not drive or r ide with
the backrest in the reclined position. The
safety belts and airbag system can only pro
vide the greatest protection possible when
the backrests are in the upright position and
the safety belts are worn correctly. The more a backrest is reclined, the greater the
risk of injury due to an incorrect seating po
sition and safety belt position .
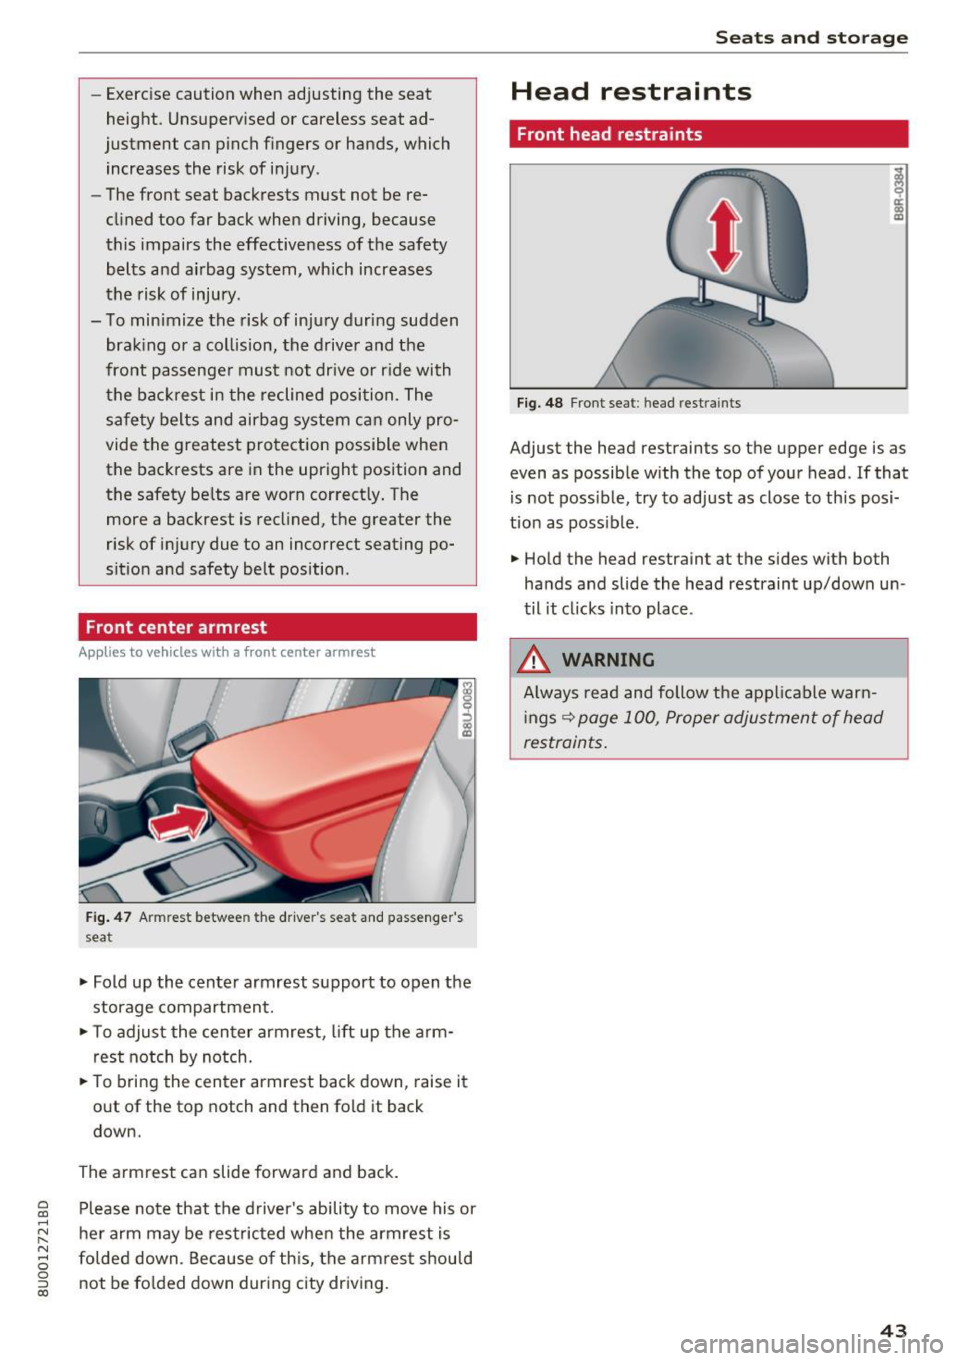
Front center armrest
Applie s to vehicles with a front center armrest
Fig. 47 Armrest between the driver's seat and passenger's
seat
.,. Fold up the center armrest support to open the
storage compartment.
.,. To adjust the center armrest, lift up the arm
rest notch by notch .
.,. To bring the center armrest back down, raise it
out of the top notch and then fold it back
down.
The armrest can slide forward and back. Please note that the driver 's ability to move his or
her arm may be restricted when the armrest is
folded down. Because of this, the armrest should
not be folded down during city driving.
Seats and storage
Head restraints
Front head restraints
Fig. 48 Front seat: head restraints
Adjust the head restraints so the upper edge is as
even as possible with the top of your head . If that
is not possible, try to adjust as close to this posi
tion as poss ible .
.,. Hold the head restraint at the sides with both
hands and slide the head restraint up/down un
til it clicks into place .
_& WARNING
Always read and follow the applicable warn
ings
~ page 100, Proper adjustment of head
restraints.
.
43
Page 46 of 230
Sea ts and stor age
Rear head restraints
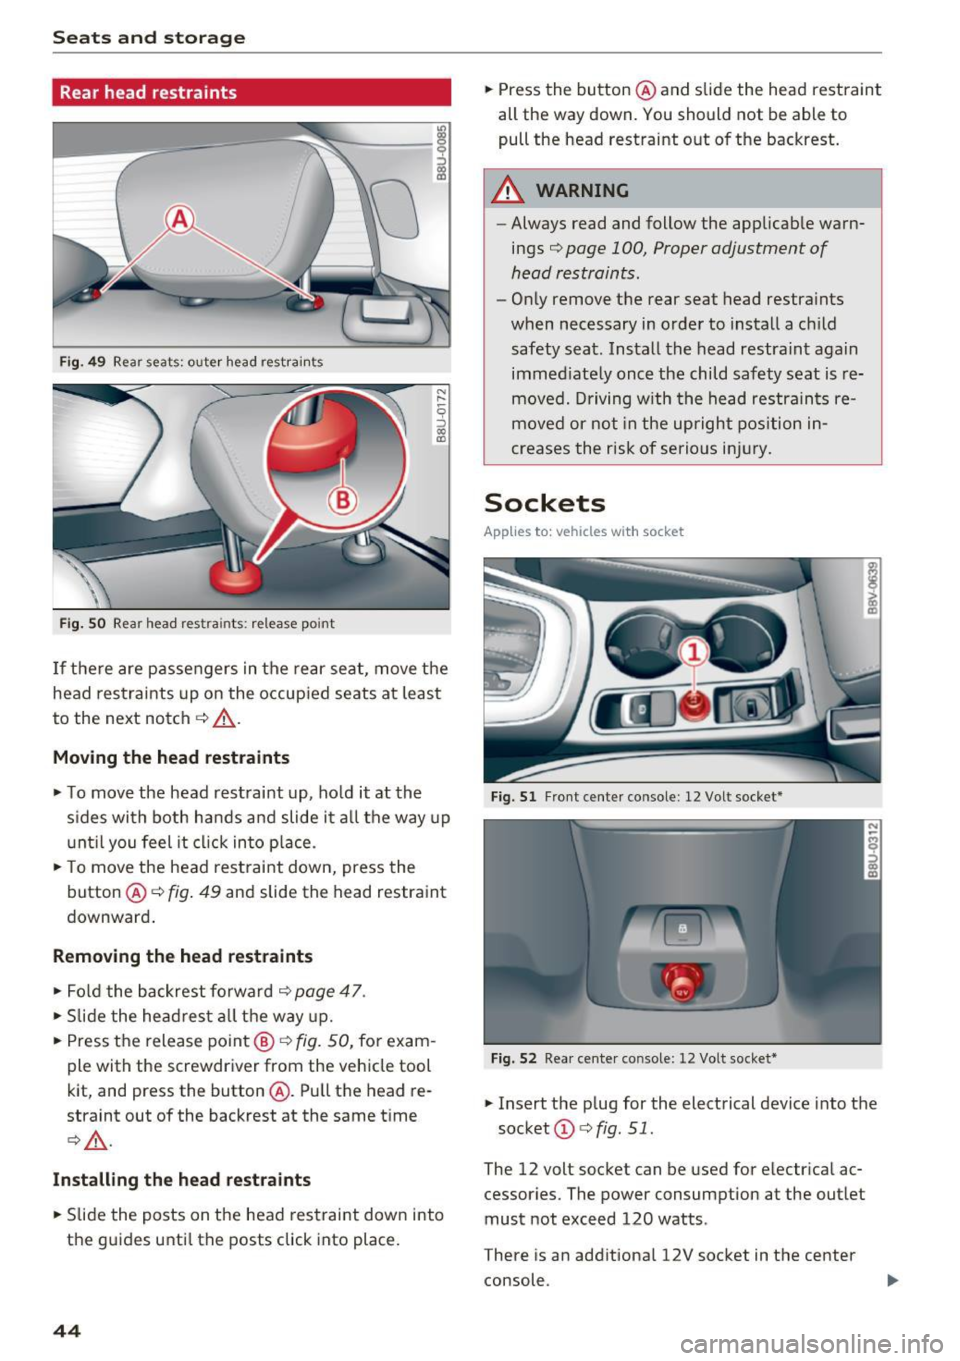
Fig . 4 9 Rear seat s: oute r head restra ints
Fig . SO Rear head res tra ints: re lease po int
I f the re are passengers in the rear seat, move t he
head restrai nts up on the occup ied seats at least
to the next notch
c::> _&. .
Moving th e head restraints
• To move the head rest raint up, ho ld it at the
s ides with both hands and slide it a ll the way up
u nt il you feel it cl ick in to p lace .
• To move the head restraint down, press the
button @
c::> fig. 49 and slide the head restraint
downward .
Removing th e head restraints
• Fol d the backrest forwa rd c::> page 47 .
• Slide the head res t all the way up.
• Press the release point @
c::> fig. SO, for exam
ple with the screwdriver from the vehicle tool
kit, and press the button @. Pull the head re
straint out of the backrest at the same t ime
¢ _&. .
Install ing the h ead rest ra ints
• Slide the posts on the head restraint down into
the guides unti l th e posts click into place.
44
• Press the button @ and slide the head restraint
all the way down. You should not be abl e to
pull the head restraint o ut of the backrest.
A WARNING
- Always read and follow the applicab le warn
ings
c> page 100, Proper adjustment of
head restraints.
- On ly remove the rear seat head restra ints
when necessary in order to install a ch ild
safety sea t. Install the head restraint again
immed iate ly once the child safety seat is re
moved. Driving w ith the head restrain ts re
moved or not in the upright pos ition i n
creases the risk of serious inj ury.
Sockets
App lies to : vehicles wit h socket
Fig. 51 Front cente r co nso le : 12 Volt socket*
Fi g. 5 2 Rea r cen te r co nsole: 12 Vol t socket*
• Insert the p lug for the electrical device into the
socket @
c> fig. 51.
The 12 volt socket can be used for electr ica l ac
cessories. The power consumption at the outlet
must not exceed 120 watts .
T here is an additiona l 12V socket in the center
console .
Page 47 of 230
a
co
...... N r--. N .-< 0 0 ::, co
A WARNING
The sockets and the electrical accessories connected to them only funct ion when the igni
tion is switched on . Incorrect usage can lead
to ser ious injuries or b urns . To reduce the risk
of injur ies, neve r leave child ren unat tended i n
t he vehicle with the veh icle key .
CD Note
-To reduce the risk of damage to the vehicle
electrical system, never attempt to charge
the veh icle bat tery by connect ing accesso
ries that prov ide power, such as solar pa ne ls
or battery chargers, to the 12 Volt sockets.
- To reduce the risk of damage to the sockets,
on ly use plugs that fit cor rect ly.
@ Tips
The vehicle battery d rains when accessories
are turned on b ut the engine is off .
Storage
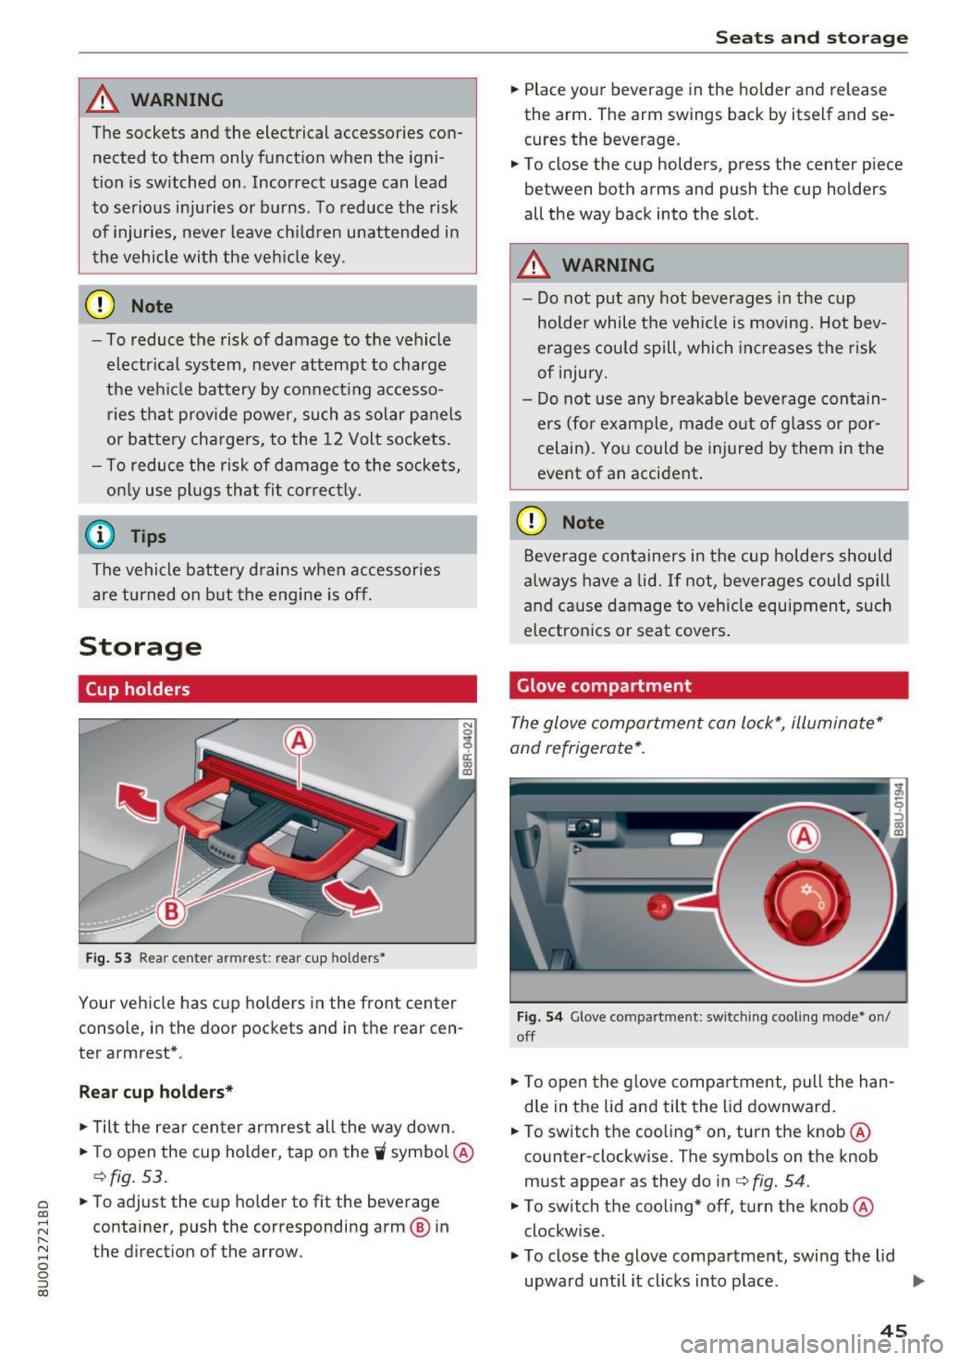
Cup holders
Fig. 53 Rea r ce nter a rmrest: rea r cup holders•
Your vehicle has cup holders in the front center
console, in the door pockets and in the rear cen
ter armrest *.
Rear cup holder s*
.. Til t the rear center armrest all the way down .
.. To open the cup holder, tap on the
'i symbo l@
c:::> fig. 53.
.. To adjust the cup ho lder to fit the beverage
container, push the corresponding arm @ in
the direction of the arrow .
Seats and storage
.. Place your beverage in the holder and release
the arm. The arm swings back by itself and se
cures the beverage.
.. To close the cup holders , press the center piece
between both arms and push the cup holders
all the way back into the slot .
A WARNING
--
-Do not put any hot beverages in the cup
holder while the vehicle is moving. Hot bev
erages could spill, which increases the risk
of injury.
- Do not use any b reakab le beve rage contain
e rs (for example, made out of g lass or por
celain). Yo u could be injured by them in the
event of an accident .
CD Note
Beverage containers in the cup holders should
a lways have a lid.
If not, beverages could spill
and cause damage to veh icle equipment, such
electron ics or seat covers .
Glove compartment
The glove compartment can lock*, illuminate*
and refrigerate* .
Fig. 54 G love co mpart m en t: sw itching cooling mode * on /
off
.. To open the glove compa rtment, pull the han
d le in the lid and tilt the lid downward .
.. To switch the cooling* on, turn the knob@·
co unter -clockwise . T he symbols on the knob
must appear as they do in c:::>
fig. 54.
.. To switch the cooling* off, turn the knob @
clockw ise .
.. To close the glove compartment, swing the lid
upward until it clicks in to p lace . ..,.
45
Page 48 of 230
Sea ts and stor age
_&. WARNING
Always keep the glove compartment l id
closed while driv ing to reduce the risk of in
jury.
Additional compartment s
You will find a variety of storage compartments
and holde rs at var ious locations in the veh icle.
- In the door trim panels .
- In the center console .
- On the side of the front seats*. The sliding com-
partment can hold a maximum of 3.3 lbs (1.5
kg) and the folding compartment can hold 2.2
lbs (1 kg).
- Nets* on the backrests of the front seats
- Garment hooks next to and above the rear
doors.
- Bag/securing hooks in luggage compartment.
_&. WARNING
- No heavy or hard objects may be placed on
the storage compartment behind the rear
seat backrest. There is a risk of injur ing the
vehicle passengers when brak ing suddenly .
- Make sure that the view to the rear is not
obstructed by hanging garments .
- Hang only lightweight clothing and be sure that there are no heavy or sharp-edged ob
jects in the pockets .
- Do not use coat hangers to hang garments,
because th is could reduce the effectiveness
of the side curtain airbags* .
- Only use the storage compartments in the
door trim panels to store small objects that
will not st ick o ut of the compartment and
impa ir the range of the side a irbags .
(D Note
Objects on the rear shelf that rub against the
rear window can damage the rear window
heating wires .
46
Luggage compartment
General information
_&. WARNING
Read and follow the important safety precau
tions in ¢page
102.
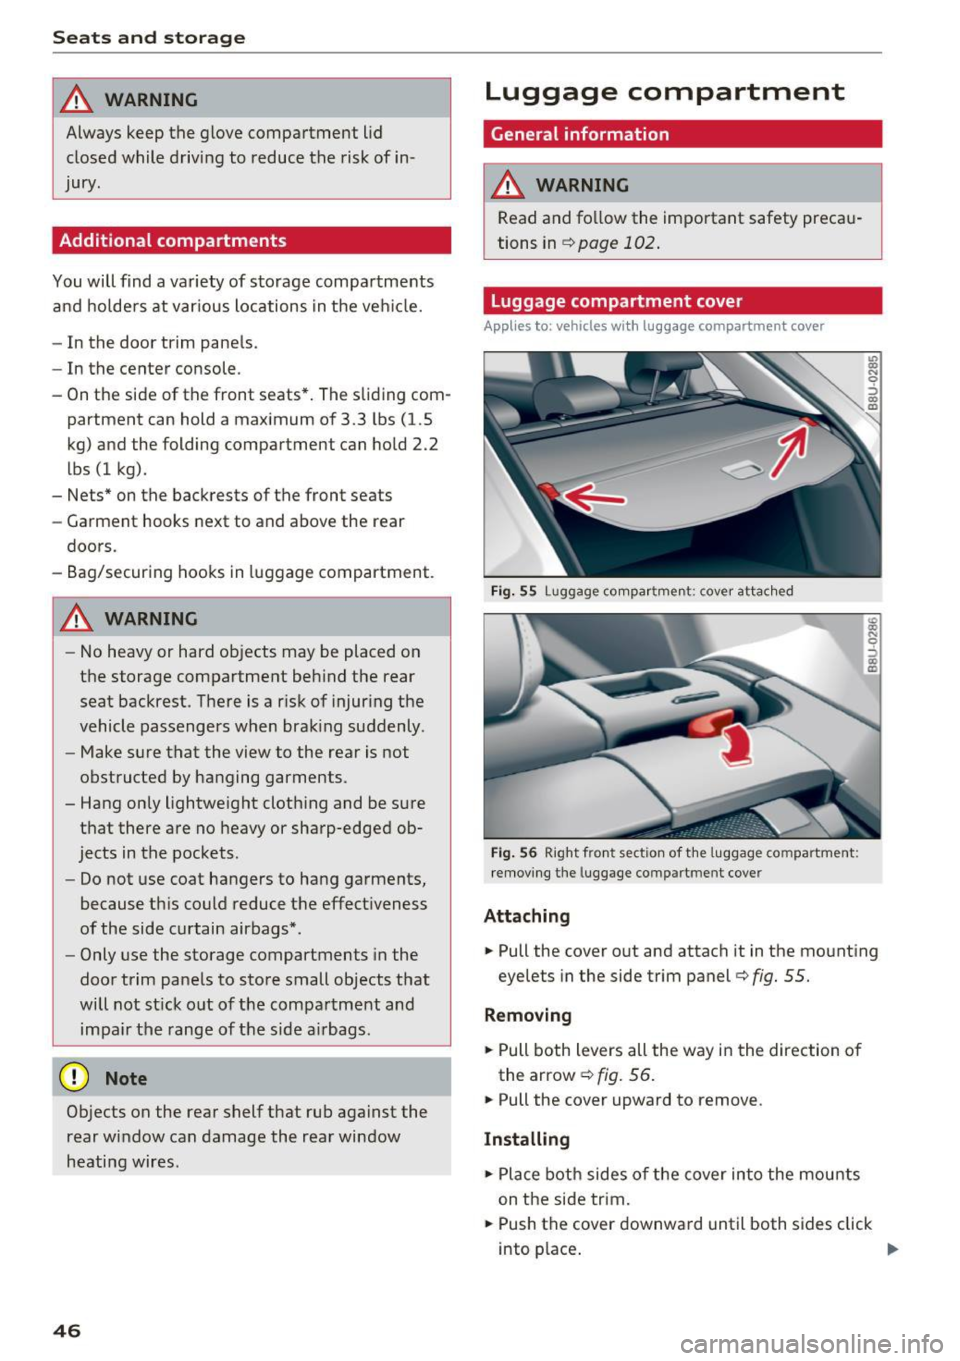
Luggage compartment cover
Applies to: vehicles with luggage compartment cover
Fig . 55 Lug gage co mpar tmen t: c over attac hed
Fig . 56 Right fron t sec tio n of the luggage co m partment:
remov ing the luggage co mpartm ent cove r
Attaching
-
.. Pull the cover out and attach it in the mounting
eyelets in the side trim panel ¢
fig. 55.
Removing
.. Pull both levers all the way in the direction of
the arrow ¢
fig. 56 .
.. Pull the cover upward to remove .
Installing
.. Place both sides of the cover into the mounts
on the side trim .
.. Push the cover downward until both sides click
into p lace .
Page 49 of 230
a
co
...... N r--. N .... 0 0 ::, co
Storing* Depending on the vehicle equ ipment, yo u can
store the cover under the cargo floor
Q page49.
.&_ WARNING
- To reduce the risk of accidents, the luggage
compartment cover should never be unse
cured under any circumstances .
- The luggage compartment cover is not a surface for storing objects. Objects placed on the cover co uld endanger a ll vehicle oc
c u pan ts during sudden braking maneuvers
o r in a crash.
CD Note
To avoid damage , let t he luggage compart
ment cover roll up slow ly after removing .
Increasing the size of the luggage
compartment
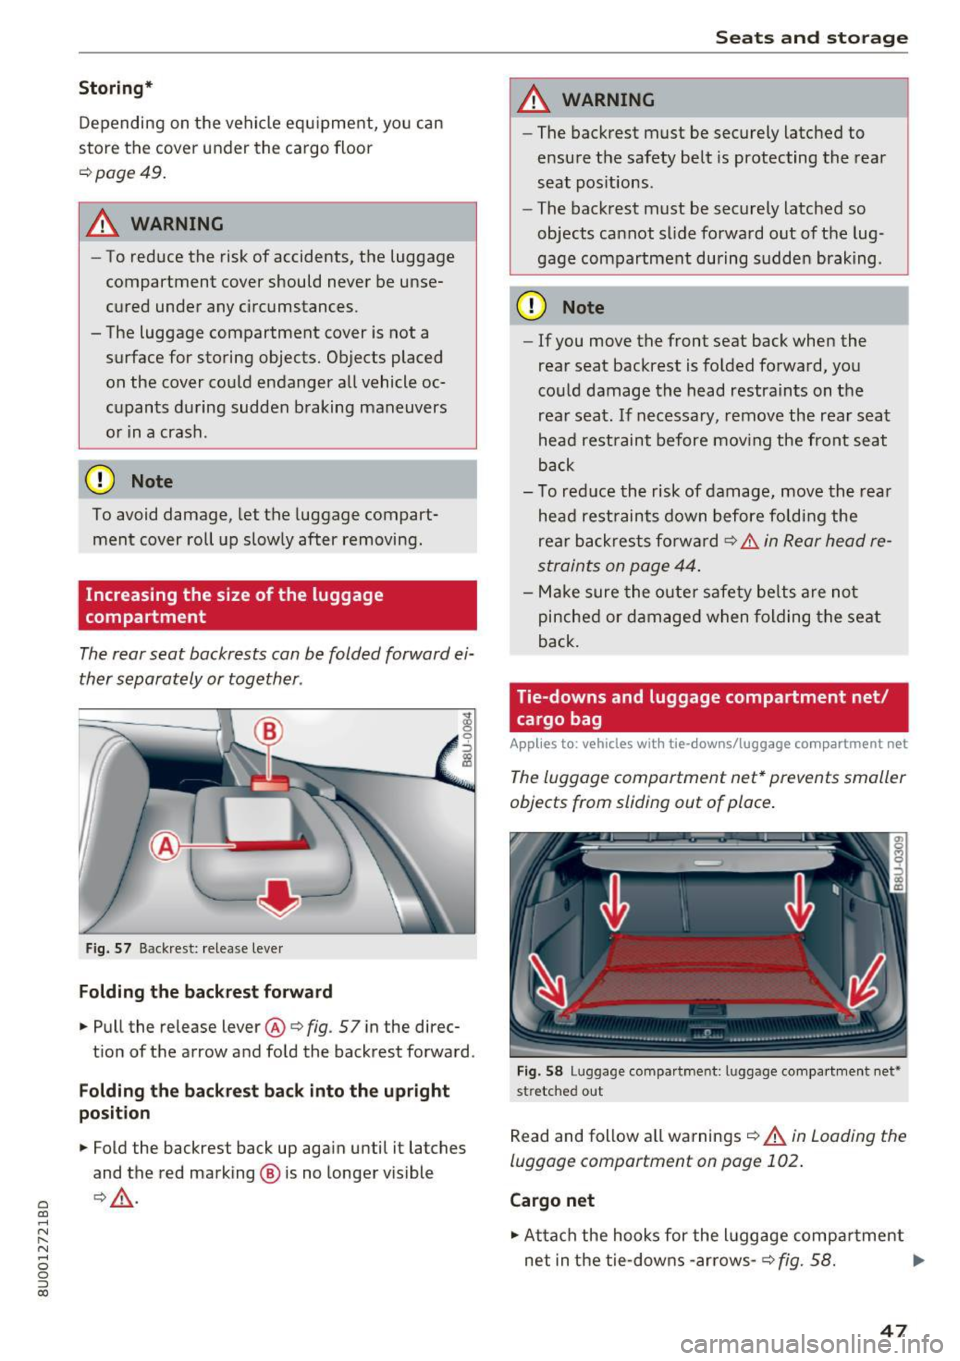
The rear seat backrests can be folded forward e i
ther s eparately or together .
Fig . 57 Backrest: re lease leve r
Folding the backrest forward
.,. Pull the release lever@Q
fig. 57 in the direc-
t ion of the arrow and fo ld the backrest forward .
Folding the backrest back into the upright
position
.,. Fold the backrest back up aga in until it latches
and the red marking ® is no longe r visible
Q _& .
Seats and storag e
.&_ WARNING
-~
-The backrest must be secure ly latched to
e nsu re the safety belt is protecting the rea r
seat pos itions .
- The bac krest must be securely latched so
objects cannot slide fo rwa rd out of the lug
gage compartment during sudde n braking .
CD Note
-If you move the front seat back when the
rear seat backrest is fo lded fo rwa rd, yo u
could damage the head restraints on the
rear seat . If necessary, remove the rear seat
hea d rest raint before mov ing the front seat
back
- To red uce the risk of damage, move the rea r
hea d res train ts down before f oldi ng the
rea r back res ts fo rw ar d Q
.&. in Rear head re
straint s on page 44.
- Make sure the o uter sa fety be lts are not
pinche d or d am aged when fol din g th e seat
back.
Tie-downs and luggage compartment net /
cargo bag
Applies to : vehicles with tie-downs/luggage compartment net
The luggage compartment net* prevents smaller
objects from sliding out of place .
Fig. 58 Luggage co mpa rt me nt: lu ggage compa rtme nt net •
st retc hed o ut
Read and follow a ll warn ings Q .& in Loading the
luggage compartment on page 102 .
Cargo net
.,. At ta ch the hoo ks for the l uggage compa rtment
net in t he tie -dow ns -ar rows-
Q fig. 58. ..,
47
Page 50 of 230
Sea ts and stor age
Cargo bag
.. Engage the two hooks on the side with the car
go bag to the tie-downs on the floor near the
rear seat.
.. Engage both eyes on the luggage compartment
net to the bag hooks * in the side trim panel.
You can a lso use the bag hooks* to hang light
purses, bags, etc.
A WARNING
For strength reasons, only ob jects with a max
imum weight of 10 lb (5 kg) should be se
cured in the luggage compartment net. Heavi
er objects a re not adequately secured . There
is risk of personal inj ury.
Bag hooks
F ig. 59 Luggage compartment : bag hooks (example)
The bag hooks can be used to prevent bags with
light contents from falling over.
A WARNING
Do not use the bag hooks to secure heavy ob
jects. Heavy objects are not adequately se cured. There is risk of pe rsonal injury.
48
Cargo mat
App lies to : vehicles with cargo mat
The cargo mat* protects the luggage compart
ment and bumper from dirt and scratches .
Fig. 60 Luggage compartment: cargo mat
r, .,,
~ co C0
You can use the cargo mat with the dirt -resistant
side or the decorative side . After loading or un
loading, fo ld up the cargo mat and close the lug
gage compartment lid. On ly store the cargo mat
if it is dry.
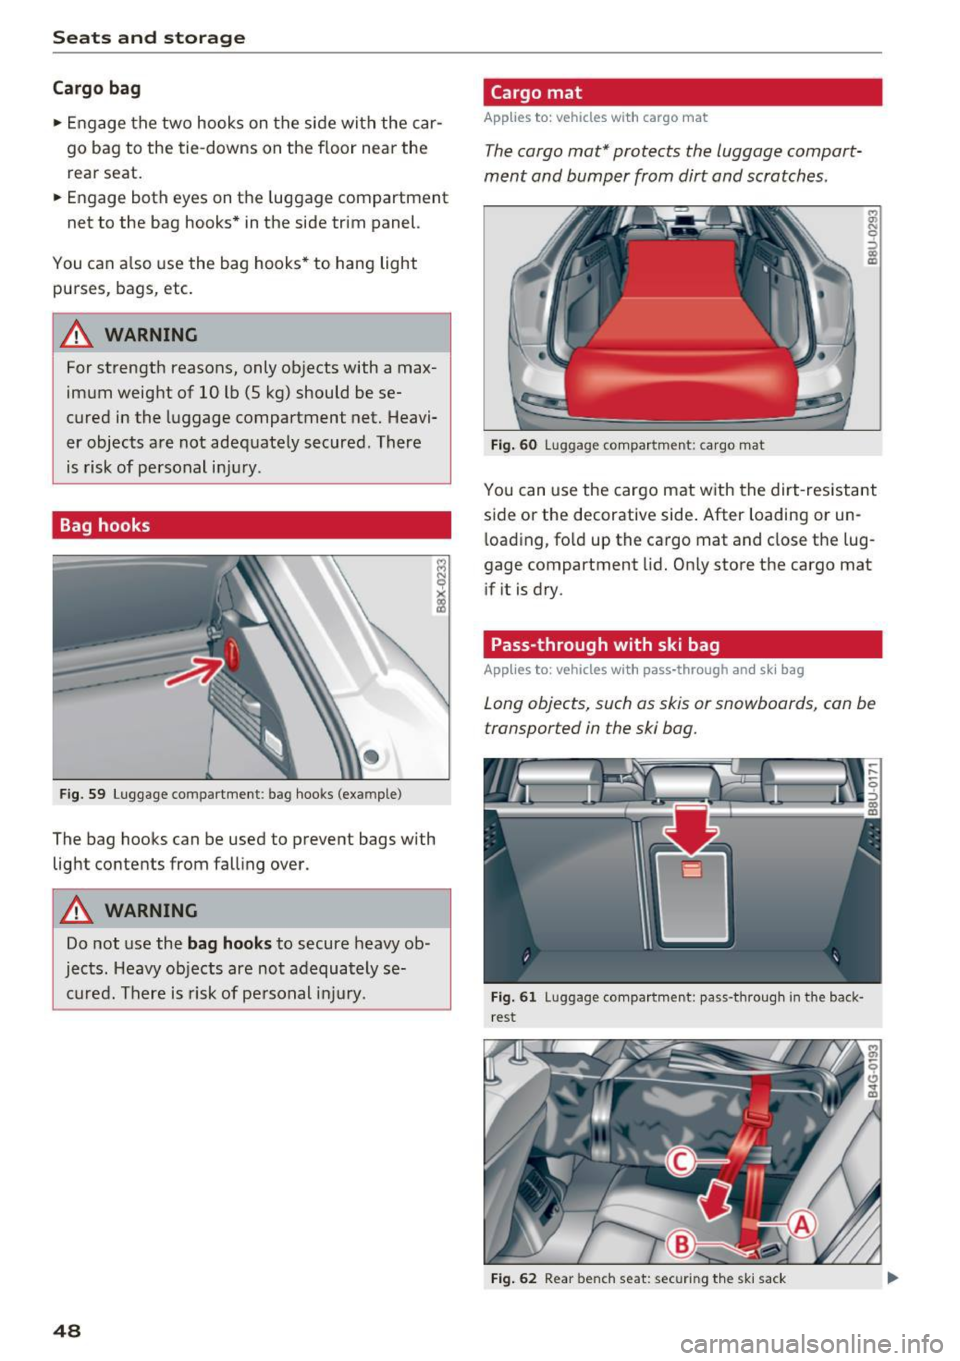
Pass-through with ski bag
App lies to: vehicles with pass-through an d ski bag
Long objects, such as skis or snowboards, can be
transported in the ski bag.
Fig. 61 Luggage compartment: pass-through in the back·
rest
F ig . 62 Rear bench seat: securing the ski sack