AUDI Q3 2018 Workshop Manual
Manufacturer: AUDI, Model Year: 2018, Model line: Q3, Model: AUDI Q3 2018Pages: 230, PDF Size: 57.03 MB
Page 51 of 230
a
co
...... N r--. N .-< 0 0 ::, co
Loading
• Press the release button in the luggage com
partment
c:> fig. 61 and fold the pass-through
toward the front.
• Push the ski bag through the op ening from the
luggage compartment . T he zipper must face
toward the rear
c:> ,& .
Securing
• Stick the strap @on th e bag in the center belt
latch
@ c:> fig. 62.
• Tighten and secure the strap©
A WARNING
-The ski sack is intended only for the trans
portation of skis and other light objects. To
reduce the risk of serious personal injury,
never transport heavy or pointed objects in
the ski sack.
- When braking rapidly or during an accident ,
the load could be displaced and cause injury
to occupants.
- Sharp edges on the load must be covered
for protection. Always fasten the belt tight ly around the sack and its contents
c:>fig . 62.
- For safety reasons, do not transport more
than two pairs of skis in the ski sack .
- You must secure the ski sack with the strap
after loading.
- Make sure all objects that you are transport
ing in the pass-through are secured. Other
wise they could slide around during sudden
braking maneuvers and cause injury .
(D Tips
-Only fold the bag up if it is dry.
- When transporting skis or snowboards, tighten the securing strap between the
bindings.
- Lay skis in the bag with the points facing
forward and snowboards and ski pole points
facing the rear.
-
Seats and storage
Reversible cargo floor
Applies to: vehicles with reversible cargo floor
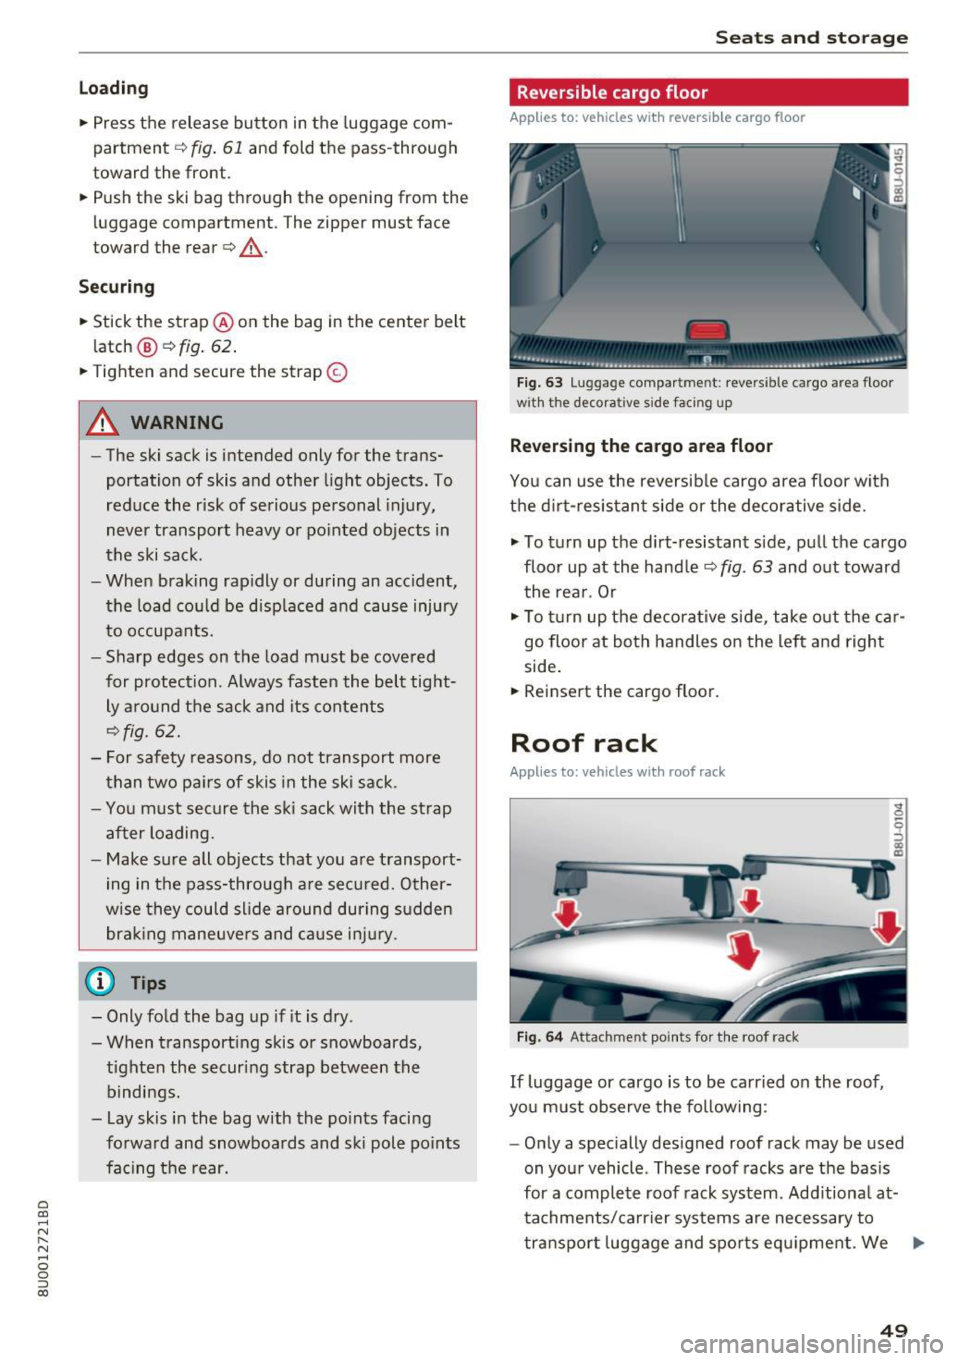
Fig. 63 Lug gag e compar tmen t: reve rs ibl e ca rgo area floor
w ith the decora tive s ide faci ng up
Reversing the cargo area floor
You can use the reversible cargo area floor with
the dirt-resistant side or the decorative side .
.,. To turn up the dirt-resistant side, pull the cargo
floor up at the handle
c:> fig . 63 and out toward
the rear . Or
.,. To turn up the decorative side , take out the car
go floor at both handles on the left and right
side.
• Reinsert the cargo floor.
Roof rack
Applies to: vehicles with roof rack
Fig. 64 Attac hme nt point s for the roof rack
If luggage or cargo is to be carried on the roof,
you must observe the following :
- Only a specially designed roof rack may be used
on your vehicle . These roof racks are the basis
for a complete roof rack system. Additional at
tachments/carrier systems are necessary to
transport luggage and sports equipment. We ..,.
49
Page 52 of 230
Seat s and sto rage
recommend roof racks and attachments from
the Audi Genuine Accessories program .
- When installing the roof rack, make sure that it
is mounted on ly at the designated points on
the roof ¢
fig. 64.
-The permissib le roof load fo r your vehicle is
165 lb (7 5 kg). The roof load is the total of the
weight of the roof rack, the attachments and
the cargo you are carrying. However, you must
also note the permitted load of the carrier sys
tem being used . For the permitted axle load
and the permitted total vehicle weight, see
¢ page 209 .
A WARNING
-Fo llow the installation instructions p rovided
with the roof ra ck system. If you do not se
cure the roof rack system and objects on the
roo f correctly, they co uld come loose from
the vehicle and cause an accident .
- T he risk of an accident increases when using
a roof rack system, because it changes the
driving ch aracteristics by shift ing the center
of gravity and/or the increasing the surface
area exposed to wind. Adapt your driving
and speed to the current conditions.
Q;) Note
- If you use other roof luggage rack systems
or do not install the racks as intended, any
damage to the veh icle is not covered by the
warranty . Carefully follow the assembly and
i nsta llation instruct ions included w ith the
r oof rack car rier system.
- Make sure that the luggage compartment lid and the panorama glass roof* do not
come into contact with objects on the roof
when they are open.
@ For the sake of the environment
Your vehicle will requ ire more fuel due to the
increased wind resistance. So remove the roof
rac k after using it.
so
Page 53 of 230
0 co ......
"' ,-...
"' ...... 0 0 :::,
00
Warm and cold
Climate control system
Description
Depending on the vehicle equipment, different
systems could be installed:
- manual climate control system or
- automatic climate control system"
The climate control system circu lates, warms or
cools, and removes humidity from the air in the
vehicle interior. It is the most effective when the windows and panorama glass roof" are closed. If
there is a build-up of heat inside the vehicle, ven
tilation can help to speed up the cooling process .
Pollutant filt er
The pollutant filter removes pollutants such as
dust and pollen from the air.
Key rec ogn ition *
The automatic climate cont ro l system* settings
are stored and assigned to the remote control
key that is in use.
A WARNING
Poor visibility can lead to accidents.
- For safer driving, keep all windows free of
ice, snow and fog .
- Become familiar with the correct use and
function of the climate control system as
quickly as poss ible, espec ially with the de
frosting and defogging functions.
- When the temperature is below freezing,
only use the windshield washer system after
the windsh ield has been warmed by the cli
mate control system. The washer fluid could
Warm and c old
freeze on the windshield and impair visibili
ty.
@ Note
- If you suspect that the climate contro l sys
tem is damaged, switch the system off to
prevent further damage and have it checked
by an authorized Aud i dealer or authorized
Audi Service Facility.
- Repairs to the Audi climate control system
require special technical knowledge and
special tools. See an authorized Audi dea ler
or authorized Aud i Service Fac ility.
@) For the sake of the environment
- To save fuel, turn off the climate control
system cooling mode by pressing the A/C
button. This will also reduce emissions . The
cl imate control system is off when the LED
in the button turns off.
- In vehicles w ith the efficiency program*,
you can find other consumptio n information
and more economy tips
¢ page 20.
(D Tips
- To prevent interference with the heat ing
and cooling output and to prevent the win
dows from fogging over, the air intake in
fro nt of the windshie ld must be free of ice
,
snow or leaves.
- Condensation from the cooling system* can
dr ip and fo rm a pudd le of water under the
vehicle. This is norma l and does not mean
there is a leak .
- The energy management system may tem
porarily switch off certain functions, s uch as
the seat heating* or rear window defogger .
These systems are avai lable aga in as soon
as the energy supply has been restored.
5 1
Page 54 of 230
Warm and cold
Manual climate control system
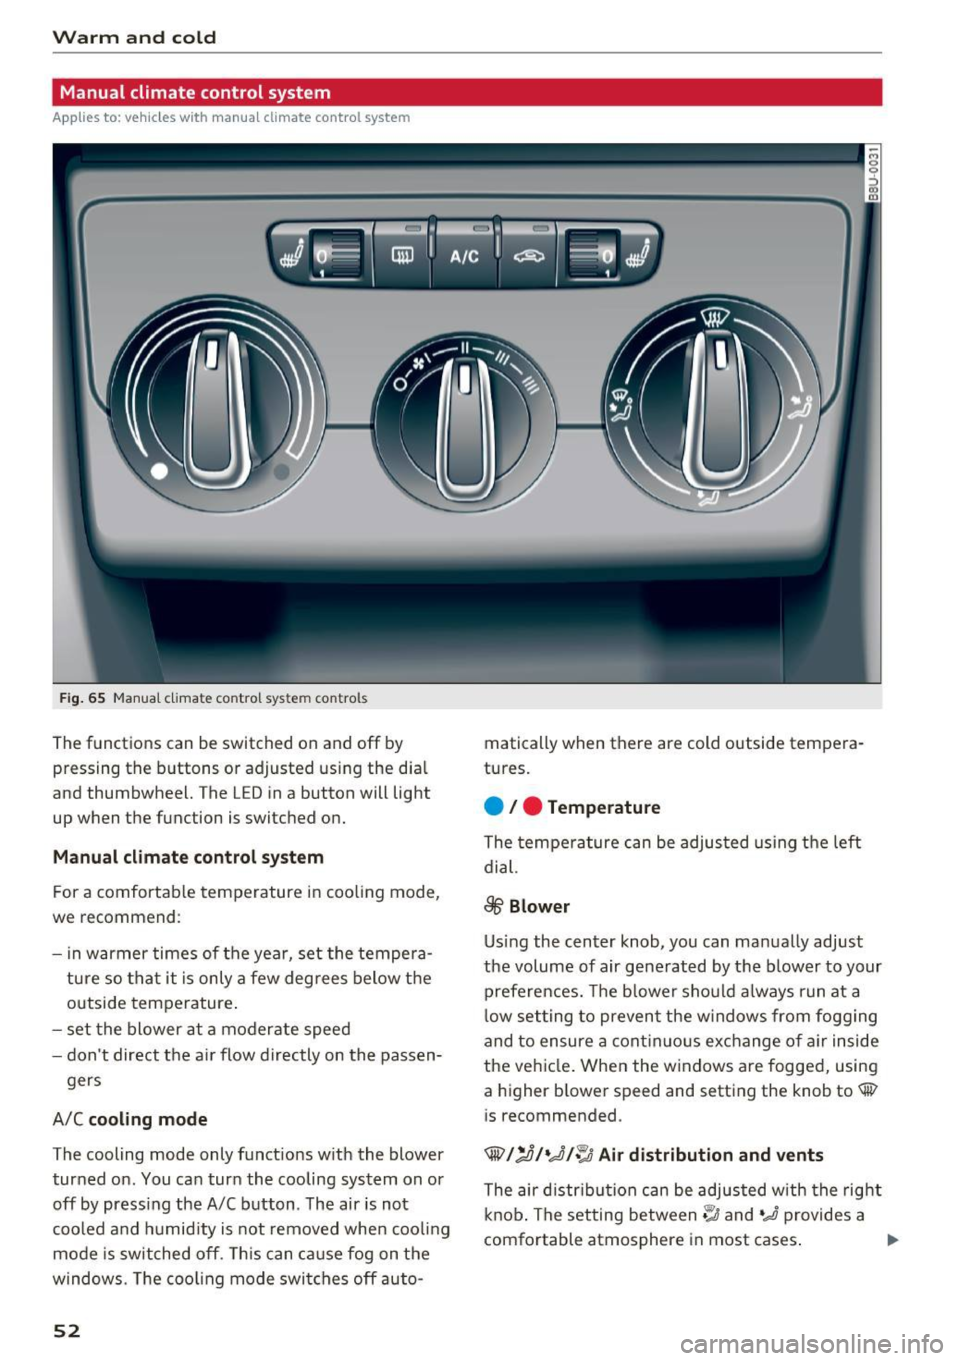
Applies to: vehicles with manual climate control system Fig. 65 Manual climate control system controls
The functions can be switched on and off by
pressing the buttons or adjusted using the dial
and thumbwheel. The
LED in a button will light
up when the function is switched on.
Manual climate control system
For a comfortable temperature in cooling mode,
we recommend :
- in warmer times of the year, set the tempera
ture so that it is only a few degrees below the
outside temperature.
- set the blower at a moderate speed
- don't direct the air flow directly on the passen-
gers
A/C cooling mode
The cooling mode only functions with the blower turned on. You can turn the cooling system on or
off by pressing the A/C button . The air is not
cooled and humidity is not removed when cooling
mode is switched off. This can cause fog on the
windows. The cooling mode switches off auto-
52
matically when there are cold outside tempera
tures.
e / e Temperature
The temperature can be adjusted using the Left
dial.
8/5' Blower
Using the center knob, you can manually adjust
the volume of air generated by the blower to your
preferences. The blower should always run at a
low setting to prevent the windows from fogging
and to ensure a continuous exchange of air inside
the vehicle. When the windows are fogged, using
a higher blower speed and setting the knob to@
is recommended.
®l:.0/•.,g/~ Air distribution and vents
The air distribution can be adjusted with the right
knob. The setting between~ and
o,,,o provides a
comfortable atmosphere in most cases.
II>
Page 55 of 230
0 co ......
"' ,....
"' ...... 0 0 :::,
00
I n the@ setting, the windshield and side win
dows are defrosted or cleared of condensation as
qu ickly as possible. The rec irculat ion mode
switches off, but can be act ivated again manually
by pressing the~ button.
You can open or close the center and rear vents in
the cockpit and the vents in the rear center con
sole us ing the r idged thumbwhee ls. The levers
adjust the direction of the airflow from the vents.
To keep the front side windows from fogging up
in damp weather, we recommend opening the
side air vents and tilting them to the side.
~ R ecirc ulation mo de
In recircu lation mode, the a ir inside the vehicle is
circu lated and fi ltered. This prevents the unfil
tered air outside the vehicle from entering the
vehicle interior . Switching recircu lation mode on
when dr iving through a tunnel or when sitting in
traffic is recommended
¢ .&, . If recirculation
mode is sw itched on before the eng ine starts, it
will be switched off automatically after approx i
mate ly 20 minutes.
Recirculation mode is switched off in the defrost
setting®.
QW R ea r win dow defogger
The rear window defogger only operates when
the eng ine is running. It switches off automati-
Warm and c old
ca lly after approximately 10 to 20 minutes, de
pending on the outside temperature .
J Seat heating*
You can adjust the left and right heated seat
temperature using the left/right thumbwheel.
T he seat heating is switched off when the leve l is
set to 0.
A WARNING .-==-
- You sho uld not use the recircu lation mode
for an extended period since no fresh air is
drawn in. When the A/C system* is sw itched
off, the windows can fog up, which increas
es the risk of an acc ident.
- Individuals w ith reduced sensit ivity to pa in
or temperature could develop burns when
using the seat heat ing* function . To reduce
the r isk of inju ry, these individua ls sho uld
not use seat heating*.
Q) Note
To avoid damaging the seat heat ing* ele
ments, do not kneel on the seats o r place
heavy pressure on one area of the seat .
53
Page 56 of 230
Warm and cold
Automatic climate control system
Applies to: vehicles with automatic climate control
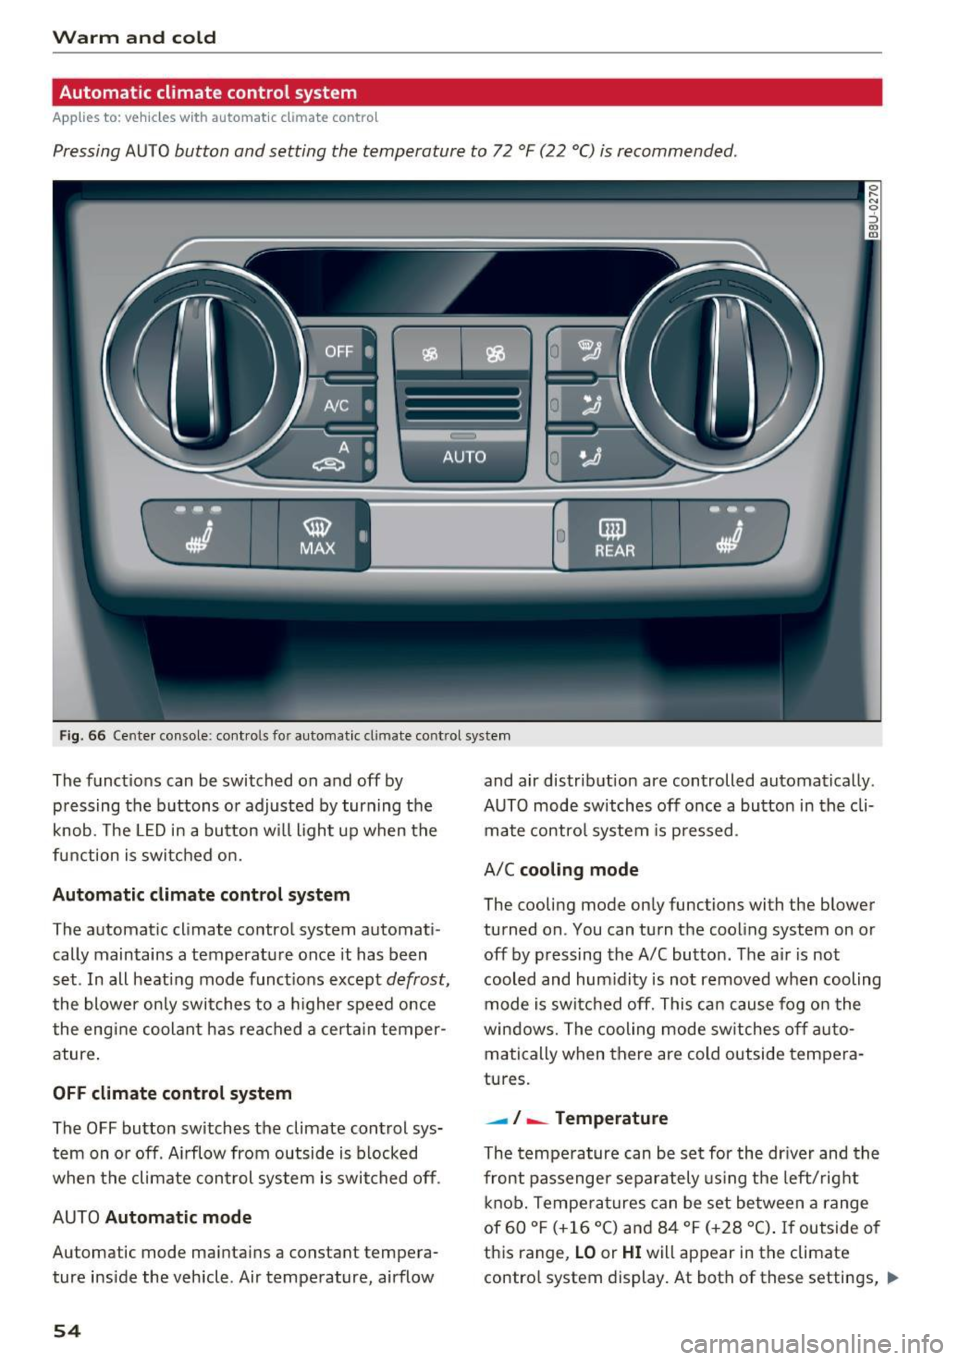
Pressing AUTO button and setting the temperature to 72 °F (22 °C) is recommended.
Fig . 66 Cente r console: cont ro ls fo r auto matic cl imate co ntrol system
The f unct ions can be switched on and off by
pressing the b uttons or adjusted by turning the
knob. The
LE D in a button w ill light up when the
function is switched on.
Autom atic climate control sy stem
The automat ic climate control system automat i
cally maintains a temperatu re once it has been
set . In all heat ing mode funct ions except
defrost,
the blower on ly switches to a higher speed once
the engine coolant has rea ched a certa in temper
ature .
OFF climate control s ystem
The OFF button switches the climate control sys
tem on or off . A irflow from outside is blocked
when the climate con trol system is swit ched off .
AUTO
Automatic mode
Automatic mode ma intains a constant tempera
ture ins ide the vehicle . Air temperature, airflow
54
and air distrib ution are controlled automatically .
AUTO mode switches off once a button in the cli mate contro l system is pressed .
A/C
cooling mode
The cooling mode only functions with the blower
turned on . You can turn the cooling system on or
off by pressing the A/C button . The a ir is not
cooled and hum idity is not removed when cooling
mode is sw itc hed off. This can cause fog o n the
windows. The cooling mode sw itches off a uto
matically when there are cold outside tempera
tures.
- ! -Temperature
The tempe rature can be set for the dr iver and the
front passenger separately using the left/rig ht
knob. Tempe ra tu res can be set between a range
of 60 °F (+16 °C) and 84 °F (+28 °C) .
If outside of
th is range,
LO or HI will appear in the climate
contro l system display. At both of these settings, ..,_
Page 57 of 230

0 co ......
"' ,....
"' ...... 0 0 :::,
00
the climate control system runs continuously at
maximum cooling or heating power. There is no
temperature regulation.
Synchronization : by pressing the AUTO button
for two seconds, the temperature setting for the
driver's side is transferred to the front passeng
er's side. This applies a temperature change to
the front passenger's side.
Be Blower
Using the regulator 8ft, you can manually adjust
the volume of air generated by the blower to your
preference.
Use the left
8ft butto n to decrease the air speed,
and use the right
8ft button to increase the air
speed .
The blower should always run at a low setting to
prevent the windows from fogging and to ensure
a continuous exchange of a ir inside the vehicle.
To have the airflow regulated automatically,
press the AU TO button.
!,.i /:,0/!,DAir distribution and vents
The air distr ibut ion can adjusted with the but
tons. To have the air dist rib ut ion regulated a uto
matica lly, press the AUTO button.
You can open or close the center and rear vents in
the cockpit and the vents in the rear center con
sole using the r idged thumbwheels . T he levers
adjust the direction of the airflow from the vents .
To keep the front s ide windows from fogging up
in damp weathe r, we recommend opening the
side air vents and tilting them to the side.
~ MAX Defrosting
The windshield and side windows are defrosted
or cleared of condensation as quickly as possible.
The maximum amount of air flows mainly from
the vents below the windshie ld. Recirculation
mode switches off. The temperature should be
set at +72°F (22°() or highe r.
The AUTO button sw itches the defroster off.
Warm and cold
~A Recirculation mode
To switch on the recircu lation mode, press the
~A button . The lower LED in the button turns
on .
In rec ircu lation mode, the air inside the vehicle is
circulated and filtered. This prevents the unfi l
tered air outside the vehicle from entering the
vehicle interior. Switching recirculat ion mode on
when driving through a tunnel or when sitting in
traffic is recommended
¢ ,&..
The AU TO button or@ button switches recircula
tion mode off.
T o switc h on the automatic recirculation mode,
press the
~A button again. The upper LED in the
button turns on. The system switches to recircu
lation mode when driving in reverse when the en
gine is cold. The air quality sensor that is de
s igned for diese l and gasoline exhaust automati
ca lly switches the recirculation mode on or off
depending on the level of pollutants in the out
s ide air . Automatic rec irculat ion mode is time re
stricted when cooling mode (A/C) is sw itched off
and frost temperatures are ide ntif ied.
QW REAR Rear window defogger
The rear window defogger on ly operates when
the engine is running and will be automatically
switched off after approximately 10 minutes.
.J Seat heating*
Pressing the button switches the seat heating on
at the highest setting (level 3).
The LEDs indicate the temperature level. To re
duce the temperature, press the button again. To
switch the seat heating off, press the button re
peatedly until the LED turns off.
A ft er approximately 10 minutes, the seat heating
automatica lly switches from level 3 to level 2.
Switching the temperature measurement
units
The temperature display can be switched be
tween °C and °F. Press and hold the
~A button
¢ fig. 66 and turn the knob on the driver's side to
- for three seconds. ..,
55
Page 58 of 230
Warm and cold
& WARNING
-You should not use the recirculation mode
for an extended period of time, because no
fresh air is drawn in and the windows can
fog when cooling mode is switched off. This
increases the risk of an accident .
- Individuals with reduced sensitivity to pain
or temperature could develop burns when
using the seat heating* function. To reduce
the risk of injury, these individuals should
not use seat heating*.
(D Note
To avoid damaging the seat heating* ele
ments, do not kneel on the seats or place
heavy pressure on one area of the seat.
56
Page 59 of 230
0 co ......
"' ,....
"' ...... 0 0 :::,
00
Driving
General information
Breaking in
A new vehicle must be broken in for the first
1,000 mi les (1,500 km). For the first 600 miles
(1,000 km), do not drive at speeds that are more
than 2/3 of the maximum permitted RPM, avoid
full acce leration, and do not tow a trailer . You
may gradually start increasing the RPM and the
speed between 600 miles (1,000 km) and 1,000
miles (1,500 km) .
During the first hours of use, the engine has a
higher internal friction than later on when all
moving parts have settled into p lace with each
other.
How the vehicle is driven during the first 1,000
miles (1,500 km) also affects the engine quality.
Drive at moderate engine speeds after the initia l
break-in period, particularly when running a cold
engine . This will reduce eng ine wear and improve
the m ileage .
Do not drive at too
low of an engine speed (RPM).
Shift down if the engine stops running "smooth ly". Extremely high eng ine speeds are automati
cally reduced.
Reducing the risk of vehicle damage
([) Note
When driving on poor roads, by curbs and on
steep ramps , make su re that low-hang ing
components such as the spoiler and exhaust
system do not come into contact with these
or they could be damaged. This especially ap
plies to vehicles with low ground clearance
and vehicles that are heavily loaded.
Driving through water on roads
Note the following to reduce the risk of vehicle
damage when driv ing through water, for example
on flooded roads :
- The water must not be any higher than the bot
tom of the vehicle body.
D riving
- Do not drive faster than walking speed.
A WARNING
After driv ing through water or mud, the effec
tiveness of the brakes may be reduced due to moisture on the brake rotors and brake pads.
A few careful brake applications should dry
off the brakes and restore the full braking ef
fect .
(D Note
Vehicle components such as the engine,
transmission, suspension or electrical system
can be severely damaged by driving through
water.
(D Tips
-Determine the depth before driving through
water.
- Do not stop the vehicle, drive in reverse or
switch the engine off when driving through
water.
- Keep in mind that oncom ing vehicles may
create waves that raise the water level and
make it too deep for your vehicle to drive
through safely.
- Avoid dr iving through salt water, because
this can cause corrosion .
Economical and environmentally-friendly
driving
T he amount o f fuel consumption, the environ
mental impact and the wear to the engine,
brakes and tires depends mostly on your driving
style. With an anticipatory and economic driving
style, fuel consumption can be reduced by ap proximately 10-15% . The following tips will help
you conserve the environment and your money at
the same time .
Anticipatory driving
A vehicle uses the most fuel when accelerating.
When you drive with anticipation, you do not
need to brake as often and so you accelerate less.
When possible, let your vehicle coast with a
gear
engaged,
for examp le when you notice that the
next t raffic light is red. This produces an engine
llll-
57
Page 60 of 230
Driving
braking effec t, which he lps to protect the brakes
and tires and reduces the emissions and fuel con
sumpt ion to zero (fuel shut-off during dece lera
tion) .
Shift effici en tly
Upshift ing earlier is an effective way to save fuel.
Staying in a gear too long uses fue l unnecessari
ly.
P ress down o n the acce le ra tor peda l slowly and
avoid " kick -down ".
Avoid full acceleration
You should rare ly trave l at the maximum vehicle
speed. High speeds cause a d isproportionately
h igh inc rease in fuel consump tion, emissions and
tr affic no ise. Slower driving saves fuel.
Reduce idling time
There are benefits to stopp ing the engine, for ex
ample when at railroad crossings or traffic lights
with longer red lights. Stopping the engi ne for
30 -40 seconds already saves mo re fuel than the
amount of extra fuel needed to restart the en
gine.
It takes a very long time in idle to wa rm the en
g ine up to ope ra ting tempe ra tu re. Wea r and
emissions are especially high in the wa rm -up
phase . Therefore, yo u should begi n driving im
mediately after starting the engine. Avoid high
RP Ms while doing t his .
Have maintenance performed r egularly
By having m ainten ance perfo rmed regu larly on
your ve hicle, yo u can he lp to reduce f uel con
sumpt ion befo re yo u even start to dr ive. The
maintenance condition of your vehicle not only
affects traffic safety and long-te rm value but a l
so impacts
fuel consumpt ion . A poorly main
tained engine can lead to fuel consumption that
is 10% higher than normal.
Also check th e
oil level when refueling . T he oil
consumption
depends large ly on the engine load
and speed. It is normal for the oil consumpt ion
of a new eng ine to reach its lowest point only af
ter a certain amount of use. Therefo re, the oil
consumpt ion can o nly be properly judged after
58
approximately 3,0 00 miles (S,000 km) have been
driven .
Avoid short trips
The eng ine and exhaust clean ing system mus t
r each their optima l
operating temperature to ef
fe ct ively reduce consump tion and emissions.
A cold engine uses a d isp roportionately high
amount of fue l. The engine reac hes operat ing
temperat ure and cons umption no rmal izes on ly
a fter approximate ly 2.5 m iles (4 km) .
Check the tire pressure
To save fuel, make sure the t ires are always in
flated to the correct pressure ~
page 175. The
fuel consumpt ion can increase by 5% if the p res
s ur e is on ly 0.5 bar too low. Due to the i ncreased
rol ling resis tance, low tire p ressures w ill also
l ead to greater tire
wear and will affect driving
behavior .
Do no t drive on
winter tir es ye ar-r ound, as this
will consume up to 10% more f uel.
Eliminate unnecessary weight
S ince every po und of ext ra weight increases fuel
consump tion , a quick inspect io n of the luggage
compartmen t may be wo rth it to avoid unneces
s ar y we ight.
When not be ing used, a roof rack shou ld be re
moved to decrease the w ind resistance of the ve
hi cle. This will save yo u ap prox imately 1 2% fue l
at speeds from 62 -75 mph (100 -12 0 km/h).
Save energy
The eng ine drives the generator, which generates
e lectric ity; the fuel consumpt io n also increases
with t he demand for e lectricity . T he refore, sw itch
electrica l eq uipm ent off whe n you no longe r
need i t. Exa mples of eq uipme nt tha t uses a lo t of
energy a re air blowe rs at a high setting, the rea r
window defogger and seat heating* .
([) Note
-Do not leave engine idling un attended afte r
sta rting. If warn ing li ghts should come on
to ind icate improper ope ration, they wou ld
go unheeded . Extended idling also pro duces .,.