tires AUDI Q3 2019 Owners Manual
[x] Cancel search | Manufacturer: AUDI, Model Year: 2019, Model line: Q3, Model: AUDI Q3 2019Pages: 280, PDF Size: 72.73 MB
Page 88 of 280
Driving
i Transmission: malfunction! You can contin-
ue driving. See owner's manual
There is a system malfunction in the transmis-
sion. You may continue driving. Drive to an au-
thorized Audi dealer or authorized Audi Service
Facility soon to have the malfunction corrected.
fs} Transmission: malfunction! You can contin-
ue driving with limited function. Please contact
Service
There is a system malfunction in the transmis-
sion. The transmission is switching to emergency
mode. This mode only shifts into certain gears or
may no longer shift at all. The engine may stall.
Drive to an authorized Audi dealer or authorized
Audi Service Facility immediately to have the
malfunction corrected.
fs} Transmission: malfunction! You can contin-
ue driving with limited function. No reverse
gear
There is a system malfunction in the transmis-
sion. The transmission is switching to emergency
mode. This mode only shifts into certain gears or
may no longer shift at all. The engine may stall.
You cannot engage the reverse gear. Drive to an
authorized Audi dealer or authorized Audi Service
Facility immediately to have the malfunction cor-
rected.
[8] Transmission: malfunction! You can contin-
ue driving in D until engine is off
There is a system malfunction in the transmis-
sion. The transmission is switching to emergency
mode. If you turn the engine off, you will not be
able to select any other gears after restarting the
engine. Drive to an authorized Audi dealer or au-
thorized Audi Service Facility immediately to have
the malfunction corrected.
fs} Danger of rolling away! P not possible.
Please apply parking brake
— The parking lock was released using the emer-
gency
release > page 85. Or
— The parking lock can no longer be engaged.
Drive to an authorized Audi dealer or author-
ized Audi Service Facility immediately to have
the malfunction corrected.
86
fs] Clutch: malfunction! Please contact service
There is an ongoing malfunction in the clutch.
The engine torque that can be transferred is re-
duced. You may continue driving. Avoid using the
clutch in any way that will place a heavy load on
it. Do not let the clutch rub for a long time. Drive
immediately to an authorized Audi dealer or au-
thorized Audi Service Facility to have the mal-
function repaired.
i Clutch: temperature too high. Adapt driving
style
There is a malfunction in the clutch. The engine
torque
that can be transferred is reduced. You
may continue driving. Avoid using the clutch in
the future in any way that will place a heavy load
on it. Do not let the clutch rub for a long time.
The indicator light turns off once the clutch is
fully operable again.
Clutch: check pedal. You can continue driv-
ing
The clutch is not transferring all of the engine
torque. If necessary, remove your foot from the
clutch pedal.
Drive system
A new vehicle must be broken in within the first
1,000 miles (1,500 km) so that all moving parts
work smoothly together, which helps to increase
the service life of the engine.
Do not drive higher than two-thirds of the maxi-
mum permitted engine RPM during the first 600
miles (1,000 km) and do not use full accelera-
tion. The engine can be increased RPM gradually
during the next 300 miles (500 km).
ieee LR deollaCil el Meda LaCe Lig
driving
Your driving style greatly influences the amount
of fuel and energy consumed, the environmental
impact, and the wear on the engine, brakes, and
tires. Note the following information for efficient
and environmentally-conscious driving:
Page 89 of 280
83A012721BA
Driving
— Turn off electrical equipment that is not need-
ed, for example seat heating*.
— Anticipate upcoming traffic situations while
driving to avoid unnecessary acceleration and
braking.
— Avoid driving at high speeds.
— Avoid adding extra weight to the vehicle if pos-
sible, for example by not leaving roof racks or
bike racks installed when they are not needed.
— Make sure the tire pressure is correct.
— Have maintenance performed regularly on the
vehicle.
— Do not let the engine run while the vehicle
parked.
— Do not drive with winter tires during the summ-
er.
— Use the Start/Stop system.
— Utilize the engine braking effect.
— Avoid driving short distances when possible.
@ Tips
The amount of noise produced by the vehicle
can increase significantly when driving with a
sporty style. Show respect to others around
you and the environment with the way you op-
erate your vehicle, especially at night.
Energy management
Your vehicle is equipped with an intelligent ener-
gy management system for distributing electrici-
ty. This significantly improves the starting ability
and increases the vehicle battery life.
@ Tips
— If you drive short distances frequently, the
vehicle battery may not charge enough
while driving. As a result, convenience func-
tions for electrical equipment may be tem-
porarily unavailable.
— The vehicle battery will gradually drain if
the vehicle is not driven for long periods of
time, or if electrical equipment is used
when the engine is not running. To ensure
that the vehicle can still be started, the
electrical equipment will be reduced or
switched off.
B Drive system: malfunction! Safely stop vehi-
cle
There is a malfunction in the drive system. The
brake
booster and the power steering may stop
working. Stop the vehicle immediately or as soon
as possible and do not continue driving. Have the
problem corrected by an authorized Audi dealer
or authorized Audi Service Facility.
B Drive system: malfunction! Please contact
Service
There is a malfunction in the drive system. Drive
slowly to an authorized Audi dealer or authorized
Audi Service Facility to have the malfunction cor-
rected.
Start/Stop system
Applies to: vehicles with Start/Stop system
The Start/Stop system can help increase fuel
economy and reduce CO2 emissions.
In Start/Stop mode, the engine shuts off auto-
matically when stopped, for example at a traffic
light. The ignition and important assist systems
such as power steering and the brake booster will
remain available during the Stop phase. The en-
gine will restart automatically when needed.
The Start/Stop system is automatically activated
once the ignition is switched on.
Basic requirements
— The driver's door and hood must be closed.
—"P","N", or"D" must be engaged.
— The steering wheel must not be turned far in ei-
ther direction.
— The vehicle must have driven faster than 2 mph
(3 km/h) since the last time it stopped.
—The vehicle is not in trailer mode.
@) Note
Always switch the Start/Stop system off when
driving through water > page 88. >
87
Page 104 of 280
Trailer towing
Tongue weight
The maximum permitted tongue weight of the
trailer drawbar on the trailer hitch ball head may
not be exceeded.
If the tongue weight is too low, this affects the
trailer's handling. For driving safety, we recom-
mend to always utilize the maximum permitted
tongue weight, but not exceed it. You can reach
it, for example, by distributing the cargo in the
trailer correctly.
You can determine the tongue weight using a
tongue weight scale, a bathroom scale, or a pub-
lic weigh station, for example.
The permitted tongue weight of your vehicle can
be found in the vehicle documentation or in
=> page 264.
Load distribution
Poor cargo load and distribution can negatively
impact vehicle handling. Load the trailer based
on the following criteria as much as possible:
— Store objects preferably in the vehicle luggage
compartment. The vehicle should always carry
the heaviest possible load and the trailer
should have the lightest possible load.
— Distribute the load in the trailer so that the
heavy objects are as close to the axle as possi-
ble.
— Secure objects from sliding out of place.
— Utilize the maximum permitted tongue weight
if possible.
Tires
Set the tire pressure on your vehicle for a “full
load”; see the tire pressure sticker > page 226. If
necessary, also adjust the tire pressure on the
trailer according to the manufacturer's recom-
mendation.
Winter tires should be mounted on the vehicle
and on the trailer during winter temperatures.
Outside mirrors
If you cannot see the traffic behind the trailer
with the standard exterior mirrors, then you
must attach additional exterior mirrors. Adjust
102
them so you have a sufficient visibility behind
you.
Exterior lighting
Follow the legal regulations for lighting on your
trailer that are applicable in the country where
you are operating the vehicle. Contact an author-
ized Audi dealer or authorized Audi Service Facili-
ty for more information.
Before starting to drive, check all lighting equip-
ment on the hitched trailer.
The headlight range control adjusts automatical-
ly to the light range of the headlights.
Safety chains
Make sure the safety chains are correctly applied
when pulling a trailer. The chains should hang
enough so that the trailer can drive around
curves. However, they must not touch the
ground.
@) Note
Attachments retrofitted on the vehicle may
cause damage, especially on the trailer hitch
ball head. In cases of damage, have the func-
tion checked by an authorized Audi dealer or
authorized Audi Service Facility.
G) Tips
— Use chocks when parking on inclines if the
trailer is loaded.
—We recommend also having the vehicle in-
spected between the inspection intervals if
you are towing a trailer frequently.
— Avoid driving with a trailer during the vehi-
cle break-in period.
Driving with a trailer
Driving with a trailer requires extra caution.
Speed
Adhere to the legal speed limits. Follow the legal
regulations that are applicable in the country
where you are operating the vehicle.
Page 110 of 280
Driving information
Driving information
Speed warning system
Applies to: vehicles with speed warning system
The speed warning system helps the driver to
stay below a specified maximum speed. A warn-
ing threshold can be set for this purpose.
Once the speed slightly exceeds the stored
threshold, the speed warning system will alert
the driver with an indicator in the instrument
cluster and a warning tone. Once the speed drops
below the stored maximum speed, the indicator
will turn off.
Setting a threshold is recommended if you would
like to be reminded when you reach a certain
maximum speed. Situations where you may want
to do so include driving in a country with a gener-
al speed limit or if there is a specified maximum
speed for winter tires.
G) Tips
Regardless of the speed warning system, you
should always monitor your speed using the
speedometer and make sure you are following
the legal speed limit.
Setting the warning threshold
Applies to: vehicles with speed warning system
» Applies to: MMI: Select on the home screen:
VEHICLE > Driver assistance > Speed warning.
CEE Tel
Applies to: vehicles with speed warning system
cy Manually set XX speed limit warning
threshold exceeded
The stored speed was exceeded.
108
Traffic light information
Applies to: vehicles with traffic light information
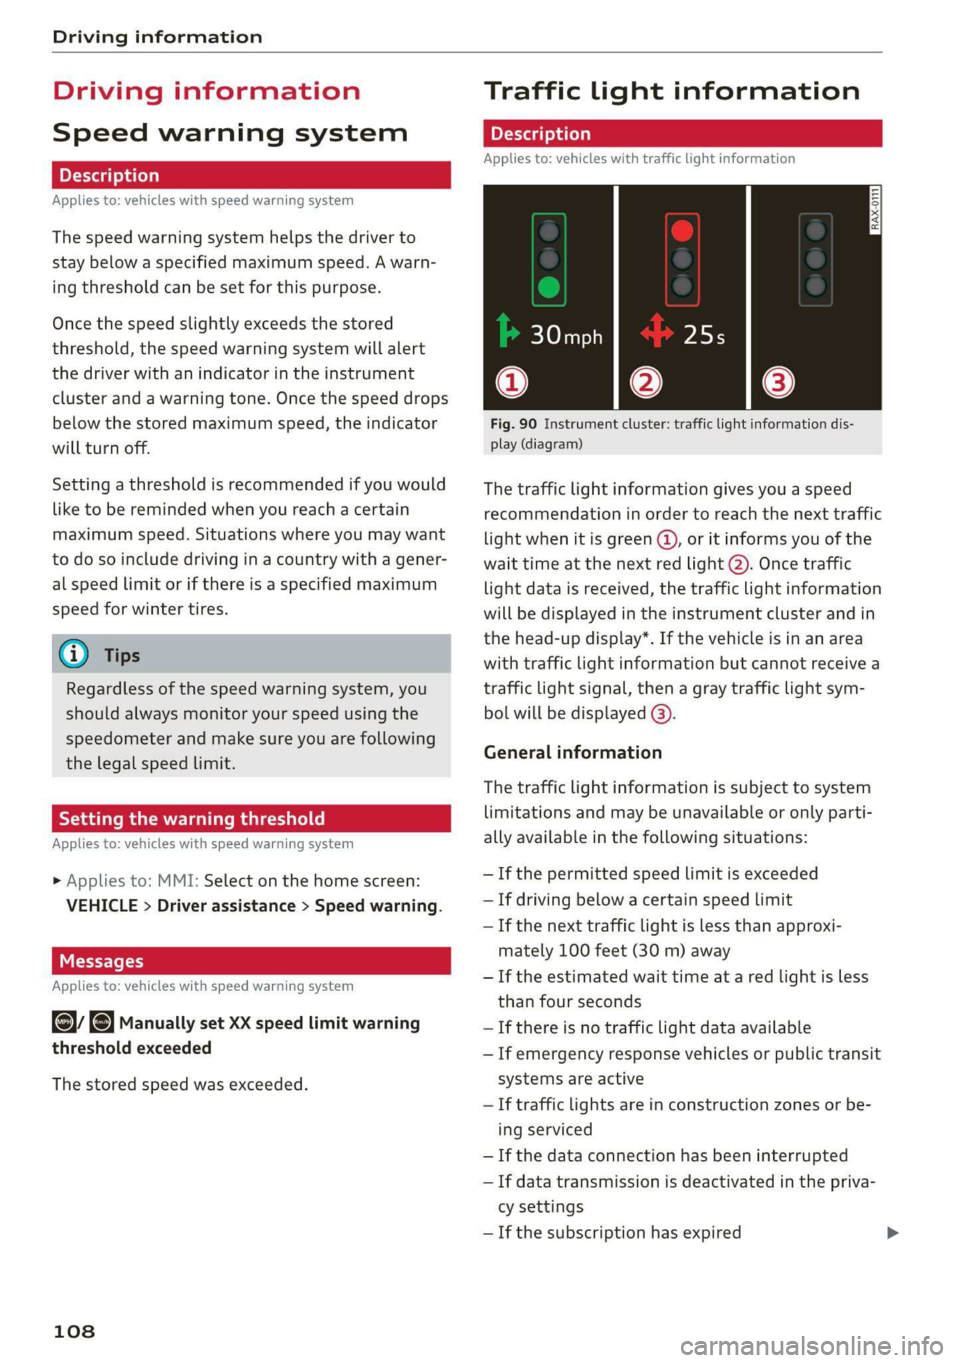
Fig. 90 Instrument cluster: traffic light information dis-
play (diagram)
The traffic light information gives you a speed
recommendation in order to reach the next traffic
light
when it is green ©, or it informs you of the
wait time at the next red light 2). Once traffic
light data is received, the traffic light information
will be displayed in the instrument cluster and in
the head-up display*. If the vehicle is in an area
with traffic light information but cannot receive a
traffic light signal, then a gray traffic light sym-
bol will be displayed @).
General information
The traffic light information is subject to system
limitations and may be unavailable or only parti-
ally available in the following situations:
— Ifthe permitted speed limit is exceeded
— If driving below a certain speed limit
—If the next traffic light is less than approxi-
mately 100 feet (30 m) away
—If the estimated wait time at a red light is less
than four seconds
—If there is no traffic light data available
— If emergency response vehicles or public transit
systems are active
— If traffic lights are in construction zones or be-
ing serviced
— If the data connection has been interrupted
— If data transmission is deactivated in the priva-
cy settings
— If the subscription has expired
Page 134 of 280
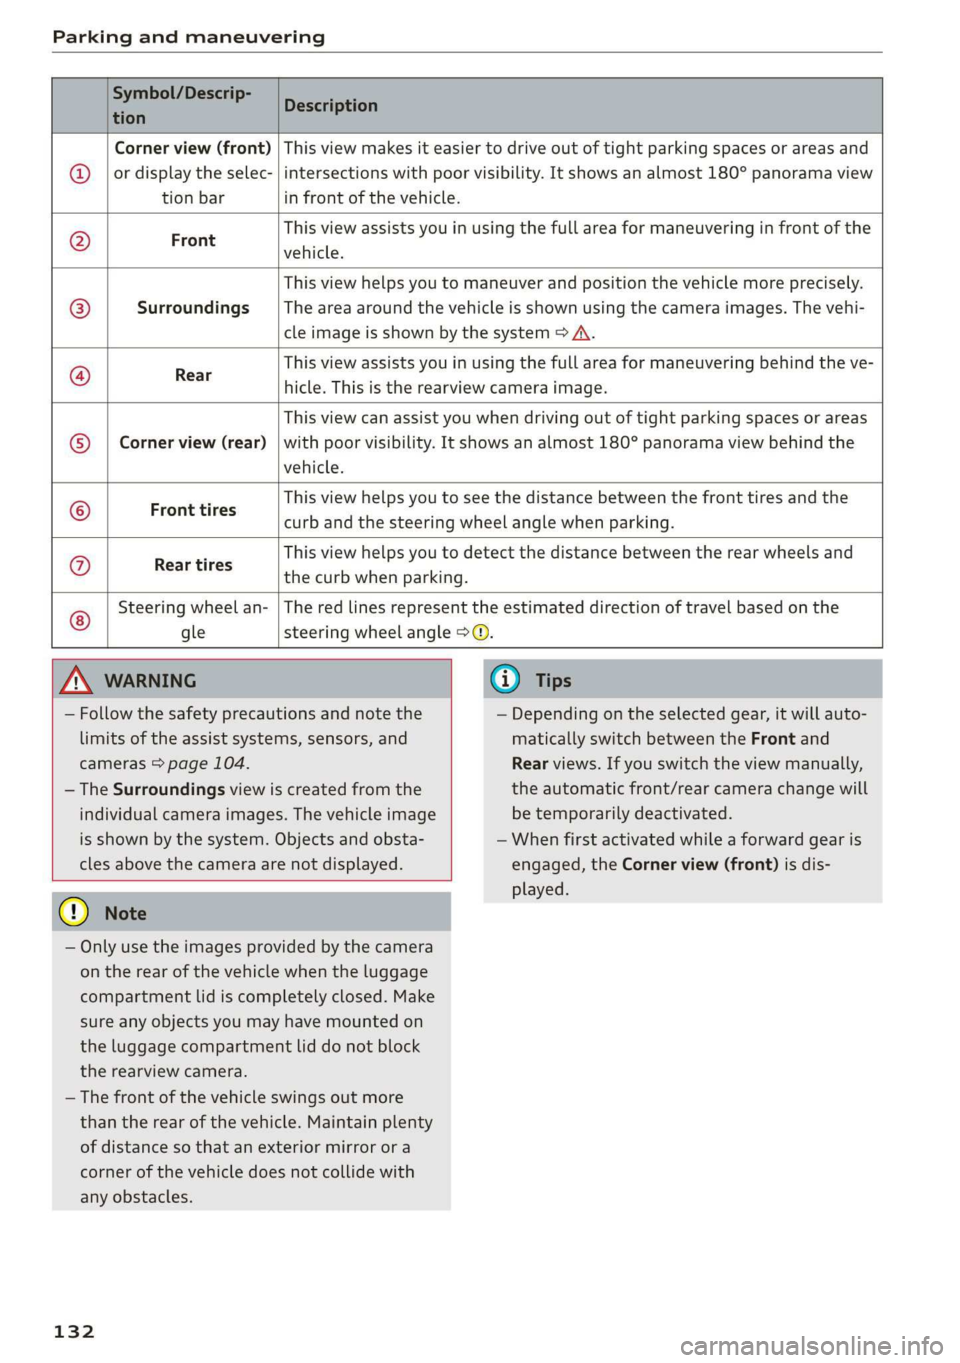
Parking and maneuvering
Symbol/Descrip-
tion
Description
Corner view (front)
or display the selec-
tion bar
This view makes it easier to drive out of tight parking spaces or areas and
intersections with poor visibility. It shows an almost 180° panorama view
in front of the vehicle.
Front
This view assists you in using the full area for maneuvering in front of the
vehicle.
Surroundings
This view helps you to maneuver and position the vehicle more precisely.
The area around the vehicle is shown using the camera images. The vehi-
cle image is shown by the system > A\.
Rear
This view assists you in using the full area for maneuvering behind the ve-
hicle. This is the rearview camera image.
Corner view (rear)
This view can assist you when driving out of tight parking spaces or areas
with poor visibility. It shows an almost 180° panorama view behind the
vehicle.
Front tires
This view helps you to see the distance between the front tires and the
curb and the steering wheel angle when parking.
G/@}
©
|O|}
©
|@]}]
©
Rear tires
This view helps you to detect the distance between the rear wheels and
the curb when parking.
Steering wheel an-
gle
The red lines represent the estimated direction of travel based on the
steering wheel angle >@.
Z\ WARNING
— Follow the safety precautions and note the
limits of the assist systems, sensors, and
cameras > page 104.
— The Surroundings view is created from the
individual camera images. The vehicle image
is shown by the system. Objects and obsta-
cles above the camera are not displayed.
@) Note
— Only use the images provided by the camera
on the rear of the vehicle when the luggage
compartment lid is completely closed. Make
sure any objects you may have mounted on
the luggage compartment lid do not block
the rearview camera.
— The front of the vehicle swings out more
than the rear of the vehicle. Maintain plenty
of distance so that an exterior mirror or a
corner of the vehicle does not collide with
any obstacles.
132
G) Tips
— Depending on the selected gear, it will auto-
matically switch between the Front and
Rear views. If you switch the view manually,
the automatic front/rear camera change will
be temporarily deactivated.
— When first activated while a forward gear is
engaged, the Corner view (front) is dis-
played.
Page 138 of 280
Parking and maneuvering
The driver must decide if the parking space
displayed is suitable for the vehicle.
— Certain conditions near the parking space
may cause the parking process to fail, such
as if the parking space is near trees or posts,
or if the ground is covered, for example,
with gravel, snow, or ice.
G) Tips
— If you did not drive past a suitable parking
space too quickly, you can also select Pe to
activate the system afterwards.
— The Electronic Stabilization Control (ESC)
must not be switched off during the parking
process. If the ESC intervenes, the parking
process
will be canceled.
— You can also drive into a perpendicular park-
ing space yourself and then activate the sys-
tem. If this is the case, the front of the vehi-
cle should already be in the space (4)
= page 134, fig. 116 so that the sensors
can measure the space.
— You cannot park with the parking assist sys-
tems when you are towing a trailer or have
the connector inserted in the trailer socket.
— The system is not available when certain as-
sist systems are switched on.
— If there are suitable parking spaces on both
sides of the street, for example on a one-
way street, you can change the side where
the system is searching for parking spaces
by activating the turn signal for the other
side or by pressing on that side in the center
display.
— The park systems do not provide support for
assisted parking on tight curves.
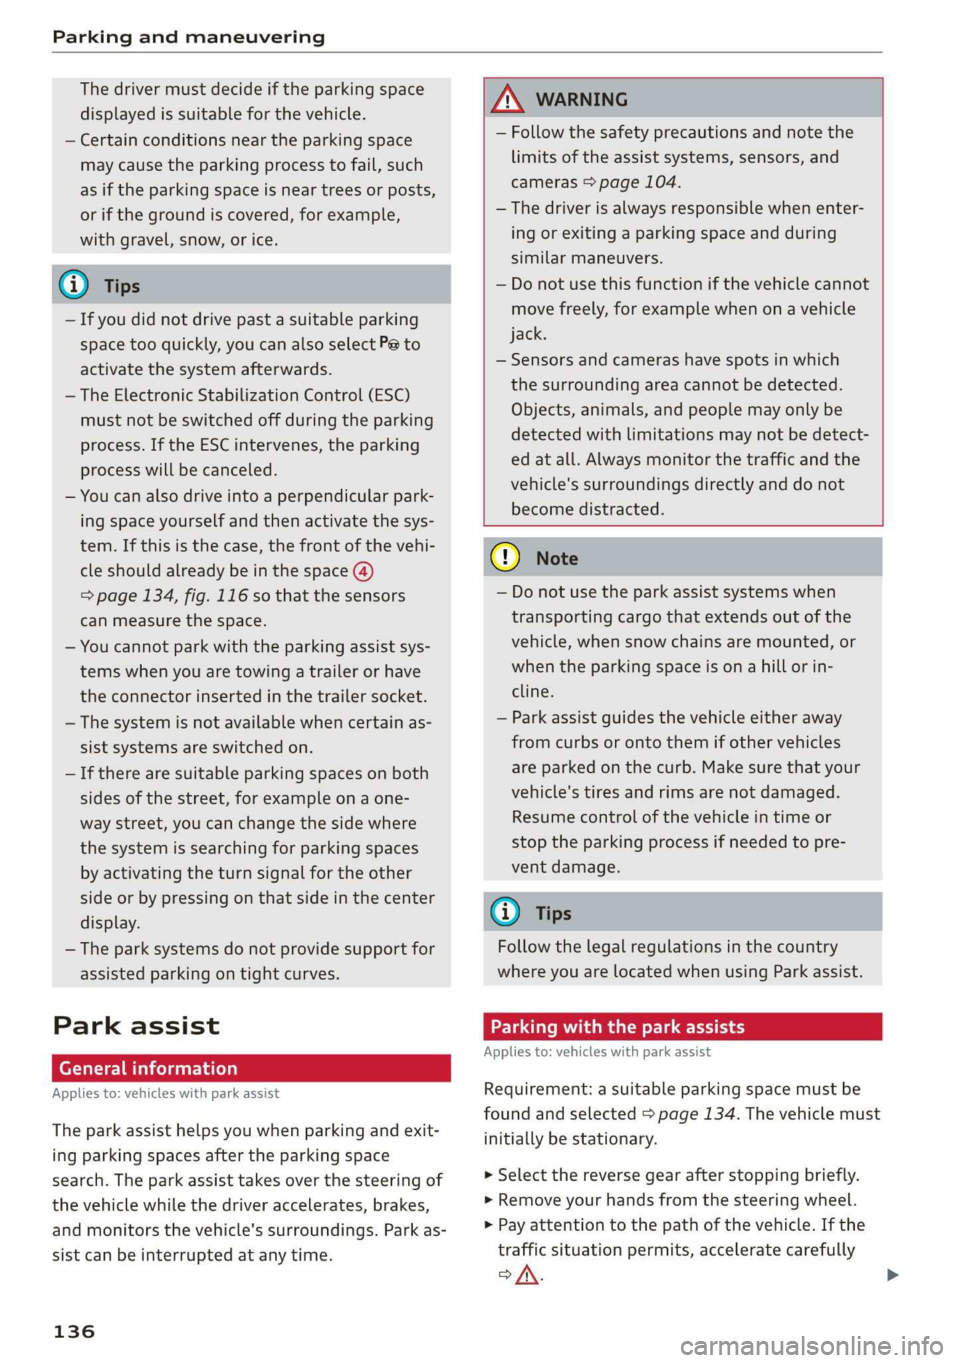
Park assist
(eT eeeeue lela)
Applies to: vehicles with park assist
The park assist helps you when parking and exit-
ing parking spaces after the parking space
search. The park assist takes over the steering of
the vehicle while the driver accelerates, brakes,
and
monitors the vehicle's surroundings. Park as-
sist can be interrupted at any time.
136
Z\ WARNING
— Follow the safety precautions and note the
limits of the assist systems, sensors, and
cameras > page 104.
— The driver is always responsible when enter-
ing or exiting a parking space and during
similar maneuvers.
— Do not use this function if the vehicle cannot
move freely, for example when on a vehicle
jack.
— Sensors and cameras have spots in which
the surrounding area cannot be detected.
Objects, animals, and people may only be
detected with limitations may not be detect-
ed at all. Always monitor the traffic and the
vehicle's surroundings directly and do not
become distracted.
@) Note
— Do not use the park assist systems when
transporting cargo that extends out of the
vehicle, when snow chains are mounted, or
when the parking space is on a hill or in-
cline.
— Park assist guides the vehicle either away
from curbs or onto them if other vehicles
are parked on the curb. Make sure that your
vehicle's tires and rims are not damaged.
Resume control of the vehicle in time or
stop the parking process if needed to pre-
vent damage.
G) Tips
Follow the legal regulations in the country
where you are located when using Park assist.
dem ne eee
Applies to: vehicles with park assist
Requirement: a suitable parking space must be
found and selected > page 134. The vehicle must
initially be stationary.
> Select the reverse gear after stopping briefly.
> Remove your hands from the steering wheel.
> Pay attention to the path of the vehicle. If the
traffic situation permits, accelerate carefully
of.
Page 218 of 280
Wheels
Wheels Wheels
and Tires
General information
> Check your tires regularly for
damage (punctures, cuts, cracks
and bulges). Remove foreign ob-
jects from the tire tread.
>If driving over curbs or similar
obstacles, drive slowly and ap-
proach the curb at an angle.
>Have faulty tires or rims re-
placed immediately.
>Protect your tires from oil,
grease and fuel.
>Mark tires before removing
them so that the same running
direction can be maintained if
they are reinstalled.
>Lay tires flat when storing and
store them in a cool, dry location
with as little exposure to light as
possible.
AN WARNING
—Never drive faster than the
maximum permitted speed for
your tires. This could cause the
tires to heat up too much. This
increases the risk of an acci-
dent because it can cause the
tire to burst.
216
—Always adapt your driving to
the road and traffic condi-
tions. Drive carefully and re-
duce your speed on icy or slip-
pery roads. Even winter tires
can lose traction on black ice.
() Note
—Please note that summer and
winter tires are designed for
the conditions that are typical
in those seasons. Audi recom-
mends using winter tires dur-
ing the winter months. Low
temperatures significantly de-
crease the elasticity of summ-
er tires, which affects traction
and braking ability. If summer
tires are used in very cold tem-
peratures, cracks can form on
the tread bars, resulting in
permanent tire damage that
can cause loud driving noise
and unbalanced tires.
—Burnished, polished or
chromed rims must not be
used in winter driving condi-
tions. The surface of the rims
does not have sufficient corro-
sion protection for this and
could be permanently dam-
aged by road salt or similar
substances.
Page 219 of 280
83A012721BA
Wheels
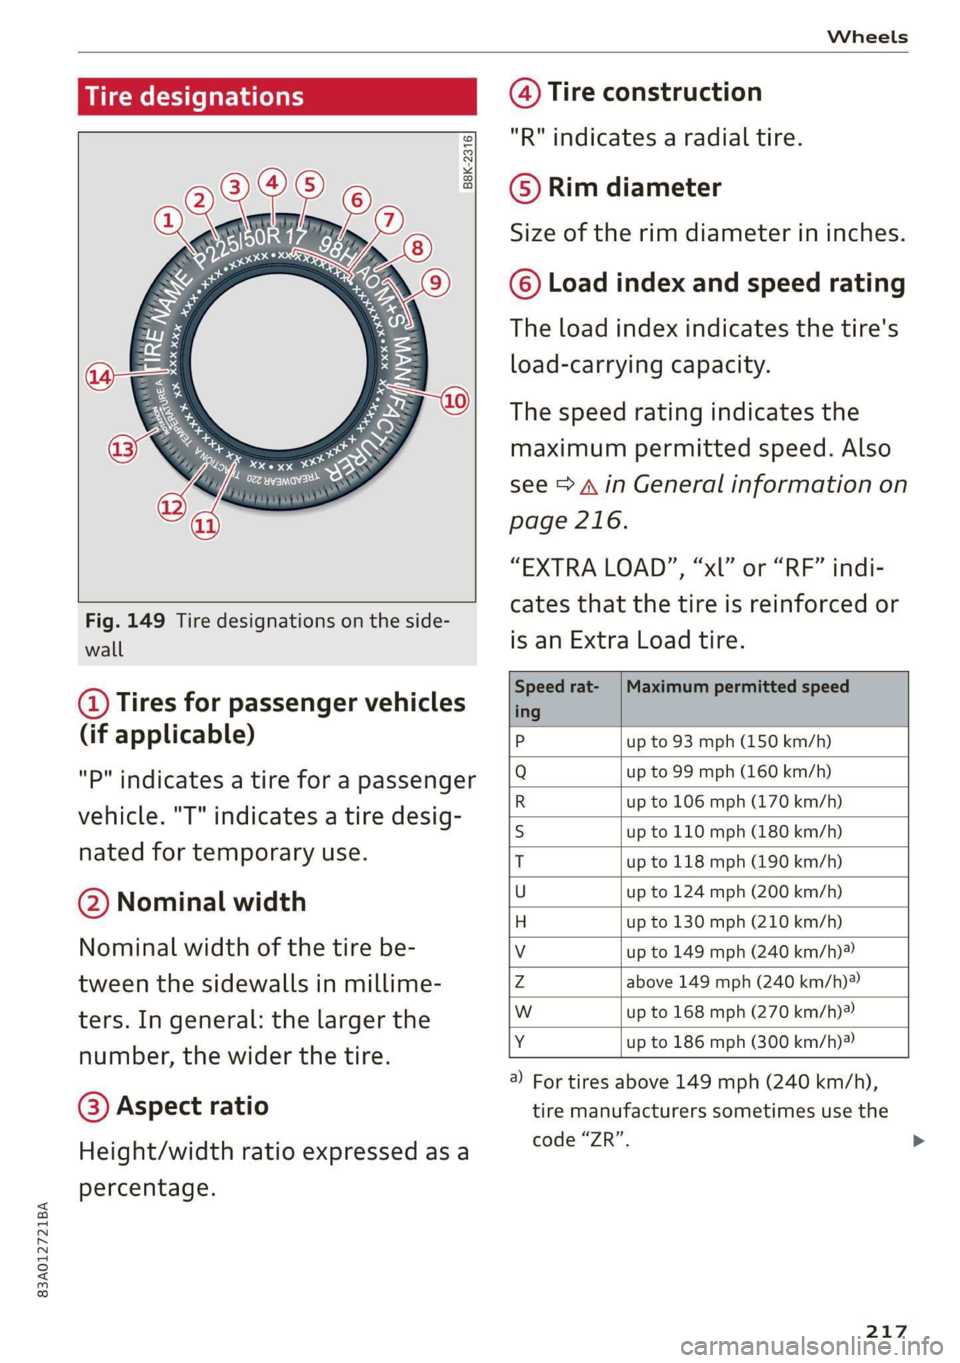
Tire designations
B8K-2316
Fig. 149 Tire designations on the side-
wall
@ Tires for passenger vehicles
(if applicable)
"P" indicates a tire for a passenger
vehicle. "T" indicates a tire desig-
nated for temporary use.
@ Nominal width
Nominal width of the tire be-
tween the sidewalls in millime-
ters. In general: the larger the
number, the wider the tire.
@) Aspect ratio
Height/width ratio expressed as a
percentage.
@ Tire construction
"R" indicates a radial tire.
©) Rim diameter
Size of the rim diameter in inches.
© Load index and speed rating
The load index indicates the tire's
load-carrying capacity.
The speed rating indicates the
maximum permitted speed. Also
see > A in General information on
page 216.
“EXTRA LOAD”, “xl” or “RF” indi-
cates that the tire is reinforced or
is an Extra Load tire.
Speed rat- /Maximum permitted speed
ing
P up to 93 mph (150 km/h)
Q up to 99 mph (160 km/h)
R up to 106 mph (170 km/h)
S up to 110 mph (180 km/h)
T up to 118 mph (190 km/h)
U up to 124 mph (200 km/h)
H up to 130 mph (210 km/h)
Vv up to 149 mph (240 km/h)?
Zz above 149 mph (240 km/h)?
w up to 168 mph (270 km/h)?
Y up to 186 mph (300 km/h)®)
) For tires above 149 mph (240 km/h),
tire manufacturers sometimes use the
code “ZR”.
217
Page 220 of 280
Wheels
@ US DOT number (TIN) and
manufacture date
The manufacture date is listed on
the tire sidewall (it may only ap-
pear on the inner side of the tire):
DOT... 2219...
means, for example, that the tire
was produced in the 22nd week of
the year 2019.
@) Audi Original Tires
Audi Original equipment tires
with the designation “AO” have
been specially matched to your
Audi. When used correctly, these
tires meet the highest standards
for safety and handling. An au-
thorized Audi dealer or author-
ized Audi Service Facility will be
able to provide you with more in-
formation.
@) Mud and snow capability
“M/S” or “M+S” indicates the tire
has properties making it suitable
to drive in mud or snow. /& indi-
cates a winter tire.
Composition of the tire cord
and materials
The number of plies indicates the
number of rubberized fabric lay-
ers in the tire. In general: the
more layers, the more weight a
218
tire can carry. Tire manufacturers
must also specify the materials
used in the tire. These include
steel, nylon, polyester and other
materials.
@ Maximum permitted load
This number indicates the maxi-
mum load in kilograms and
pounds that the tire can carry.
@ Uniform tire quality grade
standards for treadwear,
traction and temperature
resistance
Treadwear, traction, and tempera-
ture ranges > page 233.
@ Running direction
The arrows indicate the running
direction of unidirectional tires.
You must always follow the speci-
fied running direction
=> page 245.
Maximum permitted
inflation pressure
This number indicates the maxi-
mum pressure to which a tire can
be inflated under normal operat-
ing conditions.
Page 221 of 280
83A012721BA
Wheels
Glossary of tire and loading
terminology
Accessory weight
means the combined weight (in
excess of those standard items
which may be replaced) of auto-
matic transmission, power steer-
ing, power brakes, power win-
dows, power seats, radio, and
heater, to the extent that these
items are available as factory-in-
stalled equipment (whether in-
stalled or not).
Aspect ratio
means the ratio of the height to
the width of the tire in percent.
Numbers of 55 or lower indicate a
low sidewall for improved steer-
ing response and better overall
handling on dry pavement.
Bead
means the part of the tire that is
made of steel wires, wrapped or
reinforced by ply cords and that is
shaped to fit the rim.
Bead separation
means a breakdown of the bond
between components in the bead.
Cord
means the strands forming the
plies in the tire.
Cold tire inflation pressure
means the tire pressure recom-
mended by the vehicle manufac-
turer for a tire of a designated
size that has not been driven for
more than a couple of miles (kilo-
meters) at low speeds in the three
hour period before the tire pres-
sure is measured or adjusted.
Curb weight
means the weight of a motor ve-
hicle with standard equipment in-
cluding the maximum capacity of
fuel, oil, and coolant, air condi-
tioning and additional weight of
optional equipment.
Extra load tire
means a tire designed to operate
at higher loads and at higher in-
flation pressures than the corre-
sponding standard tire. Extra load
tires may be identified as “XL”,
“xL’, “EXTRA LOAD”, or “RF” on
the sidewall.
219