AUDI Q3 2020 Owners Manual
Manufacturer: AUDI, Model Year: 2020, Model line: Q3, Model: AUDI Q3 2020Pages: 278, PDF Size: 72.66 MB
Page 241 of 278
83A012721BB
Care and cleaning
— Never treat leather with solvents, floor
polish, shoe polish, spot remover or simi-
lar products.
— Objects with sharp edges, such as zippers
or rivets on clothing or belts, can cause
damage to the surface.
— Never use steam cleaners, brushes, hard
sponges, etc. when cleaning.
— Do not turn on the seat heating* to dry
the seat.
—To help prevent the leather from fading,
do not leave the vehicle in direct sunlight
for long periods of time. If leaving the ve-
hicle parked for long periods of time, you
should cover the leather to protect it from
direct sunlight.
G) Tips
— Insects are easier to remove from paint that
has been freshly waxed.
— Regular waxing can prevent rust spots from
forming.
— Decorative decals can age due to environ-
mental conditions, which can result in dam-
age such as brittleness. The color may fade
if exposed to excessive sunlight.
Taking your vehicle out
of service
If you would like to take your vehicle out of serv-
ice for a Long period of time, contact an author-
ized Audi dealer or authorized Audi Service Facili-
ty. They will advise you of important measures,
such as corrosion protection, service, and storage
procedures. Also follow the information about
the vehicle battery > page 210.
239
Page 242 of 278

Emergency assistance
Emergency assistance
General information
> Park the vehicle as far as possible from moving
traffic in the event of a breakdown. In the event
of a flat tire, park the vehicle ona level surface.
If you are ona steep hill, be especially careful.
> Set the parking brake.
> Switch the emergency flashers on.
> Have the passengers exit the vehicle. They
should move to a safe place, for example be-
hind a guard rail.
Z\ WARNING
Follow the steps given above. This is for your
protection and the for the safety of others on
the road.
Equipment
Vehicle tool kit/vehicle jack
Applies to: vehicles with the vehicle tool kit and vehicle jack
Fig. 152 Luggage compartment: cargo floor cover
The vehicle tools and vehicle jack* are stored in
the luggage compartment under the floor cover.
> Lift up the cargo floor with the plastic handle
until it is clamped behind the tabs on both side
panels.
> If necessary, lift out the center floor panel.
Applies to: vehicles with spare tire/subwoofer
> Turn the handwheel counter-clockwise and re-
move it.
> Remove the subwoofer* > page 243.
> Remove the spare tire*.
240
@ Tips
The vehicle jack* does not require any mainte-
nance.
Changing a tire
You must complete the preparation before
changing a tire.
> Read and follow the important safety precau-
tions > page 240.
> Set the parking brake.
> Select the “P” position.
>» When towing a trailer: disconnect the trailer
from your vehicle.
> Lay out the vehicle tool kit > page 240 and the
spare tire > page 243.
> Switch the ignition off.
ZA\ WARNING
The vehicle must also be secured to prevent it
from rolling when using the vehicle jack”. Use
suitable objects to block the front and back of
the wheel that is diagonal from the wheel
with the flat tire.
Removing the cover
\
> a
Fig. 153 Wheel: wheel bolts with caps
N
> Slide the plastic clip from the vehicle tool kit
onto the cap until it engages > fig. 153.
> Remove the cap with the plastic clip.
Page 243 of 278
83A012721BB
Emergency assistance
ON elated ere) od
Applies to: vehicles with anti-theft wheel bolts
i
»
Fig. 154 Anti-theft wheel bolt with cap and adapter
B4H-0470
ie
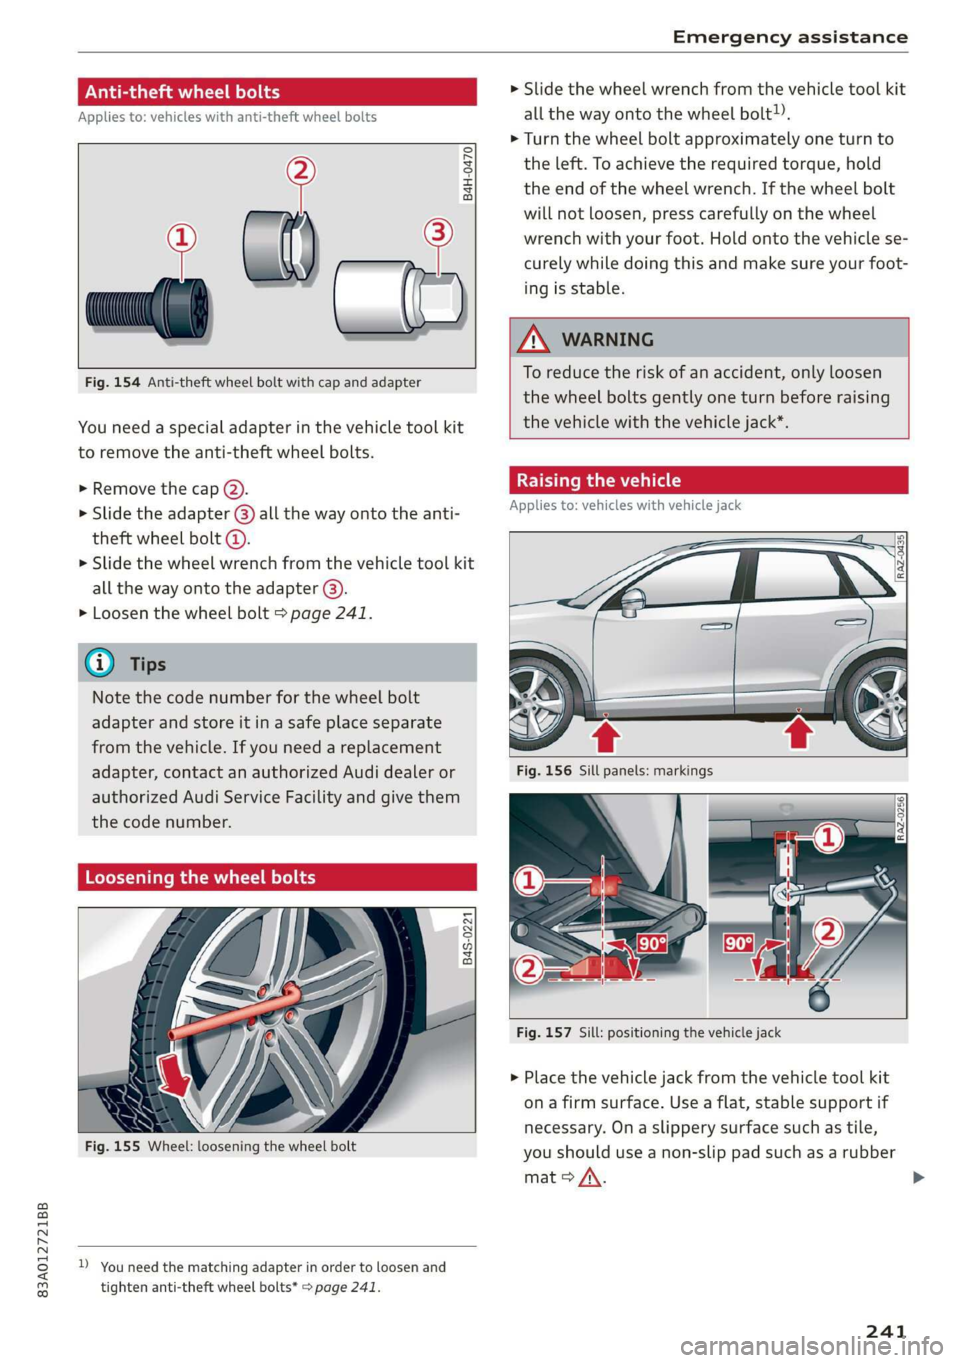
You need a special adapter in the vehicle tool kit
to remove the anti-theft wheel bolts.
» Remove the cap @).
> Slide the adapter @) all the way onto the anti-
theft wheel bolt @.
> Slide the wheel wrench from the vehicle tool kit
all
the way onto the adapter @).
> Loosen the wheel bolt > page 241.
@ Tips
Note the code number for the wheel bolt
adapter and store it in a safe place separate
from the vehicle. If you need a replacement
adapter, contact an authorized Audi dealer or
authorized Audi Service Facility and give them
the code number.
Loosening the wheel bolts
B4S-0221
Sh
Fig. 155 Wheel: loosening the wheel bolt
D_ You need the matching adapter in order to loosen and
tighten anti-theft wheel bolts* > page 241.
> Slide the wheel wrench from the vehicle tool kit
all the way onto the wheel bolt).
> Turn the wheel bolt approximately one turn to
the left. To achieve the required torque, hold
the end of the wheel wrench. If the wheel bolt
will not loosen, press carefully on the wheel
wrench with your foot. Hold onto the vehicle se-
curely while doing this and make sure your foot-
ing is stable.
ZA\ WARNING
To reduce the risk of an accident, only loosen
the wheel bolts gently one turn before raising
the
vehicle with the vehicle jack*.
Raising the vehicle
Applies to: vehicles with vehicle jack
Fig. 157 Sill: positioning the vehicle jack
> Place the vehicle jack from the vehicle tool kit
ona firm surface. Use a flat, stable support if
necessary. On a slippery surface such as tile,
you should use a non-slip pad such as a rubber
mat > A\.
241
>
Page 244 of 278
Emergency assistance
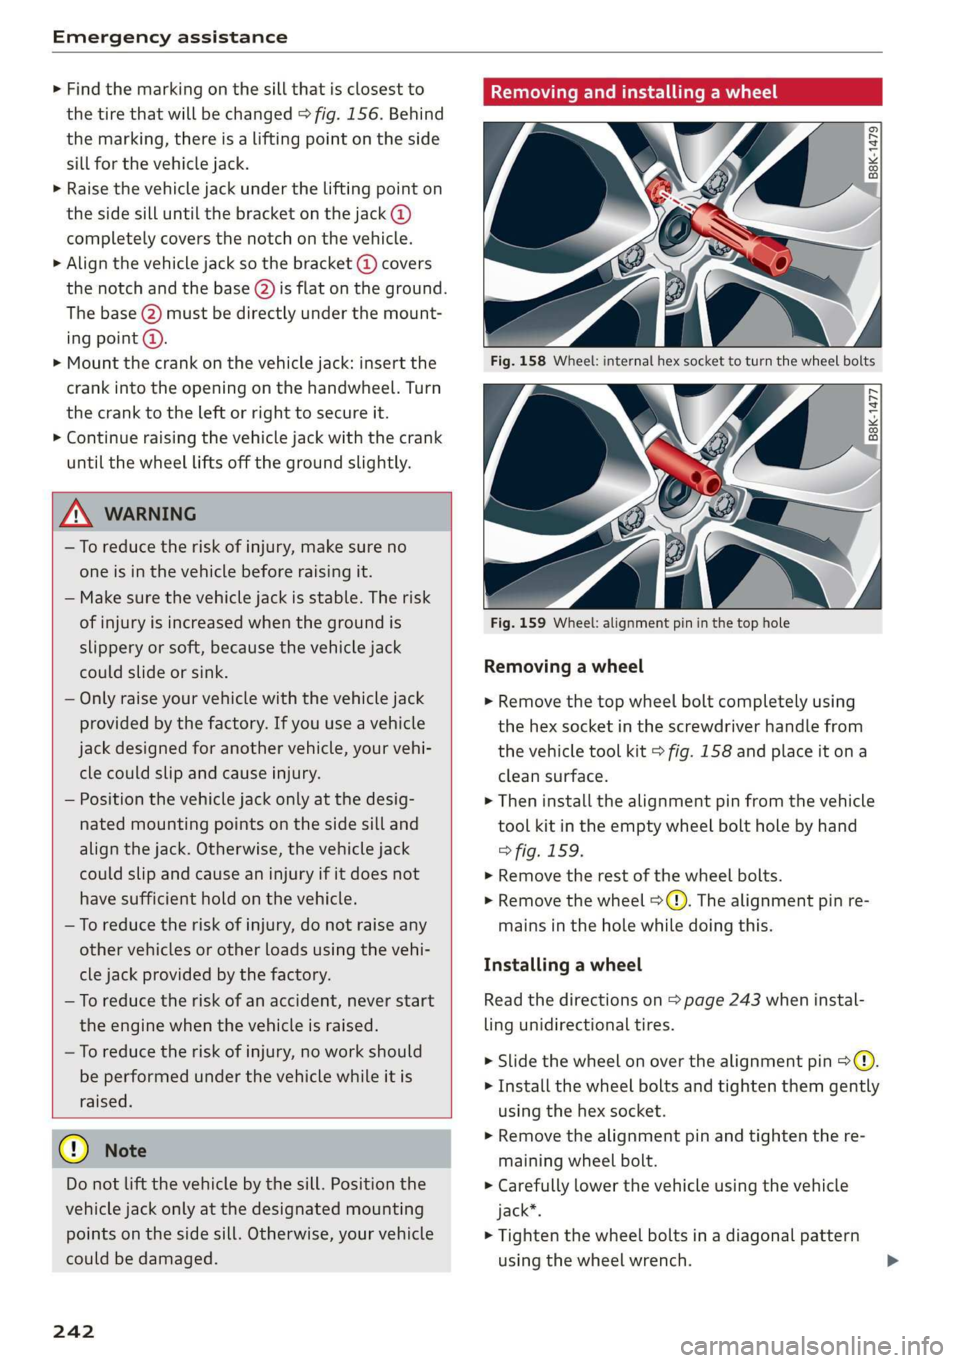
> Find the marking on the sill that is closest to
the tire that will be changed > fig. 156. Behind
the marking, there is a lifting point on the side
sill for the vehicle jack.
> Raise the vehicle jack under the lifting point on
the side sill until the bracket on the jack @)
completely covers the notch on the vehicle.
> Align the vehicle jack so the bracket @ covers
the notch and the base (2) is flat on the ground.
The base @) must be directly under the mount-
ing point @.
> Mount the crank on the vehicle jack: insert the
crank into the opening on the handwheel. Turn
the crank to the left or right to secure it.
> Continue raising the vehicle jack with the crank
until the wheel lifts off the ground slightly.
ZX WARNING
— To reduce the risk of injury, make sure no
one is in the vehicle before raising it.
— Make sure the vehicle jack is stable. The risk
of
injury is increased when the ground is
slippery or soft, because the vehicle jack
could slide or sink.
— Only raise your vehicle with the vehicle jack
provided by the factory. If you use a vehicle
jack designed for another vehicle, your vehi-
cle could slip and cause injury.
— Position the vehicle jack only at the desig-
nated mounting points on the side sill and
align the jack. Otherwise, the vehicle jack
could slip and cause an injury if it does not
have sufficient hold on the vehicle.
—To reduce the risk of injury, do not raise any
other vehicles or other loads using the vehi-
cle jack provided by the factory.
— To reduce the risk of an accident, never start
the engine when the vehicle is raised.
—To reduce the risk of injury, no work should
be performed under the vehicle while it is
raised.
@) Note
Do not lift the vehicle by the sill. Position the
vehicle jack only at the designated mounting
points on the side sill. Otherwise, your vehicle
could be damaged.
242
Removing and installing a wheel
Fig. 158 Wheel: internal hex socket to turn the wheel bolts
|
©
B8k-1477
Fig. 159 Wheel: alignment pin in the top hole
Removing a wheel
> Remove the top wheel bolt completely using
the hex socket in the screwdriver handle from
the vehicle tool kit > fig. 158 and place it ona
clean surface.
> Then install the alignment pin from the vehicle
tool kit in the empty wheel bolt hole by hand
> fig. 159.
> Remove the rest of the wheel bolts.
> Remove the wheel >(). The alignment pin re-
mains in the hole while doing this.
Installing a wheel
Read the directions on > page 243 when instal-
ling unidirectional tires.
> Slide the wheel on over the alignment pin >@.
> Install the wheel bolts and tighten them gently
using the hex socket.
> Remove the alignment pin and tighten the re-
maining wheel bolt.
> Carefully lower the vehicle using the vehicle
jack*.
> Tighten the wheel bolts in a diagonal pattern
using the wheel wrench.
Page 245 of 278

83A012721BB
Emergency assistance
The wheel bolts must be clean and loosen and
tighten easily. Check the contact surfaces for the
wheel and hub. Contaminants on these surfaces
must be removed before installing the wheel.
Z\ WARNING
— Read and follow the important information
and notes under > page 221.
— Never use the hex socket in the screwdriver
handle to tighten the wheel bolts. Using the
hex socket will not achieve the required
tightening torque, which increases the risk
of an accident.
C) Note
When removing or installing the wheel, the
rim
could hit the brake rotor and damage the
rotor. Work carefully and have a second per-
son help you.
Unidirectional tires
A unidirectional tire profile is identified by arrows
on the tire sidewall that point in the running di-
rection. You must always maintain the specified
running direction. This is necessary to ensure the
tire's optimal performance in regard to adhesion,
running noise, and friction, and to reduce the risk
of
hydroplaning.
To benefit fully from the advantages of the uni-
directional tire design, you should replace faulty
tires as soon as possible and restore the correct
running direction on all of the tires.
> Reinstall the caps on the wheel bolts if necessa-
ry.
> Store the vehicle tool kit in its designated
place.
> If the removed wheel does not fit in the spare
wheel well, store it securely in the luggage
compartment > page 74.
> Check the tire pressure on the installed wheel
as soon as possible.
> Correct the tire pressure and store it
> page 233.
> The wheel bolt tightening specification must be
100 ft lbs (140 Nm). Have it checked as soon as
possible with a torque wrench. Drive carefully
until then.
> Have the faulty wheel replaced as quickly as
possible.
Spare tire
tute Mae eis
Applies to: vehicles with subwoofer
The subwoofer must be removed before the
spare tire*/temporary spare tire* can be re-
moved.
Fig. 160 Spare tire well: subwoofer
Removing the subwoofer
> Pull out the red connector lock @).
>» Remove the connector (2) and set the discon-
nected cable aside.
> Turn the handwheel counter-clockwise and re-
move it.
> Carefully remove the subwoofer.
Installing the subwoofer
> Carefully place the subwoofer in the rim well.
The word “FRONT” on the subwoofer must face
forward.
> Insert the connector that was removed.
> Secure the subwoofer with the handle.
Byer leet Ue iy re
Applies to: vehicles with space-saving spare tire (compact
spare tire)
The spare tire is intended for short-term use only.
Have the damaged tire checked and replaced if
necessary by an authorized Audi dealer or author-
ized Audi Service Facility as soon as possible.
243
>
Page 246 of 278
Emergency assistance
There are some restrictions on the use of the
compact spare tire. The compact spare tire has
been designed specifically for your type of vehi-
cle. Do not replace it with the spare tire from an-
other type of vehicle.
The compact spare tire is located in the luggage
compartment under the cargo floor cover
=> page 240.
The tire pressure must be 61 PSI (420 kPA).
Snow chains
For technical reasons, the use of snow chains on
the compact spare tire is not permitted.
If you have to drive with snow chains and a front
tire fails, mount the spare tire in place of a rear
tire. Install the snow chains on the rear tire that
you removed, and install that in place of the
front tire that failed.
ZA WARNING
— After installing a spare tire, the tire pressure
must be checked as soon as possible.
— Do not drive faster than 50 mph (80 km/h)
with a compact spare tire. Driving faster
than that increases the risk of an accident.
— To reduce the risk of an accident, avoid hard
acceleration or braking and driving fast
around curves with the compact spare tire.
— To reduce the risk of an accident, never drive
with more than one compact spare tire.
— Normal summer or winter tires must not be
mounted on the compact spare wheel rim.
battery that is giving power must not be less
than the capacity of the drained vehicle battery.
Jump start cable
Only use a jump start cable with a large enough
diameter. Note the manufacturer's specifica-
tions.
Only use a jump start cable with insulated termi-
nal clamps.
Positive cable - usually red.
Negative cable - usually black.
ZA WARNING
— A drained battery can freeze at tempera-
tures around 32 °F (0 °C). If the vehicle bat-
tery is frozen, it must be thawed before con-
necting the jump start cables. If it is not,
the risk of an explosion and chemical burns
increases. After jump starting the vehicle,
drive to an authorized Audi dealer or author-
ized Audi Service Facility immediately to
have the vehicle battery checked.
— Read the warnings when working in the en-
gine compartment > page 201.
— Handling the jump start cables incorrectly
may cause the vehicle battery to explode
and lead to serious injuries.
—To reduce the risk of chemical burns, do not
bend over the vehicle battery.
Jump starting
You should only perform the steps that follow if
you have the necessary tools and technical ex-
pertise.
If the engine does not start because the vehicle
battery is drained, you can jump start your vehi-
cle using another vehicle. Jump start cables are
needed to do this.
Both vehicle batteries must have 12 V nominal
voltage. The voltage capacity (Ah) of the vehicle
244
() Note
Jump start cables can cause considerable
damage to the vehicle electrical system if
they are connected incorrectly.
G) Tips
— There must be no contact between the
vehicles, or else voltage could flow when
connecting the positive terminal and drain
the vehicle battery of the vehicle providing
the jump start.
— The drained vehicle battery must be con-
nected correctly to the electrical system.
— Switch off electrical equipment that is not
needed.
Page 247 of 278
![AUDI Q3 2020 Owners Manual 83A012721BB
Emergency assistance
aaa) itl aalare]
Both jump start cables must be connected in the
correct order.
S
g = & oO
Fig. 161 Engine compartment: connectors for jump start
cabl AUDI Q3 2020 Owners Manual 83A012721BB
Emergency assistance
aaa) itl aalare]
Both jump start cables must be connected in the
correct order.
S
g = & oO
Fig. 161 Engine compartment: connectors for jump start
cabl](/img/6/57625/w960_57625-246.png)
83A012721BB
Emergency assistance
aaa) itl aalare]
Both jump start cables must be connected in the
correct order.
S
g = & oO
Fig. 161 Engine compartment: connectors for jump start
cables or a charger
RAZ-0128
Fig. 162 Connecting the jump start cables
The jump start cable connections are located in
the engine compartment.
Follow the information about the vehicle battery
=> page 210.
Connecting the positive cable (red) to the
positive terminal
> Open the cover on the positive terminal
> fig. 161.
1. Attach one end of the positive cable (red) to
the positive terminal on the vehicle battery
@ ° fig. 162.
2. Attach the other end of the positive cable
(red) to the positive terminal @ on the pow-
er source.
Connecting the negative cable (black) to the
negative terminal
3. Attach one end of the negative cable (black)
to the negative terminal @) on the power
source.
4. Attach the other end of the negative cable
(black) to the jump-start pin @ on the vehi-
cle.
Starting the engine
> Start the engine in the vehicle giving the charge
and let it run at idle.
> Now start the engine in your vehicle, which has
the
drained battery.
> If the engine does not start, stop the starting
procedure after 10 seconds and then repeat it
after approximately 30 seconds.
> Turn on the rear window defogger in your vehi-
cle in order to reduce any voltage peaks that
may occur when disconnecting the jump start
cables. The headlights must be switched off.
> With the engines running, remove the cables in
reverse order of the way they were installed.
> Close the cover on the positive terminal.
ZA WARNING
— Do not touch the non-insulated parts of the
terminal clamps. The cable must also not
come into contact with vehicle components
that conduct electricity when it is connected
to the positive vehicle battery terminal. This
can cause a short circuit.
— The plugs on the battery cells must not be
opened.
— Keep ignition sources (such as open flames,
burning cigarettes, etc.) away from the vehi-
cle batteries to reduce the risk of an explo-
sion.
— Route the jump start cables so they cannot
get caught in the moving parts in the other
vehicle's engine compartment.
q@ Note
— Do not use the negative terminal on the ve-
hicle battery for jump starting. A malfunc-
tion could occur in the vehicle electrical sys-
tem.
— Please note that the connecting process
previously described for the jump start ca-
bles is intended for when your vehicle is be-
ing jump started.
245
Page 248 of 278

Emergency assistance
@) Tips
Make sure that the connected jump start ca-
bles have sufficient contact with metal.
Towing
General information
You should only perform the steps that follow if
you have the necessary tools and technical ex-
pertise.
Towing requires a certain amount of practice.
Audi recommends contacting a towing company
to have the vehicle transported.
You should only have your vehicle towed by an-
other vehicle when disabled in exceptional cir-
cumstances. Inexperienced drivers should not
tow.
Notes on towing
When the engine is stopped, the transmission
will not be sufficiently lubricated if traveling at
high speeds and long distances:
— The maximum permitted towing speed is 30
mph (50 km/h).
— The maximum permitted towing distance is 30
miles (50 km).
Additional information on towing with a tow
truck
The vehicle may only be towed with the front axle
raised. Do not wrap any chains or cables around
the brake lines.
If the vehicle should be towed with the axle
raised, then the ignition must be switched off to
reduce the risk of damage to the drivetrain.
Tow bar and towing cable
The vehicle can be towed with a tow bar or tow-
ing cable. Both drivers should be familiar with
the special considerations when towing, especial-
ly when using a towing cable.
Always make sure the traction force does not ex-
ceed the permitted level and there are no shock
loading conditions. There is always the risk of the
246
coupling becoming overloaded when driving off-
road.
For the most safety and security, drive with a tow
bar. You should use a towing cable only if a tow
bar is not available. Use a towing cable made of
synthetic elastic cable similar elastic material.
ZA WARNING
— Towing highly increases the risk of an acci-
dent, for example from colliding with the
towing vehicle.
— To reduce the risk of an accident, do not al-
low anyone to remain inside the vehicle
when it is being transported by a tow truck
or a special transporter.
@) Note
— If normal towing is not possible, for exam-
ple if the transmission is faulty or if the
towing distance is greater than 30 miles
(50 km), then transport the vehicle on a
special carrier.
— If the vehicle is towed by a tow truck at the
axle that is not permitted, this can cause se-
vere damage to the transmission.
— The vehicle must not be tow started for
technical reasons.
@ Tips
— If the power supply is interrupted, then it
will not be possible to move the selector
lever out of the "P" position. The parking
lock must be released using the emergency
release before towing the vehicle
=> page 87.
— Switch Audi pre sense* off > page 124 when
loading the vehicle onto a vehicle carrier,
train, ship, or other type of transportation,
or when towing the vehicle. This can prevent
an undesired intervention from the pre
sense* system.
— Follow the local legal regulations for tow-
ing.
Page 249 of 278

83A012721BB
Emergency assistance
Read and follow the important information under
=> page 246.
Preparations
> Only secure the towing cable or tow bar at the
designated towing loops > page 247,
=> page 247.
> Make sure the towing cable is not twisted. Oth-
erwise it could disconnect from the towing loop
while towing.
> Switch the emergency flashers on in both
vehicles > page 46. However, do not do this if it
prohibited by law.
Towing vehicle (front)
> Only start to drive when the towing cable is
taut.
> Press the brake pedal very carefully.
> Avoid sudden braking or driving maneuvers.
Vehicle being towed (rear)
> Make sure the ignition is switched on so that
the steering wheel is not locked and so that you
can use the turn signals, the horn, and the
windshield wipers if needed > A\.
> Switching it off before the vehicle has stopped
may impair the function of the brake booster
and power steering. You would then need to
use more force to steer and brake the vehicle.
> Release the parking brake > page 93.
» Select the “N” selector lever position.
> Make sure the towing cable is always taut.
ZX WARNING
Never tow a vehicle using a tow bar or towing
cable if the vehicle does not have electrical
power.
Front towing loop
Fig. 163 Front bumper: installing the towing loop
The threaded opening for the towing loop is lo-
cated on the right side of the front bumper.
> Remove the towing loop from the vehicle tool
kit > page 240.
> Press the cap inward with brief, strong pressure
> fig. 163. The cap will loosen from the bump-
er.
> Tighten the towing loop in the threaded open-
ing until it stops and then tighten it with a
wheel wrench.
> After using, place the towing loop back in the
vehicle tool kit.
ZX WARNING
If the towing loop is not tightened until it
stops when installing, the threads may be
pulled out when towing the vehicle and result
in an accident.
@) Tips
Depending on the model, the shape of the
cover can vary.
Rear towing loop
Fig. 164 Rear bumper: installing the towing loop
247
Page 250 of 278
Emergency assistance
The threaded opening for the towing loop is lo-
cated on the right rear of the bumper.
> Remove the towing loop from the vehicle tool
kit > page 240.
> Press the cap inward with brief, strong pressure
> fig. 164. The cap will loosen from the bump-
er.
> Tighten the towing loop in the threaded open-
ing until it stops and then tighten it with a
wheel wrench.
> After using, place the towing loop back in the
vehicle tool kit.
If the towing loop is not tightened until it
stops when installing, the threads may be
pulled out when towing the vehicle and result
in an accident.
Depending on the model, the shape of the
cover can vary.
248