change time AUDI Q5 2016 Owners Manual
[x] Cancel search | Manufacturer: AUDI, Model Year: 2016, Model line: Q5, Model: AUDI Q5 2016Pages: 300, PDF Size: 75.02 MB
Page 24 of 300
Driver information system
Service interval display
The service interval display reminds you when
your next service is due.
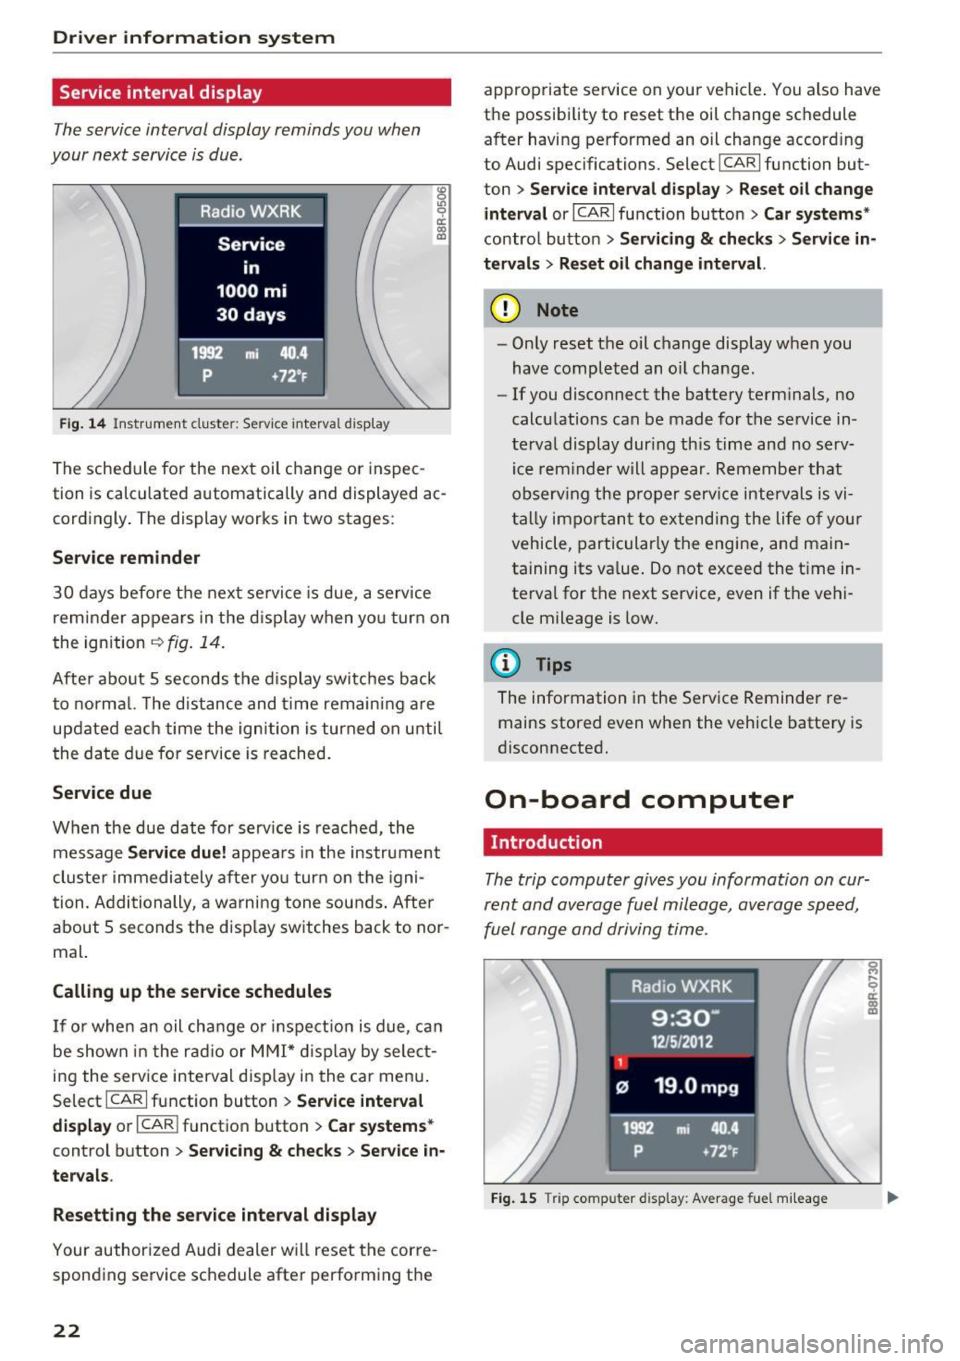
Fig. 14 Instrument cluste r: Service interva l d isp lay
The schedule for the next oil change or inspec
tion is calculated automatically and displayed ac
cordingly . The display works in two stag es:
Service reminder
30 days before the next se rvice is due, a service
reminder appears in the d isplay when yo u turn on
the ignition
~ fig. 14.
After about 5 seconds the display switches back
to normal. The distance and time remain ing are
updated each time the ignition is turned on until
the date due for service is reached.
Service due
When the due date for serv ice is reached, the
message
Service due! appears in the instrument
cluster immediately after yo u turn on the igni
tion. Additionally, a warning tone sounds . After
about
5 seconds the display switches back to nor
mal.
Calling up the service schedules
If or when an oil change or inspection is due, can
be shown in the radio or MMI* display by select
ing the serv ice interval d isplay in the car menu .
Select
ICARI function button > Service interval
display
or I CAR I function button > Car systems*
control button > Servicing & checks > Service in·
tervals .
Resetting the service interval display
Your authorized Audi dealer will reset the corre
sponding service schedule after perform ing the
22
appropriate service on your vehicle . You also have
the possibility to reset the oil change schedule
after having performed an oil change accord ing
to Audi specifications. Select
I CAR I function but
ton >
Service interval display > Reset oil change
interval
or ICARI function button> Car systems*
control button > Servicing & checks > Service in·
tervals
> Reset oil change interval.
(D Note
- Only reset the oil change display when you
have completed an o il change.
- If you disconnect the battery term inals, no
calculations can be made for the se rvice in ·
terval display dur ing this time and no serv
ice rem inder will appear. Remember that
observ ing the proper service intervals is vi
tally impo rtant to extending the life of your
vehicle, particularly the engine, and main
ta ining its va lue. Do not exceed the time in
terval for the next service, even if the vehi
cle mileage is low.
(D Tips
The information in the Service Reminder re
mains stored even when the vehicle batte ry is
disconnected.
On-board computer
Introduction
The trip computer gives you information on cur
rent and average fuel mileage , average speed,
fuel range and driving time .
Fig. 15 Tri p comp uter d isplay: Average fue l mileage
Page 25 of 300
..... N
co ~ CX)
..... I.Cl U"I
..... I.Cl .....
The following informa tion is cont inuo usly evalu
ated by the trip computer and can be displayed
sequent ia lly in the inst rument cl uste r display:
Fuel range
The estima ted cruising range in miles ( km) ap
pea rs in t he d isp lay. Th is tells you how far your
ve hicle wi ll be able to trave l on the curren t tank
of fuel and with the same driving style. The dis
p lay changes in increments of 5 miles (10 km) .
Average fuel mileage The aver age f uel economy in M PG (l/ 100 km)
since you las t clea red the memory appears in this
d is p lay . You can use this d isplay to adjust your
d riving technique to ach ieve a desired mileage .
Current fuel mileage
The in stantaneous f ue l cons umption in miles per
g all on (l/ 100 km) is shown in th is display. Yo u
c a n use th is d isp lay to ad just yo ur dr iv ing tech ni
que to achieve a desi red mileage .
F ue l cons umption is re calc ula ted at inte rvals of
3 3 ya rds (30 meters).
Average speed The average speed in mph (km/h) si nce the last
time the display was reset appea rs in the disp lay .
Elapsed t ime
The length of time that you have been driving
since you last reset the memory appears in t his
d isplay .
Distance
The distance that has been covered since the last
time the memory was cleared appears in the dis p lay.
(D} Tips
- Fuel consum ptions (average and c urrent),
r ange and speed are displayed in metric
units on Canadian models.
- All stored val ues will be lost if the ve hicle
batte ry is disconnected .
Driver informa tion system
Memories
The trip computer is equipped with two fully au
tomatic memories as well as an efficiency pro
gram*.
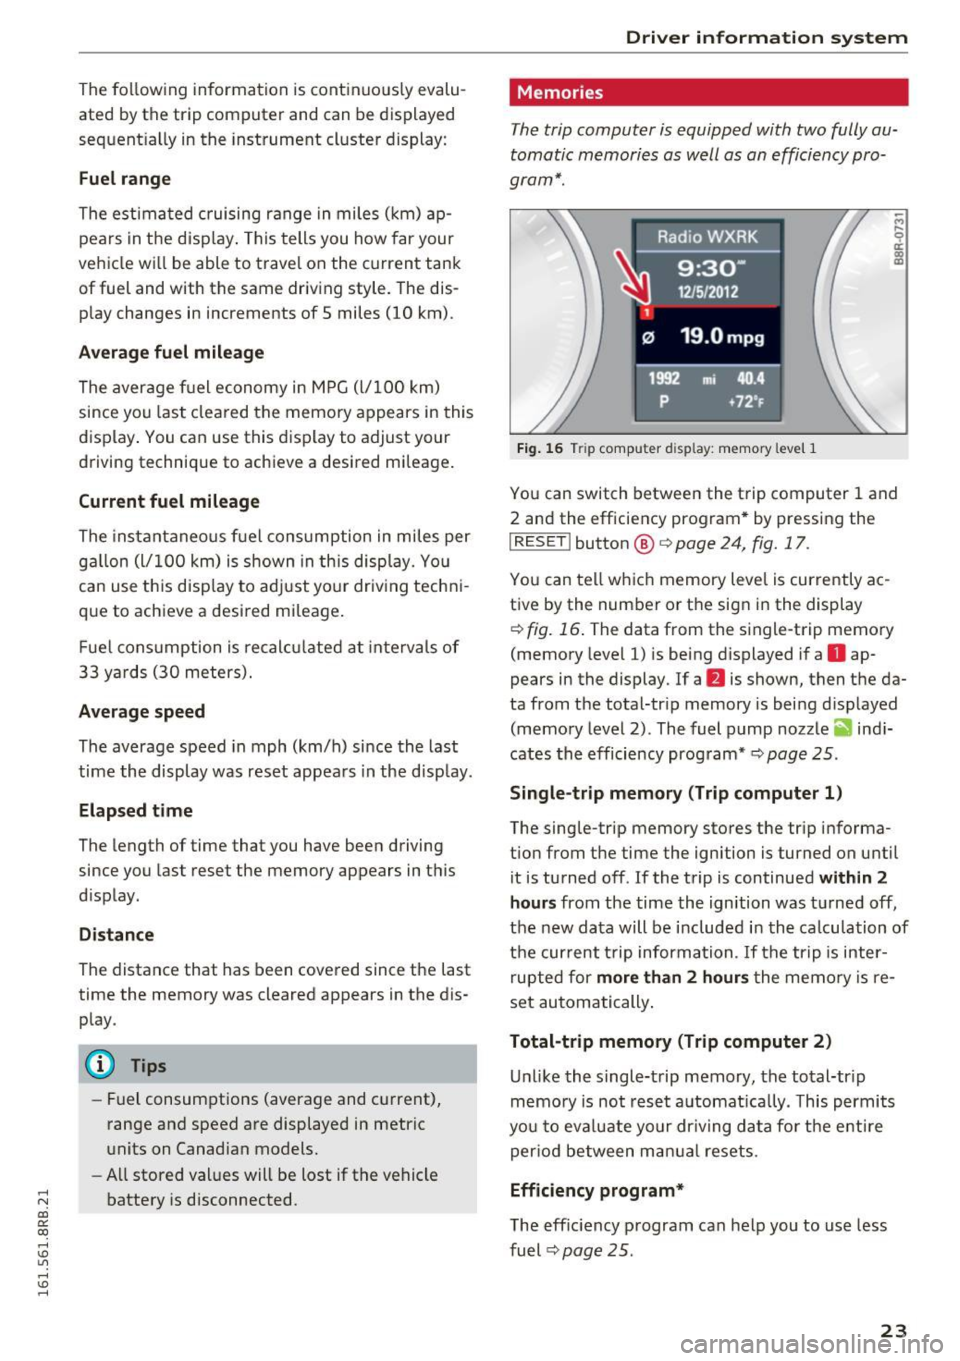
Fig. 1 6 Trip com puter d isp lay: memory level 1
-M
9 a: (D Cl)
Yo u can switch between the t rip computer 1 and
2 an d the efficie ncy program * by pressing the
I RESET I button @ c> page 24, fig. 17.
Yo u can te ll w hich memory leve l is currently ac
tive by the num ber or t he sign i n the display
i=;, fig. 16 . The data from the s ingle-trip memo ry
(memo ry level 1) is be ing displayed i f a
D ap
pears in the display. If a
fJ is shown, then t he da
ta from t he total-tr ip memory is bei ng d isp layed
(memo ry level 2) . The fuel p ump nozz le
ii ind i
cates the efficiency program* ¢
page 25 .
Single-trip memory (Trip computer 1)
The sing le-trip memory sto res the tr ip info rma
t ion from the time the ignition is turned on unt il
it is tu rned off . If the t rip is continued within 2
hours from the time the ign ition was t urned off,
th e n ew data will be include d in th e calcu lation of
t h e cur rent t rip information . If the tr ip is in te r
r upte d for more th an 2 hours the memo ry is re
set au tom atically .
Total-trip memory (Trip computer 2) U nli ke the single-trip memory, the to tal-tr ip
m emo ry is no t rese t automat ically . T his p ermi ts
yo u t o ev aluate yo ur dr iv ing d ata fo r th e e ntir e
per io d between m anual rese ts.
Efficiency program*
T he eff ic iency p rogram can he lp you to use less
fuel
i=;, page 25 .
23
Page 35 of 300
,....,
N
co
er::
co
,....,
light tu rns on to indicate the location on the vehi
cle.
Vehicle light s: System fault!
If the message appears, there is a ma lfunction in
the head lights or light switch.
Drive to your authorized Aud i dealer immediately
to have the malfunct ion corrected .
A WARNING
-Light bu lbs are pressur ized and could ex
plode while they are being changed caus ing
ser ious persona l injury.
-
- Work with due care when handling the high
voltage section of gas dis charge (xenon)
ligh ts*. Failure to do so co uld result in death
or serious injury .
@ Tips
Have the bulb replaced or the connect ion re
pa ired by yo ur autho rized Aud i Serv ice depart
men t.
<:;::> Windshield washer flu id level too low
llt Plea se refill washer fluid
If the symbol illumi nates, add w indshield was her
fluid to the washer system and also to the head
light washer system
c::> page 233 .
Bil Fuel supply too low
When the liD symbol i llum inates, this means
there are about 2.6 ga llons ( 10 liters) of fue l left
in the fuel tank. Time to refuel!
c::> page 214.
If the symbol lights up, even when there is amp le
fuel in the tank, and the text
Fuel tank sy stem
malfun ction! Contact deale r
appears in the dis
p lay, there is a fault in the system. Contact an au
thor ized Audi dealer to have the fault rect ified.
D Battery voltage
If battery power drops into the range where it
can limit the ab il ity of the engine to start, th is
the symbol (•) ;ippears in the instrument cluster
Dri ver informa tion system
display with the following driver message Lo w
batter y: Batte ry will be char ged while dri ving.
While t his driver notification is disp layed , you
have to be prepared for limited start ing capabili
ty .
Driver message appears and goes out again
If this d rive r message appea rs after the ignition
is turned on or while d riving a nd it goes ou t again
after a whi le, the battery has been adequately re
charged .
Driver message appears and does not go out
again
If this drive r notificat ion appea rs after the igni
tion is tu rned on or while driv ing and does not go
out again, the battery's state of charge is not in
the optimal range. Start ing capability is restrict
ed . Have the battery checked at an authorized
Audi dealer or other qualified workshop as soon as possible.
~ Check engine oil
II Add oil, ma x x qt (l). You may cont. driv.
When the Ill symbol and dr iver message appear,
add the amount of oil appear ing in the disp lay at
the next opportunity
c::> page 224 .
'l:7;,.. Engine oil sensor defective
• Oil le vel! Sen sor defecti ve
If the symbol illuminates, contact your author
ized Audi dea ler and have the oil sensor inspect
ed . Until you have this done, check the oil level
each time you refuel just to be on the safe side
c::> page 224.
! ? Engine speed limitation
Applies to vehicles: with engine speed limitation
II! Do not exceed max. engine spe ed of XXXX
rpm
T he II! symbol illuminates when there is an en
gine co ntrol malf unct ion. The indi cator light ~
in t he i nstr ument cluster also illum ina tes. The
engine speed is limited to the speed displayed in ..,.
33
Page 39 of 300
from transmitters in the vicinity of the vehi
cle work ing in the same frequency range
(e .g . a cell p hone, radio equipment) .
- If yo u open the dr iver's doo r with t he key
l eft in the ignition Lock, a chime w ill sound.
This is your remi nder to remove the key and
l ock the door.
- Fo r security reasons, replacement keys are
on ly availab le from Audi dealers.
- Fo r De claration of Comp liance to U nite d
States FCC and Ind ustry Canada reg ulations
r:=> page283 .
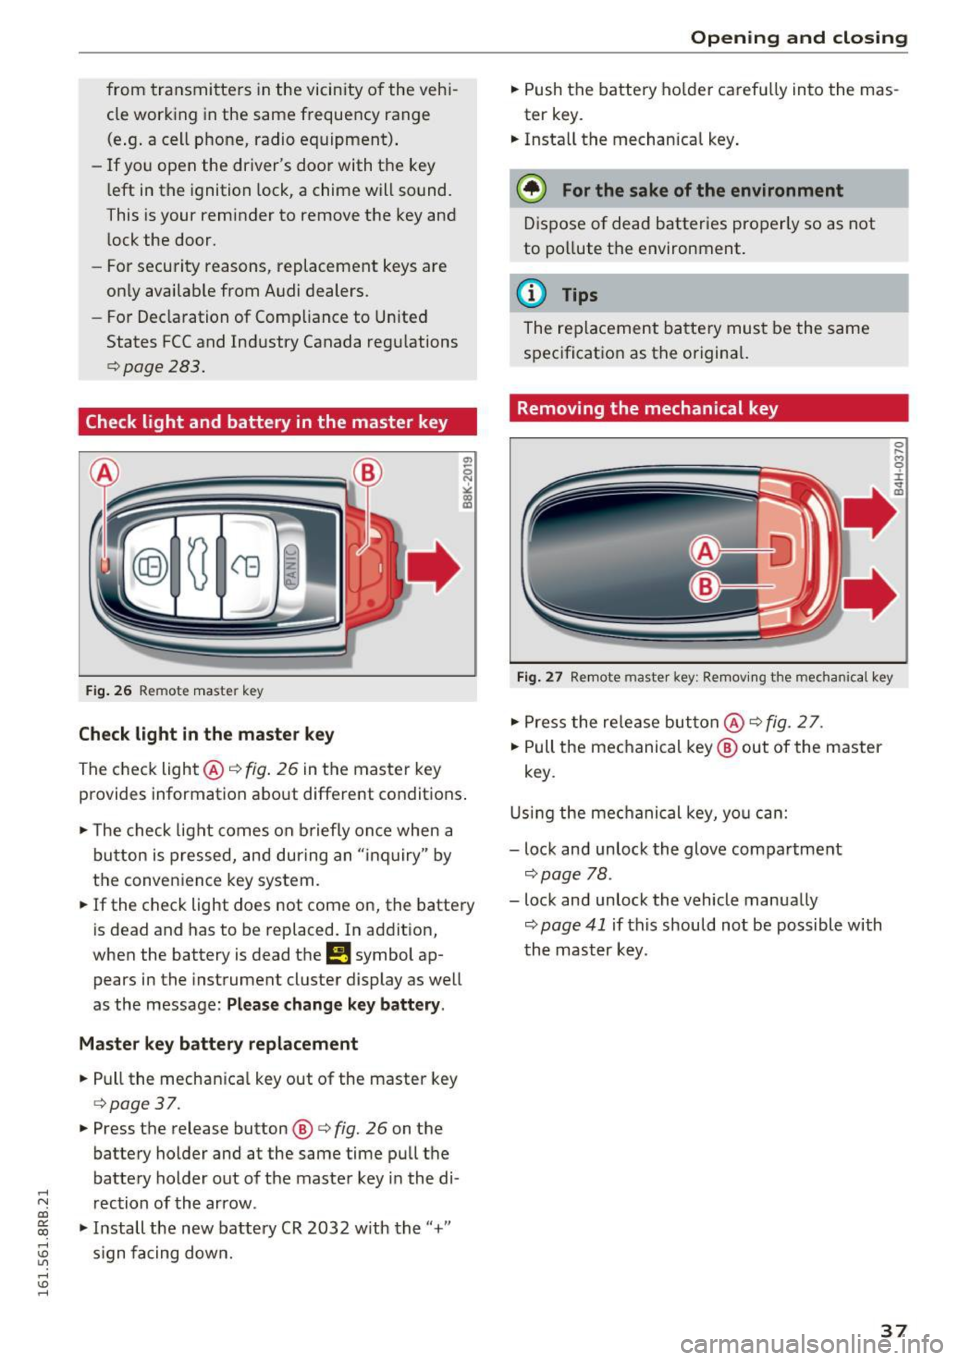
Check light and battery in the master key
Fig. 26 Re mote mast er key
Check light in the master key
The check light@q fig. 26 in t he master key
p rovides information abo ut different condit ions .
.,. The check light co m es on briefly on ce when a
button is pressed, and dur ing an " in qu iry" by
the conven ience key system .
.,. If the check light does not come on, the batte ry
is dead and has to be replaced. In ad dition,
when the battery is dead
the m symbol ap
pears in the instrument cluster display as well
as the message :
Please change key battery .
Master key battery replacement
.,. Pull the mechan ica l key out of the master key
c=> page 37 .
.,. Press the release button @ r=> fig. 26 on the
batte ry holder and at the same time pu ll th e
batte ry holder out of t he maste r key in the di-
.....
'"" rection of the arrow . co
~ .,. In stall the new battery CR 2032 w ith the "+"
; s ign f acing dow n.
Open ing and closing
.,. Push the batt ery ho lder caref ully into the mas
ter key.
.,. Insta ll the mechanical key .
@ For the sake of the environment
Dis pose of dead batter ies properly so as not
to po llute t he environment.
@ Tips
The re placeme nt ba tte ry mus t be the same
s p ec ificat ion as t he o rigina l.
Removing the mechanical key
Fig. 27 Remote maste r key: Re mov ing the mecha nical key
.,. Press the re le a se but ton @ r=> fig. 2 7.
.,. Pull the me chanical key @ out of the master
key .
U sing th e mec hanical key, yo u ca n:
- lock and unlock the glove compartment
c=> page 78 .
-lock and unlock the vehicle manua lly
c=> page 41 if this should no t be possible with
t h e m aster k ey .
37
Page 55 of 300
..... N
co ~ CX)
..... I.Cl U"I
..... I.Cl .....
-Some exterior lighting functions can be a d
j u sted
¢page 53 .
-When yo u remove your key from the igni
tion while the vehicle's lights are t urne d on,
a buzzer sounds as long as the driver's door
i s open.
- In coo l or damp weather, the inside of the
headlights, turn signals and tai l lights can
fog over d ue to the temperature d ifference
between the inside and outs ide. They will
clea r short ly after switch ing them on. This
does not affect the serv ice life of the lig ht
i ng .
- In the event of a light sensor malfunct ion,
the d river is not ifi ed in t he i nstr ument clus
te r dis play¢
pag e 32.
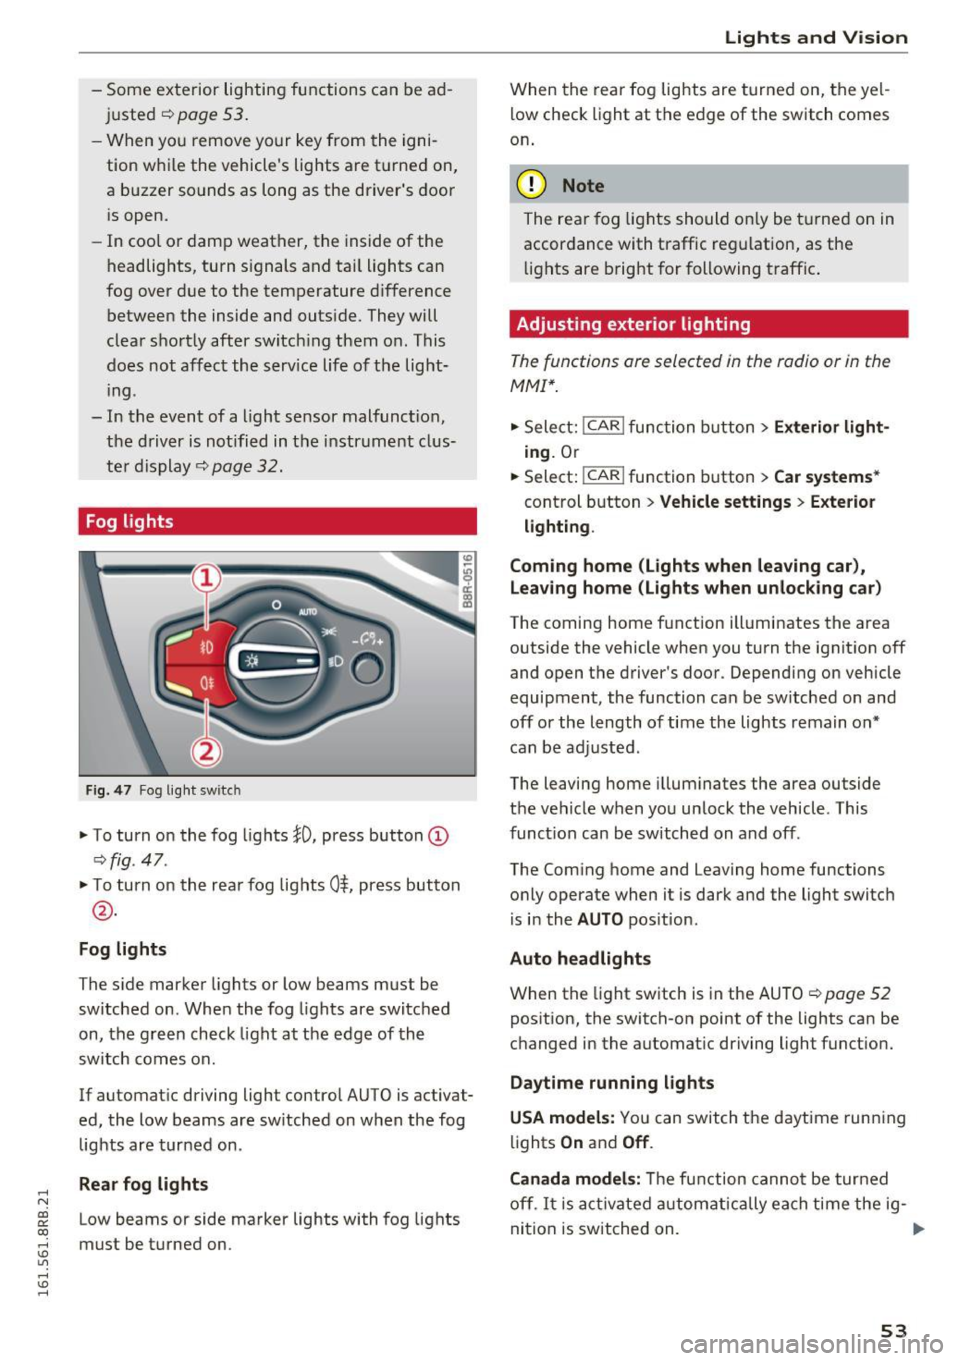
Fog lights
Fig . 4 7 Fog ligh t sw itc h
"To turn on the fog lights }O, press button (D
¢ fig. 47.
"T o turn on the rea r fog lights 0$, press but ton
@ .
Fog lights
The s ide marker lights or low beams must be
switche d on. When the fog lights are switc hed
on, the g reen check light at the edge of the
sw itch comes on.
If automat ic driving light control AUTO is activat
ed, the low beams are sw itched on w hen the fog
lights are tur ned on .
Rear fog lights
Low beams or side marker lights with fog lights
must be t urned on .
Lights and V ision
W hen the rear fog lights are t urned on, the yel
l ow check light at the edge of the switch comes
on .
(D Note
The rear fog lig hts should o nly be t urne d on in
accor dance with traffic reg ulation, as the
li g hts are b right for f ollowing traffic .
Adjusting exterior lighting
The functions are selected in the radio or in the
MMI*.
"Sele ct: !CAR ! func tion b utton> Exterior light
ing .
Or
.. Select:
-,c- A- R~I function button > Car systems *
control b utton > Vehicle settings > Exterior
lighting .
Coming home (Lights when leaving car ),
Leav ing home (Lights when unlock ing car )
The coming home f unction illuminates the area
outside the vehicle when you turn the ignit ion off
and open the d river's doo r. Dependi ng on vehicle
equipment, the function can be sw itched on and
off or the length of time the lights remain on*
c an be ad justed .
The leaving home i llum inates the area outside
t h e ve hicle when you un lock the vehicle . This
funct ion can be switched on and off .
The Com ing home and Leaving home functions
o nly operate when it is dark and the light switch
i s i n the
AUTO pos it ion.
Auto headlights
When the light sw itch is in the AU TO ¢ page 52
pos ition, the switch-on point of the lights can be
changed in the automat ic driving light funct ion.
Daytime running lights
USA models: You can switch the daytime runn ing
li ghts
On and Off .
Canada models:
Th e fu nction canno t be turned
off .
It is a ct ivate d automatica lly ea ch time the ig-
ni tio n i s switched on. ..,
53
Page 96 of 300
Driving
Messages in the instrument cluster display
Applies to vehicles: with Start-Stop-System
Start-stop system: deactivated. Please
restart engine manually
This message appears when specific conditions
are not met during a stop phase and the Start
Stop -System wi ll
not be able to restart the en
gine. The engine must be started with the key or
with the
! START ENGINE STOPI* button .
Start-stop system: system fault. Function
unavailable
There is a malfunction in the Start-Stop-System .
Drive the vehicle to an authorized repair facility
for servicing as soon as possible to correct the malfunction.
Transmission: Car may roll! Shift to pa rk!
This message appears if the selector lever is not
in the
P position when the driver's door is
opened. You will also hear a warning tone. Shift
the selector lever to the
P position. Otherwise,
the vehicle could roll.
Speed warning system
Overview
The speed warning system helps you to keep your
driving speed below a set speed limit.
The speed warning system warns if the driver ex
ceeds a prev ious ly stored maximum speed. A
warn ing tone w ill sound as soon as the vehicle
speed exceeds the set speed by about
3 mph
(3 km/h). At the same time, a wa rning symbo l
appears in the display. The symbol's appearance
might be different in some models.
The speed warning system has
two warning
thresholds that function independently of each
other and that have somewhat different purpos
es:
Speed warning 1
You can use speed warning 1 to set the maximum
speed while yo u are driving. This setting will re
main in effect unti l yo u turn off the ignition, as-
94
suming that you have not changed or reset the
setting .
The speed warning symbol. (USA models)/ .
(Canada models) in the warning 1 disp lay ap
pears when you exceed the maxim um speed. It
goes out when the speed falls below the stored
max imum speed .
The speed warning symbol will also go out if the
speed
exceeds the stored maximum speed by
more than about 2S mph (40 km/h) for at least
10 seconds . The stored maximum speed is delet
ed.
Setting speed warning 1
¢page 95.
Speed warning 2
Storing warning 2 is recommended if you always
want to be reminded of a ce rtain speed, for ex
amp le when you are traveling in a country that
has a genera l maximum speed limit, or if you do
not want to exceed a specified speed for winter
tires.
The speed warning 2 symbol ,. (USA mode ls)/
• (Canada models) appears in the display when
you exceed the stored speed limit. Unlike warn
ing 1, it will not go out until the vehicle speed
drops below the stored speed limit.
Setting speed wa rning 2
¢page 95.
(D Tips
Even though your vehicle is eq uipped with a
speed warning system, you should still watch
the speedometer to make sure you are not
driving faster than the speed limit.
Page 110 of 300
Audi adaptive cruise control and braking guard
Audi adaptive cruise
control
Description
A pplies to veh icles: with Audi adaptive cruise co ntrol
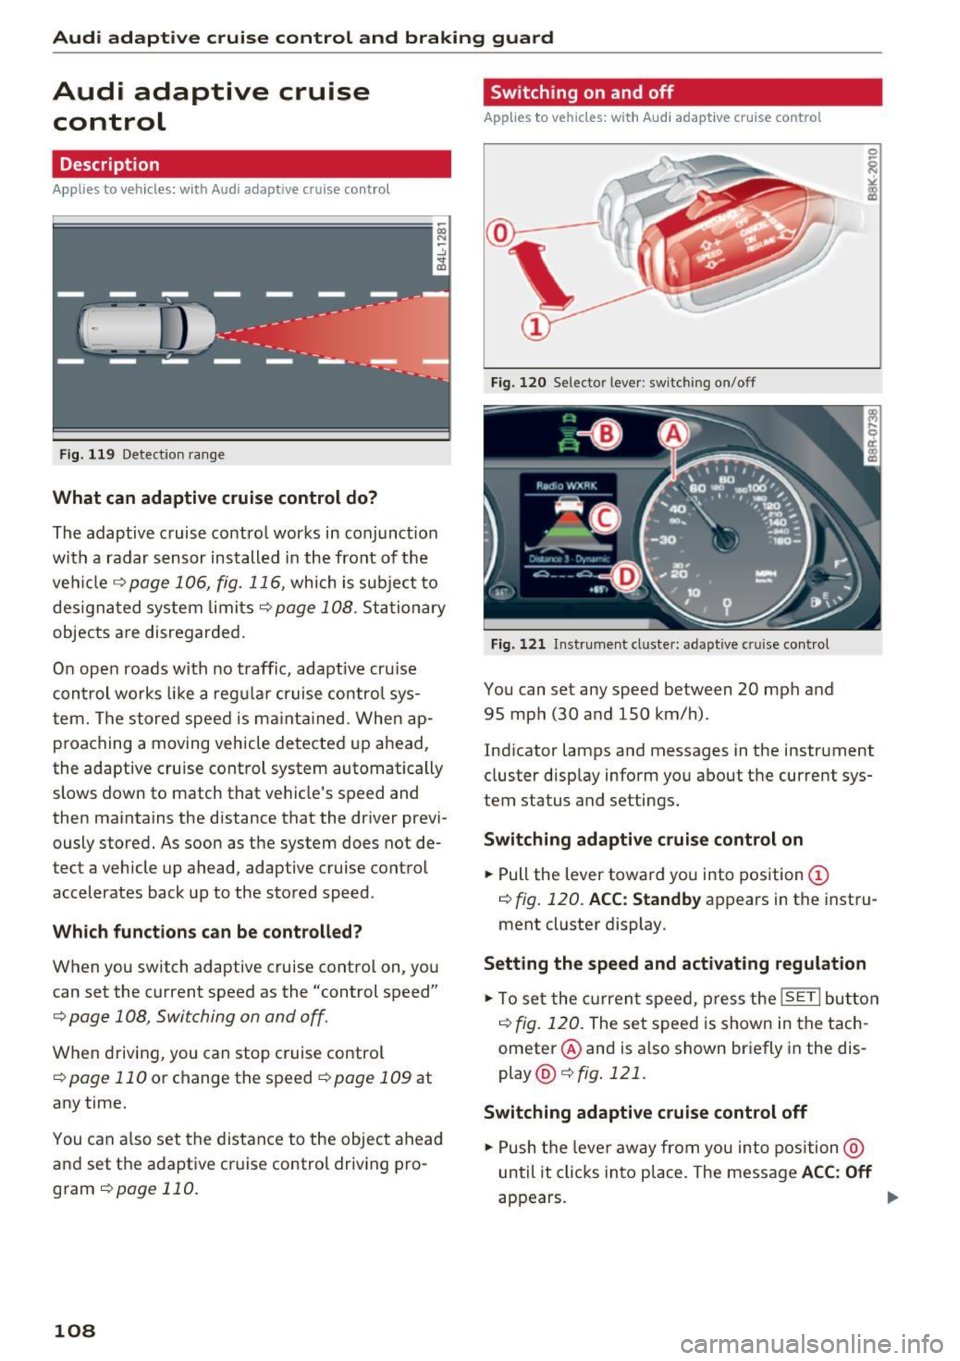
F ig. 119 Detection range
What can adaptive cruise control do?
The adaptive cruise control works in conjunct ion
with a radar sensor installed in the front of the
veh icle¢
page 106, fig. 116, which is subject to
designated system limits
¢page 108. Stationary
objects a re disregarded.
On open roads with no traffic, adaptive cru ise
control works like a regular cruise control sys
tem. The stored speed is ma inta ined. When ap
proaching a moving vehicle detected up ahead,
the adaptive cruise control system automatically
slows down to match that vehicle's speed and
then maintains the distance that the driver previ
ously stored. As soon as the system does not de
tect a vehicle up ahead, adaptive cruise control accelerates back up to the stored speed.
Which functions can be controlled?
When you switch adaptive cruise control on, you
can set the current speed as the "control speed"
¢ page 108, Switching on and off.
When driving, you can stop cruise control
¢
page 110 or change the speed ¢ page 109 at
any time.
You can also set the distance to the object ahead
and set the adaptive cruise control driving pro
gram
¢page 110.
108
Switch ing on and off
App lies to vehicles: wit h Audi ada ptive cruise control
Fig. 120 Selector lever: switch ing on/o ff
Fig. 121 Instrument cl uster: adapt ive c ruise control
You can set any speed between 20 mph and
95 mph (30 and 150 km/h) .
Indicator lamps and messages in the instrument cluster display inform you about the current sys
tem status and settings .
Switching adaptive cruise control on
.,. Pull the lever toward you into position (D
¢ fig. 120. ACC: Standby appears in the instru
ment cluster display.
Setting the speed and activating regulation
.,. To set the current speed, press the ISETI button
¢
fig. 120. The set speed is shown in the tach
ometer @and is also shown briefly in the dis
play @¢
fig. 121 .
Switching adaptive cruise control off
.,. Push the lever away from you into position @
until it clicks into place. The message ACC: Off
appears. Iii>
Page 112 of 300
Audi adaptive cruise control and braking guard
Interrupting cruise control
Applies to vehicles: with Audi adaptive cruise contro l
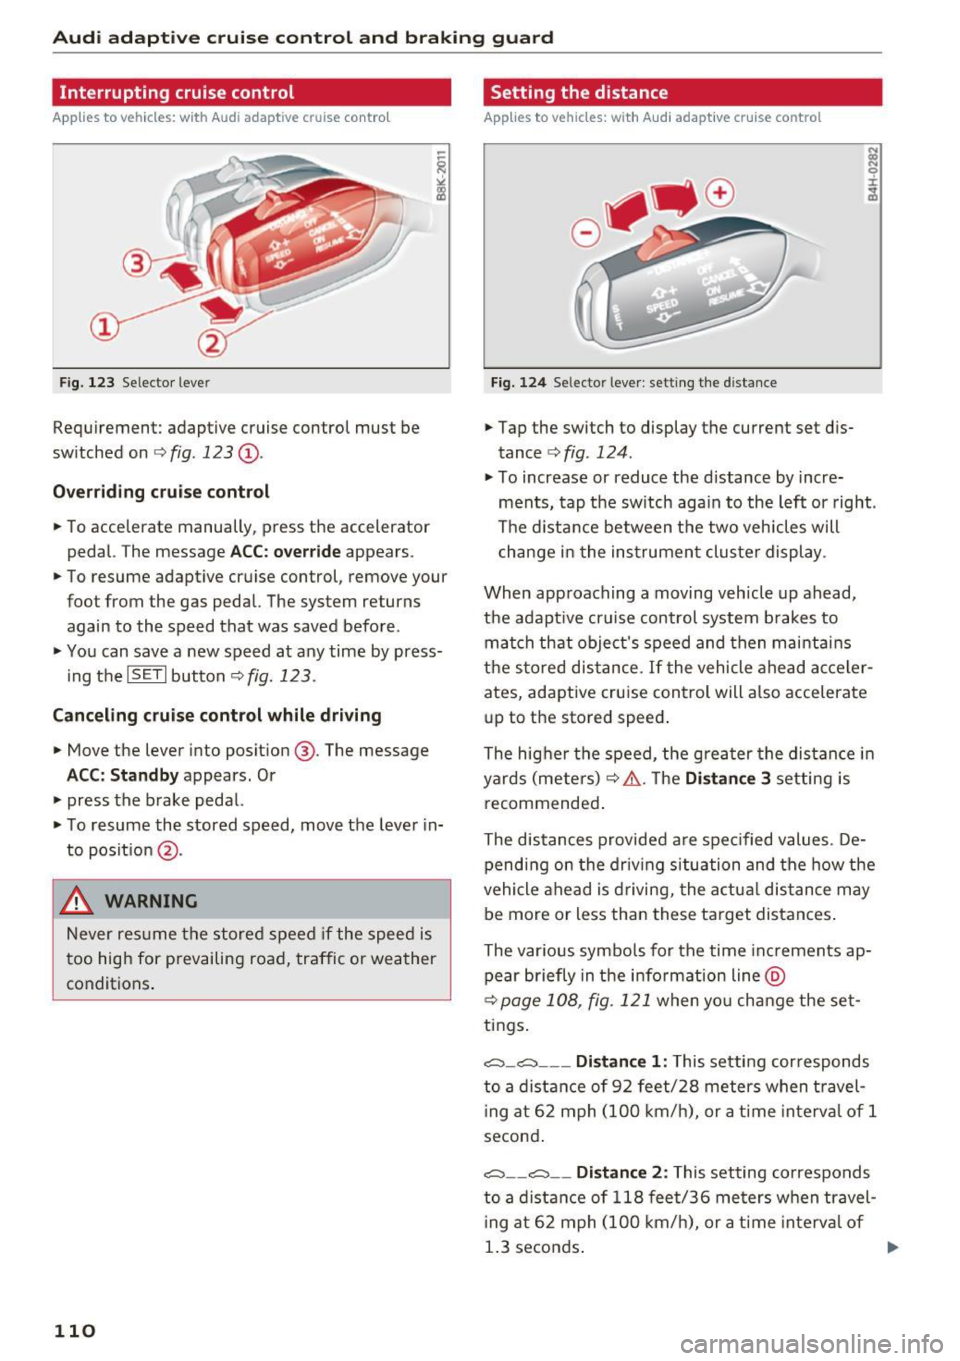
Fig. 123 Selector leve r
Requirement: adaptive cruise control must be
switched on
c:> fig . 123 (D.
Overriding cruise control
• To accelerate manually , press the accelerator
pedal. The message
ACC: override appears .
• To resume adaptive cruise control, remove your
foot from the gas pedal. The system re turns
again to the speed that was saved before .
• You can
save a new speed at any time by press
ing the
IS ETI button c:> fig. 123 .
Canceling cruise control while driving
• Move the lever into position @. The message
ACC: Standby appears. Or
• press the brake pedal.
• To resume the stored speed, move the lever in
to position
@.
.,&. WARNING
Never resum e the stored speed if the speed is
too high for prevailing road, traffic or weather
conditions.
110
Setting the distance
Applies to vehicles: with Audi adaptive cruise control
Fig. 124 Se lector leve r: setting the distance
• Tap the switch to display the current set dis
tance
c:> fig . 124 .
• To increase or reduce the distance by incre
ments, tap the switch again to the left or right.
The distance between the two veh icles will
change in the instrument cluster display .
When approaching a moving vehicle up ahead,
the adapt ive cruise control system b rakes to
match that object's speed and then maintains
the stored distance.
If the vehicle ahead acceler
ates, adaptive cruise control will also accelerate
up to the stored speed .
The higher the speed, the greater the distance in
yards (meters)
c:> &. . The Distance 3 setting is
recommended.
The distances provided are spec ified values . De
pending on the driving situation and the how the
vehicle ahead is driving, the actua l distance may
be more or less than these target distances .
The var ious symbo ls for the time increments ap
pear briefly in the information line @
c:>page 108, fig . 121 when yo u change the set
tings.
c::::, _c::::, ___ Distance 1 : This setting cor responds
to a distance of 92 feet/28 meters when travel
in g at 62 mph (100 km/h), or a time interval of 1
second .
c::::, __ c::::, __ Distanc e 2: This setting corresponds
to a distance of 118 feet/36 meters when travel
in g at 62 mph (100 km/h), or a time interval of
1.3 seconds .
Page 118 of 300
Audi side assist
General information
Applies to vehicles: with Audi side assist
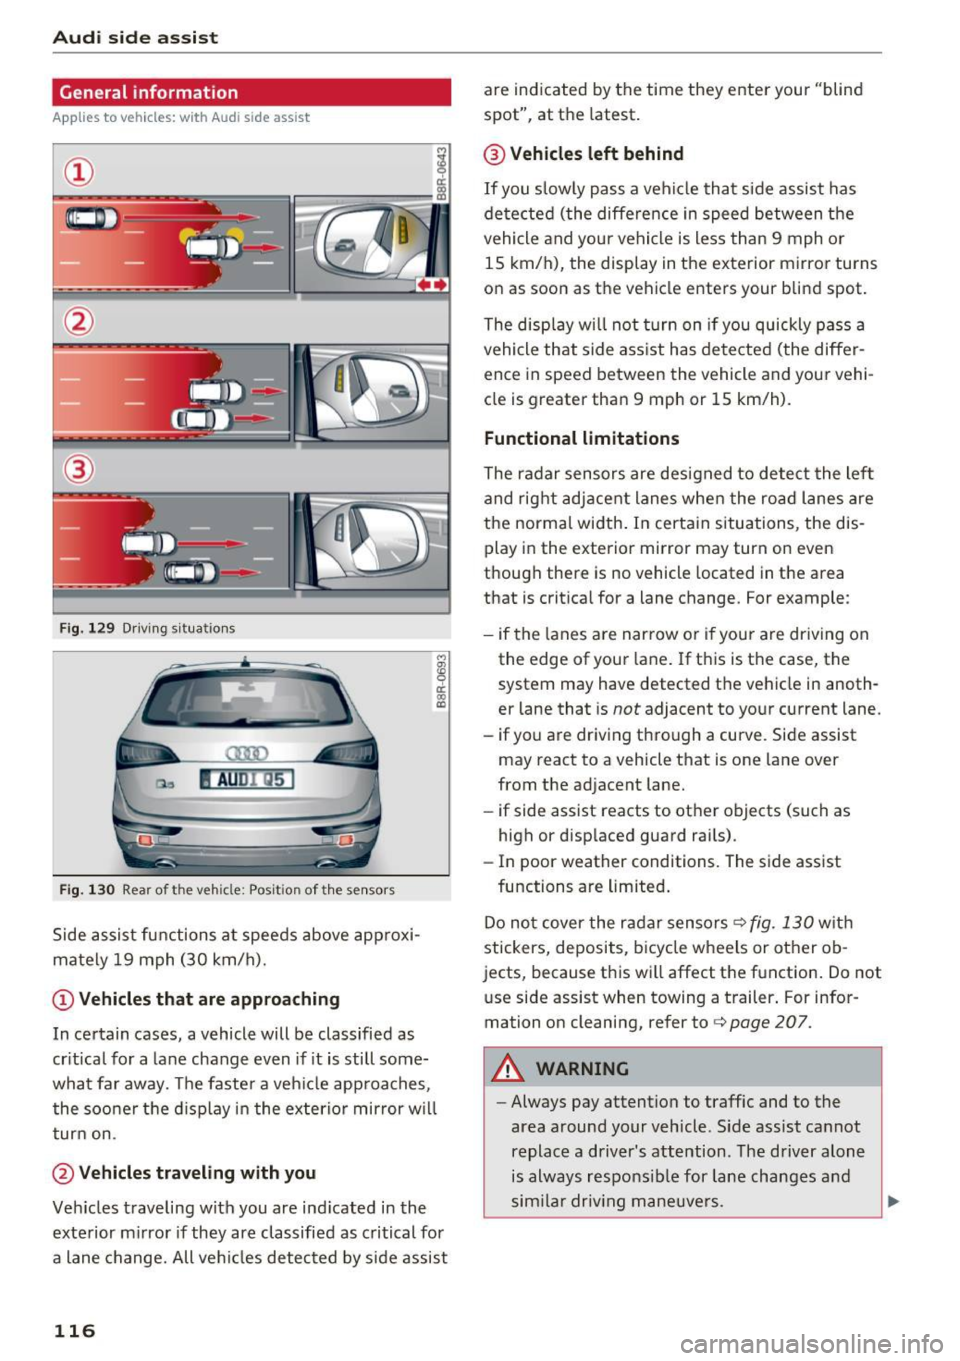
F ig . 129 Driving s it ua tion s
Fig. 130 Rear of the veh icle: Posit ion of the se nsor s
Side assist functions at speeds above approxi
mately 19 mph (30 km/h).
(D Vehicles that are appro aching
M
! OJ CD
In certain cases, a vehicle will be classified as
cr itical for a la ne change even if it is still some
what far away. The faster a veh icle approaches ,
the soo ner the d isplay in the exterior mirror w il l
turn on.
@ Vehicles tra veling with you
Veh icles traveling with you are ind icated in the
exterior m irror if they are classified as critical for
a lane change. All ve hicl es detected by side assist
116
are indicated by the time they enter your "blind
spot", at th e latest .
@ Vehicle s left behind
If you slow ly pass a vehicle that s ide assist has
de tected (the diffe rence in speed between the
vehicle and your vehicle is less than 9 mph or
15 km/h), the display in the exterior mirror turns
on as soon as the vehicle enters your blind spot.
The display w ill not turn on if you quickly pass a
vehicle that side ass ist has detected (the differ
ence in speed between the vehicle and your vehi
cle is greater than 9 mph or 15 km/h).
Functional limitation s
The radar sensors are designed to detect the lef t
and rig ht adjacent lanes whe n the road lanes are
the normal width . In certa in situations, the dis
play in the exterior mirror may turn on even
t hough there is no vehicle located in the area
that is crit ica l for a lane change. For example :
- if the lanes a re narrow o r if your are driving on
the edge of your lane . If this is the case, the
system may have detect ed the vehicle in anoth
e r lane that is
not adjacent to your current lane.
- if yo u are driving through a curve. Side assist
may r eact to a vehicle that is on e lane over
from the ad jacent lane.
- if side assist reacts to other objects (such as
high or disp laced guard rai ls) .
- In poor weather condit ions. The side assist
functions are limited .
Do no t cover the radar sensors ¢
fig. 130 wit h
stickers, deposits, bicycl e wheels or other ob
jects, because this wi ll affect the function. Do not
u se side assist when towing a trailer . For infor
mation on cleaning, refer to ¢
page 207.
A WARNING
-Always pay attention to traffic and to the
area around your veh icle . S ide assist cannot
replace a driver's attention . The driver alone
is always responsib le for lane changes and
sim ila r driv ing mane uve rs .
Page 119 of 300
..... N
co ~ CX)
..... I.Cl U"I
..... I.Cl ..... -
Improper reliance on the side assist system
can cause collisions and serious personal in
jury:
- Never rely only on side assist when chang
ing lanes.
- Always check rear view mirrors to make
sure that it is safe to change lanes.
- Side assist cannot detect all vehicles under
all conditions -danger of accident!
- Please note that side assist indicates there
are approaching vehicles, or vehicles in your
blind spot, only after your vehicle has
reached a driving speed of at least 19 mph
(30 km/h).
- In certain situations, the system may not
function or its function may be limited. For
example:
- if vehicles are approaching or being left
behind very quickly. The display may not
turn on in time.
- in poor weather conditions such as heavy
rain, snow or heavy mist.
- on very wide lanes, in tight curves or if
there is a rise in the road surface. Vehicles
in the adjacent lane may not be detected
because they are outside of the sensor
range.
(D Note
The sensors can be displaced by impacts or
damage to the bumper, wheel housing and
underbody. This can affect the system. Have
your authorized Audi dealer or authorized
Audi Service Facility check their function.
(D Tips
-If the window glass in the driver's door or
front passenger's door has been tinted , the
display in the exterior mirror may be misin
terpreted.
- For Declaration of Compliance to United
States FCC and Industry Canada regulations
¢page 283.
Audi side assist
Activating and deactivating
Applies to vehicles: with A udi side ass ist
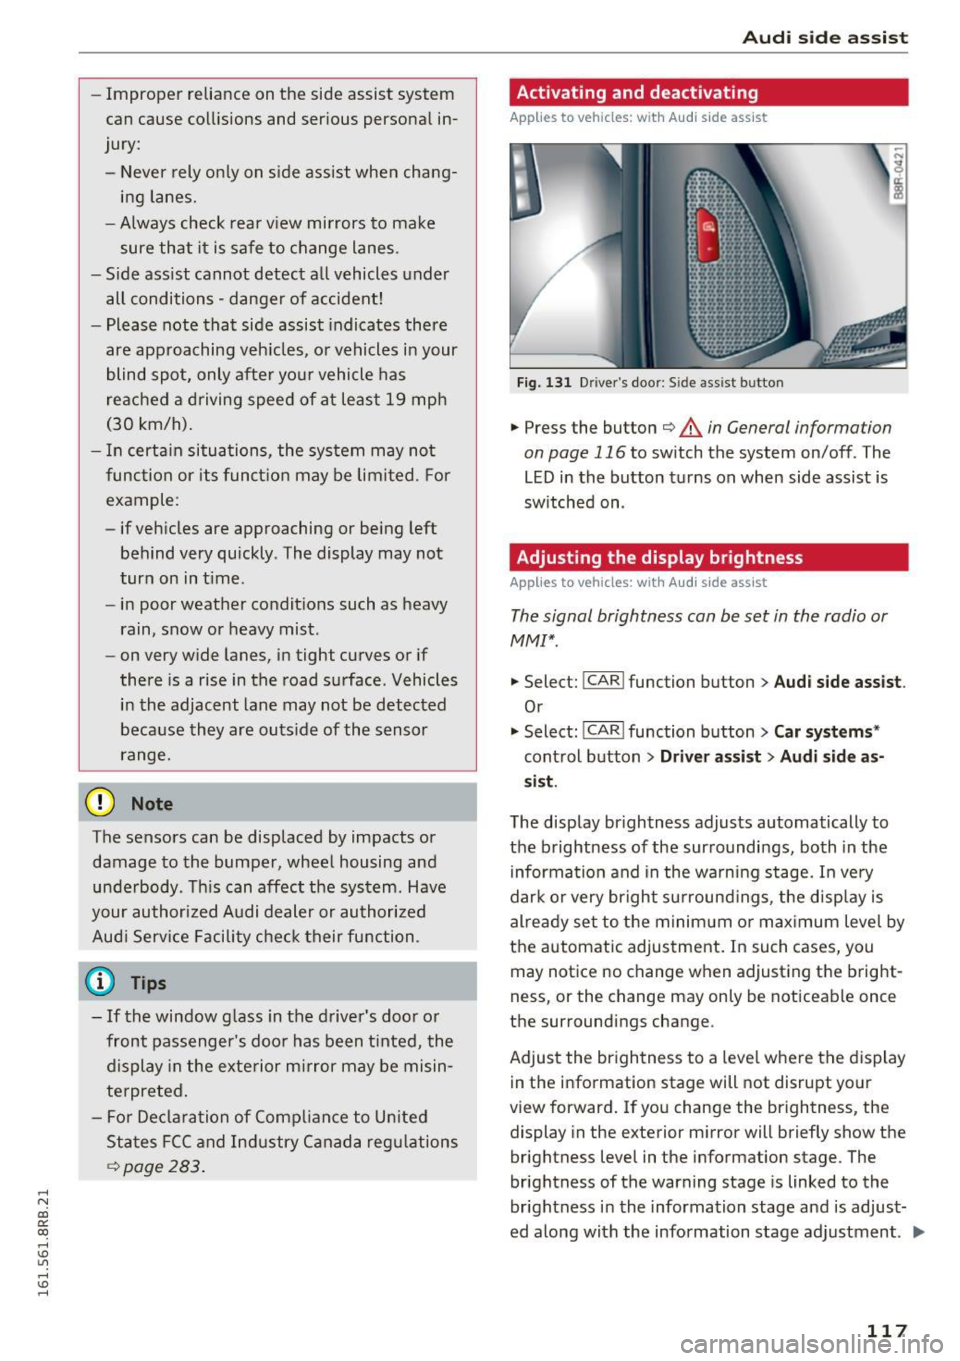
Fig. 131 Dr iver 's do or: Sid e assis t button
.,. Press the button ¢ & in General information
on page 116
to switch the system on/ off . The
LED in the button turns on when side assist is
switched on .
Adjusting the display brightness
Applies to vehicles: with Audi side assist
The signal brightness can be set in the radio or
MM!*.
.,. Select: !CAR I function button> Audi side assist .
Or
.,. Select: !CAR I function button> Car systems *
control button > Driver assist > Audi side as
sist.
The display brightness adjusts automatically to
the brightness of the surroundings, both in the
information and in the warning stage. In very
dark or very bright surroundings, the display is
already set to the minimum or maximum level by
the automatic adjustment. In such cases, you
may notice no change when adjusting the bright
ness, or the change may only be noticeable once
the surroundings change .
Adjust the brightness to a level where the display
in the information stage will not disrupt your
view forward. If you change the brightness, the
display in the exterior mirror will briefly show the
brightness level in the information stage . The
brightness of the warning stage is linked to the
brightness in the information stage and is adjust
ed along with the information stage adjustment . ..,.
117