change time AUDI Q5 2016 User Guide
[x] Cancel search | Manufacturer: AUDI, Model Year: 2016, Model line: Q5, Model: AUDI Q5 2016Pages: 300, PDF Size: 75.02 MB
Page 121 of 300

,....,
N
co
er::
co
,....,
Introduction
Applies to vehicles: with Audi drive select
Drive select provides the possibility to experience
d iff erent types of vehicle settings in one veh icle.
F or instance, using the three
Comfort, Auto and
Dynamic modes, the driver can switch from a
sporty to a comfortab le driving mode with the
press of a button.
Addit ionally, in vehicles with MM I*, the vehicle
setup for
Individual* mode can be customized by
you. This makes it possible to combine settings
such as a sporty engine tuning with comfortable
steering.
A WARNING
-
Improper use of the drive select can cause
collisions, other accidents and serious person
al injury.
Description
App lies to vehicles: with Audi drive select
The vehicle setup in each mode depends on the
veh icle's features . However, the engine, auto
matic transmission and steering are always in
volved.
Engine and automatic transmission
Depending on the mode, the engine and the au
tomatic transm ission respond quicker or in a
more balanced manner to accelerator pedal
movements . In the sporty dynam ic mode, the au
tomatic transmission shifts at higher RPMs .
Steering
The steering adapts in terms of steering effort
and steering ratios . Indirect steer ing that moves
eas ily, like the steering in comfort mode, is best
suited to long drives on a highway. In contrast,
dynamic mode provides sporty, direct steering.
The follow ing applies to vehicles with dynam ic
steering*: the steering rat io changes based on
vehicle speed in order to ma inta in optim um
steering effort for the driver at all times. This
Audi drive select
sets the steering to be less sensitive at higher
speeds in order to provide improved vehicle con
tro l. At reduced speeds, however, steering is
more direct in order to keep the steering effort as
minimal as possible when the driver is maneuver
ing the vehicle. At low and average speeds, dy
nam ic steering additionally prov ides more re
sponsive steering performance .
Adaptive dampers*
The adaptive dampers* use sensors to record in
formation regarding steering movements, brak ing and acceleration operations by the driver,
road surface, driving speed, and load . This makes
it possible to adapt damping to the driving situa
t ion virtua lly in real time. Drive select also makes
it possible to sat isfy the desire for sporty suspen
sion (Dynamic) and comfortable suspension
(Comfort) without giving up balanced tuning (Au
to).
Engine sound*
T he sound of the eng ine is adapted to the select
ed mode and ranges from subtle to spo rty.
Adaptive cruise control*
The behavior when accelerating can be adjusted
from comfortable to sporty, depending on the drive select mode. Adaptive cruise control also
responds to the driv ing behavior of the vehicle
ahead in a more conservative or sporty manner.
(D Tips
- In some models, the maximum vehicle
speed can only be reached in the
Auto and
Dynamic modes.
- Selecting the
Dynamic mode results in spo r
ty shift ing characteristics. The S gear posi
tion engages automatically.
- In vehicles that have dynamic steering*, op
erating noise is heard when starting or stop
ping the engine . This does not indicate a
prob lem.
119
Page 122 of 300
Audi drive select
Selecting the driving mode
Applies to vehicles: with Audi drive select
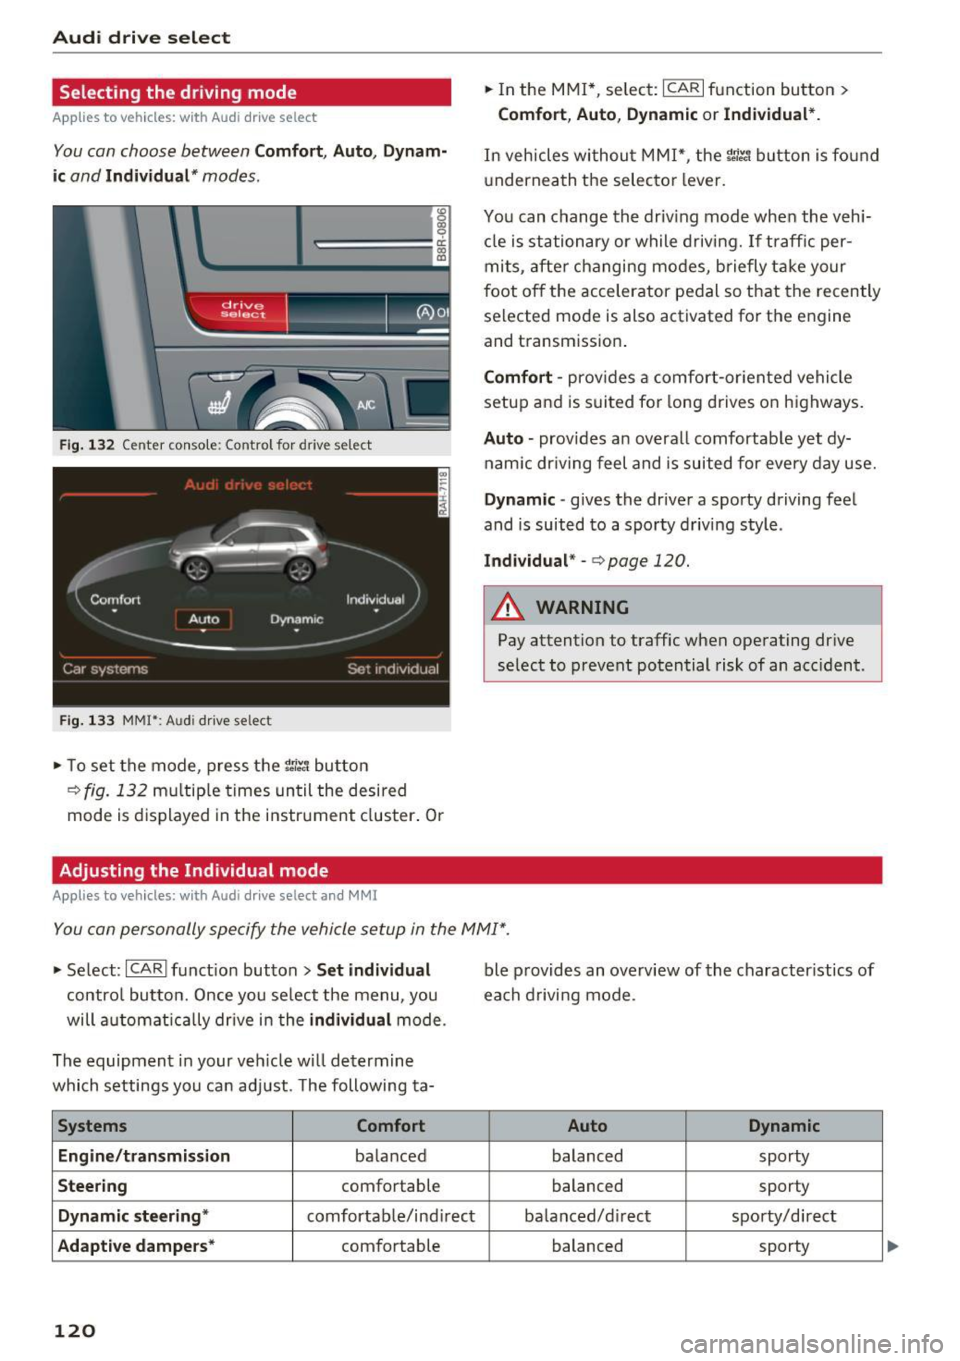
You con choose between Comfort, Auto, Dynam
ic
and Individual* modes .
c:=====:-~ ID
drive I I a,. "-"elect _ --~
Fig . 132 Center conso le: Cont rol for dr ive se lect
F ig . 133 MM !•: Audi drive select
.,. To set the mode, press the r.ri:t. button
¢fig. 132 multiple times until the desired
mode is displayed in the instrument cluster. Or
Adjusting the Individual mode
Applies to vehicles: with Audi drive select and MMI
.,. In the MMI*, select: ICARI function button >
Comfort , Auto, Dynamic or Individual*.
In vehicles withou t MMI*, the r:i:t. button is found
u nderneath the selecto r lever.
You can change the driving mode when the vehi
cle is stationary or while driving.
If traffic per
mits, after changing modes, briefly take your
foot off the accelerator pedal so that the recently
selected mode is also activated for the engine
and transm ission .
Comfort -provides a comfort-oriented vehicle
setup and is suited for long drives on highways.
Auto· provides an overal l comfortable yet dy
namic driving feel and is suited for every day use.
Dynamic · gives the driver a sporty driving feel
and is suited to a sporty driving style.
Individual * -q page 120.
A WARNING
Pay attention to traffic when operating drive
select to prevent potential risk of an acc ident .
You con personally specify the vehicle setup in the MMI" .
.,. Se lect : ICARI funct ion button > Set individual
control button. Once you se lect the menu, you
will automatically drive in the
individual mode .
The equipment in your veh icle will determine
which settings you can adjust . T he following ta-
Systems Comfort
Engine/transmission
ba lanced
Steering comfortable
Dynamic steering* comfortable/ind irect
Adaptive dampers* comfortable
120
ble provides an overview of the character istics of
each driving mode.
Auto Dynamic
balanced sporty
balanced sporty
balanced/d irect sporty/direct
balanced sporty
Page 124 of 300
Automatic transmissio n
Automatic transmission
tiptronic
Introduction
The automat ic transmission is controlled e lec
tron ically . The transmission upshifts or down
shifts automatically depending on wh ich dr ive
p rogram is selected. The powe r is transferred by
a torque converter .
When a
moderate driving style is used, the
transmission se lects the most economical d riving
mode .
It will then change up early and de lay the
downshifts to give better fuel economy .
The transm ission switches to a spo rty mode afte r
a kick-down or when the drive r uses a
sport y
d riv ing sty le
charac ter ized by quick accelerator
pedal movements, heavy acce leration, frequent
changes in speed and traveling at the maximum
speed.
If desired, the dr iver can a lso select the gears
manually ( tiptronic mod e) ¢ page 126.
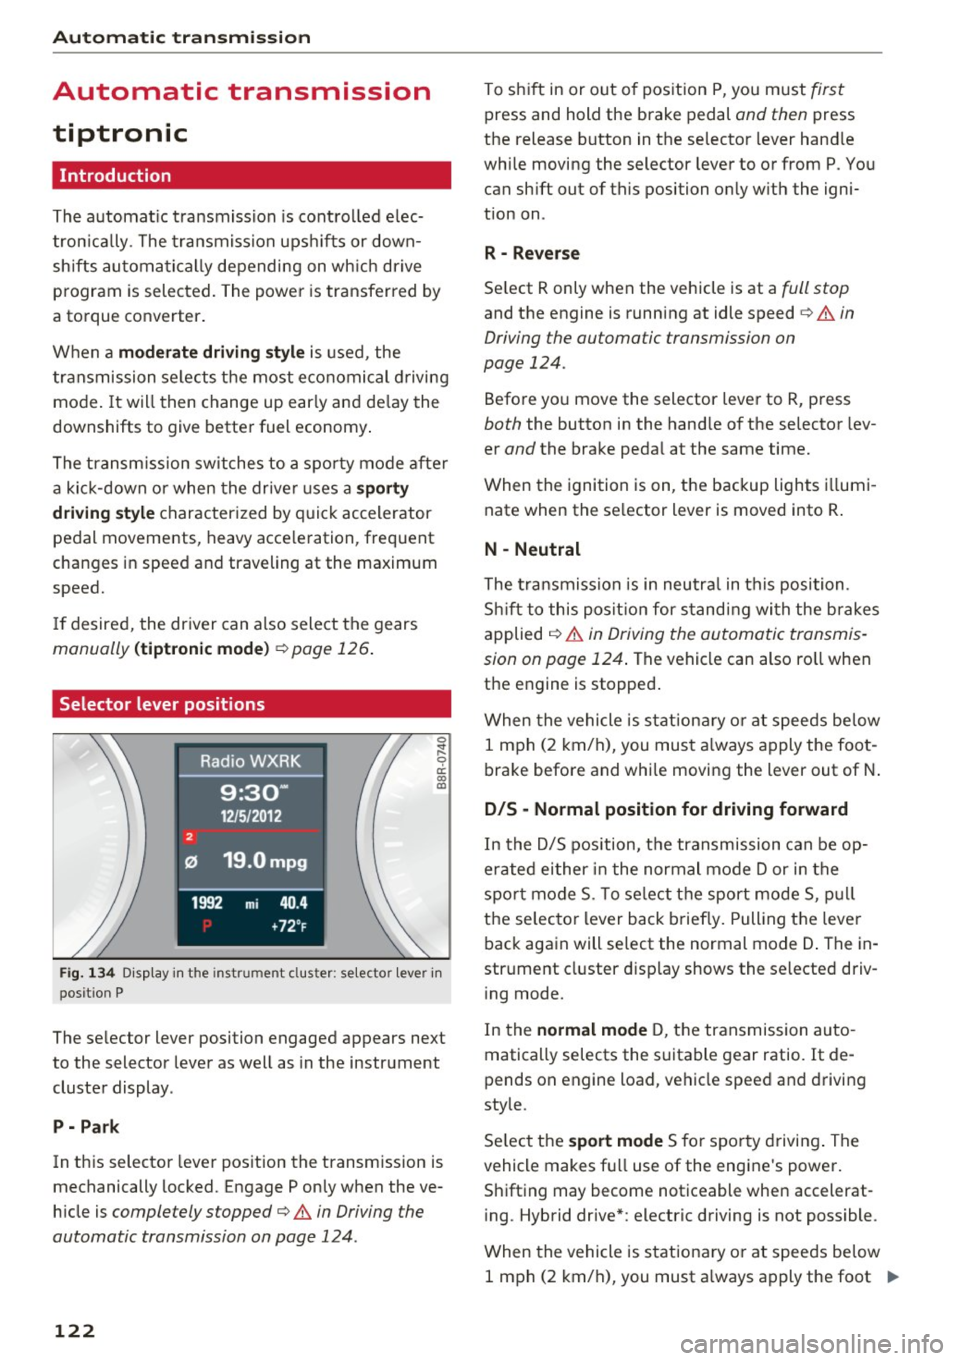
Selector lever positions
0 ;:t 0 ct CX) a,
Fig. 1 34 Disp lay in the instrument cl uster: selector lever in
position P
The selector lever position engaged appears next
to the selector lever as well as in the instrument
cluster display .
P -Pa rk
In this selector lever position the transmission is
mechanically locked. Engage P only when the ve
h icle is
completely stopped¢.& in Driving the
automatic transmission on page 124 .
122
To shift in or out of pos ition P, you m ust first
press and hold the brake pedal and then press
the release button in the selector lever hand le
while moving the selector lever to or from P. You can sh ift out of this position on ly w ith the igni
tion on .
R -Reve rse
Se lect R only when the vehicle is at a full stop
and the engine is running at idle speed c> .& in
Driving the automatic transmission on
page 124.
Befo re yo u move the selector lever to R, press
both the button in the hand le of the se lector lev
er
and the brake peda l at the same time.
When the ignition is on, the backup lights i llumi
nate when the se lector lever is moved into R .
N -Neutral
The t ra nsmission is in neutra l in this position .
S hi ft to this pos it ion for s tand ing wi th the brakes
applied
¢ .&. in Driving the automatic transmis
sion on page 124 .
The vehicle can also ro ll when
the engine is stopped .
When the vehicle is stationa ry o r at speeds be low
1 mph (2 km/h), you must a lways apply the foot
brake before and whi le moving the lever out of N .
D/S -Normal position for driving forward
In the D/5 position, the transmission can be op
erated either in the normal mode Dor in the
spo rt mode 5. To se lect the sport mode 5, p ull
t h e se lecto r lever back briefly. Pulling the leve r
back again will select the normal mode D . The in
strument cluster d isplay shows the se lected driv
i ng mode.
In the
normal mode D, t he transmission auto
matically selects the suitable gear ratio . It de
pends on engine load, vehicle speed and d riving
style.
Se lect t he
sport mode 5 for sporty drivi ng . The
vehicle makes fu ll use of the engine 's power.
Shifting may become noticeable when accelerat
i ng . Hybrid drive* : electric driving is not possible .
When the vehicle is stationary o r at speeds be low
1 mph (2 km/h), you must a lways apply the foot ..,.
Page 132 of 300
Parking system
Switching on and off
Applies to veh icles: w ith Aud i park ing system p lus w ith rear
view ca mera
The rearview camera switches on automatically
together with the acoustic and visual park assist
when you put the vehicle in reverse.
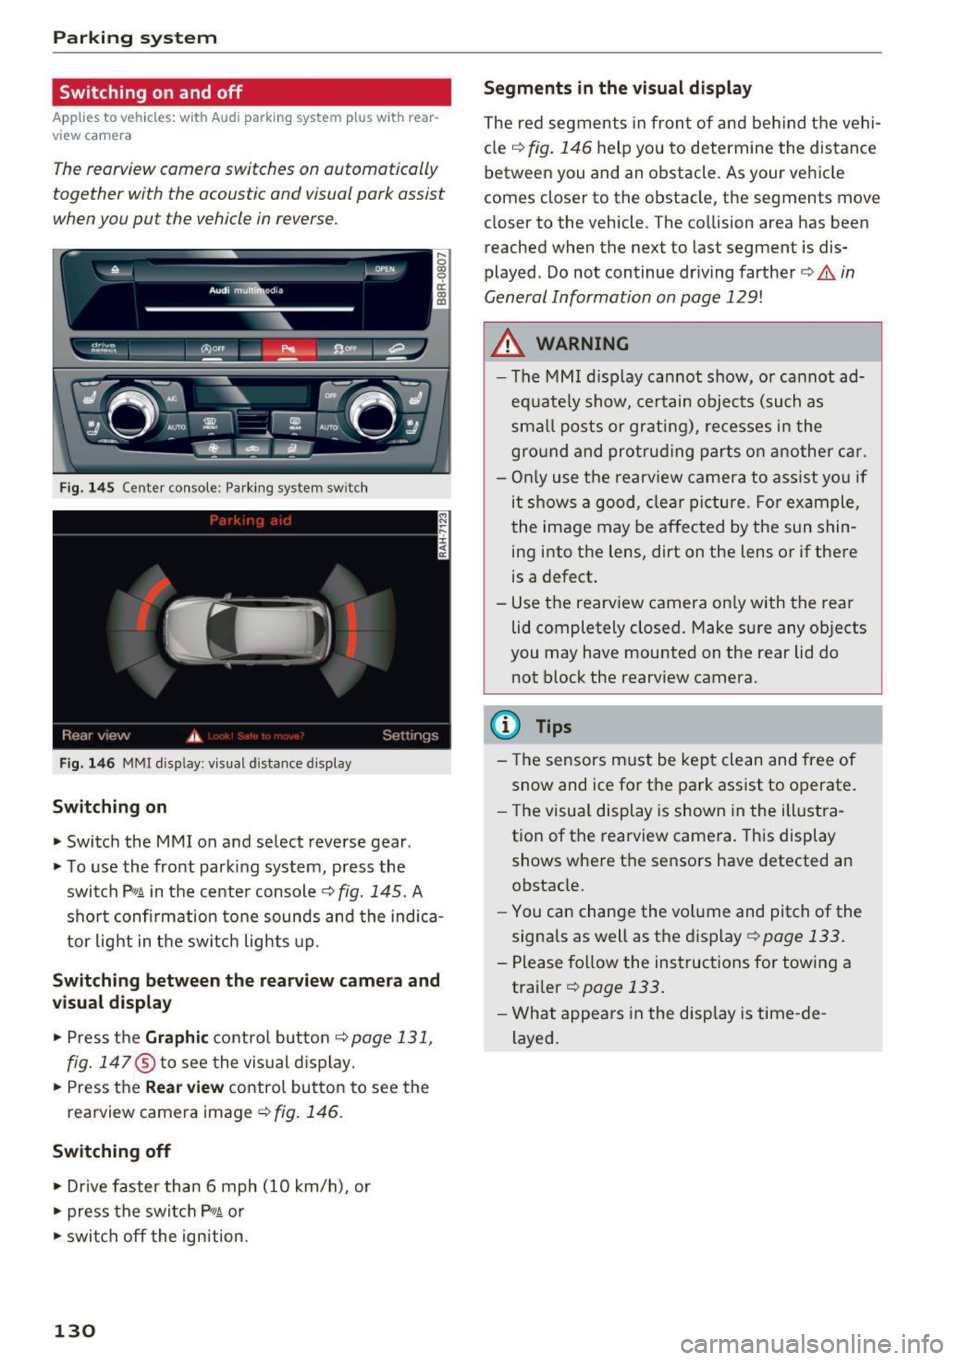
F ig. 145 Center console: Pa rking system sw itch
F ig. 146 MM I d isp lay : v isual d istance display
Sw itch ing on
• Switch the MM I on and select reverse gear .
• To use the front parking system, press the
switch
P11A in the center console¢ fig. 145. A
sho rt confi rmation to ne sounds and the indica
tor light in the switch lights up.
Sw itching betwe en th e re arview came ra and
visual display
• Press t he Graphi c control but ton ¢ page 131,
fig. 147
® to see the vis ual d isplay.
• Press the
Re ar view contro l button to see the
rearview camera image¢
fig. 146.
Switching off
• Drive faster than 6 mph (10 km/h), or
• press the switch
P"1A or
• swit ch off the ignition.
130
S egments in the vis ual d isplay
The red segments in front of and behind the vehi
cle
¢ fig. 146 help you to determine the distance
between you and an obstacle . As your vehicle
comes closer to the obstacle, the segments move
closer to the vehicle . The collision area has been
reached when the next to last segment is dis
played . Do not continue dr iving farther ¢.&.
in
General Information on page 129!
,& WARNING
- The MMI display cannot show, or cannot ad
equate ly show, certain objects (such as
sma ll posts or grati ng), re cesses in the
gro und and protrud ing parts on another car.
- On ly use the rearv iew camera to ass ist you if
it shows a good, clear picture . For example,
the image may be affected by the sun shin
ing into the lens, dirt on the lens o r if there
is a defect .
- Use the rearview camera on ly with the rear
lid completely closed. Make sure any ob jects
you may have mounted on the rear lid do
not block the rearview camera.
(D Tips
- The sensors m ust be kept clean and free of
snow and ice for the park assist to operate .
- The visu al display is shown in the illustra
tion of the rearview camera. This display
shows where the sensors have detected an obstacle.
- Yo u can change the vol ume and pitch of the
signals as well as the disp lay ¢
page 133.
-Please follow the instruc tions for tow ing a
trailer
¢ page 133.
- What appears in the display is time -de
layed .
Page 142 of 300
Driving safety
-Always put objects, for example, luggage or
other heavy items in the luggage compart
ment.
- Always secure objects in the luggage com
partment using the tie-down eyelets and
suitable straps.
A WARNING
Heavy loads will influence the way your vehi
cle handles. To help reduce the risk of a loss
of control leading to serious personal injury:
- Always keep in mind when transporting
heavy objects, that a change in the center of
gravity can also cause changes in vehicle
handling:
- Always distribute the load as evenly as
possible.
- Place heavy objects as far forward in the
luggage compartment as possible.
- Never exceed the Gross Axle Weight Rating or the Gross Vehicle Weight Rating specified
on the safety compliance sticker on the left
door jamb. Exceeding permissible weight
standards can cause the vehicle to slide and handle differently .
- Please observe information on safe driving
¢page 134.
A WARNING
To help prevent poisonous exhaust gas from
being drawn into the vehicle, always keep the
rear lid closed while driving.
- Never transport objects larger than those fitting completely into the luggage area be
cause the rear lid cannot be fully closed .
- If you absolutely must drive with the rear lid open, observe the following notes to reduce
the risk of poisoning:
- Close all windows,
- Close the Panoramic sliding sunroof*,
- Open all air outlets in the instrument pan-
el,
- Switch off the air recirculation,
- Set the fresh air fan to the highest speed .
140
A WARNING
,--
Always make sure that the doors, all win
dows, the Panoramic sliding sunroof* and the
rear lid are securely closed and locked to re
duce the risk of injury when the vehicle is not
being used .
-After closing the rear lid, always make sure
that it is properly closed and locked.
- Never leave your vehicle unattended espe
cially with the rear lid left open. A child
could crawl into the vehicle through the lug
gage compartment and close the rear lid be
coming trapped and unable to get out. Be
ing trapped in a vehicle can lead to serious
personal injury.
- Never let children play in or around the vehi
cle.
- Never let passengers ride in the luggage
compartment. Vehicle occupants must al
ways be properly restrained in one of the ve
hicle's seating positions.
(D Tips
- Air circulation helps to reduce window fog
ging. Stale air escapes to the outside
through vents in the trim panel. Be sure to keep these slots free and open .
- The tire pressure must correspond to the
load. The tire pressure is shown on the tire
pressure label. The tire pressure label is lo
cated on the driver's side B-pillar . The tire
pressure label lists the recommended cold
tire inflation pressures for the vehicle at its
maximum capacity weight and the tires that
were on your vehicle at the time it was man
ufactured. For recommended tire pressures
for normal load conditions, please see chap
ter ¢
page 245.
Tie-downs
The luggage compartment is equipped with four
tie-downs to secure luggage and other items.
Use the tie-downs to secure your cargo properly
¢page 139, Loading the luggage compartment . ..,_
Page 167 of 300
..... N
co ~ CX)
..... I.Cl U"I
..... I.Cl .....
@ For the sake of the environment
Undep loyed airbag modu les and pretension
ers might be classified as Perchlorate Materi
al -special handling may apply, see
www.dtsc .ca.gov/hazardouswaste/perchlo
rate . When the veh icle or parts of the re
straint system including airbag modules safe
ty belts with pretensioners are scrapped, all
app licable laws and regulations must be ob
served. Your authorized Audi dealer is familiar
w ith these req uirements and we recommend
that you have your dealer perform this service
for you.
Other things that can affect Advanced
Airbag performance
Changing the vehicle's suspension system can
change the way that the Advanced Airbag System
pe rforms in a crash. For examp le, using tire-r im
comb inat ions not approved by Audi, lowering the
veh icle, chang ing the stiffness of the suspens ion,
including the springs, suspension struts, shock
absorbers etc . can change the forces that are
measured by the airbag sensors and sent to the
e lectronic control unit . Some suspension changes
can, for example, increase the force levels meas
ured by the sensors and make the airbag system
deploy in crashes in wh ich it would not deploy if
the changes had not been made . Other kinds of
changes may reduce the fo rce levels measured by
the sensors and prevent the airbag from deploy ing when it should.
A WARNING
Changing the vehicle's suspension including
use of unapproved tire-rim combinations can
change Advanced Airbag performance and in
crease the risk of serious personal injury in a
crash.
- Never install suspens ion components that
do not have the same performance charac
teristics as the components or iginally instal
led on your veh icle.
- Never use tire-rim combinations that have
not been approved by Audi.
Airb ag sys tem
A WARNING
-Items stored between the safety belt buckle
and the center console can cause the sensors
i n the buckle to send the w rong information
to the electronic contro l modu le and prevent
the Advanced A irbag System from wo rking
p roperly.
- Always make sure that nothing can interfe re
with the safety belt buckles and that they
are not obstructed.
Side airbags
Description of side airbags
The airbag system con provide supplemental
protection to properly restrained occupants.
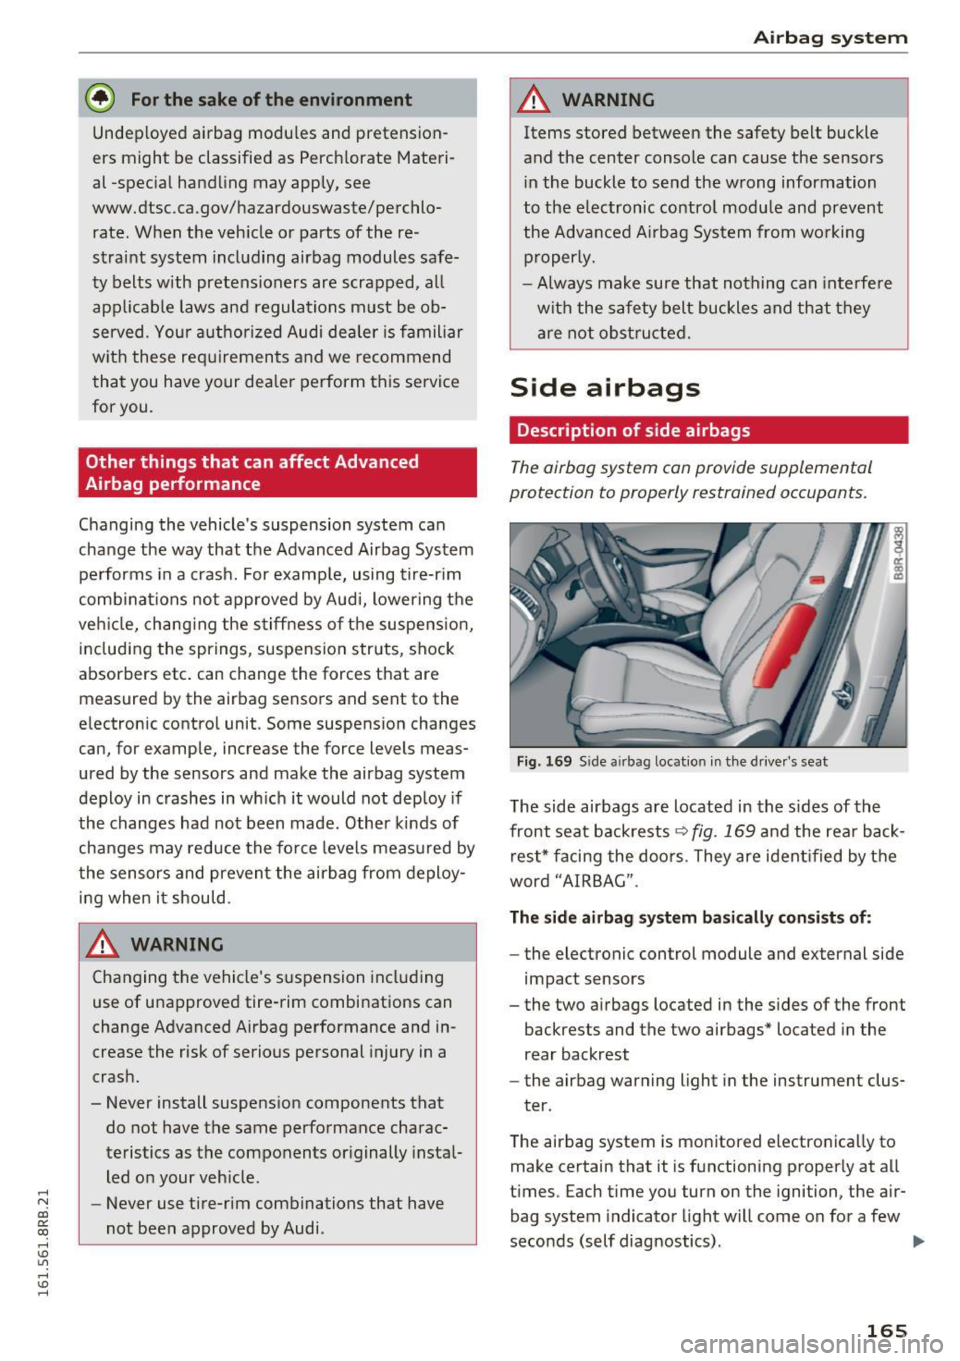
Fig. 1 69 Side a irbag locatio n in the driver 's seat
T he side airbags are located in the s ides of the
front seat backrests
r='.> fig . 169 and the rear back
rest* facing the doo rs. They are ident ified by t he
word "AIRBAG".
The si de airbag system ba sic ally con sis t s of:
- the electronic control module and external side
impact sensors
- the two a irbags located in the s ides of the front
backrests and the two airbags* located in the
rear backrest
- the airbag warning light in the instrument clus-
ter.
The airbag system is monitored electronica lly to
make certain that it is functioning proper ly at all
t imes . Each time you turn on the ignition, the a ir
bag system indicator light w ill come on for a few
seconds (self diagnostics) .
Ill-
165
Page 205 of 300
,....,
N
co
er::
co
,....,
General information
Your Audi was designed primarily for passenger
transportation .
If you plan to tow a trailer, please remember that
the additional load will affect durability, econo my and performance.
T railer towing not only places more stress on the
vehicle, it also calls for more concentration from
the driver.
For this reason, always follow the operating and
driving instructions provided and use common
sense.
Technical requirements
Trailer hitch
Use a weight-carrying hitch conforming to the
gross trailer weight. The hitch must be suitable
for your vehicle and trailer and must be mounted
securely on the vehicle's chassis at a technically
sound
location . Use only a trailer hitch with a re
movable ball mount . Always check with the trail
er hitch manufacturer to make sure that you are
using the correct hitch.
Do not use a bumper hitch.
The hitch must be installed in such a way that it
does not interfere with the impact -absorbing
bumper system . No modifications should be
made to the vehicle exhaust and brake systems .
From time to time, check that all hitch mounting
bo lts remain securely fastened.
When you are not towing a trailer,
remove the
tra iler hitch ball mount . This prevents the hitch
from causing damage should your vehicle be
struck from beh ind ¢
,&. .
Trailer brakes
If your trailer is equipped with a braking system,
check to be sure that it conforms to all regula
tions .
Trailer mode
The trailer hydraulic brake system must not be
directly connected to the vehicle's hydraulic
brake system ¢.&. .
Safety chains
Always use safety chains between your vehicle
and the trailer.
Trailer lights
T ra iler lights must meet all regulations . Be sure
to check with your author ized Audi dealer for cor
rect wiring, switches, and relays.
Mirrors
If you are unable to see the traffic behind you us
ing the regular outside mirrors, then you
must in
stall extended mirrors. It is important that you
always have clear vision to the rear.
,8. WARNING
-If a trailer has electrical brakes please note
that these brakes are not activated by the
factory-fitted control unit -risk of accident!
- After removing the trailer hitch, do not store it in your vehicle. In case of sudden
braking, the hitch could fly forward and in
jure you or your passengers.
- Never install a "weight distributing" or
"load equalizing" trailer hitch on your vehi
cle. The vehicle was not designed for these
kinds of trailer hitches . The hitch attach
ment can fail, causing the trailer to tear
loose from the vehicle.
- The Gross Vehicle Weight Rating for your
vehicle, found on the safety compliance la bel on the driver's side B-pillar, must never
be exceeded under any circumstances. Ex
ceeding the Gross Vehicle Weight Rating of
your vehicle is likely to damage your vehicle,
and such damage will not be covered by
your Limited New Vehicle Warranty. Exceed
ing the Gross Vehicle Weight Rating will al
so change the performance and handling
characteristics of your vehicle, which could
cause a crash resulting in serious injury or
death.
203
Page 215 of 300
,....,
N
co
er::
co
,....,
pecia lly we ll for winter or summer driving. Dur
ing seasona l change-over, we suggest that you
f ill up at busy gas stations where the seasonal
adjustment is more likely to be made in time.
- Fuels containing a high percentage of etha
no l such as ESO and E85 may only be used in
vehicles with flexible fuel* eng ines. Using
high ethanol fuel in veh icles not equ ipped
with flexible fuel* engines can cause severe
engine damage .
- Methanol fuels which do not meet these re quirements may ca use corros io n and dam
age to plast ic and r ubber components in the
fuel system.
- Do not use fuels that fail to meet the spec i
fied c rit er ia i n this c hapter.
- If you a re unable to determine whether or
not a particular fue l blend meets the spec i
fi cat ions, ask your service station o r its fuel
su pplier.
- Do not use fue l fo r w hich the contents can
not be identified.
- Fuel sys tem damage and performance prob
l ems result ing from the use of fue ls diffe r
ent from those specified are not the respon
s ibility o f Audi and are no t covered under
the New Vehicle or the Emissio n Contro l
System Wa rranties .
- If you experience a loss of fue l economy o r
driveability an d performance prob lems d ue
to the use o f one of these fuel b lends, we
r ecommend that you switch to unblended
fuel.
Ethanol fuel (Bio-ethanol)
App lies to vehicles: with flexib le fuel engine
You con recognize vehicles with a flexible fuel
engine by looking a t the label on the inside of
the fuel filler flop.
Veh icles with flexibl e fu el engines may be op er
ated w ith bio -ethanol fuels such as E85 (85%
ethano l and 15% gasoline) or with un leaded gas
oline (9 1 AKI/RO Z 95). The ve hicle may a lso be
ope rated with a mixture of these fuels.
Fuel and R efueling
Your fuel consumpt ion w ill increase when using
bio-ethano l fue ls due to th e lower amount of en
ergy conta ined per un it vol ume in ethanol.
Warming up the flexible fuel engine in low
temperature s
Due to the chemica l composition of b io -ethanol ,
a certa in amount of fue l ends up in the engine o il
when driving short distances in very low temper
atures . This fuel evaporates again when the en
gine is warmed up.
II Please warm up eng ine .
If the drive r message appears in the instr ume nt
cluster disp lay, drive with a warm engine to re
duce the oil leve l.
(D Note
- N ever fill wi th metha nol o r with a higher
percentage of b io -ethanol than 85% (E85).
A highe r percentage of bio-ethanol in the
fuel can cause damage to the engine or to the fuel system.
- If you use on ly E85, it is recommended to
fill the fue l tank complete ly w ith unleaded
premium grade gasoline every 5,000 mi les.
- If you expe rience starting, rough id le or hes
itat ion d riveab ility prob lems, f ill the fuel
tank complete ly w ith unleaded p remium
grade gaso line and drive it norma lly until
the gaso line is used. See your author ized
Audi dea ler if the problem persists.
- Inform your author ized Audi dealer that you
are operating o r have operate d the vehicle
w ith E8S.
- Read and follow the i nformat ion and tips
abou t gasoli ne <=:>
page 212 .
(D Tips
It may take longer to start the engine when
the outs ide temperatu re is very cold . If possi
ble, use w inte rized fue l if tempe ratures are
below free zing .
213
Page 224 of 300
Checking and Filling
Engine compartment
Engine compartment
These are the most important items that you can check.
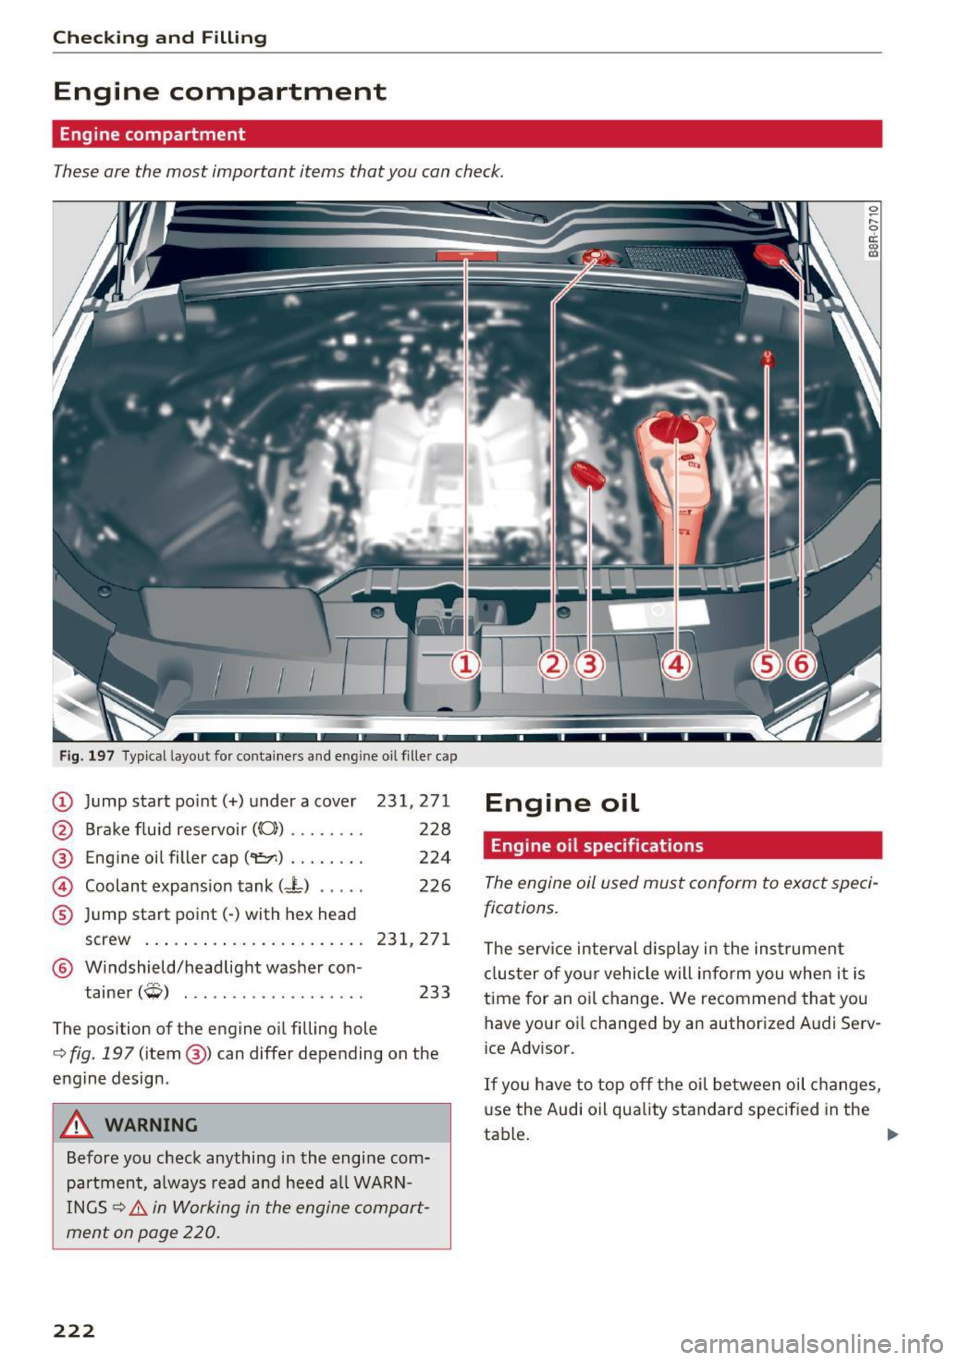
Fig. 197 Typical layout for con tainers and eng ine oil filler cap
® Eng ine oil filler cap ("1::7':) ........ 224
© Coolant expansion tank (- L) ..... 226
® Jump start point(-) with hex head
screw
. .. .. .... .............. 231,271
® Windshield/headlight washer con-
tainer
(Q) ................... 233
The position of the engine oil filling hole
¢ fig. 197 (item @) can differ depending on the
engine design .
A WARNING
Before you check anything in the engine com
partment, always read and heed all WARN
INGS ¢.&.
in Working in the engine compart
ment on page 220.
222
Engine oil
Engine oil specifications
~ r--0 d::
"' t0
The engine oil used must conform to exact speci
fications.
The serv ice interval display in the instrument
cluster of your vehicle will inform you when it is
time for an oi l chang e. We recommend that you
have your oi l changed by an authorized Audi Serv
i ce Advisor.
If you have to top off the oil between oil changes,
us e the Audi oil quality standard specified in the
ta ble.
~
Page 225 of 300
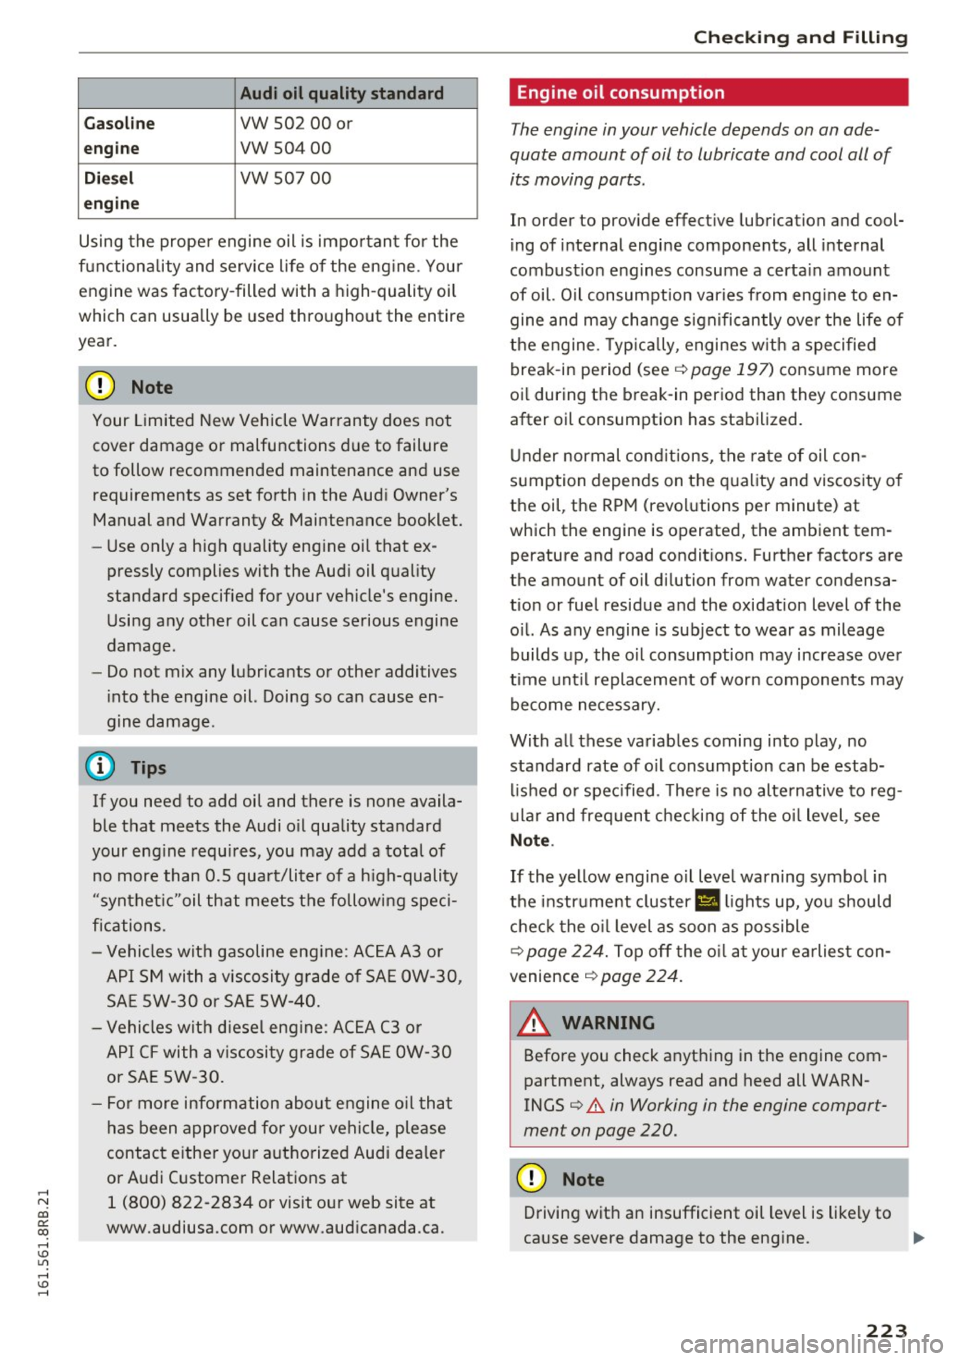
Audi oil quality standard
Gas oline
VW 502 00 or
engi ne vw 504 00
Die sel vw 507 00
en gin e
Using the prope r engine oil is important for the
functiona lity and service life of the eng ine. Your
engine was factory-filled with a high -quality oil
which can usually be used throughout the entire
year.
@ Note
Your Limited New Vehicle Warranty does not
cover damage or malfunctions due to failure
to follow recommended maintenance and use
requirements as set forth in the Audi Owner's Manual and Warranty
& Maintenance booklet.
- Use only a high quality eng ine oil that ex-
pressly complies with the Aud i oil quality
standard specified for your vehicle's engine.
Using any other oil can cause serious engine
damage .
- Do not mix any lubricants or other additives
into the engine oil. Doing so can cause en
gine damage.
(D Tips
If you need to add oil and there is none availa
ble that meets the Audi o il quality standard
your eng ine requ ires, you may add a total of
no more than 0.5 quart/liter of a h igh-quality
"synthet ic"oil that meets the followi ng speci
fications.
- Vehicles with gasoline eng ine: AC EA A3 o r
API SM wi th a viscosity g rade of SA E OW-30,
SAE SW-30 or SAE SW-40.
- Vehicles wit h diesel eng ine: ACEA C3 o r
API CF with a v iscosi ty grade of SA E OW-30
or SA E SW -30.
- Fo r more information abou t engine o il that
has been approved for your vehi cle, please
contact either you r a utho rized Audi dea ler
or A udi Customer Relations at
~ 1 (800) 822-2834 or visit our web site at co
g:; www.audiusa.com or www.aud icanada.ca.
Ch eck ing and Filling
Engine oil consumption
The engine in your vehicle depends on on ade
quate amount of oil to lubricate and cool oil of
its moving ports.
In order to provide effect ive lubrication and cool
i ng of internal engine components, all internal
combust ion eng ines consume a certa in amount
of oil. Oil consumption varies from eng ine to en
gine and may change s ign ificantly ove r the life of
the engine. Typ ica lly, engines w ith a specified
break-in period (see
¢ page 197) consume more
oi l during the break -in period than they consume
after oil consumption has stabilized.
Under normal cond itions, the rate of oil con
sumption depends on the q uality and viscosity o f
the oil, the RPM (revol utions per minute) at
which the engine is operated, the ambient tem
perature and road condit ions. Further factors are
the amount of oil dilution from water condensa
tion or fuel residue and the oxidation level of the o il. As any engine is subject to wear as mileage
builds up, the oil consumption may increase over
time unt il replacement of worn components may
become necessary.
With all these variables coming into play, no standard rate of o il consumption can be estab
li shed or spec ified . T he re is no alte rnative to reg
u la r and frequent checking of the oi l level , see
Note .
If the yellow engine o il leve l warning symbo l in
the instrument cluster
II lights up, yo u should
c h eck the o il level as soon as possible
¢ page 224. Top off the o il at your earlies t con
venience
¢ page 224.
A WARNING
--=-
Before you check anything in the engine com-
partment, always read and heed all WARN
INGS
¢ &. in Working in the engine comport
ment on page 220.
(D Note
Driving wit h an insufficient oil level is likely to
cause severe damage to the eng ine. ..,.
223