radiator AUDI Q5 2017 Owners Manual
[x] Cancel search | Manufacturer: AUDI, Model Year: 2017, Model line: Q5, Model: AUDI Q5 2017Pages: 296, PDF Size: 74.43 MB
Page 11 of 296
a,
a,
..... N r-N ..... 0 0
0:
co
Warning light in the instrument cluster
display
If the . warning light in the instrument cluster
display flashes, this can mean one of two things:
either the coolant
temperature is too high, or the
coolant
level is too low~ page 26.
If the needle is well in the upper area of the
gauge, the coolant temperature is too high.
Stop
the vehicle, switch the engine off, and allow it
to cool. If the warning light comes on again after
driving a short distance, contact an authorized
Audi dealer or other qualified workshop .
_& WARNING
- Always observe the warning in~ page 217,
before opening the hood and checking the
engine coolant level.
- Never open the engine hood if you see or
hear steam, or if you see engine coolant
dr ipping from the engine compartment. You
cou ld burn yourself. Let the engine cool off
first so that you cannot hear or see any
steam or engine coo lant.
CD Note
- Mounting additional lights or accessories in
front of the air inlets reduces the cooling ef
fect of the radiator. At high outside temper
atures or high engine load, the engine could
overheat.
- The front spoiler has been designed to prop
erly distribute the cooling air when the vehi
cle is moving. If the spoiler is damaged, this
could reduce the cooling effect and the en
gine could then overheat. Ask your author
iz ed Audi dealer for assistance.
Tachometer (engine rev counter)
The tachometer indicates the engine RPM (revo
lutions per minutes) .
If engine RPM drops below 1,500, you should
downshift to the next lower gear. The red area at
the end of the scale indicates max imum permis
sible engine RPM after the break-in period . Be
fore reaching this area, move the selector lever
Instruments and indicator lights
to posit ion D/S or ease your foot off the accelera
tor pedal.
CD Note
The tachometer need le@ ~ page 8, fig. 3
shou ld only briefly be in the red zone: you
could damage your engine! The beginning of
the red zone varies depending on the engine.
@ For the sake of the environment
Upshifting early saves fuel and reduces en
gine noise.
~ button
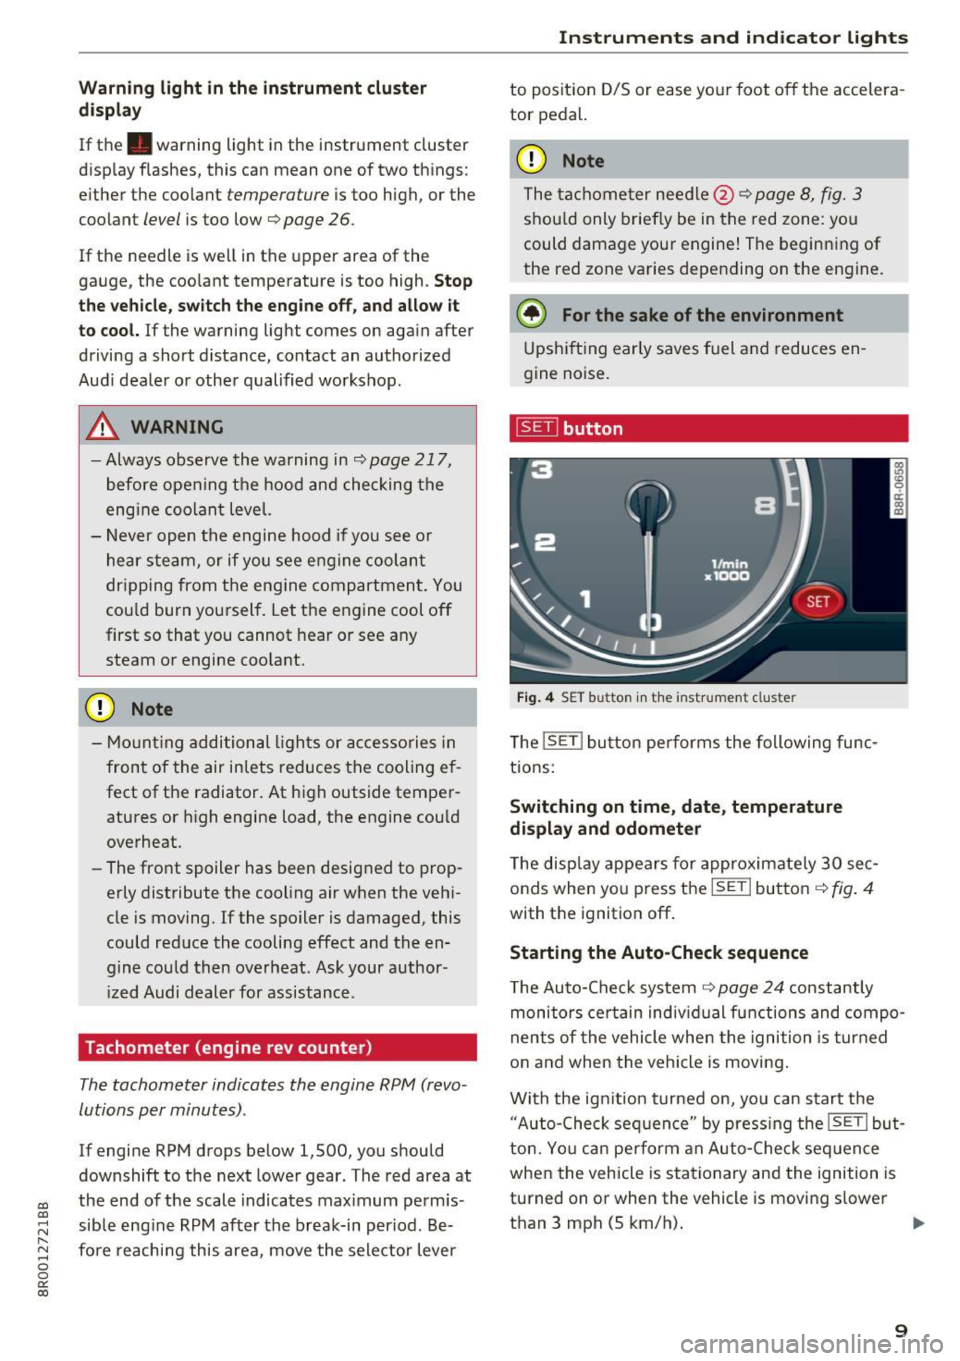
Fig. 4 SET button in the instrument cluster
The !SET ! button performs the following func
tions:
Switching on time, date, temperature
display and odometer
The display appears for approximately 30 sec
onds when you press the
ISETI button ~fig . 4
with the ignition off .
Starting the Auto-Check sequence
The Auto-Check system ~ page 24 constantly
monitors certain individual functions and compo
nents of the vehicle when the ignition is turned
on and when the vehicle is moving.
With the ignit ion turned on, you can start the
"Auto-Check sequence" by press ing the
!SE TI but
ton. You can pe rform an Auto-Check seq uence
when the vehicle is stationary and the ignition is
turned on or when the vehicle is moving slower
than 3 mph (5 km/h).
IIJ,,,
9
Page 48 of 296
Opening and clo sin g
Operation
Applies to: ve hicles w ith garage door opener (Homelink)
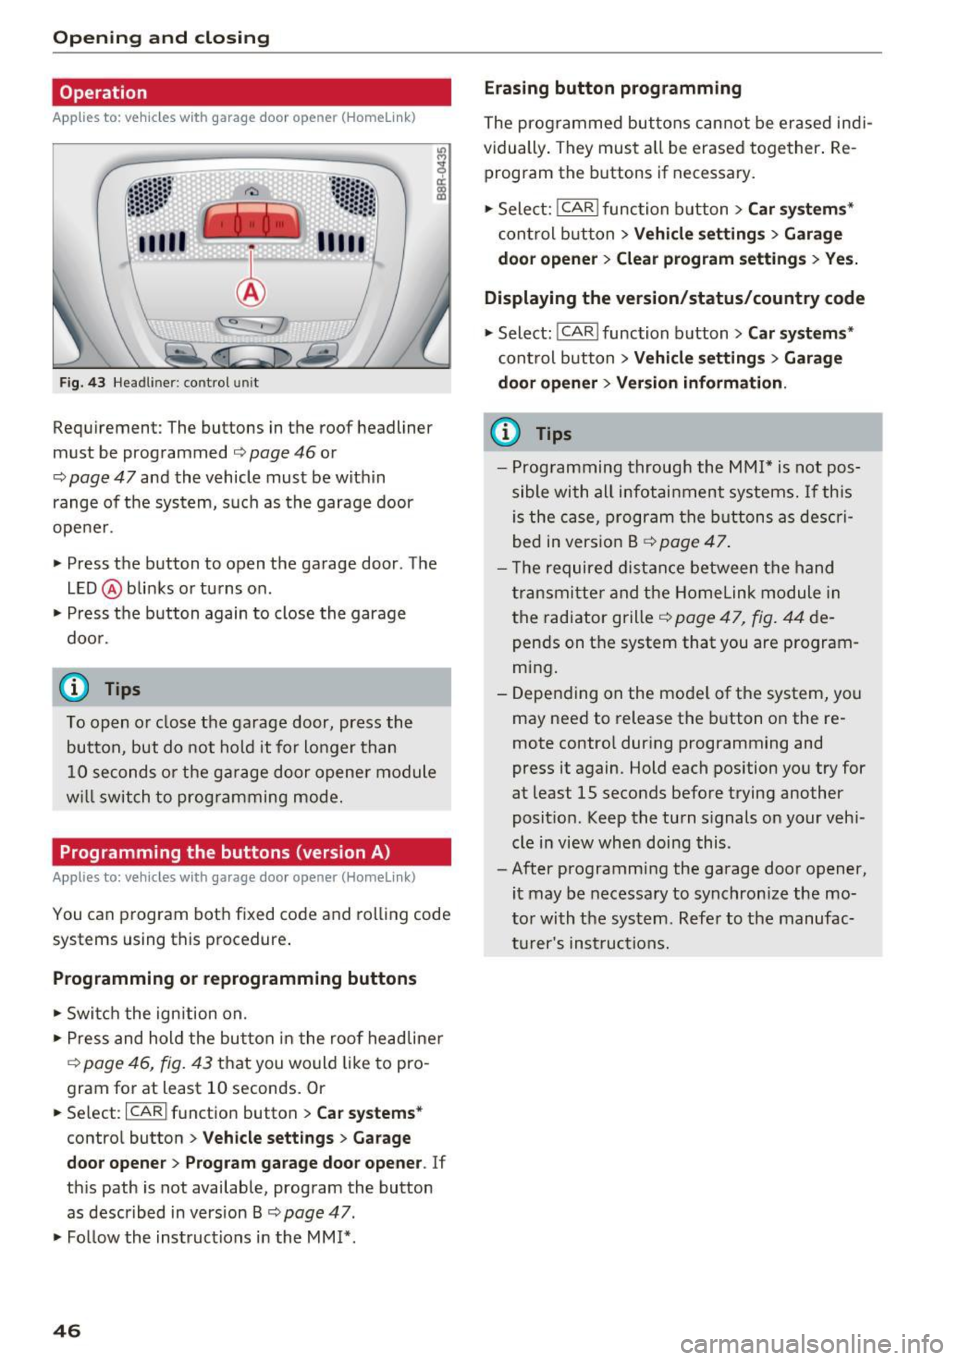
F ig. 43 Hea dlin er: co ntrol uni t
Requirement: The buttons in the roof headliner
must be programmed
Q page 46 or
¢
page 47 and the vehicle must be within
range of the system, such as the garage door
ope ner.
• Press the button to open the garage door . The
L E D @ blinks or turns on .
• Press the button again to close the garage
door .
@ Tips
To open o r close the garage door, press the
button, but do not hold it fo r lo nger than
10 seconds o r th e ga rage door opener module
w ill switch to prog ramming mode.
Programming the buttons (version A)
Applies to: ve hicles with ga rage doo r opener (Homeli nk}
You can program both fixed code and rolling code
systems using this procedure .
Programming or reprogramming buttons
• Switc h the ign ition on.
• Press and hold the but ton in the roo f headline r
¢
page 46, fig. 43 that you would like to pro
gram fo r at least 10 seconds. Or
• Se lect :
ICAR I function button> Car sys tems*
cont ro l button > Vehicle sett ing s > Garage
door opene r> Program garage door opener .
If
this path is not available, program the button
as descr ibed in version B ¢
page 47.
• Fo llow the inst ructions i n the MM I*.
46
Erasing button programm ing
The prog rammed but tons cannot be erased ind i
vidually . They must a ll be erased toge ther . Re
program the buttons if necessary.
• Sele ct:
I CAR I func tion b utton > Car sy ste m s*
con trol b utton > Vehicle setting s > Garage
door opener > Clear program setting s > Yes.
Displaying the version /status/country code
• Select: !CAR ! function button> Ca r sy stems *
control button > Vehicle setting s > Garage
door opener > Ver sion informa tion .
@ Tips
-Prog ramming through the MMI* i s not pos
sible wi th all infot ainm ent systems.
If th is
is the case, program the buttons as descri
bed in vers ion B ¢
page 47.
- T he required distance between the hand
transmitte r and the Homelink module in
the radiator grille ¢
page 47, fig. 44 de
pends on the system that you are program
ming.
- Depending on the mode l of the system, you
may need to release the b utton on the re
mote contro l dur ing programming and
press it again. Hold each position you try for
at least 15 seconds before trying another
posit ion . Keep the turn s ignals on your vehi
cle in view when doing this .
- After programm ing the garage door opener,
it may be necessary to synchron ize the mo
tor with the sys tem . Refer to the manufac
t u rer 's ins truct ions.
Page 49 of 296
a,
a,
..... N r-N ..... 0 0
0:
co
Programming the buttons (version B)
Appl ies to: ve hicles with garage door opener (Homelink)
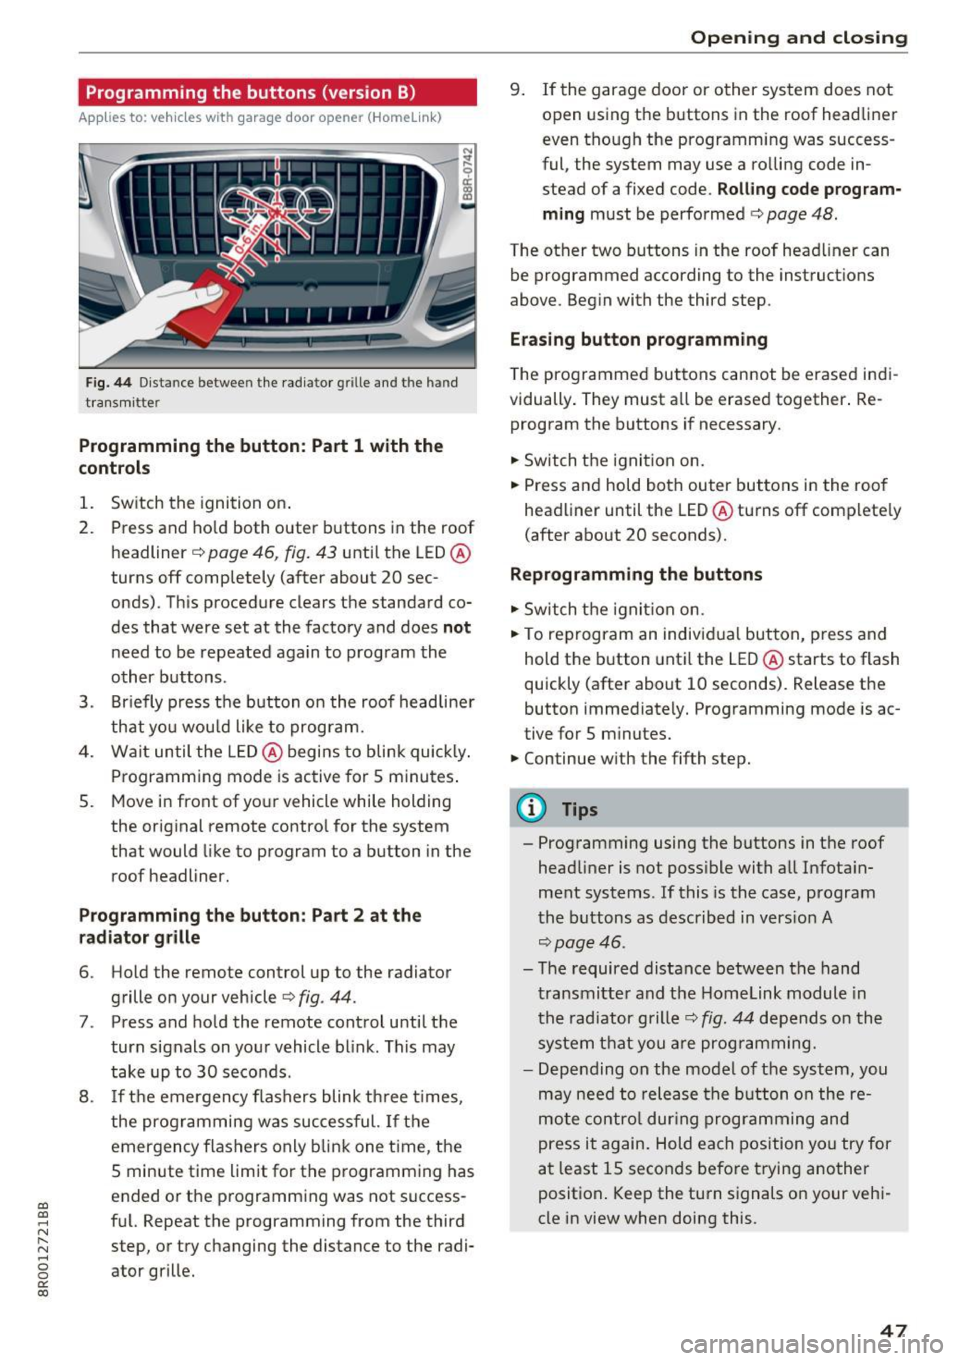
Fig . 44 D ist an ce betwee n the rad ia to r grill e and th e h and
tra nsmi tter
Programming the button: Part 1 with the
controls
1. Switch the ignition o n.
2 . Press and ho ld both outer buttons in the roof
headliner
c::> page 46, fig. 43 unti l the LED @
turns off completely (after about 20 sec
onds). T his procedure clears the standard co
des that were set at the factory and does
not
need to be repeated aga in to program the
other buttons .
3 . Briefly p ress t he b utton on the roof headline r
th at yo u wou ld like to prog ram.
4 . Wait un til the LED@ begi ns to blink quick ly .
Programm ing mode is ac tive for 5 minutes .
5 . Move in front of yo ur vehicle while holding
the orig inal remote contro l for the system
that would like to program to a button in the
roof headliner.
Programming the button : Part 2 at the
radiator gr ille
6 . Hold the remote control up to the radiator
grille on your vehicle¢
fig. 44.
7. Press and ho ld the remote control until t he
turn signals on yo ur vehicle bl ink . Th is may
tak e up to 30 seconds .
8 . If t he emergen cy f lashers blink th ree times,
the progr amming wa s suc cessful.
If t h e
emergency f las her s only blink one time, the
5 minute time limit for t he p rogramm ing has
ended o r the programm ing was not success
f ul. Repeat the programming from the third
step, o r try changing the distance to the radi
ator grille.
Open ing and closing
9 . If the garage door or o ther sys tem does not
open using the b uttons in the roof head liner
even tho ugh the programming was success
ful, the system may use a ro lling code in
stead of a fixed code.
Rolling code program
ming
must be perfo rmed c::> page 48.
The other two buttons in the roof hea dliner can
be programmed according to the inst ruct ions
above. Beg in with the third step.
Eras ing button prog ramming
T he programmed but tons can not be erased in di
vidually . They must a ll be erase d together . Re
program the buttons if necessary .
"' Switch th e ignit ion on.
"' Press and hold both ou ter but tons i n the roo f
headliner until the LED @turns off complete ly
(after about 20 seconds).
Reprogramming the buttons
"' Swit ch th e ignit ion on.
"' To reprogram an indivi dual but ton, p ress and
hold the button unti l the LED @starts to flash
quickly (afte r about 10 seconds) . Release the
button immediate ly. Prog ramming mode is ac
tive for 5 m inutes.
"' Continue w ith the fifth step.
@ Tips
- Prog ramming using the buttons in t he roof
head liner is not poss ible with a ll Infota in
ment systems . If this is the case, p rogram
t he b uttons as described in vers io n A
c::> page 46.
- T he required distance between t he hand
t ra nsmitte r and t he Homelink module in
t he radia tor grille ¢
fig. 44 depend s on th e
syste m th at y ou ar e pr og ra mming.
- De pending on the mo de l of t he syst em, you
m ay need to re lea se th e butt on o n the re
m ot e co ntrol dur ing progra mmin g an d
p ress it a gain. Hol d each position y ou try for
a t l east 15 seco nds befo re t rying a nother
p osit ion . Keep the turn s ignals on your veh i
cle in view whe n doin g this.
47
Page 85 of 296
a,
a,
..... N
" ('I ..... 0 0
0:
co
Starting the vehicle with the emergency
key
You can use the emergency key as an ignition key
in an emergency .
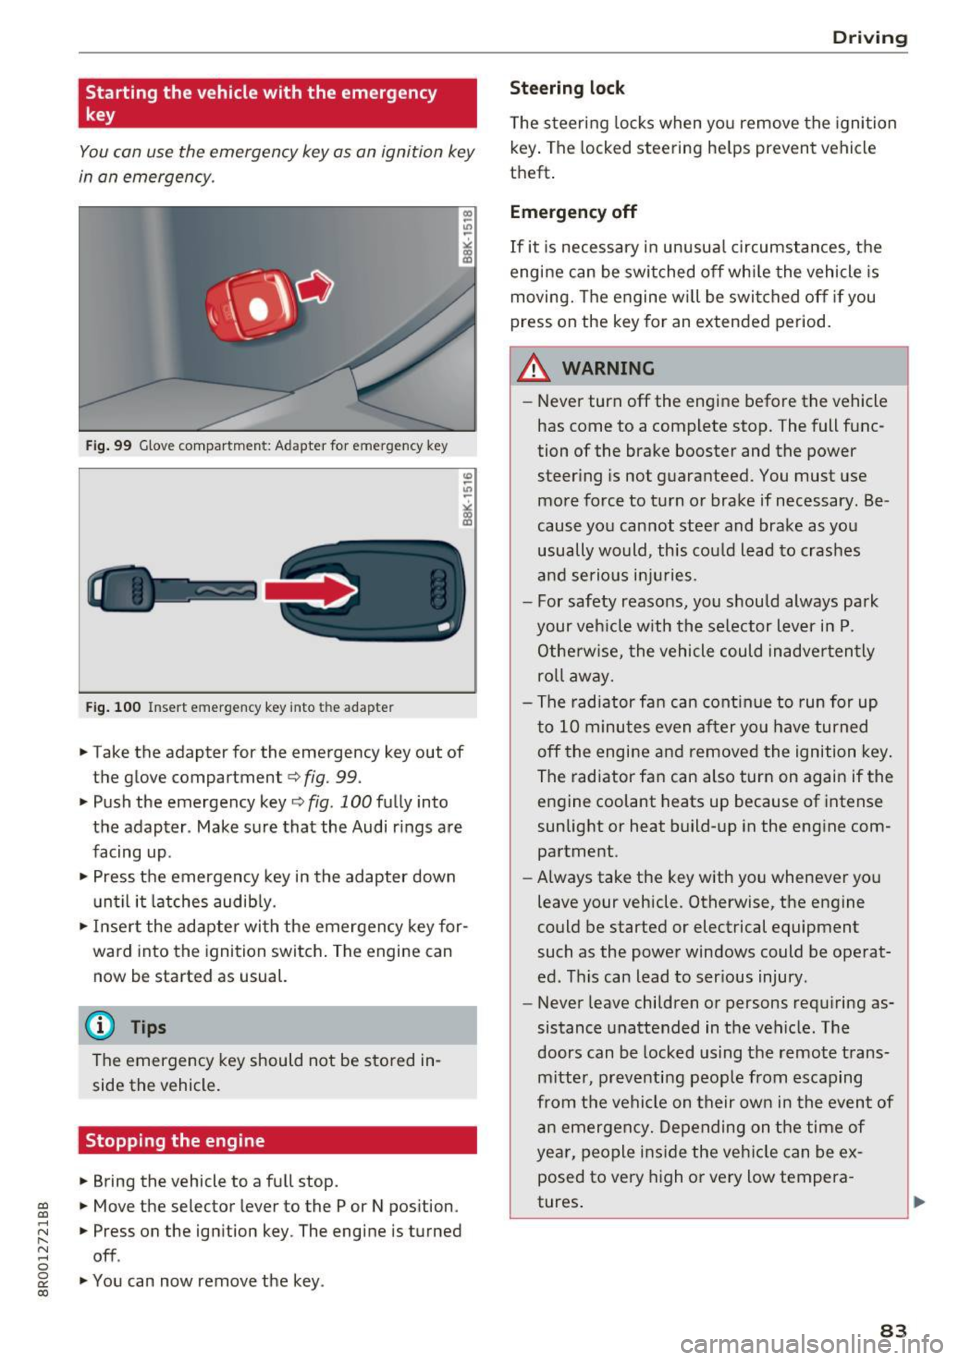
Fig. 99 G lo ve compar tme nt: A dap ter for e mergen cy key
F ig . 1 00 In sert emergen cy key into t he ad ap te r
.. Take the adapter for the emergency key out of
t he glove compartmen t¢
fig. 99.
.. Push the emergency key¢ fig. 100 fully into
the adapter . Make sure that the Audi r ings are
facing up .
.. Press the emergency key in the adapter down
until it latches audib ly.
.. Inse rt the adapter wi th the emergency key for
ward into the ign ition switch. The engine can
now be started as usual.
@ Tips
The emergency key should not be sto red in
side the vehicle.
Stopping the engine
.. Bring the vehicle to a full stop.
.. Move the selector lever to the P or N pos ition .
.. Press on the ignition key . The engine is turned
off.
.. You can now remove the key .
Drivi ng
Ste ering lock
T he s teeri ng locks when yo u remove the ignition
k ey . The locked steering he lps prevent vehicle
theft .
Emergency off
If it is necessary in unusua l circumstances, the
engine can be switched off wh ile the vehicle is
moving. The engine will be swi tched off if you
press on the key for an extended period.
A WARNING ~
- Never turn off the engine before the vehicle
has come to a complete stop. The full func
tion of the brake booster and the power
steer ing is not guaranteed. You must use
more force to turn or brake if necessary . Be
cause yo u cannot steer and brake as you
usually would, this cou ld lead to crashes
and se rio us i njur ies.
- For safety reasons, you should always park
your veh icle w ith the selector lever i n P.
Otherw ise, the vehicle could inadve rten tly
ro ll aw ay.
- The radiator fa n can cont inue to run for up
t o 10 minutes even after you have turned
off the engine and removed the ignition key .
The radiator fan can also turn on again if the engine coolant heats up because of intense
sunlig ht or heat build-up in the eng ine com
partment .
- Always take the key with you whenever you
leave your vehicle . Otherwise, the engine
could be started or electrical equipment
such as the power windows could be operat
ed . T his can lead to ser ious injury .
- Never leave children or persons requiring as
sistance unattended in the vehicle. T he
doors can be locked using the remote t rans
mitter, pr eve nti ng peop le from escaping
from t he vehicle on their own in the even t of
a n emergency. Depe nding on the time of
year, peo ple i nside the ve hicle can be ex
posed to very high o r very low tempera
tures .
83
Page 87 of 296
CD
CD
.... N ,-... N .... 0 0 C<'. 00
electrical equipment s uch as exterior lights
will switch off as well when that happens.
Switching engine off
A pp lies to: ve hicles with Conve nien ce key
~ Bring your vehicle to a complete stop.
~ Move the selector lever to the P or N position.
~ Press the I STAR T ENGINE ST OPI button
¢ page 84, fig. 101.
Ste ering lock
The steering locks when you turn the engine off
using the
! S TART ENGINE STOPI button and
open the dr iver's door. The locked steering helps
prevent vehicle theft.
Emer gency off
If necessary, the engine can be switched off with
the selector lever in the R or D/S position. The
engine stops if you press and ho ld the
I START ENGINE STOPI button at speeds below
6 mph (10 km/h) and press the brake pedal.
A WARNING
- Never turn off the engine before the veh icle
has come to a comp lete stop. The fu ll func
t ion of the brake booster and the power
steering is no t gua ranteed. You must use
more fo rce to turn or brake i f necessary. Be
cause you cannot steer and b rake as you
usually wou ld, this could lead to crashes
and ser ious injuries.
- For safety reasons, you should a lways park
your vehicle with the selector lever in P .
Otherwise, the vehicle could inadvertently
roll away.
- The radiator fan can continue to run for up
to 10 m inutes even after you have turned
off the engine and removed the ignition key.
The radiator fan can also turn on again if the engine coolant heats up because of intense
sunlight or heat bui ld-up in the engine com
partment.
- Always take the key with you whenever you
leave you r vehicle. Othe rw ise, the engine
c ou ld be started o r electrical equ ipme nt
D riv ing
such as the power windows could be operat
ed. This can lead to ser ious injury.
- Never leave chi ldren or persons requiring as
sistance unattended in the vehicle. The
doors can be locked using the remote trans mitter, preventing people from escaping
from the vehicle on their own in the event of
a n emergency. Depending on the time of
year, people ins ide the veh icle can be ex
posed to very high o r very low tempera
tures.
0 Note
If the engine has been under heavy load for
an extended pe riod, heat bu ilds up in the en
g ine compartment afte r the engine is switch
ed off -there is a ris k of damaging the engine.
A llow the engine to run at id le for about two
minutes before switching it off.
Driver messages
Ignition i s on
This message appears and a warning tone sounds
if you open the drive r's door when the ig nition is
swi tched on.
No k ey id ent ified
This message appears when the
I START ENGINE STOP !* button is pressed if there
is no master key inside the vehicle or if the sys
tem does not recognize it. For example, the mas
ter key cannot be recognized if it is covered by an
obje ct (e.g. al uminum brief case) which
screens
the radio s ignal. Elec tronic devices such as ce ll
phones can a lso interfere with the radio signal.
Pre ss brake p edal to start en g ine
This message appears if you do not press the
brake pedal to start the engine.
S hift to N or P to start en gine
This message appears when attempting to start
the engine if the se lector lever for the automatic
transm ission is not in the P or N position. The en
gine can on ly be started with the se lector in
these positions.
Ill-
85
Page 220 of 296
Checking and Filling
-Always let the engine cool down. Hot com
ponents will burn skin on contact .
- To reduce the risk of being burned, never
open the hood if you see or hear steam or
coolant escaping from the engine compart
ment. Wait until no steam or coolant can be
seen or heard before carefully opening the
hood.
- Keep children away from the engine com
partment.
- Never spill fluids on hot engine compo
nents . They can cause a fire.
- Never touch the radiator fan. The auxiliary
electric fan is temperature controlled and
can switch on suddenly.
- Never open the coolant reservoir cap when
the engine is still warm. The coolant system
is pressurized and hot coolant could spray
out .
- Protect your face, hands and arm from steam or hot engine coolant by placing a
thick rag over the cap when you open the coolant reservoir.
- Do not remove the engine cover under any
circumstances . This increases the risk of
burns.
- If work on the fuel system or the electrical
system is necessary:
- Always disconnect the battery.
- Never smoke or work near heaters or open flames. Fluids in the engine compartment
could start a fire.
- Keep an approved fire extinguisher imme
diately available.
- To avoid electrical shock and personal injury
while the engine is running or being started, never touch:
- Ignition cables
- Other components of the high voltage
electronic ignition system .
- If you must perform a check or repair with
the engine running:
- First, fully apply the parking brake, move
selector lever of automatic transmission
to P (Park).
218
- Always use extreme caution to prevent
clothing, jewelry, or long hair from get
ting caught in the radiator fan, V-belts or
other moving parts, or from contacting hot parts . Tie back hair before starting,
and do not wear clothing that will hang or
droop into the engine.
- Minimize exposure to emission and chemi
cal hazards
~ &.
&, WARNING
California Proposition 65 Warning:
- Engine exhaust, some of its constituents,
and certain vehicle components contain or
emit chemicals known to the State of Cali
fornia to cause cancer and birth defects and
reproductive harm. In addition, certain flu
ids contained in vehicles and certain prod
ucts of component wear contain or em it
chemicals known to the State of California
to cause cancer and birth defects or other
reproductive harm .
- Battery posts, terminals and related acces sories contain lead and lead compounds,
chemicals known to the State of California
to cause cancer and reproductive harms .
Wash hands after handling.
('.!) Note
When adding fluids, always make sure that
they are poured into the proper container or
filler opening, otherwise serious damage to
vehicle systems will occur.
@ For the sake of the environment
To detect leaks in time, inspect the vehicle
floor pan from underneath regularly . If you
see spots from oil or other vehicle fluids, have
your vehicle inspected by an authorized Audi dealer.
Page 225 of 296
CD
CD
.... N ,-... N ..... 0 0 C<'. 00
Cooling system
Coolant
The engine cooling system is filled with a mixture
of purified water and coolant additive at the fac
tory. This coo lant must not be not changed.
The coolant level is monitored through the. in
dicator light
¢page 26. However , we do recom
mend occasionally check ing the coo lant level
manually.
If you must add coolant, use a mixture of water
and coolant addit ive. Mixing the coolant additive
with distilled water is recommended.
Coolant additive
The coolant additive is made of anti-freez ing and
corros ion protection agents. Only use the follow
ing coolant addit ives . These additives may be
mixed with each other.
Coolant additive Specification
G13
TL 774 J
G12++ TL 774 G
The amount of coo lant add itive that needs to be
mixed with water depends on the climate where
the vehicle will be operated.
If the coolant addi
tive percentage is too low, the coolant can freeze
and damage the engine.
Coolant Freeze protec-
additive tion
Warm min. 40% m in. -13 °F
regions max. 45% (-25 °C)
Cold min. 50% max
. -40 °F
regions max. 55% (-40 °C)
(D Note
-Before the start of winter, have your author
ized Audi dealer or authorized Audi Service
Facility check if the coolant additive in your
vehicle matches the percentage appropriate
for the climate . Th is is especially important
when driving in colder climates.
- If the appropriate coolant additive is not
available in an emergency, do not add any
other additive . You could damage the en-
Checking and Filling
gine. If this happens, only use water and re
store the correct mixture ratio with the
specified coolant add it ive as soon as possi
ble.
- Only refill with new coolant .
- Radiator sealant must not be mixed with
the coolant.
Adding coolant
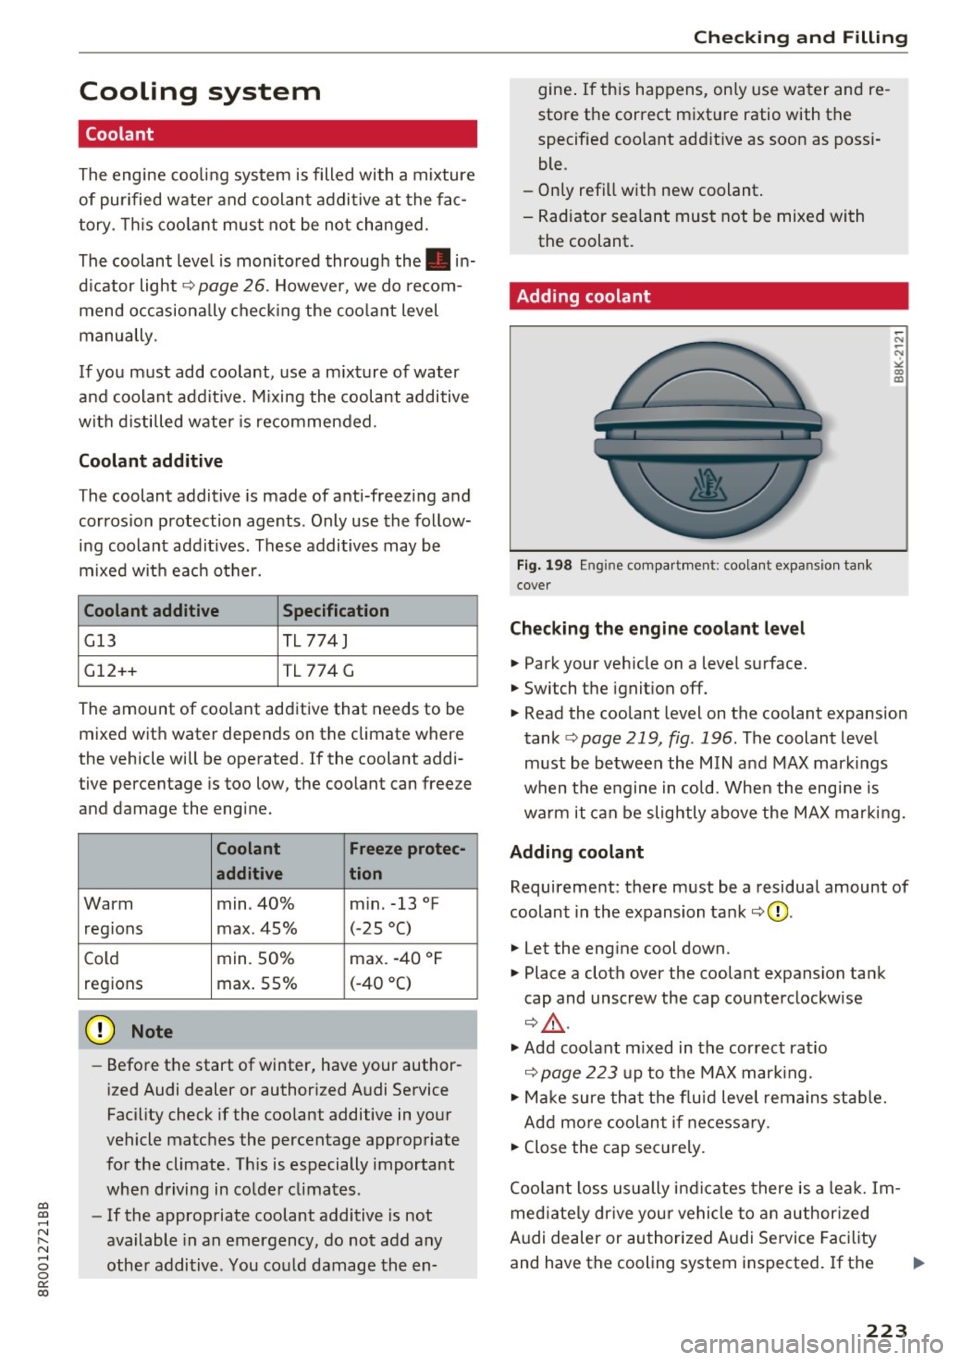
Fig. 198 Engine compartment: coolant expansio n ta nk
cover
Checking the engine coolant level
.,. Park your vehicle on a level surface.
.,. Switch the ignit ion off.
-N
-N
"" CD co
.,. Read the coolant level on the coolant expansion
tank
¢ page 219, fig . 196. The coolant level
must be between the MIN and MAX mark ings
when the engine in cold. When the engine is
warm it can be slightly above the MAX marking.
Adding coolant
Requirement: there must be a residual amount of
coolant in the expansion tank
¢(D .
.,. Let the engine cool down.
.,. Place a cloth over the coolant expansion tank
cap and unscrew the cap counterclockw ise
¢ _& .
.,. Add coo lant mixed in the correct rat io
¢ page 223 up to the MAX marking .
.,. Make sure that the fluid level remains stable.
Add more coolant if necessary .
.,. Close the cap securely.
Coolant loss usually indicates there is a lea k. Im
mediately drive your vehicle to an authorized
Audi dealer or authorized Audi Service Facility
and have the cooling system inspected.
If the
223
Page 271 of 296
a,
a,
..... N r-N ..... 0 0
0:
co
Front towing loop
Do not install the front towing loop until it is
needed.
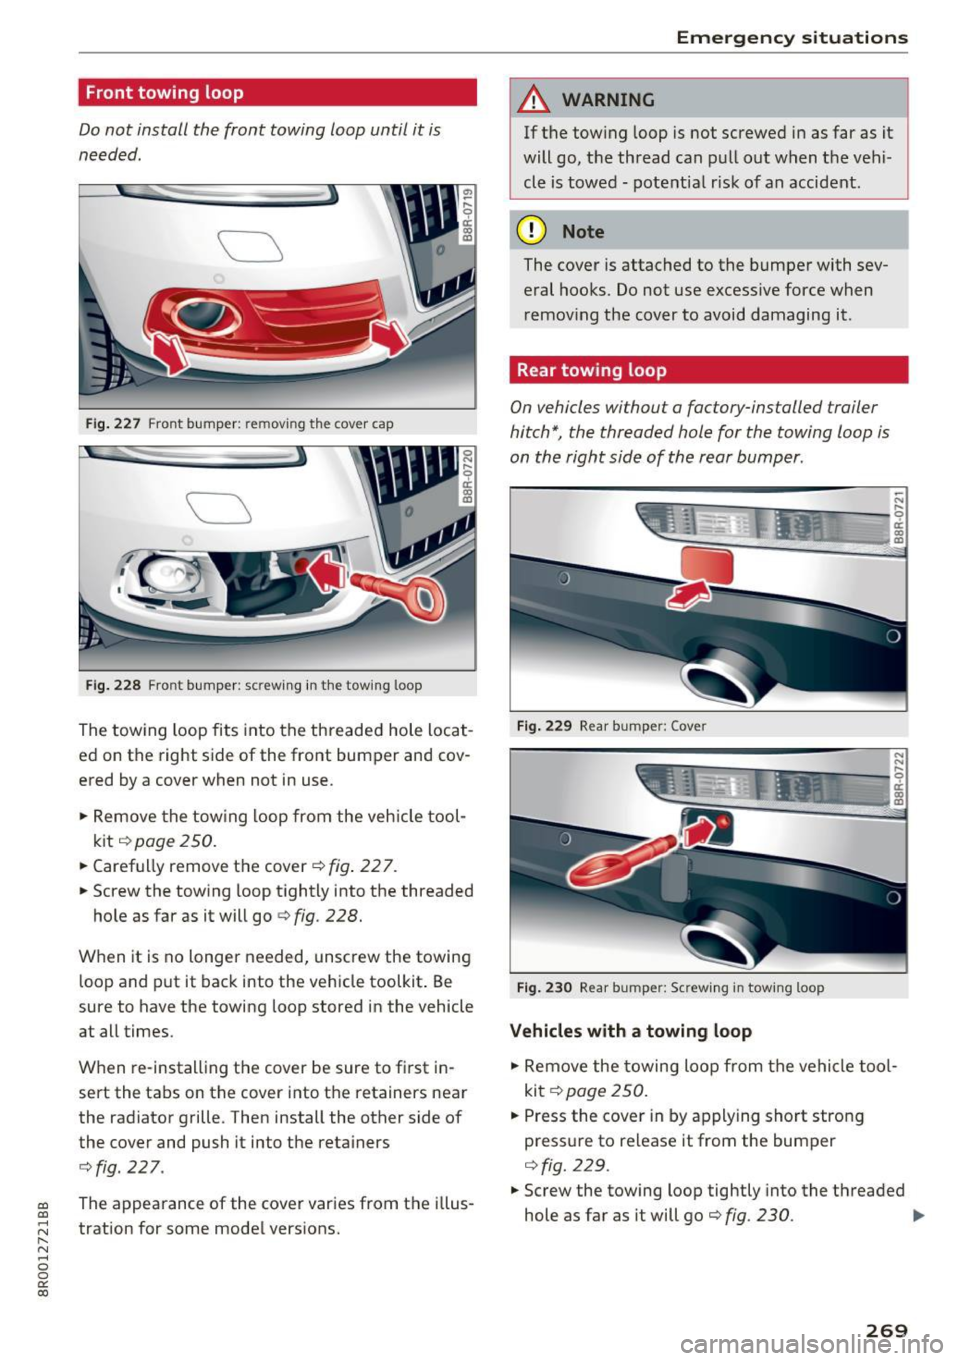
Fig. 227 Fro nt bumper: remov ing the cover cap
:'CT ..,, -
-·
Fig. 228 F ro nt bumper : sc rewing in the towing loop
The towing loop fits into the threaded hole locat
ed on the right side of the front bumper and cov
ered by a cover when not in use .
.,. Remove the towing loop from the vehicle tool
kit ¢
page 250 .
.,. Carefully remove the cover ¢fig . 227 .
.,. Screw the towing loop tightly into the threaded
hole as far as it will go ¢
fig. 228.
When it is no longer needed, unscrew the towing
loop and put it back into the vehicle toolkit . Be
sure to have the towing loop stored in the vehicle
at all times.
When re-installing the cover be sure to first in
sert the tabs on the cover into the retainers near
the radiator grille . Then install the other side of
the cover and push it into the reta iners
¢ fig. 227 .
The appearance of the cover varies from the illus
tration for some model versions.
Emergency situations
A WARNING
-If the towing loop is not screwed in as far as it
will go, the thread can pull out when the vehi
cle is towed -potential risk of an accident.
(D Note
The cover is attached to the bumper with sev
eral hooks. Do not use excessive force when
removing the cover to avoid damaging it .
Rear towing loop
On vehicles without a factory-installed trailer
hit ch*, the threaded hole for the towing loop is
on the right side of the rear bumper .
Fig. 229 Rear bumper: Cove r
Fig. 230 Rear bumper: Sc rewing in towing loop
Vehicles with a towing loop
.,. Remove the towing loop from the vehicle tool
kit
¢ page 250.
.,. Press the cover in by applying short strong
pressure to release it from the bumper
¢ fig. 229 .
.,. Screw the towing loop tightly into the threaded
hole as far as it will go¢
fig. 230 . ..,_
269
Page 279 of 296
CD
CD
.... N ,-... N ..... 0 0 C<'. 00
today's automobiles, have steadily reduced the
scope of maintenance and repairs which can be
carried out by vehicle owners.
Also, safety and
environmental
concerns place very strict limits
on the nature of repairs and adjustments to en
gine and transmission parts which an owner can perform .
Maintenance, adjustments and repairs usually re
quire special tools, testing devices and other
equipment available to specially trained work
shop personnel in order to assure proper per
formance, reliability and safety of the vehicle and
its many systems.
Improper maintenance, adjustments and repairs
can impair the operation and reliability of your
vehicle and even void your vehicle warranty .
Therefore, proof of servicing in accordance with
the maintenance schedule may be a condition for upholding a possible warranty claim made within
the warranty period.
Above all , operational safety can be adversely af
fected, creating unnecessary risks for you and
your passengers.
If in doubt about any servicing, have it done by
your authorized Audi dealer or any other properly equipped and qualified workshop. We strongly urge you to give your authorized Audi dealer the
opportunity to perform all scheduled mainte nance and necessary repairs. Your dealer has the
facilities, original parts and trained specialists to keep your vehicle running properly .
Performing limited maintenance yourself
The following pages describe a limited number of
procedures which can be performed on your vehi
cle with ordinary tools, should the need arise and
trained personnel be unavailable. Before per
forming any of these procedures, always thor
oughly read all of the applicable text and careful ly follow the instructions given . Always rigorously
observe the
WARNINGS provided .
Before you check anything in the engine com
partment, always read and heed all WARNINGS
c::> .&. and c::> .&. in Working in the engine compart
ment on page 217 .
Consumer information
A WARNING
-Serious personal injury may occur as a result
of improperly performed maintenance, ad
justments or repairs .
- Always be extremely careful when working
on the vehicle. Always follow commonly ac
cepted safety practices and general com
mon sense. Never risk personal injury.
- Do not attempt any of the maintenance,
checks or repairs described on the following pages if you are not fully familiar with these
or other procedures with respect to the ve hicle, or are uncertain how to proceed.
- Do not do any work without the proper tools
and equipment. Have the necessary work
done by your authorized Audi dealer or an
other properly equipped and qualified work
shop.
- The engine compartment of any motor vehi cle is a potentially hazardous area. Never
reach into the area around or touch the radi
ator fan.
It is temperature controlled and
can switch on suddenly - even when the en
gine is off and the ignition key has been re
moved . The radiator fan switches on auto
matically when the coolant reaches a certain
temperature and will continue to run until
the coolant temperature drops.
- Always remove the ignition key before any
one gets under the vehicle.
- Always support your vehicle with safety
stands if it is necessary to work underneath
the vehicle . The jack* supplied with the vehi
cle is not adequate for this purpose and
could collapse causing serious personal in
jury.
- If you must work underneath the vehicle
with the wheels on the ground, always make
sure the vehicle is on level ground, that the
wheels are always securely blocked and that the engine cannot be started.
- Always make sure the transmission selector
lever (automatic transmission) is in P (Park
position) and the park brake is applied.
277