ECO mode AUDI Q5 2018 Owners Manual
[x] Cancel search | Manufacturer: AUDI, Model Year: 2018, Model line: Q5, Model: AUDI Q5 2018Pages: 392, PDF Size: 60.56 MB
Page 11 of 392
u co ..... N ,..._
N ..... 0 <( 0 00
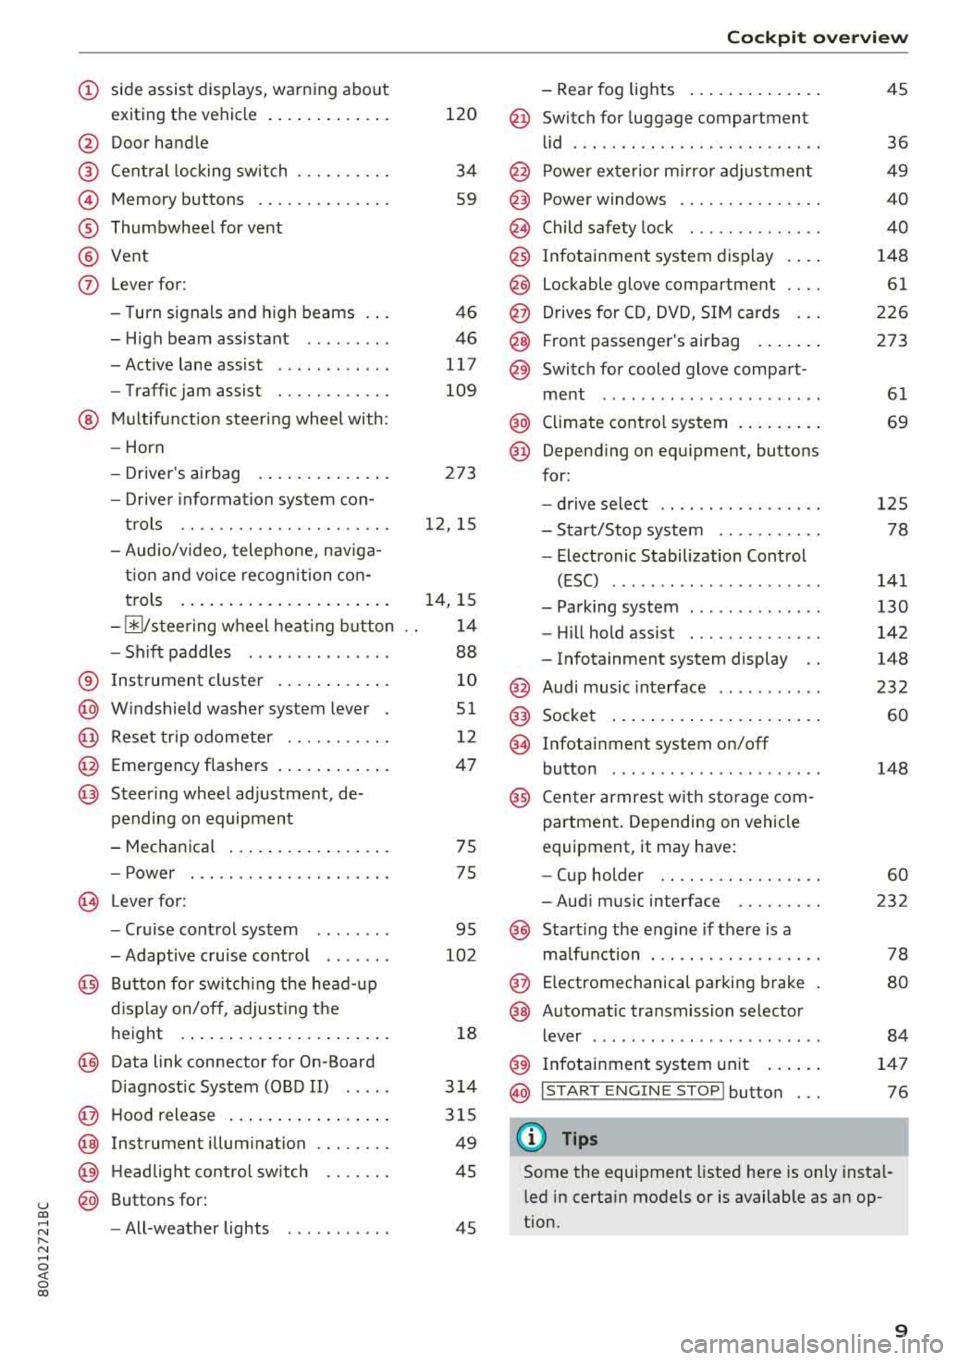
(D side assist displays, warn ing abo ut
exiting the vehicle ..... ... .. .. .
@ Door handle
@ Cen tral locking swit ch ....... .. .
@ Memory buttons ........... .. .
® Thumbwheel for vent
@ Vent
(J) Leverfor:
- T urn s ignals and high beams
- High beam assistant ........ .
- Active lane assist ........... .
- Traffic jam assist ......... .. .
@ Mul tifunct ion steer ing wheel with:
- Horn
- Drive r's airbag . ..... ... .. .. .
- Drive r informa tion system con -
t rols .. .. ............... .. .
- Audio/v ideo, telephone, nav iga
t io n and voice recogn ition con -
t rols .... ... .. ..... ... .. .. .
- ~/ stee ring wheel heat ing b utton
- Sh ift paddles ............. . .
® Instrument cluster .... ... .. .. .
@) W indshield washer system lever
@ Reset trip odometer ...... .. .. .
@ Emergency flashe rs .... ... .. .. .
@ Steer ing whee l adjustment, de-
pending on equipment
- Mechanica l .... ..... ... .. .. .
- Power . .. ............... .. .
@ Lever for:
- Cru ise cont rol system
- Adaptive cruise control ...... .
@ Bu tton for sw itch ing the hea d-up
d isp lay on/o ff, adjust ing t he
h eight .... ... .. ..... ... .. .. .
@) Data link connector for On -Board
D iagnostic System (OBD II) .... .
@ H oo d release .. .. ..... ... .. .. .
@ Instrument illum ination
@) H eadlight cont rol sw itch
@ Buttons for :
- All -weather lights
120
34
S9
4 6
46
117
109
273
12 , 15
1 4, 15
1 4
88
1 0
51
12
47
75
75
95
102
18
3 14
3 15
49
45
45
Coc kpit o ver view
- Rear fog lights .... .. ..... .. .
@ Switch for luggage compartment
lid ...... ... .. .. ............ .
@ Power exte rior m irro r adjustment
@) Power windows .............. .
@ Child safety lock ............. .
@ Infotainment system display . .. .
@ Lockable glove compartment ... .
@ D rives for CD, DVD, S IM cards .. .
@ Front passenger's airbag .... .. .
@ Switch for cooled glove compart -
me nt ... ... .. .. ............ .
@ Climate contro l system . ..... .. .
@ Depend ing o n equ ipment, buttons
for:
- drive select .. .............. .
- Sta rt/Stop system .......... .
- Electronic Stabilization Cont rol
( E SC) ..... .. .. ............ .
- Park ing system ............. .
- Hi ll hold ass ist . ............ .
- Infotainment system display ..
@ Audi music inte rface .......... .
@ Socket ... .... .. ... .. ..... .. .
@ Infotai nment system on/off
button ..... .. .. ............ .
@ Cen ter armrest w it h sto ra ge com
p artmen t. Depending on vehicle
equipment, it may have:
- Cup holder .. .. ... .. ..... .. .
- Aud i m usic interface ........ .
@ Start ing t he e ngine if the re is a
m alfu nction . .. .. ............ .
@ E lectromechanical par king brake
@ Automa tic transmission selector
lever ....... .. .. ............ .
@ Infotainment system unit ... .. .
@ I START E N GINE STOP I button
(D Tips
45
36
49
40
40
148
61
2 26
273
61
69
1 2 5
78
141
130
142
148
232 60
148
60
232
78
80
84
14 7
76
Some the equipment listed he re is only insta l
l ed in certa in models or is available as an op
tion.
9
Page 18 of 392
Cockpit overv ie w
(D Operating the driv er inform ation s yst em
The drive r informat ion system conta ins mult ip le
tabs
(D c::> page 12, fig. 6 that display various in
formation @c::>
page 12, fig. 6.
The fo llow ing tabs are ava ilable, depend ing on
ve hicle equ ipment :
First tab On-board computer
c::> page 16
Seco nd Messages
taba l
Third tab Rad io c::> page 160
Media c::> page 160
Fourth tab Telephone c::> page 161
al T
h is t ab is onl y v is ibl e w hen there is at lea st one ind ic a to r
light or mess age dis playe d.
-Sw itching t abs: press the !MODE ! button
c::> fig. 12 on the mult ifunction steer ing wheel
repeatedly until the des ired tab is d isp layed .
-Selec ting a fun ction in the m enu /li st: turn the
left thumbwheel on the multifunct ion steer ing
whee l to the desired f unct ion.
-Confirming a selection : press the left thumb
wheel on the mu ltifunction steering whee l to
confi rm your select ion.
-Scrolling within the li sts: turn the left thumb
whee l on t he multifunct ion steer ing whee l
quic kly to scroll within the lists.
@ ~ Button
-Switching th e voi ce recognition sy stem on :
briefly press the 51 button c::> fig. 13 . Say the
desired command after the
B eep .
-Switching th e voice r ecogn ition sy st e m off :
press and hold the 51 button . Or: say the com
mand
Canc el.
Fo r more information about the vo ice recog nition
system, see
c::> page 16 7, Voice recognition sys
tem
or c::> page 245 .
@ Right thumbwheel
The volume of an audio source o r a system mes
sage ( such as traffic announcements) can be di
rect ly adjusted dur ing the aud io output.
-In creas ing or dec reasing the volume : turn the
right thumbwhee l
c::>fig. 13 up o r down.
16
-Muting o r pausing: turn the right thumbwhee l
down .
Or: press the right thumbwhe el.
-Unmuting o r re suming : turn the right thumb
wheel upward.
Or : press the right thumbwheel.
Vehicle functions
Overview
The t rip computer is displayed in the first tab of
t h e d river i nfo rmat ion system . Additional vehicle
funct ions can be accessed depend ing on the vehi
cle equ ipment .
.,. Press the left cont rol button .
-On-board computer c::>page 16
-Lap times c::> page 98
-Statistics c:> page 99
-Layo ut c::> page 14
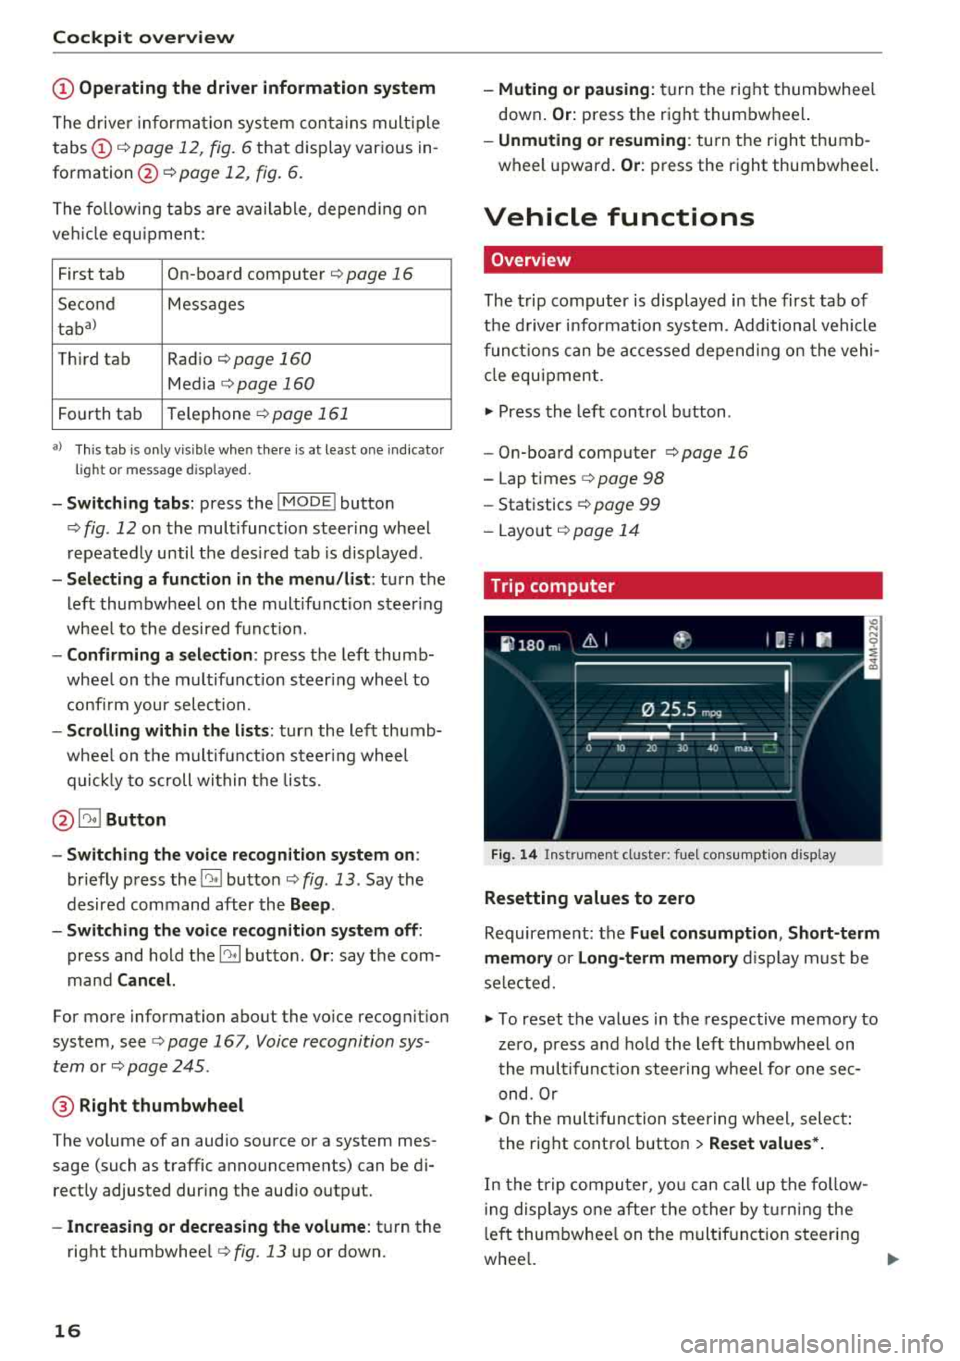
Trip computer
F ig. 1 4 In str umen t cl uste r: fue l co nsu m pt io n disp lay
Resetting values to zero
Requirement: the Fuel con sumption , Short -term
memor y or Long -t e rm memor y
disp lay must be
selected.
.,. To reset the values in the respective memory to
zero, press and ho ld the left thumbwheel on
the mult ifunct ion stee ring w heel for one sec
ond. Or
.,. On the multifunction steering w heel, selec t:
the rig ht contro l button
> Re set value s*.
In the t rip compu ter, yo u can call up the fo llow
i ng displays one afte r the other by t urning the
l eft thumbwhee l on t he multif unction steering
whee l.
..,.
Page 21 of 392

u co ..... N r--N ..... 0 <( 0 00
Indicator lights
Description
The indicato r lights in the inst rument cluste r
b link or turn on. They ind icate funct ions or mal
f u nctions.
Messages may appear with some indicator l ights .
A wa rni ng sig nal w ill so und at the same t ime.
The indicato r lights a nd messages in the instr u
men t cluster display can be covered by o ther d is
p lays. To show t hem again, select the second tab
with the m ultifunction steering wheel
¢ page 12 .
If th ere are seve ral malfunctions, you can display
them one at a time using the thumbwheel.
Some ind icator lights in the disp lay can display in
several colors .
& Central indicator light
If the. or u indicator light turns on, check
the message in the instrument cluster.
Overview
Some ind icator lights turn on briefly as a function
check whe n you switch the ig nition on . These sys
tems are marked with a
./ i n t he following tables .
I f o ne of these indicato r lights does not turn on,
the re is a ma lf un ction in t hat system.
Your ve hicle has either a monochrome display or
a mu lticolored display, depend ing o n ve hicle
eq uipment. Some indicato r lights appear wh ite
on a monochrome d isp lay.
The . or II cen tral
in dic ator light turns on at the same t ime to indi
cate the priority of these indicator lights.
Red indicator lights
--------------
Cent ral indicato r light
¢page 19,
Aud i pre sense *
¢page 112
USA models:
brake system ./
¢ page22
Coc kpit o ver view
Canada mod els:
bra ke system ./
¢page 2 2
USA models:
electromechanica l parking b rake
¢ page 23
Canada models :
electromechan ic al pa rki ng b rake
¢page 23
Cooling system
¢ page 23
Engine o il pressure
¢ page 24
Engine o il level (MIN)*
¢ page 24
Alternato r
¢page 24
Safety be lt
¢ page 24
Elec trome chanic al steering ./
¢ pag e 144
Stee ring lock
¢ page 24
Engine sta rt system
¢ page 25
Transmission
¢page 89
Hood
¢page 25
Adaptive cruise contro l* ./
¢ page 104
Traffic jam assist*
¢ page 109
Air s uspension*
¢ page 25
Yellow ind icator lights
--------------
Centra l indicator light
¢ page 19
Elec tron ic St abiliz ati on Contro l
(ESC)
¢ page26
19
Page 24 of 392

Cockpit overv ie w
Canada mod els:
speed war ning system*
¢ poge95
Active lane ass ist*
¢ page 118
Aud i side assist*
¢page 125
Camera-based traffic sign recogni
tion*
¢poge98
H igh beam assistant *
¢poge46
High beams
¢ poge46
High beam assistant *
¢poge46
BRAKE/(©) Brake system
If th is ind icator light turns on, there is a malfunc
tion in the brake system .
1111 (USA mod els ) /. (Canada models )
Brakes: stop veh icle and chec k bra ke fluid le vel
Stop the vehicle and check the brake fluid level.
See an authorized Audi dea ler or authorized Audi
Serv ice Facility for assistance if necessary.
1111 ( USA model s) /. (Canada model s)
B rake s: malfunction! Stop vehicle safel y
If t he i nd icator lig ht tu rns on and th is message
appears, there is a malfunc tion in the brake
booster.
I f t he ABS indicato r
light ~ (U SA mode ls) /
fee) (Canada mode ls), the ESC indicato r light Bl
a nd the bra ke system ind ic a tor light 1111 (USA
models)
/ . (Canada mode ls) all turn on and
this message appears, then t he ABS, ESC and
braking distribution are malfunctioning
¢ .&. .
Do not cont inue d rivi ng. See an autho rized Aud i
dea le r or autho rized Aud i Serv ice Facili ty fo r as
sistance
¢ .& .
1111 (USA m od els)/ . (Canada model s) Park
ing brake : malfun ction! Saf ely s top v ehicl e. Se e
owner 's manual
22
-If the ind icator light and the message appear
when the vehicle i s station ary or afte r switch
ing the ignition on ,
check if you can re lease the
parking brake. If you cannot release the park
ing brake, see an authorized Audi dealer or au
thorized Audi Service Fac ility . If you can release
the parki ng brake and the message st ill ap
pears , see an author ized Audi dealer or autho r
ized Aud i Serv ice Fac ility immediately to have
the ma lfu nction correc ted.
- If the ind icator light and message appear
while
dri ving ,
the hill sta rt ass ist o r emergency brak
ing function may be ma lfunction ing. It may not
be poss ible to set the park ing b rake o r release
it once it has been set. Do not park yo ur vehicle
on hills . See an aut horized Audi dea ler or au
thorized Audi Service Faci lity for assistance .
Brake boo ster : limited functionality . You can
continue d riv ing . Plea se cont act Ser vice
There is a ma lfunction in the b rake booster . The
brake booste r is ava ilab le, but its effective ness is
r educed. Br aking behavior may be d ifferent from
how it normally f unctions and the brake peda l
may vibrate .
D rive to an au thor ized A udi dealer or au tho riz ed
Audi Se rvice Fac il ity immed iate ly to have the
malfunction cor rected.
& WARNING
- Read and fo llow the warnings in
¢ page 314, Working in the engine com
portment
before opening the hood and
checking the brake fluid level.
- If the brake system indicator light does not
turn off or it turns on wh ile driving, the
brake flu id leve l in the reservo ir is too low,
and this increases the risk of an accident .
Stop the vehicle and do not continue driv ing . See an a utho rized Aud i dea le r o r au
thor ized A udi Se rvi ce Fac il ity for assistan ce.
- If t he brake system indicator light t urns on
together w it h the ABS and ESC indicator
lights, t he ABS/ ESC regu lating fu nction may
be ma lf u nct io ni ng. Funct io ns tha t stabi lize
the vehicle a re no longer available. This
co uld cause the vehicle to swerve, which
Ill>
Page 45 of 392
u co ..... N r-N .....
~ 0 co
Garage door opener (Homelink)
Description
Applies to: vehicles with garage door opener (Homelink)
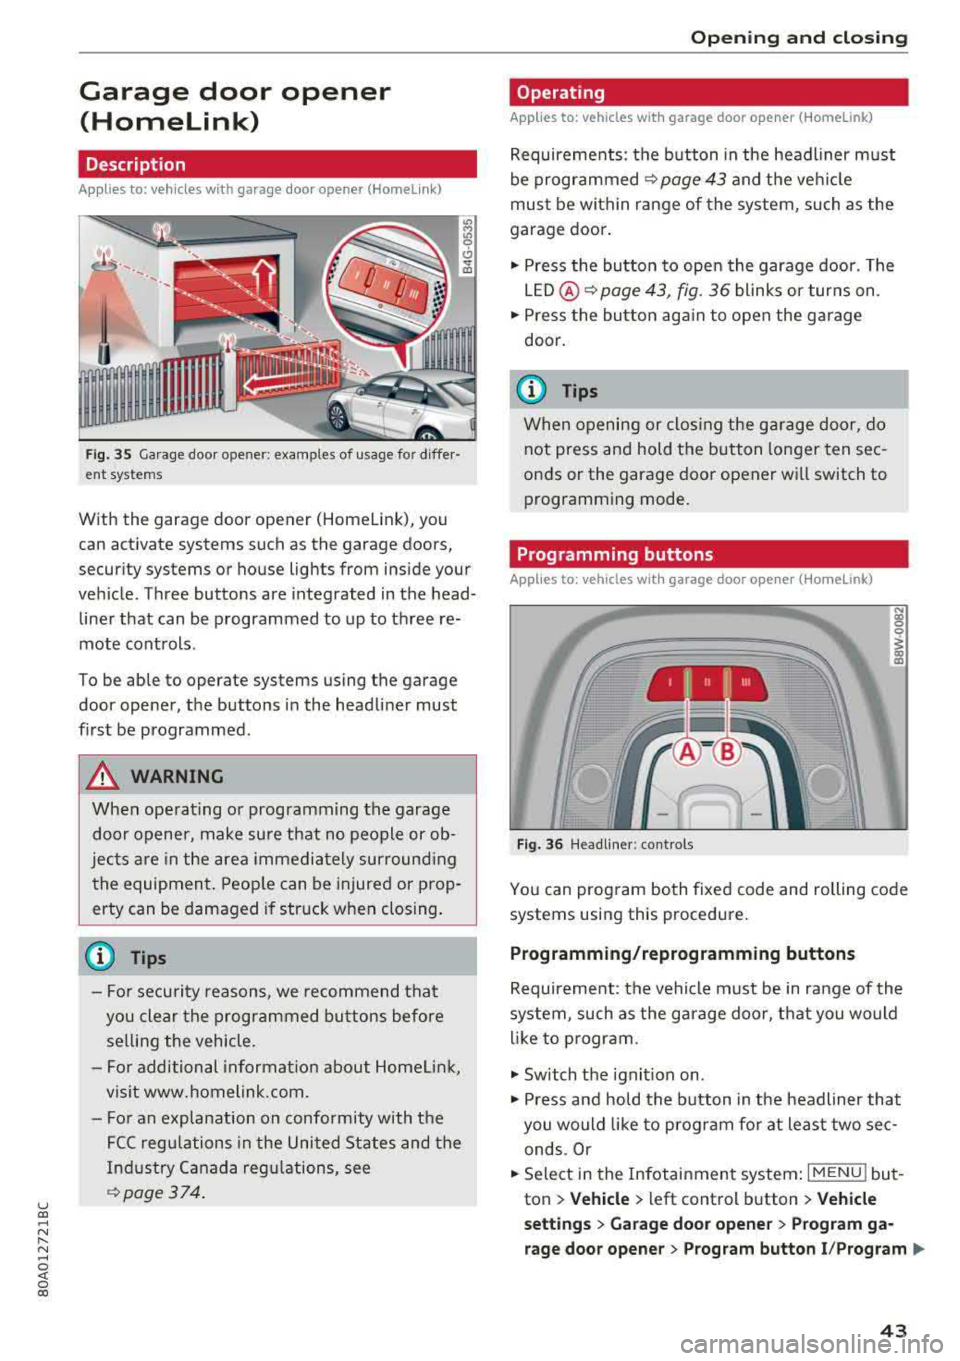
Fig. 35 Garage door o pene r: examp les of usage fo r diffe r·
ent syste ms
With the garag e door opener (Hom elink), you
can activate systems such as the garage doors,
security systems or house lights from inside your
vehicle. Three buttons are integrated in the head·
liner that can be programmed to up to three re
mote controls .
To be able to oper ate systems using the garage
door opener, the buttons in the headliner must
first be programmed .
A WARNING
When operating or programming the garage
door opener, make sure that no people or ob·
jects are in the area immediately surround ing
the equipment. People can be injured or prop
erty can be damaged if struck when closing.
- For security reasons, we recommend that
you clear the programmed buttons before
selling the vehicle .
- For additional informat ion about Homelink,
visit www.homelink.com.
- Fo r an explanation on conformity with the
FCC regulations in the United States and the
Industry Canada regulations, see
¢page 374 .
Opening and closing
Operating
Applies to: vehicles with garage door opener (Home link)
Requirements : the button in the headl iner must
be programmed
<>page 43 and the veh icle
must be within range of the system, such as the
garage door .
., Press the button to open the garage door. The
LED @<>
page 43, fig. 36 blinks or turns on .
.. Press the button again to open the garage
door.
@ Tips
When opening or closing the garage door, do
not press and hold the button longer ten sec
onds or the garage door opener wi ll switch to
programming mode.
Programming buttons
Applies to: vehicles with garage door opener (Home Link)
, 1 111 111
Fig . 36 H eadlin er: controls
N
~ 0
~ 0:, m
You can program both fixed code and rolling code
systems using this procedure.
Programming/reprogramming buttons
Requirement: the vehicle must be in range of the
system , such as the garage door, that you would
lik e to program.
., Switch the ignit ion on .
., Press and hold the button in the headliner that
you would like to program fo r at least two sec·
ends .Or
.. Select in the Infotainment system: I MENU ! but
ton
> Vehicle > left control button > Vehicle
settings
> Garage door opener > Program ga
rage door opener
> Program button I/Program ll>
43
Page 46 of 392
Opening and clo sing
button II /P rogram button III (reprogram) .
The yellow LED @ blinks.
~ Follow the instructions in the Infotainment sys -
tem.
S y nchronizing a button1>
Requirement: the button must already be pro
grammed and must be synchronized with the
system that you would like to program.
~ Switc h the ign ition on.
~ Press the button in the head liner that you
would like to synchronize.
~ Fo llow the instructions in the Infotainment sys -
tem.
Del eting button prog ramming
The programmed buttons cannot be de leted ind i
vidua lly. They must be deleted all at once . Rep ro
gram the buttons if necessary .
~ Switch the ign ition on.
~ Se lect in the Infota inment system: I MENU I but
ton
> Vehi cle > left contro l button > Vehicl e
settings > Garage d oor o pene r > Delete button
programming > Yes, delete no w.
Di splaying the version /statu s/country code
~ Se lect in the Infota inmen t system: IM ENU I but
ton
> Vehi cle> left contro l button >Vehicl e set
tings > Garage d oor o pene r > Versi on inf orma
ti on.
(D Tips
- The garage door opener may need to be
synchronized with the system motor after
the programming . Follow the manufactur
er's instructions for doing t his.
- The programming process can take up to 30
seconds . The hand transmitter may need to
be operated again during the process.
- Make sure the batteries in the hand trans
mitter are charged before starting the pro
gramming process.
- In some cases, the system must be pro
grammed using an alternative mode. Select i n the Infota inment system :
IMENUI > Vehi-
1> On ly appl ies to ro lling code sy stem s
44
cle > left control button > Vehicle settings >
Garage door opener > Progr am garage door
open er >
right control b utton > UR -Mode /
D-Mode .
Page 57 of 392
u co ..... N r-N .....
~ 0 co
Lights and Vision
Adjusting the magnetic zone
Applies to: ve hicles with d ig ital compass
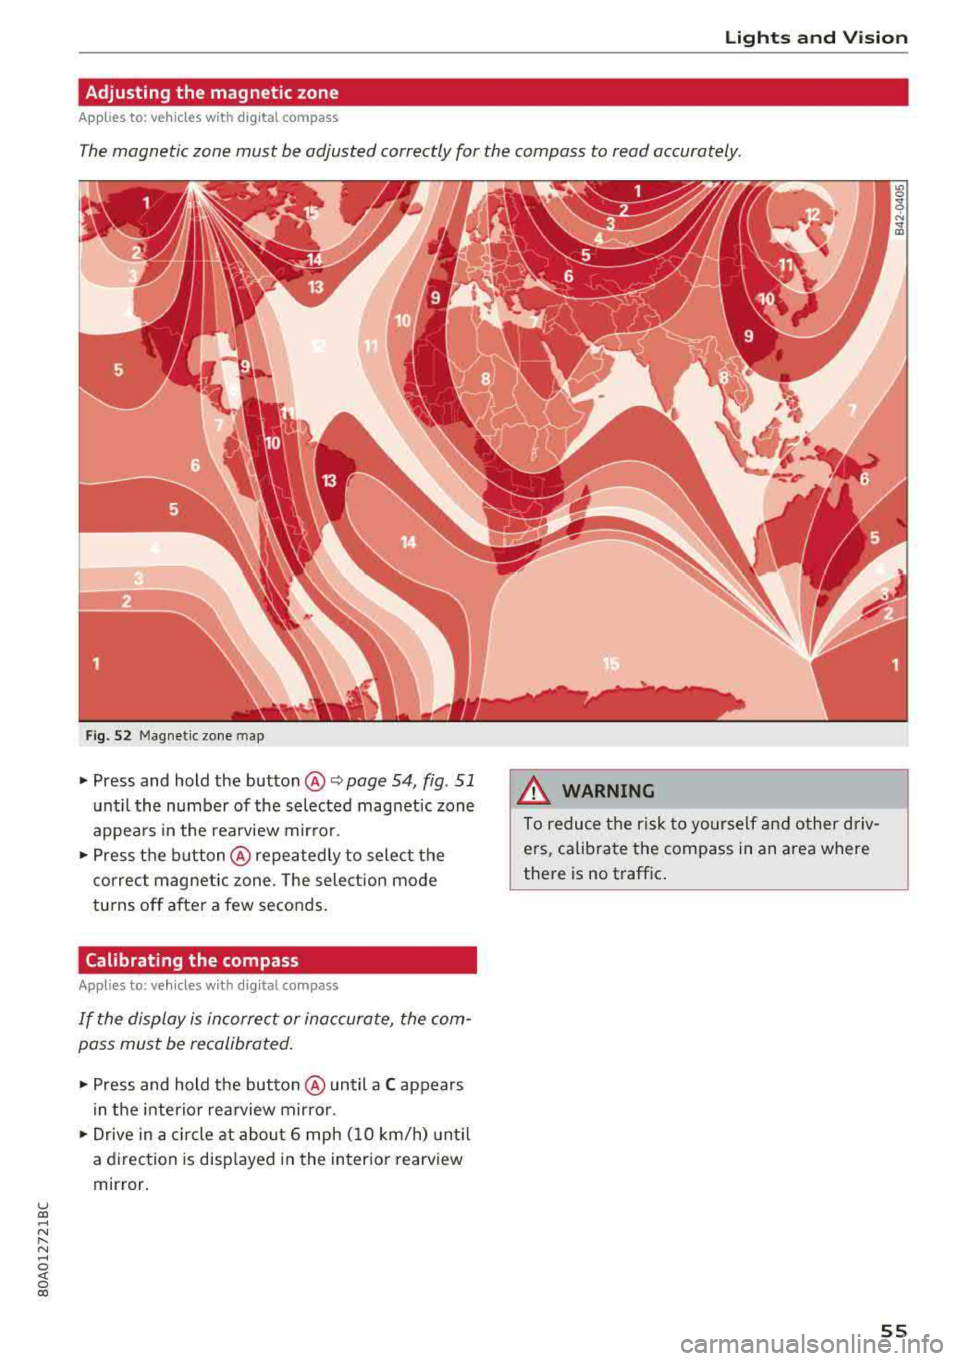
The magnetic zone must be adjusted correctly for the compass to read accurately.
Fig . 52 Magnetic zone map
• Press and hold the button @ Q page 54, fig . 51
until the number of the selected magnetic zone
appears in the rearview mirror .
• Press the button@repeatedly to select the
correct magnetic zone . The selection mode
turns off after a few seconds.
Calibrating the compass
A ppl ies to: ve hicles w ith d ig ital compass
If the display is incorrect or inaccurate, the com
pass must be recalibrated.
• Press and hold the button @ until a C appears
in the interior rearview mirror .
• Drive in a circle at about 6 mph (10 km/h) until
a direction is displayed in the interior rearview
mirror.
A WARNING
To reduce the risk to yourself and other driv
ers, calibrate the compass in an area where
there is no traffic.
.
55
Page 63 of 392
u co ..... N r-N .....
~ 0 co
-Do not use any breakable beverage contain
ers (for example, made out of glass or por
celain). You could be injured by them in the
event of an accident .
(D Note
Beverage containers in the cup holders should
always have a lid. If not, beverages could sp ill
and cause damage to vehicle equipment, such
electronics or seat covers .
Climatized cup holder
Applies to: veh icles wit h clim atized cup holders
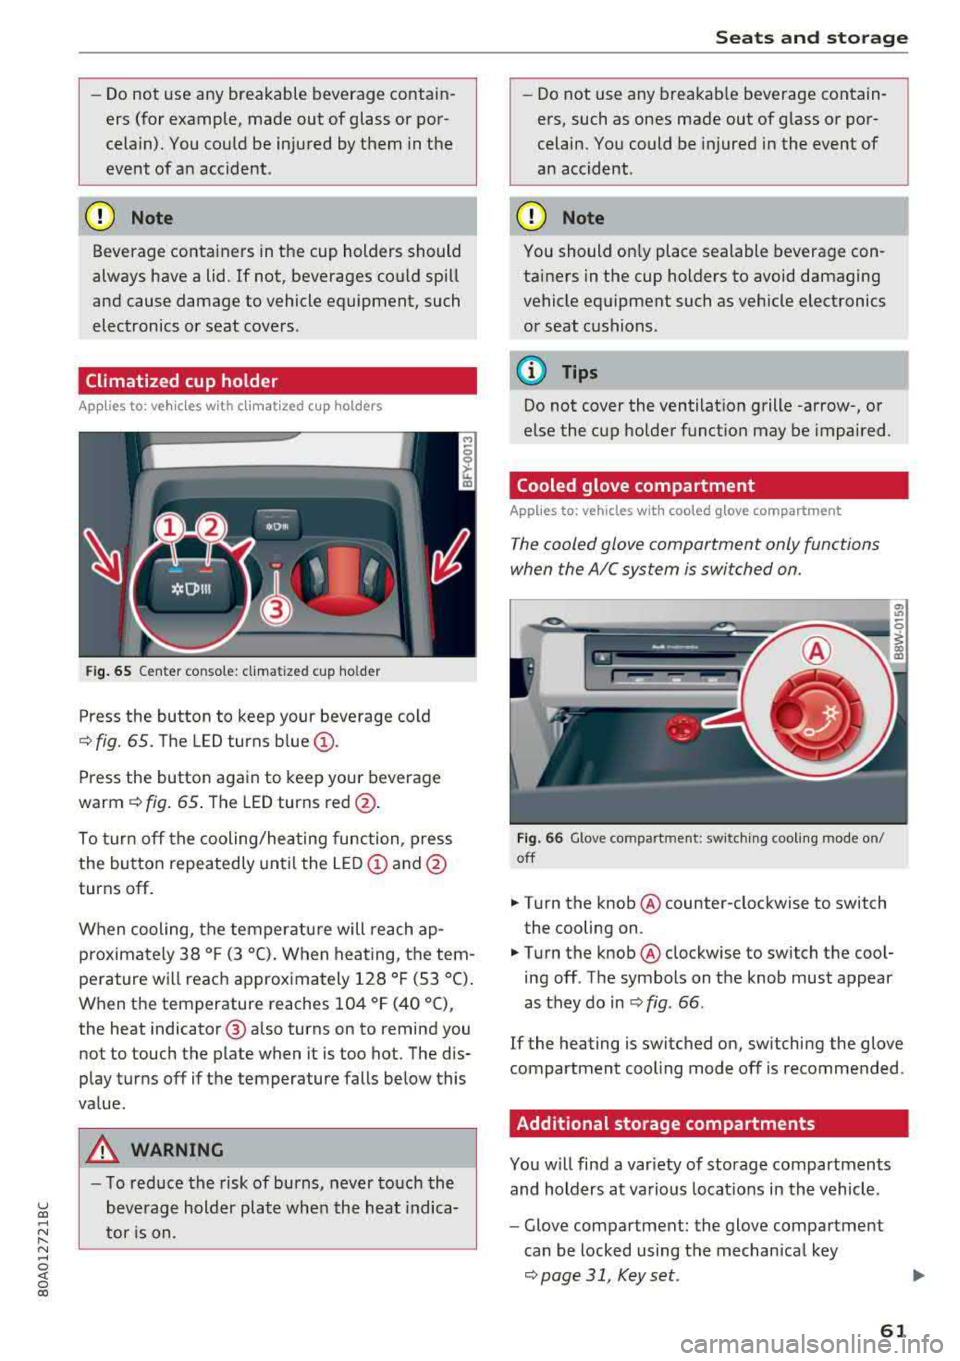
Fig. 65 Center co nsole: cl imatized cup holder
Press the button to keep your beverage cold
¢ fig. 65. The LED turns blue@.
Press the button again to keep your beverage
warm ¢ fig. 65 . The LED turns red @.
To turn off the cooling/heating function, press
the button repeatedly until the LED
(D and@
turns off .
When cooling, the temperature will reach
ap
p roximately 38 ° F (3 °C) . When heating, the tem
perature will reach approximately 128 ° F (53 °C).
When the temperature reaches 104 °F (40 °C),
the heat indicator @ also turns on to remind you
not to touch the plate when it is too hot. The dis
p lay turns off if the temperature falls below this
value.
_&, WARNING
- T o reduce the risk of burns, never touch the
beverage holder plate when the heat indica
tor is on.
Seats and storage
-Do not use any breakable beverage contain
ers, such as ones made out of glass or por
celain. You could be injured in the event of
an accident .
({I) Note
You should on ly place sealable beverage con
tainers in the cup holders to avoid damaging
vehicle equipment such as vehicle electronics
or seat cushions .
@ Tips
Do not cover the ventilation grille -arrow-, or
else the cup holder function may be impaired.
Cooled glove compartment
Applies to: vehicles with coo led glove compartment
The cooled glove compartment only functions
when the AIC system is switched on.
Fig . 66 G love compartment: switching cooling mode on/
off
.,. T ur n the knob @ counter-clockwise to switch
the cooling on .
.,. Turn the knob@ clockwise to switch the cool
ing off . The symbols on the knob must appear
as they do in
¢ fig. 66 .
If the heating is switched on, sw itching the glove
compartment cool ing mode off is recommended .
Additional storage compartments
You will find a var iety of storage compartments
and holders at various locat ions in the vehicle .
- Glove compartment: the glove compartment
can be locked using the mechan ical key
¢ page 31, Key set.
61
Page 71 of 392
u co ..... N r--N ..... 0 <( 0 00
Warm and cold Climate control system
Description
The climate control system warms , cools and re
moves humidity from the air in the vehicle inte ri
or. It is the most effective when the w indows and
sunroof* are closed . If there is a bu ild -up of heat
inside the ve hicle, ventilation can he lp to speed
up the cooling process.
I n all he ating mode f unct ions except for
defrost ,
the blower on ly switches to a higher speed once
the engine coolant has reached a sufficient tem
perature .
Pollutant filter
The pollutant filte r removes pollutants such as
d ust and pollen from the a ir.
Key recognition
The climate control settings are automatically
sto red and assig ned to the remote control key
that is i n use .
Warm and c old
@ For the sake of the environment
If you wo uld like to reduce fue l consumption,
switch the air conditioning off. T his w ill also
r educe em issions.
(D Tips
- To prevent interference with the heating
and cooling output and to prevent the win
dows from fogging over, the a ir intake in
fro nt of the w indshie ld must be free of ice,
snow o r leaves .
- Condensation from the coo ling system can
dr ip and form a pudd le of water under the
veh icle . Th is is norma l and does not mean
t here is a lea k.
- The e nergy management system may tem
pora rily switch off certa in functions, s uch as
the seat heati ng* o r rear window defogger .
Th ese sys tems are av ailable aga in as soon
as t he e nergy supply has been restore d.
69
Page 72 of 392
Warm and cold
3 zone deluxe automatic climate control
Operation
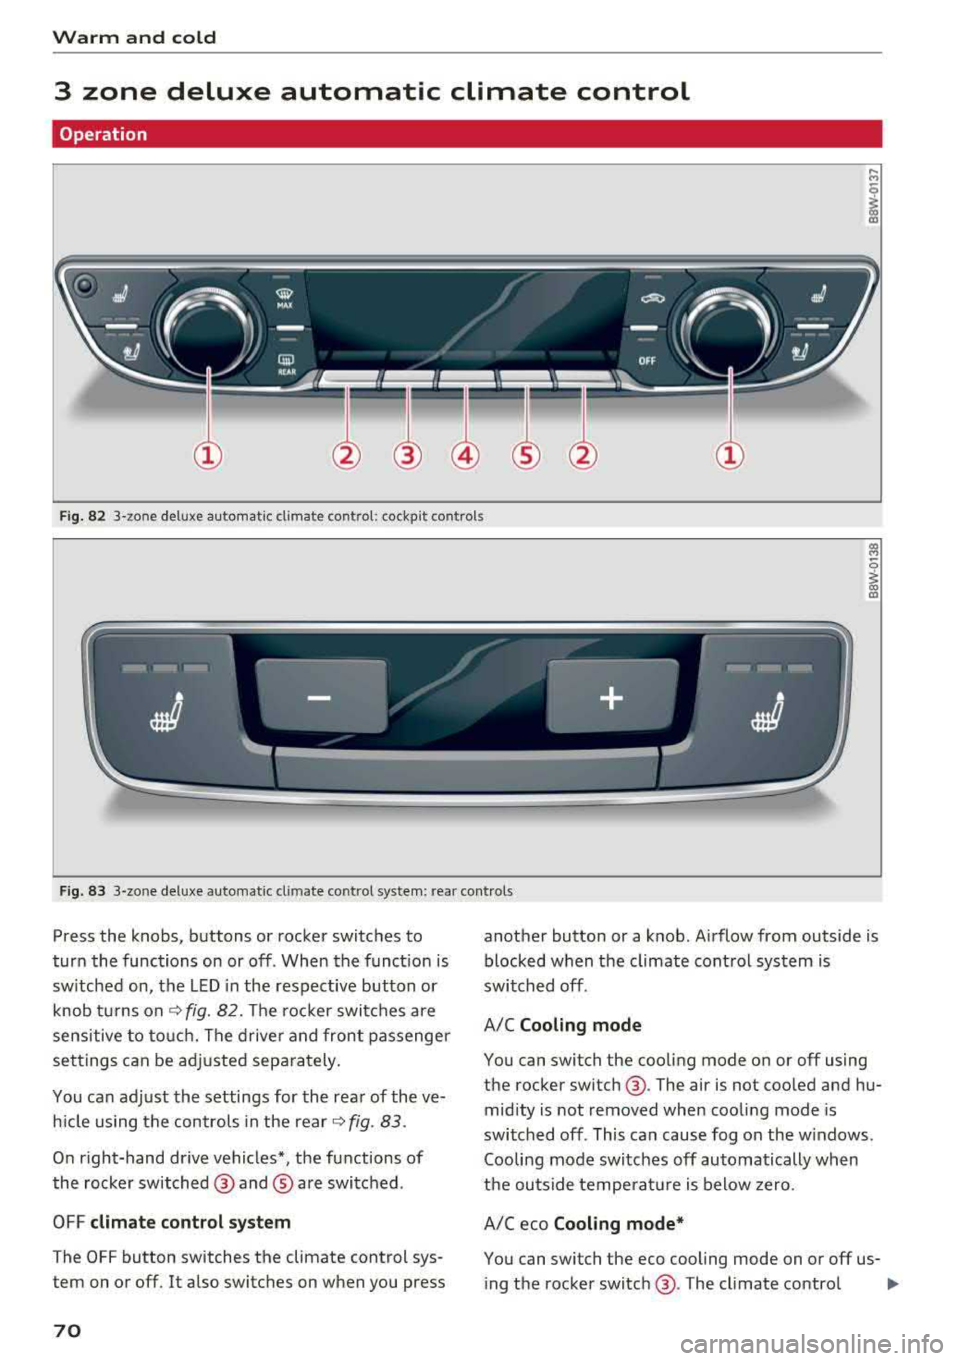
Fig. 82 3-zone deluxe automatic climate cont rol: cockpit controls
Fig. 83 3-zone deluxe automatic cl imate control system: rear controls
Press the knobs, buttons or rocker switches to
turn the functions on or off. When the funct ion is
sw itched on, the LED in the respective button or
knob turns on
¢ fig. 82. The rocker switches are
sensitive to touch. The driver and front passenger
settings can be adjusted separately.
You can adjust the settings for the rear of the ve hicle using the controls in the rear
¢fig. 83 .
On right-hand drive vehicles*, the functions of
the rocker switched @ and ® are switched .
OFF
climate control system
The OFF button switches the climate control sys
tem on or off. It also switches on when you press
70
another button or a knob. Airflow from outside is blocked when the climate control system is
switched off.
A/C
Cooling mode
You can switch the cooling mode on or off using
the rocker switch @. The air is not cooled and hu
midity is not removed when cooling mode is
switched off . This can cause fog on the windows.
Cooling mode switches off automatically when
the outside temperature is below zero.
A/Ceco
Cooling mode*
You can switch the eco cooling mode on or off us- ing the rocker switch @. The climate control
..,.