tow AUDI Q5 2018 Owners Manual
[x] Cancel search | Manufacturer: AUDI, Model Year: 2018, Model line: Q5, Model: AUDI Q5 2018Pages: 392, PDF Size: 60.56 MB
Page 4 of 392
Table of contents
About this Owner's Manual. . . . . .
6
Cockpit . . . . . . . . . . . . . . . . . . . . . . . . . . . 8
Cockpit overview . . . . . . . . . . . . . . . . . 8
Controls at a glance . . . . . . . . . . . . . . . . . . 8
Instrument cluster . . . . . . . . . . . . . . . . . . .
1 0
M ultif unction steering wheel pl us . . . . . . 12
Mu ltifunction steering wheel . . . . . . . . . . 15
Ve hicle functions . . . . . . . . . . . . . . . . . . . . 16
H ead-up display . . . . . . . . . . . . . . . . . . . . . 18
Indicato r lights . . . . . . . . . . . . . . . . . . . . . 19
Starting and driving . . . . . . . . . . . . . 30
Opening and closing . . . . . . . . . . . . . 30
Cent ral lock ing . . . . . . . . . . . . . . . . . . . . . . 30
Luggage com part ment lid . . . . . . . . . . . . . 36
C hil d safety lock . . . . . . . . . . . . . . . . . . . . .
40
Powe r windows . . . . . . . . . . . . . . . . . . . . . 4 0
Panorama g lass roof . . . . . . . . . . . . . . . . . 42
Garage door opener (Homelink) . . . . . . . . 43
Lights and Vision . . . . . . . . . . . . . . . . . 45
Exterio r lighting . . . . . . . . . . . . . . . . . . . . . 45
Interior lighting . . . . . . . . . . . . . . . . . . . . . 48
V1s1on . . . . . . . . . . . . . . . . . . . . . . . . . . . . . 49
W indshield wipers . . . . . . . . . . . . . . . . . . .
51
Dig ita l compass . . . . . . . . . . . . . . . . . . . . . 54
Seats and storage . . . . . . . . . . . . . . . . 56
General information . . . . . . . . . . . . . . . . . 56
Front seats . . . . . . . . . . . . . . . . . . . . . . . . . 56
Rea r seats . . . . . . . . . . . . . . . . . . . . . . . . . .
57
H ead restra ints . . . . . . . . . . . . . . . . . . . . . 58
M emory fu nction . . . . . . . . . . . . . . . . . . . . 59
P ower so urces . . . . . . . . . . . . . . . . . . . . . . 60
Storage . . . . . . . . . . . . . . . . . . . . . . . . . . . . 60
L uggage compartment . . . . . . . . . . . . . . . 62
Roof rack . . . . . . . . . . . . . . . . . . . . . . . . . . 67
Warm and cold . . . . . . . . . . . . . . . . . . . 69
Climate control system . . . . . . . . . . . . . . . 69
3 zone del uxe automatic climate control .
70
Steering whee l heating . . . . . . . . . . . . . . . 72
Driving .... .. .. ............. .... .. . 73
Gene ral information . . . . . . . . . . . . . . . . . 73
Steer ing . . . . . . . . . . . . . . . . . . . . . . . . . . . 7 5
Starting and stopping the engi ne . . . . . . . 76
2
Start/Stop system .... ... .. ..... ... . .
E lectromechanical parking brake .. ... . .
Start ing to drive . ..... ... .. ..... ... . .
0ffroad driving . .. .. .. ............. . .
Tilt angle d isplay . .. .. ............. . .
Automat ic transmission
Trailer towing ... .. ............. . .
Driving with a tra iler .. ... .. ..... ... . .
Driver assistance .. ............. . .
Assistance systems ............. .
Speed warning system ............... .
78
80
82
82 84
84
92
92
95
95
95
Cru ise cont rol system . . . . . . . . . . . . . . . . 95
Came ra-based t raff ic sign recogn it io n . . . 97
Lap time r . . . . . . . . . . . . . . . . . . . . . . . . . . 98
P red ictive eff ic iency assis t . . . . . . . . . . . . . 99
Audi adaptive cruise contro l . . . . . . . . . . .
102
Audi pre sense . . . . . . . . . . . . . . . . . . . . . . 112
Audi active lane assist . . . . . . . . . . . . . . . . 117
Audi s ide ass ist . . . . . . . . . . . . . . . . . . . . . 120
Audi drive select . . . . . . . . . . . . . . . . . . . . . 125
Parking aid . . . . . . . . . . . . . . . . . . . . . . . 130
Genera l information . . . . . . . . . . . . . . . . . 130
Rear parking system . . . . . . . . . . . . . . . . . 131
Parking system plus ... ............... 131
Rearv iew camera . . . . . . . . . . . . . . . . . . . . 133
Per iphera l came ras . . . . . . . . . . . . . . . . . . 135
Adjus ting the pa rking aid . . . . . . . . . . . . . 138
Er ror messages . . . . . . . . . . . . . . . . . . . . . 138
T raile r hitch . . . . . . . . . . . . . . . . . . . . . . . . 139
Intelligent Technology . . . . . . . . . . 140
El ectron ic Stab iliza tion Contro l (ESC) . . . . 140
Brakes . . . . . . . . . . . . . . . . . . . . . . . . . . . . . 142
E lectromechanical steering, Dynamic
steering . . . . . . . . . . . . . . . . . . . . . . . . . . .
144
A ll-wheel drive (quattro) . . . . . . . . . . . . . . 144
Energy management . . . . . . . . . . . . . . . . . 145
Notice about data recorded by the Event
Data Recorder and veh icle co ntrol
modules . . . . . . . . . . . . . . . . . . . . . . . . . . .
145
Infotainment system . . . . . . . . . . . . 147
Multi Media Interface............ 147
Traffic safety info rmat ion . . . . . . . . . . . . . 14 7
Intro duction . . . . . . . . . . . . . . . . . . . . . . . .
14 7
Page 6 of 392
Table of contents
Supported media and fi le forma ts 2
4 0
T roubleshooting . . . . . . . . . . . . . . . . . . . . . 241
Audi smartphone interface . . . . . . 243
Setup ... ...... ... .. ..... ... .. .. ... 243
Op erating . . . . . . . . . . . . . . . . . . . . . . . . . . 243
Troubleshoot ing . . . . . . . . . . . . . . . . . . . . . 244
System settings ... ..... ... .. .. ... 24 5
Sett ing the date and time . . . . . . . . . . . . . 245
MMI sett ings . . . . . . . . . . . . . . . . . . . . . . . 245
Con nection manager . . . . . . . . . . . . . . . . . 246
System update . . . . . . . . . . . . . . . . . . . . . . 248
Sound setti ngs . . . . . . . . . . . . . . . . . . . . . . 249
Volume sett ings . . . . . . . . . . . . . . . . . . . . . 249
R estart ing the M MI . . . . . . . . . . . . . . . . . . 250
Softw are license i nfo rm atio n 250
Safety first . . . . . . . . . . . . . . . . . . . . . . . 25 2
Driving safety . . . . . . . . . . . . . . . . . . . . 2 52
B asics . . . . . . . . . . . . . . . . . . . . . . . . . . . . . 252
Correct passenger seating positions . . . . . 253
Peda l area . . . . . . . . . . . . . . . . . . . . . . . . . . 256
Storing cargo correctly . . . . . . . . . . . . . . . 257
Report ing Safety Defects . . . . . . . . . . . . . . 259
Safety belts . . . . . . . . . . . . . . . . . . . . . . 26 1
Gene ral information . . . . . . . . . . . . . . . . . 261
W hy use safety belts? . . . . . . . . . . . . . . . . 262
Safety belts . . . . . . . . . . . . . . . . . . . . . . . . 264
Belt tensioners . . . . . . . . . . . . . . . . . . . . . . 267
Airbag system . . . . . . . . . . . . . . . . . . . . 269
Important information . . . . . . . . . . . . . . . 269
F ront a irbags . . . . . . . . . . . . . . . . . . . . . . . 273
M on itor ing t he Advanced Airbag System . 28 1
Side airbags . . . . . . . . . . . . . . . . . . . . . . . . 285
Side curtain air bags . . . . . . . . . . . . . . . . . . 288
Child safety . . . . . . . . . . . . . . . . . . . . . . 29 1
I mpo rtant inform ation . . . . . . . . . . . . . . . 29 1
Ch ild safety sea ts . . . . . . . . . . . . . . . . . . . . 297
Securing c hild safety seats . . . . . . . . . . . . 302
L A TCH system (lower anchorages and
tethers for chi ldren) . . . . . . . . . . . . . . . . . 305
Addit ional information . . . . . . . . . . . . . . . 309
4
Maintenance and Care . . . . . . . . . . . 3 10
Checking and Filling . . . . . . . . . . . . . 310
Fuel... ... .. .. .... .. ... .. ..... ... .. 310
Refueling . . . . . . . . . . . . . . . . . . . . . . . . . . 311
Emissions control system . . . . . . . . . . . . . 313
On Board D iagnost ic System (OBD) . . . . . 313
E ngine compartment .. ............... 314
Engine o il .... ... .. .. ............... 317
Cooli ng sys tem. .. .. .. ............. .. 319
B rake fl uid . . . . . . . . . . . . . . . . . . . . . . . . . 32 1
Battery . . . . . . . . . . . . . . . . . . . . . . . . . . . . 3 21
Windshie ld washer system . . . . . . . . . . . . 3 23
Service interva l display 324
Wheels
.. .. .. .... .. ... .. ..... ... .. 3 25
Whee ls and Tires . . . . . . . . . . . . . . . . . . . . 325
Tire p ressure mo nitoring system 342
Care and cleaning . . . . . . . . . . . . . . . . 3 44
Genera l information . . . . . . . . . . . . . . . . . 344
Car washes . . . . . . . . . . . . . . . . . . . . . . . . . 344
Cleaning and care i nfo rmation . . . . . . . . . 345
Plac ing your vehicle out of serv ice . . . . . . 349
Troubleshooting . . . . . . . . . . . . . . . . . 350
Emergency assistance . . . . . . . . . . . 350
General information . . . . . . . . . . . . . . . . . 350
Eq uipment . . . . . . . . . . . . . . . . . . . . . . . . . 350
T ire mobility ki t . . . . . . . . . . . . . . . . . . . . . 350
Repla cing a whee l . . . . . . . . . . . . . . . . . . . 352
Co llapsibl e sp are t ire . . . . . . . . . . . . . . . . . 356
Fuses and bulbs . . . . . . . . . . . . . . . . . . 3 58
F u ses ..... .. .. .. .. .. ............. .. 358
B ul bs . . . . . . . . . . . . . . . . . . . . . . . . . . . . . . 3 62
Emergency situations . . . . . . . . . . . . 3 63
Gener al . . . . . . . . . . . . . . . . . . . . . . . . . . . . 363
Start ing by p ushi ng o r tow ing . . . . . . . . . . 3 63
Starting with jumper cab les . . . . . . . . . . . 363
U sing the jump start cable . . . . . . . . . . . . 364
Towing with a tow truck . . . . . . . . . . . . . . 365
Raising the vehicle . . . . . . . . . . . . . . . . . . . 367
Accessories and Technical Data . 369
Technical data . . . . . . . . . . . . . . . . . . . . 369
Vehicle specificat ions . . . . . . . . . . . . . . . . 369
Notes about technical data . . . . . . . . . . . . 369
Page 19 of 392
u co ..... N r-N .....
~ 0 co
- Time and date¢ page 245
- Digital speedometer*
- Average consumpt ion
- Rema ining range*
- Short-term memory overview
- Long-term memory overview
- Energy consumers *
~ page 17
- Driver assistance* ¢ page 102
- T raffic s ign recognition* ¢
page 97
The short-term memory collects driving informa
tion from the t ime the ignition is sw itched on un
til it is switched off. If you continue driv ing with
i n two hours after switching the ign ition off, the
new values are included when calculating the cur
rent trip information .
Unlike the short-term memory, the long-term
memory is not e rased automat ical ly. Yo u can se
l ect the time period for evaluating trip informa
tion yourself .
Fuel consumption
The current fue l consumption can be shown us
ing a bar g raph ¢
fig. 14. The average cons ump
tion stored in the short-term memory is also dis
p layed .
If the bars are green or the gray tone on
the bars changes (depending on the equipment),
your vehicle is sav ing fuel by the following func
tion :
-Rec upe rati on: electrical energy can be stored in
the vehicle battery when the vehicle is coasting or driving downhill. The bar will move toward
0 /0.
@ Tips
The date, time of day and time and date for
mat can be set in the Infotainment system
<::> page 245 .
Coc kpit o verview
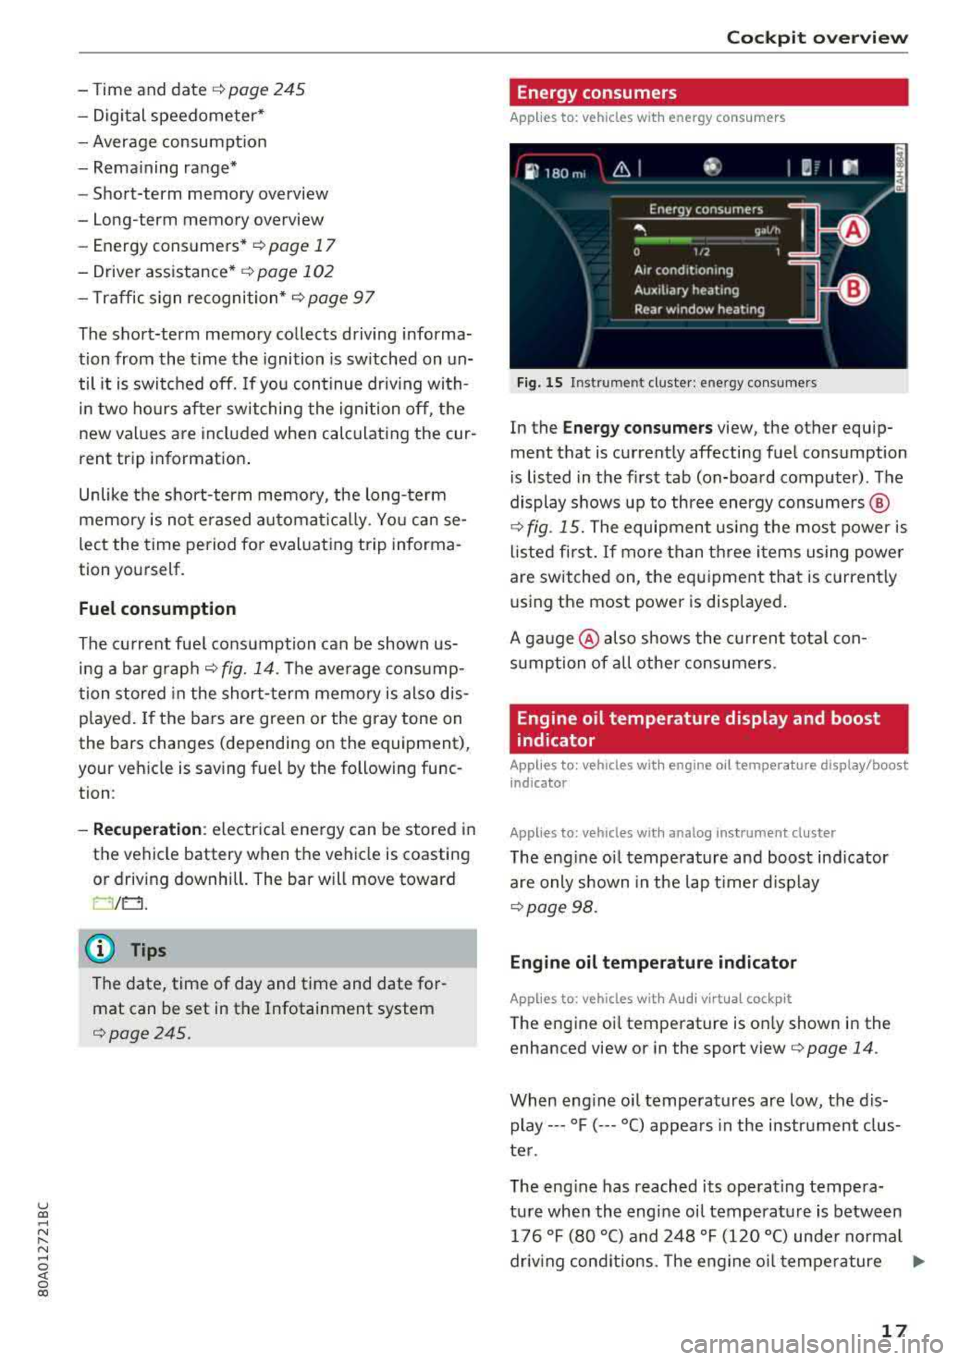
Energy consumers
Applies to: vehicles with energy consumers
Fig. 15 Instrume nt cluster : en ergy consumers
In the Ene rg y c onsume rs view, the other equip
ment that is current ly affecting fuel consumption
is listed in the first tab (on-board computer) . The
display shows up to three energy consumers @
¢
fig . 15. The equipment using the most power is
l isted fi rst. If more than three items using power
are switched on, the equ ipment that is currently
using the most power is displayed .
A gauge @also shows the cu rrent tota l con
s u mption of all othe r consumers.
Engine oil temperature display and boost
indicator
Applies to : vehicles with engine o il temperature display/boost
indicator
Applies to: vehicles with analog instrument cluster
The engine oi l temperature and boost ind icator
are only s hown in the lap t imer d isplay
<::>page 98.
Eng ine oil temp erature indica tor
Applies to: vehicles with Aud i v ir tual cockp it
The engine oi l temperature is on ly shown in the
enhanced view or in the sport view
c:> page 14.
When eng ine oi l temperatures are low, the dis
play--- °F (--- °C) appears in the instrument clus
ter .
The eng ine has reached its operat ing tempera
ture when the engine oil temperature is between 176 °F (80 °() and 248 °F (120 °() unde r normal
driv ing cond itions. The engine o il temperature
..,,.
17
Page 26 of 392

Cockpit overview
~ Safety belt
The. indicator light stays on unt il the driver's
and front passenger's safety belts a re fastened.
Above a certain speed, there will also be a warn
ing tone.
(D Tips
For additional information on safety belts,
see
"* page 261.
0 Generator/vehicle battery
If the . or(•) indicator light turns on, there is a
malfunction in the generator or the vehicle elec
tr ica l system .
• Electrical system: malfunction! Safely stop
vehicle
Do not continue driving and switch the engine
off. See an authorized Audi dea le r or aut horized
Audi Service Facility for assistance .
(•) Electrical system: malfunction! Restart not
possible. Please contact Service
The vehicle battery was disconnected from the
veh icle elect rical system and will no longer
charge . Drive to an authorized Aud i dealer or au
thorized Audi Service Facility immediately.
Do not stop the engine, or you will not be able to
start it aga in . If you can no longer start the en
g in e, see an authorized Aud i dealer or autho rized
Aud i Service Facility for assistanc e.
(•) F.lectrical system: malfunction! Please con
tact Service
Drive to an authorized Aud i dea ler or authorized
Aud i Serv ice Facility immediately . Because the ve
h icle battery is d ischarg ing, turn off all unneces
sary electr ical equipment such as the radio. See
an authorized Audi dealer or authorized Audi
Service Facility if the battery charge level is too
low.
(•) Electrical system: low battery charge. Bat
tery will be charged while driving
The start ing ability may be impaired.
24
If this message turns off after a little whi le, the
vehicle battery charged enoug h while driving.
If the message does not turn off and stay off
whe n driving, have an authorized Aud i dealer or
authorized Audi Service Facility repair the mal
function .
~ Engine oil pressure
• Turn off engine. Oil pressure too low
Stop the engine and do not continue driving.
Check the engine oi l level
~ page 317.
- If the eng ine oil level is too low, add engi ne oil
¢ page 317 . Only continue driving once the in
dicator light turns off .
- I f the engine oil level is correct and the indica
tor light still turns on, turn the engine off and
do not continue driving. See an authorized Audi
dealer or authorized Audi Service Facility for as
sistance.
(D Tips
T he oil pressure warn ing is not an oil leve l in
dicator. Always check the oil leve l regularly.
't'.:7;, Engine oil level (MIN)
Appl ies to: vehicles with o il level warning
• Please add oil immediately.
Add engi ne oil immediately ¢page 317.
Ill Please add max. x qt (l) oil. You can contin
ue driving
Add the maximum amount of oi l indicated in the
display as soon as possible
¢ page 317 .
~-Steering lock
• Steering: malfunction! Please stop vehicle
There is a ma lfunction in the e lectron ic steering
lock. You cannot tur n the ignition on.
Do
not tow your vehicle because it cannot be
steered. See an a uthorized Audi dea ler or author
i z ed Audi Service Facility for assistance.
...
Page 27 of 392

u co ..... N r--N ..... 0 <( 0 00
1!11 Steering lock: malfunction! Please contact
Service
There is a malfunction in the elect ronic stee ring
l o ck.
Dri ve to an authorized Aud i dea ler or authorized
Audi Service Fac ility imm ediately to have the
malfunction corrected.
A WARNING
Do not tow your vehicle when there is a mal
function in the electronic steering lock
-this
increases the risk of an accident .
~ Engine start system
• Engine start system: malfunction! Please
contact Service
Do not switch the ignition off because you may
not be able to switch it on again.
Drive to an authorized Aud i dea le r or authorized
Aud i Service Facility im media tely to have the
mal function corrected.
-
l::J Engine start system: malfunction! Please
contact Service
There is a malfunction in the engine starting sys
tem .
Drive to an authori zed Aud i dea ler or authori zed
Aud i Service Facility immediately to have the
malfunction corrected.
c;:::::,Hood
• Warning! Hood is not locked. Stop vehicle
and check the lock
If the indicator light turns on and the message
appears, the hood locking mechanism is not en
gaged correctly.
Stop immediately and close the hood
c>page 315.
0/Q Air suspension
Applies to: vehicles with air suspension
• Air suspension: malfunction. Safely stop ve
hicle . Steering and ground clearance limited
Cockpit overview
Due to a system ma lf u nction, your vehicle's
ground clearance is very low at the front or rear
axle* (in veh icles with all -whee l steering) . Be
cause of this, the wheels no longer have enough
clearance to steer correctly.
See an authorized Audi dealer or authorized Audi
Service Facility for assistance.
• Air suspension: malfunction! You can con
tinue driving slowly. Speed limited to max.
3S mph (60 km/h )
The re is a malfunction that can result in restrict
ed driving stability. T he speed is limit ed to a
maximum of 35 mph (60 km/h).
Drive to an authorized Audi dealer or authorized
A udi Service Facility immediately to have the
malfunction corrected.
• Air suspension: malfunction! You may con
tinue driving slowly at max. 35 mph (60 km/h)
There is a malfunction that can result in restrict
ed driv ing stab ility .
Drive to an authorized Audi dealer or authorized
Audi Service Facility immed iate ly at a maximum
speed of 35 mph (60 km/h) to have the malfunc
t ion corrected .
• Air suspension: service mode! Vehicle can be
moved but handling may be impaired
Carefully drive to an authorized Audi dea ler or
authorized Audi Service Facility immediately to
have the service mode deactivated .
II Air suspension: malfunction! Please contact
Service
T he re is a system malfunction that can result in
restricted driving stability or red uced ground
clearance.
Drive to an authorized Audi dealer or autho rized
A udi Service Facility immediately to have the
malfunction corrected.
II Air suspension: vehicle too low. Limited
ground clearance
The ground clearance is very low due to a system
malfunction . Wait until the a ir suspension sys-
tem has restored normal ground clearance .
.,.
25
Page 38 of 392
Opening and clo sin g
~ WARNING
Read and following all WARNINGS c:> .&. in De
scription on page 30.
Anti-theft alarm system
Applies to: vehicles w ith anti-t heft alarm system
If the anti -theft alarm system detects a vehicle
break-in, audio and v isual warning signals are
triggered. The anti-theft alarm system is switch
ed on or off when locking/unlocking your vehicle.
If the alarm is tr iggered, it w ill shut off automat
ically after a ce rta in amount of time .
Sw itching the alarm off manually
• To switch the alarm off, press the rrl button on
the remote control key or switch the ignition
on.
Depending on the vehicle equipment, the anti
theft alarm system may have the following fea
tures:
Break -in security feature
The alarm w ill sound if the re is a break- in at the
doors, hood, and/or luggage compartment lid.
Interior /towing protection monitoring
button*
The alarm wi ll be triggered if there are move
ments detected in the vehicle interior or if there
is a change in the veh icle ang le .
If you leave persons/an imals in the vehicle o r
have the vehicle t ransported, sw itch off the inte
rior/towing protection monitoring alarm to pre
vent the alarm from being triggered:
• Press the ffi button on the remote cont ro l key a
seco nd time
within 2 seconds. Or
• Applies to vehicles with convenience key: touch
the sensor on the door handle a second t ime
with in 2 se conds . Or
• Turn the mechanical key in the door lock to the
close pos it ion a second time
w ithin 2 second s.
• If you lock the veh icle now, then the interior/
towing protect ion monitor will stay off until
the next time the vehicle is u nlocked.
36
@ Tips
The interior/towing protection monitoring *
on ly functions correctly when the windows
and the roof* are closed.
Luggage compartment
lid
Opening/closing the luggage compartment
lid
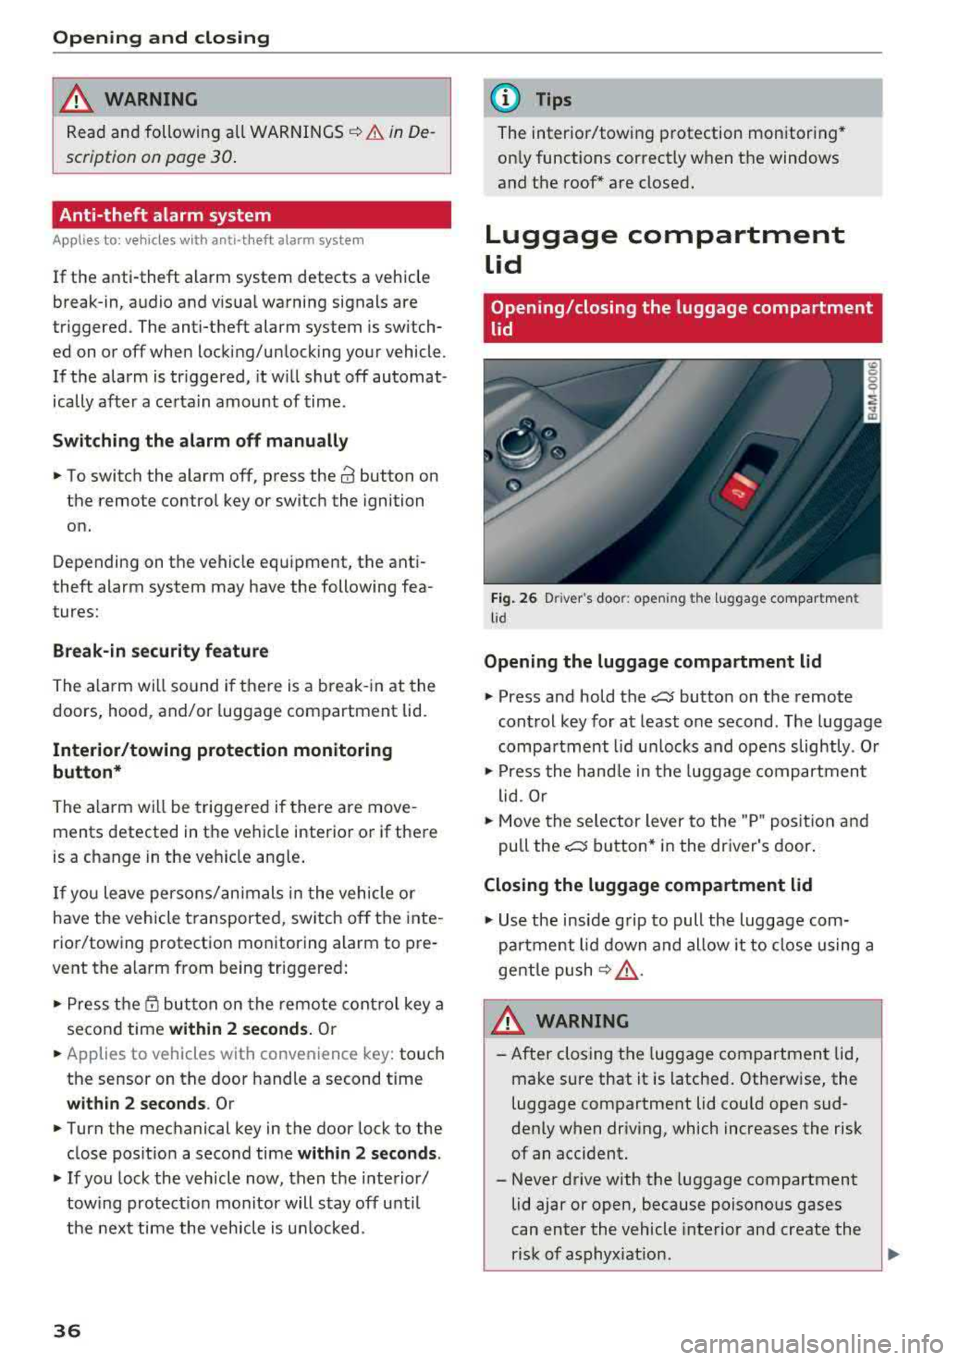
F ig . 26 D river 's doo r: ope ning th e luggage compartmen t
l id
Opening the luggage compartment lid
• Press and hold the c::J button on the remote
control key for at least one second . The luggage
compa rtment l id u nlocks and opens slightly . Or
• Press the hand le in the luggage compartment
lid . Or
• Move the se lector lever to the "P" posit io n and
pull the
c::J button* in the dr iver's door .
Closing the luggage compartment lid
• Use the inside grip to pull the luggage com
pa rtment lid down and allow it to close using a
gentle push
¢ .&, .
&_ WARNING
-After closing the luggage compartment lid,
make sure that it is latched . Otherw ise, the
luggage compartment lid cou ld open sud
denly when driv ing, which increases the risk
of an accident.
- Never drive with the luggage compartment
lid ajar or open, because poisono us gases
can enter the vehicle interior and create the
risk of asphyx iat ion.
..,_
Page 50 of 392
Lights and Vision
The emergency flashers also work when the igni
t ion is turn ed off .
(D Tips
You s hou ld sw itch the emergency flashers on
if:
- you are the last car in a traff ic jam so that
a ll other vehicles approaching from behind
can see your vehicle
- your ve hicle has bro ke n down or you are
having an eme rgency
- you r vehicle i s being towed or if yo u are tow
ing another vehicle
Interior lighting
Front interior lighting
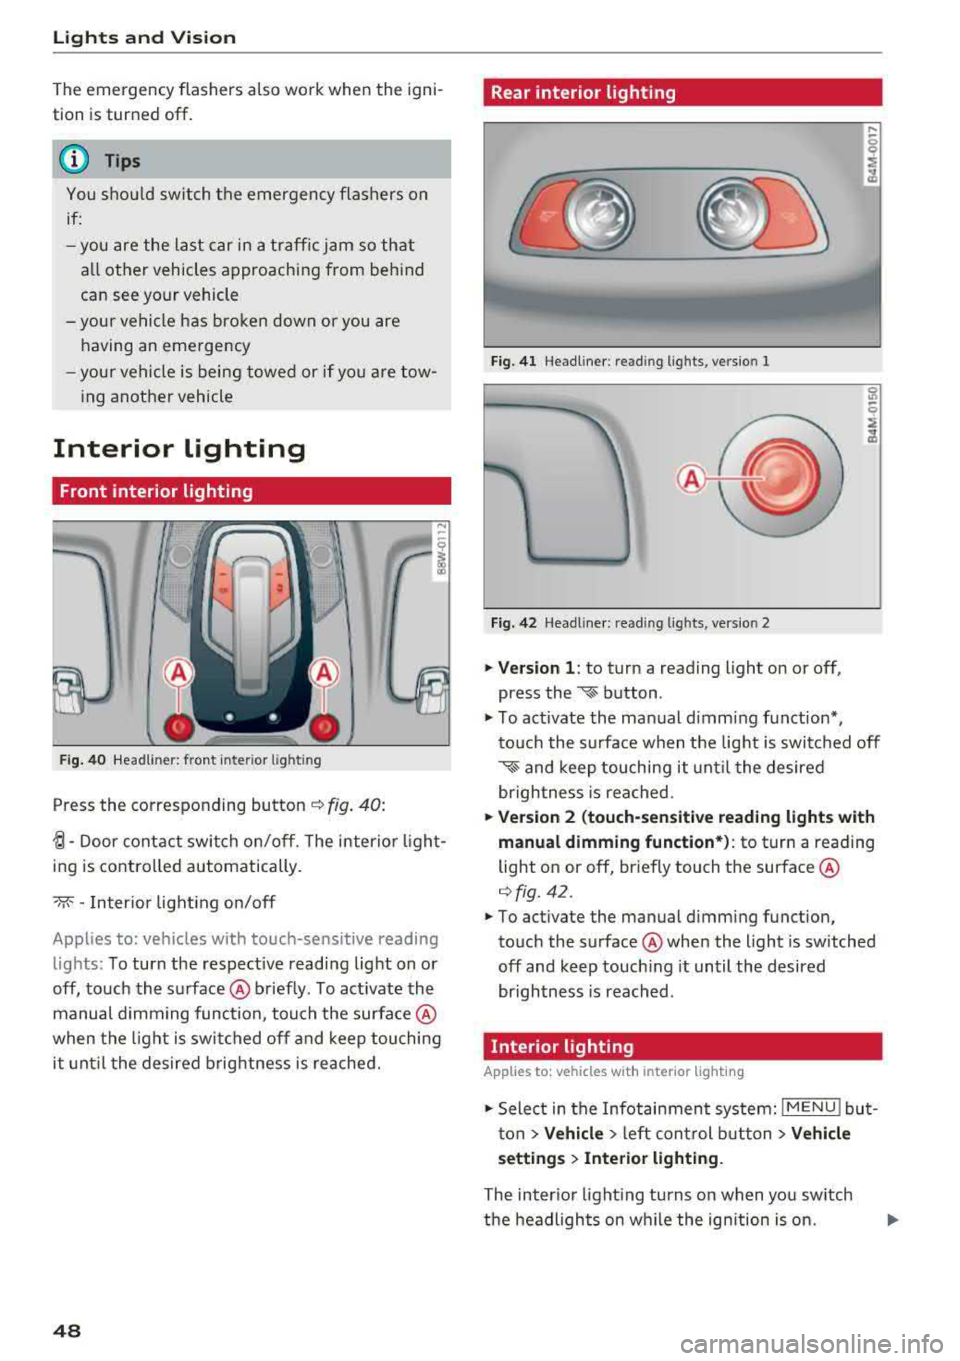
F ig. 40 He adlin er: fr ont in te ri or l ig htin g
Press the co rresponding button ¢ fig . 40:
-fJ-Door contact swi tch on/off . T he interio r ligh t
ing is controlled automatically.
- M--I n ter ior light ing o n/off
Applies to: vehicles with touch-sensitive reading lights: To turn the respect ive readi ng light on or
off, to uch the su rface @ brief ly . To act ivate the
manual d imm ing func tion , touch the surfa ce @
when the light is swi tched off and kee p touching
it unt il t he desired brig htness is reached.
48
Rear interior lighting
Fi g. 41 Headline r: re ad in g light s, vers io n 1
Fig. 42 Headline r: re ad in g l igh ts , ve rs io n 2
.. Version 1 : to turn a read ing l ight on or off,
press the
~ b utton .
.. To ac tivate the ma nual dimming f unct ion* ,
t o uch the s urface when the lig ht is swi tc h ed off
~ and keep touching it unt il t he de sired
brigh tness is reached.
.. Ver sion 2 (touch-sensiti ve reading light s with
manual dimming function* ):
to turn a reading
light on or off, br iefly touch t he surface @
¢fig. 42 .
.. To activate the manual dimming function,
to uch the surface @whe n the light is switched
off and keep touch ing it until the desired
brightness is reached .
Interior lighting
Applies to: vehicles with interior lighting
.. Select in the Infotainment system: IMENU ! but
t on
> Vehicle > le ft cont rol but ton > Vehicle
s etting s> Interior lighting.
The inter io r li gh ting turns on when yo u sw itch
t h e headlights on w hile the ign ition is on.
Page 51 of 392
u co ..... N r-N .....
~ 0 co
Version 1
To adjust the brightness of individual zones, se
lect
Front brightness* , Door brightness or Foot
well brightness.
Turn the control knob to th e left
or to th e right. Pr ess the control knob to confirm
the b rightness.
Version 2
Select and confirm one of the displayed profiles
by pressing the control knob.
Individual: you can customize the brightness and
color of individual zones. Press the right control
button. Press the control knob again to confirm
the settings.
Audi drive select: the interior and contour light
ing color changes depending on the driving mode
selected in drive select*
r::?vpage 125.
(0) Tips
The setting is automatically stored and as
signed to the remote control key that is being
used.
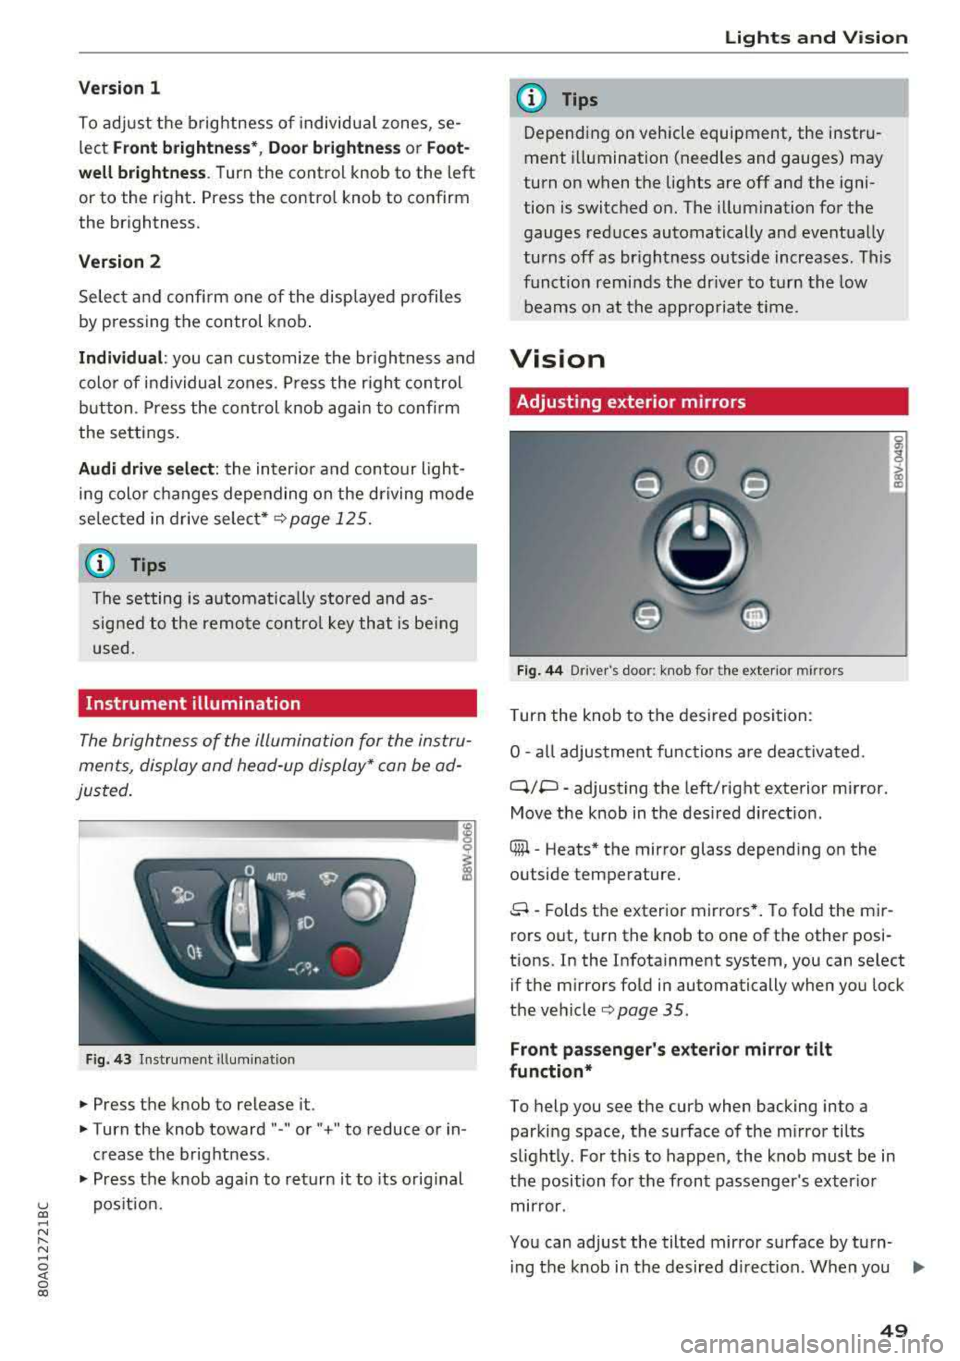
Instrument illumination
The brightness of the illumination for the instru
ments, display and head-up display* can be ad
justed.
--------... ~
i
Fig. 43 Instrument i llumination
.. Press the knob to release it.
.. Turn the knob toward "-" or" +" to reduce or in
crease the brightness .
.. Press the knob again to return it to its original
position.
Lights and Vision
(D Tips
Depending on vehicle equipment, the instru
ment illumination (needles and gauges) may
turn on when the lights are off and the igni
tion is switched on. The illumination for the
gauges reduces automatically and eventually
turns off as brightness outside increases . This
function reminds the driver to turn the low
beams on at the appropriate time.
Vision
Adjusting exterior mirrors
Fig. 44 D river 's doo r: knob fo r the ext erior mirr ors
Turn the knob to the desired position:
0
-all adjustment functions are deactivated .
q;p -adjusting the left/right exterior mirror.
Move the knob in the desired direction .
® -Heats* the mirror glass depending on the
outside temperature.
8 -Folds the exterior mirrors*. To fold the mir
rors out, turn the knob to one of the other posi
tions. In the Infotainment system, you can select if the mirrors fold in automatically when you lock
the
vehicle¢ page 35 .
Front passenger's exterior mirror tilt
function*
To help you see the curb when backing into a
parking space, the surface of the mirror tilts
slightly. For this to happen, the knob must be in
the position for the front passenger's exterior
mirror.
You can adjust the tilted mirror surface by turn- ing the knob in the desired direction. When you
.,.
49
Page 67 of 392
u co ..... N r-N .....
~ 0 co
The height of the partition net can be adjusted.
This a llows you to transport long objects using
the cargo pass-through, wh ile keep ing the parti
tion net attached at the same time.
(D Tips
-The straps must face tow a rd the rear when
attaching the part ition net.
- You must disengage the part ition net before
fo lding the backrest back into the upright
position.
- The partition net can also be attached to the
adjustable
tie-downs* ~ page 65.
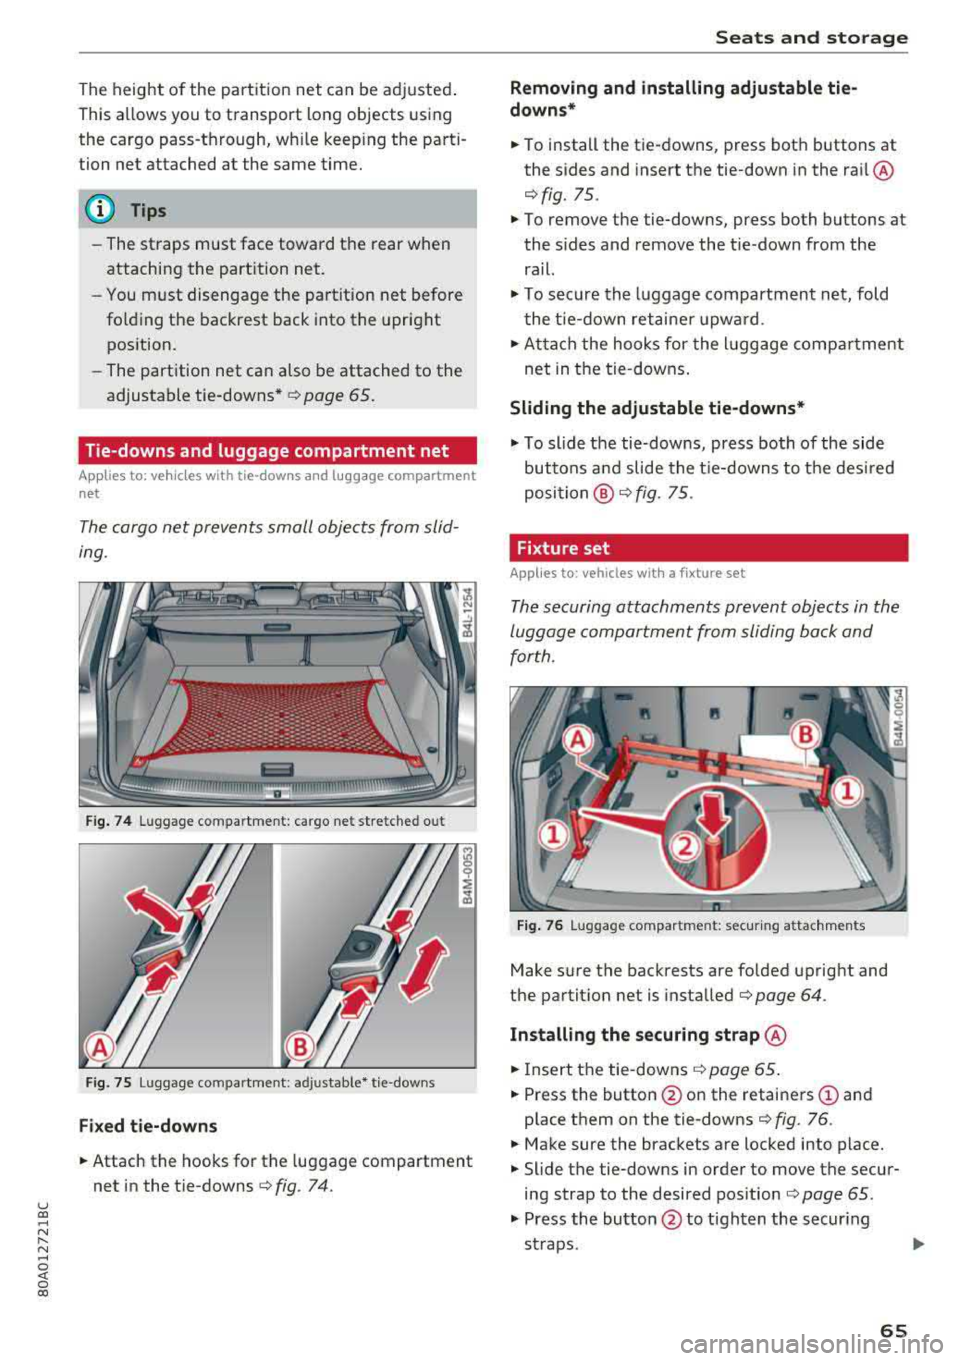
Tie-downs and luggage compartment net
A ppl ies to: ve hicles with tie -dow ns a nd l uggage compartment
n et
The cargo net prevents small objects from slid
tng .
liil
ell I
Fig. 74 Luggage compartment: cargo net stretched out
Fig. 75 Luggage compartment : adjusta ble* tie-downs
Fixed tie-downs
.. Attach the hooks for the luggage compartment
net in the tie-downs
c>fig . 74.
Seats and storage
Removing and installing adjustable tie
downs*
.. To install the tie-downs, press both buttons at
the sides and insert the tie-down in the rai l@
r=> fig. 75 .
.. To remove the tie-downs, press both buttons at
the sides and remove the tie-down from the
rail.
.. To secure the luggage compartment net, fold
the tie-down retaine r upward .
.. Attach the hooks for the lu ggage compa rtment
net in the tie-downs.
Sliding the adjustable tie-downs*
.. To slide the tie-downs, press both of the side
buttons a nd slide the tie-downs to the desired
position @r=>fig. 75.
Fixture set
A pp lies to: veh icles w ith a fixture se t
The securing attachments prevent objects in the
luggage compartment from sliding back and
for th.
Fig. 76 Luggage compartment: secur ing attachments
Make sure the backrests are folded upright and
the partit ion net is installed
c> page 64.
Installing the securing strap @
.. Insert the tie-downs c> page 65.
.. Press the button @on the retainers (D and
place them on the tie-downs
r::> fig. 76 .
.. Make sure the brackets are locked into place .
.. Slide the tie-downs in order to move the secur
ing strap to the desired pos ition
c> page 65.
.. Press the button @ to tighten the secur ing
straps .
1111>
65
Page 69 of 392
u co ..... N r-N .....
~ 0 co
Removing and in stalling the cargo floor
.,. To remove the cargo floo r, p ull the entire cargo
floor toward the back of the veh icl e.
... To insert the cargo f loor, slide it toward the
backr ests until i t aud ibly engag es into the tabs
r=> fig . 79 .
Roof rack
Applies to: veh icles with roof rack
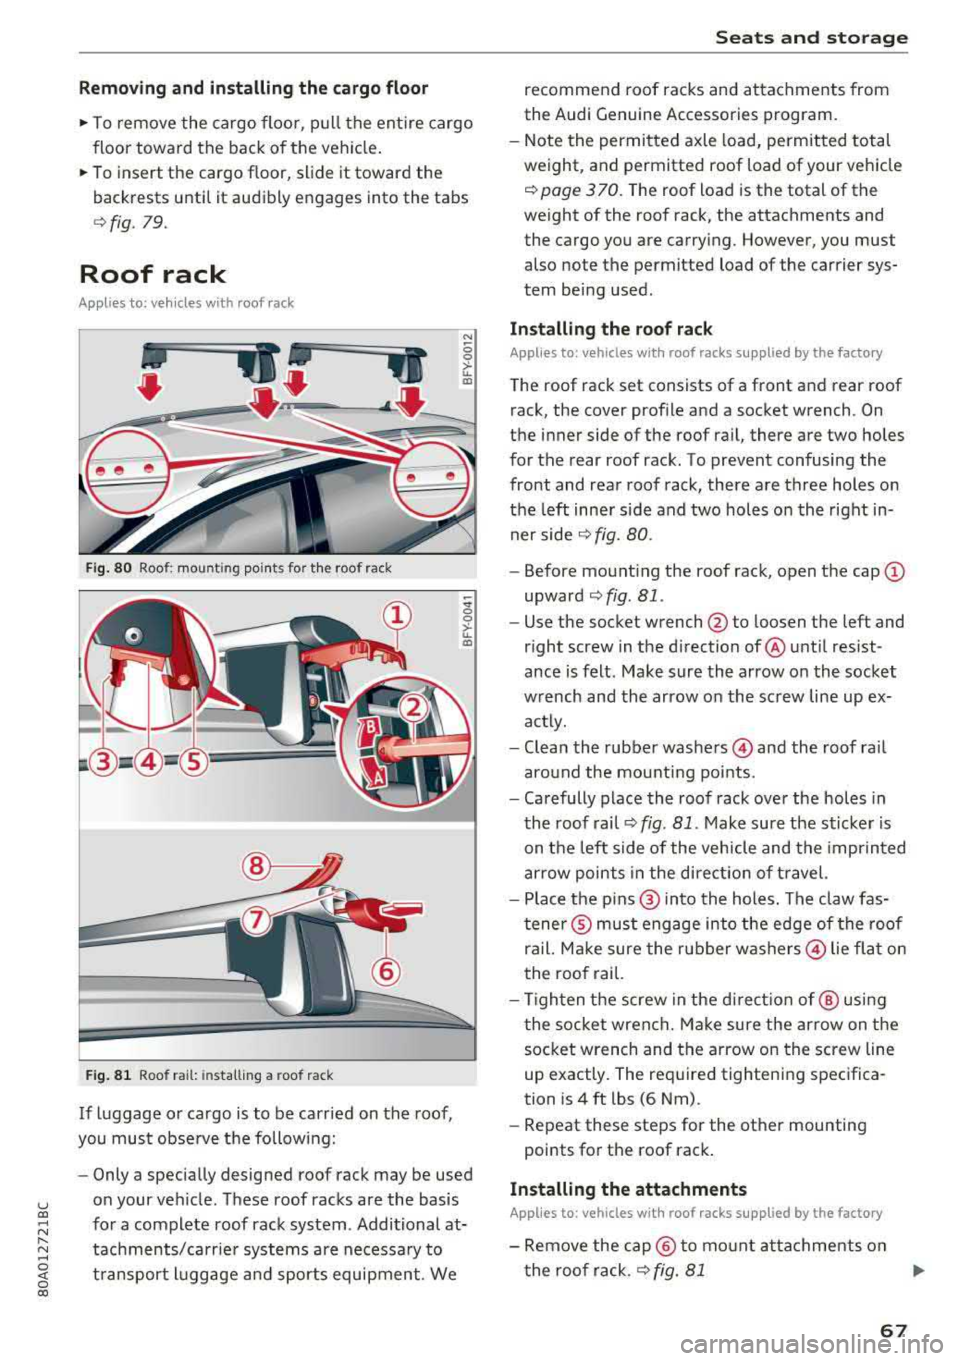
Fig. 80 Roo f: mount ing poi nts fo r th e ro of rack
F ig . 81 Roo f ra il: in sta lling a roo f ra ck
If luggage or cargo is to be carried on the roof ,
you must obse rve the following:
"' -0
0
>-u.. a,
-;!I; 0 >-u.. a,
- Only a specially designed roo f rack may be used
on your veh icle . These roof racks are the basis
for a complete roof rack system . Additional at
tachments/carrie r systems are necessary to
t ransport l uggage a nd sports equipment . We
S eats and storag e
recommend roof racks and attachme nts from
the Aud i G enu ine Accessories program .
- Note the permitted axle load, permitted total
weight , and permitted roof load of your veh icle
9 pag e 3 70 . The roof load is the total of the
weight of the roof rack, the attachments and
the cargo you are carrying . However, you must
also no te the permit ted load o f the carrier sys
tem being used .
Installing the ro of r ack
Applies to: vehicles with roof racks supplied by the factory
The roof rack set consists of a front and rear roof
rack, the cover profile and a socket wrench . On
the inner side of the roof rail, the re are two holes
for the rear roof rack. To prevent confusing the
front and rear roof rack, there a re three holes on
the left inner side and two holes on the right in
ner side
9 fig. 80 .
-Before mount ing the roof rack, open the cap (D
upward 9 fig . Bl .
- Use the socket wrench
@ to loo sen the left and
r ight screw in the d irection of @unt il res ist
ance is felt. Make sure the arrow on the socket
wrench and the arrow on the screw line up ex
actly.
- Clean the rubber
washers @ and the roof rai l
around the mounting points .
- Carefully place the roof rack over the holes in
the roof rail '=>
fig. 81 . Make sure the sticker is
on the left side of the vehicle and the imprinted
arrow points in the direct ion of travel.
- Place the p ins @ into the holes. The claw fas
tene r® must engage into the edge of the roof
ra il. Ma ke sure the rubber
washers @ lie flat on
the roof rai l.
- Tighten the screw in the directio n of @ using
t he socket wrench. Make sure the arrow on the
socket wrench and the arrow on the screw line
up exactly. The required tight ening specifica
tion is 4 ft lbs (6 Nm) .
- Repeat these steps for the other mounting
po ints for th e roof rack .
Installing the attachments
Applies to: vehicles with roof racks supplied by the factory
- Remove the cap@ to mo unt at tachments on
the roof rack .
9 fig. 81 ..,
67