seat AUDI Q7 2012 Owner´s Manual
[x] Cancel search | Manufacturer: AUDI, Model Year: 2012, Model line: Q7, Model: AUDI Q7 2012Pages: 342, PDF Size: 86.42 MB
Page 219 of 342
_& WARNING
Improper installation of child restraints
w ill increase the risk of injury and death in
a crash .
- Always follow the instructions prov ided
by the manufacturer of the ch ild re
st raint you intend to install in your Audi.
- Improper use of ch ild restraint anchors
(including tether anchors) can lead to in
jury in a co llision. The anchors are de
signed to withstand only those loads im
posed by correct ly fi tted ch ild restraints.
- Never mount two child restrai nt systems
on one LA TCH lowe r ancho r po int.
- Never attach two child restraint systems
to one tethe r strap or te ther anchorage.
- Never attach a tether st rap to a tie-down
hook in the luggage compartment.
- Never use ch ild restra int tether ancho
rages to secur e safety belts o r other
k inds of o ccupant rest ra ints.
- Never secure o r attach any l uggage or
other items to the LATCH lowe r ancho
rages or to t he tethe r ancho rs.
- If a tether o r othe r strap is used to at
ta ch a child rest raint to the front passen
ger seat, make sure that it is not so
t ight, th at it c auses the weigh t-sensing
mat to measure mo re weig ht than is ac
t u ally on the seat.
- T he heav ier we ig ht reg iste red can make
the Advanced Airbag System work as
though an ad ult were on the seat and de
ploy the Advanced Airbag w hen it must
be suppressed causing serious or even
fatal injury to the child .
- If you must install a rearward facing child safety seat on the front passenger
seat beca use of exceptional circ umstan
ces and the
PASSENGER AIR BAG OFF
light does not come on and stay on, im
med iate ly install the rear -facing child
sa fety seat in a rear seating posi tion and
have the a irbag sys tem inspec ted by you r
Audi dealer .
Child Safety 21 7
Installing the upper tether strap on the
anchorage
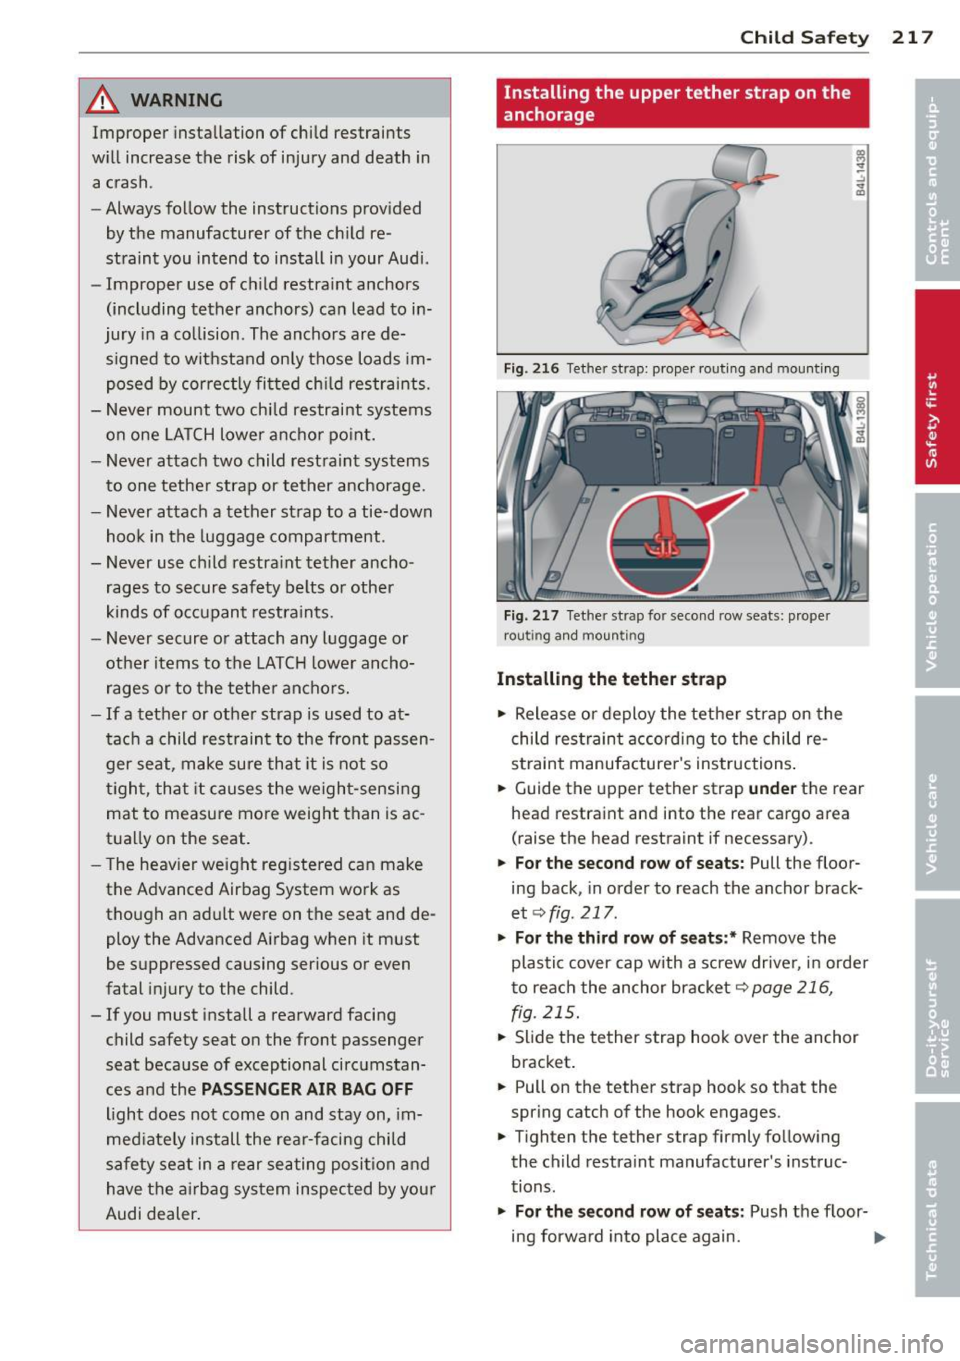
Fig . 21 6 Tet her s trap: prope r rout ing a nd m ounti ng
Fi g. 217 Tet her st rap fo r seco nd row se ats: prope r
rou ting and moun tin g
Installing the tether strap
... Release or deploy the tether strap on the
child res traint accord ing to the child re
st raint manufacture r's ins tructions .
... Guide the upper tether strap
und er the rear
head restraint and into the rear ca rgo area
(raise the head restraint if necessary) .
... Fo r the second row o f seats: Pull the floor
ing back, in order to reach the anchor brack
et
c:::> fig. 217 .
... For the third row of seats :* Remove the
plastic cover cap with a screw drive r, in orde r
t o reach the anchor bracket
c:::> page 216,
fig . 215.
... Slide the tether s trap hoo k over the anchor
bracket .
... Pull on the tether strap hook so that the
spring catch of the hook engages .
.,. Tighten the tether strap firmly fo llow ing
the child restra int manufacturer's instruc
tions.
.,. For the second row of seats: Push the floor
ing forward into place again.
Page 220 of 342
218 Child Safety
Releasing the tether strap
.. Loosen the tension following the child re
straint manufacturer's instructions.
.. Depress the spring catch on the hook and
release it from the anchorage.
.. For the second row of seats: Push the floor
ing forward into place again.
.. For the third row of seats:* Replace the
plastic cover cap .
(D Note
If you leave the child restraint with the
tether strap firmly installed for several
days, this could leave a mark on the up
holstery on the seat cushion and backrest
in the area where the tether strap was in
stalled. The upholstery would also be per
manently stretched around the tether
strap. This applies especially to leather
seats.
Using tether straps on rearward-facing
child restraints
Currently , few rear -facing child restraint sys
tems come with a tether . Please read and
heed the child restraint system manufactur
er's instructions carefully to determine how to
properly install the tether.
& WARNING
A child in a rearward-facing child safety
seat installed on the front passenger seat
will be seriously injured and can be killed if
the front airbag inflates - even with an Ad
vanced Airbag System.
- The inflating airbag will hit the child safety seat or infant carrier with great
force and will smash the child safety seat and child against the backrest, center
armrest, or door .
- A tight tether or other strap on a rear
ward-facing child restraint attached to
the front passenger seat can put too much pressure on the weight-mat in the
seat and register a heavier weight in the
Advanced Airbag System. The heavier weight
registered can make the system
work as though an adult were on the seat
and deploy the Advanced Airbag when it
must be suppressed causing serious or
even fatal injury to the child.
- If you must install a rearward facing
child safety seat on the front passenger
seat because of exceptional circumstan
ces and the
PASSENGER AIR BAG OFF
light does not come on and stay on, im
mediately install the rear-facing child
safety seat in a rear seating position and
have the airbag system inspected by your
Audi dealer.
Additional Information
Sources of information about child
restraints and their use
There are a number of sources of additional
information about child restraint selection, in
stallation and use:
NHTSA advises that the best child safety seat
is the one that fits your child and fits in your
vehicle, and that you will use correctly and
consistently.
Try before you buy!
U.S National Highway Traffic Safety Admin
istration
Tel.: 1-888-327-4236 (TIY: 1-800-424-9153)
http://www.nhtsa.gov
National SAFE KIDS Campaign
Tel.: (202) 662-0600
http://www.safekids .org
Safety BeltSafe U.S.A
Tel.: (800) 7 45 -SAFE (Eng Lish)
Tel.: (800) 747-SANO (Spanish)
http://www.carseat.org
Transport Canada Information Centre
Tel.: 1-800 -333-0371 or call
1-613-998-8616 if you are in the Ottawa area
http://www.tc.gc.ca/eng/roadsafety/
menu.htm
Audi Customer Relations
Tel.: (800) 822-2834
Page 228 of 342
226 Intelligent technology
can result in there being insufficient energy
avai lab le to start the engine .
I ntell igent energy management in your vehi
cle handles the distribution of electrical ener
gy . Starting abi lity is markedly improved and
the life of the battery is extended .
Basically , energy management consists of
battery diagnosis , idling current manage
ment
and dynamic energy management.
Battery diagnosis
Battery diagnosis continuously determines
the state of the battery. Sensors determine
battery volta ge, battery current and battery
temperature. This determines the current
state of charge and the power of the battery.
Idling current management
Idling current management reduces energy
consumption while the vehicle is stand ing.
With the ignition switched off, it contro ls the
energy supply to the various e lectrica l compo
nents. Data from battery diagnosis is consid
ered.
Depending on the battery's state of charge,
individua l consumers are gradually turned off
to prevent excessive discharge of the battery
and thus maintain starting capability.
Dynamic energy management
While the vehicle is being dr iven , dynamic en
e rg y management distributes the energy gen
erated according to the needs of the individu
a l components. It regulates consumption, so
that more ele ctrical energy is not being used
than is being generated and ensures an opti mal state of cha rge for the battery.
{D) Tips
- But even energy management cannot
negate the limits of physics. Consider
that the power and life of a battery are
limited .
- If starting ab ility is threatened, you are
i nformed by a warn ing
c> page 22 7,
Driver notification in the instrument
cluster display .
What you should know
The highest priority is given to maintaining
starting capability .
The battery is seve rely taxed in shor t-distance
driving, in city tra ffic and dur ing the cold time
of year . Abundant electrical energy is re
quired, but only a little is generated . It is also
critical if the engine is not running and e lectri
ca l components are turned on . In this in
stance energy is being consumed but none is
being generated.
It i s in precisely these situations that you will
notice energy management actively regulat
ing the distribution of energy.
Vehicle stands for an extended period
If you do not drive your vehicle over a period
of several days or weeks , e lectr ica l compo
nents are gradually cut back or sw itched off.
T his reduces energy consumption and main
ta ins start ing capability over a longer period .
Take into consideration that when you unlock
your vehicle , some conven ience functions ,
s uc h as the inte rior lights or the power seat
adjustment, may not be available. The con
venience functions will be available again
when you turn on the ignition and start the e ngine .
With the engine turned off
If you listen to the radio, for example, w ith
the engine turned off or use other MMI func
tions, the battery is being discharged .
If starting capability is jeopardized due to en
ergy consumption , the following warning ap
pears in the MMI display:
Please start engine, otherwise system will
switch off in 3 minutes .
The warning indicates that the system will be
turned off automatically after 3 minutes . If
you w ish to continue using the funct ions, you
have to sta rt the eng ine.
1111>
Page 229 of 342
With the engine running
Although electrical energy is generated when
the vehicle is being driven, the battery can be
come discharged. This happens most ly when
litt le energy is being generated and a great
deal consumed and the battery's state of
charge is not optimal.
To bring the energy balance back into equili
brium, consumers which require especia lly
large amounts of energy are temporarily cut
back or switched off. Heating systems in par
ticular requ ire a great deal of energy. If you
notice, for example, that the heated seats* or
the heated rear window are not heating, they h ave been temporar ily cut back or switched
off. These systems will be available again as
soon as the energy ba lance has been restored.
You will also notice that engine idle speed has
been increased slightly. This is normal and not
a cause for concern . By increasing engine idle
speed the additional energy required is gener
ated and the battery is charged .
Driver notification in the instrument
cluster display
If battery power drops into the range where it
can limit the ab ility of the engine to start, th is
is shown in the instrument cluster display
with the following driver message:
(•i Low battery charge: battery will be
charged while driving
This notification reminds you that the starting
capability of the engine may be limited. As
soon as you start driving again, the battery
will be recharged and the notification will go
out.
Driver notification appears and goes out
again
If th is driver notification appears after the ig
nition is turned on or while driving and it goes
out again after a wh ile, the battery has been
adequately recharged.
Intelligent technology 22 7
Driver notification appears and does not
go out again
If this driver notification appears after the ig
nition is turned on or whi le driving and does
not go out again, the battery's state of charge
is not in the optimal range. Starting ab ility is
restricted . Have the battery checked as soon
as possible by an authorized Aud i dealer or
qualified workshop.
•
•
Page 238 of 342
236 Trailer to wing
-The Gross Vehicle Weight Rating for yo ur
Audi Q7 would be exceeded if your vehi
cle is simultaneously equ ipped w ith Pan
oramic sl iding sunroof; th ird-row seat
ing; trailer towing equipment (factory or
dealer-installed), and running boards
(dea le r-installed) . UNDER NO C IRCUM
STANC ES MAY AL L SUC H ITE MS BE IN
STALLED ON THE SAM E VEH ICLE.
Operating instructions
MAX 6 .9 "
MAX175mm
E
"' E
"' .... a)
rt
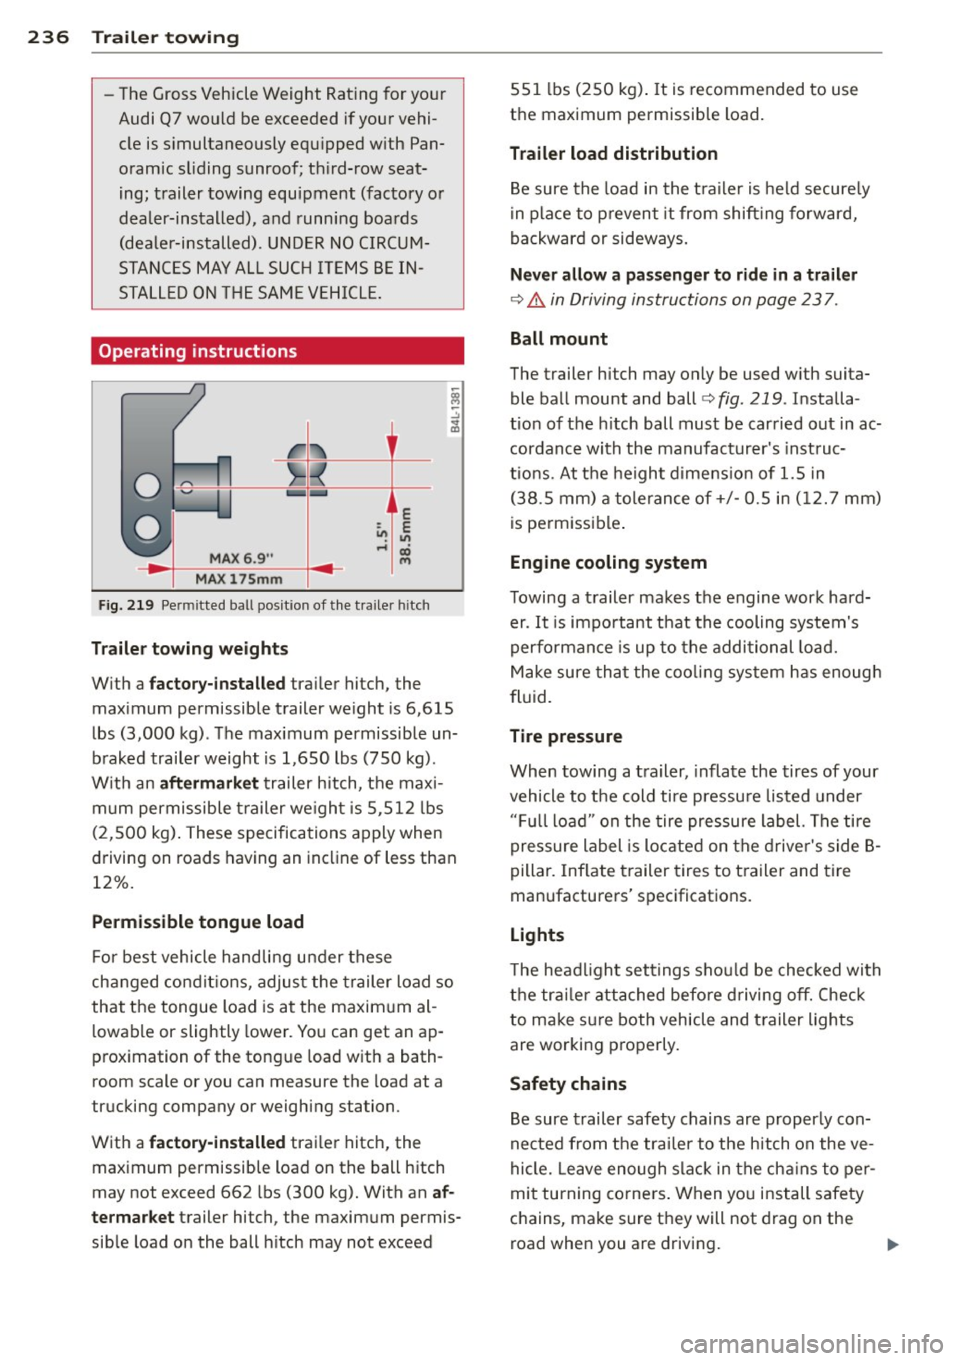
Fig. 219 Permi tted ball p osit ion of the t ra iler hitc h
Traile r to wing we ight s
W it h a fac tor y-ins talled trailer hitch, the
maximum permissible trailer we ight is 6 ,615
lbs (3,000 kg) . The maximum permissible un
braked trailer weight is 1,650 lbs (750 kg) .
W ith an aft er mar ket trailer hitch, the maxi
m um permissible trailer we ight is 5,512 lbs
(2,500 kg) . These specifica tions apply when
driving on roads having an incline of less than
12%.
Perm issible tongue load
F or best vehicle handli ng u nder these
changed condit ions, adjust the trailer load so
that the tongue load is at the maxim um al
l owable or slightly lower. Yo u can get an ap
proximation of the tongu e load with a bath
room scale o r you c an measu re the load at a
trucking company or weighing s ta tion.
With a factory-in stalled trailer hitch, the
maximum permissib le load on the ball hitch
may not exceed 662 lbs (300 kg). With an af
termarket trailer hi tch, the maximum permis
sib le load on the ball h itch may not exceed 551
lbs (250 kg) . It is recommended to use
the maximum permissible load.
Trailer load distribution
Be sure the load in the t ra iler is held secure ly
in place to prevent it from shift ing forward,
backward or sideways.
Nev er allow a pas seng er t o rid e in a trai ler
¢&. in Driving instructions on page 23 7.
Ball m ount
The trailer hi tch may only be used w ith suita
ble ball mount and ball¢
fig. 219 . Installa
tion of the h itch ball must be carried out in ac
cordance with the manufacturer's inst ruc
tions . At the height dimens ion of 1.5 in
(38 .5 mm) a tolerance of+/- 0.5 in ( 12. 7 mm)
is permissible .
Engine cooling system
Towing a trailer makes the engine work hard er . It is impo rtant that the cooling system's
performance is up to the additional load.
Make sure that the cooling system has enough
fluid.
T ire pressur e
When towing a trailer, inflate the tires of your
vehicle to the cold ti re pressu re listed under
" F u ll load" on the tire pressure label. The tire
pressure label is located on the drive r's side B
pillar . Inflate trailer tires to t railer and tire
manufacturers' specifications.
Lights
T he headlight settings should be checked wi th
t h e trai ler attached before d riving
off. Check
to make s ure both vehicle and trailer lights
are worki ng properly.
Safety chains
Be sure trailer safety chains are properly con
nected from the trai le r to the hitch on the ve
hicle. Leave enough slack in the ch ains to pe r
mit turning corners. When you install safety
chains, make sure they will not drag on the
road when you are driving. ..,.
Page 247 of 342
The MMI control console should be cleaned
with a brush first so that no dirt is trapped be
tween the buttons and the housing . We rec
ommend giv ing the MMI control console a fi
nal w ipe with a cloth mo istened with water
and d ish washing detergent.
Q;) Note
To prevent damage, make sure that no flu
id ever gets into the MMI control console .
Aluminum trim
Use only neutr al- pH products to remove spots
and depos its from alum inum surfaces.
C hr ome ca re products and alkaline cleaners
will attack alum in um s urfaces and can dam
age them ove r time.
& WARNING
Always read and heed a ll WARNINGS and
other information
¢ page 239 .
Fabrics and fabric coverings
Fabrics and fabric coverings (e .g. seats, door
trim panels, etc.) should be cleaned at regu lar
intervals with a vacuum cleaner . Th is removes
surface dirt particles which could become em bedded in the fabr ic through use. Steam
cleaners should not be used, because the
steam tends to push the dirt deeper into the
fabric and lock it there.
Norm al cleaning
Generally, we recommend using a soft sponge
or a lint-free microfiber cloth to the clean fab
ric. Brushes should only be used for carpets
a nd floor mats, since other fabric surfaces
could be harmed by b rushes.
Normal surface sta ins can be cleaned using a
commercia lly available foam cleaner . Spread
the foam on the surface of the fab ric with a
soft sponge and work it in gently. Do not sat u
r ate the fabric. Then pat the foam dry using
absorbent, dry cloths (e .g. microfiber cloth)
and vacuum it after it has dried comp lete ly.
Cleaning and protec tion 245
Cl ean ing sta in s
Stains caused by beverages (e.g . coffee, fruit
juice, etc.) can be treated with a mild deter
gent solution. Apply the detergent sol ution
with a sponge. In the case of stubborn stains, a detergent paste can be applied directly to
the s tain and worked into the fabric . After
wards, use copious amounts of clean water to
remove the rema ining detergent . Apply the
water with a damp cloth or sponge and pat
the fabric dry with an abso rbent, dry cloth.
Stains from chocolate or makeup should have detergent paste (e .g . ox -gall soap) rubbed in
to them . Afterwards, remove the soap with
water (damp sponge).
Alcohol can be used to treat stains from
grease, o il, lipstick or a ballpoint pen . Melted
grease or dye must be patted off using ab
sorbent mater ial. It may be necessa ry to re
treat the areas with detergent paste and wa
te r.
In the case of general soiling of the uphols
tery and cover material, we recommend hir ing
a specia list that has the eq uipment to clean
the seat cove rs and othe r fabr ic surfaces by
shampooing and spray extraction.
A WARNING
A lways read and heed all WARNINGS and
the information
¢ page 239.
(D Tips
Open Ve lcro fas teners on yo ur cl othing can
damage the seat cover . Please make sure
that Ve lcro fasteners are closed .
Plastic parts and instrument panel
Always use a clean cloth moistened in clear
water to clean these areas. For persistent d irt
use an Aud i approved
s olvent-fre e plastic
clea ner/protectant . .,.. •
•
Page 248 of 342
24 6 Cl eaning and protec tio n
8_ WARNING
So lvents can change the properties of
some plastics and make it harder for the
airbag to deploy .
-
-Never clean the instrument panel or the
surface of airbag modules with cleaning
products that contain solvents .
- Products containing solvents w ill make
the surface of th is part porous.
- Serious injur ies can result if plastic parts
come loose when the airbag is deployed.
- Always read and heed all WARNINGS and
other information
¢ page 239.
(D Note
Cleaning agents containing solvents will
attack the mater ial and can change the
way it behaves.
Natural leather
App lies to vehicles: with natura l leather
Audi makes great efforts to maintain the
properties, natural look and feel of interior
leather.
Gen eral
We offer many different types of leather on
our vehicles. Most are different types of nappa
leather, which has a smooth surface and
comes in various colors.
The intensity of the color determines the visu al characteristics and appearance . If the sur
face of the leather has a typical natural look,
then the leather is a nappa leather that has
been left in a relatively natural condition. This
leather offers particularly good comfort and
breathes well. F ine veins, closed grains, insect
b ites, ski n folds , and subtle var iations in color
remain visible. These characte ristics demon
strate that the mater ial is natural.
Natural nappa leather is not covered by a col
or finish.
It is therefore more sensitive to soil
ing and wear, which is something you need to
consider if chi ld ren, anima ls or othe r factors
might prove to be particular ly hard on the
leather. By cont
rast, leather types that are covered by
a colored finish layer are more durable . This
has a positive effect on the leather's resist
ance to wear and soiling in dai ly use. On the
other hand, the typical characteristics of natu
ral leather are barely or not apparent . Howev
er, th is does not mean that the leathe r itself
is of inferior quality .
Care and h andling
Because of the exclusive nature of the types of
leather that Aud i uses and their unique prop
erties (such as sensit ivity to oils, grease, soil
ing, etc.), you will need to be somewhat care
ful with these leathers, and a ce rtain type of
ca re is requ ired . For example , dark clothing
mater ials can disco lor leathe r seats (especia l
ly if such clothing is damp and was not dyed
correct ly). Dust and dirt particles in pores,
folds, and seams can have an abrasive effect and can damage the leather surface as we ll as
weaken seams.
The leather should be cleaned regularly as
needed . After having been used for a relatively
l ong time, your leather seats will acqu ire a
rich aged fin ish. This is a characteristic of nat
ural leather and a sign of true quality.
In order to maintain the value of this natural
product over the life of your vehicle, you
should follow the recommendat ions below:
(D Note
- To keep your leather from b leaching out,
do not allow it to be exposed to bright
sunlight for long periods of time. If you
have to leave the veh icle parked outside
for long per iods, cover the leather to
protect it from direct exposure to sun
light.
- Sharp objects on cloth ing, such as zip
pers, rivets or sharp pieces on belts can
leave permanent s cratches or s crape
ma rks on the su rface of the leather.
(D Tips
- After each time you clean the leather and
at regular intervals, use a leathe r
1111>
Page 249 of 342
preservative creme that contains UV
blockers and that works into the leather .
This creme w ill nourish and mo istur ize
the leather, he lp ing it to breathe and
stay supple. It also helps to build up a
protective coating on the surface.
- Clean the leather every 2 - 3 months,
and clean any areas that get soiled.
- Remove fresh marks made by ballpoint pens, ink, lipst ick, shoe polish, etc. as
soon as possib le.
- Preserve the color of the leather as need
ed by using a special colored leather care
creme to touch up areas of uneven color .
Cleaning and caring for leather
upholstery and trim
Applies to vehicles: with natural leather
Natural leather requires special care and at
tention.
Norm al cleaning
.,. Clean soiled areas w ith a slightly mo istened
cotton or woolen cloth.
Mor e stub born dir t
.,. More stubborn dirt can be removed using a
cloth saturated with a m ild soap so lution (2
tablespoons m ild liquid soap) .
.,. Never allow the soap solution to saturate
the leather, and make certa in that no water
soaks into the seams .
.,. Wipe off the soap solut ion with a soft, dry
cl oth.
Cleaning spots
.,. Remove fresh water -b ased spots (such as
coffee, tea, ju ices, blood) w ith an absorbent
cloth or paper towel.
.,. Remove fresh
gr eas e or oil -ba sed spot s
(such as b utter, mayon naise , chocolate) wi th
an absorbe nt cloth or paper towe l, or use
the cleaner from the leat her ca re kit i f the
spot has not yet penetrated into the s urface
of the leather .
.,. Use an oil/grease disso lv ing spray, if
oil /
grease spots h ave d ried on.
Cleaning and protec tion 247
.,. Remove specific k inds of spots (ba llpoint
pe n, fe lt marker, fingernai l polish, water
based pa int, shoe po lish, etc .) with a spot
remover specifically formu lated for leather.
L e ather care
.,. Every half year use an approved leather care
product (available from your authorized Au
di dea ler) to care for the leather .
.,. App ly the product very sparingly.
.,. Wipe it off with a damp cloth.
If you have any q uestions about cleaning and
caring for the leather in yo ur vehicle, it is best
to contact your a uthorized Audi dea ler, who
will be g lad to help you and tell you about our
full range of leather care products, such as :
- Leather cleaning and care kit
- Creams to ca re fo r colored leather
- Spot removers for ballpoin t pens, shoe pol-
ish, etc.
- Oil/grease d issolving spr ay
- New and upcom ing products .
.&_ WARNING
Always read and heed all WARN INGS and
other in formation
r::!)page 239 .
(D Note
- Never use chem ica l so lvents (e .g . lighte r
fluid, tu rpe nti ne), waxes, s hoe polish o r
simi la r prod ucts on the lea ther surfaces
i n yo ur Audi .
- T o avoid damage, have stubbo rn sta ins
remove d by a comme rci al clean ing spe
c ialist .
Cleaning Alcantara ® (synthetic suede)
Applies to vehicles: with Alcantara upholstery
Removing du st and dirt
.,. Mois ten a cloth, squeeze out excess water
and wipe down the seat surfaces .
Removing stains
.,. Moisten a cloth with lukewa rm wate r o r
w ith di luted
ethyl (rubbing ) alc ohol.
•
•
Page 272 of 342
2 70 Chec king and filling
should only be disconnected from the vehicle
e lectrical system when absolutely necessary
for repairs.
Vehicles not driven for long periods
If you do not drive your vehicle over a pe riod
of several days or weeks, electrical compo
nents are gradually cut back or switched off.
This reduces energy consumption and main
tains starting capab ility over a longer period
c;, page225.
Take into consideration that when you un lock
your vehicle, some convenience functions, such as the interior lights or the power seat
adjustment, may not be available. The con
venience functions will be available again
when you turn on the ignition and start the
engine .
Winter operation
During the winter months, battery capacity
tends to decrease as temperatures drop . This
is because more power is also consumed while
starting, and the headlights, rear window de
fogger, etc., are used more often .
Avoid unnecessary power consumption, par
ticularly in city traffic or when traveling only
short d istances . Let your authorized Audi
dealer check the capacity of the vehicle bat
tery before w inte r sets in
¢ page 271. A well
cha rged battery w ill not only prevent starting
p rob lems when the weather is cold, but will
a lso last longer.
(D Tips
If your vehicle is left standing for several
weeks at extremely low temperatures, the
vehicle battery should be removed and
stored where it will not freeze . This wi ll
prevent it from being damaged and having
to be replaced.
Working on the battery
Be especially careful when working on or near
the battery.
The battery is located under the driver 's seat.
Before you check anyth ing under the driver 's
seat,
read and heed all WARNINGS c:;, _&.
Always heed the safety warnings, when work
ing on the vehicle battery or the vehicle elec
trical system to prevent injury.
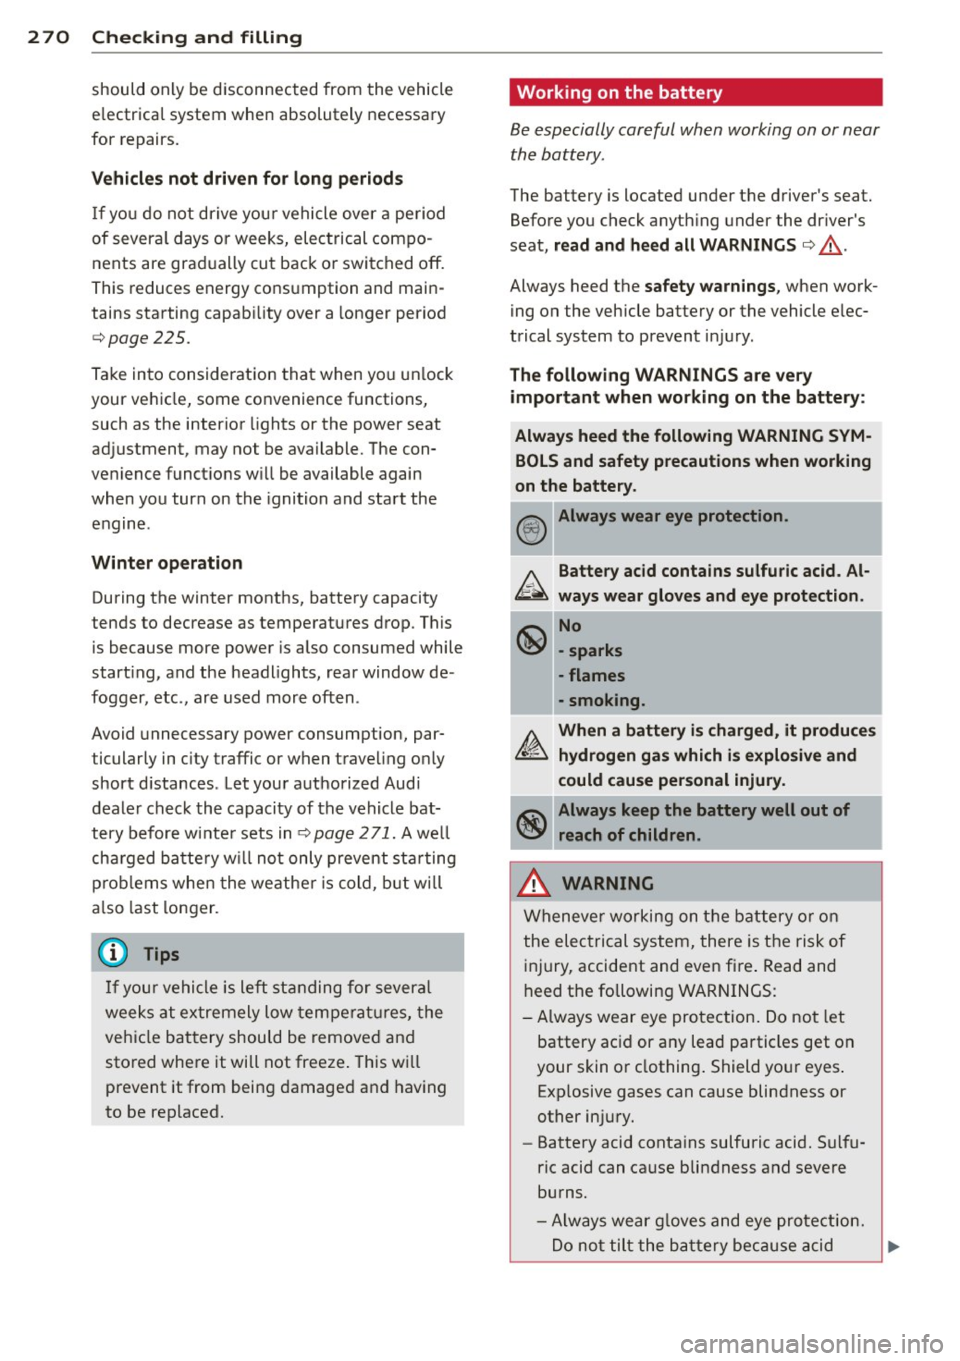
The following WARNINGS are very
important when working on the battery:
Always heed the following WARNING SYM BOLS and safety precautions when working
on the battery.
@!) Always wear eye protection .
b.. Battery acid contains sulfuric acid . Al
~ ways wear gloves and eye protection.
~ No
\!:51 -sparks
- flames
- smoking.
A. When a battery is charged, it produces
~ hydrogen gas which is explosive and
could cause personal injury.
~ Always keep the battery well out of
~ reach of children.
,&. WARNING
Whenever working on the battery or on
the electrical system, there is the risk of
injury, accident and even fire . Read and
heed the following WARNINGS:
- Always wear eye protection. Do not let
battery ac id or any lead particles get on
your skin or clothing. Shield your eyes .
Exp losive gases can cause blindness or
other injury.
- Battery acid contains sulfuric acid. Sulfu
ric acid can cause blindness and severe
burns.
- Always wear g loves and eye protection.
-
Do not tilt the battery because acid ~
Page 278 of 342
2 76 Tires and wheels
M aximum loaded vehicle weight
means t he sum of:
(a) Curb weight
(b) Accessory weight
( c ) Vehicle capacity we ight, and
(d) P rod uction options weight
Maximum (permissible) inflation pressure
means t he max imum co ld inflation pressu re
to which a tire may be in flate d. Also called
"maxim um inflation p ress ure."
Normal occupant weight
means 150 lbs. (68 kilog rams) times the
nu mbe r of o ccupants seated in t he vehicle up
to the tota l sea ting capaci ty of yo ur vehicle .
Occupant distribution means dist ribution of occupants in a veh icle .
Outer diameter means t he overa ll diameter of a n inf lated new
tire.
Overall width
means t he linear dis tan ce between the ex ter i
ors o f th e sidewalls of an inflated tire, in cl ud
ing e levations due to labeling, decorations, or
p rotective bands o r ribs.
Ply
mea ns a laye r of r ubber-coate d parall el c ords.
Production options weight
means t he comb ined we ight of those installed
regular produc tion options weigh ing ove r 5
l bs . (2 .3 kg) in excess of t hose standard items
which they repla ce, no t previously considered
in cur b weight o r acc essory weig ht, incl uding
h eavy duty brakes, r ide leve le rs, roof ra ck,
h eavy duty ba ttery, a nd specia l trim .
Radial ply tire
means a pneumatic t ire in which the p ly co rds
that ex tend to the beads are laid a t sub stan
ti ally 9 0 degrees to the ce nt erline o f the
tread . Recommended inflation pressure
see
~
page 2 75, C old tire infla tion pressure.
Reinforced tire
means a t ire design to operate at h igher loads
and at h igher inflation pressures than t he cor
r espondi ng stan da rd tire. Reinforced tires
may be identifie d as "X L", "xl" , "EX TRA LOAD",
o r "RF " on t he sidewal l.
Rim
means a metal su ppo rt for a tire or a t ire and
tube assembly upon which the tire beads are
seated.
Rim diameter
means nom inal d iameter of the bead seat.
If
you change your wheel s ize, you wi ll have to
purchase new tires to match th e new r im di
ameter .
Rim size designation
means r im diameter and width.
Rim width
means nom inal d ista nce between rim flanges .
Sidewall
means tha t po rtion of a t ire betw ee n t he
t read and bead.
Speed rating (letter code)
means the speed at which a tire is designed to
be driven for extended periods of time. The
r a ti ngs range from 93 mph ( 150 km/h) to
186 mph (298 km/h)
~ page 286 . You may
not fi nd this information o n all ti res because
it is no t re quir ed by law.
T he speed rating letter code, wh ere applica
ble , is molde d on the tire sidewall a nd indi
c ates the max imum pe rmissibl e road speeds
~ A in Winter tire s on page 290 .
Tire pressure monitoring system
mea ns a system that detects when o ne or
more of a ve hicle 's tires are unde rinf lated an d
i lluminat es a low tir e pr essure wa rning t ell-
tal e. ..,_