ECO mode AUDI Q7 2012 Owner´s Manual
[x] Cancel search | Manufacturer: AUDI, Model Year: 2012, Model line: Q7, Model: AUDI Q7 2012Pages: 342, PDF Size: 86.42 MB
Page 72 of 342

70 Clear vis ion
The digital compass only works with the igni
tion turned on. The directions are displayed as
in itia ls:
N (North), NE (Northeast), E (East),
S E (Southeast), S (South), SW (Southwest),
W (West), NW (Northwest).
(D Tips
To avo id inaccurate directions, do not al
low any remote controls, electrical sys
tems, or metal parts close to t he mirror.
Setting the magnetic deflection zone
App lies to vehicles: with digital compass
The correct magnetic deflection zone must be
set in order to display the directions correctly.
©
F ig . 73 Nort h Amer ica: magnet ic deflect ion zo ne
bou nda ries
.. Hold the®~ page 69, fig. 72 button down
u nti l the number of the set magnetic deflec
t ion zone appears on the inter io r r ear view
mirror .
.. Adjust the magnetic deflection zone by re
peatedly pressing on the ® button. The set
mode automatically deactivates after a few
seconds.
Calibrating the compass
App lies to vehicles : w it h dig ita l compass
The compass has to be recalibrated if the dis
play is wrong or inaccurate.
.. Hold the ® button down unt il the letter C
is displayed on the inter ior rear view mirror .
.. Drive in a circle at a speed of about 5 mph
(10 km/h) until a d irect ion is shown on the
interio r rear view mirro r.
8, WARNING
The digital compass is to be used as a di
r ectiona l aid only . Even though you may
want to look at i t while you are driving, you
must still pay atte ntion to traffic, road a nd
weather conditions as well as other possi b le hazards.
-
Page 85 of 342
Lo adin g
"' Fo ld the center seatback forward
r=> page 79.
"' Remove the sack from the luggage com
partment and unfold it.
"' Place the empty sack over the lowered seat
back so that the end wi th the z ip fastener is
i n the luggage compartment.
"' Load objects from the luggage compart
ment into the sk i sack
r=> &, .
Securin g
"' Insert the ski sack strap @ r=> fig. 94 into
the center seat belt buckle @.
"' Pull the securing strap t ight by the free end
of the belt @.
"' Vehicles with 6 seats* : The ski sack has two
straps with hooks on the unders ide . Hang
the hooks into the luggage compartment by
the rear fastening eyes and pull the secur ing
strap tight by the free end @.
Storage
"' Re lease the securing strap for the sack .
"' Pull the sack to the rear over the folded
down seatback.
"' Raise the seatback unti l it is securely latch
ed .
"' Fo ld up the empty sack.
"' Stow the ski sack in the luggage compart
ment so that it cannot slide around.
_&. WARNING
-
- The ski sack is intended only for the
transportation of skis, snowboards and
other light objects. To reduce the risk of
serious persona l injury never transport
heavy or po inted ob jects in the ski sack .
- When bra king rapidly o r during an acci
dent the load cou ld be displaced and
ca use inj ury to occupants.
- Sharp edges on the load must be cove red
for protect ion. Always fas ten the belt
t igh tly around the sack and its contents
r=> fig. 94. S
eat s an d sto rage 8 3
(D Tips
Never stow the ski sack away if it's wet or
damp (for examp le, snow me lting from
skis). Let it dry complete ly before you stow
i t away.
Roof rack
First things first
A roof rack can be fitted to carry additional
luggage on the roof.
"' Always read and follow the instructions pro
vided by the roof rack manufacturer when the roof rack system must be installed .
If you are transporting luggage or other ob
jects on the roof, p lease note the following:
- Your vehicle has spec ially designed aerody-
namic roof rails. Only install a roof rack spe
cifically designed for your model. Contact
the nearest authorized Aud i dealer fo r infor
mation on approved modu lar roof racks for
your vehicle.
- These approved roof racks are the bas is for a
complete roof rack system. Additional at
t achments for the basic roof rack a re neces
sary to safely transpo rt luggage, bicycles,
surf boards, skis or sma ll boats. All necessa
ry hardware for these systems is available at
your authorized Audi dealer.
- We recommend that you keep the installa
tion instructions for your roof rack system
together with your Owner's literature in the
veh icle.
When sh ould the roof rac k be remov ed?
- Before going through an automatic car wash
(it is best to ask the car wash operator for
advice) .
- When not in use, to reduce fuel cons ump
tion, wind noise and to guard against theft.
_&. WARNING
- Use of an unapproved roof rack or incor
rect mounting of an approved roof rack
Page 90 of 342
88 Seats and storage
-Any articles of clothing that you have
hung up must not interfere with the driv
er's view. The coat hooks are designed
only for lightweight clothing. Never hang any clothing with hard, pointed or heavy
objects in the pockets on the coat hooks .
Dur ing sudden braking or in an a ccident -
especi ally if the airbag is deployed -
these objects could injure a ny passe n
gers inside the vehicle.
Glove compartment
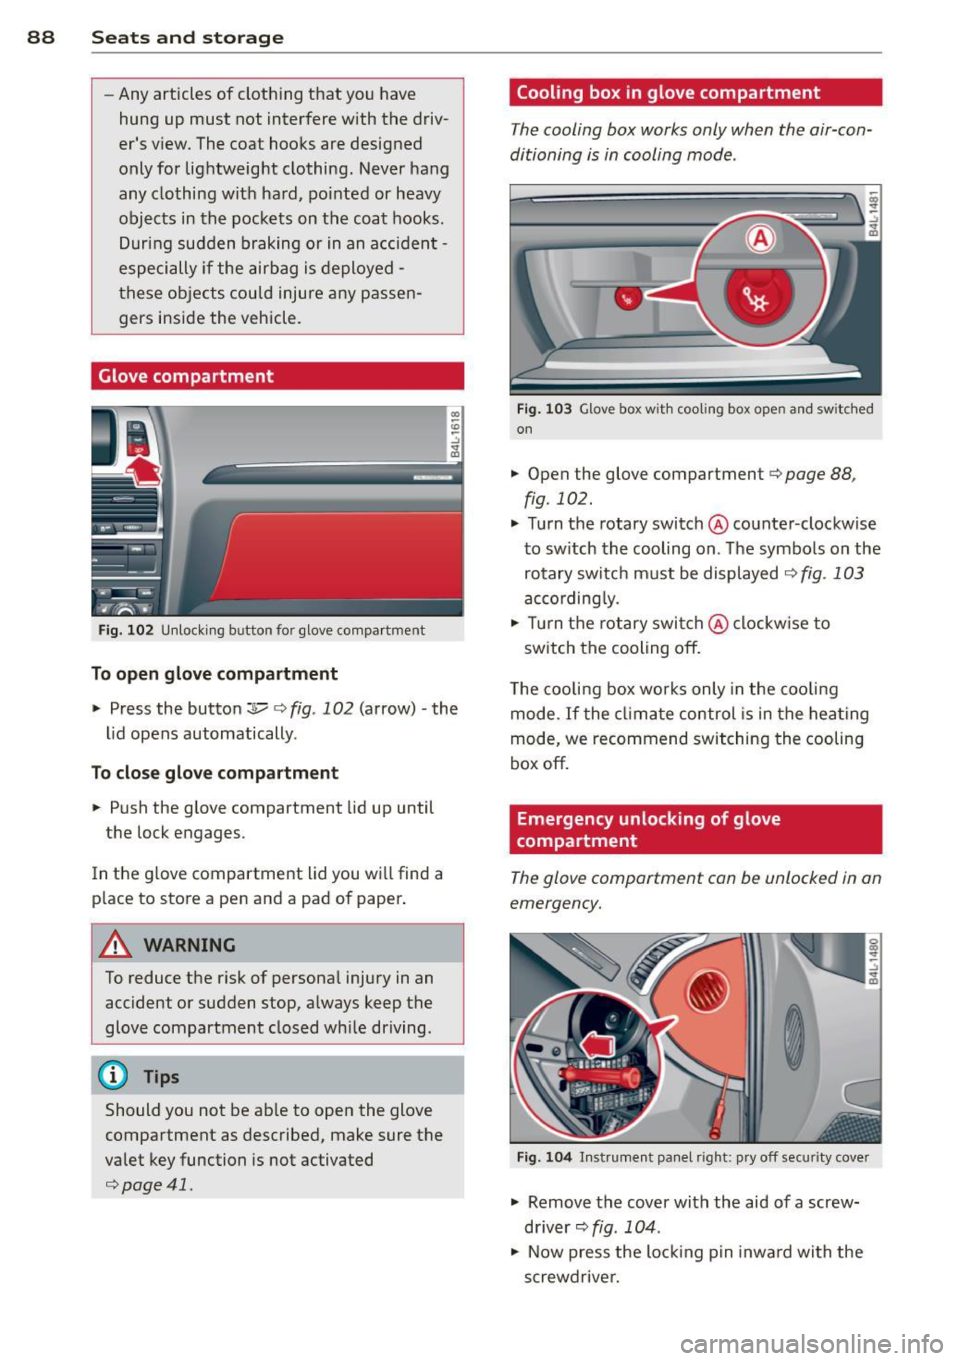
F ig . 102 U nlocki ng button for glove compa rtment
To open glove compartment
• Press the button :::!l.....-¢ fig . 102 (arrow) -the
lid opens automatically .
To close glove compartment
• Push the glove compartment lid up until
the lock engages.
In the g love compartment lid you wi ll find a
p lace to store a pen and a pad of paper .
A WARNING
To reduce the risk of personal injury in an
accident or sudden stop, a lways keep the
glove compartment closed wh ile driving.
@ Tips
Should you not be ab le to open the glove
compartment as described, make sure the
valet key function is not activated
¢page 41.
Cooling box in glove compartment
The cooling box works only when the air-con
ditioning is in cooling mode.
F ig . 1 03 Glove box with coo ling box open and sw itched
on
• Open the glove compartment¢ page 88,
fig. 102.
• Turn the rotary switch @counter-clockwise
to sw itch the cooling on. The symbo ls on the
rotary switch must be displayed
¢ fig . 103
according ly.
• Tur n the rotary swi tch@ clockw ise to
switch the cooling off.
T he cooling box wor ks only in the coo ling
mode. If the cl imate control is in the hea ting
mode, we recommend switching the cooling
box off.
Emergency unlocking of glove
compartment
The glove compartment can be unlocked in an
emergency.
F ig. 10 4 In strument panel right: pry off secur it y cover
• Remove the cover with the aid of a screw
driver~
fig . 104 .
• Now press the lo cking p in inwa rd with the
screwdrive r.
Page 93 of 342
Warm and cold Climate control
Description
The air conditioner is fully automatic and is
designed to maintain a comfortable and uni
form climate inside the vehicle .
We recommend the following settings:
~ Set the temperature to 72 °F (+22 °C).
~ Press the !AUTO I button.
With this setting, you attain maximum com
fort in the least amount of time. Change this
setting, as desired, to meet your personal
needs.
The climate controls are a combination of
heating, ventilation and cooling systems,
which automatica lly reduce humidity and cool
the air inside your vehicle.
The air temperature, air flow and air distribu
tion are automatica lly regu lated to achieve
and maintain the desired passenger compart
ment temperature as quickly as possible.
The system automatically compensates for
changes in outside temperature and for the
intensity of the sunlight entering the ve hicle.
We recommend you use the
Automatic mode
¢ page 94 for year-round comfort.
Please note the following:
Turn on the air conditioner to reduce humidity
in the vehicle. This also prevents the windows
from fogging up .
When the outside temperature is high and the
air is very hum id,
condensation from the
evaporator may drip under the vehicle. This is
normal and does not indicate a leak.
If the outside temperature is low, the fan nor
mally only switches to a h igher speed once
the engine coolant has warmed up sufficient
l y.
The a ir conditioner temporarily switches off
when you drive off from a standstill using full
throttle to save engine power.
Warm and cold 91
The compressor also switches off if the cool
ant temperature is too high , so that the en
gine can be adequately cooled under extreme
loads .
Air pollutants filter
The air pollutants filter (a combined particle
filter and activated charcoa l filter) reduces or
prevents outside air pollution (dust, or pollen)
from entering the vehicle. The air is a lso fil
tered in a ir recirculation mode.
The air pollutants filter must be changed at
the interva ls specified in your Warranty
&
Maintenance booklet, so that the a ir cond i
tioner can properly work.
If you drive your vehicle in an area with high
air pollution, the filter may need to be
changed more frequently than specified in
your Audi Warranty
& Maintenance booklet. If
in doubt, ask your authorized Audi Serv ice Ad
visor for advice .
Key coded settings
The air conditioner settings selected are auto
matically stored and assigned to the key be ing
used. When the vehicle is started, the air con
ditioner automa tically selects the settings as
s igned to that key . This way every driver w ill
mainta in his/her own personal settings and
does not have to reset them manually.
If a different dr iver uses your key and changes
the air cond itioner settings, the latest adjust
ments will erase and replace the sett ings you
have stored.
Energy management
To prevent the battery from being discharged
and to restore the balance of energy, compo
nents which require large amounts of energy
are temporarily cut back or switched off
¢ page 225. Heat ing systems in particular re
quire a great deal of ene rgy. If you notice , fo r
example, that the seat* or rear window hea t
ing is not heating, they have been temporarily
cut back or switched off by
energy manage
ment .
These systems are availab le aga in as
soon as the energy balance has been restored . .,.
Page 96 of 342
94 Warm and cold
cannot be lower than the outside tempera
ture. The air wi ll not be cooled or
dehumid ified. The windows can fog up .
Automatic mode~
The automatic mode is the standard setting
for all seasons .
.,. Se lect temperature between 60 °F ( +16 °C)
and 84 °F (+28 °C) .
.,. Press the
!AU TO I button .
Automatic operation ens ures constant tem
peratures in the inter ior and dehumidifies the
air inside the vehicle . Air temperature, volume
and distribution are controlled automatically
to reach or maintain the desired interior tem perature as quickly as possible. Fluctuations
in exterior temperature and the effects of
temperature from the pos ition of the sun are
compensated for automat ically .
This operat ing mode works only in the adjust
ab le temperature range, from 60 °F ( +16 °C)
to
84 °F (+28 °C) . If a temperature below 60
°F (+16 °C) is selected, LO appears in the d is
p lay. At temperatures above 84 °F ( +28 °C) ,
HI is disp layed. At both extreme settings, cl i
mate control r uns continuously at maximum
cooling or heat ing power . There is no temper
ature reg ulation.
Setting the temperature
Separate temperatures con be selected for the driver's and front passenger's side.
.,. Ro tate the reg ulator to the left to reduce
the temperature, or to the right to increase
the temperature.
The selected temperature appea rs on the cli
mate con trol d isp lay. The tempe ratu re set ting
will also appear for a few seconds in the MMI
display . Fan
~
The automatically preset fan speed con be re
duced or increased .
.,. Press the~ button .
.,. Ro tate the regulator to t he des ired fan
speed.
The climate control system automatically reg
ulates fan speed depending on inter ior tem
perature. You can adjust the volume of air pro
duced by the fa n to your own requirements .
The fan speed setting will appear for a few
seconds in the MMI display.
(D Tips
It is possible that the fan speed may
change automatica lly. This occurs to en
sure that the des ired temperature setting
i s reached as quickly as possible .
Air distribution ~
The automatically controlled air dis tribution
con be changed manually.
.,. Press the~ button.
.,. Rotate the regulator to the des ired setting.
You can adjust the air distribut ion so that air
flows from specific vents . In position
:,J air
flows on ly to the windows, in posit ion
:0, it
flows to the driver or passenger, and in pos i
t ion~ it flows to the footwell. The re a re ad
ditional comb inations ava ilab le to adjust air
dist ribution as needed .
To regulate air d istribution a utomat ically,
switch to
IAUTOI.
The air distribution setting wi ll appea r fo r a
few seconds in the MMI display .
Defrosting ~
The windshield and side windows ore rapidly
defrosted or defogged .
.,. Press the~ button to turn on the defrost
er .
Page 97 of 342
~ Press the~ button again, or press the
IAUTOI button to turn it off.
Temperature is controlled automatically. The
maximum amount of air flows main ly from
the vents below the windshield.
To defog the rear side windows, the air ve nts
i n the door pillars shou ld be open and d irect
ed at the windows.
Manual air recirculation ~
Air recirculation prevents exhaust fumes or
other pollution from entering the vehicle.
Tu rning on air r ecircul ation
~ Press the 1.,..,1 button ~ .&
Tu rning off air recircul ation
~ Press the~ button again, or
~ press the IAUTO I button, or
~ press the~ button.
In the air recirculation mode, the air in the
passenger compartment is recirculated and
filtered to prevent exhaust fumes and other
pollution from entering the vehicle . We rec
ommend that you use the manual air recircu lation under the following conditions:
- when driving through tunnels
- in a traffic jam.
A WARNING
Do not use the air recirculation mode for
extended per iods of t ime. The windows
could fog up since no fresh a ir can enter
the vehicle.
If the windows fog up, press
the air recirculation button again immed i-
,
Warm and c old 95
ately to switch off the air recirculation
f u nction or select defrost.
Rear window defogger~
The rear window defogger clears the rear win
dow of condensation .
~ Press the QW button to turn the rear window
defogger on and
off.
T he rear window defogger wo rks only when
the engine is runn ing. The light in the sw itch
will i lluminate when the defogger is on.
T he rear window defogger w ill sw itch
off au
tomat ica lly after a short t ime. The t ime the
rear w indow defogger remains on w ill vary de
pending on the outside temperature.
At very low outs ide temperatures, the rear
window defogger can be sw itched on continu
o usly by pushing the
QW button for more than
2 seconds . This remains stored until the igni
tion is switched
off.
A rea r w indow defogger that was switched on
also remains stored for 15 m inu tes after the
ignition is switched
off . If the engine is re
started within these 15 min utes, the rear win
dow defogger is a lso activated, depending on
outside temperature. With a vehicle that is
parked for a short time, the rear window de
fogger does not need to be manually activat ed again.
@ For the sake of the environment
Turn the defogger off when the rear win
dow is clear. When you save electric ity, you
save fuel.
Page 99 of 342

@ Tips
If the climate control system is operating
in cooling mode, a ir flows primarily from
the outlets in the center conso le and in the
door pillars. To achieve adequate cooling,
you should never close the outlets com
pletely .
Using climate control economically
Using the climate controls prudently can help
save fuel.
When you use the air conditioner, engine pow
er is reduced and fuel consumption increases.
To save fuel, you should use the air condition
e r only when necessary. Also please note the
following points :
.,. To save fuel, turn off cooling mode by press
ing the
I AC ! button (indicator light goes
out) .
.,. In add ition, if you open the window or the
Panoramic sliding sunroof* while driving,
turn off cooling mode by p ress ing the
IACI
button (indicator light goes out).
.,. If the vehicle is extremely hot due to the
heat of the sun, briefly open doors and win
dows.
@ For the sake of the environment
By reducing the amount of fue l you use,
you also reduce the amount of poll utants
emitted into the air. W
arm and cold 9 7
Rear Air Conditioning
Rear air conditioning - controls
Applies to vehicles: with four-zone automatic comfort air
conditio nin g
This overview is to assist you in familiarizing
yourself with the rear air conditioning con
trols.
lll ... :;
- --- ------------....... ~
Fig . 113 Rea r air conditioning controls
The left display indicates the temperature se
lected for the rear left passenger, the right
display indicates the temperature selected for
the rear right passenger . If the settings for
seat heating *, air distribution or the air condi
tioning fan are changed, the relevant indica
tor will appear br iefly on the display .
Funct io ns are set by ro tating the control or
are switched on and off by tapping the but
tons. The indicator light in the button illumi
nates when the function is active.
Button (s) Function
ION/OFFI Climate control on/off
¢ page98
-
IAUTOI Automatic mode
¢page98
Regulatoral El Temperature selection
¢page98
Qi Seat heating *
¢page 101
~
Fan
¢page98
~
Air distribution
¢page99
a) The regu lator is also u sed to set the fan sp ee d, air dis-
tribut ion and seat heating .
IIJ,
Page 101 of 342

Rear air distribution ~
Applies to vehicles: with four-zone automatic comfort air
conditioning
The automatically controlled air distribution
con be changed manually.
.. Press the Gil button.
.. Rotate the regu lator to the desired setting .
You can adj ust the air circulation so that air
flows from specific vents .
- In position
:J, all air flows from the vents in
the center console and the outlets to the
door pilla rs.
- In position
:0, air flows from the outlets in
the door p illars.
- In position
!,8, air flows from the outlets un-
der the front seats.
There are additional combinations available to
adjust air d istr ibut io n as needed.
To regulate air distribution automatically,
sw itch to
IAU TO I.
Basic settings
General
The basic climate control settings con be ad
justed in the MMI.
.,. Select: Funct io n button ICAR I > Control but
ton
AC . Or
.,. Se lect: Funct ion button
ICAR I > Control but-
ton
Car sy stem s* > AC.
The follow ing funct ions can be selected :
- Auto recirculation
c> page 99
- Synchronization c> page 99
-Supplementary heater * ¢page 100
-Rear opera tion* c> poge 100
Warm and c old 99
Automatic recirculation mode
An air quality sensor detects increased con
centrations of pollutants in the outside air
and automatically switches to recirculation
mode .
We recommend that you always keep auto
matic a ir recirculation ON to p revent polluted
outside air from enteri ng the veh icle inter ior.
If the
a ir qu ality sensor l ocated in the air con
ditioning system detects polluted outs ide a ir,
the sensor dec ides whether the air pollut ion
can be reduced by the facto ry-installed pollu
ta nt fi lter or whethe r it is necessary to switc h
to air recirc ulation. With heavy conce ntra ti ons
of pollu tants, the a ir condit ion ing system is
switched automatica lly to recirc ulation mode
and the supp ly of outside air is blocked . As
soon as the concentration of pollutants in the
outside air drops, fresh air is supplied to the
vehicle interior aga in.
In the event that the windows fog up during
automat ic air rec irculat ion, you must press
the® button immediately.
Under certa in ope rating cond itions, a utomatic
air recirculation is switched off automatica lly.
With outside temperatures be low about 50 °F
(+10 °C), automatic air rec irculat ion is limited
to 30 seconds. W it h outside temperatures be
low about 30 °F ( -1 °C) a nd with the air condi
tione r switched off, the a utomatic air recircu
l ation is limited to 15 seconds.
Synchronization
One climate control setting for the driver and
front passenger seats .
With synchro nization active, the driver's set
tings a re adopted for the passenger o r vice
versa . All the othe r setti ngs that were made
are t ransferred to t he other seat . This in
cl udes all the cl ima te co ntro l settings, excep t
for the se at heating/ven tilat ion* .
If a different setting is selected at a
"synchron ized seat ", synchronization is can
c e lled.
Page 108 of 342

106 On the road
Starting and stopping
the engine
Starting the engine
The engine can only be started with your orig
inal Audi key.
Fig. 120 I gni tion key positio ns
Vehicles with gasoline engine:
.. Step on the brake .
.. Move the selector lever into P or N
¢ A.
.. Tu rn the ignition key to position @
9 fig. 120 -do not depress the gas pedal
when starting the engine.
Vehicles with diesel engine:
.. Step on the brake.
.. Move the selector lever into P or N
¢ &.
.. Turn the ignition key to position ©- the
glow plug indicator light
m illuminates
when the glow plug system is act ive .
.,. When the indicator light
&J switches off,
turn the ignition key to pos it ion @ but do
not press the accelerator pedal.
.. Re lease the ignition key once the engine
sta rts. The starter must not continue run
ning.
A cold engine may sound loud after it has
been started . This is due to the hydraulic
va lves building up oil pressure. This is normal
and is not a need for concern.
If the engine does not start immediately, stop
trying after 10 seconds and then try to restart
the engine about 30 seconds Later.
Glow plug system*
Diesel engines are equipped with a glow plug
system whose preheating t ime is controlled by the coo
lant and outs ide temperature . Start
the engine
immediately after the glow plug
indicator light
m switches off .
The glow plug indicator light will only illumi
nate for approximate ly 1 second when the en
gine is warm or the outside temperature is
higher than 46 °F (8 °C). That means you can
start the engine
immediately .
A WARNING
-Never start or let the engine run in a con-
fined or enclosed area. Exhaust fumes
from the engine contain carbon monoxide,
a colorless and odorless gas . Carbon mon
oxide can be fatal if in haled.
- Never leave the engine idling unattend
ed. An unattended veh icle w ith a runn ing
engine poses a danger of personal injury
or theft .
(D Note
- Avo id high engine speeds, fast accelera
tion or heavy engine loads while the en gine is still cold. This could damage the
eng ine .
- Th e engine cannot be started by pushing
or towing the vehicle .
@ For the sake of the environment
To avoid unnecessary engine wear and to
reduce exhaust emissions, do not let your
vehicle stand and warm up. Be ready to
drive off immediately after starting your
vehicle. Maintain moderate speed until the
engine is completely warm . Remember,
the engine performs best at operating
temperature.
· Stopping the engine
.,. Turn the ignition key to position @
¢page 106, fig . 120 .
A WARNING
-
-Never turn off the engine until the vehi-
cle has come to a complete stop.
Page 113 of 342

The system is activated when the brake pedal
is depressed
for a few seconds. For this, the
veh icle must be standing in uphill driving di
rection .
After releasing the brake pedal, the brake
power is held for a
brief moment to prevent
the vehicle from rolling back when starting. At
this time, you can easily begin to move your
vehicle.
A WARNING
- If you did not begin moving immediately
after releasing the brake pedal, under
certain circumstances, the vehicle would
begin to roll backward. Depress the
brake pedal immediately or engage the
parking brake.
- Should the engine stall, depress the
brake pedal immediately or engage the
parking brake.
- In order to prevent the vehicle from roll ing back unintentionally when starting in
stop-and -go traffic, keep the brake pedal
depressed for a few seconds before driv
ing
off.
- When you leave the vehicle -even if only
briefly -, switch
off the ignition and
make sure to remove the ignition key. Al
so engage the
parking brake to prevent
your vehicle from rolling unintentionally. This particularly applies if ch ildren are
left in the veh icle -danger of acc ident!
On the road 111
Cruise control
Switching the system on
The cruise control system makes it possible to
drive at a constant speed starting at 20 mph (30 km/h) .
®-
Fig. 124 Co ntro l l ever w ith set bu tton
Fig. 125 Disp lay : Se lected speed
.. Pull the lever to position @<=:> fig. 124 to
sw itch the system on .
.. Drive at the speed you wish to set.
.. Press button @to set that speed.
T he display
c::> fig . 125 will show the set speed.
The display may vary depending on the type of
display in your vehicle. The indicator light
tB;m~1~ (US model)/ . (Canadian model) will
also light up in the instrument cluster .
A WARNING
-Always pay attention to traffic even when
the cruise control is switched on . You are
always responsible for your speed and
the distance between your vehicle and
other veh icles.
- For safety reasons, the cruise control
should not be used in the city, in stop
and-go traffic, on twisting roads and
when road conditions are poor (such as