ignition AUDI Q7 2012 Owner´s Manual
[x] Cancel search | Manufacturer: AUDI, Model Year: 2012, Model line: Q7, Model: AUDI Q7 2012Pages: 342, PDF Size: 86.42 MB
Page 140 of 342
138 Automatic transmi ssion
co uld "creep" forward or backward.
When stopped, keep the brake pedal
fully depressed and use the parking brake if necessary to keep the vehicle
from ro lling .
- If the selector lever is unintentionally
moved into N wh ile you are driving, take
yo ur foot off the accele rato r pedal and
wa it for the engine to return to idle
speed befo re selecting a d rivi ng position .
- Never shift into "R" or "P" when the vehi
cle is in mot ion.
- Never get out of the dr iver 's seat when
the engine is runn ing .
- If you must get out of the vehicle, move
the se lector lever securely into the P po
sit io n and apply the par king brake f irm ly.
- If the eng ine must remain ru nning, never
hav e any driv ing pos ition engaged when
c hec king under the hood . M ake sure t he
sele ctor lever has securely eng aged and
is locke d in "P" with the par king brake
firmly set ¢
page 248, Engine compart
ment .
Otherw ise, any increase in eng ine
speed may set the vehicle in m otion,
even w ith the par kin g brake applied.
Selector lever positions
This section describes the selector lever posi
tions and driving ranges.
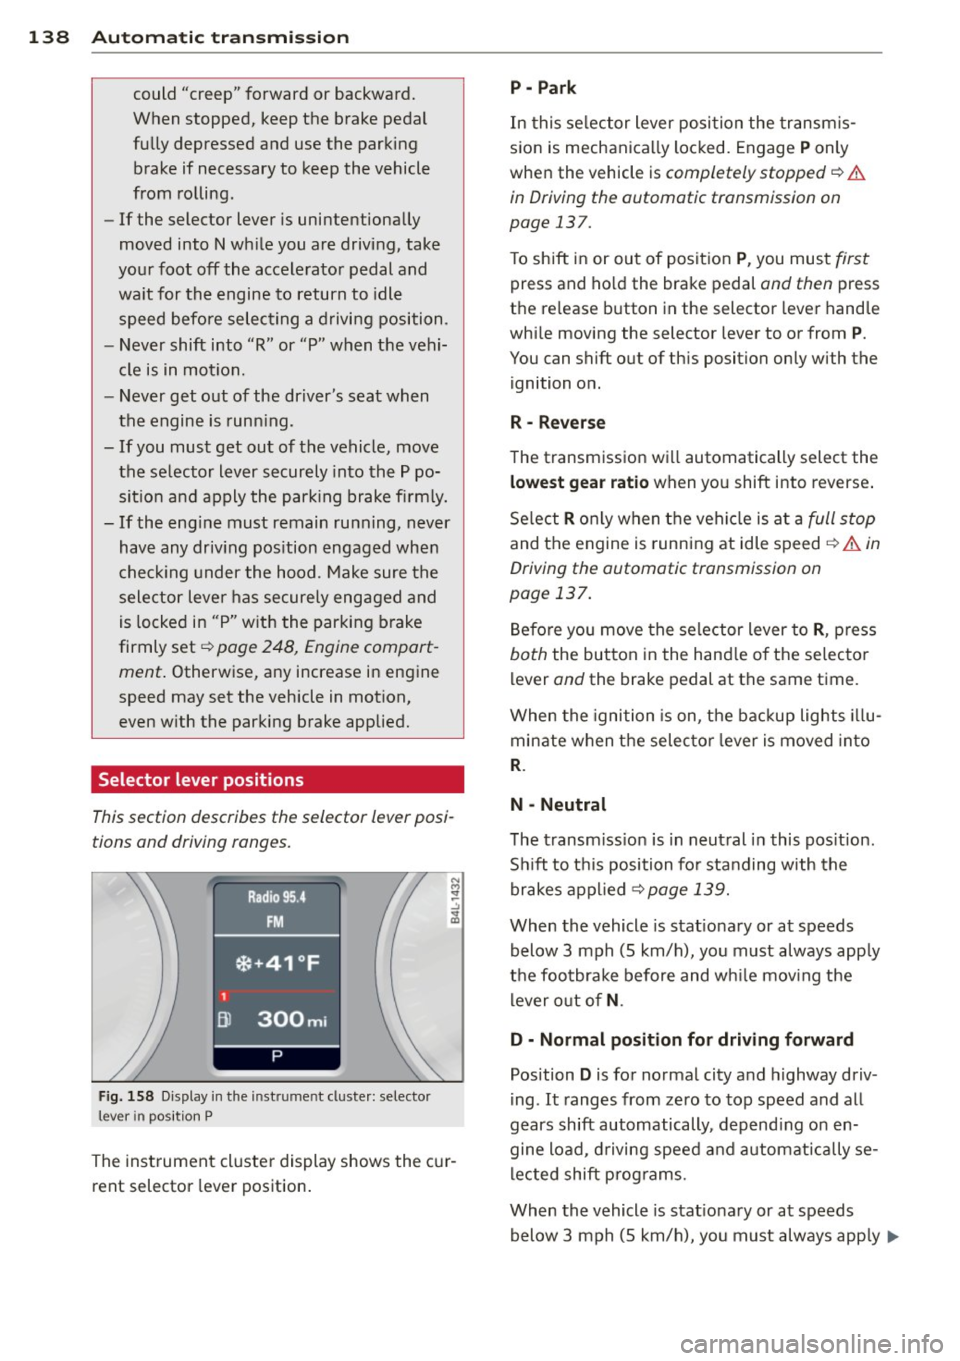
F ig. 158 Display in t he in st rum en t cluste r: selecto r
lev er in po sit ion P
The inst rumen t cluste r display shows the c ur
rent selector lever position .
P - Park
In this selector lever posi tion the transm is
s ion is mechanica lly locked. Engage
P only
whe n the vehicle is
completely stopped¢&.
in Driving the automatic transmission on
page 137.
T o shift in or out of posit ion P , you mus t first
press and ho ld the brake pedal and then press
the re lease button in the selector leve r hand le
whi le moving the selector lever to or from
P .
You can shift out of th is position only with the
ignition o n.
R • Reverse
The transm iss ion w ill automatically select the
lowest gear ratio when you shift into reverse .
Se lect
R o nly when t he vehi cle is at a full stop
and the engine is running at idle speed¢&. in
Driving the automatic transmission on
page 137.
B efore you move the se lector lever to R , press
both the button in the hand le o f the se lecto r
lever and the brake pedal at the same t ime.
W hen the ignition is on, the bac kup light s illu
minate w hen t he selec to r l ever is
moved in to
R .
N -Neutral
The transm iss io n is in neut ral in this pos it ion .
S hi ft to t his position fo r standing with the
brakes app lied
¢ page 139.
When the vehicle is stat iona ry or at speeds
below 3 mph (5 km/h) , you must always app ly
t h e foo tbrake before and wh ile mov ing the
l ever o ut o f
N.
D - Normal position for driving forward
Position D is for no rma l city and highway driv
ing . It ranges from zero to top speed and all
gears shift automatically , depend ing on en
gine load, d riving speed and a utomat ically se
l ected shift p rog rams.
When the vehicle is stat iona ry or at speeds
below 3 mph (5 km/h), you must always app ly
IJ,,
Page 141 of 342
the foot brake before and while moving the lever to
D o ut of N .
In ce rt a in circumst ances i t may be advan ta
geous to tempor arily swi tch to the manu al
shift p ro g ram to manually se lect gear ratios
to matc h specif ic dr iving conditions
r::!) page 140.
S - Sport position
Select this pos ition for sport ie r perfo rmance.
I n t his posi tion , the transm iss ion w ill not up
shift as soon, allowing the vehicle to use the increased power avai lab le at higher engine
speeds to achieve live lier acce lerat ion.
W hen the ve hicle is st ationary o r at speeds
be low 3 mph (5 km/h), you must a lways a pply
the foot brake before and while moving t he
l ever to
S out of N .
A WARNING
Read and follow a ll WARNI NGS <=> & in
Driving th e automatic transmission on
page 137.
(D Note
-
Coast ing downh ill with the transmission in
N and the engine not running w ill result in
damage to the automatic transmiss io n
and possibly t he catalytic converte r.
Automatic Shift Lock (ASL)
The Automa tic Shift Lock safeguards you
against accidentally shifting into a forward or
the reverse gear and causing th e vehicle to
move unintentionally .
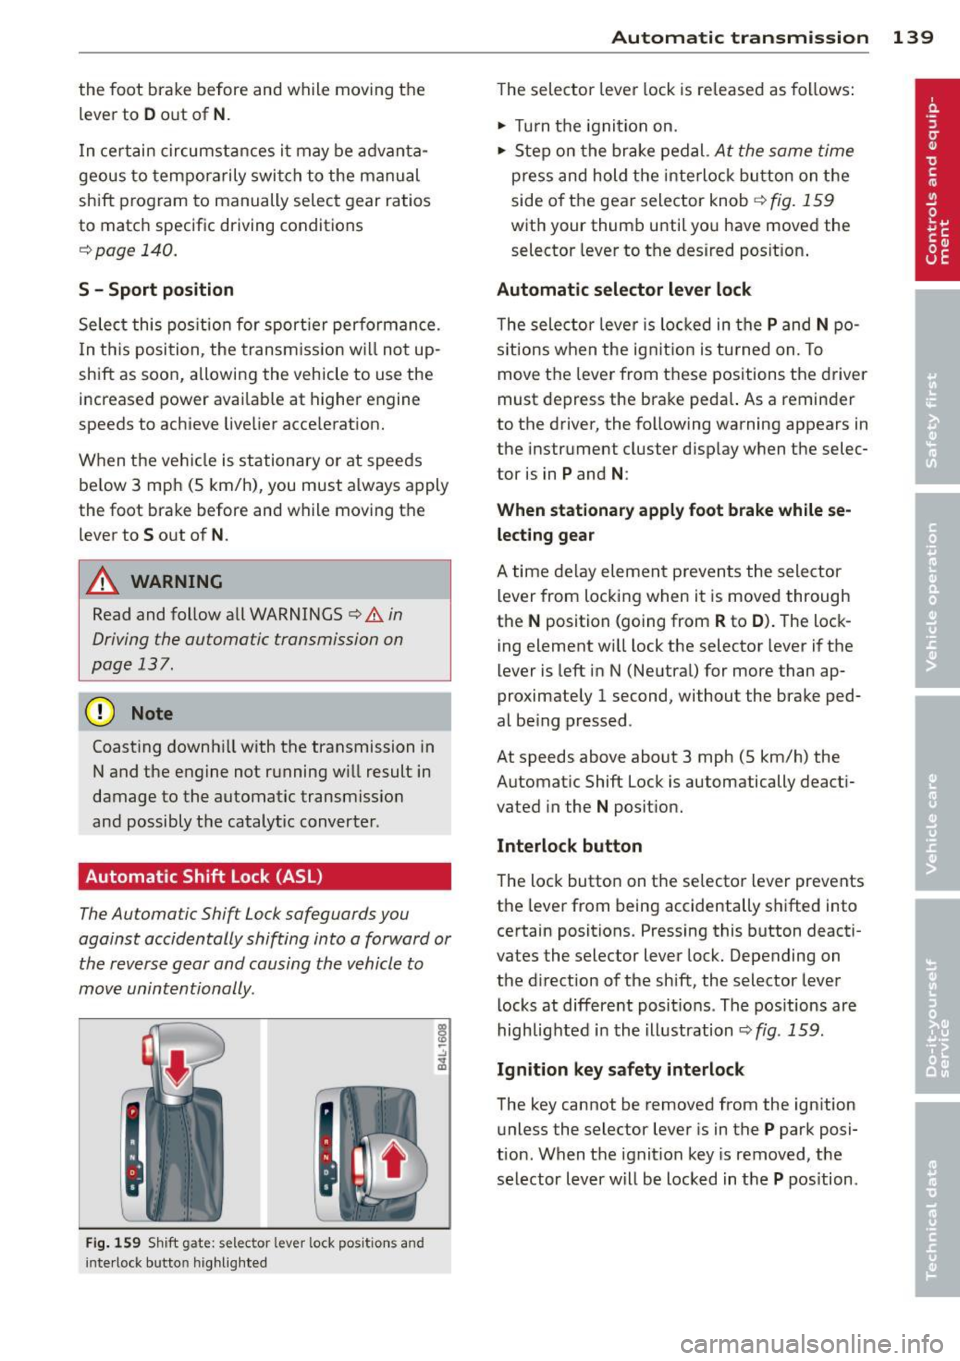
Fig. 159 Shift gate: s elec tor lever lock pos itions and
i n te rl ock bu tt on highli ght ed
Autom atic transm ission 139
T he selector lever lock is re leased as follows:
.. Turn t he igni tion on .
.. Ste p on the bra ke pedal.
At the same time
press and hold the inte rlock bu tton on the
side o f the gea r sele ctor knob
r::!) fig . 159
w ith your thum b until yo u have moved the
selector leve r to the desired posit ion .
Automatic selector lever lock
The selecto r leve r is lo cked in the P and N po
s itions w hen the ig nitio n is tu rned on. To
move t he lever from these posit ions the driver
must de press the brake peda l. As a remin der
to the d river, the following warning appears in
the instr ument cluster d isp lay w hen the selec
tor is in
P and N :
When stationary apply foot brake while se
lecting gear
A time de lay eleme nt preven ts the sele ctor
l ever from locking when it is moved through
the
N position (going from R to D ). T he lock
ing element wi ll lock the selector lever i f the
lever is left i n N (Ne utral) for more than ap
proximately 1 second, without the brake ped
al be ing pressed .
At speeds above about 3 mph (5 km/h) the
Automat ic Shift Lock is automatically deact i
vated in the
N posit ion.
Interlock button
The loc k button on t he selecto r lever prevents
the lever from being accidentally s hifted into
certain positions. Pressing this b utton deacti
vates the selector lever lock. Depending on
the d irection of the shift, the selector lever
l ocks at differe nt pos it io ns. Th e pos itions are
highlig hted i n the i llustration
r::!) fig . 159.
Ignition key safety interlock
The key cannot be removed from the ign ition
u nless the selector lever is in t he
P park posi
tion . When the ignit ion key is removed, t he
selector lever w ill be locked in t he
P pos ition.
Page 144 of 342
142 Automatic transmission
(D Note
If the transmission switches to emergency
mode, you should take the vehicle to an
authorized Audi dealership as soon as pos
sible to have the condition corrected.
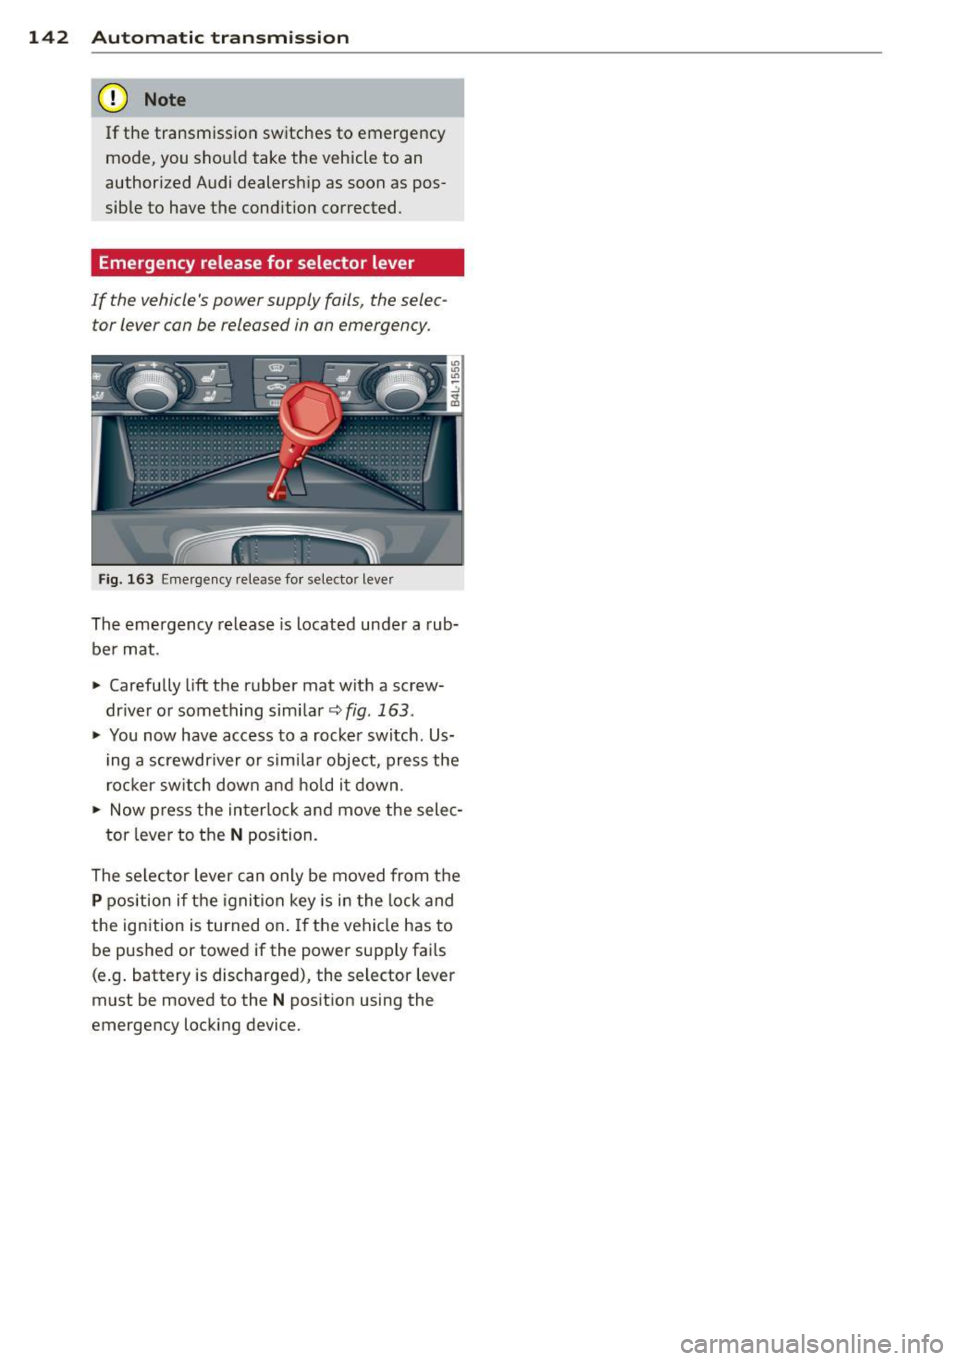
Emergency release for selector lever
If the vehicle's power supply fails, the selec tor lever can be released in an emergency .
Fig. 163 Emergency release fo r selecto r lever
The emergency release is located under a rub
be r mat .
.,. Carefully
lift the rubber mat with a screw
driver or something similar~
fig. 163 .
.,. You now have access to a rocker switch . Us
ing a screwdr iver or similar object, press the
rocker switch down and hold it down .
.,. Now press the interlock and move the selec-
tor lever to the
N position.
The selector lever can only be moved from the
P position if the ignition key is in the lock and
the ignition is turned on . If the vehicle has to
be pushed or towed if the power supply fai ls
(e .g. battery is discharged), the selector lever
must be moved to the
N position using the
emergency locking device.
Page 148 of 342
146 Parking system
Switching on and off
Applies to vehicles: with Audi parking system plus w ith
rea rview camera
The reorview camera switches on automati
cally together with the acoustic and visual
pork assist when you put the vehicle in re verse .
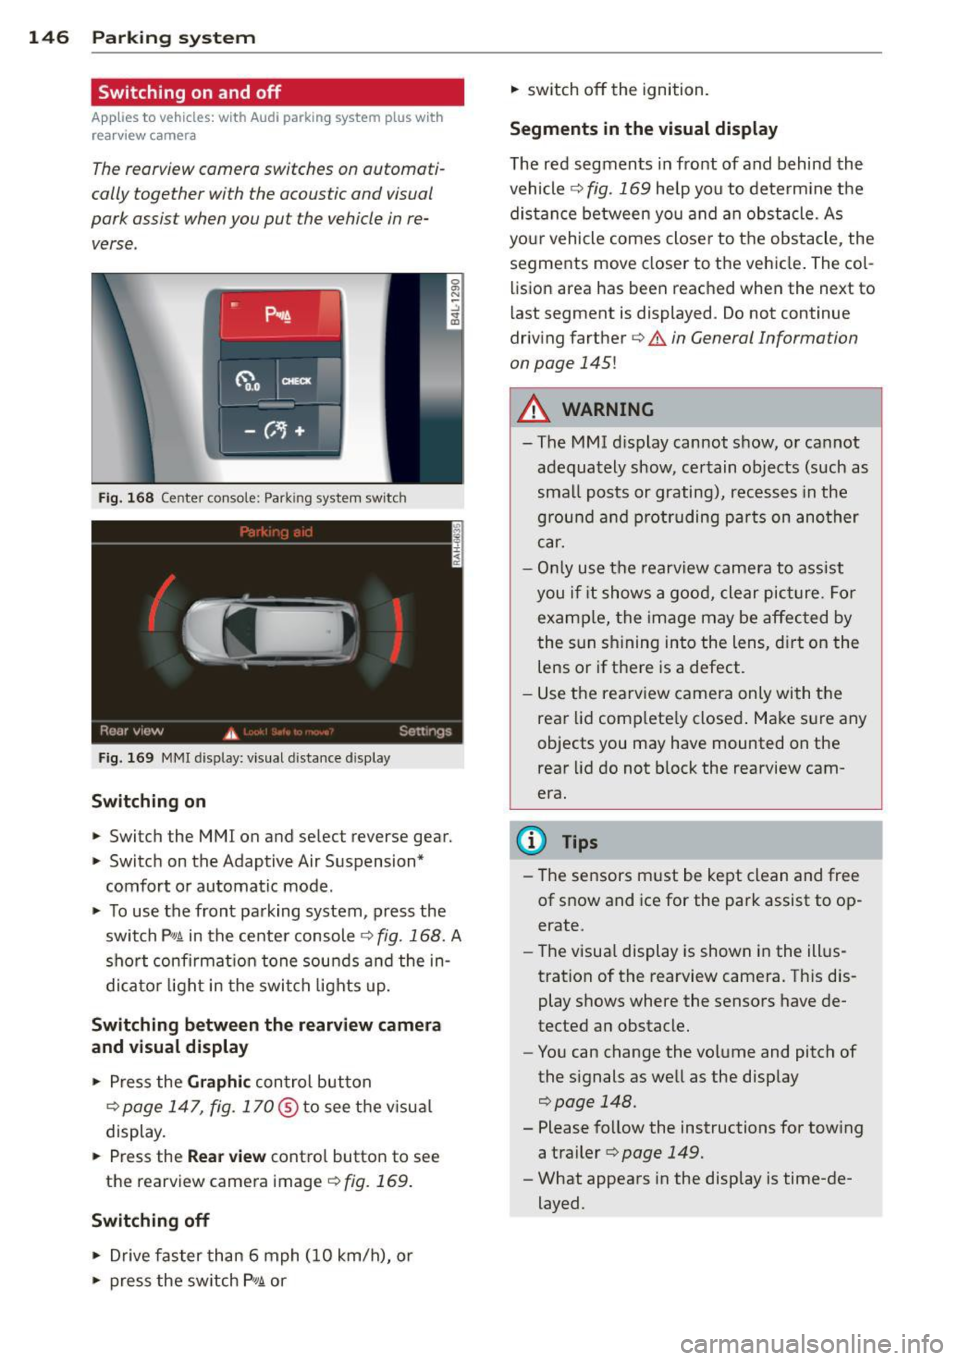
Fig. 168 Ce nter console: Park ing system switc h
Fig. 169 MMI display: visual d istance d isplay
Switching on
> Switch the MMI on and se lect reverse gear.
> Switc h on the Adaptive Air Suspension*
comfort or automatic mode.
> To use the front pa rking system , press the
switch P"1t in the center console
c:> fig. 168. A
short confirmat ion tone sou nds a nd the in
di ca to r li ght in the swi tch lights up.
Switching betwe en the r earview camera
and visual display
> Press the Graphi c control button
¢
page 147, fig. 170@to see the v isua l
display.
> Press the Rea r view contro l button to see
the rearview camera image
<=:> fig. 169.
Switching off
> Drive faster than 6 mph (10 km/h), or
> press the sw itch P 1t or
> switch off the ignition.
Segm ents in the visual display
The red segments in fro nt of and behind the
vehicle
<=:> fig. 169 help you to determ ine t he
distan ce between yo u and an obstacle. As
your vehicle comes close r to the obstacle, the
segments move closer to the vehicle . The co l
lision area has been reached when the next to
l ast segment is displayed . Do not continue
driving farther ¢
& in General Information
on page
145!
A WARNING
-
- The MMI d isplay cannot show, or ca nnot
adequately show, certain objects (such as
sma ll posts or grating), recesses in the
g rou nd a nd p rot ruding pa rts on ano ther
car.
- Onl y use t he rearview camera to ass ist
you i f it shows a good, clear pic ture. For
examp le, the image may be affec ted by
the sun s hining into the lens, d irt on the
lens or if there is a defect.
- Use the rearv iew came ra only wi th the
rear lid comp lete ly closed . Make s ure any
objects you may have mounted on the
rear lid do not b lock the rearview cam
era.
(D Tips
- The sensors m ust be kept clean and free
of snow and ice for the park assist to op
erate.
- The visua l display is shown in the ill us
tration of the rearview camera. Th is dis
play shows where the sensors have de
tected an obstacle.
- You can change the volume and pitch of
the s ignals as we ll as the disp lay
c:> page 148.
- Please follow the instructions for tow ing
a trailer
c:> page 149.
- What appears in the display is time-de
layed.
Page 151 of 342
-On -when the parking system is switched
on, either the visual display or the picture
from the rearview camera is disp layed .
Warning tones
- Front volume* -
front sensor vo lume
- Front frequency* -front sensor frequency
-Rear volume -rear sensor volume
-Rear frequency -rear sensor frequency
-In -ca r entertainment fader/Music volume
while parking -
when the parking system is
switched on, the volume of the active audio source is lowered.
The newly adjusted value is briefly heard from
the signal generator.
(D} Tips
- The warning tones can also be adjusted
direct ly by the v isual disp lay* or the pic
ture from the rearview camera*. Simply
press the
Settings* control button .
- Changed settings are activated when
parking system is switched on aga in.
- The settings are automatically stored
and ass igned to the remote control key.
Trailer hitch
Applies to vehicles: with rear park assist/Audi parking sys·
tem plus with rearview camera and trailer hitch
For vehicles with a factory installed trai ler
hitch, or a trai ler hitch installed according to
factory specifications, the parking system rear
sensors do not come on whenever you shift in
to reverse gear or when you press the P
11,
switch*. If you install a hitch yourself, th is
function may not work . In general the follow
limitations may come up:
Rear park assist*
There is no warning for distances to the rear.
Audi parking system plus with rearview
came ra*
There is no warning for distances to the rear .
The front sensors remain activated. The visual
display switches to the trailer towing mode.
The picture from the rearview camera will not
Parking system 149
show the orientation lines nor the blue surfa
ces.
Error messages
Applies to vehicles: with rear park assist/Audi parking sys
tem plus with rearview camera
There is an error in the system if the LED on
the
P" 1! switch* is blinking and you hear a con
tinuous alarm for a few seco nds after switch
ing on the park ing system or when the park
ing system is already activated. Have your au
thorized Audi dea ler correct the error .
(D Tips
If the error is not corrected before you
switch off the ignition, when you switch on
the parking system again, the LED in the
p,,1, switch* will blink .
Page 153 of 342
possible to raise the suspension to a high leve l
above certain speeds .
When a speed of about 75 mph (120 km/h) is
exceeded for more than 30 seconds, the vehi
cle is automatically lowe red to
low level when
in comfort and automatic mode. Ground
clearance is about 0.6 inch (15 mm) less,
compared to the
normal level.
When a speed of about 100 mph (160 km/h)
is exceeded for more than 20 seconds , the ve
h icle is automat ica lly lowered to
highway lev
el
when in automatic and dynamic mode.
Ground clearance is about 1.4 inches (35 mm)
less, compared to the
normal level. Road
holding is opt imized as a result of the lower
center of gravity, and fuel consumption is re
duced as a result of reduced wind resistance .
Level adjustment
high level 2
high level 1
normal leve l
low level
highway level
Ground clearance
about 9 .4 inches
(240 mm)
about
8 inches
(205 mm)
about 7 inches (180 mm)
about 6 .5 inches
(165 mm)
about 5.7 inches (145 mm)
The segment disp lay @ in the MMI Display
c:::> page 152 or in the instrument cluster dis
p lay
i:> page 153 shows the current vehicle
level.
Automatic
Select the automatic mode if you prefer a bal
anced, comfortable suspension setting . The
damping characteristics are adjusted accord
ingly.
- Automatic lowe ring: When a speed of
about 75 mph (120 km/h) is exceeded for
more than 30 seconds, the vehicle is auto
matically lowered by about 0.6 inch (15
mm) to the
low level, wh ich is more suitable
for highway speeds. Road hold ing is opti
mized as a result of the lower center of grav-
Ad aptive Air Su sp en sion 15 1
ity and fuel consumption is reduced as a re
sult of reduced wind resistance . When a
speed of about 100 mph (160 km/h) is ex
ceeded for more than 20 seconds, the veh i
cle is automatically lowered by an addit ional
0 .8 inch (20 mm) to
highway level.
- Automat ic raising: When the vehicle is at
highway level and the speed falls below
about 80 mph (130 km/h) for more than 20
seconds, the vehicle is automatically raised
to
low level. T he ve hicle is automat ica lly
ra ised aga in to
normal level if the speed
fa lls below abo ut 44 mph (70 km/h) for a
period of 2 minutes . The vehicle is raised im
mediately when speed fa lls below abo ut 22
mph (35 km/h).
Dynamic
Se lect the dynamic mode if you prefer a spo r
ty suspension setting. In t his mo de, the veh i
cle is lowered to
low level while it is still sta
tionary and sporty damping characteristics
are se lected . The warning light
Ill in the in
strument cl uster will come on for a few sec
onds just to rem ind you of the reduced ground
clearance .
If you switc h off the engine whi le the vehicle
is in the dynamic mode and then switch on the
ignition once aga in, the
Ill warning light will
also come on aga in for a few seconds as a re
minder .
-Automa tic lo weri ng : When a speed of
about 100 mph (160 km/h) is exceeded for
more than 20 seconds, the vehicle is auto
matically lowered by 0 .8 inch (20 mm) to
highway level .
-Automat ic ra is ing: The veh icle is automati
cally ra ised to
low level aga in, if the speed
fa lls below about 80 mph (130 km/h) fo r a
pe riod of 20 seconds. The veh icle is raised
immed iate ly w hen speed falls be low about
22 mph (35 km/h).
Comfort
Select the comfort mode if you desire a s us
pension setting with a special emp hasis on
comfort . Damp ing cha racte ristics w ith a clea r
Iii-
Page 159 of 342
Programming the Homelink®
transmitter
A pplies to vehicles: with Home link® universa l remote
co ntrol
The transmitter is programmed in two phas·
es. For rolling code transmitters, a third
phase is also necessary .
.- :-::::: . ... ........ -. ----· . ...... ........ .l
-·-·-· -·-· -·..: ··-· ---- -·- ·· ..._~ -- · ····
111111
-
Fi g. 1 79 Overhead console: Homelink ® keypad
Fig. 1 80 Front bumper, d rive r side: loca tion of tra ns
mitter un it
Pha se 1:
programming the o verhead keypad
l. Make sure your vehicle is wit hin ope rating
range of the remote controlled garage
door ope ner .
2 . Set the pa rking brake
c:> .& in General in
formation on page 156.
3 . Turn the ignition o n. D o not sta rt the en
g ine!
4. Press and hold the two outs ide Home
Link ® buttons
(D and ® for approxi
mately 20 seconds until indicator light @
c:> fig. 179 begins to flash. Then release
both buttons. Do not hold the buttons for
l onger than 30 seconds .
~ This procedure only needs to be perfo rmed
on ce .
It erases the factory-set default codes
and does not have to be repeated to p ro
gram ad dit io na l remote contro ls .
Homelink ® 15 7
5. Press and ho ld the Homelink ® button (D ,
0 or ® until the indicator light@
starts flash ing
slowly . Release the button.
~ The system will remain in programming
mode for 5 minutes.
Go to the front of the
vehicle and proceed with phase 2 .
Phase 2 :
programming the bumper mounted trans
mitter
6 . Hold the
original remote control at a d is
tance between
0 -6 in. (0 -15 cm) from the
bumper below the appropr iate headligh t
f or yo ur vehicle
c:> fig. 180 (u se the short
est distance possible) .
7 . Aim the remote control just below the
driver s ide headlight.
8. Press and ho ld the activation button on
the remote control.
~ May be different in Canada. If so, press and
re-press (cycle) the activation button on your
remote cont ro l every two seconds .
9. The emergency flashers w ill flash
three
time s
(a fter about 15 -60 seconds) when
the programming is successful. Re lease
t h e button on the remote contro l.
~ To program more devices, repeat steps 4 to
9.
10. Press and hold the trained Homelink ®
button and observe the indicator light @
c:>fig . 179 .
~ If the indicator light is solid/contin uous,
programm ing is comp lete and your device
should a ctivate when you press and release
t he t rained Homelink ® bu tton.
~ If the ind icator light blinks rapidly for 2 sec
onds and is then a solid/continuous light,
proceed w ith phase 3 to program a rolling
code device.
Phase
3: rolling code programming
~ A se con d person o n a ladde r who c an safe ly
reach the garage door opener motor is rec
ommended .
11. Locate the "learn" button on the garage
door opener motor (refer to the operating
instruct ions for the opener, as the loca·
t ion of t his button may vary by manufac-
turer) . .,.
Page 183 of 342
Child restraints on the front seat - some
important things to know
.. Be sure to read the important information
and heed the WARNINGS for important de
tails about chi ldren and Advanced Airbags
i=> page 200.
Even though your vehicle is equipped with an
Advanced Airbag System, make certain that
a ll chi ldren, especially those 12 years and
younger, always ride in the back seat properly restrained for their age and size. The airbag
on the passenger side makes the front seat a potentially dangerous place for a child to r ide .
The front seat is not the safest place fo r a
chi ld in a fo rward-facing chi ld safety seat. It
can be a very dangerous place for an infan t or
a child in a rea rward-facing seat.
The Advanced Airbag System i n your veh icle
has been cert ified to comp ly with the require
men ts of United States Federa l Mo to r Veh icle
Safety Standard 208 as applicable at the time
your vehicle was manufactured.
The Standard requires the front a irbag on the
passenger side to be t urned off ("sup
p ressed") if a chi ld up to about one year of
age restrained in one of the rear -facing or for
ward -facing infant restraints listed i n Federal
Motor Vehicle Safety Standard 208 with wh ich
the Advanced Airbag System in your vehicle
was certified has been installed o n the front
passenger seat . For a listing of the child re
straints that were used to certify compliance
with the US Safety Sta ndard
c> page 202.
The PASS ENG ER AIR BAG OFF light in the in
strument panel te lls you when the front Ad
vanced A irbag on the passenger side has been
turned off by the e lectronic control u nit.
Each t ime you turn on the ignition, the
PAS
SENGER AIR BAG OFF
light w ill come on for a
few seconds and:
- will stay on if the front passenger seat is not
occupied
- will stay on if there is a small child or child
restraint on the front passenger seat
A irbag sys tem 181
- w ill go off if the front passenger seat is oc
cupied by an adult as registered by the
weight -sensing mat
c> page 190, Monitor
ing the Advanced Airbag System.
T he PASSENGER AIR BAG OFF light comes on
whe n the contro l unit detects a tota l weight
on the front passenger seat that req uires the
front a irbag to be turned off.
If the total weight on the front passenger
seat is more than that of a typical 1 year-o ld
c h ild but less than the weight of a small
adult, the front airbag on the passenger side
can deploy (the
PASSENGER AIR BAG OFF
li ght does not come on). If the PASSENG ER
AIR BAG OFF
light does not come on, the
front a irbag on t he passenger side has not
been t urned off by the elect ronic con trol unit
and can deploy if the control unit senses an
impact that meets the cond itions stored in its
memory .
For exampl e, th e airb ag may deplo y if:
- a small ch ild that is heav ie r than a typical 1
year-old ch ild is o n the front passenger seat
(regard less of whether the child is in one of
the child safety seats listed
c> page 202), or
- a child who has outgrown child restraints is
on the front passenger seat.
If the front passenger airbag is turned off, the
PASSENGER AIR BAG OFF light comes on in
the instr ument cluster and stays on .
The front airbag on the passenger side may
not deploy (the PASSENGER AIR B AG OFF
light does not illum inate and stay lit) even if a
small ad ult or teenager, or a passenger who is
not sitti ng uprig ht w ith their back against a
non -recli ned back rest w it h thei r feet on the
vehicle floor in front of the sea t is on t he front
passenger seat
c> page 161, Proper seating
position for the driver.
If the fron t passenger ai rbag dep loy s, the
Federa l Standard req uires the airbag to meet
the "low risk" dep loyment criteria to reduce
the risk of injury t hro ugh interact ion w ith the
airbag. "Low risk" dep loyment occ urs in those
crashes that take place at lower dece lerat ions ..,. •
•
Page 184 of 342
182 Airbag sys tem
as def ined in the electronic control unit
Q page 190, PASSENGER AIR BAG OFF light.
A lways remember, a ch ild safety seat or infant
carrier insta lled on the front sea t may be
struck and knocked o ut o f position by the rap
id ly inflating passeng er's airbag in a frontal
coll is ion . T he airbag cou ld greatly reduce the
effec tiveness of the child restraint and even
serious ly injure the child during inflat ion.
F or this reason, and because the back seat is
the safest p lace for children - when properly
restra ined acco rd ing to their age and si ze - we
s trongly recommend that children always sit
in the back seat
Q page 200, Child Safety .
A WARNING
A child in a rearward-facing child safety
s e at insta lled on the front passenger seat
w ill be seriously injured and can be k illed if
t he fr ont a irbag inflates - even with an Ad
vanced Airbag System.
- T he i nflating a irbag will hit the child
safety seat or infant carrier wit h great
f orce and w ill smash the ch ild safety sea t
and child against the backrest , center
armrest, door or roof.
- Always insta ll rear -facing child sa fety
seats on the rear seat.
- If you mus t install a rearward facing
child safety seat on the front passenger
seat because of exceptional circ umstan
ces and the
PASSENG ER AIR BAG OFF
light does not come on and stay on , im
med iately install the rea r-facing child
safety seat in a rear seating position and
hav e the a irbag system inspected by you r
authori zed Aud i dealer.
- Forward-fac ing ch ild safety seats instal
led on the front passenger's seat may i n
terfere wi th the deployment of the air
b ag and cau se serious person al injury to
the ch ild .
A WARNING
If, in exceptional c ircumstances, you must
install a forward-facing child restra int on
the front passenger's seat: -
Always make sure the forward-facing
seat has been designed and certified by
its manufacturer for use on a front seat
with a passenger front and s ide a irbag .
- Never put the forward-facing child re
straint up against or very near the instru ment panel.
- Always move the passenger seat into its
rearmost pos ition in the seat's fore a nd
aft ad justment range, as fa r away from
the airbag as possible b efore installing
the forwa rd-fa cing ch ild restra int. The
b ackrest mus t be a djusted to a n up right
position.
- Make s ure that the
PASSENGER AIR BAG
OFF
li ght comes on and stays o n all the
t ime wheneve r the ignition is switched
on.
A WARNING -ra----
To reduce the risk of serious injury, make
sure that the
PASSENGER AIR BAG OFF
light will be displayed whenever a child re
straint is installed on the front passenger
seat and the ignition is sw itched on.
- If the
PASSENGER AIR BAG OFF light
does not stay on, perform the checks de
scribed
Q page 190, Monitoring the Ad
vanced Airbag System .
-Take t he chi ld restraint off the front pas
senger seat and install it prope rly at one
of the rear seat positions if t he
PASSEN
GER AIR BAG OFF
li ght does not stay on.
- Have the airbag system inspected by
your author ized Audi deal er immed iate
ly .
- Always carefu lly follow instr uctions from
chi ld restraint manufacture rs when in
st all ing c hild restra ints .
A WARNING
If, in exce ptiona l circumstances, you m ust
i nsta ll a forward or rearw ard-fa cing child
r estra int on the front passenger's seat :
- Imp roper ins tallation o f child restra ints
can reduce their effec tiveness or even
Page 188 of 342

186 Airbag sys tem
-Always make sure the forward-facing
seat has been des igned and certified by
its manufacturer for use on a front seat
with a passenger front and side airbag .
- Never put the forward-facing child re
straint up aga inst or very near the instru
ment panel.
- Always move the passenger seat into its
rearmost position in the seat's fore and
aft adjustment range, as far away from
the a irbag as poss ible, before insta lli ng
the fo rward-facing chi ld restraint. The
b ackres t must be adjus ted to an upr igh t
posit io n.
- Make su re that the
PASSENGER AIR BAG
OFF
light co m es on and s tays on all the
t ime whenever the ignition is switched
on.
Advanced Airbag System components
The front passenger seat in your vehicle has a lot of very important parts of the Advanced
Airbag System in it. These parts include the
weight-sens ing mat, sensors, wiring, brack
ets, and more . The fu nction of the system in
the front passenger seat is checked by the
e lectronic control u nit when the ignit ion is on.
The control unit mo nitors the Advanced Air
bag Sys tem and turns the airbag indicator
light on when a ma lfunction in the system
components is detected . The function of the
ai rbag ind icator light is described in greater
detai l below. Because the front passenger
seat contains important parts of the Ad
vanced A irbag System, you must take care to
prevent it from be ing damaged . Damage to
the seat may prevent the Advanced A irbag for
the front passenger seat from doing its job in
a cra sh .
The front Advanced Airbag System
consists of the following:
- Crash senso rs in the front of the veh icle that
measu re ve hicle ac celera tion/de ce le ra ti on
to provide info rm ation to the Advanced Air
bag System abo ut the severity of the crash . -
An elect ronic contro l unit, with integrated
crash sensors for front and side impacts .
The control un it "decides" whether to fi re
the front a irbags based on the informat ion
received from the crash sensors. The contro l
un it also "decides" whether the safety belt
prete nsioners shou ld be act ivated .
- An Advanced A irbag w ith gas generator for
the dr iver inside the stee ring wheel hub .
- An Advanced A irbag w ith gas generator in
side the instrument panel for the front pas
senge r.
- A we ight-sensing mat under the up ho lstery
padding of the front passenger seat cushion
that measures the total weight on the seat .
The informat io n registe red is sent continu
ou sly to the elec troni c con tro l unit to regu
la te deployment of the front Advanced Air
bag on the passenger side .
- An airbag monitoring sys tem and in dicator
light in t he instr ument cluster
~ page 190.
-The PASSENGER AIR BAG OFF ligh t comes
on and sta ys on in the cen ter o f th e instr u
ment panel
~ page 190, fig . 199 and tells
you whe n the front Advanced Airbag on the
passenger side has been tu rned off .
- A sensor below the safety be lt latch for the
front seat passenger to meas ure the tension
on the safety be lt . The tension on the safety
be lt and the weight registered by the
weight-sensing mat he lp the control unit
"decide" whether the front airbag for the
front passenger seat should be turned off or
not
~ pag e 181, Child restraints on th e
front seat -some important things to
know.
- A senso r in the safety belt latch fo r th e d riv
er a nd fo r the front sea t passenger tha t
senses w het he r th at safety bel t is latched or
no t and transmi ts this information to the
electronic control unit.
A WARNING
Damage to the fr ont passenger seat can
p revent the front airbag from work ing
properly.
-