AMI AUDI Q7 2012 Owner´s Manual
[x] Cancel search | Manufacturer: AUDI, Model Year: 2012, Model line: Q7, Model: AUDI Q7 2012Pages: 342, PDF Size: 86.42 MB
Page 4 of 342
2 Table of contents Vehicle literature .. .. .. .. .. ... .
About this Owner's Manual ...
Controls and equipment .. ... .
Ins truments and controls .. . .
General illus tration .... ... .. .. ... .
Instruments and warning /
indicator lights ........ .. .. .. . .
Ins truments . .. .. ..... ... .. .. ... .
War ning/ indi cator lights ... .. ... .. .
Driver information d isplay .. . .
Introduct ion . .. .. ..... ... .. .. ... .
Trip computer .. .. ..... ... .. .. ... .
Efficiency program ........ .. .. ... .
On-Board Diagnostic system (OBD) . . .
Elect ronic speed limiter .. .. .. .. .. . .
Speed war ning system ...... ..... . .
Auto Check Control ........ ... .. . .
Opening and closing .. .. .. .. . .
Keys .. .. .. ................ ... . .
P owe r locking system . .. .. .. .. .. . .
R ear lid .. .. .. . .......... .. .. .. . .
C hild sa fety lo ck .......... .. .. .. . .
Conven ien ce key .. ..... ... .. .. ... .
Anti-theft alarm system ... .. ... .. .
Power win dows .. ..... ... .. .. ... .
Panoramic slid ing sun roof .. .. .. ... .
Clear vision .. .. ..... ... .. .. ... .
Lights . .. .. .. . .......... .. .. ... .
Inter ior lights ............. ... ... .
V 1s 1on . ...... ........... .... ... .
W iper and washer system . ... .. .. . .
M ir rors .. .. ................ ... . .
D ig ita l compass . ...... ... .. .. .. . .
Seats and storage ......... .. . .
G en eral recomme ndat ions ... .. .. . .
P owe r fron t seat adjus tment .. .. .. . .
Se at mem ory ............ .. .. ... .
Rear seats . ... . .. ..... ..... .. ... .
Head res traints .. ..... ... .. .. ... .
A rmrest .... .. .. ..... ... .. .. ... .
5
6
8
8
8
10
10
14
21
21
24
26
27
28
28
30
38
38
41
4 5
48
49
so
5 1
54
57
57
61
62
63
68
69
71
7 1
72
73
74
7 6
7 7
Long center conso le . . . . . . . . . . . . . . . 78 L
ugga ge compartment . ..... .... . .
Roof rack ..... .. .. ... ..... ... .. .
( upholder ... .. .. .. ... .. .. .. .. .. .
Rear asht ray ..... ............. .. .
Out let .... .... .. ............. .. .
Storage ...... ... .. ............. . 79
83
85
86
87
87
Warm and cold
. . . . . . . . . . . . . . . . 91
Climate control . . . . . . . . . . . . . . . . . . 91
Rea r Air Conditioning . . . . . . . . . . . . . . 97
Bas ic sett ings . . . . . . . . . . . . . . . . . . . . 99
Heated Sea ts . . . . . . . . . . . . . . . . . . . .
100
On the road . . . . . . . . . . . . . . . . . . . 103
Stee ring .. .. ... . .. ... .. ... ... .. . 103
Ig nition lo ck and ig nition sw itch . . . . . 105
St arti ng and sto pp ing t he engine . . . . 10 6
S tar ting and stopping the engine with
Co nvenience key . . . . . . . . . . . . . . . . . .
107
Pa rking bra ke . . . . . . . . . . . . . . . . . . . . 109
Starting on h ills . . . . . . . . . . . . . . . . . . 110
Cru ise contro l . . . . . . . . . . . . . . . . . . . . 111
Adaptive cruise control . . . . . . . 113
Speed and distance control system . . 113
Driver informat io n . . . . . . . . . . . . . . . . 120
System limitations . . . . . . . . . . . . . . . . 125
Audi braking gua rd . . . . . . . . . . . . . . . 126
Audi side assist . . . . . . . . . . . . . . . 129
Lane Change Assistant. . . . . . . . . . . . . 129
Not es . . . . . . . . . . . . . . . . . . . . . . . . . . 135
Automatic transmission ... .. .
t.
t . ® 1p ro ni c ..... .. .......... ... .. .
Parking system ... .. .. ... ..... .
General information ............. .
Rea r park assist .. ... ... .... ... .. .
Audi par king syste m plus with
re arview c amer a .. ............... .
Adjus ting the d is p lay a nd warning
tones ... .. .... .. ... .. ..... ... .. .
T ra ile r hitch ..... .. .... .... ... .. .
Error messages .. ... .......... .. .
137
137
143
143
143
14 4
148
149
149
Page 19 of 342
Instruments and warning/indicator lights 17
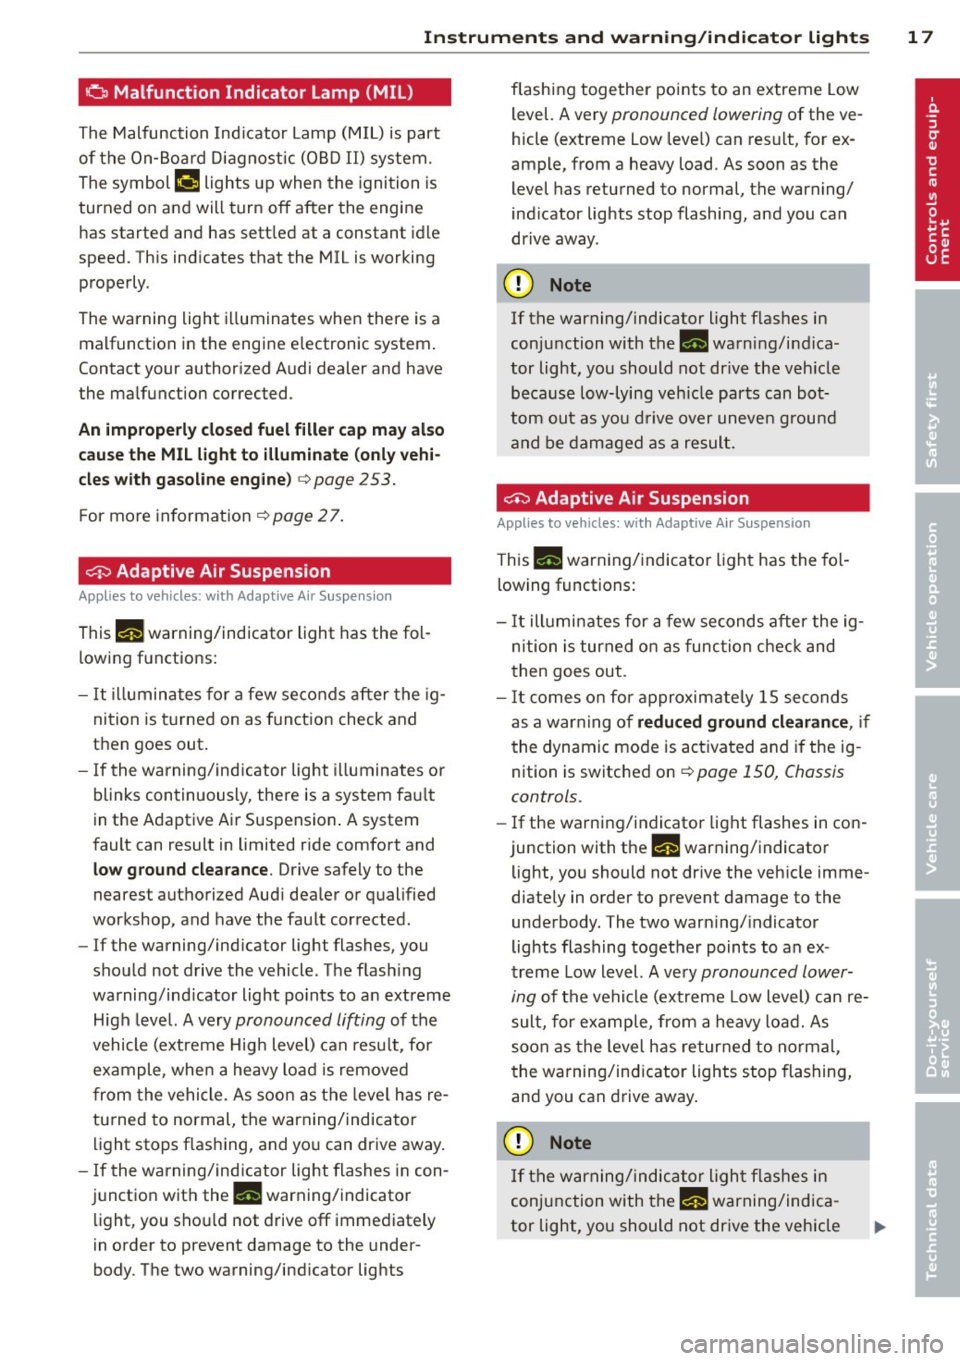
o Malfunction Indicator Lamp (MIL)
The Malfunction Indicator Lamp (M IL) is part
of the On-Board Diagnostic (OBD II) system.
The symbol
f• lights up when the ignition is
turned on and will turn off after the engine
has started and has sett led at a constant idle
speed. Th is ind icates that the MIL is working
properly.
The warning light illuminates when there is a
malfunction in the engine electronic system .
Contact your author ized Audi dealer and have
the ma lfunction corrected.
An improperly closed fuel filler cap may also
cause the MIL light to illuminate (only vehi
cles with gasoline engine)
c:> page 253.
For more informat ion c:> page 2 7.
0 Adaptive Air Suspension
Applies to vehicles: with Adaptive Air Suspension
This II warning/indicator light has the fol
l owing functions:
- It illuminates for a few seconds after the ig
nition is turned on as function check and
then goes out .
- If the warning/ind icator light illuminates or
blinks continuously, there is a system fau lt
in the Adaptive A ir Suspension . A system
fault can result in limited ride comfort and
low ground clearance . Drive safely to the
nearest authorized Aud i dealer or qualified
workshop, and have the fault corrected .
- If the warning/ind icator light flashes, you
should not drive the vehicle. The flash ing
warning/ind icator light po ints to an extreme
High level. A very
pronounced lifting of the
vehicle (extreme High level) can resu lt, fo r
example, when a heavy load is removed
from the vehicle. As soon as the leve l has re
turned to normal, the warning/indicator
light stops flashing, and you can drive away.
- If the warning/ind icator light flashes in con
junction with the
II warning/indicator
light, you sho uld not drive off immediately
i n order to prevent damage to the under
body. The two warning/ind icator lights flashing together points to an extreme Low
level. A very
pronounced lowering of the ve
hicle (extreme Low leve l) can result, for ex
ample, from a heavy load. As soon as the
level has retu rned to normal, the warning/
ind icator lights stop flashing, and you can
drive away.
(D Note
If the warning/indicator light flashes in
conjunction with the
II warni ng/indica
tor light, you should not dr ive the veh icle
because low-lying vehicle parts can bot
tom out as you drive over uneven ground
and be damaged as a result.
~ Adaptive Air Suspension
Applies to vehicles: with Adaptive Air Suspension
This II warning/ indicator light has the fol
lowing functions:
- It illuminates for a few seconds after the ig
nition is turned on as function check and
then goes out.
- It comes on for approximately 15 seconds
as a warning of
reduced ground clearance , if
the dynamic mode is activated and if the ig
nition is switched on
r:!;> page 150, Chassis
controls.
- If the warning/indicator light flashes in con
junction with the
II warning/indicator
light, you should not drive the vehicle imme
diately in order to prevent damage to the
underbody. The two warn ing/ indicator
lights flashing together points to an ex
treme Low level. A very
pronounced lower
ing
of the vehicle (extreme Low level) can re
sult, for example, from a heavy load. As
soon as the level has returned to normal,
the warning/indicator lights stop flashing,
and you can drive away.
(D Note
If the warning/indicator light flashes in
conjunction with the
II warning/indica
tor light, you should not drive the vehicle
Page 37 of 342
II
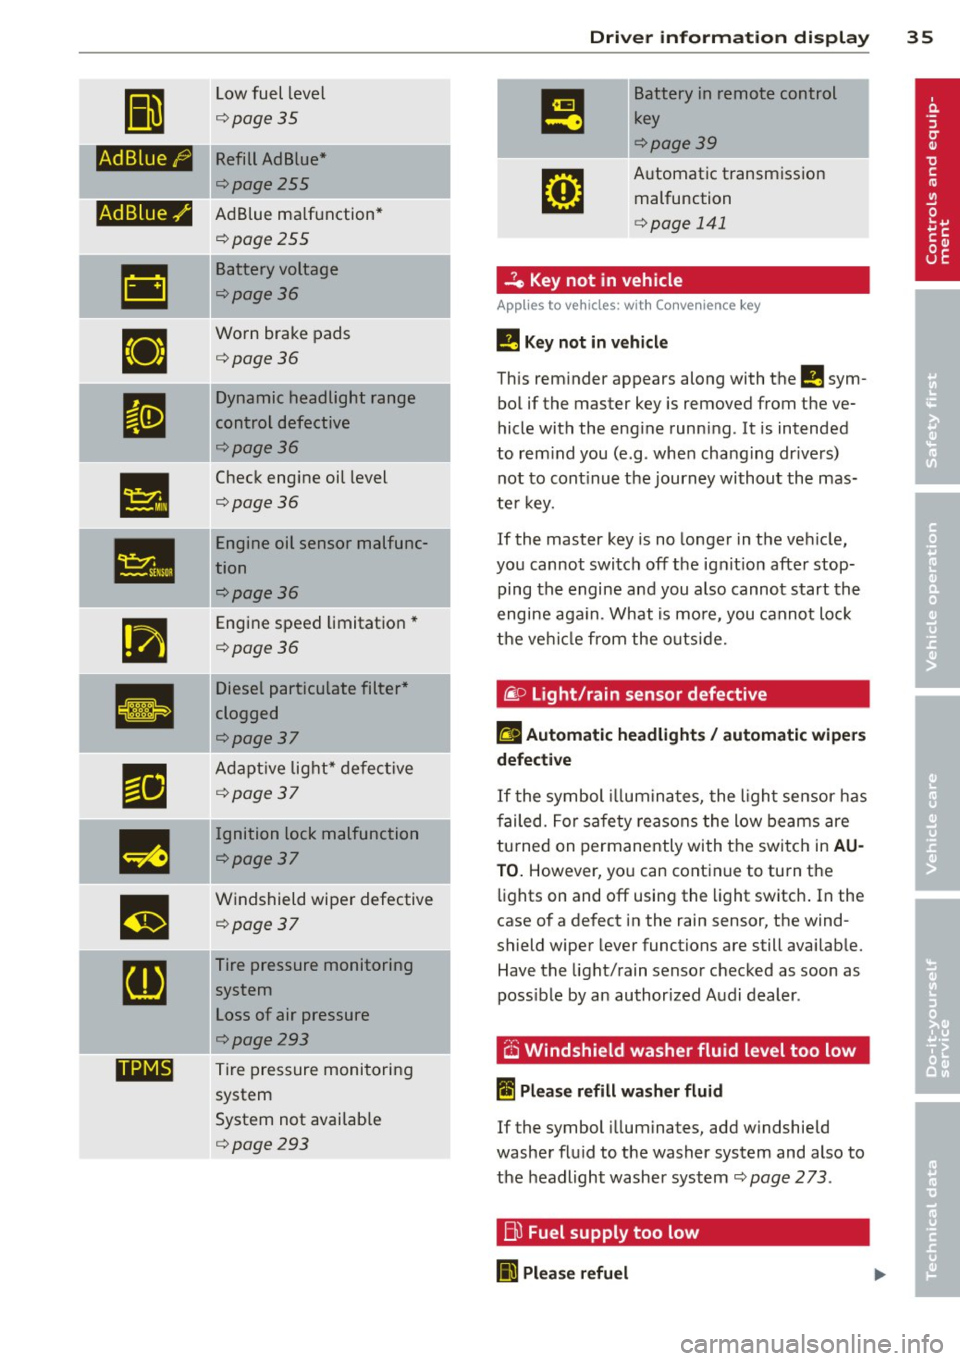
Low fuel level
¢page 35
fi.fl1::jfl1-j Kefill Ad Blue*
¢page255
-Ad Blue,/'
•
•
•
••NI@
AdBlue ma lfunction*
¢poge255
Battery voltage
¢poge36
Worn brake pads
¢poge36
Dy namic headlight range
control defective
¢poge36
Check eng ine oil level
¢poge36
Engine oil sensor malfunc
tion
¢poge36
Engine speed limitat ion*
¢poge36
Diesel particulate filter *
clogged
¢poge37
A dapt ive lig ht* defec tive
¢poge37
-Ignition lock malfunction
¢poge37
W indshield wiper defective
¢poge37
Tire pressure monitoring
sys tem
Loss of air pressure
¢poge293
T ire pressure monitoring
system
System not availab le
¢poge293
Dri ver information di spla y 35
Battery in remote control
key
¢poge39
A utomat ic transm iss ion
malfunction
¢ page 141
...?c, Key not in vehicle
Applies to vehicles: with Convenience key
!!I Key not in vehicle
This reminder appears along with the !!I sym
bol if the master key is removed from the
ve
hicle with the engine runn ing. It is intended
to rem ind you (e .g. whe n cha ng ing dr ive rs)
not to cont inue the journey without the mas
te r k ey.
If the master key is no longer in the ve hicle ,
you cannot swi tch off t he ig nit io n after stop
ping the engine an d you also cannot start the
engine aga in. What is mo re, you cannot lo ck
t he ve hicl e from the o utsi de.
@. D Light/rain sensor defective
fll Automatic headlights/ automatic wipers
defective
If t he symbol illumina tes, the l ight se nsor has
f ailed. For safe ty rea sons the low beams are
tu rned on permanently with t he switc h in
AU
TO. However , yo u can cont inue to tu rn the
li g hts on and off using the light switch . In the
case of a defect in the rain sensor, t he wind
shield wiper lever functions are still availab le.
Have the light/rain senso r ch ecked as soon as
poss ible by an author ized Audi dealer .
6 Windshield washer fluid level too low
~ Please refill washer fluid
If the symbol illuminates, add w indshie ld
washe r fl ui d to the washer system and also to
t h e headlight washer system
¢ page 2 73 .
Bl Fuel supply too low
II Please refuel
Page 38 of 342

36 Driver in formation d isplay
When this symbo l (I illuminates for the f irst
time, the fuel reserve in your vehicle is sti ll
between 2 .6 and 3 .2 gallons (10- 12 liters) .
Refue l as soon as possib le
¢ page 252.
If the symbol lights up, even when there is
ample fuel in the tank, and the text
T a nk sys
tem malfunct ion! Cont act wor kshop
appears
in the display, there is a fault in the system.
Contact a qualified workshop to have the fau lt
rectified.
t::l Battery voltage
If the battery's state of charge is not in the
optimal range, the
f• ) symbol is shown in the
d isplay and the dr iver message
Low battery
c harge : battery will be charg ed while driving
appears.
Wh ile this dr iver not ificat io n is displayed, you
have to be p repared for lim ited start ing capa
b ili ty.
Driv er m essage appears and goes out
again
I f t his driver message appears after the igni
tion is turned o n or wh ile driving and it goes
out again after a while, the battery has been
adequately recharged .
Driver message app ears and does not go
out again
If th is driver notification appears after the ig
nition is turned on or while driving and does
not go out again, the battery's state of charge
is not in the opt imal range. Starting capability
is restricted. Have the battery checked by an
author ized Audi dealer as soon as poss ible .
{0 : Worn brake pads
El Brake pads !
If the warn ing light illum inates, immediately
contact your authorized Audi dealer or quali
fied workshop to have all brake pads inspect
ed . On USA models the wa rning light
El
l ) - : USA mod els only
comes on together with the warning light
- · Both sets of bra ke pads on an ax le
must a lways be rep laced at the same time.
A WARNING
=
Driving w it h bad brakes can cause a colli-
sion and ser ious personal in jury.
- If the warn ing light
El and the warning
light
11111> with the message Brake
pads!
comes o n in the inst rument cluster
d isp lay, immediately contact your au
thor ized Audi dealer or qualified wo rk
shop to have all b rake pads checked or
re placed if ne cessa ry.
~(i) Headlight range control
II He adlight range control defective !
-
If the symbol illuminates, the dynamic head
li ght rang e control is no longer work ing prop
erly. Have the system checked and repa ired at
yo ur aut horized Aud i dea le r.
~ -Engine oil level
l!I Plea se check oil level
When the symbol illuminates, check the en
gine o il leve l as soon as possible
¢ page 263.
T op off t he oil at your ear liest opportu nity
¢ page 264 .
't::r.~ Engine oil sensor defective
II Oil level ! Sensor defective
If the symbol illum ina tes, contact yo ur au
thorized Aud i dea le r and have the oil sensor
inspected. Unti l yo u have this done, check t he
oi l level each time you refue l just to be on the
safe s ide
¢ page 263.
!?) Engine speed limitation
Applies to vehicles: wit h engine speed limitatio n
II! Do not e xceed ma x. engine speed of X XXX
rpm .,,.
Page 42 of 342
40 Opening and clo sing
@ Tips
Please note that the current state of the
veh icle door locks can only be recalled with
the master key that was last used to lock
the vehicle . It is possible that a different
state is shown for the door locks on the
other master key wh ich is not the same as
that of the vehicle .
Master key battery replacement
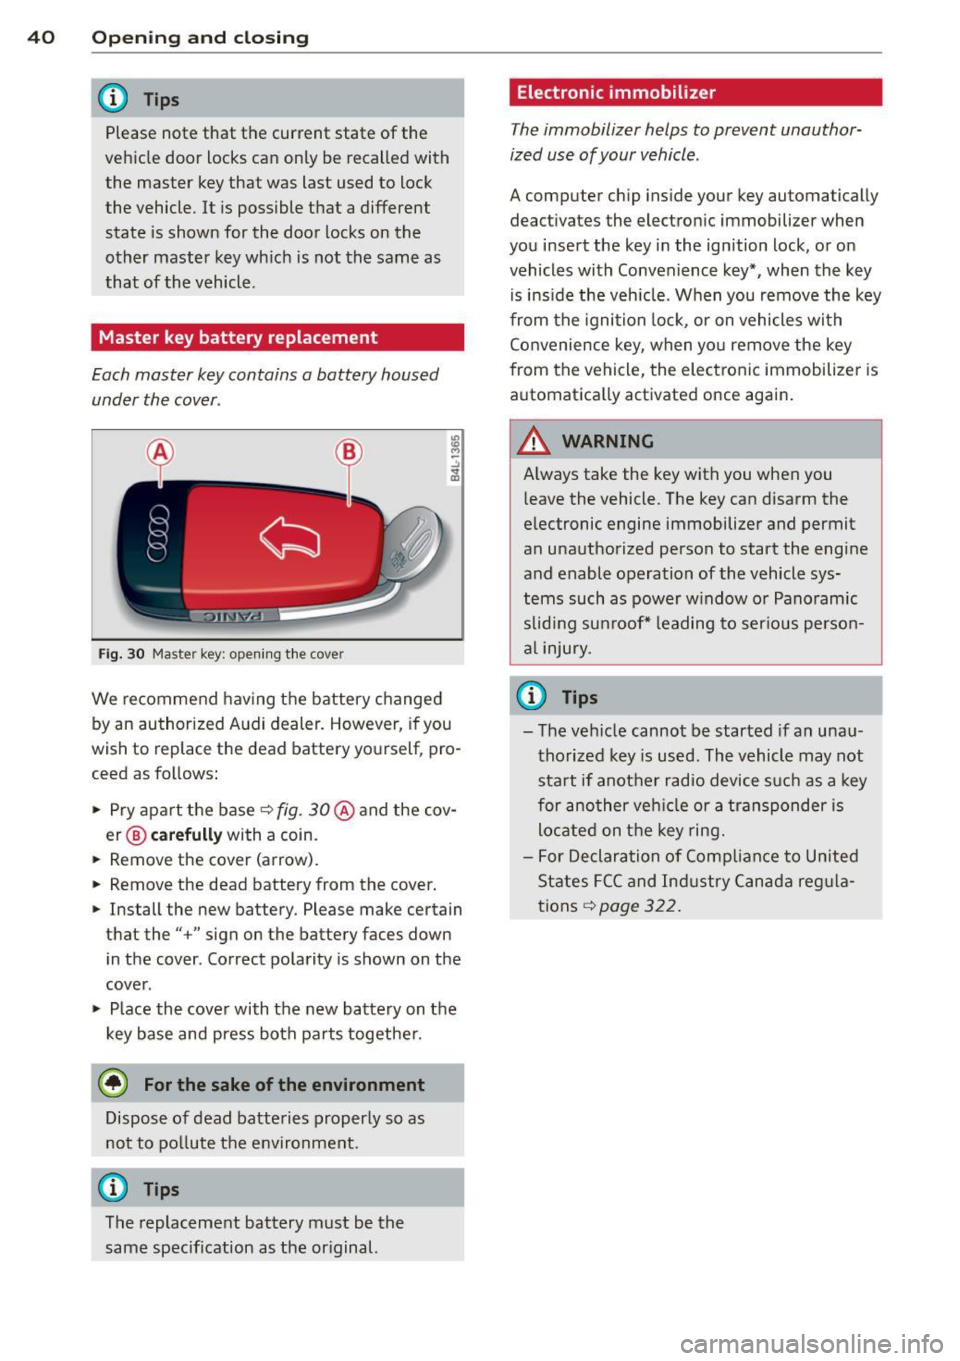
Each master key contains a battery housed
under the cover .
Fig. 30 Master ke y: opening the cove r
We recommend having the battery changed
by an author ized Audi dealer. However, if you
wish to replace the dead battery yourself, pro
ceed as follows:
.. Pry apart the base
c::> fig. 30@and the cov-
er @
carefully with a coin.
.. Remove the cover (arrow).
.. Remove the dead battery from the cover .
.. Install the new battery . Please make certain
that the" +" sign on the battery faces down
in the cover . Correct polarity is shown on the
cover .
.. Place the cover with the new battery on the
key base and press both parts together.
@ For the sake of the environment
Dispose of dead batteries properly so as
not to po llute the environment.
(!) Tips
The replacement battery must be the
same specification as the or iginal.
Electronic immobilizer
T he immobilizer helps to prevent unauthor
ized use of your vehicle .
A computer chip ins ide your key automatically
deac tivates the elec tronic immobilizer when
you insert the key in the ignition lock , or on
vehicles with Convenience key*, when the key
is ins ide the veh icle. When you remove the key
from the ignition lock, or on vehicles with
Convenience key, when you remove the key
from the vehicle, the electronic immobilizer is
automatica lly activated once again.
WARNING
Always take the key with you when you
l eave the vehicle. The key can disarm the
electronic engine immobilizer and permit
an unauthorized person to start the engine
and enable operation of the vehicle sys
tems such as power w indow or Panoramic
slid ing sunroof* leading to serious person
al injury.
u) Tips
-The vehicle cannot be started if an unau
thorized key is used . The vehicle may not
start if another radio device such as a key
for another vehicle or a transponder is
located on the key ring.
- For Declaration of Compliance to United
States FCC and Industry Canada regula
tions
c::> page 322 .
Page 50 of 342
48 Openin g and clo sing
- As soon as the electrical connec tion to
the trailer socket is completed on vehi
cles with a factory installed towing h itch,
or a trailer hitch that was installed later
according to factory specifications, the
automat ic rear lid function can on ly be
operated via the handle in the rear lid.
Rear lid emergency unlocking
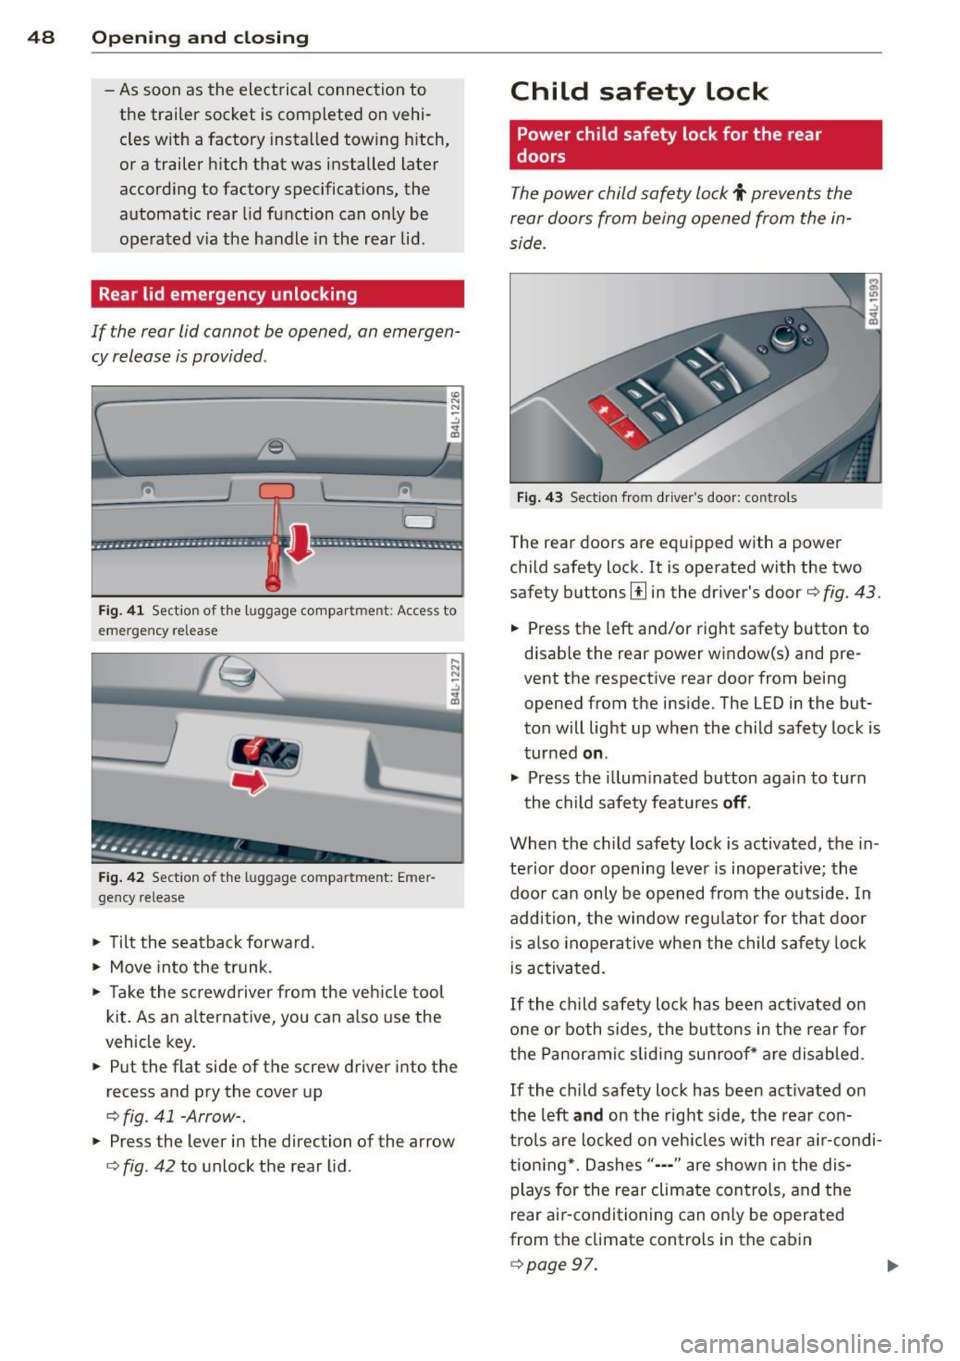
If the rear lid cannot be opened, an emergen
cy release is provided .
1----------------- --,l~ N
Fig . 4 1 Section of the luggage compar tment : Access to
emerge ncy re lease
Fig . 42 Sect ion of the luggage compartment: Emer
gency release
,.. Tilt the seatback forward .
,.. Move into the t runk.
,.. Take the sc rewd river from the veh icle tool
kit. As an alternat ive, you can a lso use the
vehicle key.
,.. Put the flat side of the screw driver into the
recess and pry the cover up
o fig. 41 -Arrow-.
,.. Press the lever in the direction of the arrow
ofig . 42 to unlock the rear lid .
Child safety lock
Power child safety lock for the rear
doors
The power child safety lock t prevents the
rear doors from being opened from the in
side .
Fig . 43 Sect ion fro m driver's door: controls
The rear doors are equipped with a power
child safety lock.
It is operated with the two
safety buttons
III in the dr iver's door o fig. 43.
,.. Press the left and/or right safety button to
disab le the rear power window(s) and pre
vent the respective rear door from being
opened from the inside. The LED in the but
ton will light up when the child safety lock is
turned
on .
,.. Press the illum inated button aga in to turn
the child safety featu res
off .
When the c hild safety lock is activated, the in
te rior door opening lever is inoperative; the
doo r can only be opened from th e outside. In
addition, the window regu lator for that doo r
is also inoperative when the child safety lock
is activa ted.
If the child safety lock has been ac tivated on
one or both sides, the butto ns in the rear for
the Panoramic slid ing su nroof* are disabled .
If the child safety lock has been act ivated on
the left
and on the right side, the rear con
tro ls are locked on veh icles with rear a ir-condi
tion ing *. Dashes"··-" are show n in t he dis
plays for the rear climate contro ls, and the
rear air-conditioning can on ly be operated
from the climate controls in the cabin
opage 97.
Page 54 of 342
52 Openin g and clo sing
opened are the power windows switched
off.
- Be careful when closing the windows .
Check to see that no one is in the way, or
serious injury could result!
- Always remove the ignition key whenever
you leave your vehicle.
- If you lock your vehicle from the outside,
no one, especia lly children, sho uld re
main in the vehicle .
- Do not stick anything on the windows or
the windshield that may interfere with
the driver's fie ld of vision.
In addition to t he switches in the drive r's
door there is a separate switch in each
door for the power window in that door
¢ page 53, fig. 47.
Switches in the driver's door
T he driver can operate all windows.
I f the respective switch is pushed or pulled
the w indow will open or close. The power win
dow switches have a
two -positi on fun ction :
Opening the windows
.. Push the sw itch to the fir st stop and hold it
there unt il the wi ndow has lowered to the
desired position.
.. Push the switch briefly to the
sec ond stop:
the window wi ll automatically open all the
way.
Closing the windows
.. Pu ll the switch up to the fir st stop and ho ld
it there until the window has risen to the de
sired position .
.. Pu ll the switch q uickly to the
second po si
tion :
the w indow w ill automatically close all
t he way ¢
A in Controls on page 5 l.
Activating /deactivating the r ear windows
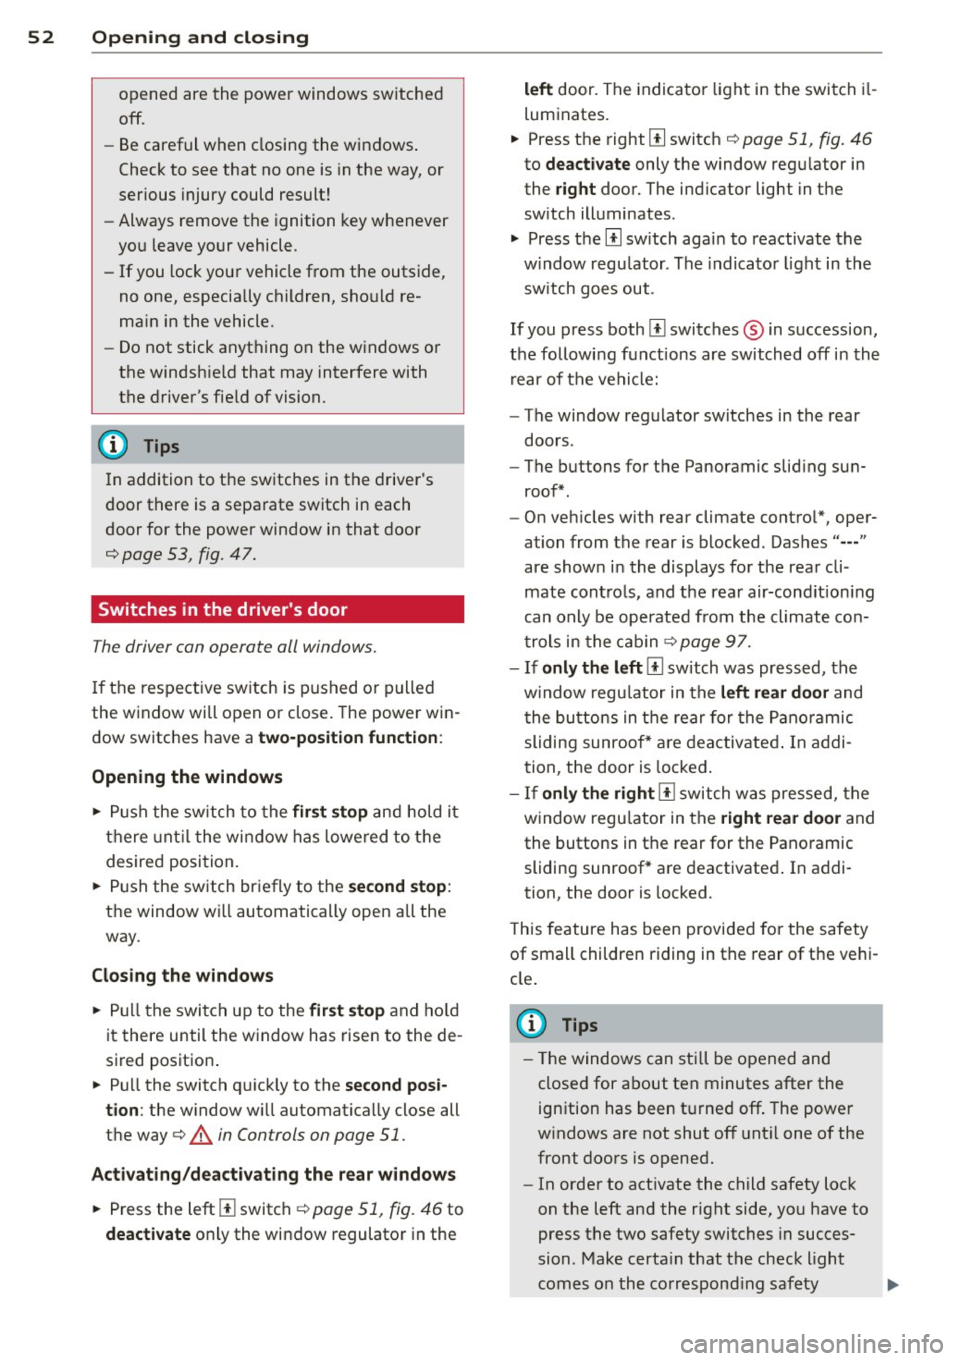
.. Press the left [!I switch ¢ page 51 , fig. 46 to
deactivate on ly the window regulator in the
left door. The indicator light in the switch i l
luminates.
.. Press the right
[!I switch ¢ page 51, fig. 46
to
d eacti vate only the window regu lator in
the
right door. The ind icator light in the
sw itch illuminates .
.. Press the
[!I sw itch aga in to reactivate the
w indow regu lator . The indicato r light in the
sw itch goes out .
If you press both
[!I switches ® in succession,
the following funct ions are switched off in the
rear of the vehicle:
- The window regulator switches in the rear
doors .
- The buttons for the Panoramic slid ing su n
roof* .
- On veh icles with rear climate control*, oper
ation from the rear is blocked . Dashes" ---"
are show n in the displays for the rear cli
mate cont ro ls, and the rear air-cond ition ing
can only be operated from the climate con
trols in the cabin ¢page 97.
- I f
only th e left [!I sw itch was pressed, the
w indow regu lator in the
left rear do or and
t he buttons in t he rear for the Panoramic
sliding sunroof* are deactivated . In addi
t ion , the door is locked .
- If
o nly the right [!I switch was pressed, the
w indow regu lator in the
right re ar door and
the buttons in the rear for the Panoramic
sliding sunroof* are deactivated . In addi
tion, the door is locked.
T his feature has been provided for the safety
of small children riding in the rear of the ve hi
cle .
(D Tips
- T he windows can sti ll be opened and
closed for about ten minutes after the
ignition has been t urned off . The powe r
w indows are not shut off unt il one of the
front doors is opened.
- In order to act ivate the child safety lock
on the left and the right side, you have to
press the two safety switches in succes
sion . Make certa in that the check light
comes on the correspond ing safety
Page 55 of 342
switch when the chi ld safety lock is acti
vated .
Switch in the front passenger 's door and
on the rear doors
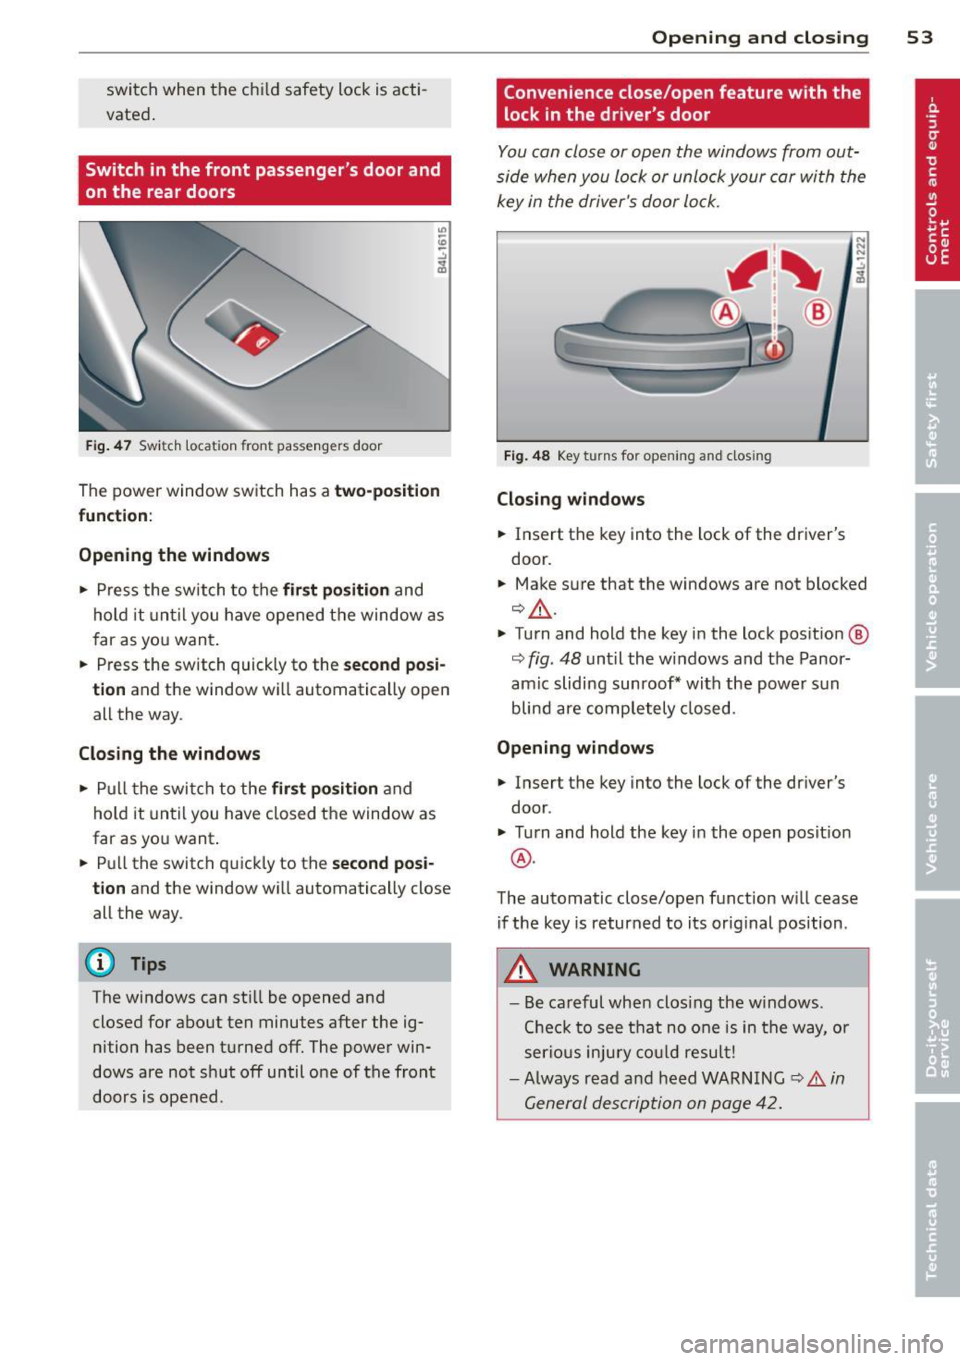
F ig. 4 7 Swit ch loca tion front pass engers door
The power window sw itch has a two-po sit ion
function :
Opening the windows
.. Press the switch to the fir st position and
hold it until you have opened t he window as
f ar as yo u wan t.
.. Press the sw itch quickly to the
second posi
tion
and the window w ill automatically open
all the way .
Closing the windows
.. Pull t he swi tch to the first position and
hold it until you have closed the window as
far as yo u want .
.. Pull the switch q uickly to the
second posi
tion
and the window wi ll automatically close
all the way.
(D Tips
The windows can st ill be opened and
closed for abo ut ten minutes after the ig
nition has been t urned off . The powe r win
dows are not sh ut off until o ne of t he front
doors is opened .
Opening and clo sin g 53
Convenience close/open feature with the
lock in the dr iver 's door
I
You can close or open the windows from out
side when you lock or unlock your car wi th the
key in the driver's door lo ck .
Fig. 48 Key turns for opening and closing
Closing windows
.. Insert the key into the lock of the dr iver's
door .
.. Make su re that the windows are not blocked
¢ _& .
.. Turn and hold the key i n the lock pos it io n @
¢ fig . 48 unt il the windows and the Panor
amic sliding sunroof * with the power s un
blin d are comp letely closed.
Opening windows
.. Insert the key into the lock of the driver's
door .
.. Turn and hold the key in the open posit ion
@ .
The automatic close/open f unction w ill cease
if the key is returned to its orig inal pos ition .
A WARNING
-
- Be careful wh en clos ing the w indows .
Che ck to see t hat no one is in the way, o r
ser ious injury could result!
- Always rea d an d h eed WARN ING
¢ A in
G eneral descrip tion on p age 42.
Page 56 of 342
54 Opening and closing
Reactivating the system after battery
disconnection
If the vehicle battery is disconnected and then
reconnected, the a utomatic closing and open
ing function wilt not work until it is reactivat
ed. To reactivate this feature, perform the fol
lowing steps:
Reactivating close /open feature
., Pull and hold the power window switch un
til the window is completely closed .
., Release the switch .
., Pull the switch again for one second. The
automatic closing/opening is now reactivat
ed .
Panoramic sliding
sunroof
Description
App lies to vehicles: with Pa noramic slidi ng sunroo f
The Panoramic sliding sunroof of two individu
al glass roof segments, wh ich can be adjusted
e lectr ically independently of each other.
The front segment can be tilted and slid open.
The rear segment can be tilted, but it cannot be slid open .
The Panoramic s liding sunroof is operated by
the driver or passenger when the ignition is on
wi th a rotary switch (for the fron t roof seg
ment) and a rocker switch (rear roof seg
ment) .
After the ignit ion has been switched off , the
Panoramic sliding sunroof can still be opened
or closed for about 10 m inutes . However, as
soon as the dr iver's or passe nger's door is
opened, the switches for the Panoramic slid
ing sun roof are inope rat ive.
0 Note
You should always close the Panoramic
sliding sunroof when you leave you r vehi
cle. Sudden rain can drench the interior
equ ipment and damage the electronic con
venience features in your vehicle.
(D Tips
If you park your vehicle in the sun, we rec
ommend that you close both sun blinds
c>page56.
Tilting/sliding open Panoramic sliding
sunroof
Applies to vehicles: w ith Panoramic sliding sunroof
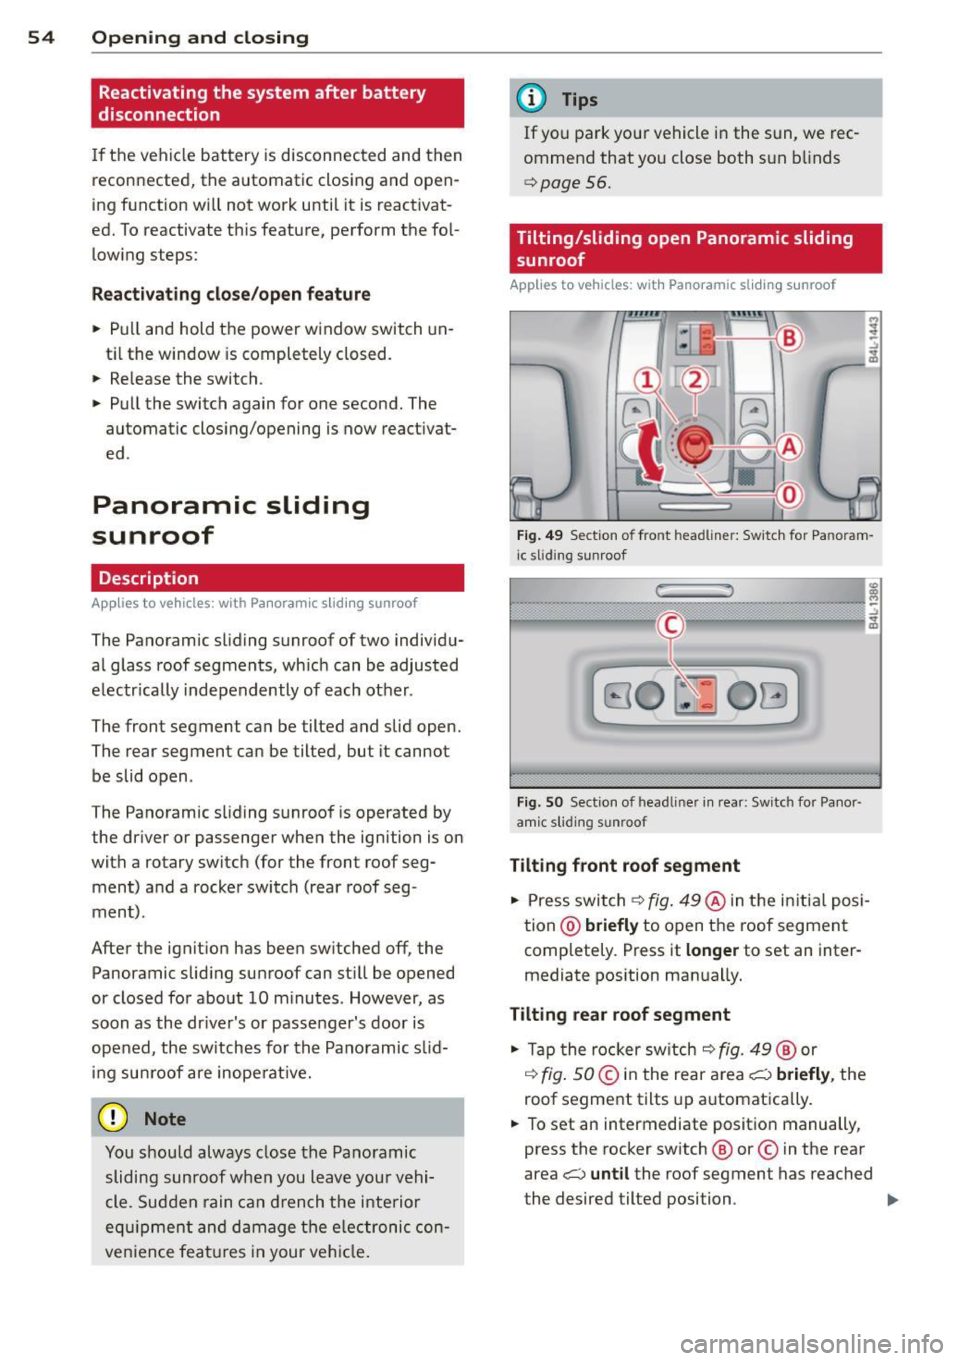
Fig. 49 Se ction o f fro nt headline r: Sw itch for Pa noram
i c slid ing sunroof
Fi g. SO Sect ion of head liner in rear : Switc h for Panor
amic s lidin g sunroof
Tilting front roof segment
., Press switch c>fig. 49@ in the in itia l posi
tion @)
briefly to open the roof segment
completely . Press it
longer to set an inter
mediate pos ition manually.
Tilting rear roof segment
., Tap the rocker switch c> fig. 49 ® or
,:¢, fig. SO@in the rear area i;:::) briefly, the
roof segment tilts up automatica lly.
., To set an intermediate position manually,
press the rocker switch ® or© in the rear
area
i;:::) until the roof segment has reached
the desired tilted position . ..,.
Page 57 of 342

Opening front r oof segment to comf ort
se ttin g
" Turn the rotary switch c::> fig. 49@ to posi
tion ©, you will feel the switch engage . The
roof segment is slid open only to a comfort
position w ith low wind noise. This is the rec
ommended standard sett ing for normal
driv ing cond itions .
Sliding front roof segment full y open
" Rotate and ho ld the switch @ in position @
unt il the roof segment has reached the de
s ired pos it ion. There may be increased wind
noise in this pos it ion.
(D Tips
- In posit ion @, the switch jumps back to
pos ition © again as soon as the switch is
released .
- When dr iv ing with the Panoramic slid ing
sunroof open, open the front roof seg
ment to the comfort setting to m inim ize
wind noise .
Closing Panoramic sliding sunroof
Applies to vehicles: with Panoram ic sliding sunroof
Clos ing tilted front roof segm ent
" Pull the switch c::> page 54, fig . 49 @ and
ho ld it until the roof segment has reached
the des ired pos ition.
" Pull the switch
bri efl y to close the roo f seg
ment automatica lly. By activating the switch
briefly again, the roof segment can be stop
ped in any position
c::, .,&_ .
Clos ing front r oof s egment wh en slid
o p en
" Rotate switch c::, page 54, fig. 49@ to posi
t ion @ to close the roof segment
c::> .,&_. To
move to an intermediate posit ion, rotate the
switch to the corresponding click-stop .
Clos ing tilt ed r ear roof segm ent
" Tap the rocker switch c::> page 54, fig . 49 ®
or c::> page 54, fig. 50 © in the front area Q
br iefl y to close the roof segment completely
c::> A.
Opening and clo sin g 55
" To set an intermediate position manually ,
press the rocker switch in the front area~
until the roof segment has reached the de
sired tilt posit ion
c::> .,&_ .
A WARNING
Improper use of the Panoram ic sliding
sunroof can cause serious personal injury.
- Be careful when closing the Panoramic
-
sliding sunroof . Not paying attention
could cause you or others to be trapped
and injured as the Panoram ic sliding sun
roof closes.
- Always take the key w ith you when you
leave the vehicle to prevent injur ies
caused by the Panoramic slid ing sunroof
clos ing
- Never leave children or persons requiring
assistance alone in the vehicle, especially
when they could access the vehicle keys .
Unsupervised use of the keys can result
in the engine being started or use of ve
hicle systems such as the power win
dows, etc. wh ich could result in serious
injury. The doors could be locked with
the remote key, de laying help in an
emergency.
- The Panoramic slid ing sunroof will con
tinue to operate until the ign ition key
has been removed and one of the front
doors has been opened.
Convenience closing feature
Applies to vehicles: wit h Pa noramic slid ing sunroof
The Panoramic sliding sunroof can be closed
from outside with the key in the driver's door lock .
" Insert the key into the dr iver's door lock .
" Tu rn and hold the key in the lock pos it ion @
c::> page 43, fig . 33 until the Panoramic slid
ing sunroof is complete ly closed
c::> .,&_ in
Closing Panoramic sliding sunroof on
page 55.
Th e power s un blind is a lso closed . .,..