hood AUDI Q7 2013 Owner´s Manual
[x] Cancel search | Manufacturer: AUDI, Model Year: 2013, Model line: Q7, Model: AUDI Q7 2013Pages: 348, PDF Size: 87.72 MB
Page 69 of 348
.. Lift the wiper blade off in the direction of
the arrow @.
Install ing wipe r blade
.. Place the new wiper b lade in the retainer on
the wiper a rm ©
r::!>fig. 68.
.. Swing the wipe r blade in the direction of
the arrow @against the wiper arm .
.. Squeeze the corrugation on the wiper until
you hear the bracket click in the wiper arm .
.,. Place the wiper arm back against the wind-
shield.
Clean your wiper blades regularly with a wind
shie ld washer solution to prevent streaking. If
the blades are very dirty, for example with in
sects, carefully clean the blades with a sponge
or a soft brush .
If the wiper blades begin to streak the wind
shie ld, this could be caused by residue left on
the windshield by automatic car washes .
Fi ll the windshield washer container with a
specia l solution available at your authorized
Aud i dealer to remove the residue.
A WARNING
Be sure to inspect the condit ion of yo ur
w iper blades regularly. See yo ur author
ized Aud i dea le r for r eplacement b lades .
(D Note
-The windshield wiper blades must only
be replaced whe n in the service position
r::!> page 66! Otherwise, yo u risk da mag-
i ng the pa int on the hood or the wind
s h ield wiper motor.
- To he lp prevent damage to the wiper sys
tem, a lways loosen blades which are fro
z en to the windsh iel d befo re ope rat ing
wipe rs.
- To he lp prevent damage to w iper b lades,
do no t use g asoline, ke rose ne, pa int
t hi nner, or othe r so lven ts on or nea r th e
wipe r blades .
- To he lp prevent dam age to the wiper
arms or other components, do not at
tempt to move the w ipers by hand .
Clear vision 6 7
@ Tips
Commercia l hot wa xes applied by auto
matic car washes affect the cleana bility of
the windshield .
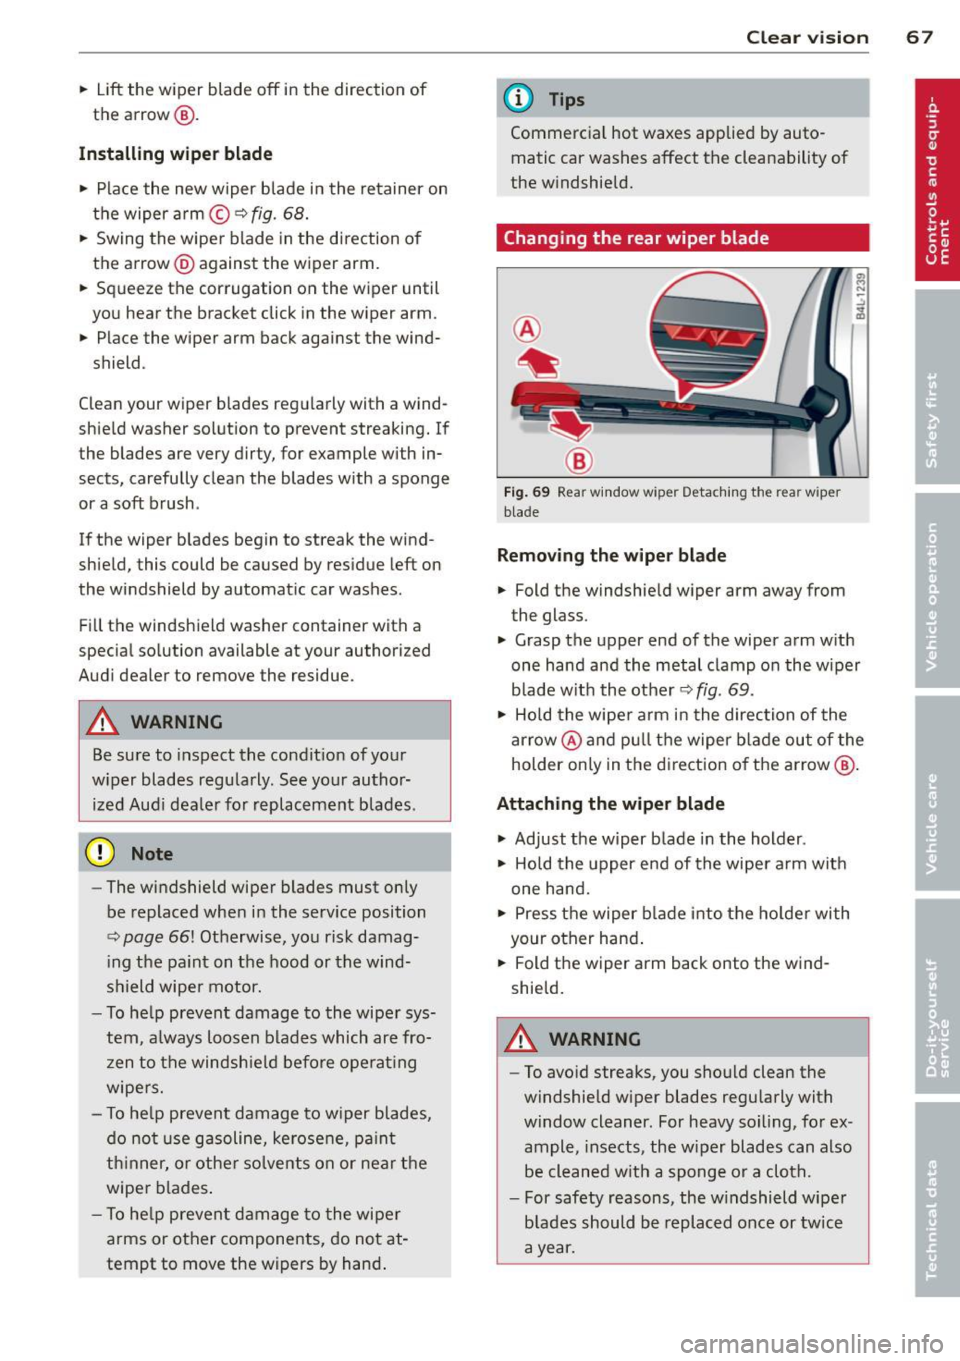
Changing the rear wiper blade
F ig . 6 9 Rear w indow w iper Detac hing the rear wiper
b lade
Removing the wiper bl ade
.. Fold the windshie ld w iper arm away from
the glass.
.. Grasp the upper end of the wiper a rm with
one hand and the metal clamp o n the wiper
b lade w it h the other
Q fig . 69.
.. Ho ld the wipe r arm in the direction of the
arrow @and pu ll th e wiper b lade out of the
holder on ly in the d irection of the arrow @.
Attaching the w iper blade
.,. Ad just the wiper b lade in the holder .
.. Ho ld the upper end of the wipe r arm wit h
one hand.
.. Press t he wiper b lade i nto the ho lder wi th
your other hand .
.. Fold the w iper arm back onto the wind
shield.
A WARNING
- To avoid streaks, you should clean the
windshie ld w iper blades regu larly with
w indow cleaner. For heavy soiling, for ex
ample, insects, the w iper blades can also
be cleaned w ith a sponge or a cloth.
- For safety reasons, the w indshield wipe r
blades should be replaced once or tw ice
a year.
Page 140 of 348
138 Automatic transmi ssion
co uld "creep" forward or backward.
When stopped, keep the brake pedal
fully depressed and use the parking brake if necessary to keep the vehicle
from ro lling .
- If the selector lever is unintentionally
moved into N wh ile you are driving, take
yo ur foot off the accele rato r pedal and
wa it for the engine to return to idle
speed befo re selecting a d rivi ng position .
- Never shift into "R" or "P" when the vehi
cle is in mot ion.
- Never get out of the dr iver 's seat when
the engine is runn ing .
- If you must get out of the vehicle, move
the se lector lever securely into the P po
sit io n and apply the par king brake f irm ly.
- If the eng ine must remain ru nning, never
hav e any driv ing pos ition engaged when
c hec king under the hood . M ake sure t he
sele ctor lever has securely eng aged and
is locke d in "P" with the par king brake
firmly set ¢
page 255, Engine compart
ment .
Otherw ise, any increase in eng ine
speed may set the vehicle in m otion,
even w ith the par kin g brake applied.
Selector lever positions
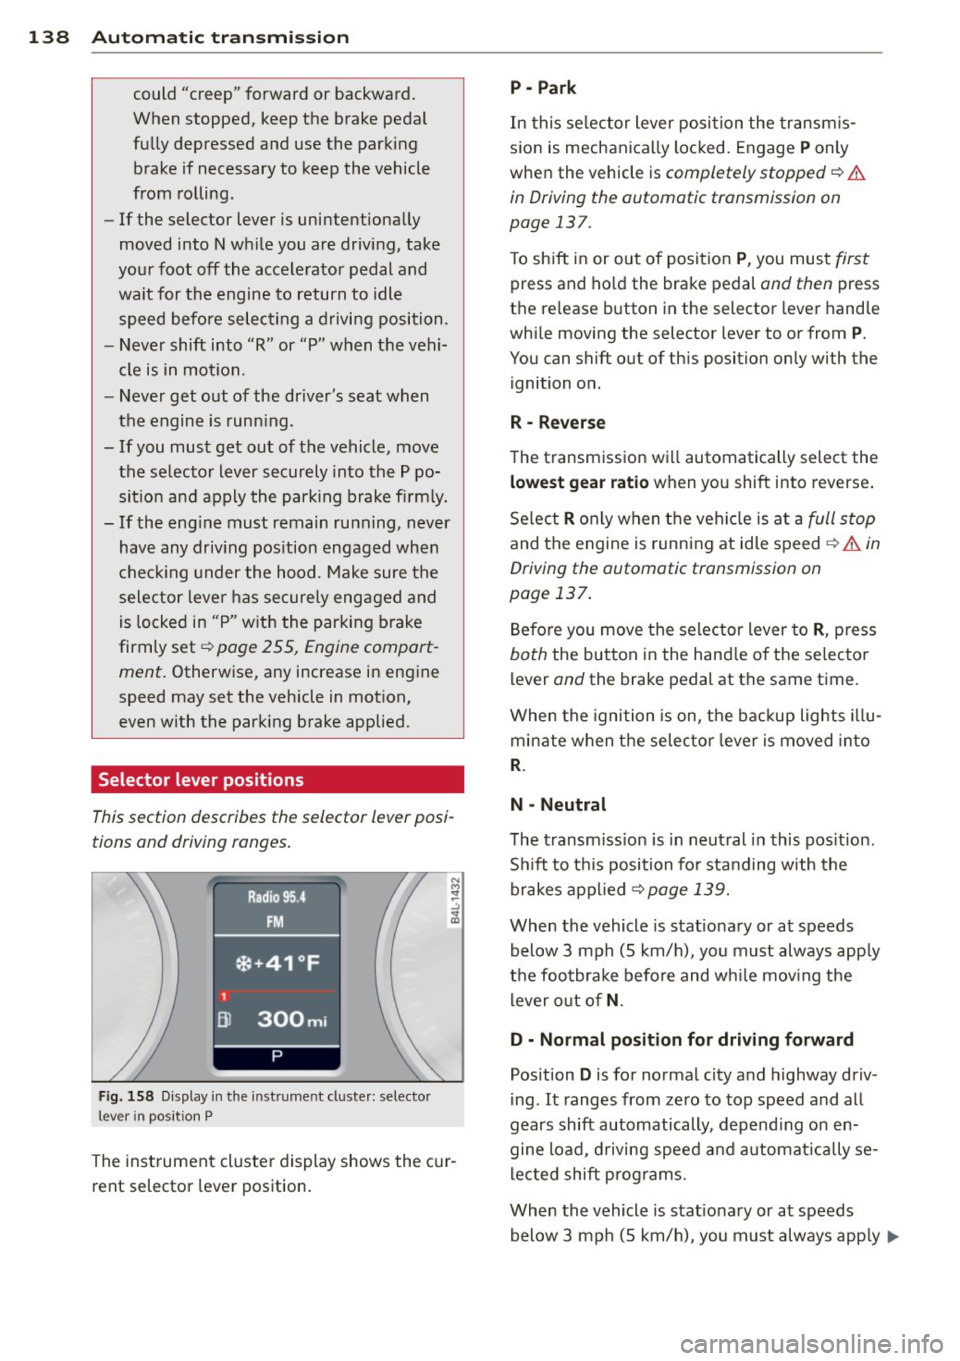
This section describes the selector lever posi
tions and driving ranges.
F ig. 158 Display in t he in st rum en t cluste r: selecto r
lev er in po sit ion P
The inst rumen t cluste r display shows the c ur
rent selector lever position .
P - Park
In this selector lever posi tion the transm is
s ion is mechanica lly locked. Engage
P only
whe n the vehicle is
completely stopped¢&.
in Driving the automatic transmission on
page 137.
T o shift in or out of posit ion P , you mus t first
press and ho ld the brake pedal and then press
the re lease button in the selector leve r hand le
whi le moving the selector lever to or from
P .
You can shift out of th is position only with the
ignition o n.
R • Reverse
The transm iss ion w ill automatically select the
lowest gear ratio when you shift into reverse .
Se lect
R o nly when t he vehi cle is at a full stop
and the engine is running at idle speed¢&. in
Driving the automatic transmission on
page 137.
B efore you move the se lector lever to R , press
both the button in the hand le o f the se lecto r
lever and the brake pedal at the same t ime.
W hen the ignition is on, the bac kup light s illu
minate w hen t he selec to r l ever is
moved in to
R .
N -Neutral
The transm iss io n is in neut ral in this pos it ion .
S hi ft to t his position fo r standing with the
brakes app lied
¢ page 139.
When the vehicle is stat iona ry or at speeds
below 3 mph (5 km/h) , you must always app ly
t h e foo tbrake before and wh ile mov ing the
l ever o ut o f
N.
D - Normal position for driving forward
Position D is for no rma l city and highway driv
ing . It ranges from zero to top speed and all
gears shift automatically , depend ing on en
gine load, d riving speed and a utomat ically se
l ected shift p rog rams.
When the vehicle is stat iona ry or at speeds
below 3 mph (5 km/h), you must always app ly
IJ,,
Page 195 of 348
first and second stages deploy almost at the
same time.
On the passenger side, regard less of safety
be lt use, the airbag will be turned off if the
weight on the passenger seat is less than the
amo unt programmed in the electronic control
un it. The front airbag on the passenger side
w ill also be turned off if one of the child safe
ty seats that has been certified under Federal
Motor Vehicle Safety Standard 208 has been
recog nized on the seat . The
PASSENGER AIR
BAG OFF
light comes on and stays on to tell
you when the front Advanced Airbag on the passenger side has been t urned off
Q page 186, Child restraints on the front seat
- some important things to know .
_&. WARNING
To reduce the risk of injury when an airbag
inf lates, a lways wear safety belts properly.
- If you are unrestrained, lean ing forward,
sitting sideways or out of position in any
way, yo ur risk of inj ury is much higher.
- You w ill also receive serio us injuries and
cou ld even be killed if you are up against
the a irbag or too close to it when it in
flates -even with an Advanced Airbag
Q page 184.
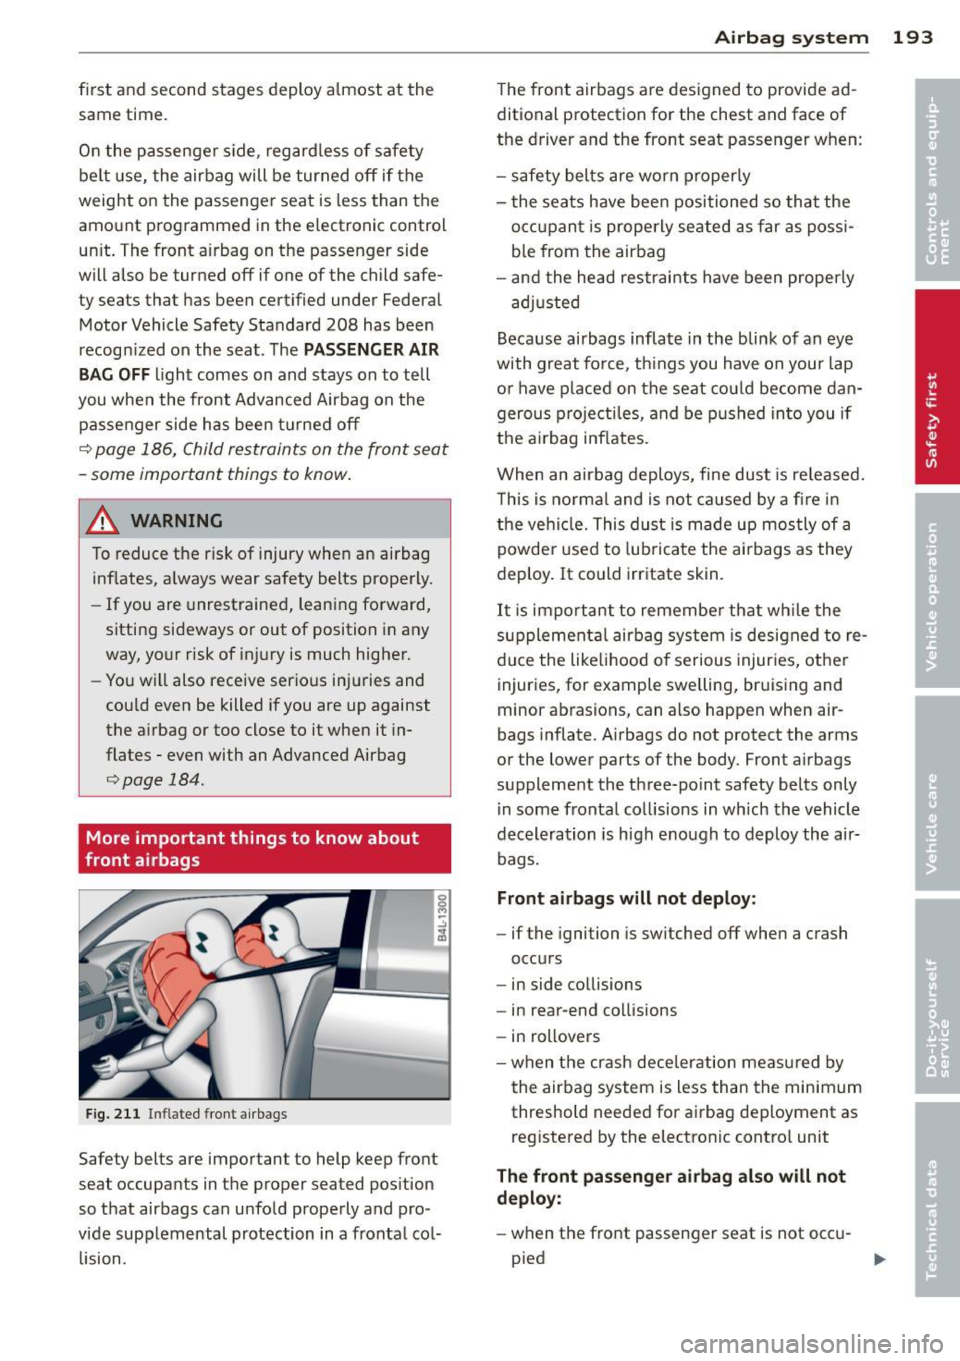
More important things to know about
front airbags
F ig. 2 11 Inflated front airbags
Safety belts are important to help keep front
seat occupants in the proper seated pos ition
so that airbags can unfo ld properly and pro
vide supplemental protection in a fronta l col
l ision.
A irba g sy stem 193
The front airbags are designed to provide ad
ditional protection for the chest and face of
the driver and the front seat passenger when:
- safety belts are worn properly
- t he seats have bee n positioned so that the
occ upan t is properly seated as far as poss i
b le from the airbag
- and the head restraints have been properly
adj usted
Because airbags inflate in the blink of an eye
with great force, t hings you have on your lap
or have placed on the seat co uld become dan
gerous projecti les, and be p ushed in to you if
the a irbag inf lates.
When an airbag deploys, fine dust is re leased.
T his is no rma l and is not caused by a fi re in
the vehi cle. This dust is made up mos tly of a
powder used to lub ricate the airbags as they
deploy. It could irritate skin.
It is important to remembe r that wh ile the
s u pplementa l airbag system is designed to re
duce the like lihood o f serious injuries, other
injuries, for example swelling, bruising and
minor abrasions, can a lso happen when air
bags inflate . A irbags do not protect the arms
or the lower parts of the body. Front airbags
supplement the th ree-point safety belts only
i n some frontal co llisions in which the vehicle
deceleration is high enough to deploy the air
bags.
Front a irbags will not deploy :
-if the ignition is sw itched off when a crash
occurs
- in side collisions
- in rear-end co llisions
- in rollovers
- when the crash dece leration meas ured by
the air bag system is less than the minimum
threshold needed for airbag deployment as
reg istered by the electronic cont ro l unit
The front passenger airbag also will not
deploy:
- when the front passenger seat is not occu-
pied ..,.
Page 202 of 348
200 Airbag system
The side airbags are located in the sides of the
front seat backrests ¢
fig. 213 and the rear
backrest* facing the doors. They are ident ified
by the word "AIRBAG".
The side airbag system basically consists of:
-the e lectronic control module and external
side impact sensors
- the two side airbags located in the sides of
the front backrests
- two rear side airbags (as an ordered
option)
-the a irbag warn ing light in the instrument
cluster .
The airbag system is monitored electron ically
to make certain that it is functioning properly
at all times. Each time you turn on the igni
tion, the airbag system indicator light will
come on for a few seconds (self diagnostics) .
The s ide airbag system supplements the safe
ty belts and can help to reduce the risk of in
jury to the driver's, front and rear* passeng
er's upper torso on the side of the veh icle that
i s struck in a side collision . Th e airbag deploys
on ly in side impacts and only when the veh icle
acceleration registered by the control unit is
high enough . If this rate is below the refer
ence value programmed into the control unit,
the side airbags will not be triggered, even
though the car may be badly damaged as a re
sult of the collision. It is not possible to de
f in e an a irbag tr igger ing range that will cover
every possible angle of impact, since the cir
cumstances will vary considerably between
one collision and another. Important factors
include, for examp le, the nature (hard or soft)
of the impacting object, the angle of impact ,
vehicle speed, etc . ¢
page 201, Important
safety instructions on the side airbag system .
Aside from their normal safety function , safe
ty belts work to help keep the driver or front
passenger in position in the event of a side
coll ision so that th e side airbags can provide
protection.
The airbag system is
not a substitute for your
safety be lt. Rather, it is part of the overall oc
cupant restraint system in your vehicle . Al
ways remember that the side airbag system can
only help to protect you if you are wearing
your safety belt and wearing it properly. This
is another reason why you should a lways wear
your safety belts, not just because the law re
quires you to do so¢
page 175, General
notes .
It is important to remember that wh ile the
s u pplementa l side airbag system is designed
to reduce the likelihood of serious injuries,
other injur ies, for example, swelling, bru is in g,
and minor abrasions can also be assoc iated
with deployed side airbags . Remember too,
s ide airbags will dep loy only once and only in
certain kinds of accidents - your safety belts
are always there to offer protection.
Vehicle damage , repair costs or even the lack
of vehicl e damage are not necessarily an indi
cation of over-sensitive or failed airbag activa
t ion. In some coll is ions, both front and side
airbags may inflate . Remember too, that air
bags will deploy only once and only in certain
k inds of co llisions -yo ur safety belts are al
ways there to offer protection in those acc i
den ts in which airbags are no t supposed to
deploy or when they have already deployed .
The side airbag system will not deploy:
-when the ignition is t urned off
- in side collisions when the acceleration
measured by the sensor is too low
- in front -end collisions
- in rea r-end collisions
- in rollovers .
In some types of accidents the front airbags ,
s ide curtain airbags and s ide a irbags may be
triggered together .
A WARNING
-
-Safety belts and the airbag system will
only provide protection when occupants
ar e in the proper seating position
¢page 201.
- If the airbag indicator light comes on
when the vehicle is being used, have the
system inspected immediately by your
authorized Audi dealer. The airbag may
Page 205 of 348
inflates in side impacts and only when the ve
hicle acceleration registered by the control
un it is high enough. If this rate is below the
reference value programmed into the contro l
unit, the side airbags will not be triggered,
even though the car may be badly damaged as
a result of the coll ision.
It is not possible to
define an airbag triggering range that will
cover eve ry possible angle of impact, since the
circumstances w ill vary considerably be tween
one co llision and another . Important factors
include, for examp le, the natu re (hard or soft)
of the impacting object, the angle of impact,
veh icle speed, etc. c::>
page 203, How side cur
tain airbags work.
Aside from the ir normal safety function, safe
ty belts work to he lp keep the driver or front
passenger in posit ion in the event of a co lli
sion so that the side curtain airbags can pro
vide protection.
The airbag system is not a s ubstitute for your
safety belt. Rather, it is part of the overall oc
cupant restraint system in your vehicle. Al
ways remember that the airbag system can
only help to protect you if you are wearing
your safety belt and wear ing it prope rly. Thi s
i s another reason why you sho uld always wear
your safety bel ts, not just beca use the law re
q ui res you to do soc::>
page 175, General
notes.
It is important to rememb er that while the
side curta in a irbag sys tem is designed to he lp
r educe the like lihood of se rious injur ies, other
in ju ries, for example, swell ing, bruising, and
minor abrasions can also be associated with
these airbags upon deployment. Remember
too, these a irbags w ill dep loy on ly once and
only in certain kinds of accidents - your safety be lts are a lways there to offer protection.
The side curtain airbag sy stem ba sicall y
consi sts of:
- The electronic control mod ule and external
s ide impact sensors
- The side curtain airbags above the front and rear side windows
A irba g sy stem 203
- The airbag indicator light in the instrument
panel
T he airbag system is mon itored e lec tronically
to make ce rtain i t is func tioning prope rly at all
times . Each time you turn on the ignit ion, the
airbag system indicator light will come on for
a few seconds (self diagnostics).
The side curtain airbag i s not activat ed :
- if the ignition is turned off
- in side co llisions whe n the acceleration
measured by the sensor is too low
- in rea r-end collisions.
A WARNING
- Safety belts and the airbag system will
only provide pro te ction when occup ants
are in the proper seating posi tion
c::>
page 71, General recommendations.
- If th e air bag ind icator light comes on
when the vehicle is being used, have the
system inspected immediately by your
authorized A udi dealer . The side curtain
airbag may not work properly even when
the vehicle acce lerat ion in a side collision
is high enough to activate the airbag.
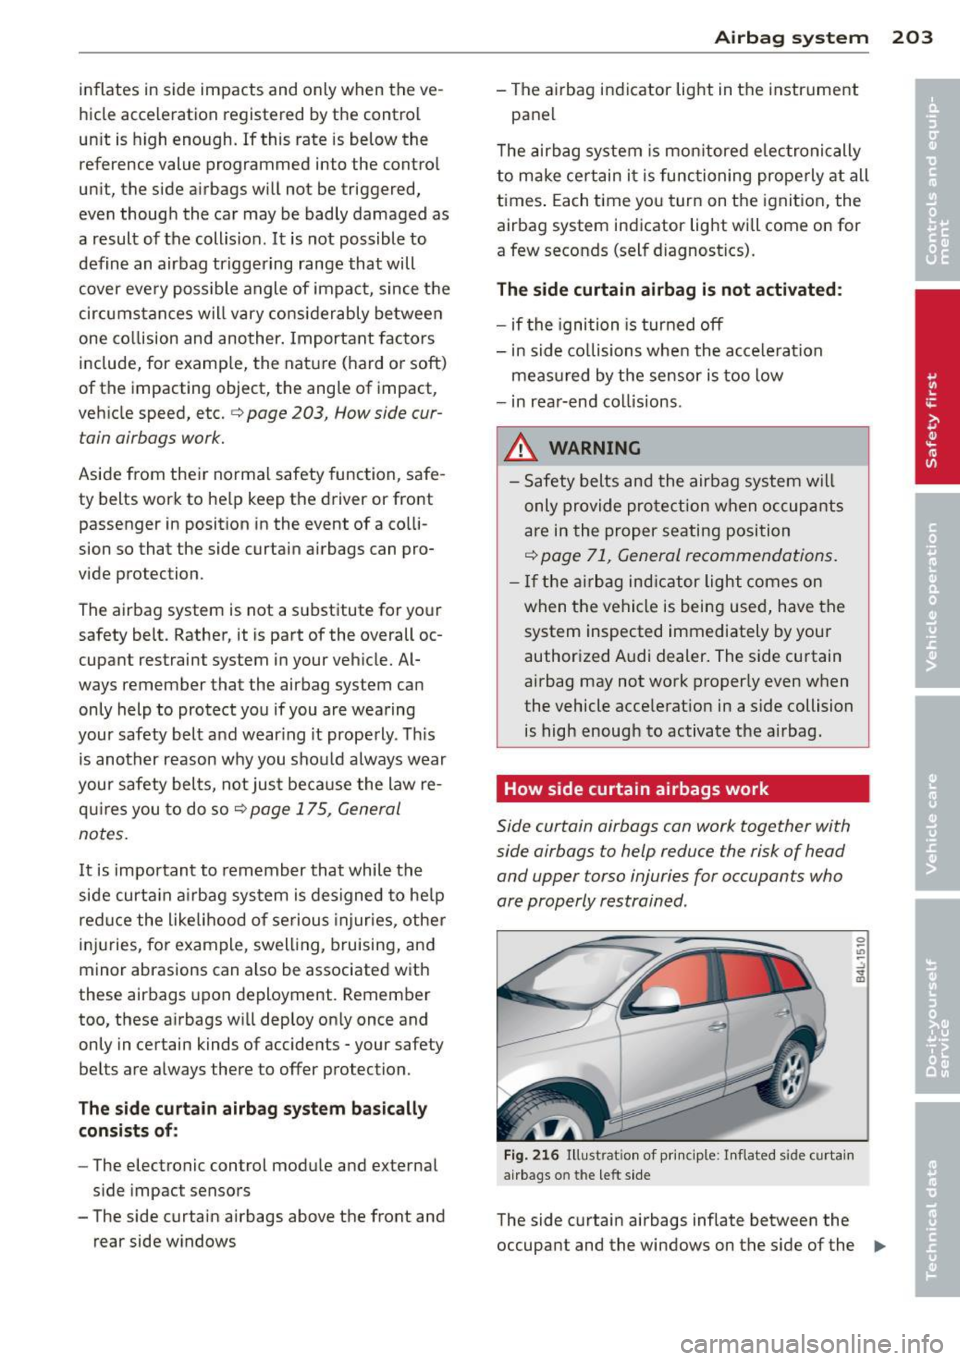
How side curtain airbags work
Side curtain airbags con work together with
side airbags to help reduce the risk of head
and upper torso injuries for occupants who
ore properly restrained.
Fi g. 216 Illustrat io n of pr incip le: Inflated side curtai n
a irbags on the left s ide
-
The side curtain airbags inflate between the
occupant and the windows on the s ide of the
IIJ,,
Page 248 of 348
24 6 Cl eaning and protec tio n
Automatic car wash
The vehicle can be washed in almost any
modern automatic car wash .
The vehicle paint is so durable that the vehicle
can normally be washed without problems in
an automatic car wash. However, the effect on
the paint depends to a large extent on the de
sign of the facility, the filtering of the wash
water, the type of wash and care mater ial , etc.
I f the pa int has a dull appearance afte r going
through the car wash or is scratched, bring
this to the attention of the operator immedi
ately. If necessary, use a different car wash.
Before going through a car wash, be sure to
take the usual precautions such as closing the
windows and the Panoramic sliding s unroof.
Factory installed antennas must not be re
moved.
I f you have installed additional accessories on
the vehicle - such as spoilers, roof rack, etc. -
it is best to ask the car wash operator if these
should be removed.
A WARNING
Please take note of the following po ints
before going through an automatic car
wash with your vehicle, so that you can avoid damage to your vehicle .
- Compare the track of your vehicle with the distance between the gu ide rails of
the fac ility- there is a risk of damage to
the whee ls and t ires.
- Compare the height and w idth of your
vehicle with the height and width of the
tunnel at the facility.
- Fold the exte rior mirrors flat - there is a
risk of damag ing the exte rior m irrors.
Power folding exterior mirrors* mus t not
be folded in or out by hand. Use the pow
er function!
- Do not al low the wiper blade to fall onto
the windshield after the vehicle is dried -
there is a risk of damag ing the paint on
the hood.
- Always read and heed all WARNINGS and other information ¢
page 245.
Washing the vehicle by hand
A lot of water is needed when washing a vehi
cle by hand .
.,. Before you start washing, make sure you
have read and understood the WARNINGS
¢ .&. in General information on page 245 .
.,. First soak all dried d irt unt il it is soft, then
r inse it off .
.,. As you clean you r vehicle , start w it h the
roof and work your way down to the bottom,
using a sponge, a sponge g love or a clean
brush.
.,. Rinse the sponge or the sponge glove often,
flushing it clean each time.
.,. Use spec ial car shampoo only for very per
sistent d irt .
.,. Rinse the car thoroughly wit h water .
.,. Use a chamo is leather to gently w ipe the ex-
ter ior d ry.
Use a separate sponge for cleaning the
wheels, door s ills and other regions exposed
to road dirt . In this way, you will not scratch
the pa int with coarse pa rticles imbedded in
the sponge the next time you wash the car.
A WARNING ~ -
- Do not clean the underside of the chas
sis, fenders, wheel covers , or other ha rd
to reach pa rts without protect ing your
hands and arms . You may cut yourself on
sharp-edged metal parts.
- Always read and heed a ll WARNINGS and
other information ¢
page 245.
(D Note
- Never try to remove dirt, mud or dust if
the surface of the ve hicle is dry . Never
use a dry cloth or sponge, s ince this
co uld scratch your vehicle's paint or win
dows .
- Never wash your car in bright s unlight.
Drops of water act as magn ifying lenses
and may damage your paint .
- When you wash your car in the winter: if you rinse your vehicle with a hose, be careful not to aim the stream of water
Page 249 of 348

directly at locks, or at door or hatch
openings -they can freeze shut.
- Never use sponges designed to remove
insects , or any kitchen scouring sponges
or similar products. They can damage
your paint finish .
- You should remove debris (such as in
sects) from the headlight lenses on a
regular basis, for example when refuel
ing your vehicle. Never use a dry cloth or
sponge to clean the headlights . Only use
wet cloths or sponges to prevent
scratches . It is best to use soapy water .
@) For the sake of the environment
In the interest of the environment, the ve
hicle should only be washed in special
wash bays .
Washing your vehicle with a power
washer
Cleaning the exterior of your car with a high
pressure power washer is safe as long as you observ e a few simple rules.
" Before using the power washer , make sure
you have read and understood the WARN
INGS ~.&.
in General information on
page 245.
" Always follow the operating instructions for
the pow er wash er.
" Make su re that the jet on the spray hose
produces a "fan shaped spr ay" .
" Do
not hold the spray nozzle too close to
soft materials .
When cleaning the vehicle with a power wash
er
always follow the operating ins truc tions.
T his applies particularly to the
operating
pressure
and the spraying distance. Maintain
a sufficient distance to soft materials such as
rubber hoses and sound/vibration deadening
materials (particularly on the underside of the
engine hood). Do not use a jet which sprays
water in a
direct stream or one that has a ro
tating
jet.
Water temperature should not exceed 140 °F
(60 °().
Cleaning and protection 247
A WARNING
Never wash tires with a jet that sprays wa
ter in a direct stream . This could cause in
visible damage to the tires and weaken
them, even if the spray is from a relatively
long distance and for a short time . Dam
aged and weakened tires can fail and cause
accidents and personal injury.
(D Note
To avoid damaging your vehicle, always make sure that there is sufficient distance
between the spray head and soft materials
like rubber hoses, plastic parts and sound
deadening materials. Never aim the spray
head at the same point for a long time.
This also applies to cleaning headlights
and painted bumpers. Remember : the
closer the nozzle is to the surface of the
material, the greater the stress on the ma
terial.
Sensors and camera lenses
- Remove snow with a hand brush and remove
ice with a de-icing spray that does not con
tain solvents.
- Clean the sensors (adaptive cruise control*,
parking system*) with a cleaning solution
that does not contain solvents and a soft
cloth.
- Dampen the camera lens with a household
alcohol-based glass cleaner, and then wipe
the lens clean with a dry cloth.
(D Note
- If you wash your vehicle with a pressure
washer,
- make sure there is enough distance to
sensors in the rear bumper .
- do not clean the camera lenses and the
area around them with the pressure
washer .
- Never use warm or hot water to remove
snow or ice from the camera lens. This
could cause the lens to crack .
•
•
Page 250 of 348
248 Cleaning and protection
-Never clean the camera lens with ab ra
sive products .
Waxing and Polishing
Waxing
A good wax coating protects the vehicle paint
to a large extent against the environmental
factors listed under
c:;, page 245, Washing and
even against slight scratches .
You can use a liquid car wax to protect your
paint as soon as one week after your vehicle
has been delivered.
Even if you regularly use a
waxing process in
automatic car washes, we recommend that
you manua lly app ly a coat of wax to give the
pa int extra protection, particularly if water no
longer beads on the clean paint.
Protect p lastic body parts with car wax in the
same way as the vehicle body.
During warm weather dead insects tend to
collect on the front bumper and on the for
ward area of the hood. They are much easier
to remove from paint that is waxed
o~en.
Polishing
Polish your vehicle only if the paint has lost its
shine and the g loss cannot be brought back
with wax .
If the polish used does not contain preserva
tive compounds, the paint must be waxed af
terwards .
A WARNING
Always read and heed a ll WARNINGS and
other information
c:;, page 245.
(D Note
Do not use car wax on
- matte or anodized metal trim
- rubber or rubber-like trim .
Trim strips
Metal trim needs special care.
For environmental reasons, Audi fabricates
the bright trim strips and trim pieces from
pure chromium-free aluminum.
Dirt and marks on the trim strips should be
removed with a
pH-balanced cleaning agent
(do not use a chrome cleaner). Authorized
Audi dealers carry cleaning products which
have been tested for use on your vehicle and
are not harmful to the environment .
To avoid corrosion on the exter ior trim strips,
only a pH-balanced solution should be used
for the windsh ield washer .
A WARNING
Always read and heed all WARNINGS and
other inform ation
c:;, page 245.
Plastic and vinyl
Plastic needs special care .
Use a clean, damp cloth or sponge to remove
dust and light surface dirt. For other soil, use
a lukewarm all-purpose cleaning solution or a
mild saddle soap for v inyl tr im . Remove water
spots and traces of soap with a clean, damp
cloth or sponge. Use a clea n, soft cloth to rub
dry.
Grease, tar or oil stains can be removed with a
clean cloth or sponge soaked with all-purpose
cleaner or with a so lvent designed espec ia lly
to clean vin yl.
Occas ionally apply a colorless vinyl or leather
preservative to retain the material's luster
and pliability .
A WARNING
Always read and heed all WARNINGS and
other information
c:;, page 245.
Aluminum trim
Use only neutral-pH products to remove spots
and deposits from a luminum surfaces .
ll-
Page 257 of 348
Engine compartment
Be especially careful when cleaning the en
gine compartment.
Al ways s witch off the ign ition befor e clean
ing the eng in e
c:> & .
Plenum panel
Remove leaves from the plenum pane l in front
of the windshield under the engine hood. This
prevents the water drain holes from becoming
blocked, and it prevents debris from entering
the vehicle interior through the heating and
ventilation ducts .
Corrosion protecti on
The engine compartment and transmission
have been corrosion-protected at the factory.
Good anti-corrosion treatment is very impor
tant, particular ly in the winter . If the vehicle
is frequent ly driven on salt treated roads, the
entire engine compartment and plenum panel
should be thoroughly cleaned at the end of
winter and retreated to prevent sa lt damage.
At the same time, the underside of the vehicle
should be washed as we ll.
If the engine compartment is cleaned at any
time with grease removing solut ions
1>, or if
you have the engine washed, the anti-corro
sion treatment is a lmost always removed as
well.
It is therefore essential to have a long
lasting co rrosion protection reapp lied to a ll
surfaces, seams, joints and components in the
engine compartment.
A WARNING
Be aware: The engine compa rtment of any
motor vehicle is a potentially hazardous
area.
- Before working in the engine compart
ment, be s ure to read the in format ion
c:> page 264.
- Before reaching into the front plenum
pane l, always remove the ignition key.
l) Use only the correct cleaning sol utions. Never use gas
oline or diesel fuel.
Cleaning and protec tion 255
Otherwise, the windshield wiper system
could un intentionally be switched on,
possibly caus ing personal injury from the
mov ing wiper linkage.
- Never reach into the area around or
touch the radiator fan. The aux iliary fan
is temperature controlled and can sw itch
on suddenly - even when the ignition is
off.
- Do not wash, wax or dry the eng ine with
the engine running. Moving or hot parts could injure you.
- Do not clean the underside of the chas
sis, fenders, wheel covers, or other ha rd
to reach pa rts without protect ing your
hands and arms. You may cut yourself on
sharp-edged metal parts .
- Always read and heed all WARNINGS and
o ther info rmation
c:> page 245.
•
•
Page 266 of 348
264 Checking and filling
Checking and filling
Engine hood
Releasing the engine hood
The engine hood is released from inside the
vehicle.
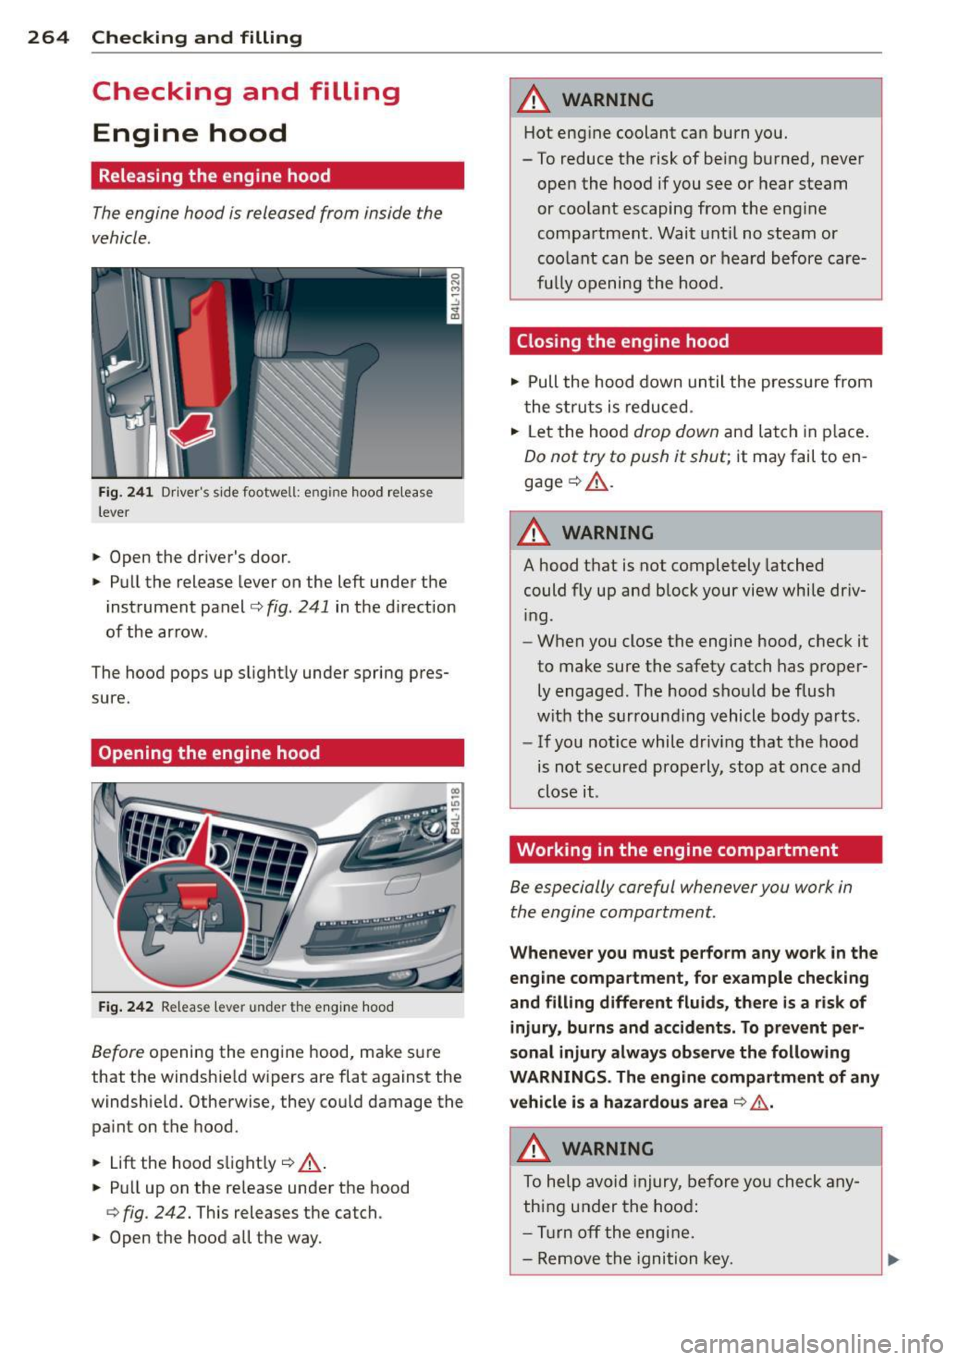
F ig . 2 41 Driver's side footwell: engine hood re lease
lever
.. Open the driver's door.
.. Pull the release lever on the left under the
inst rument panel
c> fig. 241 in the d irect ion
of the ar row .
The hood pops up s light ly under spring pres
sure.
Opening the engine hood
Fig. 242 Re lease lever under the eng ine hood
Before opening the engine hood, make s ure
that the windshie ld wipers are flat against the
windshie ld. Otherwise, they co uld damage the
pa int on the hood.
.. Lift the hood s light ly
c> _& .
.. Pull up on the release under the hood
¢ fig. 242. This releases the catch.
.. Open the hood all the way.
A WARNING
-Hot eng ine co olant can burn you.
- To reduce the risk of being b urned, never
o pen the hood if you see or hear steam
or coo la nt escaping from the eng ine
compa rtment. Wait unt il no steam or
coo lant can b e seen o r heard before care
fu lly openi ng the ho od.
Closing the engine hood
.. Pull the hood down un til the pressure from
t he stru ts is reduced .
.. Let the hood
drop down and la tch in p lace.
Do not try to push it shut; it may fail to en
gage
c> _& .
A WARNING
--
A ho od t hat is not completely latched
could fly up an d block your vi ew while dr iv
i ng.
- W hen you close the engine hood, c heck it
to make sure the safety catch has p roper
ly engaged . The hood sho uld be flush
wit h the surrou nding vehicle body parts.
- If you notice while dr iv ing t hat t he hood
is not s ecured properly, stop at once and
close it.
Working in the engine compartment
Be especially careful whenever you work in
the engine compartment .
Whenever you must perform any wo rk in the
engine compartment, for example checking
and filling different fluids, th ere is a risk of
injury, burns and accidents. To pr event per
sonal injury alway s observe the following
WARNINGS. The engine compartm ent of any
vehicle is a hazardous area
c> &, .
A WARNING
To he lp avo id i njury, before yo u check any
thi ng under the hoo d:
- Tu rn off the eng ine .
- Remove the igni tion key.