driver door AUDI Q7 2013 Owner´s Manual
[x] Cancel search | Manufacturer: AUDI, Model Year: 2013, Model line: Q7, Model: AUDI Q7 2013Pages: 348, PDF Size: 87.72 MB
Page 57 of 348
Opening front r oof segment to comf ort
se ttin g
" Turn the rotary switch c::> fig. 49@ to posi
tion ©, you will feel the switch engage . The
roof segment is slid open only to a comfort
position w ith low wind noise. This is the rec
ommended standard sett ing for normal
driv ing cond itions .
Sliding front roof segment full y open
" Rotate and ho ld the switch @ in position @
unt il the roof segment has reached the de
s ired pos it ion. There may be increased wind
noise in this pos it ion.
(D Tips
- In posit ion @, the switch jumps back to
pos ition © again as soon as the switch is
released .
- When dr iv ing with the Panoramic slid ing
sunroof open, open the front roof seg
ment to the comfort setting to m inim ize
wind noise .
Closing Panoramic sliding sunroof
Applies to vehicles: with Panoram ic sliding sunroof
Clos ing tilted front roof segm ent
" Pull the switch c::> page 54, fig . 49 @ and
ho ld it until the roof segment has reached
the des ired pos ition.
" Pull the switch
bri efl y to close the roo f seg
ment automatica lly. By activating the switch
briefly again, the roof segment can be stop
ped in any position
c::, .,&_ .
Clos ing front r oof s egment wh en slid
o p en
" Rotate switch c::, page 54, fig. 49@ to posi
t ion @ to close the roof segment
c::> .,&_. To
move to an intermediate posit ion, rotate the
switch to the corresponding click-stop .
Clos ing tilt ed r ear roof segm ent
" Tap the rocker switch c::> page 54, fig . 49 ®
or c::> page 54, fig. 50 © in the front area Q
br iefl y to close the roof segment completely
c::> A.
Opening and clo sin g 55
" To set an intermediate position manually ,
press the rocker switch in the front area~
until the roof segment has reached the de
sired tilt posit ion
c::> .,&_ .
A WARNING
Improper use of the Panoram ic sliding
sunroof can cause serious personal injury.
- Be careful when closing the Panoramic
-
sliding sunroof . Not paying attention
could cause you or others to be trapped
and injured as the Panoram ic sliding sun
roof closes.
- Always take the key w ith you when you
leave the vehicle to prevent injur ies
caused by the Panoramic slid ing sunroof
clos ing
- Never leave children or persons requiring
assistance alone in the vehicle, especially
when they could access the vehicle keys .
Unsupervised use of the keys can result
in the engine being started or use of ve
hicle systems such as the power win
dows, etc. wh ich could result in serious
injury. The doors could be locked with
the remote key, de laying help in an
emergency.
- The Panoramic slid ing sunroof will con
tinue to operate until the ign ition key
has been removed and one of the front
doors has been opened.
Convenience closing feature
Applies to vehicles: wit h Pa noramic slid ing sunroof
The Panoramic sliding sunroof can be closed
from outside with the key in the driver's door lock .
" Insert the key into the dr iver's door lock .
" Tu rn and hold the key in the lock pos it ion @
c::> page 43, fig . 33 until the Panoramic slid
ing sunroof is complete ly closed
c::> .,&_ in
Closing Panoramic sliding sunroof on
page 55.
Th e power s un blind is a lso closed . .,..
Page 60 of 348
58 Clear vis ion
li g ht sensor checked as soo n as poss ible at an
author ized Audi dealer or qua lified wor kshop .
.&_ WARNING
-Daytime ru nning lights and automatic
headlights are only intended to assist
the driver. They do not relieve the driver
of his respons ib ility to check the head
lights and to turn them on manually ac
co rding to the current light and v is ibi lity
condit ions. For example, fog cannot be
dete cted by the light sensors*. So alw ays
switch on the headlights
io u nder these
weather conditions and when driving in
the dark.
- Crashes can happen when yo u cannot see
the road ahead and when you cannot be seen by other motorists. Always turn on
the headlights so that you can see ahead
and so that others can see yo ur car from
the back.
- Please obey a ll laws when using the
lighting systems described here.
@ Tips
- With the switch in AUTO front fog lights
and rear fog lights cannot be turned on in addition.
- The light senso r for headlight contro l is
l ocated in the rear view m irror mount.
You should therefore not app ly any st ick
ers to the windsh ield in this area in o rder
to preve nt ma lfunctions o r failures.
- Some exterior lighting functions can be
adjusted
c:> page 58.
-When you remove your key from the igni
tion while the vehicle's lights are turned
on, a buzzer sou nds as long as the driv
er's door is open .
- In coo l o r damp weather, t he ins ide of
t h e headlights, turn signa ls and tail
li ghts can fog ove r du e to t he tempera
tu re diffe re n ce between the inside and
outside. They will cle ar sho rtly after
swi tching them on. This does not affect
t h e service li fe of the lighting . -
In the event o f a light sensor malfunc
tion, the driver is notified in the instru
ment cl uster display
c:> page 35 .
Adjusting exterior lighting
The functions are set in the MMI.
• Select: I CAR I func tion button > Systems *
cont ro l but to n > Exterior lighting . Or
.. Select:
!CAR ! function b utton> Car sys
tem s* contro l button > Vehicle setting s >
Exterior lighting.
Coming home (Lights when leaving car ),
Leaving home (Lights when unlock ing car )
T he coming home f unction ill umi nates the
area o utside the vehicle when you tu rn the ig
nition off and open t he driver's door. Depend
ing on vehicle eq uipment, the f unction can be
switched on and off or the length of t ime the
lights remain on* can be adjusted .
The leaving home illum inates the area outside
the vehicle when you unlock the vehicle. This
funct ion can be switched on and off .
The Coming home and Leaving home func
tions only operate when it is dark and the light switch is in the AUTO position.
Daytime running lights
USA models: The daytime r unning lights can
be turned on or off using th is function.
Canad a model s: Th e fu nction ca n no t be
tu rned off .
It is activated automati cally each
time the ignition is t urned on. This menu item
is shown "greyed out" .
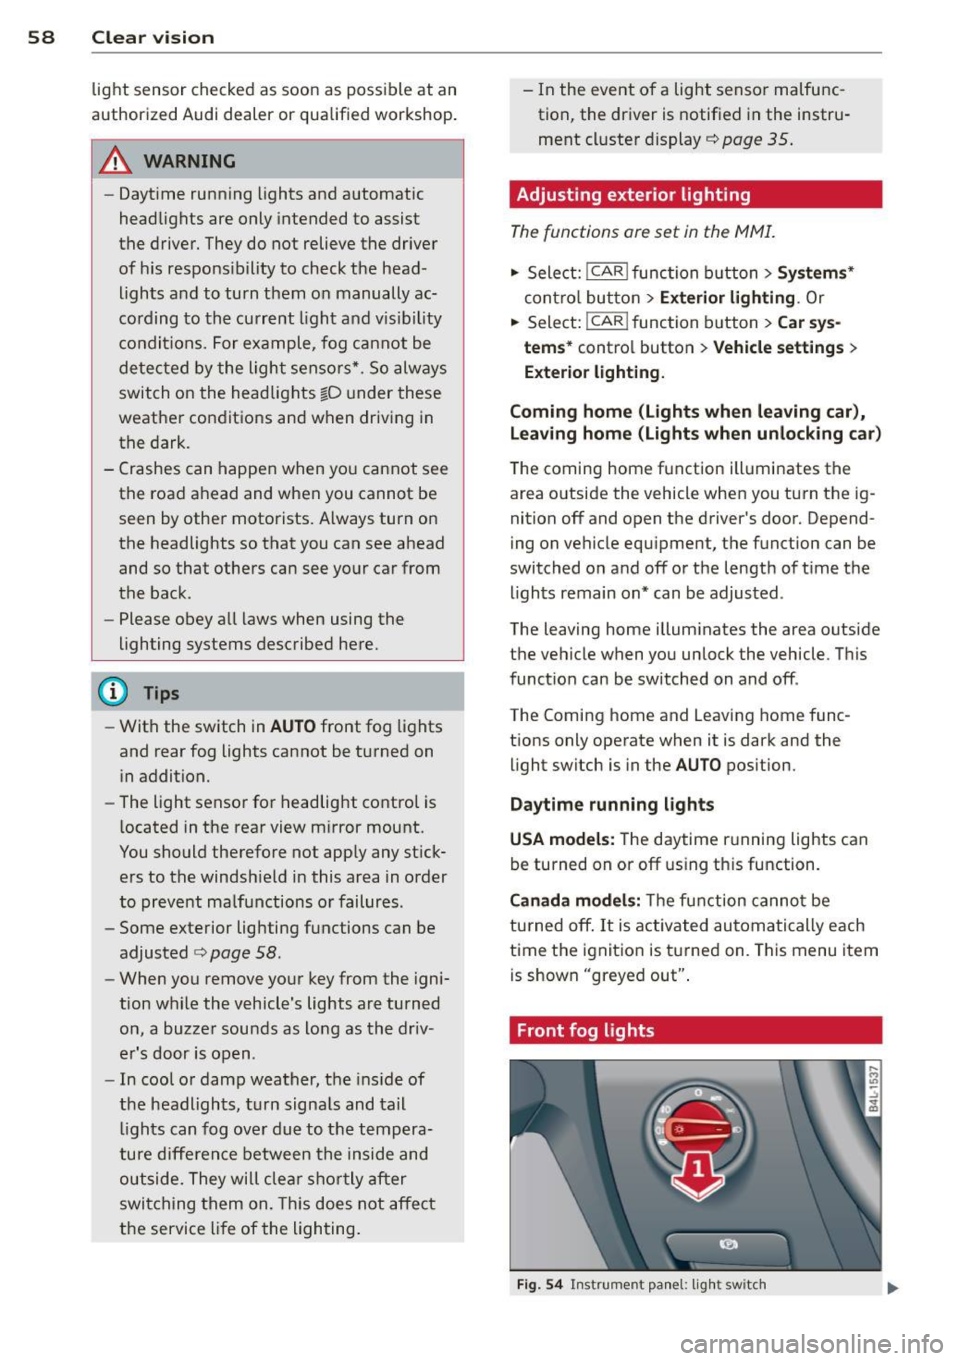
Front fog lights
Fig . 54 Instrument pa nel: light switch
Page 63 of 348
Notes o n these featur es
- The turn signals only work with t he ignition
turned on . T he indicator light s
II or Ill in
the instrument cluster
¢ page 14 also b link.
- After you have turned a corner , the tur n sig-
nal switches off automatica lly.
- The
high beam works only when the head
lights are on. The indicator light
II in t he
instrument cluster i lluminates when the
high beams a re on.
- The
headlight flasher wo rks only as long as
you hold the lever -even if there are no
lights turned on . The indicator light
II in
the ins trument cluster illuminate s when you
u se the headlight flasher .
A WARNING
-
Do not use the high beam or headlight
flasher if you know that thes e cou ld blind
oncoming traffic.
Interior lights
Front interior lights
The interior lights include reading lights for
both the driver and the front passenger .
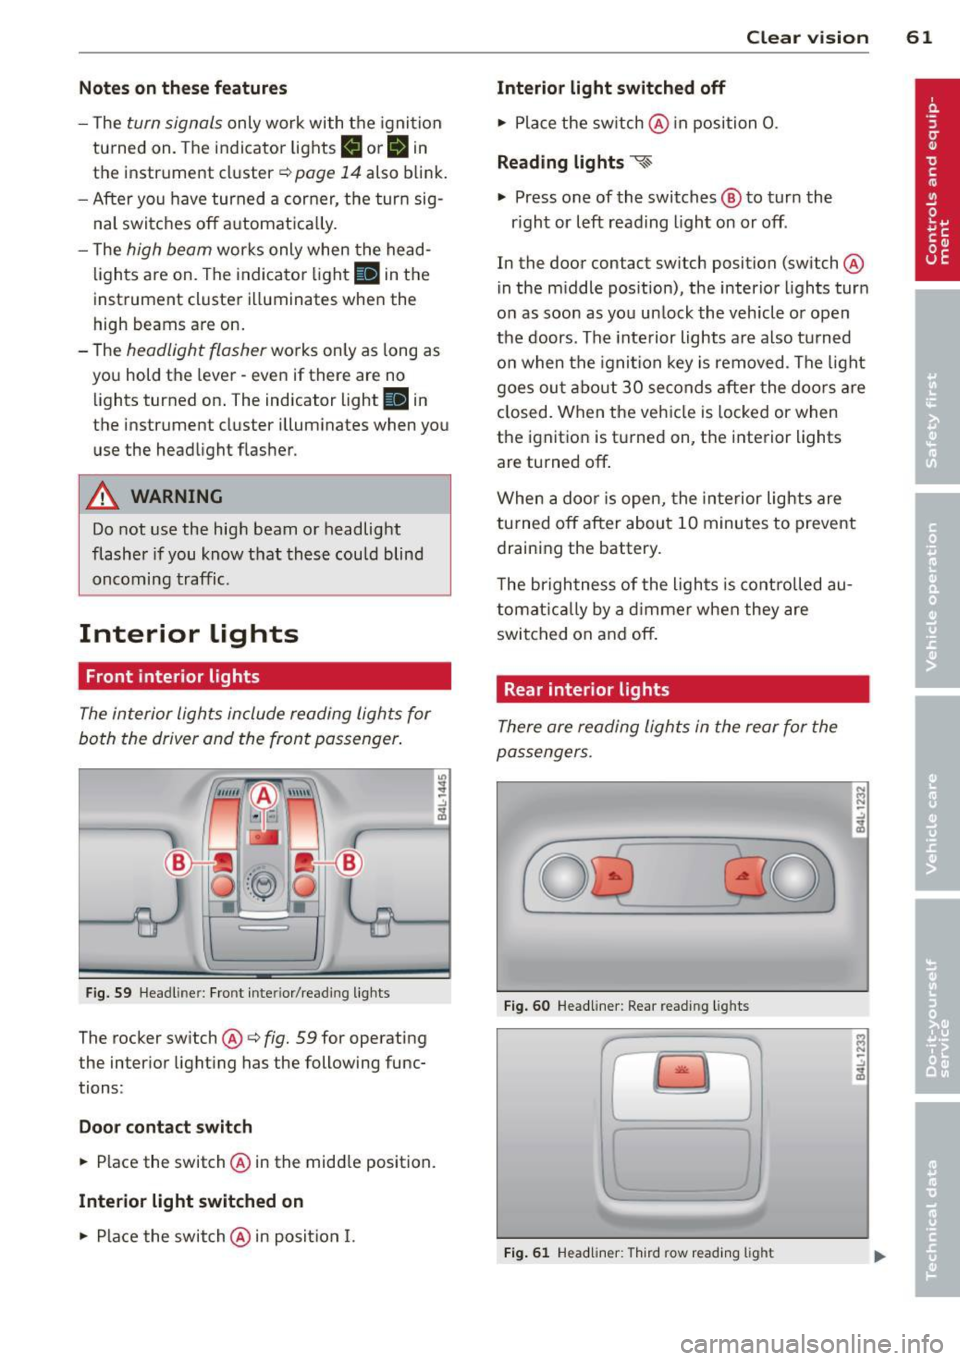
Fig. 59 Headlin er: Fro nt in te rior /re adi ng light s
The rocker switch @¢ fig. 59 for ope rating
the in ter ior lighting has the follow ing func
tions :
Door cont act switch
.,. Place the switch @ in the midd le position.
Interior light switched on
.,. Place the switch @ in posit ion I.
.,,
:! .:,
1A
Clear vision 61
Interior light switched off
.,. Place the sw itch @ in position 0.
Re ading lights ~
.,. Press one of the switches @ to turn the
r ight or left reading light on or off .
In the door contact swi tch position (switch @
in the m iddle position), the interior l ights tur n
o n as soon as you unlock the vehicle o r open
the doors . The inte rior lights are also turned
o n when the igni tion key is removed . The light
goes ou t about 30 seconds after the doo rs are
closed. When the veh icle is locked or when
the igni tion is turned on, the i nterior lights
are turned off .
When a door is open, the interior lights are
tu rned off after about 10 minutes to prevent
draining the battery.
T he brigh tness of the lights is cont rolled au
tomat ic all y by a d imme r when they are
switched on and off.
Rear interior lights
There are reading ligh ts in the rear for the
passengers .
0
...
Fig . 60 Headli ner: Rear read ing lig h ts
>l!i:.
r -
' \,
Fi g. 61 Headlin er: Third row r eading light
N .., N
.:,
1A
:::i N
-.:,
1A
Page 70 of 348
68 Clear vision
Mirrors
Adjusting the exterior mirrors
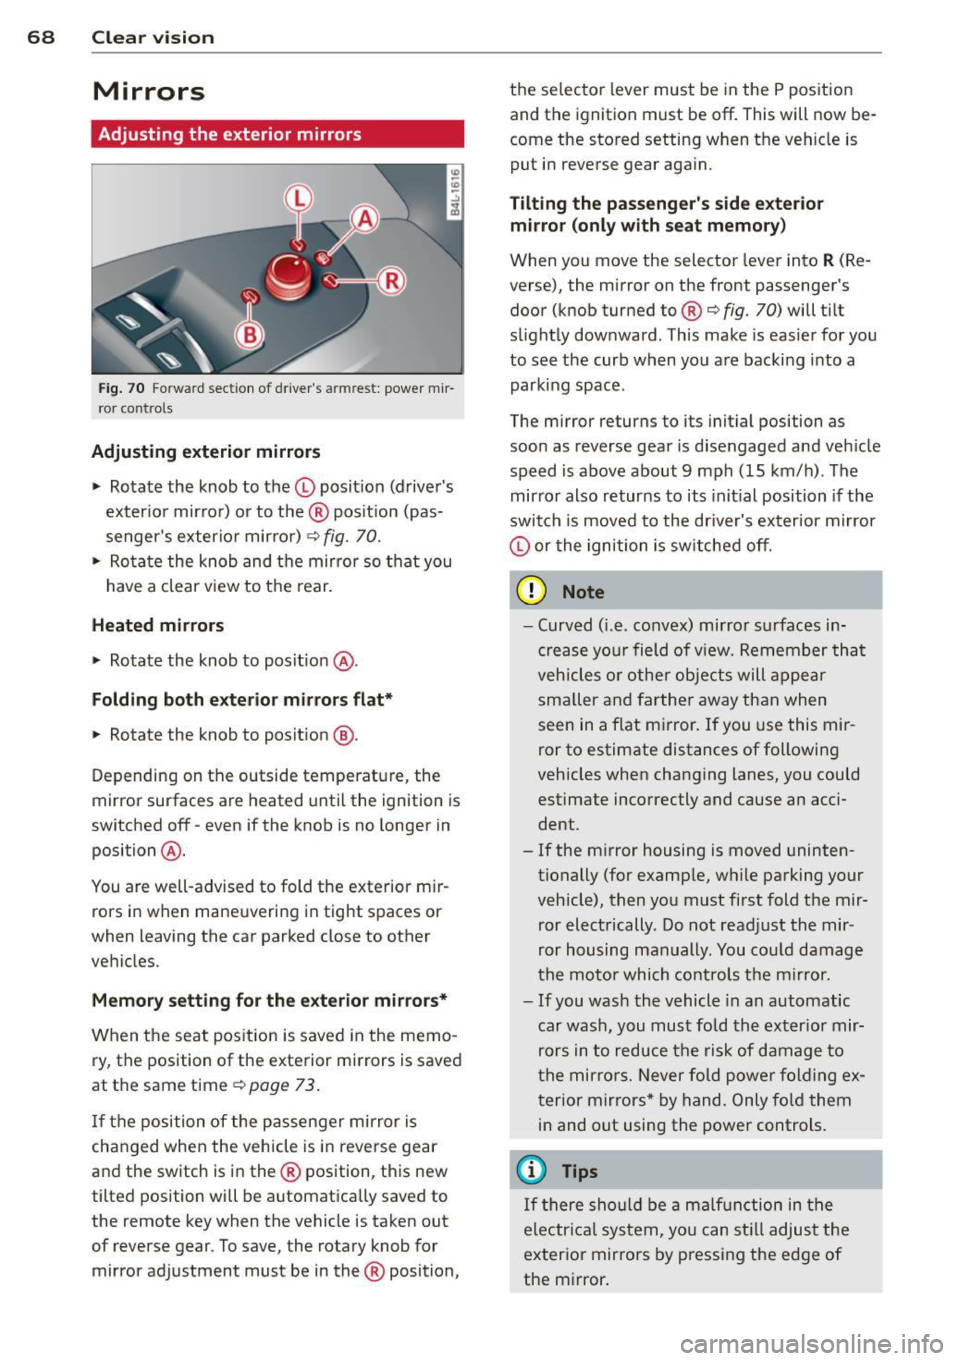
Fig. 70 Fo rwa rd sect ion of driver's armrest: powe r mir
ror controls
Adjusting exterior mirrors
.,. Rotate the knob to the© posit ion (driver's
exterio r mirror) or to the ® position (pas
senger's exterior mir ror)
9 fig. 70.
.,. Rotate the knob and the mirror so that you
have a clear view to the rear.
Heated mirrors
.,. Rotate the knob to pos it ion @.
Folding both exterior mi rrors flat*
.,. Rotate the knob to position @.
Depending on the outside temperature, the
mirror surfaces are heated until the ignition is
switched off -even if the knob is no longer in
position @.
You are well-advised to fold the exterior m ir
rors in when maneuvering in tight spaces or
when leaving the car parked close to other
vehicles .
Memory setting for the exterior mirrors*
When the seat position is saved in the memo
ry, the position of the exterior mirrors is saved
at the same time
9 page 73.
If the position of the passenger mirror is
changed when the vehicle is in reverse gear
and the switch is in the ® position, this new
tilted position will be automat ically saved to
the remote key when the vehicle is taken out
of reverse gear. To save, the rotary knob for
mirror adjustment must be in the ® position, the selector lever must
be in the P pos ition
and the ignition must be off. This will now be
come the stored setting when the vehicle is
put in reverse gear again.
Tilt ing the passenger's side exterior
mirror (only with seat memory)
When you move the selector lever into R (Re
verse), the mirror on the front passenger's door (knob turned to® ¢
fig. 70) will tilt
s light ly downward . This make is easier for you
to see the curb when you are backing into a
parking space .
The mirror returns to its initial position as
soon as reverse gear is d isengaged and veh icle
speed is above about 9 mph (15 km/h). The
mirror also returns to its initial position if the
switch is moved to the driver's ex ter ior mirror
© or the ignition is switched off .
(D Note
-Curved (i .e . convex) mirror surfaces in
crease your field of view. Remember that
vehicles or other objects will appear
smaller and farther away than when
seen in a flat mirror. If you use this mir
ror to estimate distances of following
vehicles when changing lanes, you could estimate incorrectly and cause an acci
dent.
- If the mirror housing is moved uninten
tionally (for example, while parking your
vehicle), then you must first fold the mir
ror electrically. Do not readjust the mir
ror housing manually. You could damage
the motor which controls the mirror.
-If you wash the vehicle in an automatic
car wash, you must fold the exter ior mir
rors in to reduce the risk of damage to
the mirrors. Never fold power folding ex
terior mirrors* by hand. Only fold them
in and out using the power controls.
(D Tips
If there should be a malfunction in the
electr ical system, you can still adjust the
exterior mirrors by pressing the edge of
the mirror .
Page 75 of 348
unattended in the vehicle -they could be
injured!
- Exercise caution when adjusting the seat
height. Unsupervised or careless seat ad
justment can pinch fingers or hands
causing injur ies.
- While the vehicle is moving, the seat
backs of the front seats must not be in
clined too far to the rear because the ef
fectiveness of the safety belts and the
airbag system is severely compromised -
there is a risk of injury.
- To reduce the r isk of injury in the case of
sudden braking or accident, front pas
sengers must never ride in a moving ve
hicle wi th the seatback reclined. Safety
belts and the airbag system only offer
maximum protection when the seatback
is upright and the safety be lts are prop
erly positioned on the body. The more
the seatback is reclined, the greater the
risk of personal injury from an incorrect
seating pos ition and improperly posi
t ioned safety belts.
Seat memory
Driver's seat memory
Ap plies to vehicles: with seat memo ry
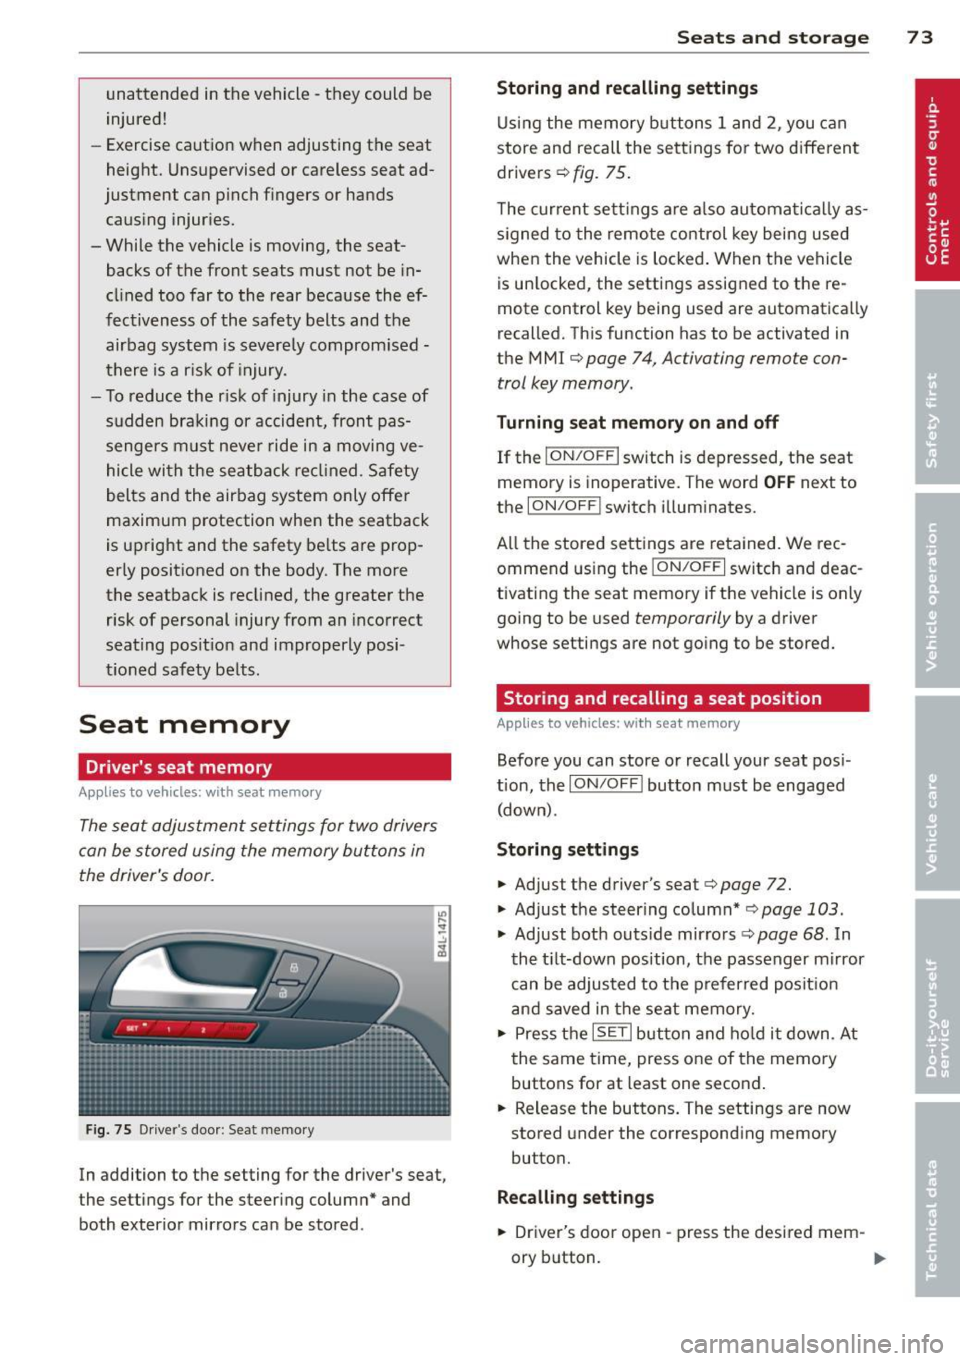
The seat adjustment settings for two drivers
can be stored using the memory buttons in
the driver's door.
F ig. 75 Driver's door : Seat memory
In addition to the setting for the driver's seat,
the settings for the steering column* and
both exterior mirrors can be stored .
Seats and storage 73
Storing and recalling settings
Using the memory buttons 1 and 2, you can
store and recall the settings for two different drivers ¢
fig. 75.
The current settings are also automatical ly as
s ig ned to the remote control key being used
when the vehicle is locked. When the vehicle
is un locked, the settings assigned to the re
mote control key being used are automatically
recalled. This function has to be activated in
the M MI ¢
page 7 4, Activating remote con
trol key memory.
Turning seat memory on and off
If the I ON/O FF I switch is depressed, the seat
memory is inoperative. The word
OFF next to
the
ION/O FF I switch illuminates.
All the stored settings are retained. We rec
ommend using the
ION/OF F I switch and deac
tivating the seat memory if the vehicle is only
going to be used
temporarily by a driver
whose settings are not going to be stored.
Storing and recalling a seat position
App lies to vehicles: wit h seat memory
Before you can store or recall your seat pos i
tion, the
ION /OFF! button must be engaged
(down) .
Storing settings
.,. Adjust the driver's seat¢ page 72 .
.,. Adjust the steer ing column* ,=;, page 103 .
.,. Adjust both outs ide mirro rs ¢ page 68 . In
the tilt-down position, the passenger mirror
can be adjusted to the preferred posit ion
and saved in the seat memory .
.,. Press the
ISETI button and hold it down . At
the same time, press one of the memory
buttons for at least one second .
... Release the buttons. The settings are now
stored under the corresponding memory
button.
Recalling settings
.,. Driver's door open -press the desired mem-
ory b utton.
ll-
Page 76 of 348
7 4 Seats and stor age
• Driver's door closed -press the correspond
ing memory button unti l the stored position
is reached.
Successf ul s torage is conf irmed a ud ibly and
by the l ight i n the
!SET ! button illuminating .
When the ve hicle is
locked , the cur rent set
tings are stored and ass igned to the remo te
control key. Bu t th e set tings stored on memo
ry buttons 1 and 2 are not deleted. They can
be reca lled at any time . When the vehicle is
unlocked , the settings assigned to the remote
control key are restored.
If you r vehicle is driven by other persons using
your remote control key, you should save yo ur
individua l seat position on one of the memory
buttons. You can reca ll your settings aga in
simply and conve niently by pressing the corre
spond ing memory butto n. When the vehicle is
l oc ked, these setti ngs are automatically re-as
signed to t he remote control key and stored.
.&_ WARNING
- F or safe ty re ason s, the sea t sett in g can
only be rec alled w hen the veh icle is st a
t ionary -othe rwise you r isk having an ac
cident.
- In an emergency, the recall operation
can be stoppe d by pressin g the
!ON/OFF I
button or by br iefly p ress ing any given
memory button.
Activating remote control key memory
A ppl ies to veh icles: with seat memo ry
To assign the driver's seat settings to the re
mote contro l key when locking the vehicle, the
function must be activated in the MMI.
• Se lect:
I CARI f u nct ion button > Systems *
control button > Seat adjustment > Driver 's
seat > Key mem. p rofile > On .
Or
• Se lect:
ICARI funct io n button > Car sy s
tems *
control bu tton > Vehicle settings >
Seats > Driver's seat > Remote control key
> On .
(D Tips
If you do not want anothe r driver's set
tings to be assigned to the remote control key, switch off the memory function using
the MMI or the
I ON/OF F! button
c> page 73.
Rear seats
General information
Safe transportation of passengers on the rear
seats requires proper safety pre cautions.
All passengers on the rear seats mus t be seat
ed in comp lian ce with the safety guide lines
exp lained in
c> page 175 and c>page 184.
T he co rrec t seating pos ition is cr it ic al f or the
sa fe ty of front
and rear seat passenge rs a like
c>page 168 .
A WARNING
--Occupants in the f ront and rear seats
m ust always be proper ly restrained.
- Do not let anyone ride in the ve hicle
witho ut the head restraints prov ided.
Head restraints help to reduce injuries.
- Loose items inside the passenge r com
pa rtment, can fly forward in a crash or
sudden maneuve r and injure occupants.
Always store a rticles i n the luggage com
pa rtment an d use the fastening eyes, es
pecially w he n the rea r seatbac ks hav e
been fo lded down.
- Read and heed all WARNI NGS
c> pag e 168, Proper s eating positions
for passengers in rear sea ts.
Page 91 of 348
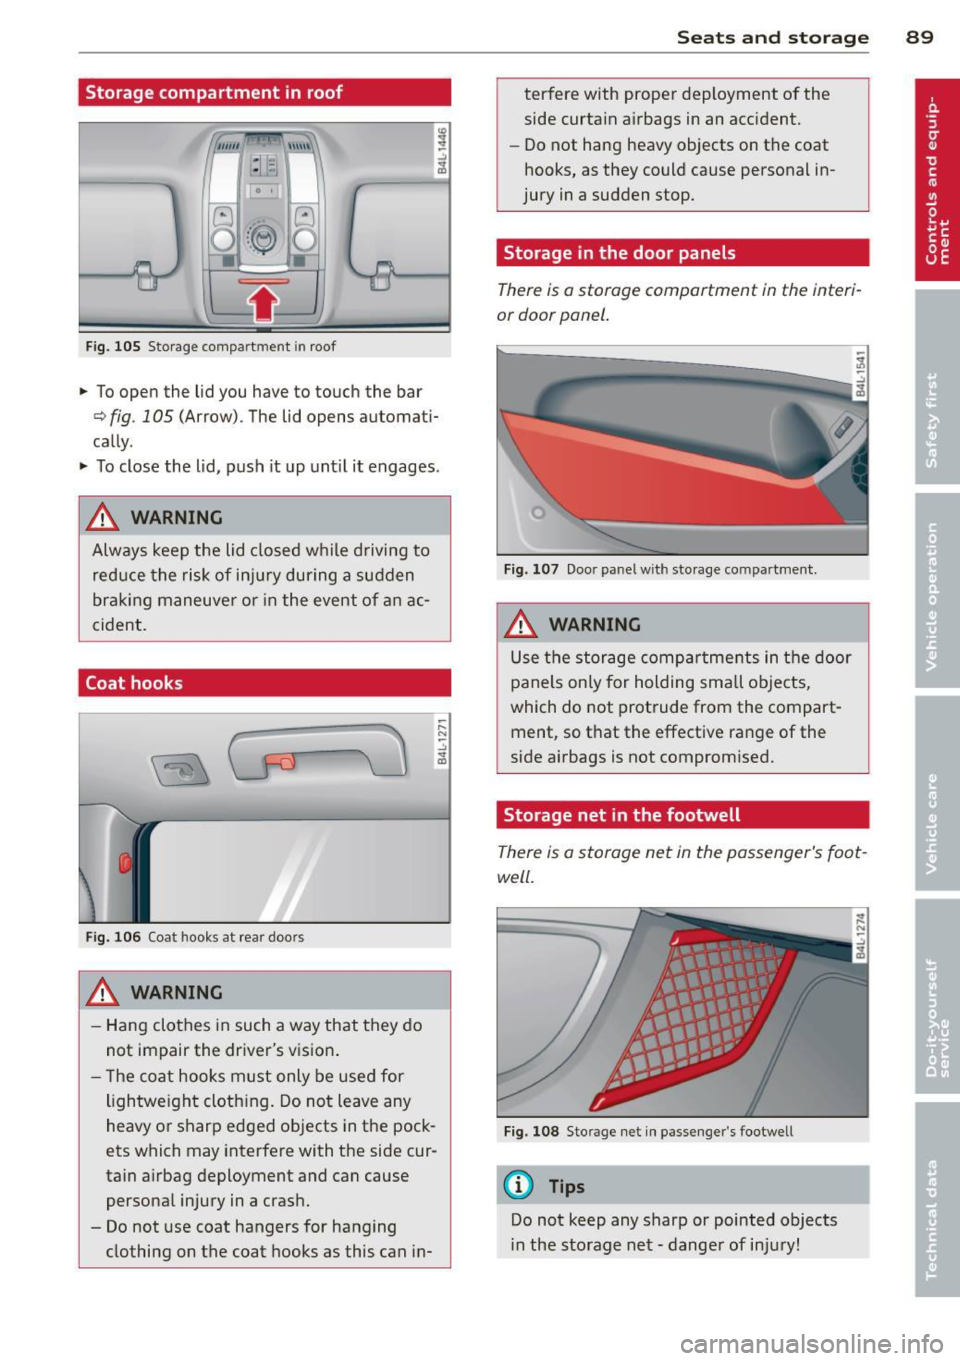
Storage compartment in roof
""'' \\\ \\
:1 :-1
F ig. 105 S torage co mpar tm en t in roof
.. To open the lid you have to touch the bar
¢ fig . 105 (Arrow) . The lid opens automati
cally .
.. To close the lid, push it up unt il it engages .
A WARNING
Always keep the lid closed while driving to
reduce the risk of injury during a sudden
braking maneuve r or in the event of an ac
cident.
Coat hooks
Fig. 106 Coat hooks at rear doors
A WARNING
- Hang clothes in such a way that they do
not impair the driver's vision .
- The coat hooks must only be used for
lightwe ight cloth ing. Do not leave any
heavy or sharp edged objects in the pock
ets which may interfere with the side cur
tain airbag deployment and can cause
persona l injury in a crash.
- Do not use coat hangers for hanging
clothing on the coat hooks as this can in-
;::: N ~ -" "' ID
Seats and storage 89
terfere with proper deployment of the
side curtain a irbags in an acc ident.
- Do not hang heavy objects on the coat
hooks, as they could cause personal in
jury in a sudden stop.
Storage in the door panels
There is a storage comportment in the interi
or door panel.
Fig. 107 Door pa nel w it h sto rage co mpartment.
A WARNING
Use the storage compartments in the door
panels only for holding sma ll objects,
which do not protrude from the compart
ment, so t hat the effective range of the
side airbags is not compromised.
Storage net in the footwell
There is a storage net in the passenger's foot
well.
Fig. 108 Storage net in passenge r's footwell
(D Tips
Do not keep any sharp or pointed objects
in the storage net - dange r of injury!
Page 98 of 348
96 Warm and cold
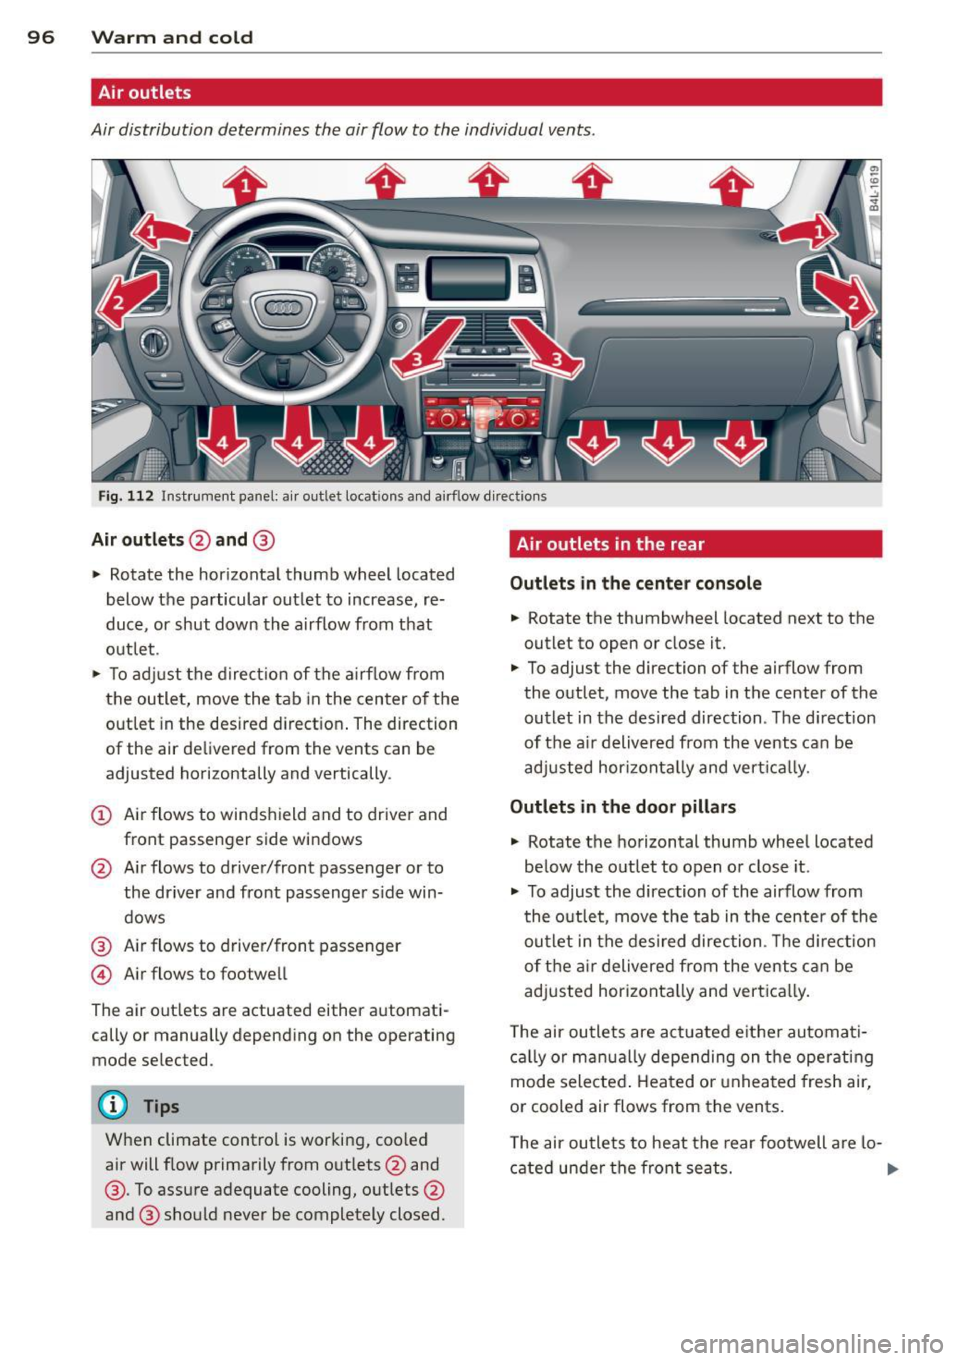
Air outlets
Air distribution determines the air flow to the individual vents .
Fig. 112 Instrument panel: a ir outlet locat ions and airf low d irections
Air outlets @and @
" Rotate the horizontal thumb wheel located
below the particular outlet to increase, re
duce, or shut down the a irflow from that
out let .
" To ad just the direc tion of the a irf low from
the outle t, move the tab in the center o f the
outlet in the desired d irect ion . The direction
of the air de livered from the vents can be
adjusted horizontally and vertically .
(D Air flows to windshield and to drive r and
front passenger side windows
@ Air flows to driver/front passenger or to
the driver and front passenger s ide win
dows
@ Air flows to driver/front passenger
© Air flows to footwell
The air out lets are actuated either automati
cally or manually depending on the operating
mode selected .
@ Tips
When climate control is working, coo led
air will f low primarily from outlets @and
@ . To assure adequate cooling, outlets @
and @ should never be completely closed.
Air outlets in the rear
Outlet s in the center con sol e
.. Rotate the thumbwheel located next to the
outlet to open or close it.
" To adjust the direction of the airflow from
the outlet, move the tab in the center of the
outlet in the desired direction . The d irection
of the a ir deliv ered from the vents can be
adj usted hor izontal ly and vert ica lly.
Outlets in the door pill ars
" Rotate the horizontal thumb wheel located
be low the outlet to open o r close it .
.. To adjust the direction of the airflow from
t he outlet, move the tab in the center of the
outlet in the desired direction . Th e d irect ion
of t he ai r delivered from the vents can be
adjusted horizonta lly and vert ica lly.
T he air ou tle ts are act uated e ither automati
c a lly or man ua lly depending on the operating
mode selected . Heated o r unheated fresh air,
or cooled air flows from the vents.
T he air ou tle ts to heat the rear footwell a re lo-
cated under the front seats.
1J11>
Page 101 of 348
Rear air distribution ~
Applies to vehicles: with four-zone automatic comfort air
conditioning
The automatically controlled air distribution
con be changed manually.
.. Press the Gil button.
.. Rotate the regu lator to the desired setting .
You can adj ust the air circulation so that air
flows from specific vents .
- In position
:J, all air flows from the vents in
the center console and the outlets to the
door pilla rs.
- In position
:0, air flows from the outlets in
the door p illars.
- In position
!,8, air flows from the outlets un-
der the front seats.
There are additional combinations available to
adjust air d istr ibut io n as needed.
To regulate air distribution automatically,
sw itch to
IAU TO I.
Basic settings
General
The basic climate control settings con be ad
justed in the MMI.
.,. Select: I CARI funct ion button > AC control
button . Or
.,. Se lect:
I CARI funct io n button > Car sys-
tem s*
control bu tton > A C.
The follow ing funct ions can be selected :
- Auto recirculation
c> page 99
- Synchronization c> page 99
-Supplementary heater * ¢page 100
-Rear oper ation* c> page 100
Warm and c old 99
Automatic recirculation mode
An air quality sensor detects increased con
centrations of pollutants in the outside air
and automatically switches to recirculation
mode .
We recommend that you always keep auto
matic a ir recirculation ON to p revent polluted
outside air from enteri ng the veh icle inter ior.
If the
a ir qu ality sensor l ocated in the air con
ditioning system detects polluted outs ide a ir,
the sensor dec ides whether the air pollut ion
can be reduced by the facto ry-installed pollu
ta nt fi lter or whethe r it is necessary to switc h
to air recirc ulation. With heavy conce ntra ti ons
of pollu tants, the a ir condit ion ing system is
switched automatica lly to recirc ulation mode
and the supp ly of outside air is blocked . As
soon as the concentration of pollutants in the
outside air drops, fresh air is supplied to the
vehicle interior aga in.
In the event that the windows fog up during
automat ic air rec irculat ion, you must press
the® button immediately.
Under certa in ope rating cond itions, a utomatic
air recirculation is switched off automatica lly.
With outside temperatures be low about 50 °F
(+10
°(), automatic air rec irculat ion is limited
to 30 seconds. W it h outside temperatures be
low about 30 °F ( -1 °C) a nd with the air condi
tione r switched off, the a utomatic air recircu
l ation is limited to 15 seconds.
Synchronization
One climate control setting for the driver and
front passenger seats .
With synchro nization active, the driver's set
tings a re adopted for the passenger o r vice
versa . All the othe r setti ngs that were made
are t ransferred to t he other seat . This in
cl udes all the cl ima te co ntro l settings, excep t
for the se at heating/ven tilat ion* .
If a different setting is selected at a
"synchron ized seat ", synchronization is can
c e lled.
Page 107 of 348
Ignition lock and ignition switch
Ignition key positions
The engine con be started or turned off with
the ignition key.
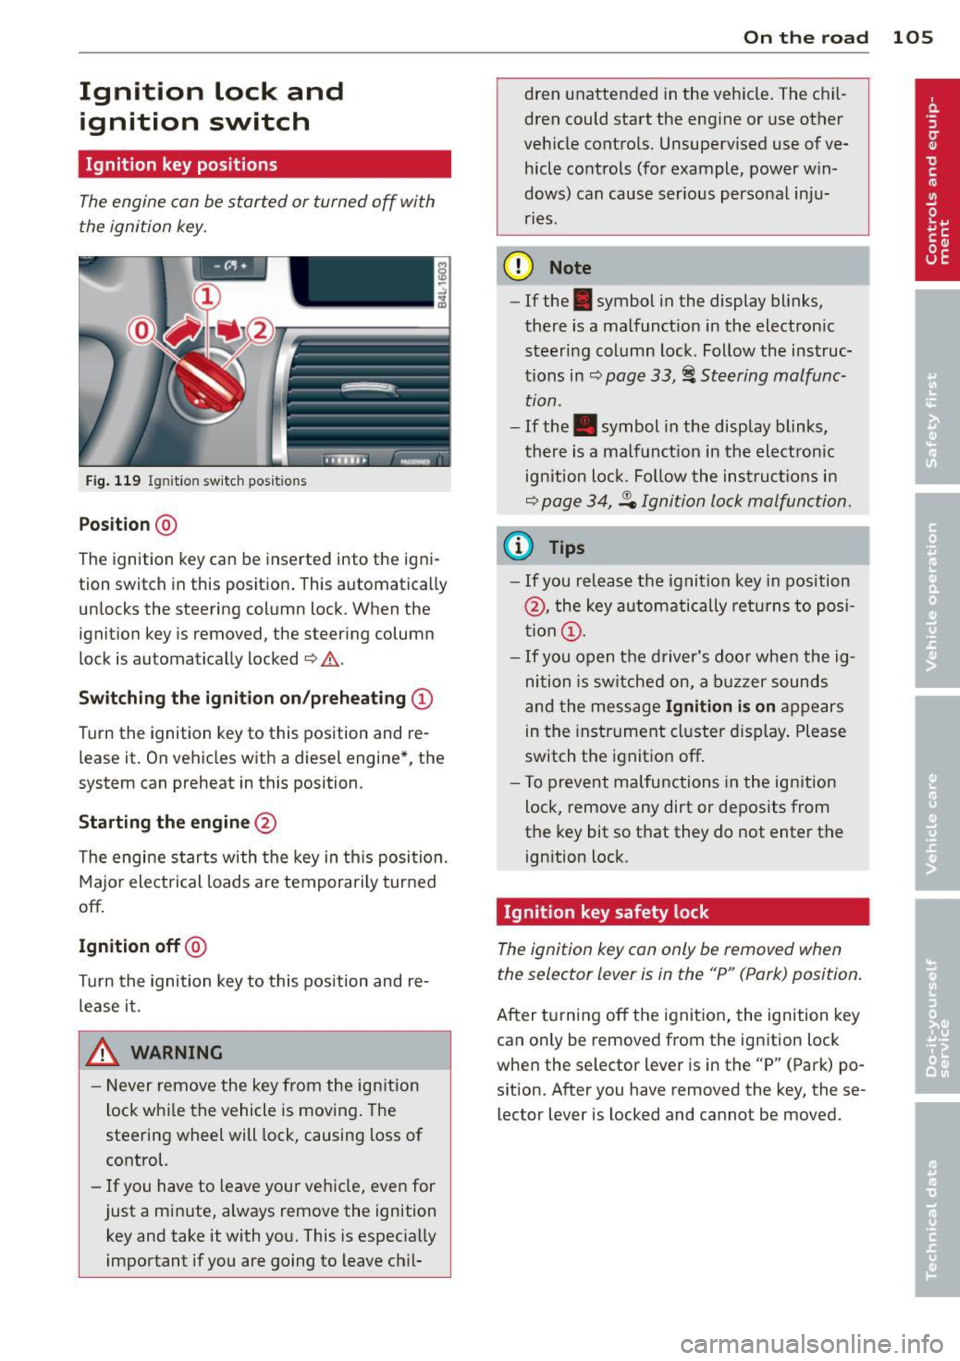
Fig. 119 Igni tion switch pos it io n s
Position @
The ignition key can be inserted into the igni
tion switch in this position . This automatically
unlocks the steering column lock . When the
ignition key is removed, the steering column
lock is automatically locked
Q .&. .
Switching the ignition on/preheating (D
Turn the ignition key to this position and re
lease it. On vehicles with a d iesel engine*, the
system can preheat in this position .
Starting the engine@
The engine starts with the key in this position.
Major electrical loads are temporarily turned
off.
Ignition off@
Turn the ignition key to this position and re
lease it.
A WARNING ,~ ~
- Never remove the key from the ign ition
lock whi le the vehicle is moving. The
steering wheel will lock, causing loss of
control.
- If you have to leave your vehicle, even for
just a minute, always remove the ignition key and take it with you. This is especially
important if you are going to leave chil-
On the road 105
dren unattended in the vehicle. The chil
dren could start the engine or use other
vehicle controls. Unsupervised use of ve
hicle controls (for example, power win
dows) can cause ser ious personal inju
ries.
(D Note
- If the . symbol in the display blinks,
there is a malfunction in the electronic
steering column lock . Follow the instruc
tions in
Q page 33, i Steering malfunc
tion .
-If the . symbol in the display blinks,
there is a malfunction in the electronic
ignition lock . Fol low the instructions in
Q page 34, .P. Ignition lock malfunction.
a) Tips
-If you release the ignition key in position
@, the key automatically returns to posi
tion (!).
- If you open the driver's door when the ig
nition is sw itched on, a buzzer sounds
and the message
Ignition is on appears
in the instrument cluster display. Please
switch the ignition off.
- T o prevent malfunctions in the ign ition
lock, remove any dirt or deposits from
the key bit so that they do not enter the
ignition lock.
Ignition key safety lock
The ignition key con only be removed when
the selector lever is in the "P" (Pork) position.
After turning off the ignition, the ignition key
can only be removed from the ignition lock
when the selector lever is in the "P" (Park) po
sition. After you have removed the key, these lector lever is locked and cannot be moved.