driver door AUDI Q7 2013 Owner´s Manual
[x] Cancel search | Manufacturer: AUDI, Model Year: 2013, Model line: Q7, Model: AUDI Q7 2013Pages: 348, PDF Size: 87.72 MB
Page 110 of 348
108 On the road
reached operating temperat ure -other
wise yo u risk engine damage.
- The eng ine cannot be sta rted by pushing
or towing the vehicle.
@ For the sake of the environment
Do not allow the engine to warm up with
t he vehicle stationary. Start driving righ t
away . In th is way you avoid unnecessa ry
emissio ns.
@ Tips
If you open the drive r's door when the ig
nition is switched o n, a buzze r sounds and
the message
Ignition is on appears i n the
instrument cluster disp lay. Please switch
the ignition off.
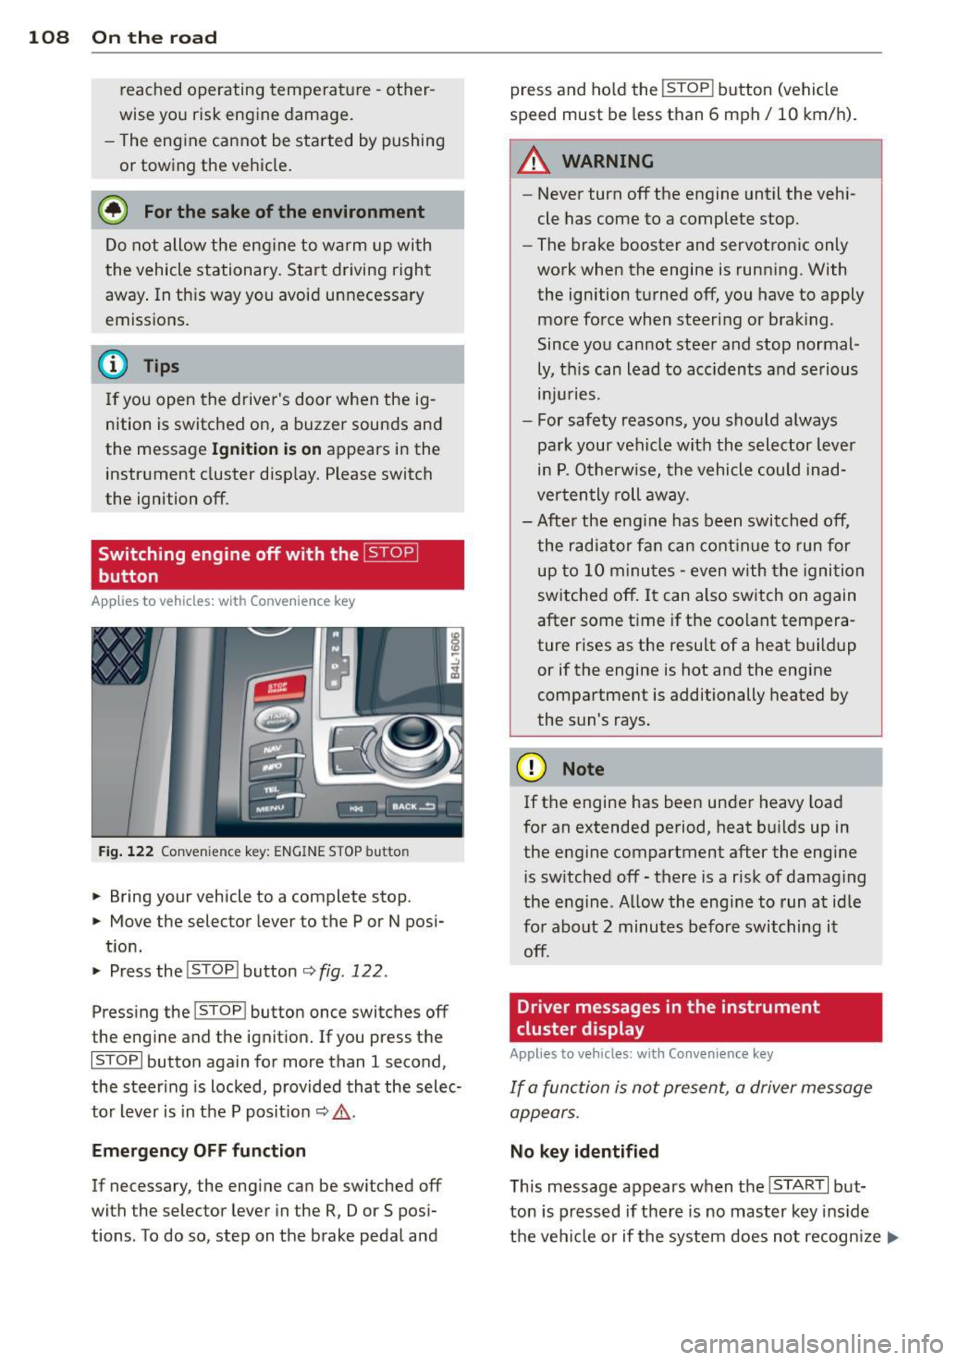
Switching engine off with the~
button
App lies to vehicles: with Convenience key
Fig. 122 Convenience key: ENGINE STOP butto n
.. Bring your vehicle to a complete stop.
.. Move the selector lever to the P or N posi-
t ion.
.. Pressthe !STOP !button
¢fig.122.
Press ing the I STOP I button once switches off
the engine and the ignition. If you press the
ISTOPI button again for more than 1 second,
the steering is locked, provided that the selec
tor lever is in t he P pos it ion
¢ & .
Emergency OFF function
If necessary, the engine can be switched off
with the selector lever in the
R, Dor S posi
tions . To do so, step on the brake peda l and press and ho
ld the !STOP ! b utton (vehicle
speed must be less than 6 mph/ 10 km/ h).
.&_ WARNING
-
- Never turn off the engine until the vehi-
cle has come to a complete stop.
- The brake booster and servotronic only
work when the engine is running. With
the ignition turned off, you have to apply mo re force when steeri ng or brak ing.
Since you cannot steer and stop normal
ly, t his can lead to acc idents and se rious
. . . in Juries.
- For safety reasons, you sho uld a lways
pa rk your vehi cle wit h the selector lever
i n P. O therwise, the vehicle could inad
ver ten tly roll aw ay.
- Afte r the eng ine has been switch ed off,
t he r adi at or f an can co ntinu e to run f or
up to 10 minu tes -even with the igni tion
switched off . It can also switch on again
after some t ime if the coolant tem pera
ture rises as the resu lt of a heat b uildup
or if the engine is hot and the engine
compa rtment is additionally heated by
the sun's rays.
(D Note
If the engine has been under heavy load
for an extended pe rio d, heat b uilds up in
the engine compartment after the engi ne
i s sw itched off -there is a r isk of damag ing
the e ng in e. A llow th e engi ne to run a t id le
fo r abo ut 2 minutes befor e switching it
off .
Driver messages in the instrument
cluster display
Applies to vehicles: with Co nvenience key
If a func tion is not present, a driver message
appears .
No key identified
This message appears when t he I STAR T I but-
ton is pr essed if there is no master key ins id e
the vehi cle or if t he system does not recogn ize
IJ,-
Page 111 of 348
it. For example, the master key cannot be rec
ognized if it is covered by an object (e.g. alu
minum brief case) which
screens the radio s ig
nal. Electronic devices such as cell phones can
also interfere with the radio signal.
Press brake pedal to start engine
This message appears if you press the I START !
button to start the engine and do not depress
the brake pedal. The engine can only be start
ed if the brake pedal is depressed .
Engage Nor P to start engine
This message appears when the engine is
started if the selector lever for the automatic
transmission is not in the P or N position. The
engine can only be started with the selector in
these posit ions.
B Key not in vehicle
This message appears along with the B sym
bol if the master key is removed from the ve
hicle with the engine r unning .
It is intended
to remind you (e .g. when changing drivers)
not to continue the journey without the mas
ter key .
If the master key is no longer in the vehicle,
you cannot sw itch off the ignition after stop
ping the engine and you also cannot start the
engine again. Moreover, you cannot lock the
vehicle from the outside with the key.
Shift to P otherwise vehicle can roll away.
Doors do not lock if you are not in P.
This message appears for safety reasons
along w ith a warning buzzer if the selector
lever for the automatic transmission is not in
the P pos ition when the ignit ion is switched
off with the
ISTOPI button and the dr iver's
door is opened. Move the se lector lever to the
P position, otherwise the vehicle is not se
cured against rolling away . You a lso cannot
lock the vehicle using the lock ing button on
the door hand le or using the remote key.
On the road 109
To engage steering lock, press and hold
STOP button
This message appears for safety reasons if the
engine and the ignition have been switched
off by pressing the
I STOPI button once, and
then the driver's door is opened. In this in
stance, the steering is not locked . The steer
ing is locked:
- If you press the
IS TOPI button again for
more than 1 second.
- If you close the driver's door and lock your
veh icle from the outside.
Parking brake
Operation
The parking brake replaces the handbrake .
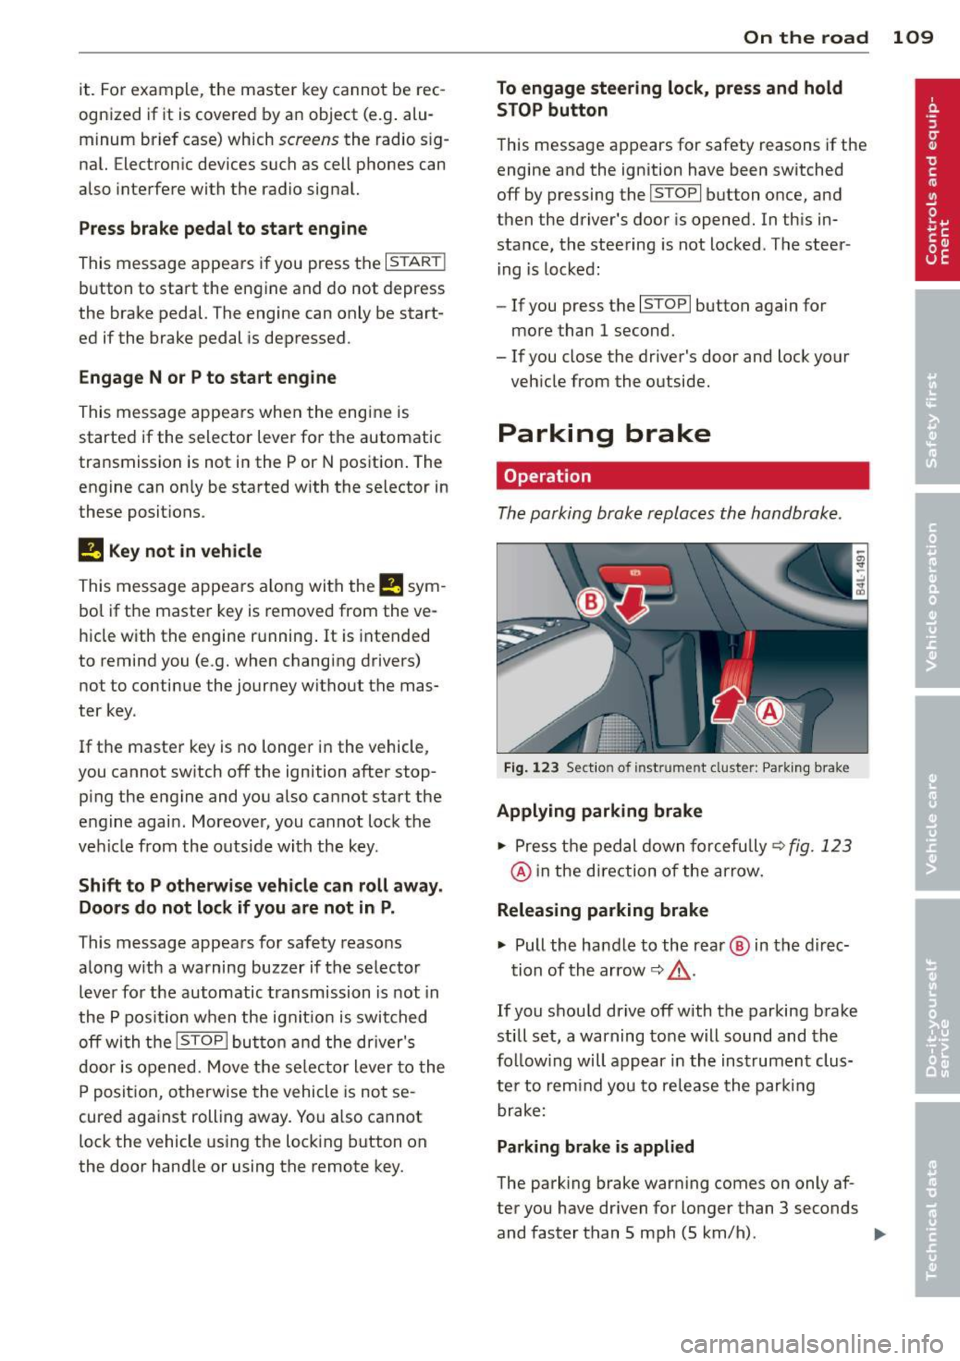
Fig. 123 Section of inst rume nt clust er: Pa rking brake
Applying parking brake
.,.. Press the pedal down forcefully~ fig. 123
@ in the direction of the arrow.
Releasing parking brake
.,.. Pull the hand le to the rear @ in the direc-
tion of the arrow
~ _&. .
If you should drive off with the parking brake
still set, a warning tone will sound and the
fo llow ing will appear in the instrument clus
te r to remind you to release the parking
brake:
Parking brake is applied
The park ing brake warning comes on only af
ter you have dr iven for longer than 3 seconds
and faster than 5 mph (5 km/h) . .,._
Page 165 of 348
12. Press and release the learn button on the
garage door opener motor.
.. Note : once the button is pressed, there are
30 seconds in which to initiate the next
step .
13. On the Homel ink® keypad inside the vehi
cle, firmly press and hold the Homelink ®
button previously programmed in phases
1 and 2 for two seconds and release. Re
peat this sequence
twice .
.. Some vehicles may requ ire the press/hold/
release sequence up to three times to com
plete the training process .
.. Homelink ® should now activate your rolling
code equipped device.
If the 5 minute time limit is exceeded, the
emergency flashers will flash one time to in
d icate that the process has been terminated.
In this case, repeat steps 4 through 9 .
If the emergency flashers do not flash
three
times (after about 15-60 seconds), program
ming was not successful. In this case, repeat
steps 4 through 9.
Remote control units for garage door openers
in Canada are set to stop transmitting radio
frequency s ignals after two seconds. This time
may not be sufficient for the Homelink ® sys
tem to learn the radio frequency s ignal. Per
form all other steps as described above .
Operating the Homelink ® transmitter
Applies to vehicles: with Home link® universa l remote
control
The Homelink ® transmitter works in the
some manner as the original hondheld re
mote control that come with the system.
mm
-
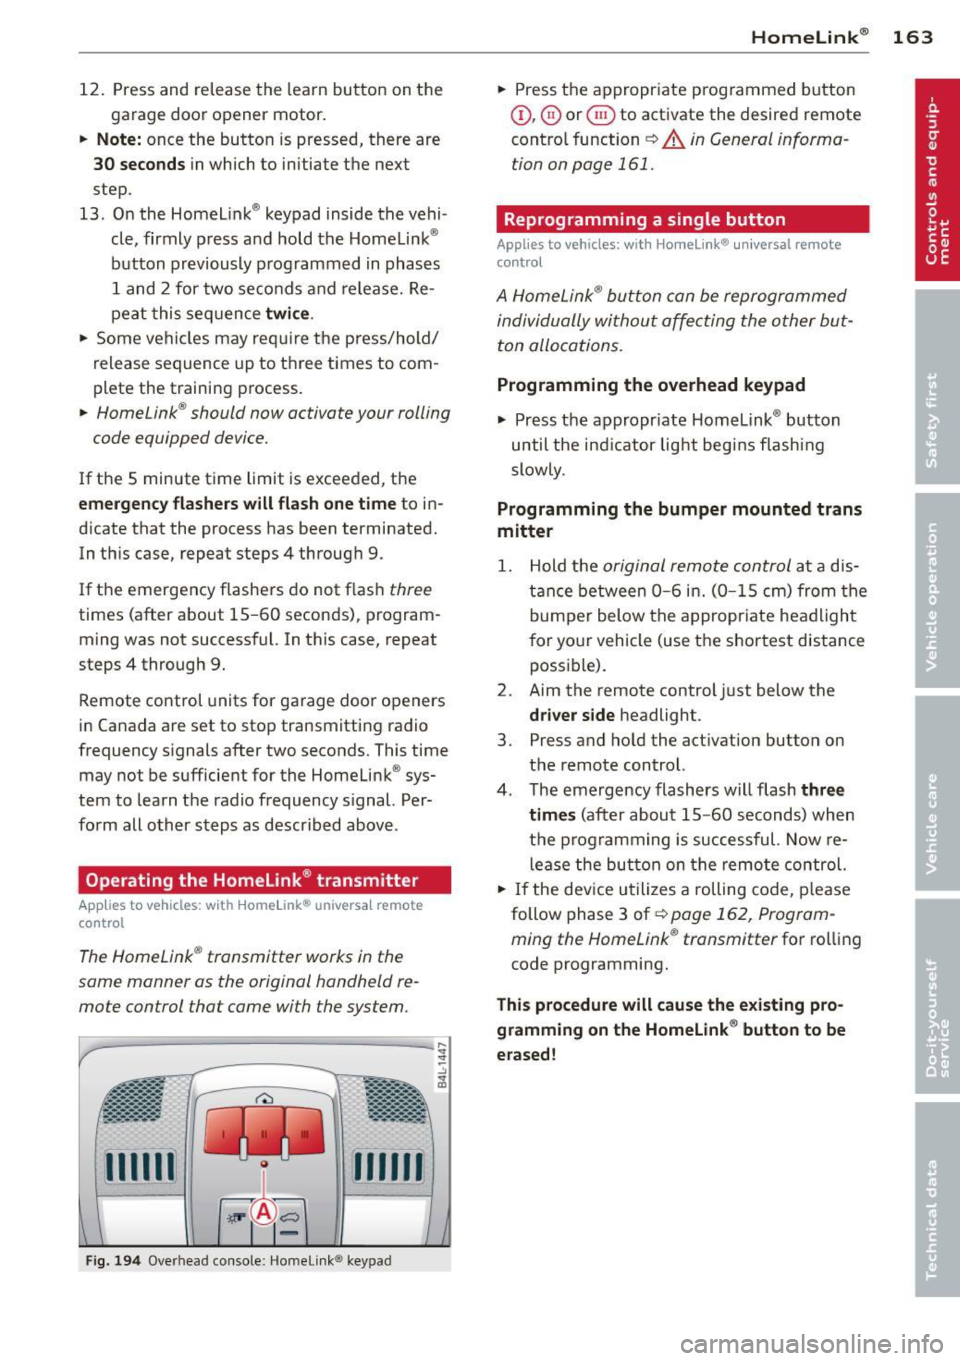
Fi g. 194 Overhead co nsole: Home link ® keypad
Homelink ® 163
.. Press the appropriate programmed button
Q), @) or @ to activate the desired remote
contro l function
~ A in General informa
tion on page 161 .
Reprogramming a single button
Applies to vehicles: with Homelink® universal remote
control
A HomeLink ® button can be reprogrammed
individually without affecting the other but
ton allocations.
Programming the overhead keypad
.. Press the appropr iate Homelink ® button
until the ind icator light begins flashing
slowly .
Programming the bumper mounted trans
mitter
1. Hold the original remote control at a dis
t anc e between
0-6 in. (0 -15 cm) from the
bumper below the appropriate headlight
for your vehicle (use the shortest distance
possible).
2. Aim the remote control just below the
driver side headlight.
3. Press and hold the act ivation button on
the remote control.
4. The emergency flashers will flash
three
times
(after about 15 -60 seconds) when
the programming is successful. Now re
lease the button on the remote control.
.. If the device utilizes a rolling code, please
follow phase 3 of¢
page 162, Program
ming the Homelink ® transmitter
for rolling
code programming.
This procedure will cause the existing pro
gramming on the Homelink ® button to be
erased!
Page 196 of 348
194 Airbag sys te m
- when the weight on the front passenger
seat as sensed by the Advanced Airbag Sys
tem indicates that the front airbag on the
passenger side has to be turned off by the
electron ic control unit (the
PA SSEN GER AIR
BAG OFF
light comes on and stays on)
A WARNING
Sitting in the wrong position can increase
the risk of serious injury in crashes.
- To reduce the r isk of injury when the air
bags inflate, the driver and passengers
must always sit in an upright position,
must not lean against o r place any pa rt
of the ir body too close to the area where
the airbags are located .
- Occ upants who are unbelted, out of posi
t ion or too close to the airbag can be se
riously injured by an airbag as it unfolds
with great force in the blink of an eye
¢page 186.
A WARNING -
A child in a rearward-facing child safety
seat installed on the front passenger seat
w ill be seriously injured and can be k illed if
the front a irbag inflates -even with an Ad
vanced Airbag System.
- The inflating a irbag will hit the child
safety seat or infant carrier with great
force and w ill smash the ch ild safety seat
and child against the backrest, center
armres t, door or roof.
- Always install rear-facing child safety
seats on the rear seat.
- If you must install a rearward-fac ing
child safety seat on the front passenger
seat because of excep tional circ umstan
ces and the
PASSENGER AIR BAG OFF
light does not come on and stay on, im
mediately install the rear-facing child
safety seat in a rear seating position and
have the airbag system inspected by your
authorized Audi dealer.
A WARNING
Objects between you and the airbag will
i nc rease the r isk of injury in a crash by in
terfering with the way the airbag unfolds
or by be ing pushed into you as the airbag
i n flates.
- Never hold things in yo ur hands or on
your lap when the veh icle is in use.
- Never transpo rt items on or in the area
of the front passenger seat. Objects
could move into the a rea of the front air
b ags du ring bra king or other sudden ma
neuvers and become dangero us projec
tiles that can cause serious personal in
jury if the ai rbags inflate.
- Never p lace or attach accessories or oth
er objects (such as cupholde rs, tele
phone brackets, large, heavy or bulky ob
jects) on the doors, ove r or near the area
marked "AIRBAG" on the steer ing whee l,
instrument panel , seat backrests or be
tween those areas and yourself . These
objects could ca use in jury in a c rash, es
pecially when the airbags infla te.
- Never recline the front passenger 's seat
to transpo rt objects . Items can a lso
move into the a rea of the s ide airbag or
the front airb ag d uring bra king or in a
sudden maneuve r. Objects nea r the air
bags can become projectiles and cause
in ju ry, partic ularly when the seat is re
clined.
- Never tilt the front passenger seat back
rest forward when the vehicle is moving .
An inflating a irbag w ill force the back
rest backward and can injure rear seat oc
cupants.
A WARNING
The fine dust created when airbags deploy
can cause breathing prob lems for people
with a history of asthma or other breath i ng cond itions.
-
- To reduce the risk of breath ing problems,
those with asthma o r othe r respiratory
....__ c_ o_ n_ d_ it_ i_o _ ns_ s_ ho _u_ l_ d ....:g:_ e_ t_ f_re _s_ h _ a_ i_r _ri ..::g :....h _t __
_J .,.
Page 197 of 348
away by getting out of the vehicle or
opening windows or doors.
-If you are in a collision in which airbags
deploy, wash your hands and face with
mild soap and water before eating.
- Be careful not to get the dust into you r
eyes, or into any cuts or scratches.
- If the residue should get into your eyes,
flush them with water.
Monitoring the
Advanced Airbag
System
Airbag monitoring indicator light
Two separate indicators monitor the function
of the Advanced Airbag System: the airbag
monitoring indicator light and the
PA SSEN ·
GER AIR BAG OFF
light.
The Advanced Airbag System (including the
e lectronic control unit, sensor circuits and sys
tem wiring) is monitored cont inuously to
make sure that it is functioning properly
whenever the ignit ion is on . Each t ime you
turn on the ignition, the airbag monitoring in
d icator light
I will come on for a few seconds
(sel f diagnos tics) .
The system must be inspected when the
indicato r light
I:
- does not come on when the ignit ion is
switched on
- does not go out a few seconds after you
have swi tched o n the ignition, o r
- comes on w hile driving
If an airbag system malfunct ion is detected,
the indicator light will first start flashing to
catch the driver's attention and then stay on
continuously to serve as a constant reminde r
to have the system inspected immediately.
If a malfunction occurs that tur ns the front
a irbag on the passenger side off, the
PAS SEN
GER AIR BAG OFF
light w ill come on and stay
on w henever the ignition is on.
A irbag system 195
A WARNING
An airbag system that is not functioning
p roperly cannot provide supplemental pro
tection in a frontal crash.
- If the airbag ind icator light comes on, it
means that there may be something
wrong with the Advanced Airbag System .
I t is poss ible that the ai rbag w ill inflate
when it is not supposed to, or will not in
fla te when it sho uld.
- Have the airbag system inspe cted imme
diate ly by yo ur aut ho rized Aud i dea ler.
PASSENGER AIR BAG OFF light
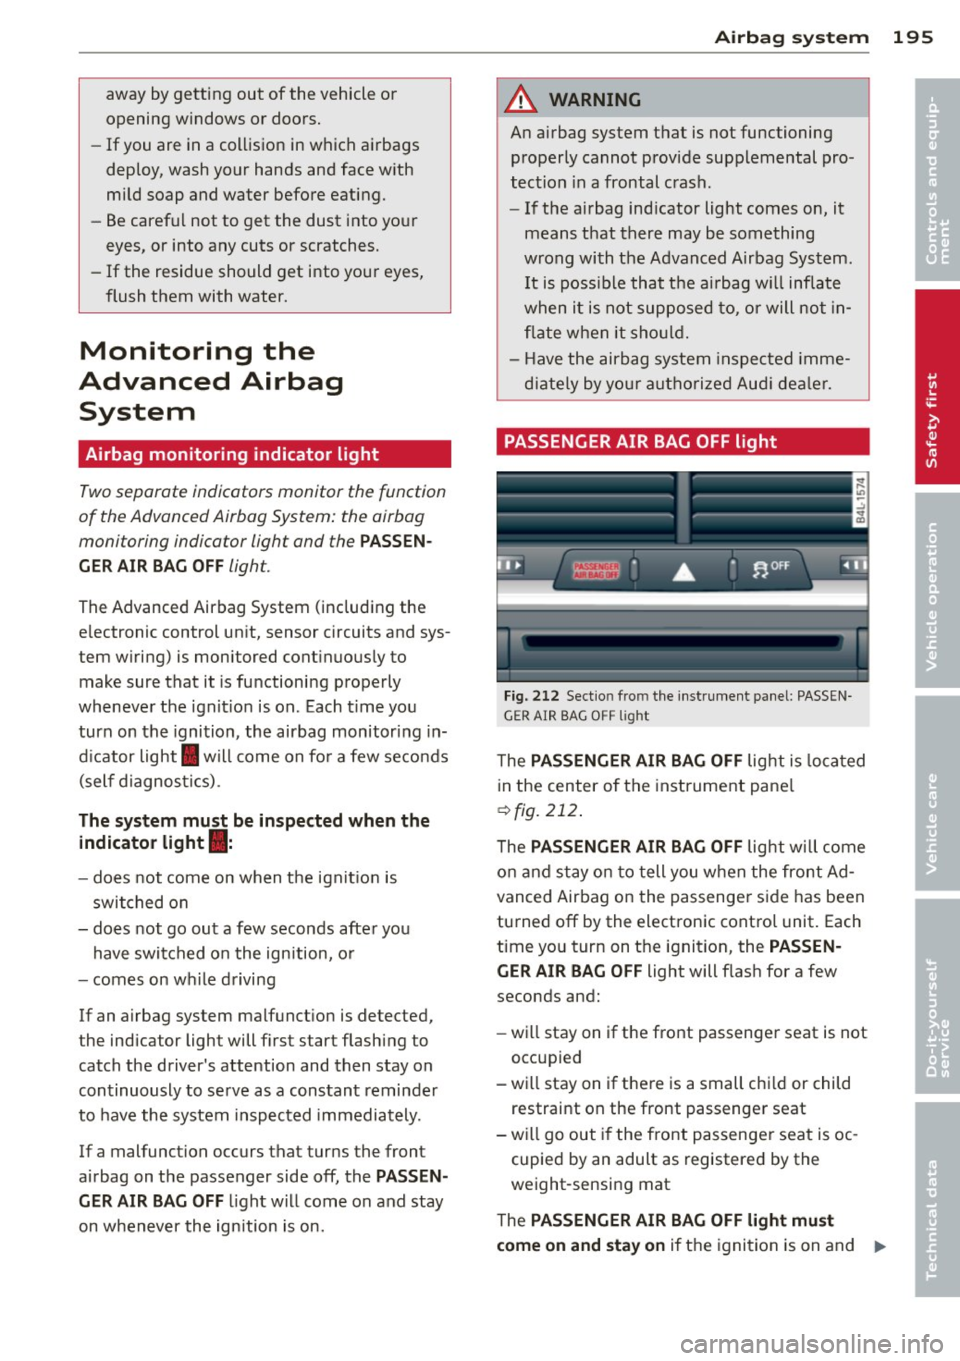
Fi g. 212 Sec tion fro m th e in str um ent pa nel: PASSEN
GER AIR BAG O FF light
-
T he PASSENGER AIR BAG OFF light is loca ted
i n the center of the instrument pa ne l
¢ fig. 212 .
The PAS SENGER AIR BAG OFF lig ht will come
o n and stay on to tell you when the front Ad
vanced Airbag on the passenger side has been
turned off by the electronic control unit. Each
t ime yo u turn on the ignition, the
PASSEN·
GER AIR BAG OFF
light will flash for a few
seconds and:
- w ill stay on if the front passenger seat is not
occupied
- w ill stay on if there is a small chi ld or child
restraint on the front passenger seat
- w ill go out if the front passenger seat is oc
cupied by an adult as registered by the
weight-sensing mat
T he
PASSENGER AIR BAG OFF light must
come on and sta y on
if the ignition is on and ..,.
•
•
Page 202 of 348
200 Airbag system
The side airbags are located in the sides of the
front seat backrests ¢
fig. 213 and the rear
backrest* facing the doors. They are ident ified
by the word "AIRBAG".
The side airbag system basically consists of:
-the e lectronic control module and external
side impact sensors
- the two side airbags located in the sides of
the front backrests
- two rear side airbags (as an ordered
option)
-the a irbag warn ing light in the instrument
cluster .
The airbag system is monitored electron ically
to make certain that it is functioning properly
at all times. Each time you turn on the igni
tion, the airbag system indicator light will
come on for a few seconds (self diagnostics) .
The s ide airbag system supplements the safe
ty belts and can help to reduce the risk of in
jury to the driver's, front and rear* passeng
er's upper torso on the side of the veh icle that
i s struck in a side collision . Th e airbag deploys
on ly in side impacts and only when the veh icle
acceleration registered by the control unit is
high enough . If this rate is below the refer
ence value programmed into the control unit,
the side airbags will not be triggered, even
though the car may be badly damaged as a re
sult of the collision. It is not possible to de
f in e an a irbag tr igger ing range that will cover
every possible angle of impact, since the cir
cumstances will vary considerably between
one collision and another. Important factors
include, for examp le, the nature (hard or soft)
of the impacting object, the angle of impact ,
vehicle speed, etc . ¢
page 201, Important
safety instructions on the side airbag system .
Aside from their normal safety function , safe
ty belts work to help keep the driver or front
passenger in position in the event of a side
coll ision so that th e side airbags can provide
protection.
The airbag system is
not a substitute for your
safety be lt. Rather, it is part of the overall oc
cupant restraint system in your vehicle . Al
ways remember that the side airbag system can
only help to protect you if you are wearing
your safety belt and wearing it properly. This
is another reason why you should a lways wear
your safety belts, not just because the law re
quires you to do so¢
page 175, General
notes .
It is important to remember that wh ile the
s u pplementa l side airbag system is designed
to reduce the likelihood of serious injuries,
other injur ies, for example, swelling, bru is in g,
and minor abrasions can also be assoc iated
with deployed side airbags . Remember too,
s ide airbags will dep loy only once and only in
certain kinds of accidents - your safety belts
are always there to offer protection.
Vehicle damage , repair costs or even the lack
of vehicl e damage are not necessarily an indi
cation of over-sensitive or failed airbag activa
t ion. In some coll is ions, both front and side
airbags may inflate . Remember too, that air
bags will deploy only once and only in certain
k inds of co llisions -yo ur safety belts are al
ways there to offer protection in those acc i
den ts in which airbags are no t supposed to
deploy or when they have already deployed .
The side airbag system will not deploy:
-when the ignition is t urned off
- in side collisions when the acceleration
measured by the sensor is too low
- in front -end collisions
- in rea r-end collisions
- in rollovers .
In some types of accidents the front airbags ,
s ide curtain airbags and s ide a irbags may be
triggered together .
A WARNING
-
-Safety belts and the airbag system will
only provide protection when occupants
ar e in the proper seating position
¢page 201.
- If the airbag indicator light comes on
when the vehicle is being used, have the
system inspected immediately by your
authorized Audi dealer. The airbag may
Page 204 of 348
202 Airbag system
-Objects between you a nd the airbag can
increase the risk of injury in an acc ident
by interfering wit h the way the airbag
unfolds or by be ing pushed into you as
the a irbag inflates .
- Never p lace or a ttach accessories or
other objects (such as cupholders, tele
phone brackets, or even large, bulky
objects) on the doors, over or near the
area marked "AIRBAG" on the seat
backrests.
- Such objects and accessories can be
come dangerous projectiles and cause
injury when the supplemental s ide air
bag deploys.
- Never carry any objects or pets in t he
deployment space between them and
the airbags or allow children or other
passengers to travel in this posit ion.
- Always use the built-in coat hooks only
for lightwe ight clothing . Never leave any
heavy o r sharp-edged objects in the
poc ke ts that may in terfere with side air
bag dep loyment and can cause personal
injury in an accident .
- Always prevent the side a irbags from be
ing damaged by heavy objects knoc king
against o r hitti ng the sides of the seat
backs.
- The airbag system can only be triggered
once . If the a irbag has been triggered ,
the system must be replaced by an au
thorized Audi dealership.
- Damage (cracks, deep scratches etc .) to
the origina l seat covers or to the seam in
the area of the side airbag module must always be repaired immediately by an au
thorized Aud i dealer.
- If children a re seated improperly, their
risk of injury increases in the case of an
acc ident
q page 205, Child Safety.
- Never attempt to modify any compo
nents of the airbag system in a ny way.
- In a side co llision, s ide airbags will not
f unction properly if senso rs cannot cor
rect ly measure increasing air p ressu re in
s ide the doors when air escapes t hro ugh larger, unclosed openings in the door
panel.
- Never dr ive with inte rior door t rim pan
els removed.
- Never dr ive when parts have bee n re
moved from the inside door pane l and
the ope nings they leave have not been
properly closed.
- Never dr ive when loudspe akers in the
doo rs have been removed unless the
speake r holes have been properly
closed.
- Always make certain tha t openings are
cove red or f ille d if ad dit iona l speakers
o r other equipment is insta lled in the
inside door panels .
- Always have work on the doors done by
an a uthorized Audi dea ler or q ualified
wor kshop.
Side curtain airbags
Description of side curtain airbags
The side curtain airbags can provide supple
mental protection to properly restrained oc
cupants .
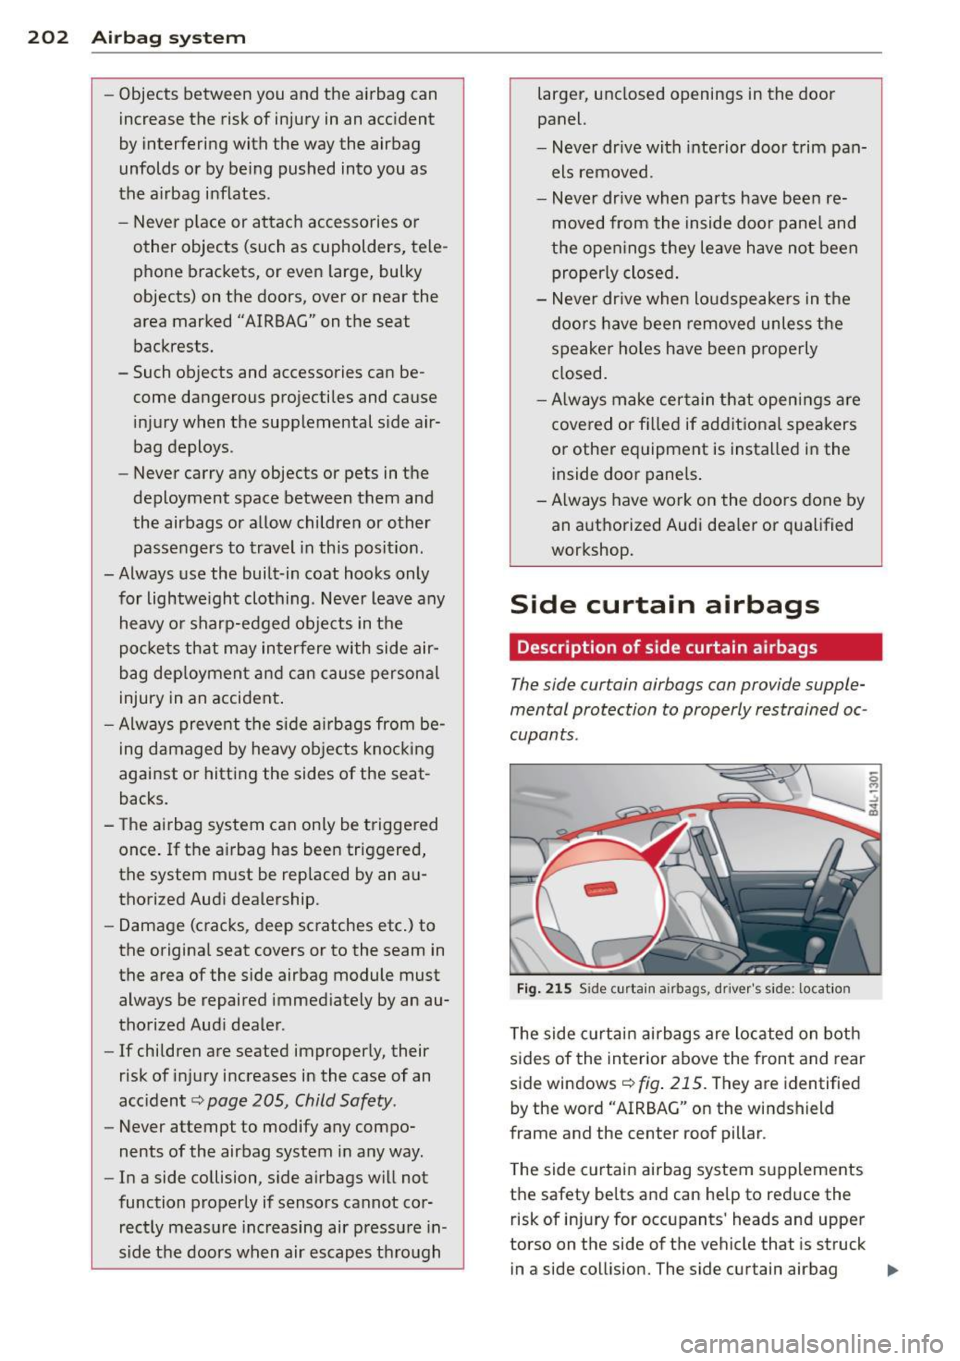
Fig. 21S Side curtain a irbags, driver 's side : locat ion
T he side c urtai n airbags are located on bot h
s ides of the interior above the front and rear
s ide windows
c!;J fig . 215. They are identified
by the word "AIRBAG" on the windshield
frame and the center roof pillar .
T he side c urtain airbag system s upplements
t h e safety be lts and can he lp to red uce the
risk of in jury for occupants' heads and upper
torso on the side of the vehicle that is struck
in a side collision. The side curtain airbag ..,.
Page 266 of 348
264 Checking and filling
Checking and filling
Engine hood
Releasing the engine hood
The engine hood is released from inside the
vehicle.
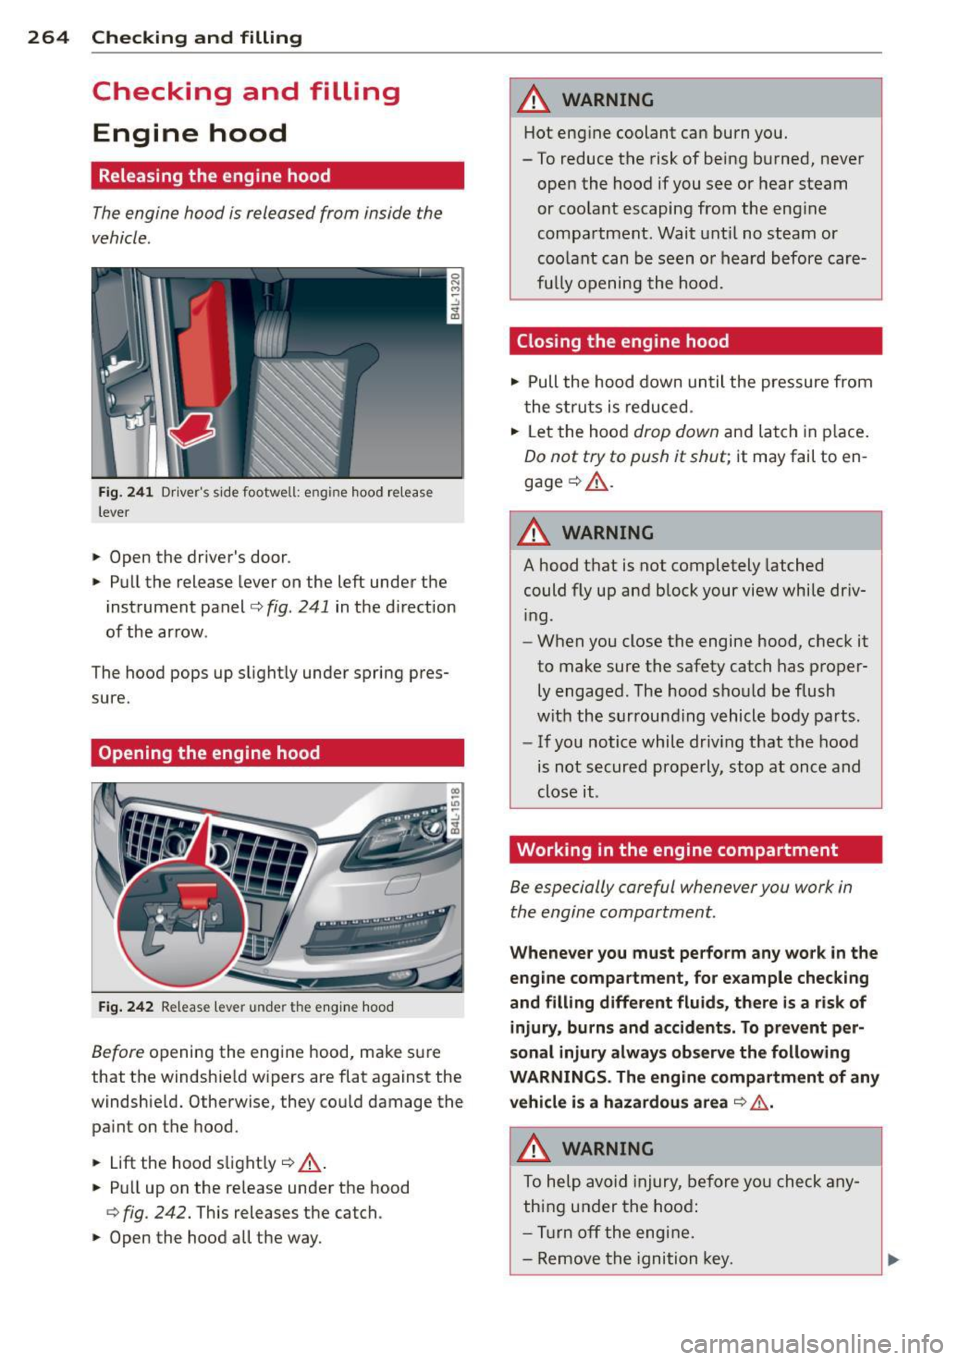
F ig . 2 41 Driver's side footwell: engine hood re lease
lever
.. Open the driver's door.
.. Pull the release lever on the left under the
inst rument panel
c> fig. 241 in the d irect ion
of the ar row .
The hood pops up s light ly under spring pres
sure.
Opening the engine hood
Fig. 242 Re lease lever under the eng ine hood
Before opening the engine hood, make s ure
that the windshie ld wipers are flat against the
windshie ld. Otherwise, they co uld damage the
pa int on the hood.
.. Lift the hood s light ly
c> _& .
.. Pull up on the release under the hood
¢ fig. 242. This releases the catch.
.. Open the hood all the way.
A WARNING
-Hot eng ine co olant can burn you.
- To reduce the risk of being b urned, never
o pen the hood if you see or hear steam
or coo la nt escaping from the eng ine
compa rtment. Wait unt il no steam or
coo lant can b e seen o r heard before care
fu lly openi ng the ho od.
Closing the engine hood
.. Pull the hood down un til the pressure from
t he stru ts is reduced .
.. Let the hood
drop down and la tch in p lace.
Do not try to push it shut; it may fail to en
gage
c> _& .
A WARNING
--
A ho od t hat is not completely latched
could fly up an d block your vi ew while dr iv
i ng.
- W hen you close the engine hood, c heck it
to make sure the safety catch has p roper
ly engaged . The hood sho uld be flush
wit h the surrou nding vehicle body parts.
- If you notice while dr iv ing t hat t he hood
is not s ecured properly, stop at once and
close it.
Working in the engine compartment
Be especially careful whenever you work in
the engine compartment .
Whenever you must perform any wo rk in the
engine compartment, for example checking
and filling different fluids, th ere is a risk of
injury, burns and accidents. To pr event per
sonal injury alway s observe the following
WARNINGS. The engine compartm ent of any
vehicle is a hazardous area
c> &, .
A WARNING
To he lp avo id i njury, before yo u check any
thi ng under the hoo d:
- Tu rn off the eng ine .
- Remove the igni tion key.
Page 312 of 348
310 Fuses and bulb s
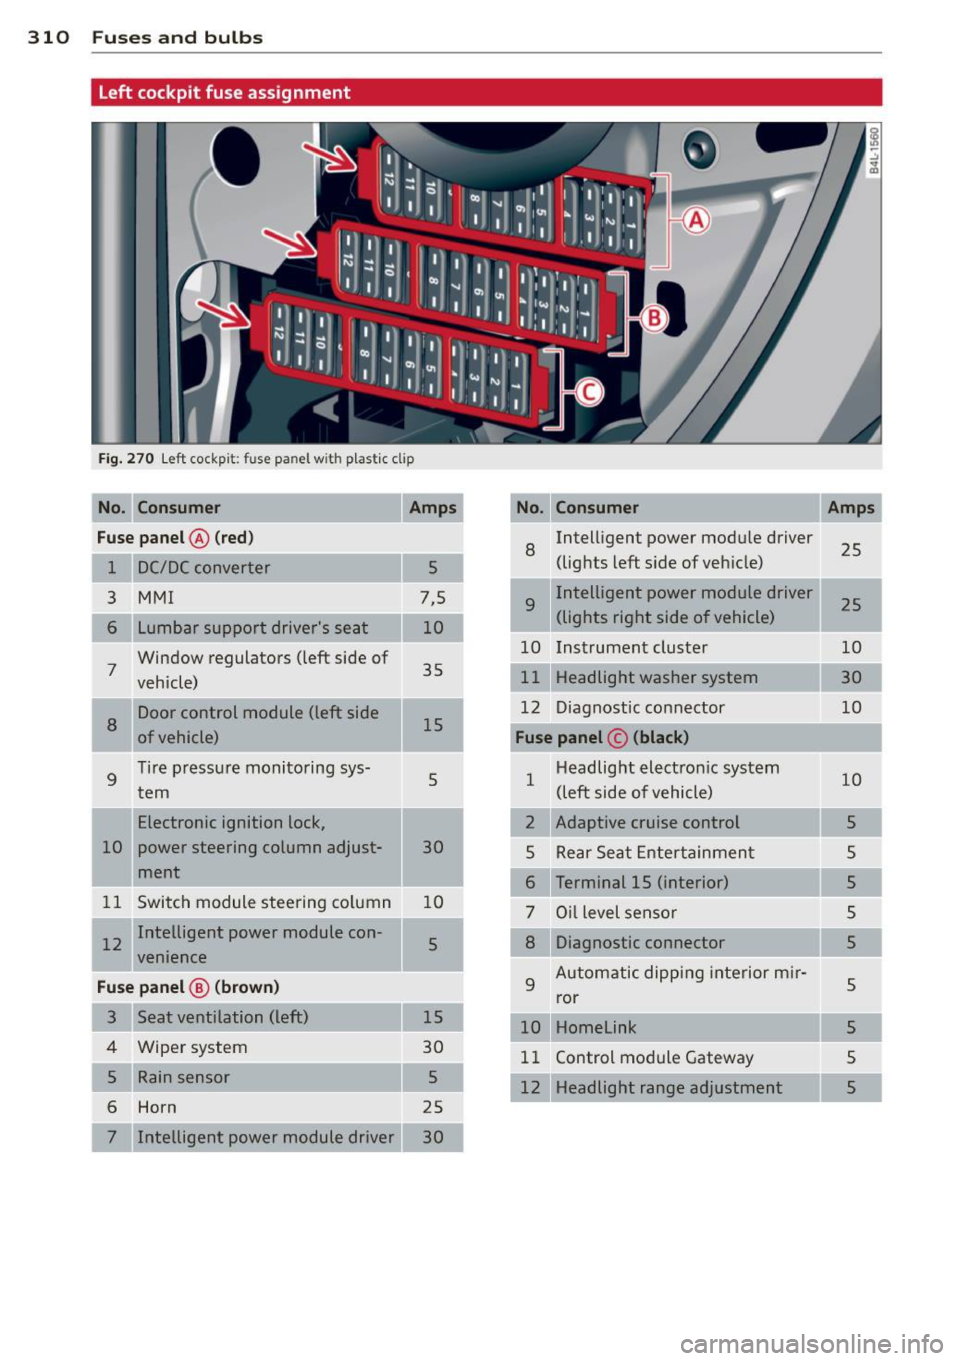
Left cockpit fuse assignment
Fig. 270 Left cockpit: fuse panel w ith p lastic clip
No. Consumer
Fu se pa nel @ (red )
8 Intelligent power modu le driver
25
1 5 (lights left s
ide of veh icle)
3
MMI 7,5 9 Intelligent power module driver 25
6 Lumbar support driver's seat
(lights right side of vehicle)
Window regulators (left side of 10 Instrument cluster
10
7 vehicle) 35
11 Headlight
washer system
Door control module (left side 12 Diagnostic connector
10
8 of vehicle) 15 Fu
se panel © (black )
9 Tire pressure monitoring sys-
5 1 Headlight electron
ic system
10
tern (left side of vehicle)
.
Electronic ignition lock,
2 Adaptive cruise control
5
10 power steering column adjust-
30
5 Rear Seat Ente rtainment
s
I ment 6 Terminal 15 (interior)
5
11 Switch module steering co lumn 10
7 Oil level sensor 5
I 12 Intelligent power module con-5 8 Diagnostic connector
5
venience
F u se pa nel @ (b ro wn) 9 Automatic dipping
interior m ir-5 ror
3 10 Homelink
5
4 Wiper system 11 Control module Gateway 5
5 5
12 Headlight range adjustment 5
6 Horn
25
7 Intelligent power module driver 30
Page 322 of 348
320 General information
General information Explanation of
technical data
Some of the technical data listed in this man
ual requires further explanation .
The technical data for your vehicle is listed in
the charts starting on
r:::>page 322. This sec
tion provides general information, notes and
restrictions which apply to this data .
Vehicle identification
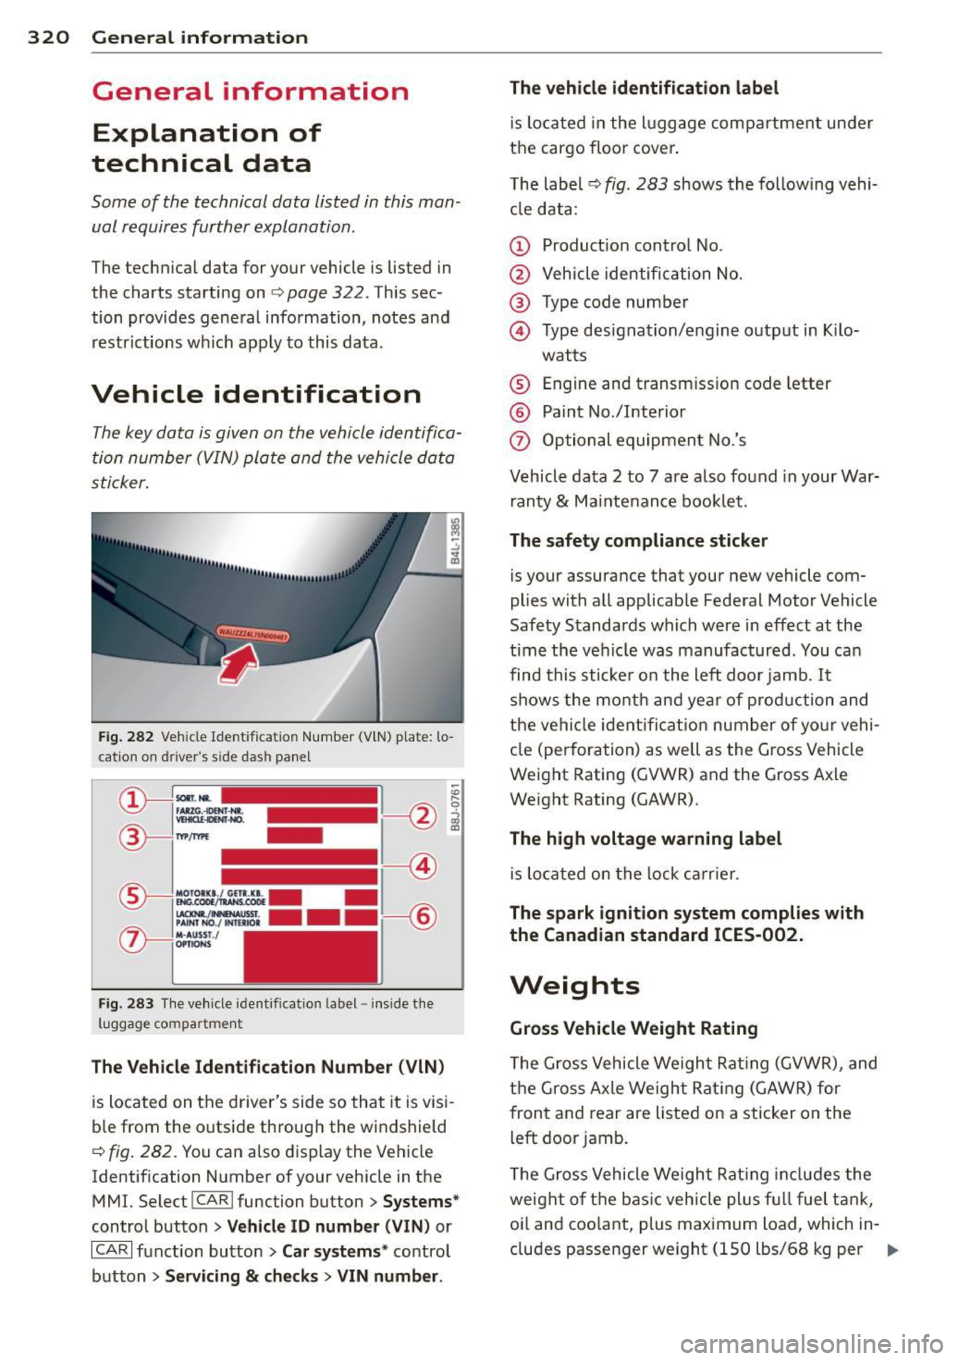
The key data is given on the vehicle identifica
tion number (VIN) plate and the vehicle data
sticker.
Fig. 282 Veh icle Ide ntific atio n Number (VlN) p late: lo
cation on driver 's sid e das h panel
Fig. 283 The vehicle identi fication label -inside the
luggage co mpa rtmen t
The Vehicle Identification Number (VIN)
is located on the driver's side so that it is visi
b le from the outside through the windshield
r:::> fig . 282 . You can also display the Vehicle
Identification Number of your vehicle in the
MMI. Select !CAR lfunc tion button>
Systems*
control button > Vehicle ID number (V IN) or
ICARI function button >
Car systems * control
button >
Servicing & checks > VIN number . The
vehicle identification label
is located in the luggage compartment under
the cargo floor cover.
The label¢
fig. 283 shows the following vehi
cle data :
(D Production control No .
@ Vehicle identification No.
® Type code number
@ Type designation/engine output in Kilo-
watts
® Engine and transmission code letter
@ Paint No./Interior
(f) Optional equipment No.'s
Vehicle data 2 to 7 are also found in your War
ranty
& Maintenance booklet.
The safety compliance sticker
is you r assurance that your new vehicle com
plies with all applicable Federal Motor Vehicle
Safety Standards which were in effect at the
time the vehicle was manufactured . You can
find this sticker on the left door jamb.
It
shows the month and year of production and
the ve hicle ident ification number of your vehi
cle (perforation) as well as the Gross Vehicle
Weight Rating (GVWR) and the Gross Axle
Weight Rating (GAWR) .
The high voltage warning label
is located on the lock carr ier .
The spark ignition system complies with
the Canadian standard ICES-002.
Weights
Gross Vehicle Weight Rating
The Gross Vehicle Weight Rating (GVWR), and
the Gross Axle Weight Rating (GAWR) for
front and rear are Listed on a sticker on the
left door jamb.
The Gross Vehicle Weight Rating includes the
weight of the basic vehicle plus full fuel tank,
oi l and coolant, plus maximum load, wh ich in
cludes passenger weight (lSO lbs/68 kg per
Ill>