change wheel AUDI Q7 2017 Owner´s Manual
[x] Cancel search | Manufacturer: AUDI, Model Year: 2017, Model line: Q7, Model: AUDI Q7 2017Pages: 402, PDF Size: 100.39 MB
Page 16 of 402
Cockpit overview
Right control button
- Opening/closing the options menu :
press the
respective right control button on the steering
whee l~
fig. 8 . You can change any context-de
pendent functions and settings using the left
thumbwheel (for example, additional station information).
(D Tips
The availability of a se lection menu or options
menu depends on the function that is select
ed.
Switching views
Applies to: vehicles with Audi virtual cockpit
F ig. 9 Expanded v iew
Applies to: vehicles with Audi virtual cockpit
Fig. 10 Classic view
Applies to: vehicles with Audi virtual cockpit
- Switching views : press the IVIEW ! button @)
~ page 12, fig. 7 to sw itch from the classic
view ~
fig. 10 to the expanded view~ fig. 9. To
return to the classic view, press the IVIEW I but
ton again .
Applies to: vehicles with analog instrument cluster
-Reducing the display : press the IVIEW I button
to switch from the classic to reduced d isplay .
To return to the class ic view, press the !VIEWI
button aga in.
14
Other function buttons
Fig. 11 Right side of the multifunction steering wheel
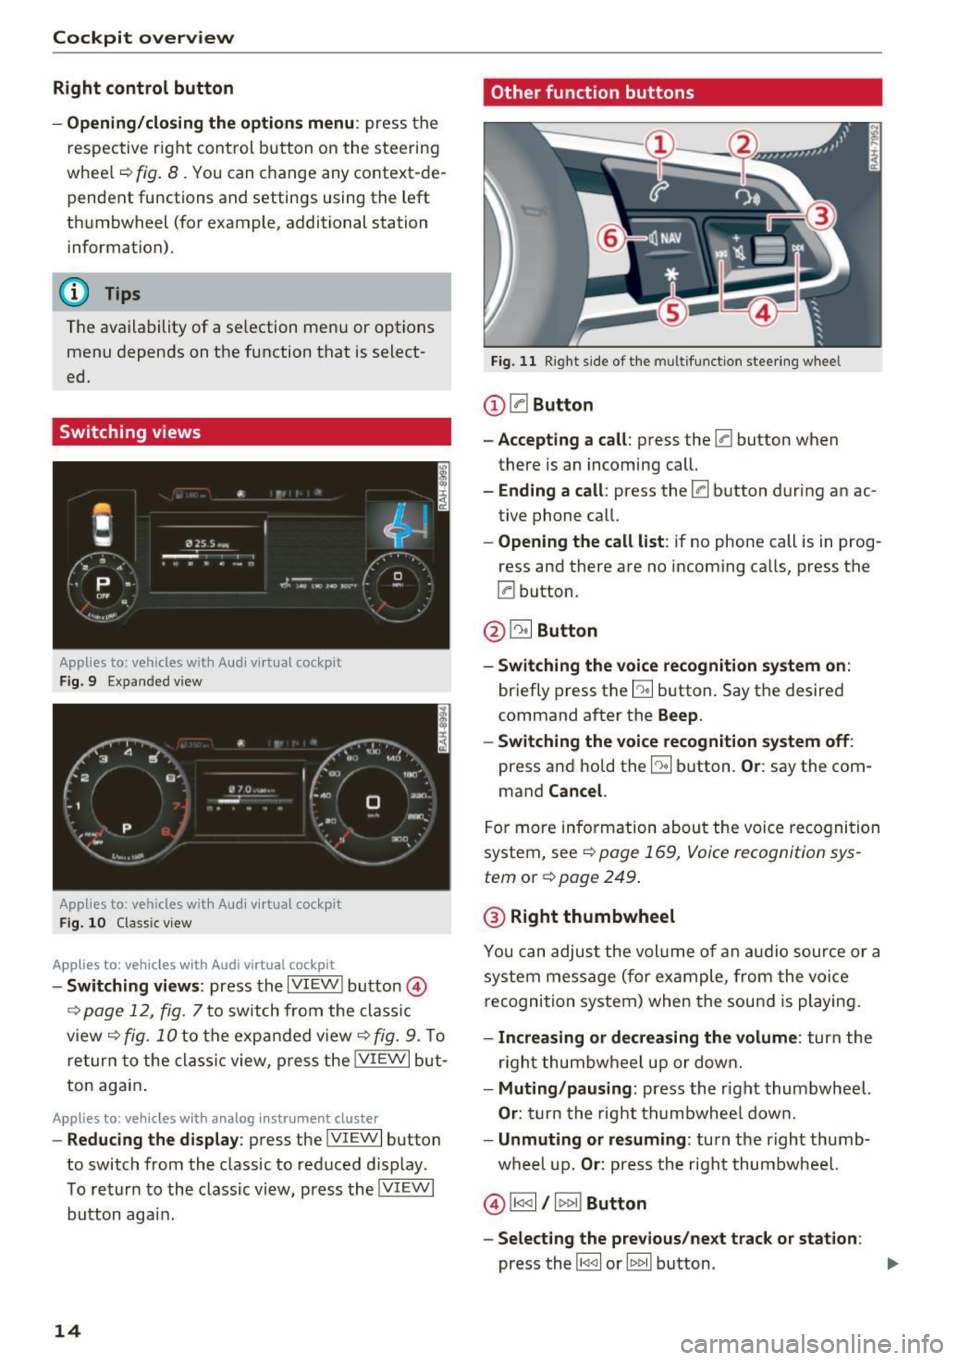
(D 0Button
- Accepting a call:
press the 0 button when
there is an incoming call.
-Ending a call: press the 0 button during an ac
tive phone call.
- Opening the call list: if no phone call is in prog
ress and there are no incoming calls, press the
0 button.
@ ~ Button
- Switching the voice recognition system on:
briefly press the E:9 button. Say the desired
command after the
Beep.
- Switching the voice recognition system off:
press and hold the [:9 button. Or: say the com
mand
Cancel.
For more information about the voice recognition
system, see
~ page 169, Voice recognition sys
tem
or Q page 249.
@ Right thumbwheel
You can adjust the volume of an audio source or a
system message (f or example, from the voice
recognition system) when the sound is playing.
-Increasing or decreasing the volume: turn the
r ig ht thumbwheel up or down.
-Muting/pausing : press the right thumbwheel.
Or: turn the right thumbwheel down.
-Unmuting or resuming : turn the right thumb
wheel up.
Or: press the right thumbwheel.
© !1441 / l t>t>I! Button
- Selecting the previous/next track or station :
press the l1<1 <1I or lt>t> II button . .,,.
Page 18 of 402
Cockpit over view
Fuel consumption
The current fue l cons umption can be shown us
ing a bar graph¢
fig. 12. The ave rage cons ump
tion stored in the short-term memory is also dis
p layed . If the ba r is green, your vehicle is saving
fue l through the following function:
- Recuperati on: electrica l energy can be stored in
the ve hicle battery when t he vehicle is coasting
or driving downhi ll. The bar will move toward
0 .
@ Tips
The date, time of day and t ime and date for
mat can be set in the Infotainment system
¢page 249 .
Energy consumers
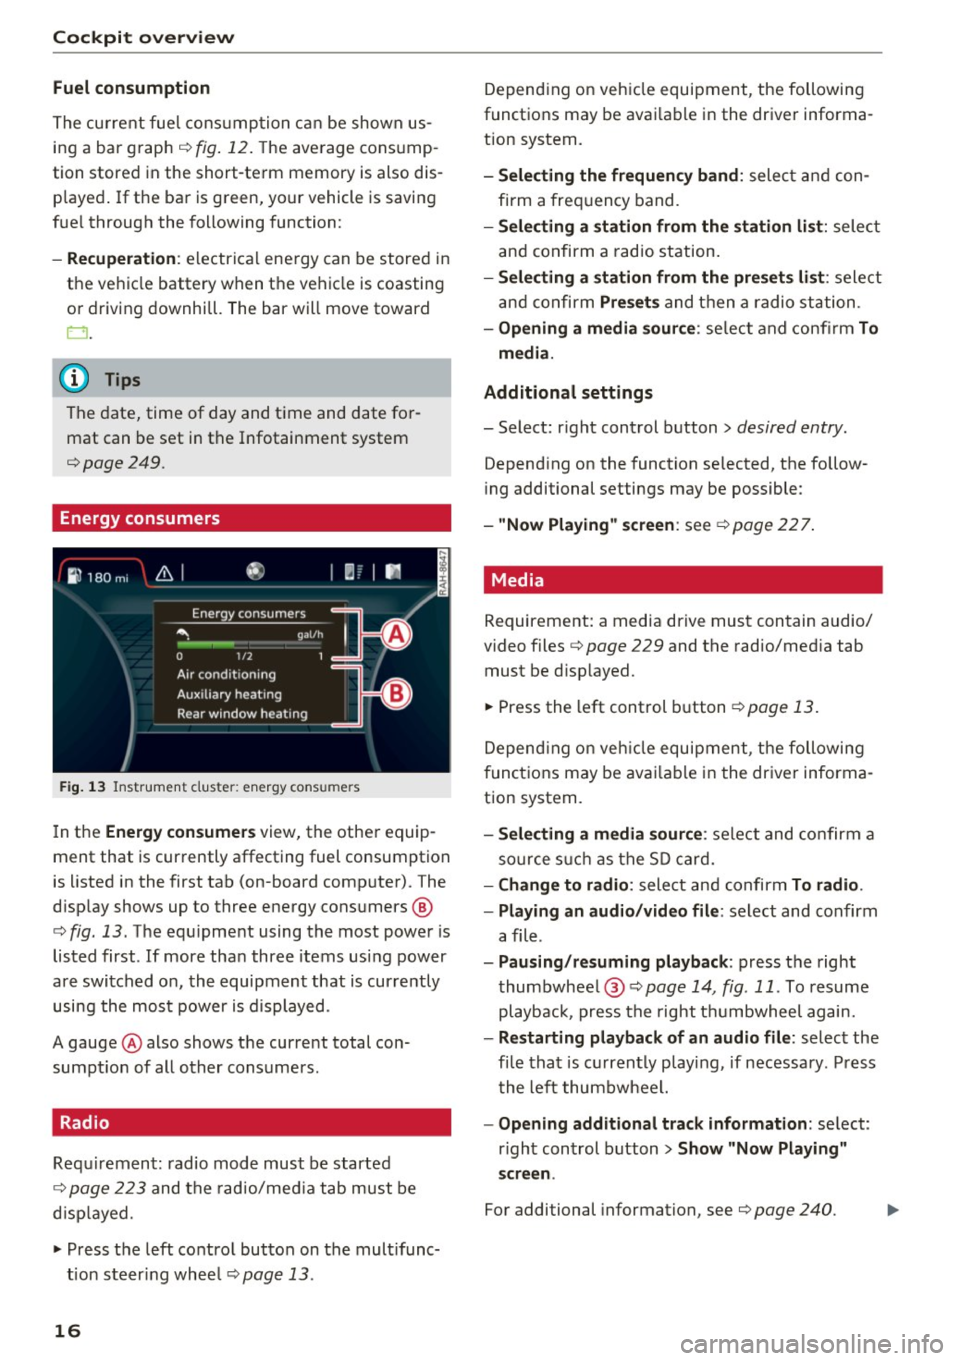
Fig . 1 3 Instrument cluste r: energy cons umers
I n the Energ y consume rs view, the othe r equip
ment that is currently affecting fuel consumption
is listed in the first tab (on-board computer) . The
d isplay shows up to three energy consumers @
¢
fig. 13 . The equ ipment using the most power is
listed first . If more tha n three items us ing power
are switched on, the equipment that is currently
using the most power is d isplayed.
A gauge @also shows the current total con
sumpt io n of all other consumers.
Radio
Requ irement: radio mode must be started
¢
page 223 and the radio/med ia tab must be
d isp layed .
.. Press the left control button on the mult ifunc
tion steer ing whee l
¢page 13.
16
Depend ing on veh icle equipment, the following
functions may be avai lable in the driver informa
t ion system.
- Selecting the frequen cy band : select and con
firm a freq uency band .
-Selecting a station fr om the station li st: select
and confirm a rad io station.
- Selecting a station from the pre set s list: select
and confirm
Pre set s and then a radio station .
-Opening a media sour ce : se lect and confi rm To
media .
Addition al sett ings
- Select: r ight control button> desired entry.
Depend ing on the function selected, the follow
i ng additional settings may be possible :
-"Now Pla ying" screen : see ¢page 227.
' Media
Requirement: a media drive must contain audio/
video files¢
page 229 and the radio/med ia tab
must be d isp layed .
.. Press the left control button
r=;, page 13.
Depend ing on veh icle equipment, t he following
f unct ions may be ava ilable in the dr iver informa
tion system.
- Selecting a media sour ce : select and confirm a
so urce s uch a s the S D card.
- Change to radio : select and confirm To radio.
- Playing an audio /video file :
select and confirm
a file .
-Paus ing /resuming playback : press the right
thumbwhee l@ ¢page
14 , fig .11. To resume
playback, press the right t humbwheel again.
-Restarting p la y back of an audio fi le: select the
fi le that is currently playing , if necessary . Pr ess
t he left thumbwheel.
- Opening additional tra ck information : select:
r ight control button >
Show "Now Pl aying"
s creen .
For additional information , see ¢ page 240.
Page 21 of 402
u (0 ...... N r--. N ...... 0
0
:E
Applies to: vehicles with navigation system and map view
Depending on the vehicle equipment, you can al
so have the active route guidance display in the
map view* in the driver information system .
W 1 St
Ill
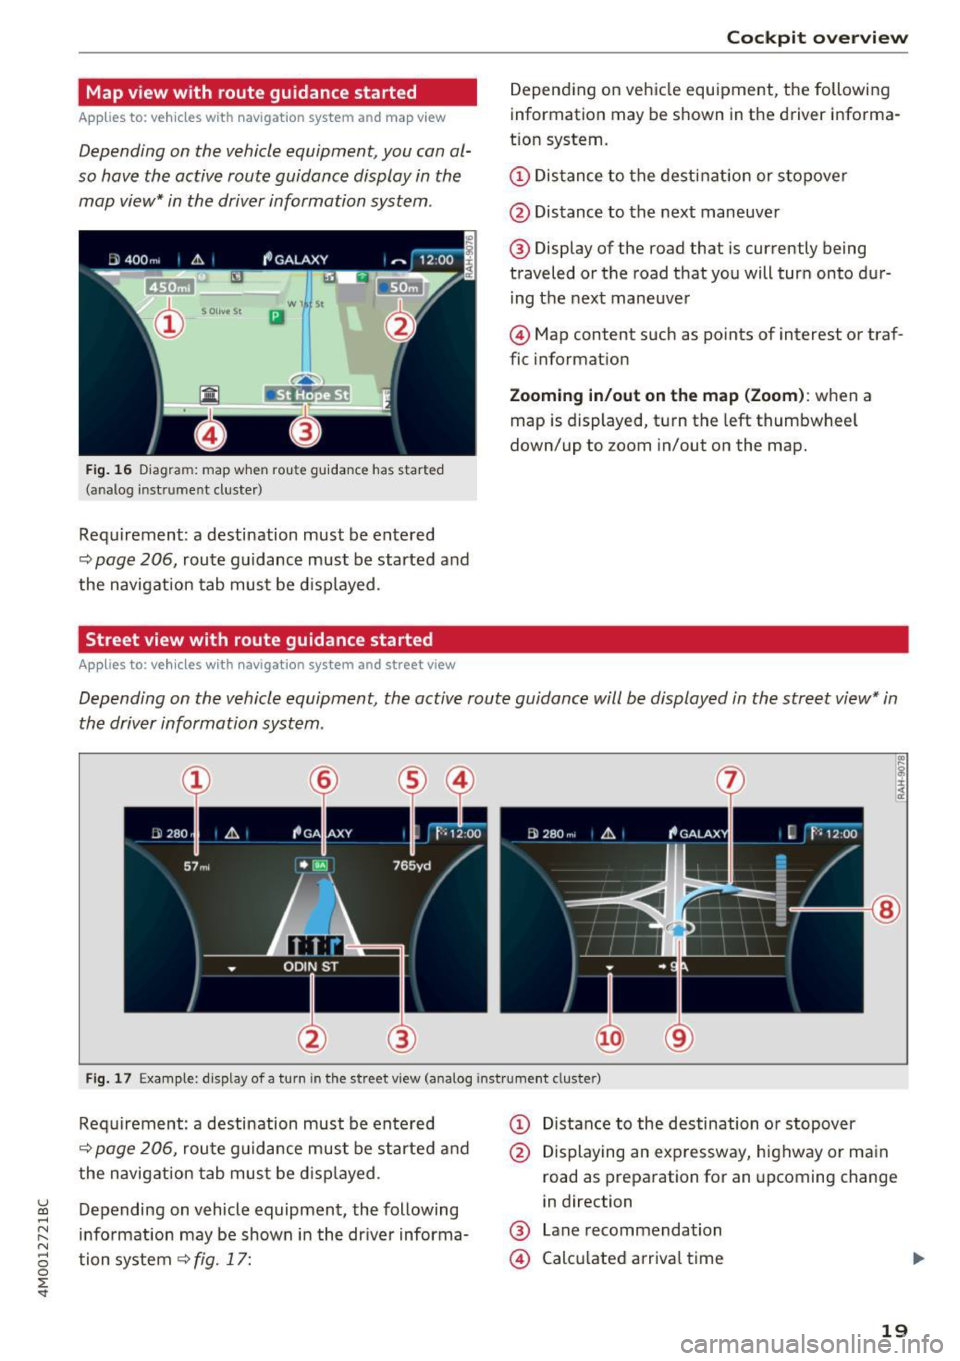
Fig. 16 Diagra m: map when rou te guidanc e has started
(ana log inst ru me nt cluster )
Requirement : a destination must be entered
q page 206, route guidance must be started and
the navigation tab must be displayed.
Street view with route guidance started
Applies to: vehicles with navigation system and street view
Cockpit overview
Depending on vehicle equ ipment, the following
information may be shown in the driver informa
t ion system .
(D Distance to the destination or stopover
@ Distance to the next maneuver
® Display of the road that is currently being
traveled or the road that you will turn onto dur
ing the next maneuver
@ Map content such as points of interest or traf
fic information
Zooming in/out on the map (Zoom): when a
map is displayed, turn the left thumbwheel
down/up to zoom in/out on the map.
Depending on the vehicle equipment, the active route guidance will be displayed in the street view* in
the driver information system .
I~ lg !:r;
:~
@
Fig. 17 Example: display of a turn in the street vi ew (analog instr ument clus te r)
Requirement: a destination must be entered
q page 206, route guidance must be started and
the navigation tab must be displayed.
Depending on vehicle equipment, the following
information may be shown in the driver informa
tion system
9 fig. 17:
(D Distance to the destination or stopover
@ Displaying an expressway, highway or main
road as preparation for an upcoming change
in direction
® Lane recommendation
@ Calculated arrival time
19
Page 79 of 402
u co ...... N r-... N ...... 0
0
:E: '
Use the rocker switch(;) to select the funct io n.
When synchronization is switched on, the set
tings for the driver's side are applied to the front
passenger's side and the rear (except for seat
heating/ventilation*). When the settings on the
front passenger 's side or in the rear are changed,
the synchron izat ion is automatically sw itched off
and
4-zone appears in the display .
SET REAR
function
Use the rocker switch (D to select the funct ion .
When the function is switched on, you can adjust
all settings for the rear using the climate control
system controls in the cockpit . The rear climate
control system controls cannot be operated at
the same time. This function switches off auto
matically after a certain period of time or after
l eaving the menu.
Vents
You can open or close the center and rear vents in
the cockpit and the vents in the rear center con
sole and door pillars using the ridged thumb
wheels. The levers adjust the direct io n of the air
flow from the vents. The w ide ven t is opened and
closed using the~ button ~
page 8, fig. 2@ .
Residual heat
You can activate the residual heat funct ion when
the ignition is switched off by pressing the knob
@ (left side). The residual heat from the coolant
is used to heat the vehicle inter io r. The resid ual
heat function switches off automatically after
about 15 min utes.
& WARNING
- You should not use the recirculation mode
for an extended period of time, because no
fresh a ir is drawn in and the windows can
fog when coo ling mode is switched off . This
increases the risk of an accident .
- Individuals with reduced sensitivity to pain
or temperature could develop burns when
using the seat heating function . To reduce
the risk of injury, these ind iv iduals should
not use seat heating.
Warm and cold
(D Note
To avoid damage to the heating elements in
the seats, do not kneel on the seats or place
heavy loads on a small area of the seat.
(D Tips
It is not possible to operate the rear climate
control system controls when the power ch ild
safety lock is switched on. With With the
SET REAR function, you can apply all settings
to the rear using the climate control system
controls in the cockpit
~ page 43.
Setup
Applies to: vehicles with 4 -zone deluxe automat ic climate
contro l
The climate control system basic settings are ac
cessed in the Infotainment system .
.. Select in the Infotainment system: I MENU! but
ton
> Vehicle > l eft control b utton > Air condi
tioning
Seat heating/seat ventilation*
You can adjust the seat heating/ventilation bal
ance fo r the driver, front passenger and rear pas
sengers .
Footwell temperature
You can adjust the footwell temperature so that
it is cooler or warmer.
Auto recirculation
When switched on, automat ic rec irculat ion con
trols the recirculation mode automatically . You
must press the
® MAX button if fog forms on
the windows.
Automatic auxiliary heater*
The aux iliary heater he lps to warm the vehicle in
terior more quickly.
Steering wheel heating
Applies to: vehicles with stee ring wheel heating
The steering wheel rim can be heated .
.. Press the button on the multifunction steering
wheel to switch the steering wheel heating on ..,_
77
Page 93 of 402
u (0 ...... N r--. N ...... 0
0
:E
disp layed. The accuracy depends on the driv ing
situation and is normally around 1
°. T he side
ways angle of your vehicle should not exceed the
yellow range in the gauge. If it reaches the red range, there is a risk that the vehicle might tip
c::, A .
Dis playing the til t angle di splay
.. Select in the Infotainment system: IMENUI but-
ton
>V ehicle > Lift / Offro ad or Allro ad *.
Showing the additional display
To change the contents shown in the rig ht area of
the screen, select in the Infota inment system:
right control button
> Additiona l d isplay.
Angle :
this displays the c urren t steering wheel
angle and the maxim um angle that was reached
during a drive . These values are reset when the
ignition is switched off .
Posit ion : disp lays the height, direction and geo
coordinates of the current vehicle pos ition.
Off : only the air suspension display remains o n.
& WARNING
- Do no t exceed the yellow range in the
gauge . Your vehicle can tip, which i ncreases
the risk of an acc ident.
- Under some circumsta nces, the vehicle can
tip over or til t sideways even if the sideways
angle is low . The angle display does not re
place the driver's attention. To reduce the
risk of an accident, make sure the vehicle
does not t ip , especia lly when you are driving
at h igh speeds.
Automatic transmission
Introduction
The automat ic transmission is controlle d elec
tronica lly . Power is transfe rred using a torque
converte r.
When a
m oderate driving styl e is used , the
transmission selects the most economical driving mode. The t ransmission upshifts at a lower RPM
D rivi ng
and downs hifts at a higher RPM to improve fue l
efficiency.
T he tra nsmission switches to a sporty mode after
a kick-down or when the driver uses a
s porty
dri ving style
characterized by quick acce lerator
peda l movements, heavy acceleration, frequent
changes in speed and t raveling at the maximum
speed .
If desired, the driver can also se lect the gears
manually ( tiptronic mode ) c::, page 94.
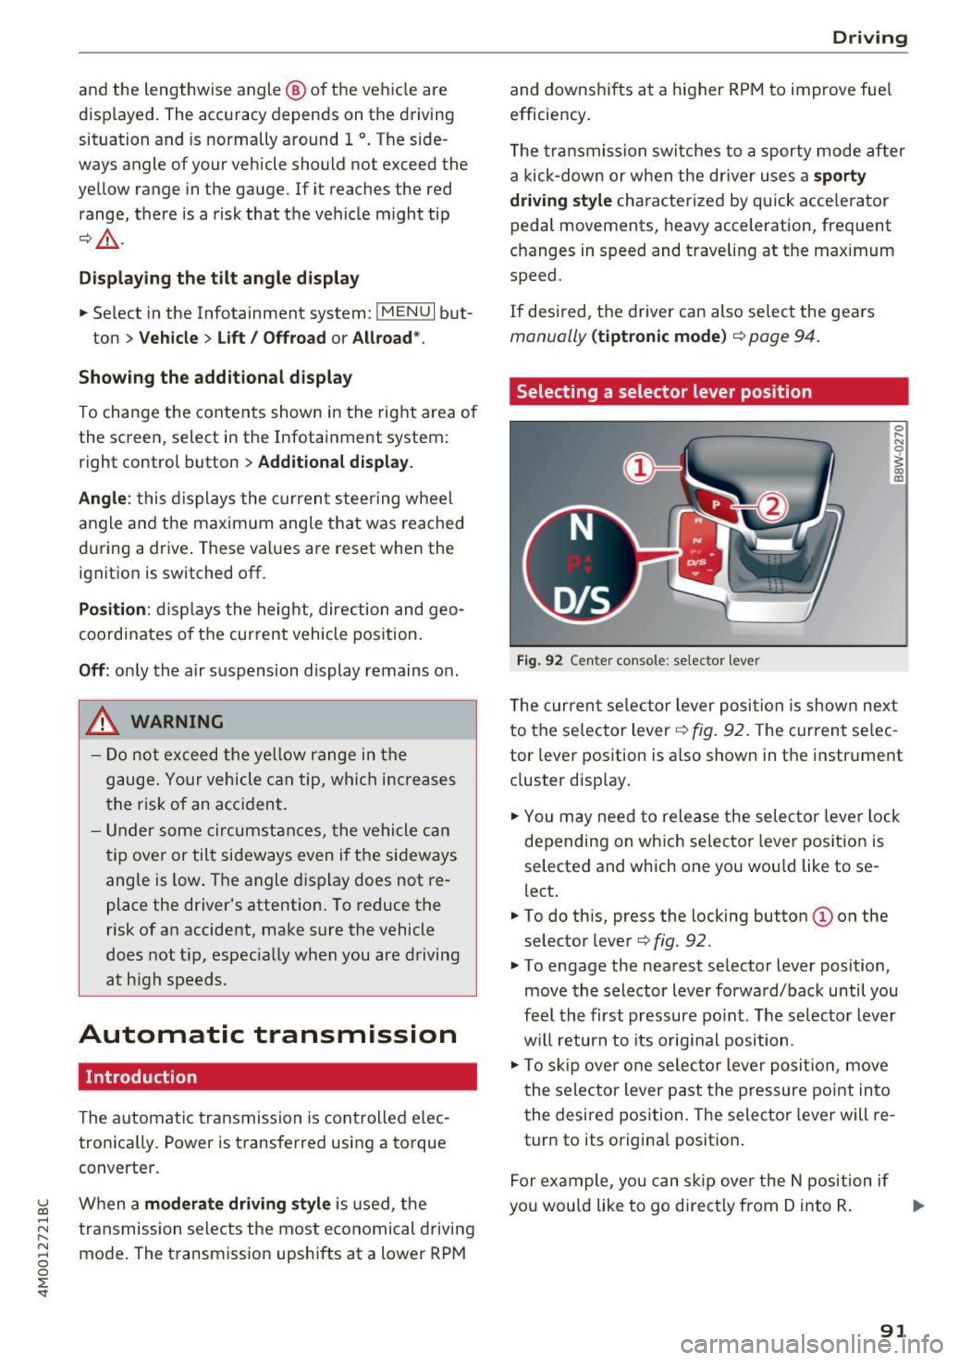
Selecting a selector lever position
Fig . 92 Cen te r conso le: se lecto r lever
0 ,.._ N 0
~ a, m
T he curren t se lector lever posi tion is show n next
to the se lector lever
c::, fig. 92. The curren t se lec
tor lever position is a lso shown in t he instrument
cluster disp lay.
.. You may need to release the selector lever lock
depending on wh ich selecto r lever pos it ion is
selected and which one you wou ld like to se
lect .
.. To do th is, press the locking button(!) on the
selector lever
<=> fig . 92.
.. To engage the nearest selector lever position,
move the selector lever forward/back until you
fee l the first pressure po int. The selec to r lever
w ill return to its orig inal position .
.. To skip over one selec tor lever posit io n, move
the selector lever past the pressure point into
the desired position. The selector lever will re
turn to its origina l position .
F or ex ample , you can s kip over the N position if
yo u wou ld like to go d irectly from D into R . ..,.
91
Page 97 of 402
u co ...... N r-... N ...... 0
0
:E: '
when the engine speed is wit hin the permitted
range .
(D Tips
-If you s hift to the next lowest gear, the
transm ission w ill only shift if the en gine w ill
not be over-rewed.
- With kick-down , th e tran smission shifts to a
l ower gear, dep end ing on vehicle s peed and
engine speed .
- tiptronic does not wo rk if the t ransmiss ion
i s r unning in eme rge ncy mo de.
Kick-down
Kick -down enables maximum acceler ation .
When you press the a ccele rator ped al down be
yon d the resis tance poin t, the au tom atic trans
miss ion downshifts into a lower gear and t he en
g ine utilizes its fu ll power, depend ing on veh icle
speed and engine RPM . It shifts up into t he next
h igher gea r once the maximum spec ified engine
RP M is reached .
A WARNING
Please note that the wheels could s pin o n
slic k or slippery roads when kick-down is ac
ti ve .
Transmission malfunction
-
• Transmission : malfunction! Please stop ve
hicle and shift to P
Do not cont inue driv ing. Select the P se lector lev
e r p osition and contact an autho rized Aud i dea le r
or author ized A udi Se rvice Fac ility for assistance .
rm Selector lever: malfunction! You may contin
ue driving. Please contact Service
There is a system malfunct ion in the t ransmis
sion. D rive to a n author ized Audi dealer or au
thor ized Audi Se rvice Fac ility immed iate ly to have
the ma lf u nction co rrected.
rm P button: malfunction! Auto P when engine
off. Please contact Service D
riving
T he re is a ma lf u n ct ion in the P but ton on these
l ector lever . The transmission automatically en
gages in P when yo u sw itch off the engine . Dr ive
to an autho rized Aud i dea le r or authori zed Aud i
Se rvice Facility immed iate ly to have the ma lfunc
t ion corrected .
rm Transmission: malfunction! Gear change on
ly possible using both paddle levers. Please con
tact Service
T he re is a system malfunction in the transmis
s io n. You can continue dr iv ing with restr icted
funct ion. The se lector lever is not work ing . Gea rs
can on ly be selected by tapping both shift pad
dles at t he same time whe n the vehicle is stat ion
ary ~
page 94, fig . 94. Pay atte ntion to these
l ected transmission position in t he i nstr um ent
cl uster d isp lay. The pa rking lo ck eng ages auto
m ati cally when yo u turn off the eng ine. Drive to
an a uth orize d Au di dealer o r auth orized Aud i
Se rvice Facility immed iate ly to have the ma lfunc
t ion corrected .
rm Transmission: Please pre ss brake pedal and
select gear again
Pr ess t he b rak e peda l and select the desired se
l ector lever position again. Yo u ca n then co nt inu e
dr iv ing.
rm Transmission: too hot . Please adapt driving
style
The transmission temperature has i ncreased sig
nificantly due to t he sporty dr iv ing ma nner . Drive
i n a less s port y m anne r unt il the tempera tu re re
tu rns to t he norma l ra nge and t he i ndi cator lig ht
swi tches of.
rm Transmission: malfunction! You can contin
ue driving. See owner's manual
There is a system malfunction in the transmis
s io n. You may contin ue d riving. Dr ive to an a u
t h orized Au di dea ler or a uthorized Audi Service
Fac ility soon to have the mal func tion corrected .
rm Transmission: malfunction! You can contin
ue driving in
D until engine off
T he re is a system malfu nction in the transmis -
s ion. The transmission is switc hing to eme rgency
mode. If you turn the engine off, you w ill not be ..,.
95
Page 103 of 402
u co ...... N r-... N ...... 0
0
:E: '
and the one in front of you. You wi ll need more
room to stop. To compensate fo r the tra iler, yo u
will need a larger than normal turn ing rad ius.
When pass ing, remember t hat you cannot accel
erate as fast as you norma lly wou ld because of
the added load. Make s ure you have eno ugh room
to pass. After passing , allow plenty of room fo r
your tra iler before changing lanes again.
Avoid jerky starts, s harp turns or rapid lane
changes .
(D Tips
-Do not tow a trailer during t he br ea k-in per i
o d of yo ur vehicle .
- If you tow a trailer, your Audi may require
more frequent maintenance due to the ex
tra load
~ page 381.
Parking on a slope
Do not pork on o slope with o trailer . If it cannot
be avoided, do so only ofter doing the following:
When parking:
" Apply the f oot brake.
" Have someone p lace chocks under both the ve
hicle and the tra il e r whee ls .
" Wi th chocks in p lace, slowly release t he b rakes
u nti l the w hee l chocks absor b the load.
" Turn the wheels towa rds the curb.
" Apply the pa rking brake.
" Move the se lector lever to P .
When restarting after parking:
"Apply the foot b rake.
" Start the engine .
" Move t he se lecto r lever to D/S.
" Release the parking brake and slowly pull out
and away from t he whee l chocks.
" Stop and have someone retrieve t he wheel
chocks .
Trailer towing
101
Page 111 of 402
u (0 ...... N r--. N ...... 0
0
:E
possibl e pass ing maneuver as low. For example,
if a vehicle that was already detected @turns or
changes lanes, the adaptive cruise control reac ts
to the stationary vehicle ahead of it@ .
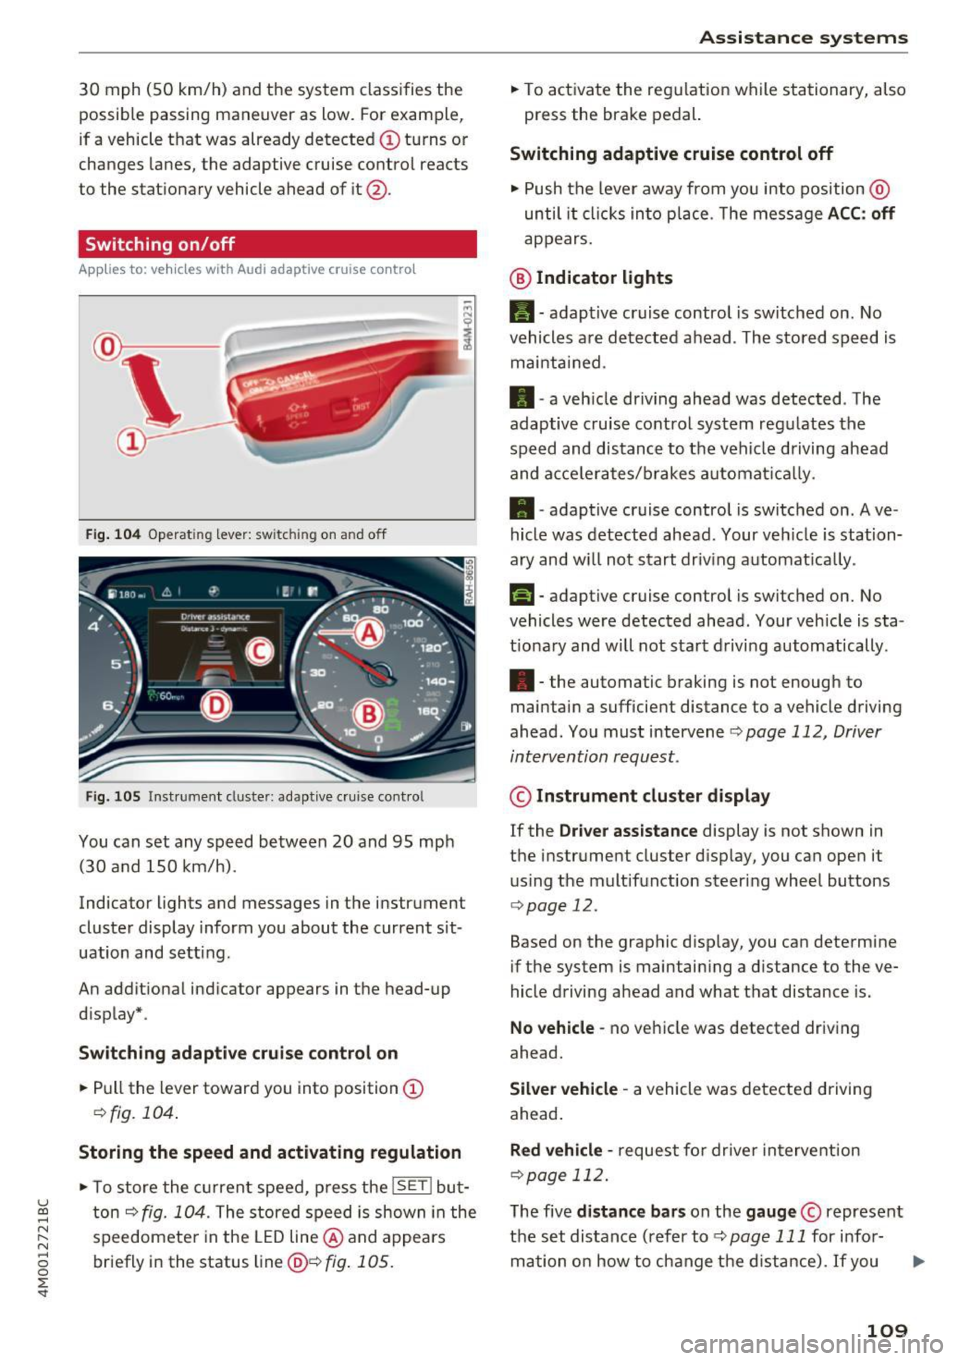
Switching on /off
App lies to: vehicles with Audi adaptive cruise contro l
Fig. 104 Operat in g lever: switc hing on and off
Fig. 105 Instr ument clus te r: adap tive cru ise cont ro l
You can set any speed between 20 and 95 mph
(30 and 150 km/h).
Indicator lights and messages in the instrument
cluster display inform you about the current sit
uation and setting .
An additional indicato r appears in the head-up
d isplay* .
Switching adaptive cruise control on
.. Pull the lever toward you into position@
¢fig. 104 .
Storing the speed and activating regulation
• To store the current speed, press the lSE Tl but
ton ¢
fig. 104. The stored speed is shown in the
speedomete r in the LED line @ and appears
briefly in the status line@¢
fig. 105.
Assistance systems
• To activate the regulation while stationary, also
press the brake pedal.
Switching adaptive cruise control off
• Push the lever away from you into position @
until it clicks into place. T he message ACC: off
appears.
@ Indicator lights
II-adaptive cruise control is switched on . No
vehicles are detected ahead. The stored speed is
maintained.
• -a veh icle dr iving ahead was detected . The
adaptive cruise control system regu lates the
speed and distance to the vehi cle driving ahead
and acce le rat es/b rakes automat ically.
• -adaptive cruise control is switched on . Ave
hicle was detected ahead. Your ve hicle is station
ary and w ill not start driving automat ica lly .
fai-adaptive cruise control is switched on. No
vehicles were detected ahead . Your vehicle is sta
t iona ry and will not start driving automatically.
•- the automatic braking is not enough to
maintain a sufficient distance to a vehicle driving
ahead . You must intervene
¢ page 112, Driver
intervention request.
© Instrument cluster display
If the Driver assistance display is not shown in
the instrument cluster d isp lay, you can open it
using the multifunction steering wheel buttons
¢page 12.
Based on the graphic disp lay, you can determine
if the system is maintain ing a d istance to the ve
hicle driving ahead and what that distance is.
No vehicle -no vehicle was detected driving
ahead .
Silver vehicle -a vehicle was detected driving
ahead .
Red vehicle -request for driver intervention
¢page 112.
The five distance bars on the gauge © represent
the set distance (refer to¢
page 111 for info r-
mation on how to change the d istance). If you .,.
109
Page 125 of 402
u co ...... N r-... N ...... 0
0
:E: '
Description
Applies to: vehicles wit h Aud i act ive lane ass ist
Active lane ass ist (lane departure warning) de
tects lane marker lines within the limits of the
system using a camera in the w indshield .
If you
are approaching a detected lane marker line and
it appears likely that you will leave the lane, the
system wi ll warn you with corrective steering .
You can override this steering at any time . If you
pass over a line, the steering wheel will vibrate
lightly . In order for this warning vibration to oc
cur, it must f irst be sw itched on in the Infotain
ment system. Active lane assist is ready for oper
ation when the lane marker line is detected on at
l east one side of the vehicle.
The system is designed for driv ing on express
ways and highways and therefore only activates
at speeds above approximately 40 mph (65 km/
h).
Applies to: vehicles with side assist: if you acti
vate a turn s ignal when active lane assist is ready
and it classifies a lane change as critical because
of vehicles traveling alongside you or approach
ing you, there w ill be not iceable cor rect ive steer
ing short ly before you leave the lane . This will at
tempt to keep your vehicle in the lane .
Applies to: vehicles without side assist: the ready
system does not warn yo u if you activate a tu rn
signal befo re crossing the lane marker line. In
this case, it assumes that you are changing lanes
intentiona lly .
Applies to: vehicles with adaptive cruise control:
there is no corrective steering or warnings if the
system recogn izes a distinct passing maneuver.
If the conditions are met, traffic jam assist
switches on at speeds under approximately
40 mph (65 km/h)
¢ page 114.
A WARNING
- The system warns the driver that the veh icle
is leav ing the lane using corrective steer ing.
T he driver is always responsib le for keep ing
the vehicle within the lane.
A ss ista nce sys te m s
-The system can assist the driver in keeping
the vehicle in the lane, but it does not drive
by itself. Always keep your hands on the
steer ing wheel.
- Corrective steering may not occur in certain
situations, such as during heavy braking.
- There may be cases where the camera does not recognize all lane marker lines. Correc
tive steering can only take place on the s ide
of the vehicle where lane marker lines are
detected .
- Other road structures or objects could poss i
b ly be identified unintentionally as lane
marker lines. As a result, corrective steering
may be unexpected or may not occur.
- The camera view can be restricted, for ex
ample by vehicles driving ahead or by ra in,
snow, heavy spray or light shining into the
camera. Th is can result in active lane ass ist
not detecting the lane marker lines or de
tecting them incorrectly.
- I n certain situations where visibility is low,
the vehicle may switch from an "early" to
"late" steering correction .
- Under certain conditions such as r uts in the
road, an inclined roadway or crosswinds, the
corrective steer ing alone may not be enough
to keep the vehicle in the middle of the lane.
- For safety reasons, active lane assist must
not be used when there are poor road and/
or weather conditions such as slippery
roads, fog, gravel, heavy rain, snow and the
potential for hydroplaning. Using active lane
assist under these condit ions may increase
the risk of a crash.
123
Page 129 of 402

u (0 ...... N r--. N ...... 0
0
:E
Applies to: vehicles with Audi side assist
®
@
©
Fig. 121 Dr iving s ituatio ns
AUD I
Fig. 122 Rear of the vehicle: position of the senso rs
Side assist functions at speeds above approxi
mately 9 mph ( 15 km/h) .
@ Vehicles that are approaching
N
0
0
:i;
" al
In certain cases, a vehicle will be classified as
critical for a lane change even if it is still some
what far away. The faste r a veh icle approaches,
t he sooner the display in the exterio r mirror w ill
turn on.
@ Vehicles traveling with you
Vehicles traveli ng with you are ind icated in the
exte rior mi rror if they are classified as critical for
a lane change. All vehicles detected by side assist
Assistance systems
are indicated by the time they ente r your "blind
spot", at the latest.
© Vehicles you are passing
If you s low ly pass a vehi cle that side assist has
de tected (the difference in speed between the
vehicle and your vehicle is less than approximate
ly 9 mph (15 km/h)), the disp lay in the exterior
mirror turns on as soon as the vehicle enters your
blind spot.
T he display w ill not turn on if you quickly pass a
vehicle that side assist has detected (the differ ence in speed is greater than approximate ly 9
mph (15 km/h)) .
Functional limitations
The radar sensors are designed to detect the left
and right adjacent lanes when the road lanes are
the normal width. In some situations, the display
in the exterior mirror may turn on even though
there is no veh icle located in the area that is criti
cal for a lane change. For example :
- If the lanes are narrow or if your are driving on
the edge of your lane. If this is the case, the
system may have detected a vehicle in another lane that is
not adjacent to your current lane .
- If you are driving through a curve . Side assist
may react to a vehicle that is in the same lane
or one lane over from the adjacent lane .
- If side assist reacts to other objects (such as
roadside structures like guard rails).
- In poor weather conditions. The side assist
functions are limited.
Do not cover the radar sensors
c:> fig. 122 with
stickers, deposits, bicycle wheels or other ob
jects, because th is will impair the function . Do
not use s ide assist when towing a trai ler. For in
formation on cleaning, see
c:> page 354.
A WARNING
-- Always pay attention to traffic and to the
area around your vehicle . S ide assist cannot
replace a driver's attention. The driver alone
is always responsible for lane changes and
-
similar driving maneuvers . IJI,
127