AUDI Q7 2020 Owner´s Manual
Manufacturer: AUDI, Model Year: 2020, Model line: Q7, Model: AUDI Q7 2020Pages: 316, PDF Size: 113.87 MB
Page 61 of 316
4M1012721BA
Sitting correctly and safely
— The distance between your upper body and the
steering wheel or instrument panel is at least
10 inches (25 cm)
— The distance between your knees and the in-
strument panel is at least 4 inches (10 cm)
— Your thighs are lightly supported by the front
surface of the seat
— The backrest is in an upright position and your
back
is resting against it
— You have a sufficient view of the area around
the vehicle
— You have a clear view of the instrument cluster,
indicator lights, and the head-up display*
Seat settings menu: quick access
Applies to: vehicles with seat settings in the MMI
If you press on the image of the driver's or front
passenger's seat in the climate control system
menu & page 89, fig. 91 @, you will go directly
to the seat settings for that seat.
Z\ WARNING
— If you are too close to the steering wheel or
instrument panel, the airbag system cannot
provide the optimal protection, which in-
creases the risk of injury and death.
—To reduce the risk of injury in the event of
sudden braking maneuvers or accidents,
never drive with the backrest reclined very
far. The airbag system and seat belts can on-
ly provide optimal protection when the back-
rest is in an upright position and the driver
is wearing the seat belt correctly. If the
backrest is angled back too far, the safety
belt can shift to soft areas of the body, such
as the stomach, which increases the risk of
injury.
—To reduce the risk of an accident, only adjust
the seats when the vehicle is stationary.
— Be careful when adjusting the seat. Lack of
control or attention when adjusting can re-
sult in injuries due to pinching to vehicle oc-
cupants both in the front seats and rear
seats.
— Never place objects in the driver's footwell.
Objects could shift and enter the area
around the pedals, which could prevent you
from using them. You would then be unable
to use the pedals if sudden driving or brak-
ing maneuvers were needed, which increas-
es the risk of an accident.
— Make sure that the floor mats are always se-
curely attached.
—To reduce the risk of an accident, never place
additional floor mats or other floor covers
over the installed floor mats, because this
reduces the pedal's range of motion and can
impair pedal operation.
—To reduce the risk of injury, never place your
feet on the instrument panel, out of the
window, or on the seat surfaces. This also
applies to passengers in the rear seats.
@) Note
To reduce the risk of damage, be very careful
when adjusting the seat to make sure the
head restraints do not come into contact with
the headliner or the sunroof*.
G@) Tips
At the same time, only move the respective
seat using the controls.
Adjusting the front power seats
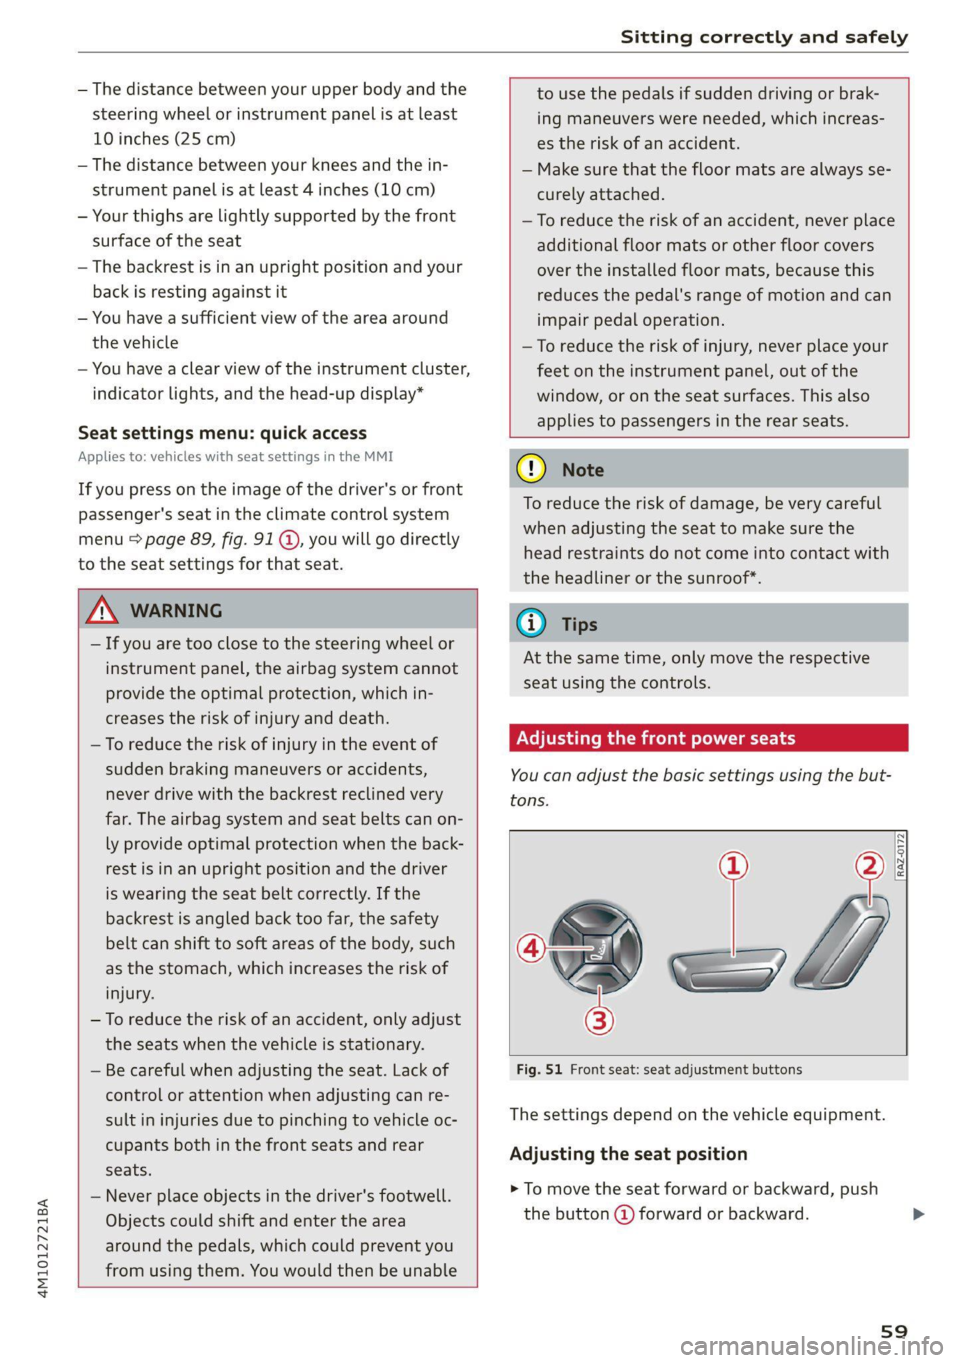
You can adjust the basic settings using the but-
tons.
RAZ.0172
CO.
oS
Fig. 51 Front seat: seat adjustment buttons
The settings depend on the vehicle equipment.
Adjusting the seat position
> To move the seat forward or backward, push
the button @) forward or backward.
59
Page 62 of 316
Sitting correctly and safely
> To adjust the seat upward or downward, push
the rear section of the button @) upward or
downward.
> To adjust the seat surface, press the front part
of the button @ upward or downward.
Adjusting the backrests
> To move the backrest forward or backward,
press the button @) forward or backward.
Adjusting the lumbar support
> To adjust the lumbar support, press the button
@ at the applicable location.
Massage function
Switch the massage function on or off @). Setting
the massage type and intensity > page 60.
ZA\ WARNING
The power front seats can also be adjusted
when the ignition is switched off. To reduce
the risk of injury, children should never be left
unattended in the vehicle.
Neem a Rice D
Applies to: vehicles with seat settings in the MMI
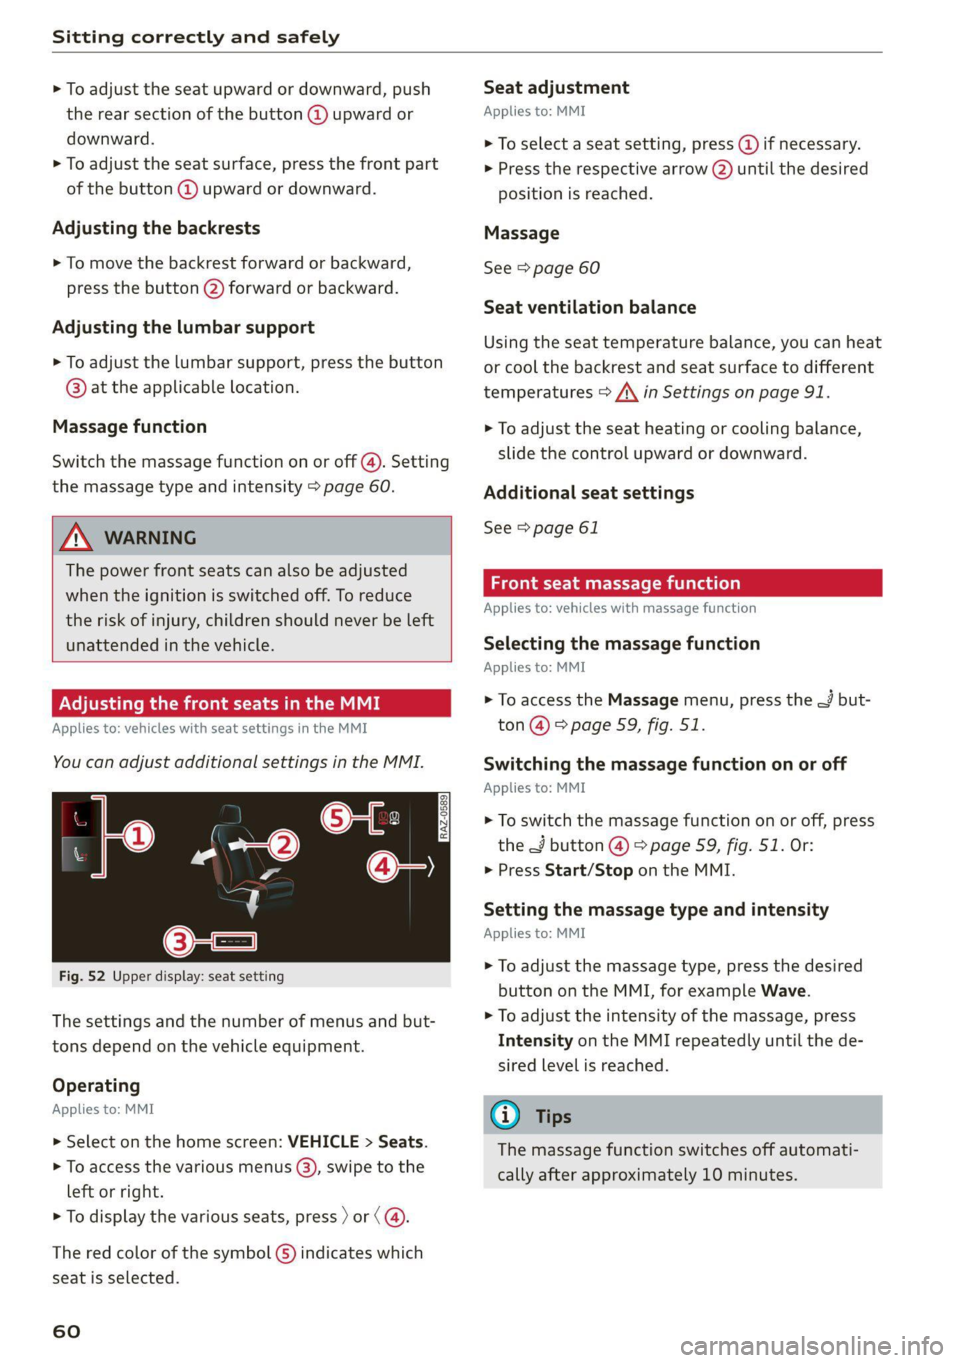
You can adjust additional settings in the MMI.
Cre
@—
RAZ-0589)
—O
©=-c
Fig. 52 Upper display: seat setting
The settings and the number of menus and but-
tons depend on the vehicle equipment.
Operating
Applies to: MMI
> Select on the home screen: VEHICLE > Seats.
> To access the various menus (3), swipe to the
left or right.
> To display the various seats, press ) or ¢ @®.
The red color of the symbol () indicates which
seat is selected.
60
Seat adjustment
Applies to: MMI
> To select a seat setting, press (@ if necessary.
> Press the respective arrow (@) until the desired
position is reached.
Massage
See > page 60
Seat ventilation balance
Using the seat temperature balance, you can heat
or cool the backrest and seat surface to different
temperatures > /\ in Settings on page 91.
> To adjust the seat heating or cooling balance,
slide the control upward or downward.
Additional seat settings
See > page 61
Front seat massage function
Applies to: vehicles with massage function
Selecting the massage function
Applies to: MMI
> To access the Massage menu, press the — but-
ton @) > page 59, fig. 51.
Switching the massage function on or off
Applies to: MMI
> To switch the massage function on or off, press
the J button @ © page 59, fig. 51. Or:
> Press Start/Stop on the MMI.
Setting the massage type and intensity
Applies to: MMI
> To adjust the massage type, press the desired
button on the MMI, for example Wave.
> To adjust the intensity of the massage, press
Intensity on the MMI repeatedly until the de-
sired level is reached.
G) Tips
The massage function switches off automati-
cally after approximately 10 minutes.
Page 63 of 316
4M1012721BA
Sitting correctly and safely
Xe)
onal settings in the MMI
You can adjust additional settings and switch
functions on or off in the MMI.
» Applies to MMI: Select on the home screen: VE-
HICLE > Seats > Additional seat settings.
Depending on the vehicle equipment, the follow-
ing options may be available.
Reset seat position
You can adjust the position of the front passeng-
er’s seat to match the driver's seat.
Driver seat entry assistance/Front passenger
seat entry assistance
Entry assistance makes it easier to enter or exit
the vehicle.
Adjusting the front passenger's seat from
State la heer
Applies to: vehicles with front passenger seat adjustment
You can adjust the front passenger's side with the
driver's seat buttons.
Applies to: MMI:
> Select on the home screen: VEHICLE > Seats.
> To display the various seats, press ) or ¢.
> To switch on the function, press the 2/ button.
The lower edge of the button will turn red.
After you have switched on the function, you can
adjust the front passenger's seat using the driv-
er's seat buttons > page 59, fig. 51.
G) Tips
The function switches off automatically when
you exit the menu.
Front center armrest
Applies to: vehicles with a front center armrest
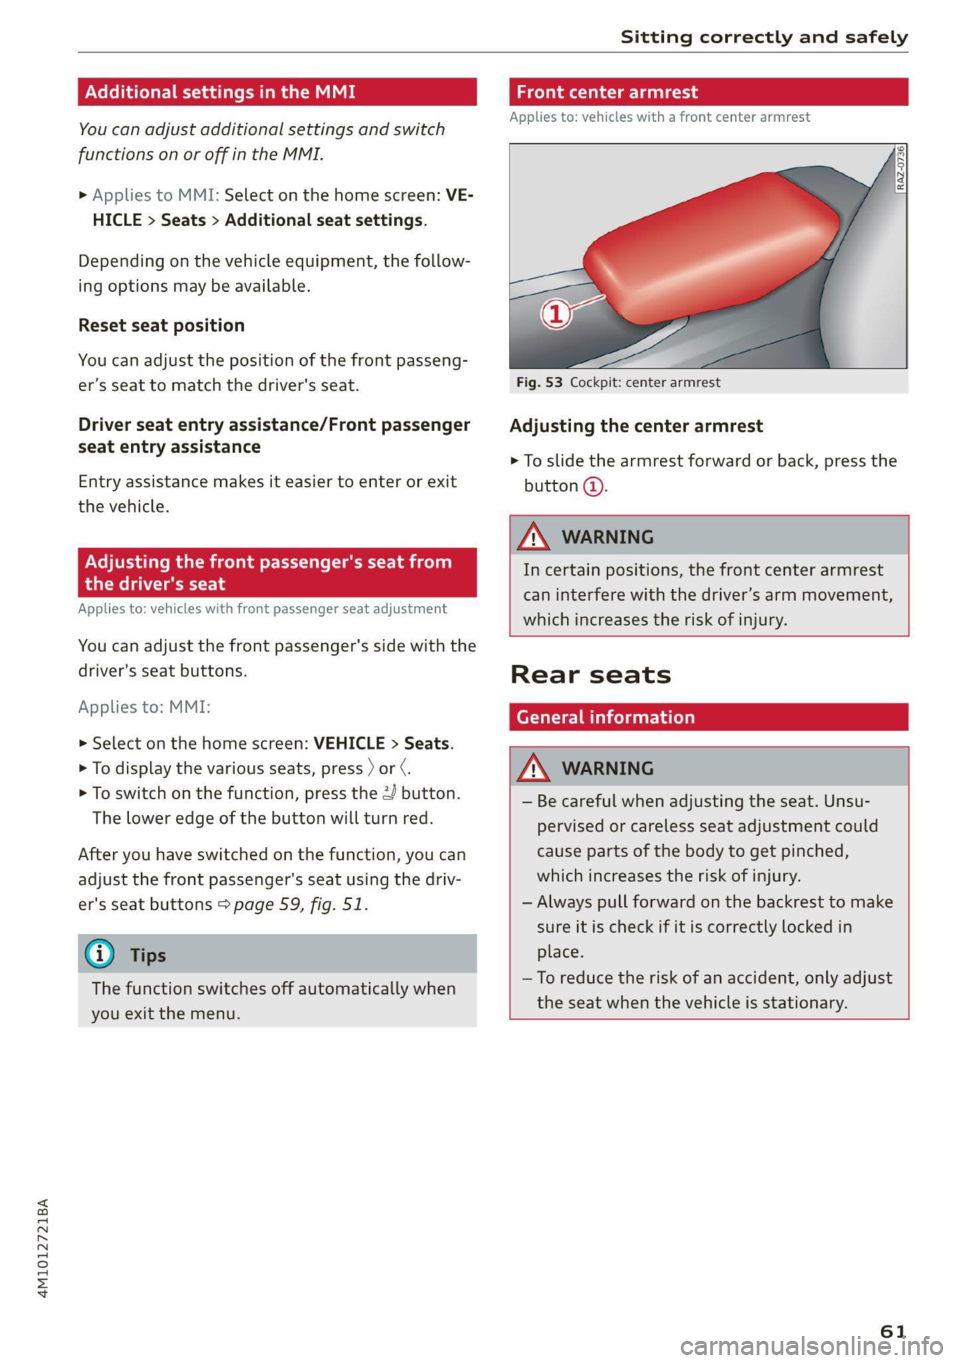
Fig. 53 Cockpit: center armrest
Adjusting the center armrest
> To slide the armrest forward or back, press the
button @).
ZA WARNING
In certain positions, the front center armrest
can interfere with the driver’s arm movement,
which increases the risk of injury.
Rear seats
ZA\ WARNING
— Be careful when adjusting the seat. Unsu-
pervised or careless seat adjustment could
cause parts of the body to get pinched,
which increases the risk of injury.
— Always pull forward on the backrest to make
sure it is check if it is correctly locked in
place.
—To reduce the risk of an accident, only adjust
the seat when the vehicle is stationary.
61
Page 64 of 316
Sitting correctly and safely
284-0031
a 8 s 2
= a
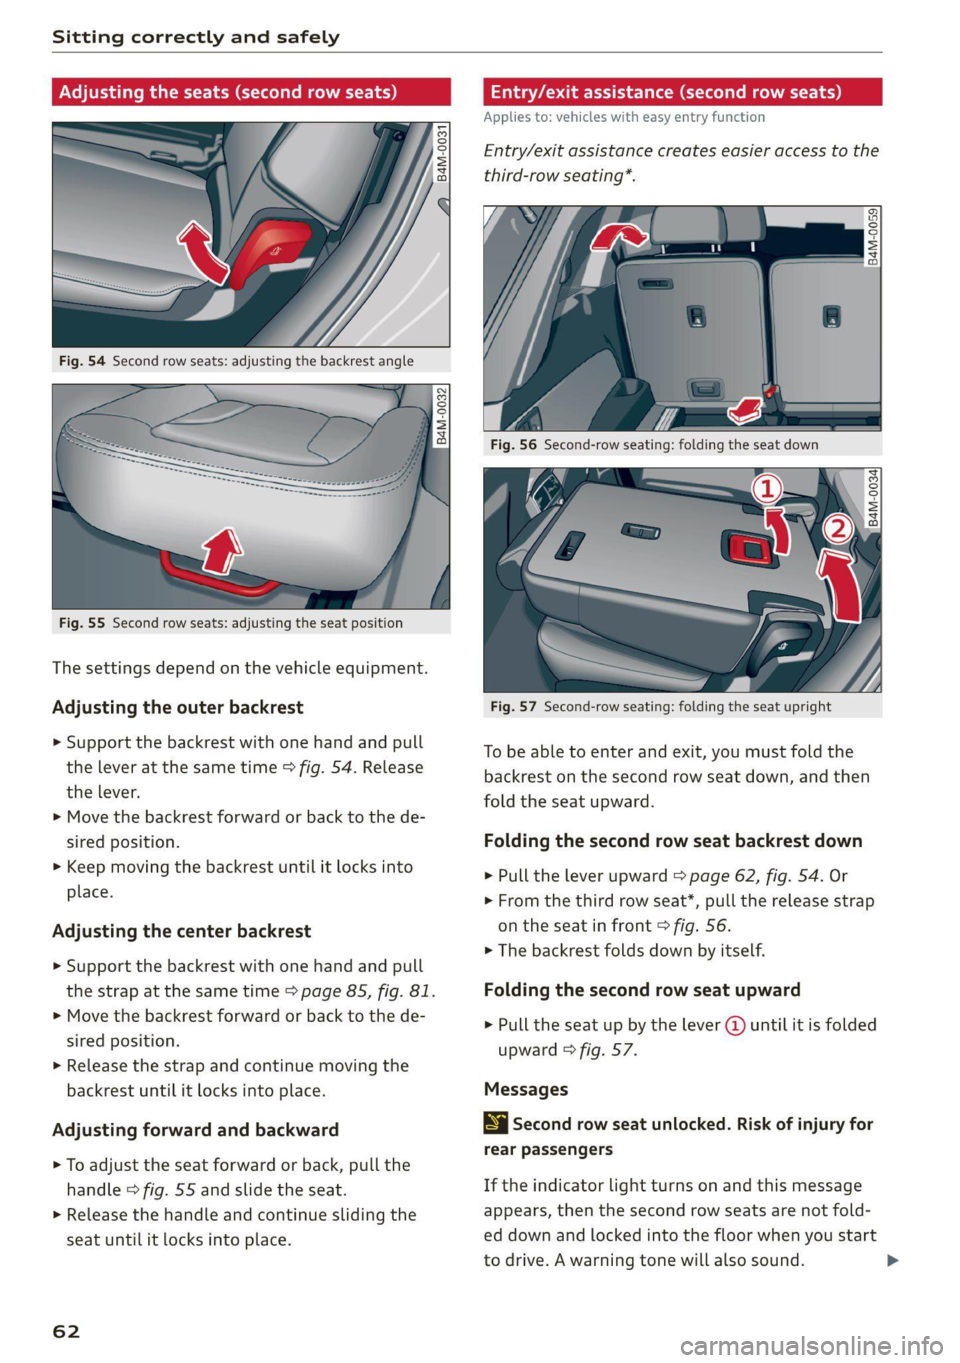
Fig. 55 Second row seats: adjusting the seat position
The settings depend on the vehicle equipment.
Adjusting the outer backrest
> Support the backrest with one hand and pull
the lever at the same time > fig. 54. Release
the lever.
> Move the backrest forward or back to the de-
sired position.
> Keep moving the backrest until it locks into
place.
Adjusting the center backrest
> Support the backrest with one hand and pull
the strap at the same time > page 835, fig. 81.
> Move the backrest forward or back to the de-
sired position.
> Release the strap and continue moving the
backrest until it locks into place.
Adjusting forward and backward
> To adjust the seat forward or back, pull the
handle > fig. 55 and slide the seat.
> Release the handle and continue sliding the
seat until it locks into place.
62
Applies to: vehicles with easy entry function
Entry/exit assistance creates easier access to the
third-row seating™.
Fig. 57 Second-row seating: folding the seat upright
To be able to enter and exit, you must fold the
backrest on the second row seat down, and then
fold the seat upward.
Folding the second row seat backrest down
> Pull the lever upward > page 62, fig. 54. Or
> From the third row seat*, pull the release strap
on the seat in front > fig. 56.
>» The backrest folds down by itself.
Folding the second row seat upward
> Pull the seat up by the lever @ until it is folded
upward > fig. 57.
Messages
Second row seat unlocked. Risk of injury for
rear passengers
If the indicator light turns on and this message
appears, then the second row seats are not fold-
ed down and locked into the floor when you start
to drive. A warning tone will also sound.
Page 65 of 316
4M1012721BA
Sitting correctly and safely
ZA\ WARNING
— When the second row seats are folded
down, they must not be used as a footrest
or have objects placed on them as this in-
creases the risk of an accident.
—To reduce the risk of an accident, never al-
low people to ride in the third row* if the
second row seats are folded upward.
—To reduce the risk of an accident, never drive
with objects on the folded third row* backr-
ests if the second row seats are folded up-
right.
— Be mindful of persons in the third row*
when folding down the second row seats.
Not paying attention when folding down
seats can cause pinching injuries.
— If you are unlocking the second row seat
backrest from the third row seat* > fig. 56,
be careful of any passengers in the second
row seats or within the backrest's range of
motion. Not paying attention when folding
down seats can cause injuries.
— Always pull forward on the backrest to make
sure it is check if it is correctly locked in
place.
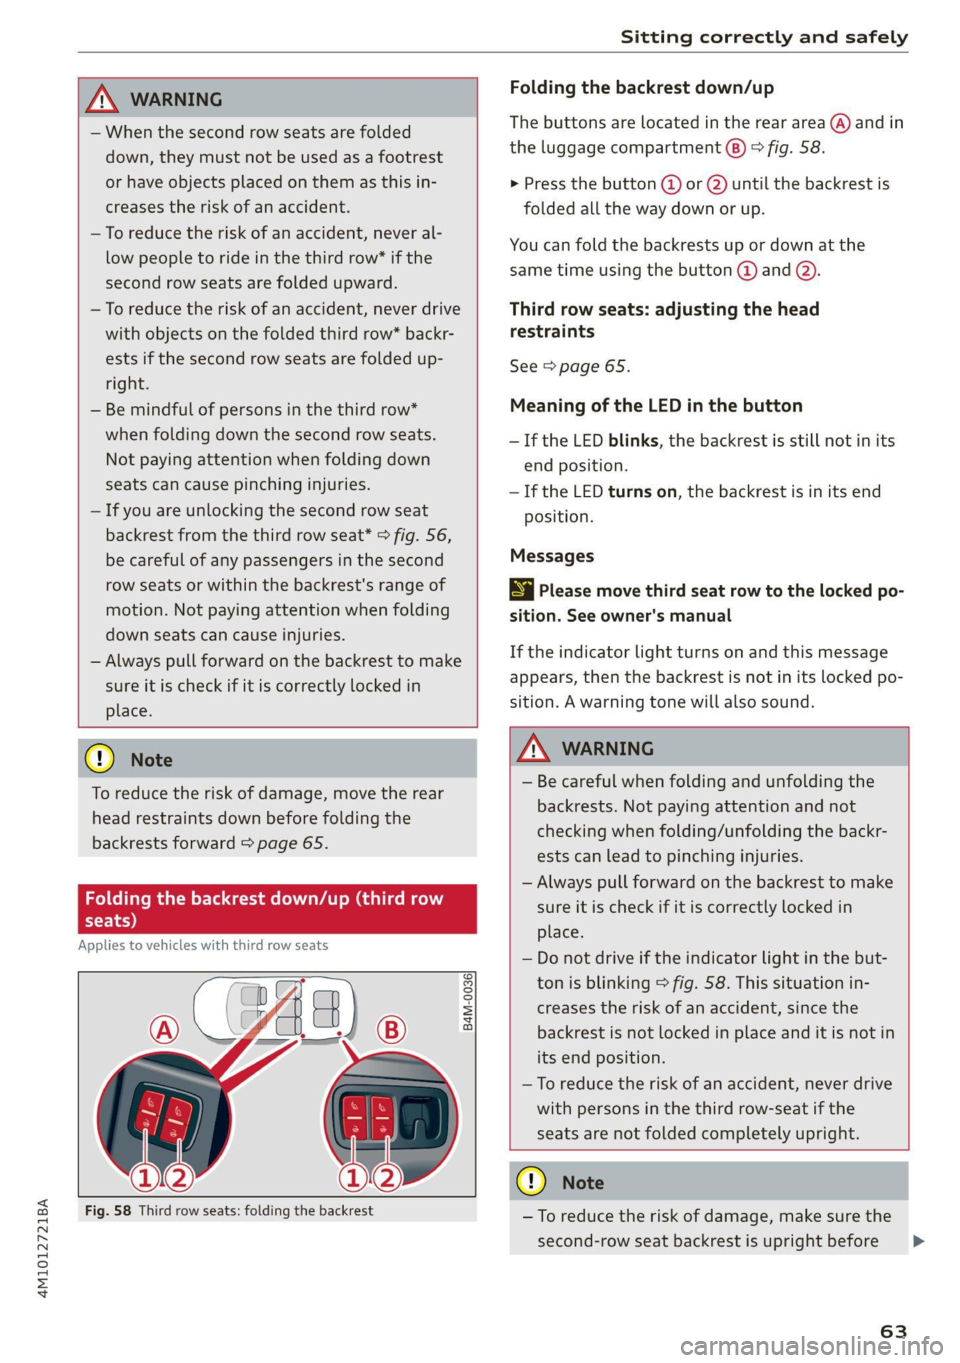
Folding the backrest down/up
The buttons are located in the rear area (@) and in
the luggage compartment (@) © fig. 58.
> Press the button @ or @) until the backrest is
folded all the way down or up.
You can fold the backrests up or down at the
same time using the button @ and ().
Third row seats: adjusting the head
restraints
See > page 65.
Meaning of the LED in the button
— If the LED blinks, the backrest is still not in its
end position.
— If the LED turns on, the backrest is in its end
position.
Messages
Ea Please move third seat row to the locked po-
sition. See owner's manual
If the indicator light turns on and this message
appears, then the backrest is not in its locked po-
sition. A warning tone will also sound.
@) Note
To reduce the risk of damage, move the rear
head restraints down before folding the
backrests forward > page 65.
Fol
seats)
Applies to vehicles with third row seats
eM M od Feda me AVA om Osa)
B4M-0036]
Fig. 58 Third row seats: folding the backrest
Z\ WARNING
— Be careful when folding and unfolding the
backrests. Not paying attention and not
checking when folding/unfolding the backr-
ests can lead to pinching injuries.
— Always pull forward on the backrest to make
sure it is check if it is correctly locked in
place.
— Do not drive if the indicator light in the but-
ton is blinking > fig. 58. This situation in-
creases the risk of an accident, since the
backrest is not locked in place and it is not in
its end position.
—To reduce the risk of an accident, never drive
with persons in the third row-seat if the
seats are not folded completely upright.
@) Note
—To reduce the risk of damage, make sure the
second-row seat backrest is upright before
63
>
Page 66 of 316
Sitting correctly and safely
folding the third-row seat backrest up or
down.
— Do not place any objects on the third row
seat backrest if it is not completely folded
down.
@) Tips
— Very low temperatures can cause malfunc-
tions when folding and unfolding the backr-
ests. If this is the case, moving the vehicle
to a warmer area (such as a garage) will
help.
— The backrest cannot be folded down or up if
the vehicle door on the side to be adjusted
is closed.
Steering wheel
General information
Make sure that:
— The distance between your upper body and the
steering wheel is at least 10 in (25 cm)
— Your arms are bent slightly at the elbows
— You have a sufficient view of the area around
the vehicle and you have a clear view of the in-
strument cluster and head-up display*.
— You are always holding the steering wheel with
both hands on the outer edge at the sides (9:00
and 3:00 position) when driving
Z\ WARNING
— To reduce the risk of an accident, make sure
the steering wheel is adjusted correctly and
cannot be moved out of position before you
start to drive.
— If you are too close to the steering wheel,
the driver's airbag cannot provide optimal
protection, which increases the risk of injury
or fatality.
— Never hold the steering wheel in the 12:00
position or in any other way, such as holding
the center of the steering wheel. Otherwise,
your arms, hands, and head could be injured
in the event that the driver's airbag deploys.
64
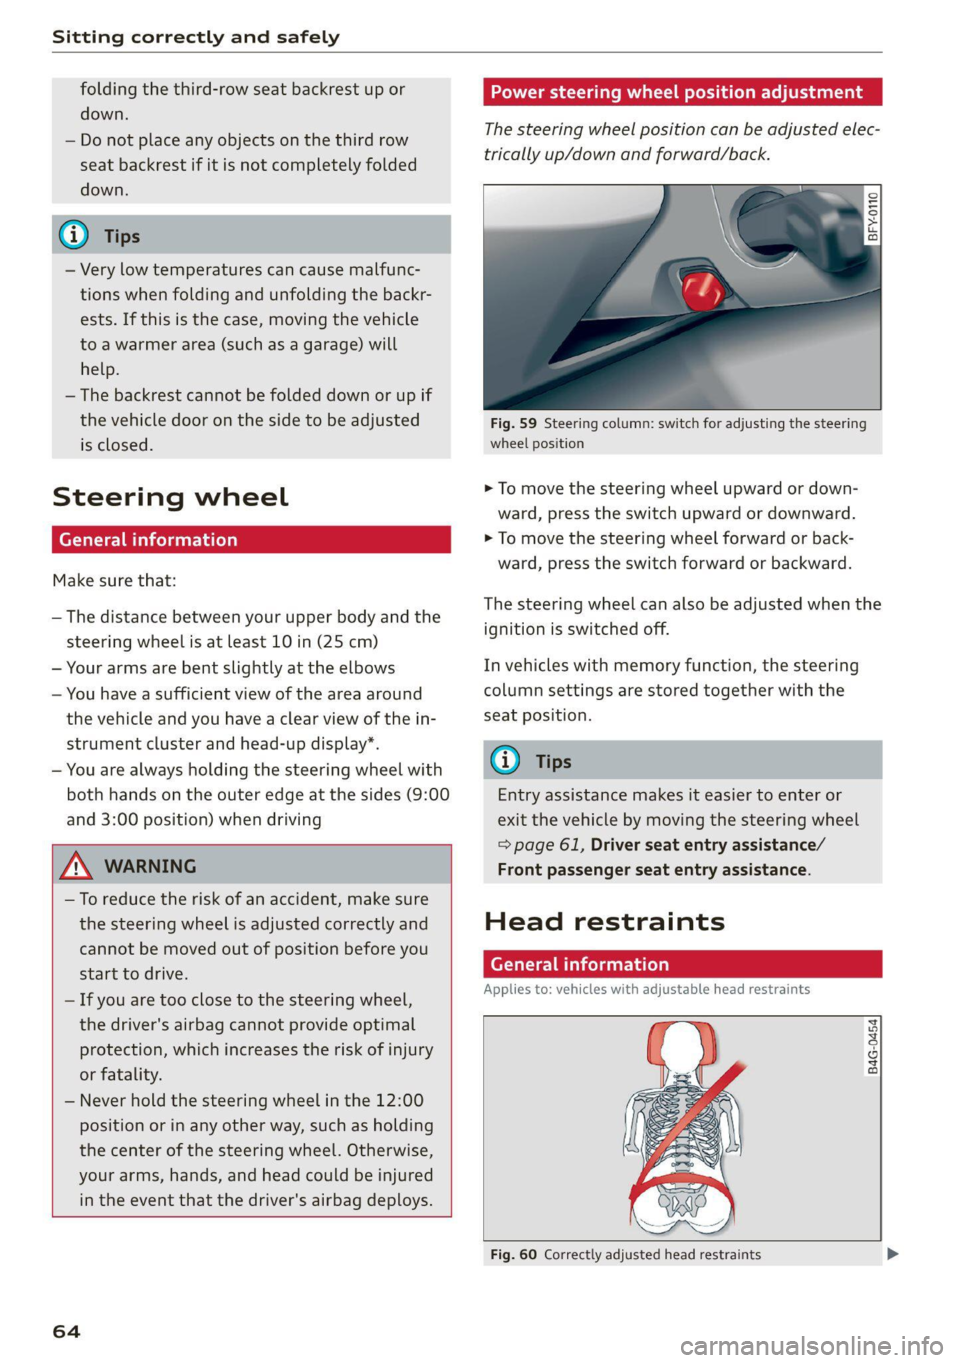
Power steering wheel position adjustment
The steering wheel position can be adjusted elec-
trically up/down and forward/back.
BFY-0110
Fig. 59 Steering column: switch for adjusting the steering
wheel position
> To move the steering wheel upward or down-
ward, press the switch upward or downward.
> To move the steering wheel forward or back-
ward, press the switch forward or backward.
The steering wheel can also be adjusted when the
ignition is switched off.
In vehicles with memory function, the steering
column settings are stored together with the
seat position.
G) Tips
Entry assistance makes it easier to enter or
exit the vehicle by moving the steering wheel
=> page 61, Driver seat entry assistance/
Front passenger seat entry assistance.
Head restraints
General information
Applies to: vehicles with adjustable head restraints
B4G-0454
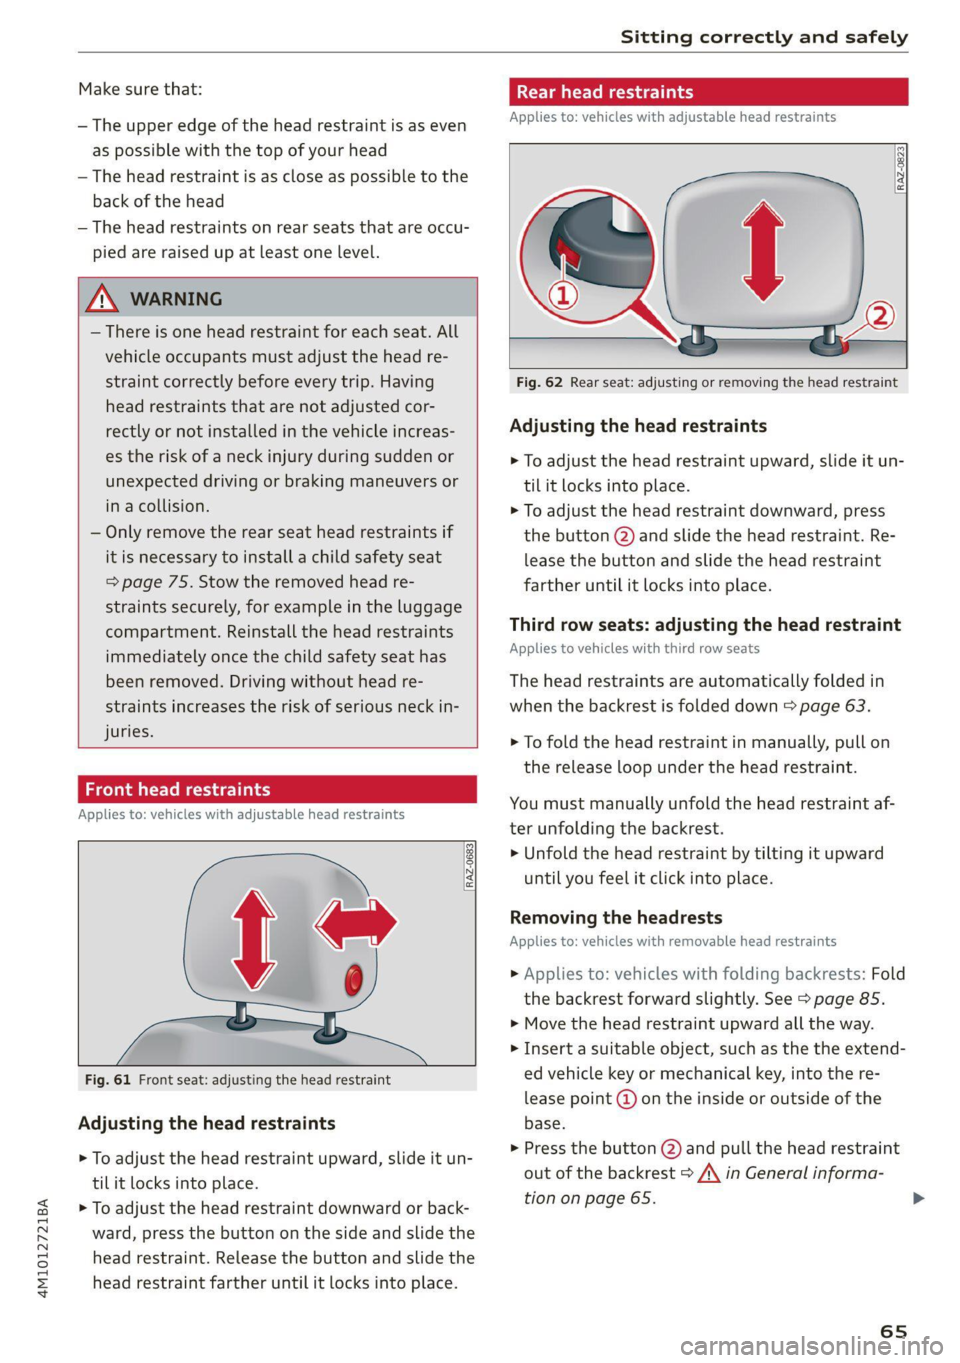
Fig. 60 Correctly adjusted head restraints
Page 67 of 316
4M1012721BA
Sitting correctly and safely
Make sure that:
— The upper edge of the head restraint is as even
as possible with the top of your head
— The head restraint is as close as possible to the
back of the head
— The head restraints on rear seats that are occu-
pied are raised up at least one level.
A WARNING
— There is one head restraint for each seat. All
vehicle occupants must adjust the head re-
straint correctly before every trip. Having
head restraints that are not adjusted cor-
rectly or not installed in the vehicle increas-
es the risk of a neck injury during sudden or
unexpected driving or braking maneuvers or
ina collision.
— Only remove the rear seat head restraints if
it is necessary to install a child safety seat
= page 75. Stow the removed head re-
straints securely, for example in the luggage
compartment. Reinstall the head restraints
immediately once the child safety seat has
been removed. Driving without head re-
straints increases the risk of serious neck in-
juries.
Front head restraints
Applies to: vehicles with adjustable head restraints
RAZ-0683,
Fig. 61 Front seat: adjusting the head restraint
Adjusting the head restraints
> To adjust the head restraint upward, slide it un-
til it locks into place.
> To adjust the head restraint downward or back-
ward, press the button on the side and slide the
head restraint. Release the button and slide the
head restraint farther until it locks into place.
Rear head restraints
Applies to: vehicles with adjustable head restraints
RAZ-0823
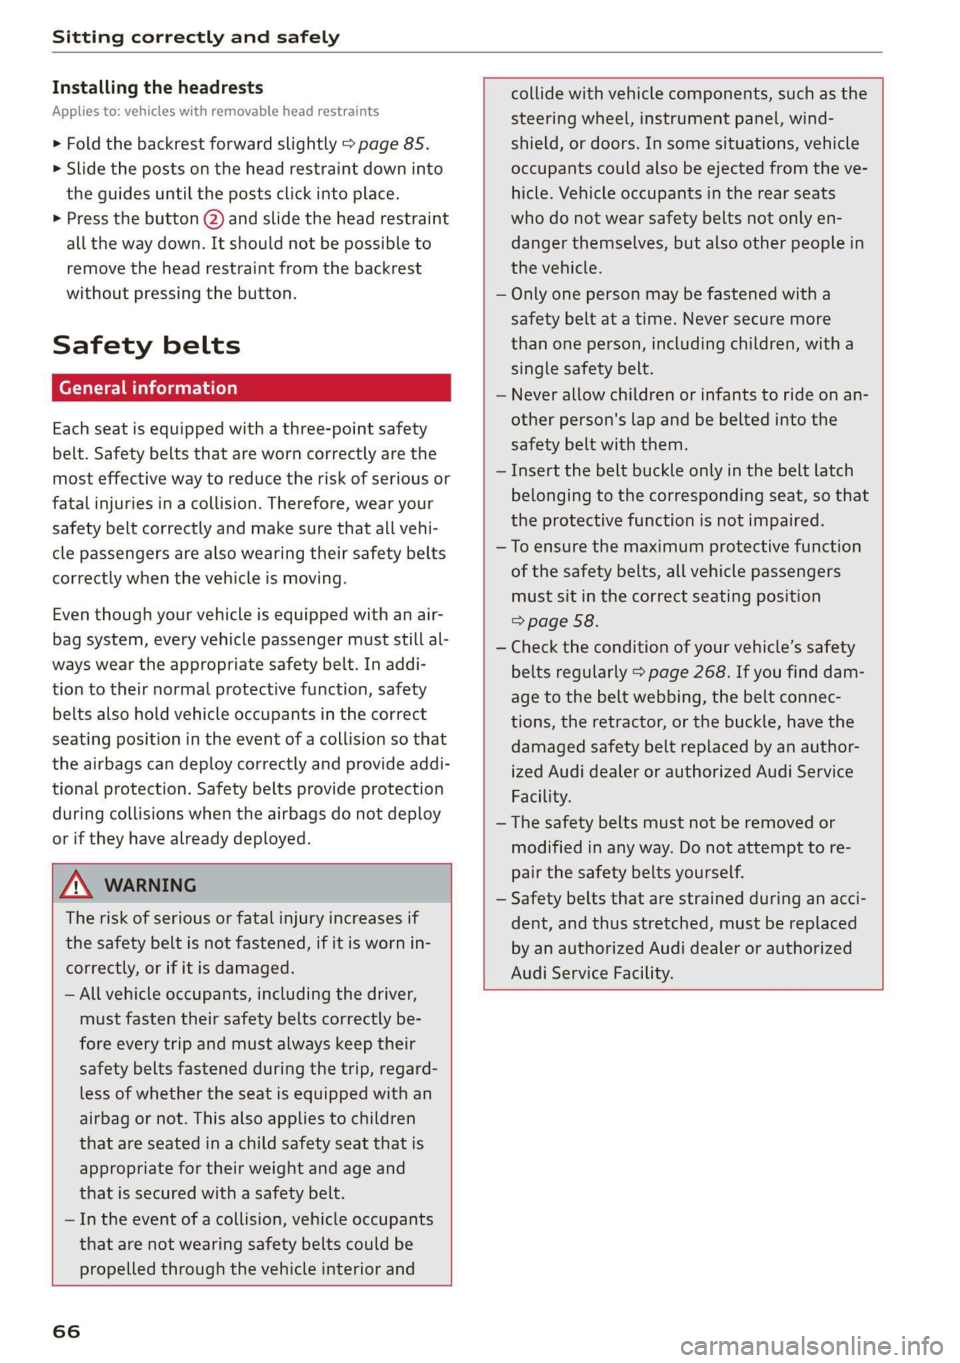
Fig. 62 Rear seat: adjusting or removing the head restraint
Adjusting the head restraints
> To adjust the head restraint upward, slide it un-
til it locks into place.
> To adjust the head restraint downward, press
the button @) and slide the head restraint. Re-
lease the button and slide the head restraint
farther until it locks into place.
Third row seats: adjusting the head restraint
Applies to vehicles with third row seats
The head restraints are automatically folded in
when the backrest is folded down > page 63.
> To fold the head restraint in manually, pull on
the release loop under the head restraint.
You must manually unfold the head restraint af-
ter unfolding the backrest.
> Unfold the head restraint by tilting it upward
until you feel it click into place.
Removing the headrests
Applies to: vehicles with removable head restraints
> Applies to: vehicles with folding backrests: Fold
the backrest forward slightly. See > page 85.
> Move the head restraint upward all the way.
> Insert a suitable object, such as the the extend-
ed vehicle key or mechanical key, into the re-
lease point @ on the inside or outside of the
base.
» Press the button 2) and pull the head restraint
out of the backrest > A\ in General informa-
tion on page 65.
65
Page 68 of 316
Sitting correctly and safely
Installing the headrests
Applies to: vehicles with removable head restraints
> Fold the backrest forward slightly > page 85.
>» Slide the posts on the head restraint down into
the guides until the posts click into place.
> Press the button @) and slide the head restraint
all the way down. It should not be possible to
remove the head restraint from the backrest
without pressing the button.
Safety belts
Each seat is equipped with a three-point safety
belt. Safety belts that are worn correctly are the
most effective way to reduce the risk of serious or
fatal injuries in a collision. Therefore, wear your
safety belt correctly and make sure that all vehi-
cle passengers are also wearing their safety belts
correctly when the vehicle is moving.
Even though your vehicle is equipped with an air-
bag system, every vehicle passenger must still al-
ways wear the appropriate safety belt. In addi-
tion to their normal protective function, safety
belts also hold vehicle occupants in the correct
seating position in the event of a collision so that
the airbags can deploy correctly and provide addi-
tional protection. Safety belts provide protection
during collisions when the airbags do not deploy
or if they have already deployed.
ZX WARNING
The risk of serious or fatal injury increases if
the safety belt is not fastened, if it is worn in-
correctly, or if it is damaged.
— All vehicle occupants, including the driver,
must fasten their safety belts correctly be-
fore every trip and must always keep their
safety belts fastened during the trip, regard-
less of whether the seat is equipped with an
airbag or not. This also applies to children
that are seated in a child safety seat that is
appropriate for their weight and age and
that is secured with a safety belt.
— In the event of a collision, vehicle occupants
that are not wearing safety belts could be
propelled through the vehicle interior and
66
collide with vehicle components, such as the
steering wheel, instrument panel, wind-
shield, or doors. In some situations, vehicle
occupants could also be ejected from the ve-
hicle. Vehicle occupants in the rear seats
who do not wear safety belts not only en-
danger themselves, but also other people in
the vehicle.
Only one person may be fastened with a
safety belt at a time. Never secure more
than one person, including children, with a
single safety belt.
Never allow children or infants to ride on an-
other person's lap and be belted into the
safety belt with them.
Insert the belt buckle only in the belt latch
belonging to the corresponding seat, so that
the protective function is not impaired.
To ensure the maximum protective function
of the safety belts, all vehicle passengers
must sit in the correct seating position
> page 58.
Check the condition of your vehicle’s safety
belts regularly > page 268. If you find dam-
age to the belt webbing, the belt connec-
tions, the retractor, or the buckle, have the
damaged safety belt replaced by an author-
ized Audi dealer or authorized Audi Service
Facility.
The safety belts must not be removed or
modified in any way. Do not attempt to re-
pair the safety belts yourself.
Safety belts that are strained during an acci-
dent, and thus stretched, must be replaced
by an authorized Audi dealer or authorized
Audi Service Facility.
Page 69 of 316
4M1012721BA
Sitting correctly and safely
Correct safety belt positioning
B4H-0751
RAZ-0696
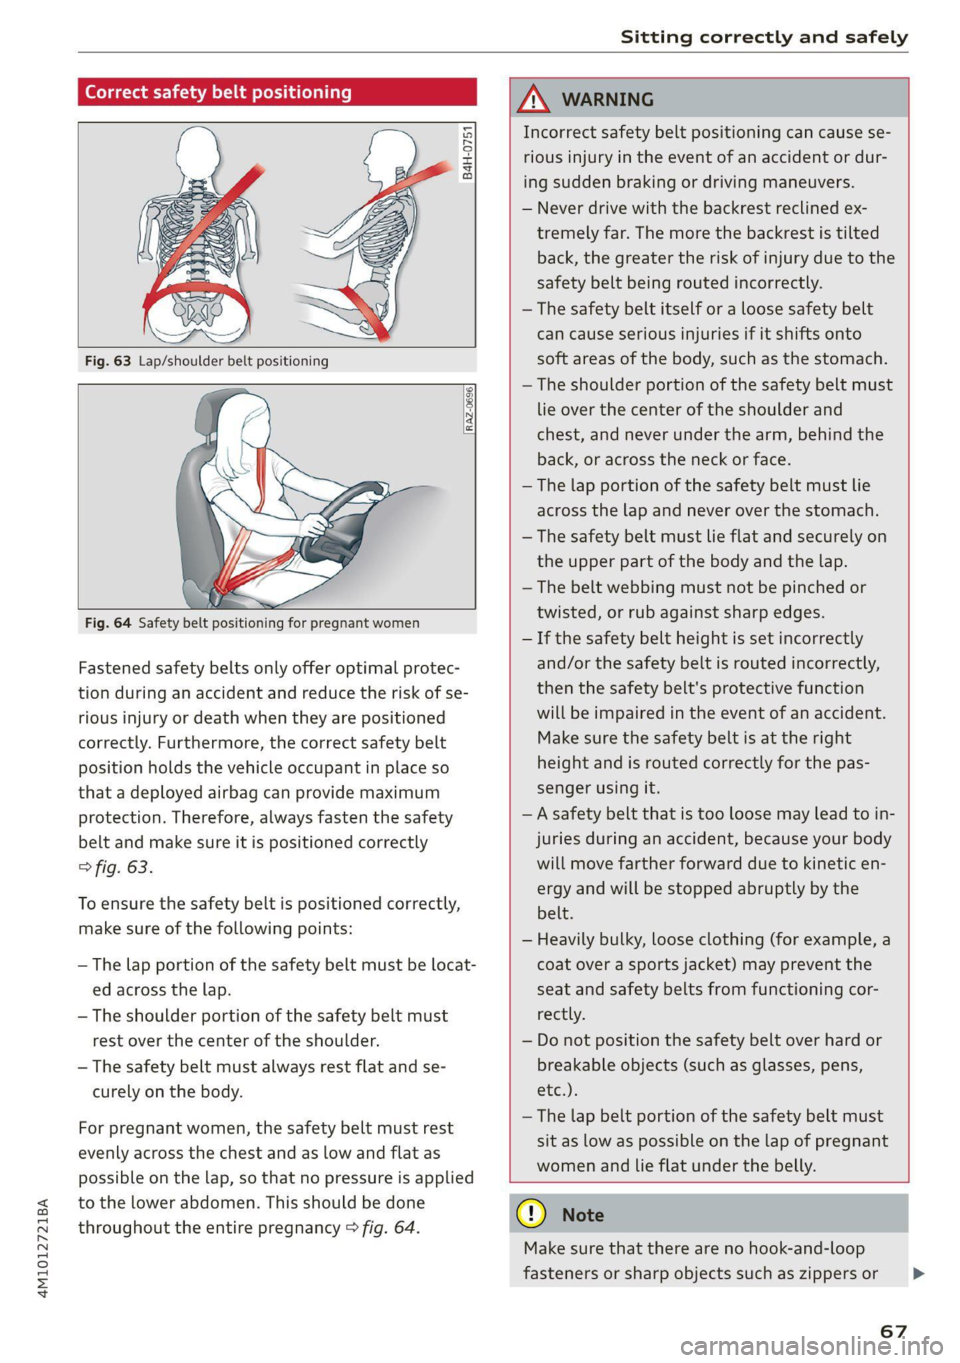
Fastened safety belts only offer optimal protec-
tion during an accident and reduce the risk of se-
rious injury or death when they are positioned
correctly. Furthermore, the correct safety belt
position holds the vehicle occupant in place so
that a deployed airbag can provide maximum
protection. Therefore, always fasten the safety
belt and make sure it is positioned correctly
> fig. 63.
To ensure the safety belt is positioned correctly,
make sure of the following points:
—The lap portion of the safety belt must be locat-
ed across the lap.
—The shoulder portion of the safety belt must
rest over the center of the shoulder.
— The safety belt must always rest flat and se-
curely on the body.
For pregnant women, the safety belt must rest
evenly across the chest and as low and flat as
possible on the lap, so that no pressure is applied
to the lower abdomen. This should be done
throughout the entire pregnancy > fig. 64.
ZA WARNING
Incorrect safety belt positioning can cause se-
rious injury in the event of an accident or dur-
ing sudden braking or driving maneuvers.
— Never drive with the backrest reclined ex-
tremely far. The more the backrest is tilted
back, the greater the risk of injury due to the
safety belt being routed incorrectly.
— The safety belt itself or a loose safety belt
can cause serious injuries if it shifts onto
soft areas of the body, such as the stomach.
— The shoulder portion of the safety belt must
lie over the center of the shoulder and
chest, and never under the arm, behind the
back, or across the neck or face.
— The lap portion of the safety belt must lie
across the lap and never over the stomach.
—The safety belt must lie flat and securely on
the upper part of the body and the lap.
— The belt webbing must not be pinched or
twisted, or rub against sharp edges.
— If the safety belt height is set incorrectly
and/or the safety belt is routed incorrectly,
then the safety belt's protective function
will be impaired in the event of an accident.
Make sure the safety belt is at the right
height and is routed correctly for the pas-
senger using it.
— A safety belt that is too loose may lead to in-
juries during an accident, because your body
will move farther forward due to kinetic en-
ergy and will be stopped abruptly by the
belt.
— Heavily bulky, loose clothing (for example, a
coat over a sports jacket) may prevent the
seat and safety belts from functioning cor-
rectly.
— Do not position the safety belt over hard or
breakable objects (such as glasses, pens,
etc.).
— The lap belt portion of the safety belt must
sit as low as possible on the lap of pregnant
women and lie flat under the belly.
@) Note
Make sure that there are no hook-and-loop
fasteners or sharp objects such as zippers or
67
>
Page 70 of 316
Sitting correctly and safely
rivets on clothing in the area where the safety
belt is worn. Otherwise, the safety belt could
be damaged.
aC mice ate mt Lime
B4H-0462
° Rg a 2
z| x oO
Fig. 66 Releasing the belt buckle from the belt latch
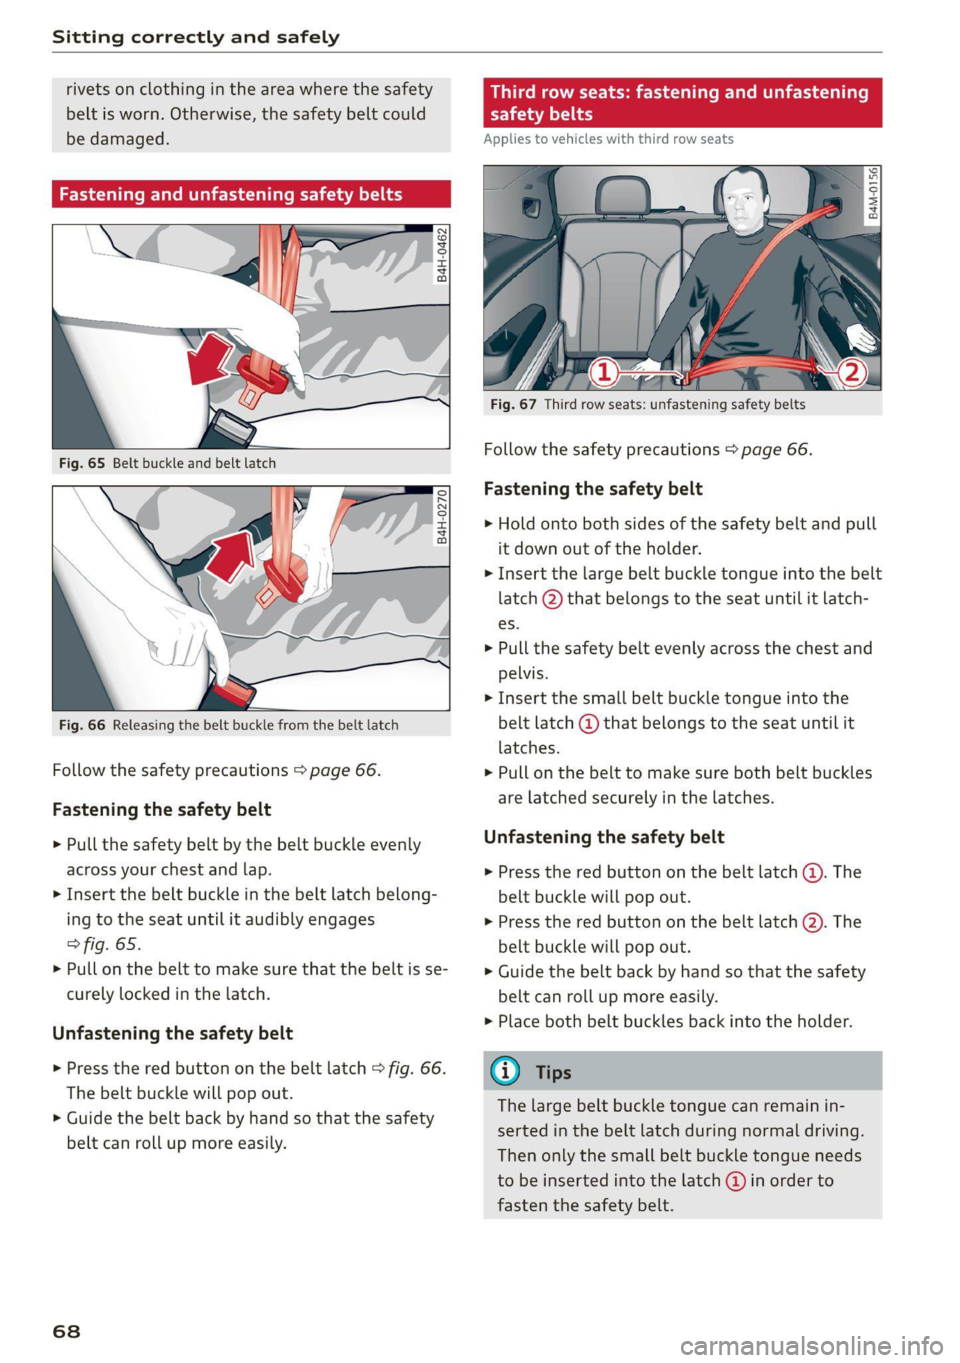
Follow the safety precautions > page 66.
Fastening the safety belt
> Pull the safety belt by the belt buckle evenly
across your chest and lap.
> Insert the belt buckle in the belt latch belong-
ing to the seat until it audibly engages
> fig. 65.
> Pull on the belt to make sure that the belt is se-
curely locked in the latch.
Unfastening the safety belt
> Press the red button on the belt latch > fig. 66.
The belt buckle will pop out.
> Guide the belt back by hand so that the safety
belt can roll up more easily.
68
Third row seats: fastening and unfaste
ria ally
Applies to vehicles with third row seats
|
B4M-0156]
Fig. 67 Third row seats: unfastening safety belts
Follow the safety precautions > page 66.
Fastening the safety belt
> Hold onto both sides of the safety belt and pull
it down out of the holder.
> Insert the large belt buckle tongue into the belt
latch @) that belongs to the seat until it latch-
es.
> Pull the safety belt evenly across the chest and
pelvis.
> Insert the small belt buckle tongue into the
belt latch @ that belongs to the seat until it
latches.
> Pull on the belt to make sure both belt buckles
are latched securely in the latches.
Unfastening the safety belt
> Press the red button on the belt latch @). The
belt buckle will pop out.
> Press the red button on the belt latch @). The
belt buckle will pop out.
> Guide the belt back by hand so that the safety
belt can roll up more easily.
>» Place both belt buckles back into the holder.
® Tips
The large belt buckle tongue can remain in-
serted in the belt latch during normal driving.
Then only the small belt buckle tongue needs
to be inserted into the latch @ in order to
fasten the safety belt.