ECO mode AUDI R8 2007 User Guide
[x] Cancel search | Manufacturer: AUDI, Model Year: 2007, Model line: R8, Model: AUDI R8 2007Pages: 210, PDF Size: 8.1 MB
Page 94 of 210
Automatic gearbox 92maximum engine speed is reached, unless you have activated the
sport function ⇒page 90.
If you select a lower gear, the R tronic gearbox will not shift down
until there is no risk of overrevving the engine.
You can change over to automatic mode at any time ⇒page 92.
WARNING
•
The driver should never get out of the vehicle when the engine
is running and a gear is engaged. If you have to leave your vehicle
while the engine is running, you must apply the parking brake and
engage neutral gear (N).
•
If the engine is running and a gear is engaged, you will need to
hold the car with the footbrake.
•
Do not press the accelerator while selecting a gear with the
vehicle stationary and the engine running, as this could cause an
accident.
•
To avoid rolling back on gradients always hold the vehicle with
the footbrake if you have to stop. Never attempt to hold the vehicle
with the clutch when stopping on a gradient. The clutch is disen-
gaged automatically if it is overloaded and becomes too hot - acci-
dent risk! Before the clutch is disengaged, the vehicle will jolt and
the driver information system will display a warning that the
clutch is overloaded.
•
Before you drive down a steep gradient, reduce the speed and
use the R tronic to select a lower gear.
•
Never allow the brake to drag and do not use the brake pedal
too often or for long periods. Constant braking will cause the
brakes to overheat and will considerably reduce the effectiveness
of the brakes. It will increase the braking distance and could cause
the brake system to fail.
Applies to vehicles: with R tronicAutomatic modeThe gearbox changes the forward gears up and down
automatically.Driving away from a standstill
– Press and hold the brake pedal.
– Briefly push the selector lever towards position A.
– Release the brake and press the accelerator ⇒ in
“Manual mode” on page 91.In some situations (such as when driving on mountain roads) it can
be advantageous to switch temporarily to the manual shift
programme ⇒page 91, so that the gear ratios can be selected
manually to suit the driving conditions.Applies to vehicles: with R tronicKick-down featureWhen the accelerator pedal is pressed right down past the point of
resistance at full throttle, the R tronic gearbox will shift down to a
lower gear, depending on road speed and engine speed. The upshift
to the next higher gear is delayed until the engine reaches
maximum rpm. This does not apply if you have activated the sport
function.
WARNING
Please note that if the road surface is slippery or wet, the kick-
down feature could cause the driving wheels to spin, which could
result in skidding.
document_0900452a816e6cc9.book Seite 92 Mittwoch, 21. Februar 2007 1:32 13
Page 98 of 210
HomeLink 96
At the operating unit
1. Switch on the ignition (do not start the engine).
2. Press and hold down the two outer buttons of the
HomeLink® operating unit ⇒page 95, fig. 80 until the
indicator diode ⇒page 95, fig. 80 begins to flash after
about 20 seconds. This means that all previously stored
data has been deleted.
3. Press the particular HomeLink button which you would
like to program.
4. Wait until the diode ⇒page 95, fig. 80 begins to flash.
The HomeLink module now remains in training mode for
5 minutes.
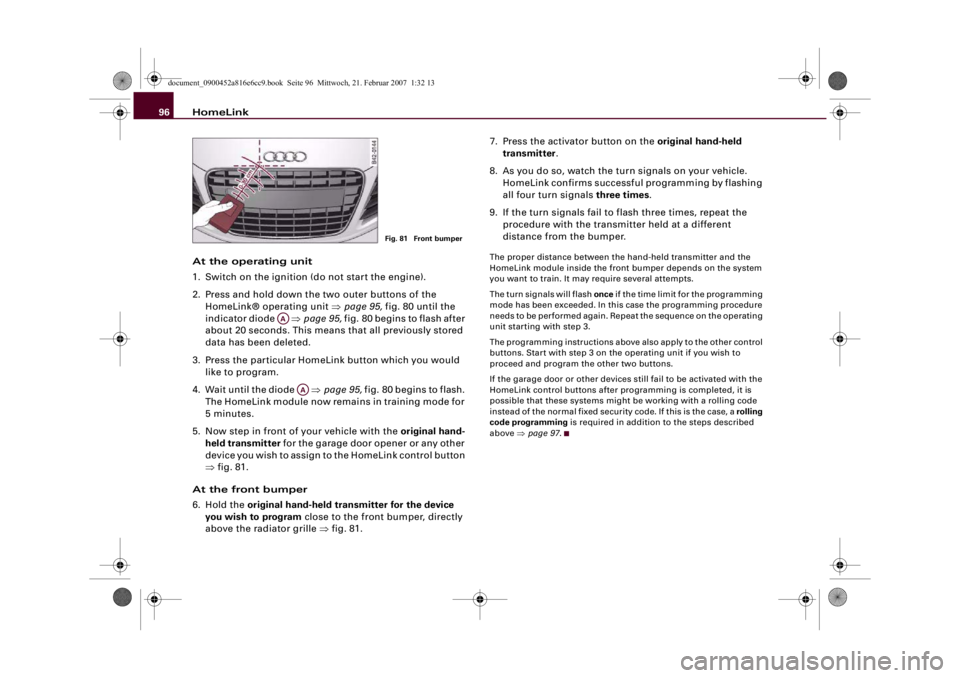
5. Now step in front of your vehicle with the original hand-
held transmitter for the garage door opener or any other
device you wish to assign to the HomeLink control button
⇒fig. 81.
At the front bumper
6. Hold the original hand-held transmitter for the device
you wish to program close to the front bumper, directly
above the radiator grille ⇒fig. 81.7. Press the activator button on the original hand-held
transmitter.
8. As you do so, watch the turn signals on your vehicle.
HomeLink confirms successful programming by flashing
all four turn signals three times.
9. If the turn signals fail to flash three times, repeat the
procedure with the transmitter held at a different
distance from the bumper.
The proper distance between the hand-held transmitter and the
HomeLink module inside the front bumper depends on the system
you want to train. It may require several attempts.
The turn signals will flash once if the time limit for the programming
mode has been exceeded. In this case the programming procedure
needs to be performed again. Repeat the sequence on the operating
unit starting with step 3.
The programming instructions above also apply to the other control
buttons. Start with step 3 on the operating unit if you wish to
proceed and program the other two buttons.
If the garage door or other devices still fail to be activated with the
HomeLink control buttons after programming is completed, it is
possible that these systems might be working with a rolling code
instead of the normal fixed security code. If this is the case, a rolling
code programming is required in addition to the steps described
above ⇒page 97.
Fig. 81 Front bumper
AA
AA
document_0900452a816e6cc9.book Seite 96 Mittwoch, 21. Februar 2007 1:32 13
Page 99 of 210
HomeLink97
Controls
Safety
Driving tips
General maintenance
Self-help
Technical data
Applies to vehicles: with HomeLinkRolling code programming
Some devices require rolling code programming of the
HomeLink universal transmitter.Identifying a rolling code
– Press the already programmed HomeLink button again
and hold it down.
–Watch HomeLink diode ⇒page 95, fig. 80. If the diode
starts flashing rapidly and turns into a constant light
after about 2 seconds, this indicates that the device you
wish to operate (e.g. a garage door opener) is equipped
with a rolling code.
– Program the rolling code as follows:
Activating the garage door opener drive unit
– Locate the programming button on the garage door
drive. The exact location and colour of the button may
vary depending on the type of garage door opener.
– Press the programming button on the door drive unit
(this will normally cause a “programming mode indicator
lamp” on the unit to light up). You now have about 30
seconds to start and complete programming of the
HomeLink control button on the operating unit.
Programming of the operating unit above the
interior mirror
– Press and release the already programmed HomeLink
button.
– Press the HomeLink button again to complete rolling
code programming.
After programming at the operating unit, the garage door opener
should recognise the HomeLink signal and respond when the
HomeLink button is pressed. Now the other control buttons can be
programmed as required.
Note
•
Having a second person assist you makes programming of the
rolling code easier and faster. For some makes of garage door
openers the HomeLink button may have to be pressed a third time
to complete the training sequence.
•
If you encounter problems programming the rolling code you
may find helpful information in the operating instructions of the
garage door opener or other device you wish to operate.
Applies to vehicles: with HomeLinkOperating HomeLink
The programmed devices are activated by means of the
HomeLink control buttons above the interior mirror.– Switch on the ignition (do not start the engine).
– Press the programmed HomeLink button ⇒page 95,
fig. 80. The device assigned to that button (e.g. garage
door) will be activated.The HomeLink indicator diode ⇒page 95, fig. 80 will light up when
you press the button.Applies to vehicles: with HomeLinkErasing the HomeLink® button programming
You can erase the complete HomeLink programming by
pressing the two outer buttons.– Switch on the ignition (do not start the engine).
AA
document_0900452a816e6cc9.book Seite 97 Mittwoch, 21. Februar 2007 1:32 13
Page 100 of 210
HomeLink 98
– Press and hold down the two outer buttons until the indi-
cator diode starts to flash ⇒page 95, fig. 80.
– Then release the buttons.After the programming of the HomeLink® universal transmitter
buttons has been erased, the system will return to the training
mode and is ready to be re-programmed at any time.
Note
•
Programmed buttons cannot be erased individually.
•
For security reasons it is advisable to erase the programming of
the HomeLink buttons prior to selling your vehicle.
Applies to vehicles: with HomeLinkReprogramming a HomeLink® button
A HomeLink button can be re-programmed individually
without affecting the other button allocations.At the operating unit
– Press and hold down the selected HomeLink® button
until the indicator diode ⇒page 95, fig. 80 starts flashing
slowly.
At the front bumper
–Hold the original hand-held transmitter for the garage
door opener or other device close to the front bumper
directly below the right headlight ⇒page 96, fig. 81. The
exact distance depends on the system that you want to
program.
– Press the button on the original hand-held transmitter
for the garage door opener or other device.– As you do so, watch the turn signals on your vehicle.
HomeLink confirms successful programming by flashing
all four turn signals three times.
– If the turn signals fail to flash three times, repeat the
procedure with the transmitter held at a different
distance from the bumper.
When the turn signals have flashed three times, this means the
device previously stored in HomeLink has been erased and the new
system programmed in its place. To activate the new system, press
the HomeLink button that has just been re-programmed.
Note
It may require several attempts before programming is successful.
When programming a new device, keep the button pressed for at
least 15 seconds before trying again with the transmitter in a
different position. Keep watching the turn signals during that
time.Applies to vehicles: with HomeLinkConformity certificationThe HomeLink universal transmitter is registered in the following
countries under the following certification numbers:Country
Certification number
Andorra
16SEP2003
Belgium
RTT/D/X2064
Denmark
98.3142-266
Germany
D800038K
Finland
FI98080106
France
97619 RD
document_0900452a816e6cc9.book Seite 98 Mittwoch, 21. Februar 2007 1:32 13
Page 128 of 210
Child safety 126Fitting child safety seatsGeneral information
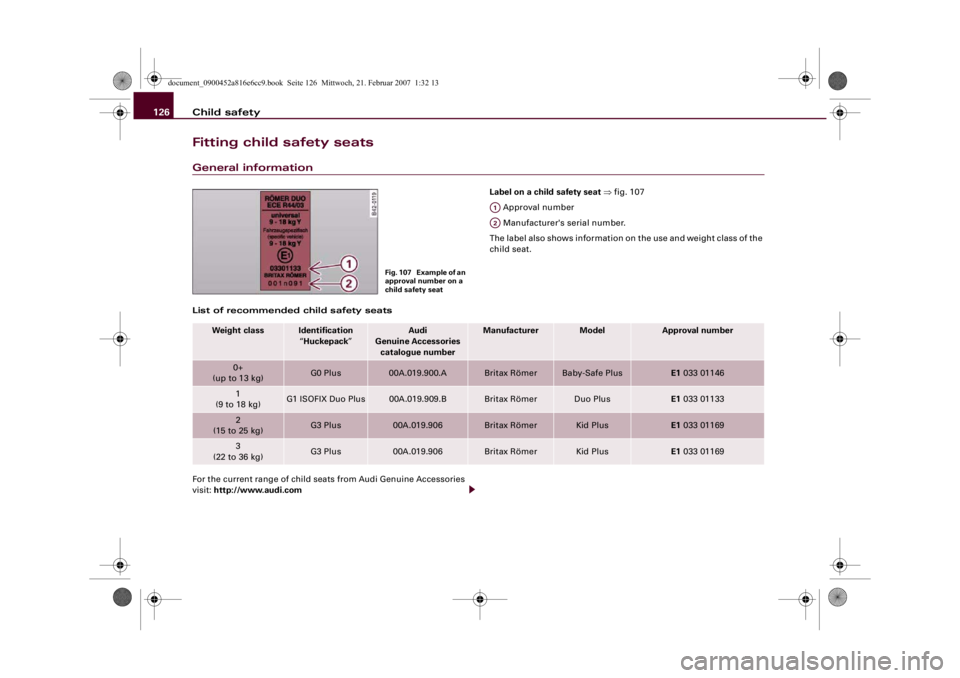
Label on a child safety seat ⇒fig. 107
Approval number
Manufacturer's serial number.
The label also shows information on the use and weight class of the
child seat.
List of recommended child safety seats
For the current range of child seats from Audi Genuine Accessories
visit: http://www.audi.com
Fig. 107 Example of an
approval number on a
child safety seat
A1A2
Weight class
Identification
“Huckepack”
Audi
Genuine Accessories
catalogue number
Manufacturer
Model
Approval number
0+
(up to 13 kg)
G0 Plus
00A.019.900.A
Britax Römer
Baby-Safe Plus
E1 033 01146
1
(9 to 18 kg)
G1 ISOFIX Duo Plus
00A.019.909.B
Britax Römer
Duo Plus
E1 033 01133
2
(15 to 25 kg)
G3 Plus
00A.019.906
Britax Römer
Kid Plus
E1 033 01169
3
(22 to 36 kg)
G3 Plus
00A.019.906
Britax Römer
Kid Plus
E1 033 01169
document_0900452a816e6cc9.book Seite 126 Mittwoch, 21. Februar 2007 1:32 13
Page 129 of 210
Child safety127
Controls
Safety
Driving tips
General maintenance
Self-help
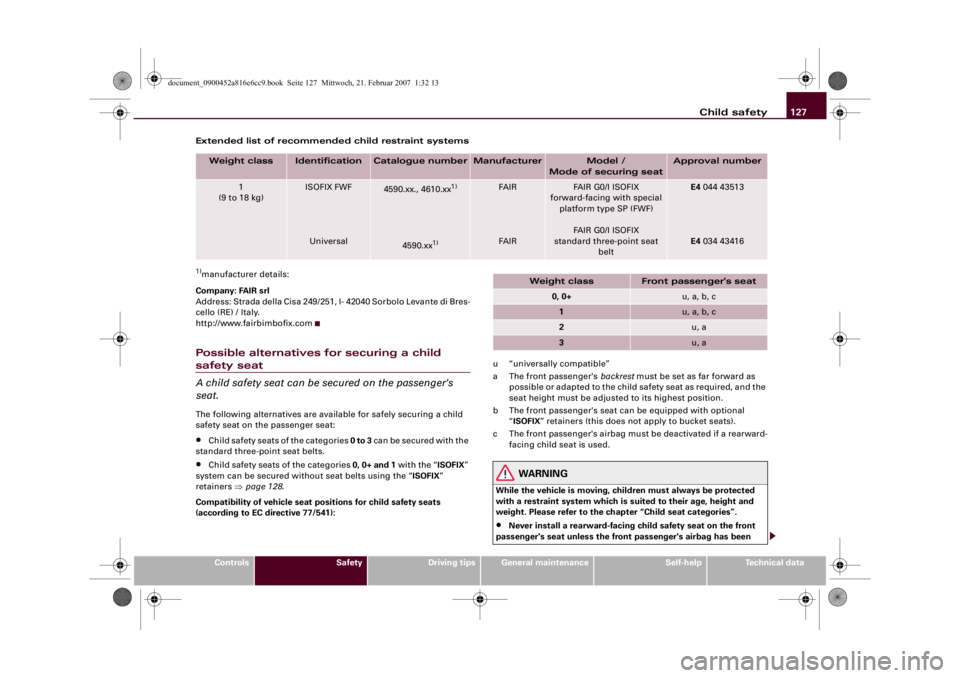
Technical data Extended list of recommended child restraint systems
1)manufacturer details:
Company: FAIR srl
Address: Strada della Cisa 249/251, I- 42040 Sorbolo Levante di Bres-
cello (RE) / Italy.
http://www.fairbimbofix.comPossible alternatives for securing a child safety seat
A child safety seat can be secured on the passenger's
seat.The following alternatives are available for safely securing a child
safety seat on the passenger seat:•
Child safety seats of the categories 0 to 3 can be secured with the
standard three-point seat belts.
•
Child safety seats of the categories 0, 0+ and 1 with the “ISOFIX”
system can be secured without seat belts using the “ISOFIX”
retainers ⇒page 128.
Compatibility of vehicle seat positions for child safety seats
(according to EC directive 77/541):u “universally compatible”
a The front passenger's backrest must be set as far forward as
possible or adapted to the child safety seat as required, and the
seat height must be adjusted to its highest position.
b The front passenger's seat can be equipped with optional
“ISOFIX” retainers (this does not apply to bucket seats).
c The front passenger's airbag must be deactivated if a rearward-
facing child seat is used.
WARNING
While the vehicle is moving, children must always be protected
with a restraint system which is suited to their age, height and
weight. Please refer to the chapter “Child seat categories”.•
Never install a rearward-facing child safety seat on the front
passenger's seat unless the front passenger's airbag has been
Weight class
Identification
Catalogue number
Manufacturer
Model /
Mode of securing seat
Approval number
1
(9 to 18 kg)
ISOFIX FWF
Universal
4590.xx., 4610.xx
1)
4590.xx
1)
FAIR
FAIR
FAIR G0/I ISOFIX
forward-facing with special
platform type SP (FWF)
FAIR G0/I ISOFIX
standard three-point seat
belt
E4 044 43513
E4 034 43416
Weight class
Front passenger's seat
0, 0+
u, a, b, c
1
u, a, b, c
2
u, a
3
u, a
document_0900452a816e6cc9.book Seite 127 Mittwoch, 21. Februar 2007 1:32 13
Page 136 of 210
Intelligent technology 134Rear spoilerThe automatic rear spoiler increases the car's stability.The rear spoiler can be extended or retracted manually or automat-
ically.
Automatic mode (normal operation)•
Automatic extension: The rear spoiler is automatically extended
at road speeds above approximately 100 km/h.
•
Automatic retraction: The rear spoiler is automatically retracted
at road speeds below approximately 35 km/h.
Manual mode
•
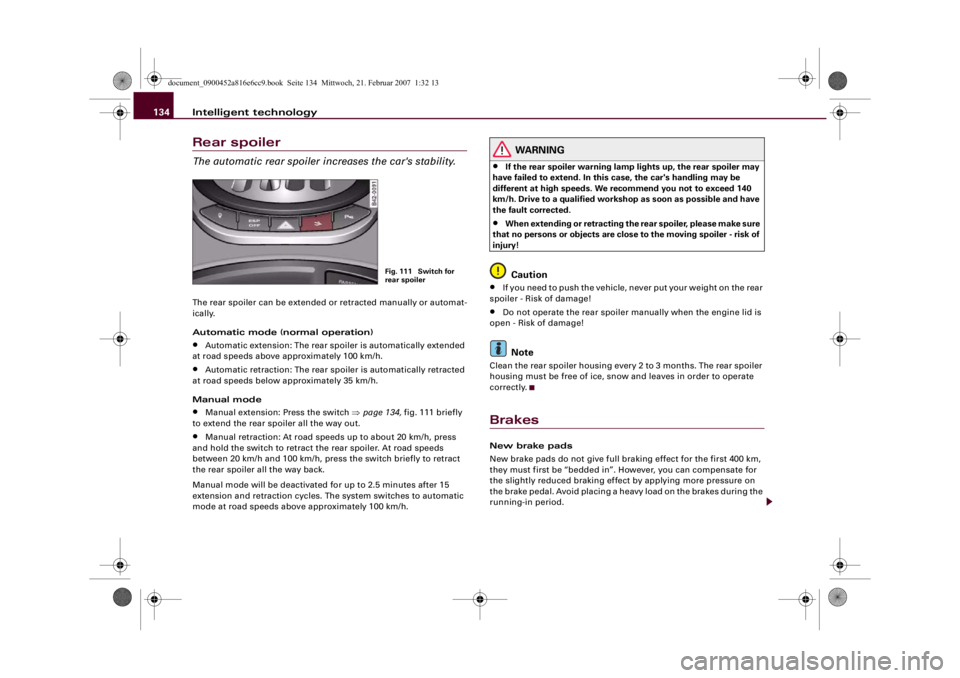
Manual extension: Press the switch ⇒page 134, fig. 111 briefly
to extend the rear spoiler all the way out.
•
Manual retraction: At road speeds up to about 20 km/h, press
and hold the switch to retract the rear spoiler. At road speeds
between 20 km/h and 100 km/h, press the switch briefly to retract
the rear spoiler all the way back.
Manual mode will be deactivated for up to 2.5 minutes after 15
extension and retraction cycles. The system switches to automatic
mode at road speeds above approximately 100 km/h.
WARNING
•
If the rear spoiler warning lamp lights up, the rear spoiler may
have failed to extend. In this case, the car's handling may be
different at high speeds. We recommend you not to exceed 140
km/h. Drive to a qualified workshop as soon as possible and have
the fault corrected.
•
When extending or retracting the rear spoiler, please make sure
that no persons or objects are close to the moving spoiler - risk of
injury!Caution
•
If you need to push the vehicle, never put your weight on the rear
spoiler - Risk of damage!
•
Do not operate the rear spoiler manually when the engine lid is
open - Risk of damage!Note
Clean the rear spoiler housing every 2 to 3 months. The rear spoiler
housing must be free of ice, snow and leaves in order to operate
correctly.BrakesNew brake pads
New brake pads do not give full braking effect for the first 400 km,
they must first be “bedded in”. However, you can compensate for
the slightly reduced braking effect by applying more pressure on
the brake pedal. Avoid placing a heavy load on the brakes during the
running-in period.
Fig. 111 Switch for
rear spoiler
document_0900452a816e6cc9.book Seite 134 Mittwoch, 21. Februar 2007 1:32 13
Page 138 of 210
Intelligent technology 136front wheels is not obstructed, otherwise the brakes can overheat. Power steeringThe power steering assists the driver when turning the
steering wheel (with the engine running).The power steering assists the driver by reducing the force needed
to turn the steering wheel.
The power steering does not function when the engine is switched
off. In this case the steering wheel is very hard to turn.
If the steering is held at its turning limit when the car is stationary,
this will place an excessive load on the power steering system. In
this case, the power steering system will make noises. It will also
reduce the idling speed of the engine.
Caution
Do not keep the steering in the full-lock position for longer than
15 seconds when the engine is running – this could cause damage
to the power steering system.
Note
•
If the power steering should fail at any time or the engine is
switched off (for instance when being towed), the car can still be
steered. However, more effort will be required to turn the steering
wheel.
•
If the system is leaking or malfunctioning, please take the car to
a qualified workshop as soon as possible.
•
The power steering requires a special hydraulic fluid. The
container for the fluid is located in the engine compartment. The
correct fluid level in the reservoir is important for the power
steering to function properly. The hydraulic fluid level is checked at
the Inspection Service.
Four-wheel drive (quattro®)On quattro models the engine power is distributed to all
four wheelsGeneral notes
On four-wheel drive vehicles, the engine power is distributed to all
four wheels. The distribution of power is controlled automatically
according to your driving style and the road conditions. Also refer
to ⇒page 132.
Winter tyres
Thanks to its four-wheel drive, your car will have plenty of traction
in winter conditions, even with the standard tyres. Nevertheless, we
still recommend that winter tyres should be fitted on all four wheels
when winter road conditions are expected, mainly because this will
give a better braking response.
Snow chains
On roads where snow chains are mandatory, this also applies to cars
with four-wheel drive ⇒page 171, “Snow chains”.
Replacing tyres
The dimensions of the wheels and tyres used on four-wheel drive
vehicles must comply with the manufacturer's specifications
⇒page 168, “Replacing wheels and tyres”.
WARNING
•
Even with four-wheel drive, you should always adjust your
speed to suit the conditions. Do not let the extra safety provided
tempt you into taking any risks when driving – this can cause acci-
dents.
•
The braking ability of your car is limited by the grip of the tyres.
In this respect, your car is no different from a car without four-
wheel drive. So do not be tempted to drive too fast on icy or slip-
document_0900452a816e6cc9.book Seite 136 Mittwoch, 21. Februar 2007 1:32 13
Page 141 of 210
Your vehicle and the environment139
Controls
Safety
Driving tips
General maintenance
Self-help
Technical data
Sporty drivingLetting the engine warm up and cool downYou can reduce the amount of wear and tear on your vehicle during
a sporty driving session simply by adopting a more restrained
driving style while the engine is warming up and cooling down.
You should allow the engine to warm up by keeping the engine
speed below 7000 rpm until the engine oil reaches at least 90 °C. In
addition, the tyres will not develop their full grip potential until they
have had a chance to warm up on the road.
Even though the engine continues to be cooled after you switch it
off, it is particularly important to give it time to cool down before
parking. The engine, brakes, exhaust system and gearbox will all
reach very high temperatures when you adopt a sporty driving style.
Before you park the vehicle, allow it to cool down to normal temper-
ature by driving at moderate rpm speeds for several miles.Driving on a racing circuitBefore you take your car out on a racing circuit, please ensure that
it is in perfect condition. You should check the tyre tread and brake
pads for wear. It's also a good idea to increase the tyre pressure by
0.3 bar.
The oil consumption may be slightly higher than “normal” when
driving on a racing circuit ⇒page 157.
You should always check your vehicle after driving hard. Are the
brake pads ok? Do you notice any problems with the tyres (e.g. tread
worn, blistering, etc.)? Are the air intakes free of leaves and
deposits? Is the oil level ok?
Your Audi R8 dealer will be glad to carry out an inspection before
and after you use the car on a racing circuit.
Note
•
Some racing circuits (e.g. with banked curves) can affect the
behaviour of the ESP.
•
Driving the car on a racing circuit places a heavy load on all parts
of the vehicle. This can result in increased wear and tear.
Environmental compatibilityEnvironmental protection is a top priority in the design, choice of
materials and production of your new Audi. Particular importance
has been attached to the following aspects:
Design measures for economical recycling•
Joints and connections designed for ease of dismantling
•
Modular construction to facilitate dismantling
•
Increased use of single-grade materials
•
Plastic parts and elastomers are labelled in accordance with ISO
1043, ISO 11469 and ISO 1629
Choice of materials
•
Nearly all materials used can be recycled
•
Similar types of plastics grouped together for easy recycling
•
Recycled materials used in manufacture
•
Reduced vapour emissions from plastics
•
CFC-free refrigerant in air conditioner
Compliance with the laws prohibiting the use of:
•
Cadmium
•
Asbestos
•
Lead
•
Mercury
•
Chrome VI
document_0900452a816e6cc9.book Seite 139 Mittwoch, 21. Februar 2007 1:32 13
Page 172 of 210
Wheels and tyres 170•
If wheel trims are fitted after the car is purchased, ensure that
there is an adequate flow of air for cooling the brakes.For the sake of the environment
Old tyres must be disposed of according to the laws in the country
concerned.
Note
•
Tyres with the “R0” mark are specially matched to your Audi. We
recommend that you use these tyres only. Your Audi R8 dealer or
specialist retailer will gladly provide you with further information.
•
Never mount used tyres if you are not sure of their previous
history.
•
For technical reasons it is not normally possible to use wheel
rims from other vehicles. In some cases this also applies to rims
from other vehicles of the same model.
Wheel bolts
The wheel bolts are designed to suit the rims on your car.The wheel bolts are matched to the rims. When installing different
wheels (for instance alloy wheels or wheels with winter tyres) it is
important to use the correct wheel bolts with the right length and
correctly shaped bolt heads. This is essential for the secure fit of the
wheels and for the proper function of the brake system.
Audi R8 dealers have full information on the technical requirements
when installing or changing tyres, rims or wheel trims.
The wheel bolts should be clean and turn easily.
A special adapter is required to turn the anti-theft wheel bolts*
⇒page 182.
Winter tyres
Winter tyres will significantly improve the car's handling
in winter road conditions.–Use only radial ply winter tyres.
– Winter tyres must be fitted on all four wheels.
– Only use winter tyres of the correct type approved for
your vehicle.
– Please note that the maximum permissible speed for
winter tyres may be lower than for summer tyres.
– Also note that winter tyres are no longer effective when
the tread is worn down.
– After fitting the wheels you must always check the tyre
pressures. The correct tyre pressures are listed on the
sticker on the driver's door pillar ⇒page 167.In winter road conditions winter tyres will considerably improve the
car's handling. Due to their type of construction (width, rubber
compound, tread pattern), summer tyres give less grip on ice and
snow. This applies particularly to vehicles equipped with wide
section tyres or high speed tyres (code letters H, V or Y on the side-
wall).
Only use winter tyres of the correct type approved for your vehicle.
The sizes of the winter tyres approved for your vehicle are listed in
the vehicle's documents (e.g. EC Certificate of Conformity or COC
document
3)). The vehicle documents vary depending on the
country of residence. Also refer to ⇒page 168.
Winter tyres are no longer fully effective when the tread is worn
down to a depth of 4 mm.
WARNING (continued)
3)COC = Certificate of conformity
document_0900452a816e6cc9.book Seite 170 Mittwoch, 21. Februar 2007 1:32 13