AUDI R8 COUPE 2020 Owners Manual
Manufacturer: AUDI, Model Year: 2020, Model line: R8 COUPE, Model: AUDI R8 COUPE 2020Pages: 308, PDF Size: 82.41 MB
Page 171 of 308
4S1012721BA
System settings
Treedate Tae eli) Wi-Fi audio player
Applies to: vehicles with Audi phone box Requirement: the Wi-Fi hotspot on the MMI
— Connect new device: search for and connect a = page 129 and the Wi-Fi on your Wi-Fi audio
cell phone. player must be switched on.
— List of devices already paired: select your cell — Connect new device: press the control knob.
phone from the list of all the devices that are Search for and connect a Wi-Fi capable device.
already paired. — Disconnecting the Wi-Fi audio player: deacti-
vate Wi-Fi on your Wi-Fi-capable device. The
device will be automatically removed from the
Applies to: vehicles with Audi connect list.
— Connect new device: search for and connect a @) Note
mobile device (such as a smartphone).
Always follow the information found in >@ in
— List of devices already paired: select your cell
General information on page 124.
phone from the list of all devices already
paired, or insert a mini SIM card in the SIM card
@ Note Display contacts from a cell phone (or an addi-
tional cell phone).
Always follow the information found in >@ in
General information on page 124. Requirement: cell phones must not be connected
to the MMI through the Bluetooth remote SIM
access profile or through the Handsfree profile.
myAudi app
Applies to: vehicles with Audi connect — Connect new device: search for and connect a
new cell phone.
— List of devices already paired: select your cell
phone from the list of all the cell phones that
— Connect new device: search for and connect a are already paired.
mobile device (such as a smartphone).
— List of devices already paired: select your mo- Menace
bile device from the list of all the devices that Applies to: vehicles with Audi smartphone interface
are already paired.
Requirement: the myAudi app must be installed
and open on your mobile device.
— Connect your cell phone to the Audi music in-
terface > page 156 using a USB adapter
=> page 155, fig. 134.
Bluetooth player — Select your cell phone from the list of cell
phones that have already been connected.
Audio player
Requirement: the Bluetooth function and visibili-
ty must be switched on in the MMI > page 169
and on the Bluetooth audio player. Additional options
— Connect new device: press the control knob. Depending on the selected function, you can use
Select Bluetooth audio player. Search for and the right control button to access the available
connect a mobile device. additional options in the connection manager.
— List of devices already paired: select a Blue-
tooth device from the list of all the devices that
are already paired. — Bluetooth: select and confirm a setting for the
Bluetooth connection visibility. Select Visible >
Bluetooth settings
169
Page 172 of 308
System settings
for the MMI to be visible to other devices. Se-
lect Invisible for the MMI to not be visible to
other devices. However, it is still possible to es-
tablish a Bluetooth connection with paired de-
vices when the visibility is switched off. Select
Off to turn visibility off. Then a Bluetooth con-
nection is not possible.
— Bluetooth audio player: when this function is
switched on , the Bluetooth audio player is
available as a source in the Media menu.
— Delete Bluetooth device: the selected cell
phone/mobile device is disconnected from the
MMI.
— Show Bluetooth profiles: you can Connect or
Disconnect the Handsfree profile and the Di-
rectory/contacts* separately.
— Bluetooth name: the MMI Bluetooth name (for
example ,AUDI MMI 2017“) is displayed and
can be changed.
When the function is switched on [M, the symbol
© appears in the Infotainment system display
=> page 101, fig. 107.
Online settings*
— Data connection settings: See > page 128, Cell
phone network.
— Data usage counter: the amount of data pack-
ets that are sent and received through the MMI
is displayed. You can reset the data usage infor-
mation to zero using the Reset data counter
option.
— Network status: the mobile network provider
for data service as well as the network status
are displayed.
Wi-Fi settings
See > page 129.
SIM PIN settings*
— Automatic PIN entry: when this function is
switched on , the SIM PIN is automatically
saved in the MMI after it is entered for the first
time. The SIM PIN for four different SIM cards
can be saved in the MMI. With the function
switched off, the currently stored SIM PIN is
deleted from the MMI. When the automatic
PIN entry is switched on, there are no SIM PIN
prompts.
170
— Disable PIN query: when switched on, there are
no SIM PIN queries. The automatic PIN entry is
not used in this case.
— Change PIN: you can change the PIN on your
SIM card. First enter the current SIM PIN. The
SIM PIN may only contain digits 0-9. The new
SIM PIN must be entered twice for security and
then it will be saved to the SIM card.
Apple CarPlay sound settings/Android Auto
sound settings
Applies to: vehicles with Audi smartphone interface
See > page 171.
About Apple CarPlay/About Android Auto
Applies to: vehicles with Audi smartphone interface
Here you will find legal information regarding the
use of Apple CarPlay or Android Auto and infor-
mation about device-specific data exchange.
Delete Apple CarPlay device/Delete Android
Auto device
Applies to: vehicles with Audi smartphone interface
Requirement: your cell phone must not be con-
nected to the Audi music interface with a USB
adapter.
Select: Audi smartphone interface > a device
from the list > right control button.
To remove your mobile device from the list, select
and confirm Delete Apple CarPlay device or De-
lete Android Auto device.
G) Tips
Some SIM cards do not allow the SIM PIN
queries to be switched off.
System update
> Select: [MENU] button > Settings > left control
button > System maintenance.
— System update: insert the storage device with
the update data into the appropriate drive
= page 151. Select and confirm the drive >
Start update. The length of the process de-
pends on the size of the update.
Page 173 of 308
4S1012721BA
System settings
— Reset driver installation: the selected media
driver package is reset to the settings at the
time of delivery.
— Version information: information on the MMI
software version and the navigation database*
software version is displayed. The Software in-
formation function also provides information
on the software contained in the MMI and the
licensing agreement.
Sound settings
The sound distribution and volume of the MMI
can be adjusted individually. The settings depend
on the vehicle equipment.
> Select: [MENU] button > Sound > left control
button > Entertainment.
Treble/Bass
You can adjust the Treble and Bass settings by
turning the control knob. The changed settings
only apply for the audio source that is active at
the time. This allows you to adjust the sound set-
tings for each audio source separately.
Balance/fader* (sound focus)
— Adjusting the sound distribution to the left or
right: press the control knob. Turn the control
knob to the left or right to the desired position.
— Adjusting the sound distribution to the front
or rear*: press the control knob again. Turn the
control knob to the left or right to the desired
position.
— Adjusting the sound distribution using the
MMI touch: move your finger on the MMI touch
control panel in the desired direction.
Sound effects*
Select and confirm a Focus setting:
— All: all speakers in the vehicle are active (sym-
metrical sound distribution).
— Front: only the speakers in the front of the ve-
hicle are active.
Speed dependent volume control
You can adjust how much the volume changes to
compensate for noise inside the vehicle by turn-
ing the control knob.
Volume settings
Adjusting the volume
The volume of an audio source or a system mes-
sage (for example, from the voice recognition
system) can be adjusted directly while the sound
is playing using the On/Off knob.
— Increasing or decreasing the volume: turn the
On/Off knob @) > page 93, fig. 94 to the right
or left.
—
Muting or pausing: press the On/Off knob
briefly, or turn the On/Off knob to the left until
the Mute symbol appears. An active audio/
video source is stopped.
—Unmuting or resuming: press the On/Off knob
briefly or turn the On/Off knob to the right.
ZA\ WARNING
Adjust the volume of the audio system so that
signals from outside the vehicle, such as po-
lice and fire sirens, can be heard easily at all
times.
G) Tips
The volume is automatically adjusted to a pre-
set level when the MMI is switched on.
Adjusting the system volume
> Select: [MENU] button > Sound > left control
button.
Telephone
Mute telephone: messages and ringtones are set
to mute.
Ringtone: see = page 122, Ringtone and volume
settings.
Ringtone volume: you can adjust the volume of
the selected ringtone by turning the control
knob.
Message volume: you can adjust the volume of
the notification for an incoming text message by
turning the control knob.
171
Page 174 of 308
System settings
Microphone input level: you can adjust the vol-
ume during a phone call by turning the control
knob.
Navigation
Voice guidance: See > page 138.
Voice guidance during phone call: See
=> page 138.
Voice guidance volume: you can adjust the voice
guidance volume during active route guidance by
turning the control knob.
Entertainment fader: the volume of audio play-
back can be temporarily lowered when the park-
ing system or voice guidance is active.
Voice recognition system
Short dialog: prompts in a shorter format can be
switched on or off.
Speech dialog system volume: you can adjust
the volume of the prompts by turning the control
knob.
Parking aid*
You can adjust the signal tone volume by turning
the control knob.
— Adjusting the Front volume: select and con-
firm High, Medium or Low.
— Adjusting the Rear volume: select and confirm
High, Medium or Low.
MMI touch volume
You can adjust the volume of the prompts for the
MMI touch by turning the control knob.
Audi Heartbeat
You can adjust the volume of Audi Heartbeat by
turning the control knob.
172
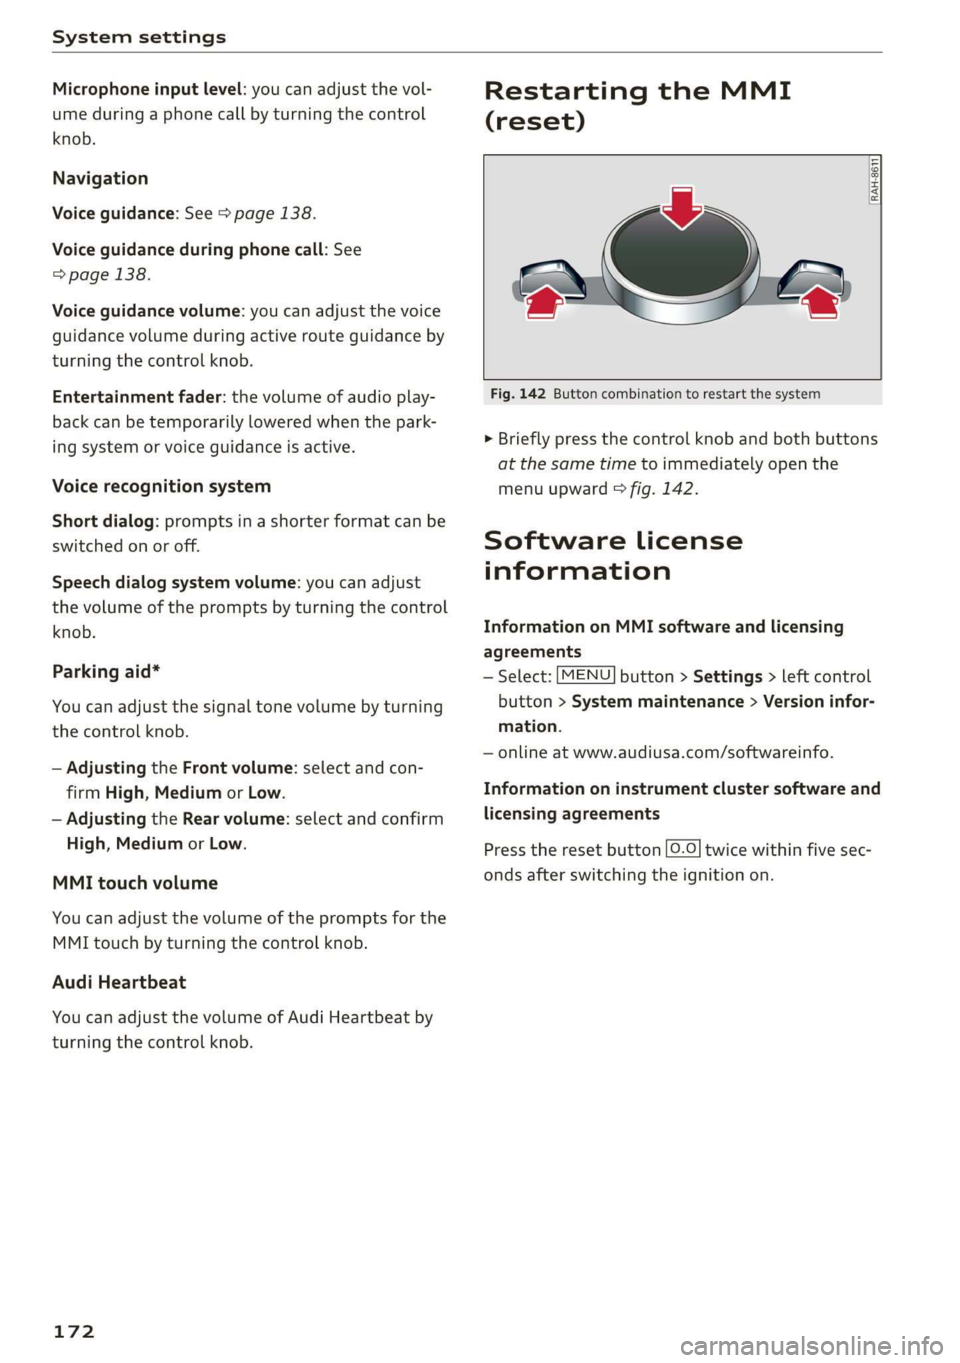
Restarting the MMI
(reset)
RAH-8611
ev
= ‘=
Fig. 142 Button combination to restart the system
> Briefly press the control knob and both buttons
at the same time to immediately open the
menu upward > fig. 142.
Software License
information
Information on MMI software and licensing
agreements
— Select: [MENU] button > Settings > left control
button > System maintenance > Version infor-
mation.
— online at www.audiusa.com/softwareinfo.
Information on instrument cluster software and
licensing agreements
Press the reset button [0.0] twice within five sec-
onds after switching the ignition on.
Page 175 of 308
4S1012721BA
Safe driving
Safe driving
Basics
SER Nails mali
Please remember - safety first!
The individual safety features of your vehicle can
work together as a system to help protect you
and
your passengers in a wide range of accidents.
These features cannot work as a system if they
are not always correctly adjusted and correctly
used.
This chapter contains important information,
tips, instructions and warnings that you need to
read and observe for your own safety, the safety
of your passengers and others. We have summar-
ized here what you need to know about safety
belts, airbags, child restraints as well as child
safety. Your safety is for us priority number 1. Al-
ways observe the information and warnings in
this section - for your own safety as well as that
of your passengers.
The information in this section applies to all
model versions of your vehicle. Some of the fea-
tures described in this sections may be standard
equipment on some models, or may be optional
equipment on others. If you are not sure, ask
your authorized Audi dealer.
ZA WARNING
— Always make sure that you follow the in-
structions and heed the WARNINGS in this
Manual. It is in your interest and in the in-
terest of your passengers.
— Always keep the complete Owner's Litera-
ture in your Audi when you lend or sell your
vehicle so that this important information
will always be available to the driver and
passengers.
— Always keep the Owner's literature handy so
that you can find it easily if you have ques-
tions.
Important things to do before driving
Safety is everybody's job! Vehicle and occupant
safety always depends on the informed and care-
ful driver.
For your safety and the safety of your passenger,
before driving always:
> Make sure that all lights and signals are operat-
ing correctly.
> Make sure that the tire pressure is correct.
> Make sure that all windows are clean and afford
good visibility to the outside.
> Secure all luggage and other items carefully
=> page 54, > page 54.
> Make sure that nothing can interfere with the
pedals.
> Adjust seat and mirrors correctly for your
height.
> Make sure to use the right child restraint cor-
rectly to protect children > page 211, Child
safety.
> Sit properly in your seat and make sure that
your passenger do the same © page 50, Front
seats.
> Fasten your safety belt and wear it properly. Al-
so instruct your passenger to fasten his safety
belt properly > page 180.
What impairs driving safety?
Safe driving is directly related to the condition of
the vehicle, the driver as well as the driver’s abili-
ty to concentrate on the road without being dis-
tracted.
The driver is responsible for the safety of the ve-
hicle and all of its occupants. If your ability to
drive is impaired, safety risks for everybody in the
vehicle increase and you also become a hazard to
everyone else on the road > /\. Therefore:
> Do not let yourself be distracted by passenger
or by using a cellular telephone.
> NEVER drive when your driving ability is im-
paired (by medications, alcohol, drugs, etc.).
> Observe all traffic laws, rules of the road and
speed limits and plain common sense.
> ALWAYS adjust your speed to road, traffic and
weather conditions.
173
>
Page 176 of 308
Safe driving
> Take frequent breaks on long trips. Do not drive
for more than two hours at a stretch.
> Do NOT drive when you are tired, under pres-
sure or when you are stressed.
Z\ WARNING
Impaired driving safety increases the risk of
serious personal injury and death whenever a
vehicle is being used.
> Grasp the top of the steering wheel with your
elbow(s) slightly bent.
> Fasten and wear safety belts correctly
> page 183.
> Always keep both feet in the footwell so that
you
are in control of the vehicle at all times.
For detailed information on how to adjust the
driver's seat, see > page 50, Front seats.
Correct passenger
seating positions
Proper seating position for the driver
The proper driver seating position is important
for safe, relaxed driving.
BFV-0183
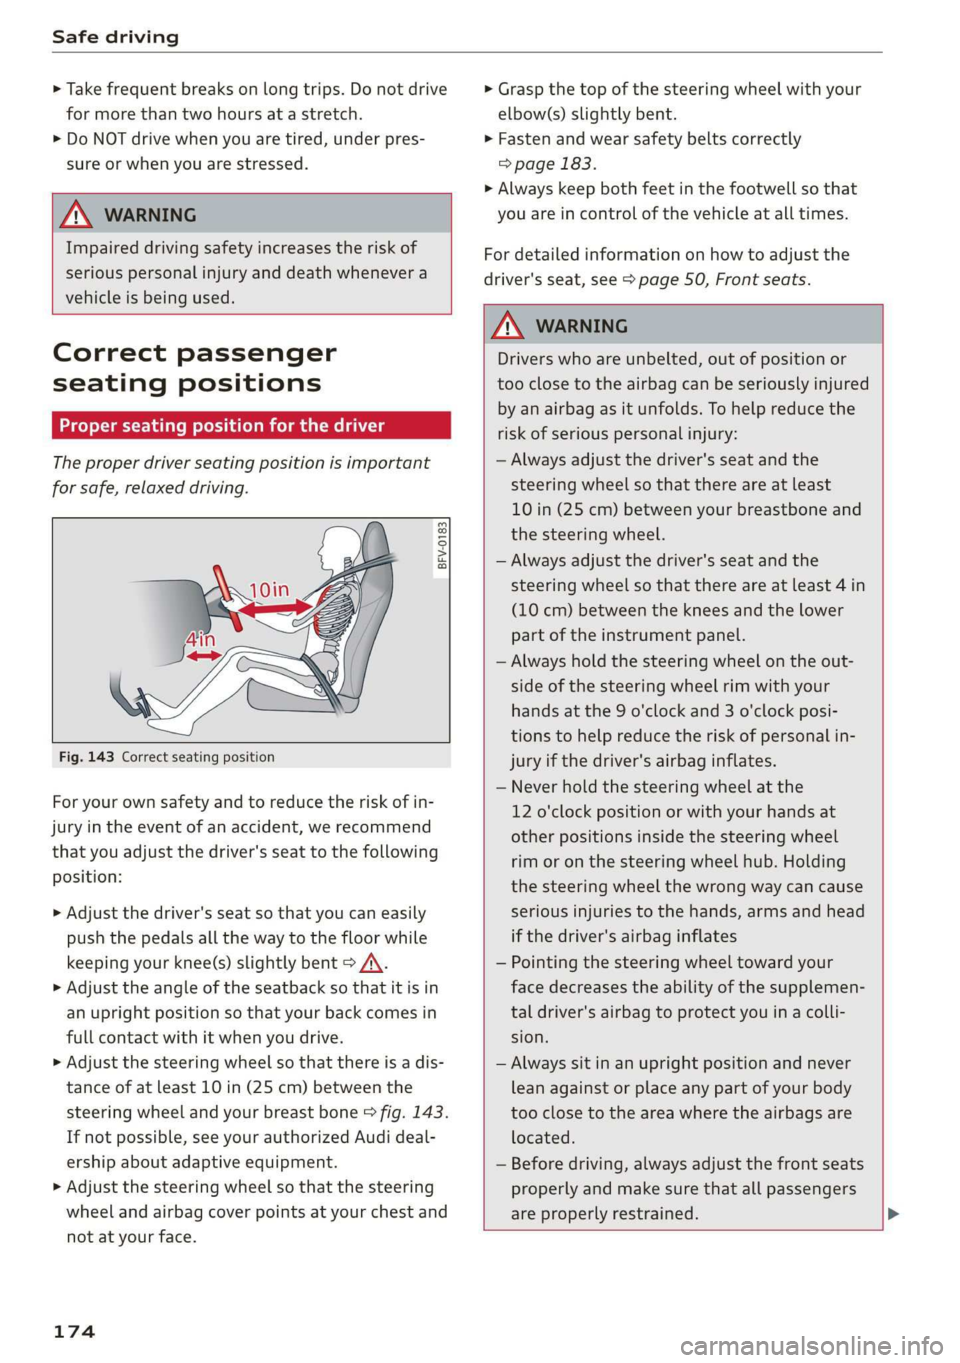
Fig. 143 Correct seating position
For your own safety and to reduce the risk of in-
jury in the event of an accident, we recommend
that you adjust the driver's seat to the following
position:
> Adjust the driver's seat so that you can easily
push the pedals all the way to the floor while
keeping your knee(s) slightly bent > A\.
> Adjust the angle of the seatback so that it is in
an upright position so that your back comes in
full contact with it when you drive.
> Adjust the steering wheel so that there is a dis-
tance of at least 10 in (25 cm) between the
steering wheel and your breast bone > fig. 143.
If not possible, see your authorized Audi deal-
ership about adaptive equipment.
> Adjust the steering wheel so that the steering
wheel and airbag cover points at your chest and
not at your face.
174
Z\ WARNING
Drivers who are unbelted, out of position or
too close to the airbag can be seriously injured
by an airbag as it unfolds. To help reduce the
risk of serious personal injury:
— Always adjust the driver's seat and the
steering wheel so that there are at least
10 in (25 cm) between your breastbone and
the steering wheel.
— Always adjust the driver's seat and the
steering wheel so that there are at least 4 in
(10 cm) between the knees and the lower
part of the instrument panel.
— Always hold the steering wheel on the out-
side of the steering wheel rim with your
hands at the 9 o'clock and 3 o'clock posi-
tions to help reduce the risk of personal in-
jury if the driver's airbag inflates.
— Never hold the steering wheel at the
12 o'clock position or with your hands at
other positions inside the steering wheel
rim or on the steering wheel hub. Holding
the steering wheel the wrong way can cause
serious injuries to the hands, arms and head
if the driver's airbag inflates
— Pointing the steering wheel toward your
face decreases the ability of the supplemen-
tal driver's airbag to protect you in a colli-
sion.
— Always sit in an upright position and never
lean against or place any part of your body
too close to the area where the airbags are
located.
— Before driving, always adjust the front seats
properly and make sure that all passengers
are properly restrained.
Page 177 of 308
4S1012721BA
Safe driving
— Never adjust the seats while the vehicle is
moving. Your seat may move unexpectedly
and you could lose control of the vehicle.
— Never drive with the backrest reclined or tilt-
ed far back! The farther the backrests are
tilted
back, the greater the risk of injury due
to incorrect positioning of the safety belt
and improper seating position.
— Children must always ride in child seats
= page 211. Special precautions apply when
installing a child seat on the front passenger
seat > page 187.
Proper seating position for the front
passenger
The proper front passenger seating position is
important for safe, relaxed driving.
For your own safety and to reduce the risk of in-
jury in the event of an accident, we recommend
that you adjust the seat for the front passenger
to the following position:
> Adjust the angle of the seatback so that it is in
an upright position and your back comes in full
contact with it whenever the vehicle is moving.
> Keep both feet flat on the floor in front of the
front passenger seat.
> Fasten and wear safety belts correctly
=> page 183.
For detailed information on how to adjust the
front passenger's seat, see > page 50.
ZA WARNING
Front seat passengers who are unbelted, out
of position or too close to the airbag can be
seriously injured or killed by the airbag as it
unfolds. To help reduce the risk of serious per-
sonal injury:
— Passengers must always sit in an upright po-
sition and never lean against or place any
part of their body too close to the area
where the airbags are located.
— Passengers who are unbelted, out of posi-
tion or too close to the airbag can be seri-
ously injured by an airbag as it unfolds with
great force in the blink of an eye.
— Always make sure that there are at least
10 in (25 cm) between the front passenger‘s
breastbone and the instrument panel.
— Always make sure that there are at least 4 in
(10 cm) between the front passenger‘s
knees and the lower part of the instrument
panel.
— Each passenger must always sit on a seat of
their own and properly fasten and wear the
safety belt belonging to that seat.
— Before driving, always adjust the front pas-
senger seat properly.
— Always keep your feet on the floor in front of
the seat. Never rest them on the seat, in-
strument panel, out of the window, etc. The
airbag system and safety belt will not be
able to protect you properly and can even in-
crease the risk of injury in a crash.
— Never drive with the backrest reclined or tilt-
ed far back! The farther the backrests are
tilted
back, the greater the risk of injury due
to incorrect positioning of the safety belt
and improper seating position.
— Children must always ride in child seats
= page 211. Special precautions apply when
installing a child seat on the front passenger
seat > page 187.
Examples of improper seating positions
The occupant restraint system can only reduce
the risk of injury if vehicle occupants are properly
seated.
Improper seating positions can cause serious in-
jury or death. Safety belts can only work when
they are properly positioned on the body. Im-
proper seating positions reduce the effectiveness
of safety belts and will even increase the risk of
injury and death by moving the safety belt to crit-
ical areas of the body. Improper seating positions
also increase the risk of serious injury and death
when an airbag deploys and strikes an occupant
who is not in the proper seating position. A driver
is responsible for the safety of all vehicle occu-
pants and especially for children. Therefore:
175
>
Page 178 of 308
Safe driving
> Never allow anyone to assume an incorrect
seating position when the vehicle is being used
>/\.
The following bulletins list only some sample po-
sitions that will increase the risk of serious injury
and death. Our hope is that these examples will
make you more aware of seating positions that
are dangerous.
Therefore, whenever the vehicle is moving:
— never stand up in the vehicle
— never stand on the seats
— never kneel on the seats
— never ride with the seatback reclined
— never lie down on the seats
— never lean up against the instrument panel
— never sit on the edge of the seat
— never sit sideways
— never lean out the window
— never put your feet out the window
— never put your feet on the instrument panel
— never rest your feet on the seat cushion or back
of the seat
— never ride in the footwell
— never ride in the cargo area
ZA\ WARNING
Improper seating positions increase the risk
of serious personal injury and death whenever
a vehicle is being used.
— Always make sure that all vehicle occupants
stay in a proper seating position and are
properly restrained whenever the vehicle is
being used.
Driver and passenger
side footwell
acetic a mee soary
ZA\ WARNING
Always make sure that the knee airbag can in-
flate without interference. Objects between
yourself and the airbag can increase the risk
of injury in an accident by interfering with the
176
way the airbag deploys or by being pushed in-
to you as the airbag deploys.
— No persons (children) or animals should ride
in the footwell in front of the passenger
seat. If the airbag deploys, this can result in
serious or fatal injuries.
— No objects of any kind should be carried in
the footwell area in front of the driver's or
passenger's seat. Bulky objects (shopping
bags, for example) can hamper or prevent
proper deployment of the airbag. Small ob-
jects can be thrown through the vehicle if
the airbag deploys and injure you or your
passengers.
Pedal area
The pedals must always be free to move and
must never be interfered with by a floor mat or
any other object.
Make sure that all pedals move freely without in-
terference and that nothing prevents them from
returning to their original positions.
Only use floor mats that leave the pedal area free
and can be secured with floor mat fasteners.
If a brake circuit fails, increased brake pedal trav-
el is required to bring the vehicle to a full stop.
ZA\ WARNING
Pedals that cannot move freely can cause loss
of vehicle control and increase the risk of seri-
ous injury.
— Never place any objects in the driver's foot-
well. An object could get into the pedal area
and interfere with pedal function. In case of
sudden braking or an accident, you would
not be able to brake or accelerate!
— Always make sure that nothing can fall or
move into the driver's footwell.
Page 179 of 308
4S1012721BA
Safe driving
1a CoYey al Mela Mealy -lard (el
Always use floor mats that can be securely at-
tached to the floor mat fasteners and do not in-
terfere with the free movement of the pedals.
> Make sure that the floor mats are properly se-
cured and cannot move and interfere with the
pedals > A\.
Use only floor mats that leave the pedal area un-
obstructed and that are firmly secured so that
they cannot slip out of position. You can obtain
suitable floor mats from your authorized Audi
Dealer.
Floor mat fasteners are installed in your Audi.
Floor
mats used in your vehicle must be attached
to these fasteners. Properly securing the floor
mats will prevent them from sliding into posi-
tions that could interfere with the pedals or im-
pair safe operation of your vehicle in other ways.
ZA\ WARNING
Pedals that cannot move freely can result ina
loss of vehicle control and increase the risk of
serious personal injury.
— Always make sure that floor mats are prop-
erly secured.
— Never place or install floor mats or other
floor coverings in the vehicle that cannot be
properly secured in place to prevent them
from slipping and interfering with the ped-
als or the ability to control the vehicle.
— Never place or install floor mats or other
floor coverings on top of already installed
floor mats. Additional floor mats and other
coverings will reduce the size of the pedal
area and interfere with the pedals.
— Always properly reinstall and secure floor
mats that have been taken out for cleaning.
— Always make sure that objects cannot fall in-
to the driver footwell while the vehicle is
moving. Objects can become trapped under
the brake pedal and accelerator pedal caus-
ing a loss of vehicle control.
Active rollover
protection system
Applies to: vehicles with active rollover protection system
The active rollover protection system helps pro-
tect vehicle occupants in the event of a rollover.
a gx
5 od x a
B4S-0173
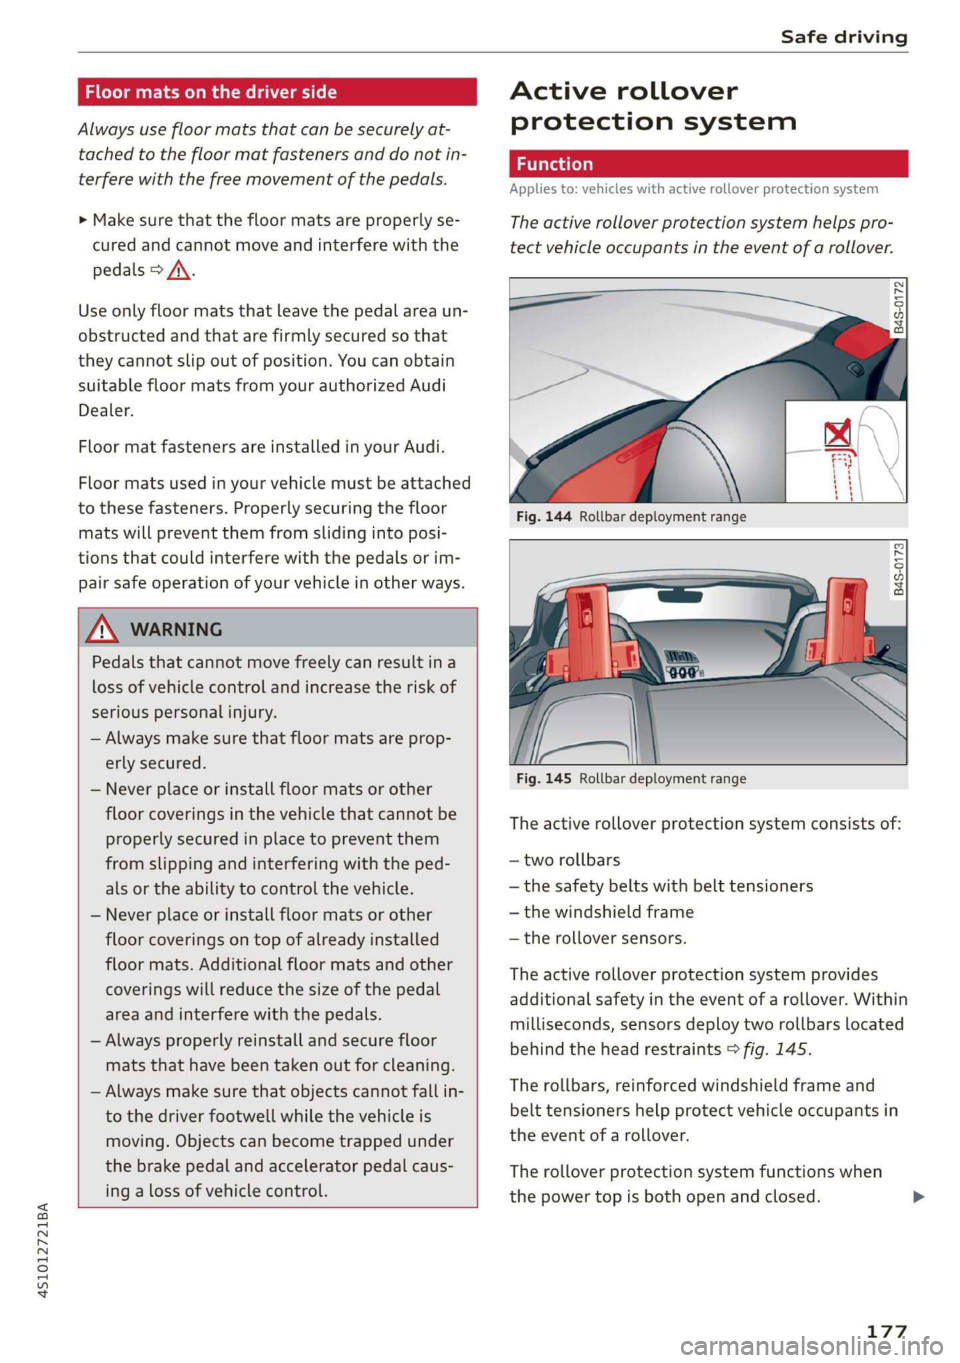
Fig. 145 Rollbar deployment range
The active rollover protection system consists of:
— two rollbars
— the safety belts with belt tensioners
— the windshield frame
— the rollover sensors.
The active rollover protection system provides
additional safety in the event of a rollover. Within
milliseconds, sensors deploy two rollbars located
behind the head restraints > fig. 145.
The rollbars, reinforced windshield frame and
belt tensioners help protect vehicle occupants in
the event of a rollover.
The rollover protection system functions when
the power top is both open and closed.
177
Page 180 of 308
Safe driving
A WARNING
Do not use the area behind the head restraints
> fig. 144 as a seat or storage area. This is the
area where the rollbars deploy. If the rollover
protection system is triggered, objects placed
there can be propelled through the vehicle
and make it more difficult for the rollbars to
deploy. This increases the risk for serious or
life-threatening injuries.
When is rollover protection deployed?
Applies to: vehicles with active rollover protection system
Rollover protection deploys in a collision or roll-
over.
Depending on the collision, sensors throughout
the vehicle and the control module trigger the
rollover system to deploy.
For safety reasons, rollover protection also de-
ploys during front, side and rear collisions above
a certain level of severity.
Retracting rollover protection
Applies to: vehicles with active rollover protection system
B4S-0174
B4S-0175
rh
Fig. 147 Deployed rollbar with power top frame facing up-
ward.
178
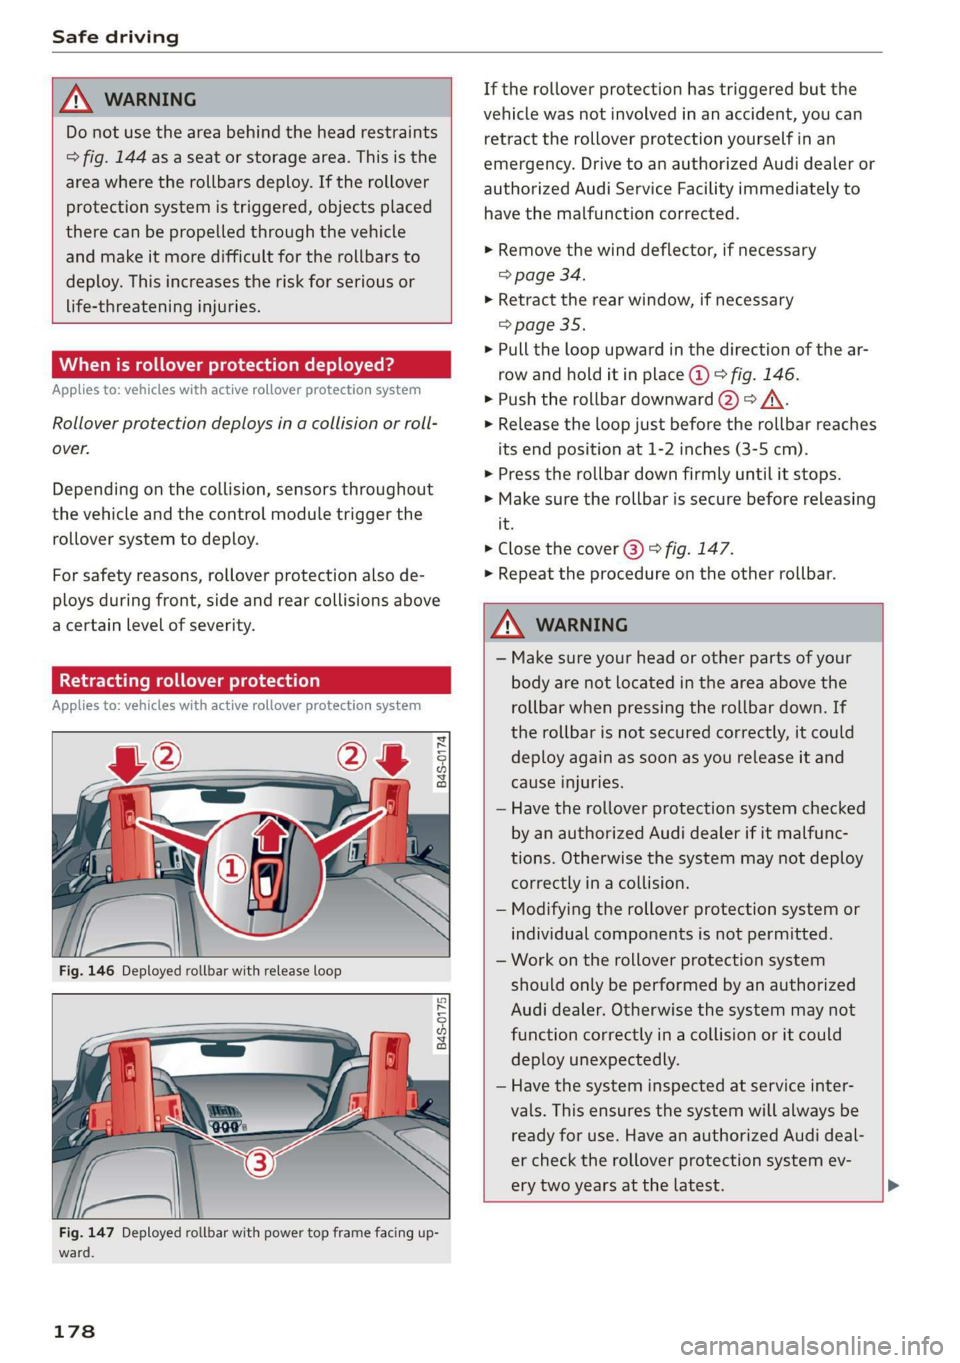
If the rollover protection has triggered but the
vehicle was not involved in an accident, you can
retract the rollover protection yourself in an
emergency. Drive to an authorized Audi dealer or
authorized Audi Service Facility immediately to
have the malfunction corrected.
> Remove the wind deflector, if necessary
> page 34.
> Retract the rear window, if necessary
=> page 35.
> Pull the loop upward in the direction of the ar-
row and hold it in place @ © fig. 146.
> Push the rollbar downward @) => /A\.
> Release the loop just before the rollbar reaches
its end position at 1-2 inches (3-5 cm).
> Press the rollbar down firmly until it stops.
> Make sure the rollbar is secure before releasing
it.
> Close the cover @) © fig. 147.
> Repeat the procedure on the other rollbar.
ZA\ WARNING
— Make sure your head or other parts of your
body are not located in the area above the
rollbar
when pressing the rollbar down. If
the rollbar is not secured correctly, it could
deploy again as soon as you release it and
cause injuries.
— Have the rollover protection system checked
by an authorized Audi dealer if it malfunc-
tions. Otherwise the system may not deploy
correctly in a collision.
— Modifying the rollover protection system or
individual components is not permitted.
— Work on the rollover protection system
should only be performed by an authorized
Audi dealer. Otherwise the system may not
function correctly in a collision or it could
deploy unexpectedly.
— Have the system inspected at service inter-
vals. This ensures the system will always be
ready for use. Have an authorized Audi deal-
er check the rollover protection system ev-
ery two years at the latest.