AUDI R8 SPYDER 2014 Owners Manual
Manufacturer: AUDI, Model Year: 2014, Model line: R8 SPYDER, Model: AUDI R8 SPYDER 2014Pages: 244, PDF Size: 61.06 MB
Page 221 of 244
4. Secure the other end to the jump start pin
© for the discharged battery@.
Starting the engine
.,. Start the eng ine of the vehicle providing as
s istance and allow it to run at id le.
.,. Now start the engine of the vehicle with the
discharged battery .
.,. If the engine does not start: Stop trying af
ter 10 seconds and then try again after
about 30 seconds .
.,. Disconnect the cable while the engine is
running in exactly
reverse order to that de
scribed.
The battery is vented to the outside to prevent
gases from entering the vehicle interior. Make
sure that the jumper clamps are well connect
ed with their
metal ports in full contact with
the battery termina ls.
A WARNING
To avoid serious personal i njury and dam
age to the vehicle, heed all warnings and
instructions of the jumper cable manufac
turer.
If in doubt, ca ll for road service .
- Jumper cables must be long enough so
that the vehicles do not touch.
- When connecting jumper cables, make
sure that they cannot get caught in any
moving parts in the engine compart
ment.
- Before you check anything in the engine
compartment, always read and heed all
WARNINGS
c:> page 172, Working in the
engine comportment.
Improper hook-up of jumper cables can ru
in the generator.
- Always connect POSITIVE( +) to POSI
TIVE(+), and NEGATIVE(-) to NEGATIVE
( - ) ground post of the battery manager
control unit.
- Check that all screw plugs on the battery
ce lls are screwed in firmly. If not, tighten
plugs prior to connecting clamp on nega
tive battery terminal.
-
What do I do now? 219
- Please note that the procedure for con
necting a jumper cable as described
above applies specifically to the case of
your vehicle being jump started. When
you are giving a jump start to another ve
hicle, do
not connect the negative(-) ca
ble to the negative(-) terminal on the
discharged battery@. Instead, securely
connect the negative(-) cable to eithe r a
solid metal component that is firmly
bolted to the engine block or to the en
gine block itself. If the battery that is be
ing charged does not vent to the outside,
escaping battery gas could ignite and ex
plode!
Emergency towing
with commercial tow
truck
' General hints
Your Audi requires special handling for tow
ing.
The following information is to be used by commercial tow truck operators who know
how to operate their equipment safely.
- Never tow your Audi, towing will cause dam
age to the engine and transmission.
- Never wrap the safety chains or winch cables around the brake lines.
- To prevent unnecessary damage, your Audi
must be transported w ith a car carrier (flat
bed truck) .
- To load the vehicle on to the flat bed, use
the towing loop found in the vehicle tools
and attach to the front anchorage
c:> page 220 .
A WARNING
A vehicle being towed is not safe for pas
sengers . Never allow anyone to ride in a
vehicle be ing towed, for any reason.
•
•
Page 222 of 244
220 What do I do now?
(D Note
The vehicle has very low ground clearance.
Make sure that no damage is caused to the
underside of the vehicle when it is being
loaded onto a flat bed truck .
Front towing loop
Do not install the front towing loop until it is
needed.
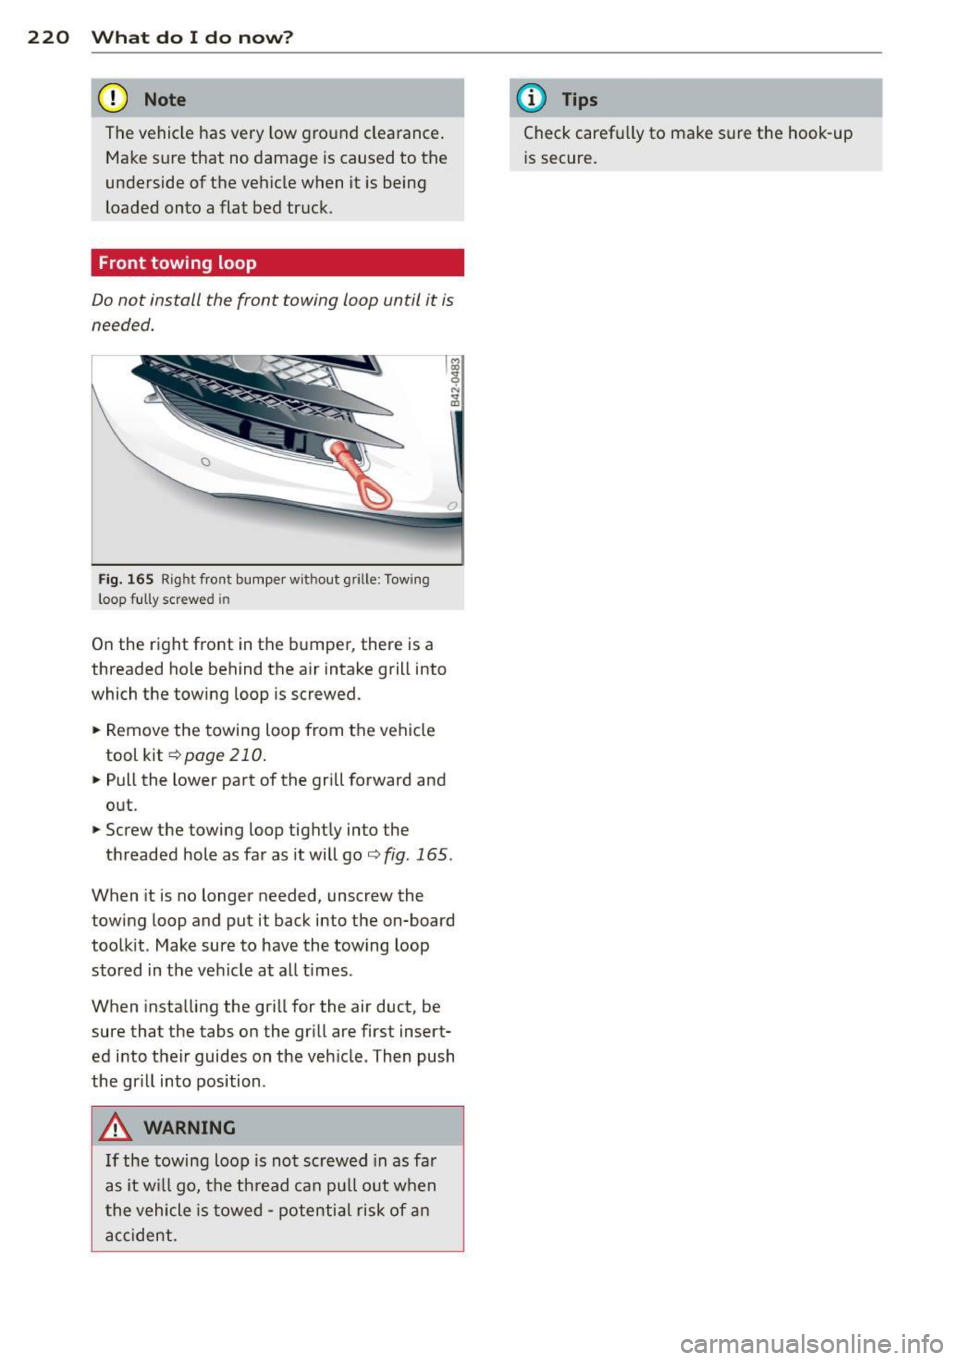
Fig. 165 Rig ht fron t bumper wit hout g rille: Tow ing
loop fully screwed in
On the r ight front in the bumper, there is a
threaded ho le behind the air intake grill into
which the towing loop
is screwed .
.. Remove the towing loop from the vehicle
tool kit
Q page 210 .
.. Pull the lower part of the grill forward and
out .
.. Screw the towing loop tightly into the
threaded hole as far as it will go¢
fig. 165.
When it is no longer needed, unscrew the
towing loop and put it back into the on-board
toolkit. Make sure to have the towing loop
stored in the vehicle at all times.
When installing the grill for the air duct, be
sure that the tabs on the grill are first insert
ed into their guides on the vehicle . Then push
the gr ill into position .
A WARNING
If the towing loop is not screwed in as far
as it will go, the thread can pull out when
the vehicle is towed -potentia l risk of an
accident.
(D Tips
Check carefu lly to make sure the hook-up
is secure.
Page 223 of 244
Fuses and bulbs
Electrical fuses
Replacing fuses
Fuses that have blown will have metal strips
that have burned through.
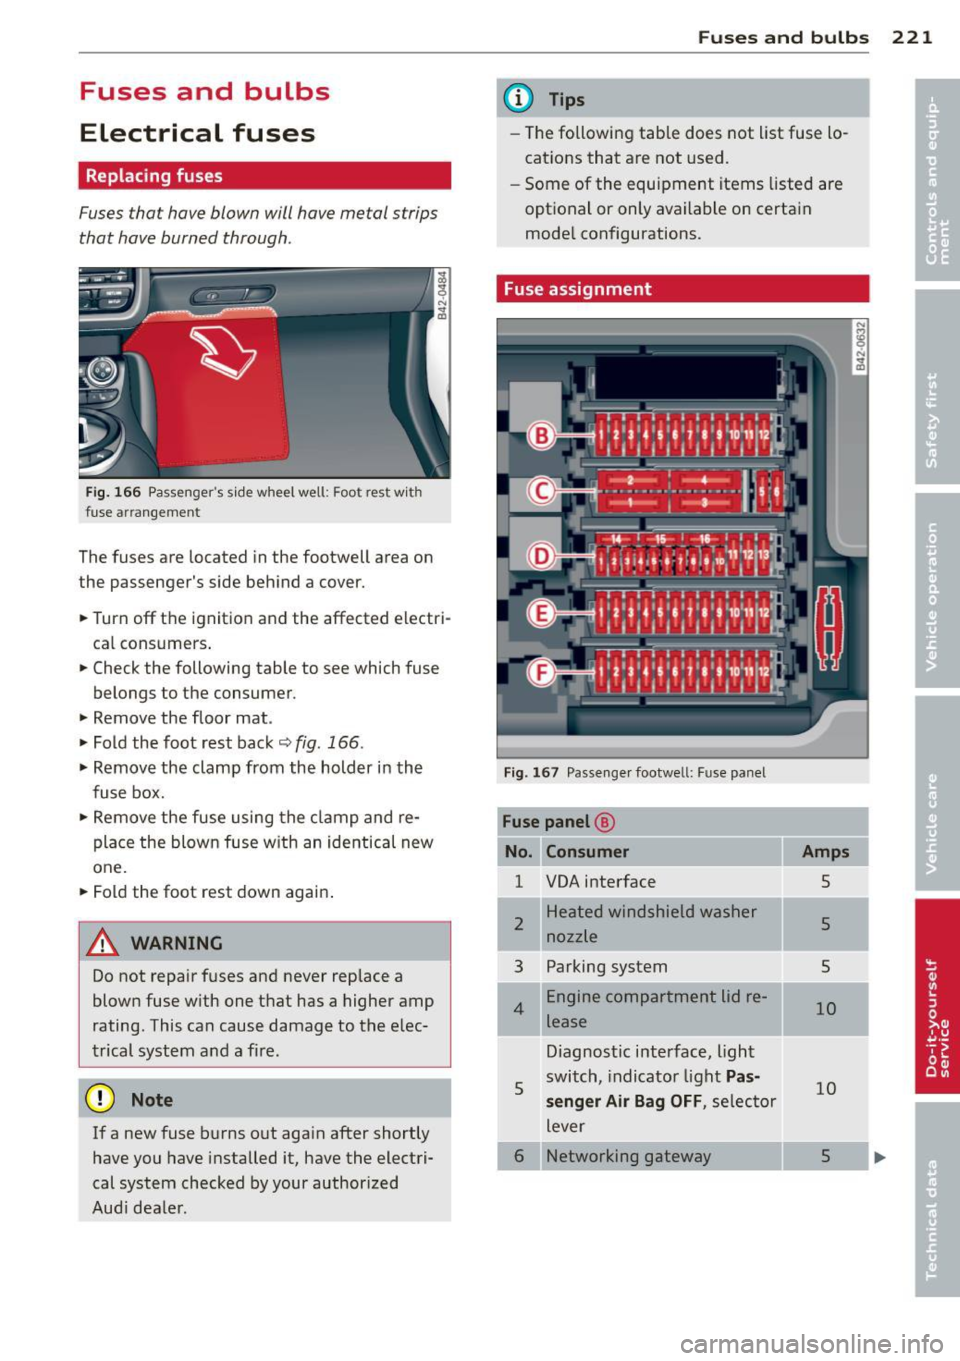
Fig. 166 Passenger 's s ide wheel well: Foot rest w ith
fuse arrangement
The fuses are located in the footwell area on
the passenger's side behind a cover.
• Turnoff the ignition and the affected electri
cal consumers .
• Check the following table to see which fuse
belongs to the consumer.
• Remove the floor mat .
• Fold the foot rest back
c::> fig. 166 .
• Remove the clamp from the holder in the
fuse box.
• Remove the fuse using the clamp and re
place the blown fuse w ith an identical new
one.
• Fold the foot rest down again .
A WARNING
Do not repair fuses and never replace a
blown fuse w ith one that has a higher amp
rating. This can cause damage to the e lec
trical system and a fire.
(D Note
If a new fuse burns o ut aga in after shortly
have you have installed it, have the electri
cal system checked by your author ized
Aud i dealer.
Fu se s and bulb s 221
@ Tips
-The following tab le does not list fuse lo
cat ions that a re not used.
- Some of the equipment items listed are
optional or only ava ilable on certain
mode l con figurations.
Fuse assignment
Fi g. 167 Passe nge r foo twell: Fuse panel
Fuse panel @
Consumer
1 VOA interface
2
3
4
s
H ea ted windshield washer
nozz le
Parking system
E ngine compartment lid re
lease
Diagnostic inte rface, light
switch, indicator light
Pa s
senger Air Bag OFF ,
selector
lever
6 Networking gateway
Amps
5
5
5
10
10
5
Page 224 of 244
222 Fuses and bulbs
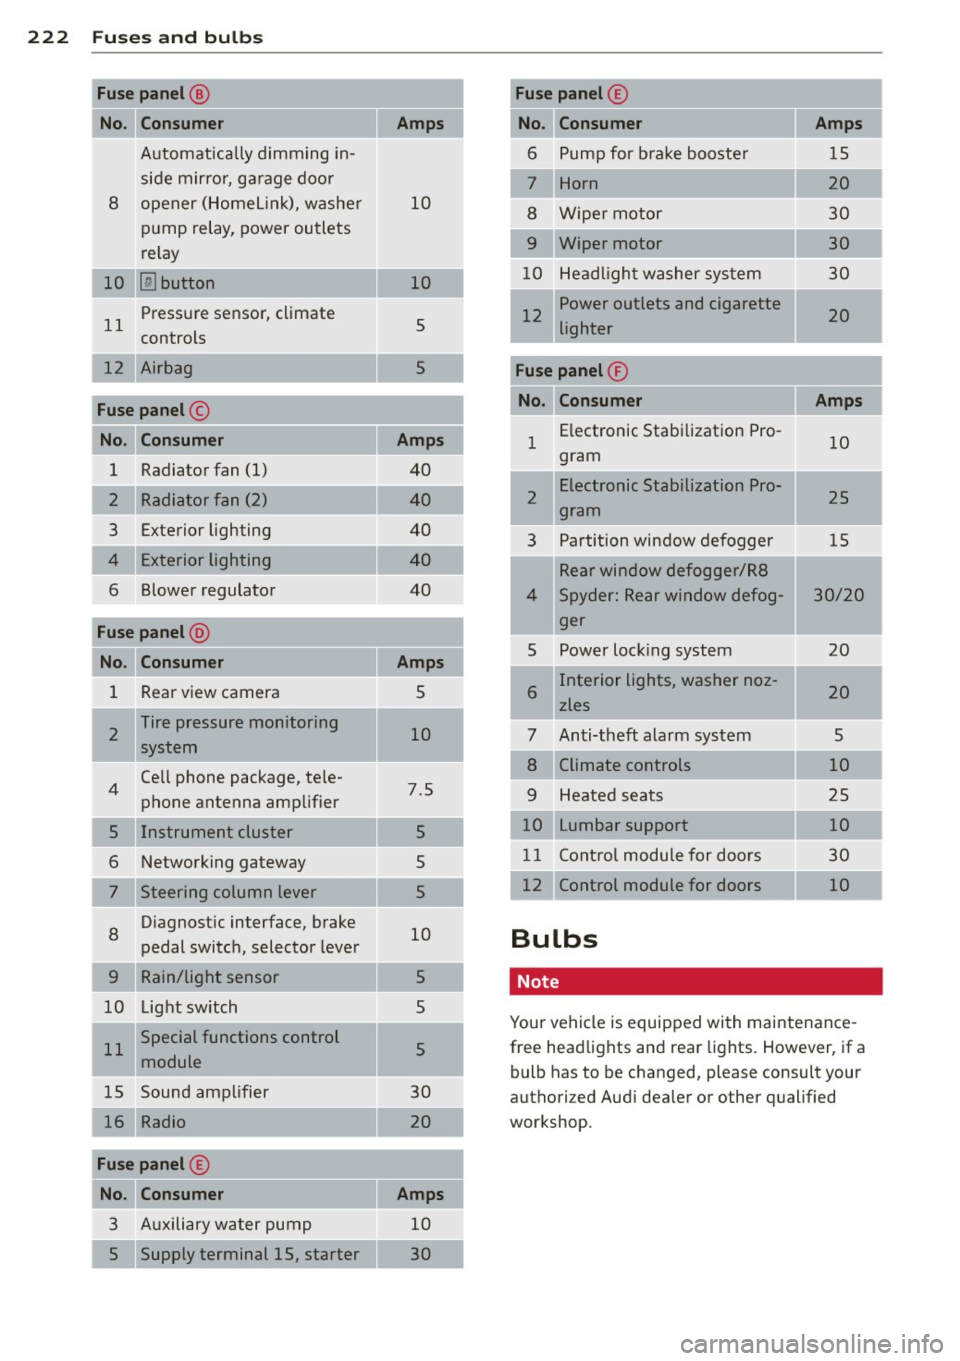
Fuse panel @
Consumer Amps
Automatically dimming in-
side mirror, garage door
8 opener (Homel
ink), washer
10
pump relay, power outlets
relay
10
[ru button 10
11 Pressure sensor, climate
5
controls
12 Airbag 5
Fuse panel@
No . II Consumer
II Amps
1 Radiator fan (1)
40
2 Radia
tor fan (2)
40
3 Exterior lighting
40
4 Exterior lighting 40
6 Blower regulator 40
Fuse panel@
No . II Consumer
II Amps
1 Rear view camera
5
2
Tire pressure monitoring
system 10
4 Cell phone package, te
le-
7.5
phone antenna amplifier
5 Instrument cluster 5
6 Networking gateway
5
7 Steering column lever 5
8 Diagnostic interface, brake
10
pedal switch, selector lever
9 Rain/light sensor 5
10 Light switch 5
11 Special functions control
5
module
15 Sound amplifier 30
Radio 20
Fuse panel E
No. Consumer Amps
3 Auxiliary water pump 10
5 Supply terminal 15, starter 30
Fuse panel @
No. Consumer Amps
6 Pump for brake booster 15
7 Horn
20
8 Wiper motor 30
9 Wiper motor
30
10 Headlight washer system 30
12 Power outlets and cigarette
20
lighter
Fuse panel ®
No. !!Consumer
ll Amps ,
1 E
lectronic Stabilization Pro -
10
gram
2 Electronic
Stabilization Pro-
25
gram
3 Partition window
defogger
15
Rear window defogger/RB
4 Spyder: Rear window defog- 30/20
ger
5 Power lock
ing system 20
6
Interior Lights, washer noz-20
zles
7 Anti-theft alarm system 5
8 Climate controls 10
9 Heated seats 25
10 Lumbar support 10
11 Control module for doors 30
12 Control module for doors
10
Bulbs
Note
Your vehicle is equipped with maintenance
free headlights and rear lights. However, if a
bulb has to be changed, please consult your
authorized Audi dealer or other qualified
workshop.
Page 225 of 244
General information Explanation of
technical data
Som e of t he technical data listed in this man
ual require further explanation.
The technical data for your vehicle are listed in
the charts starting on
Q page 225. This chap
t e r p rovides general informa tion, notes and
r estr ictions wh ich app ly to these data .
Vehicle identification
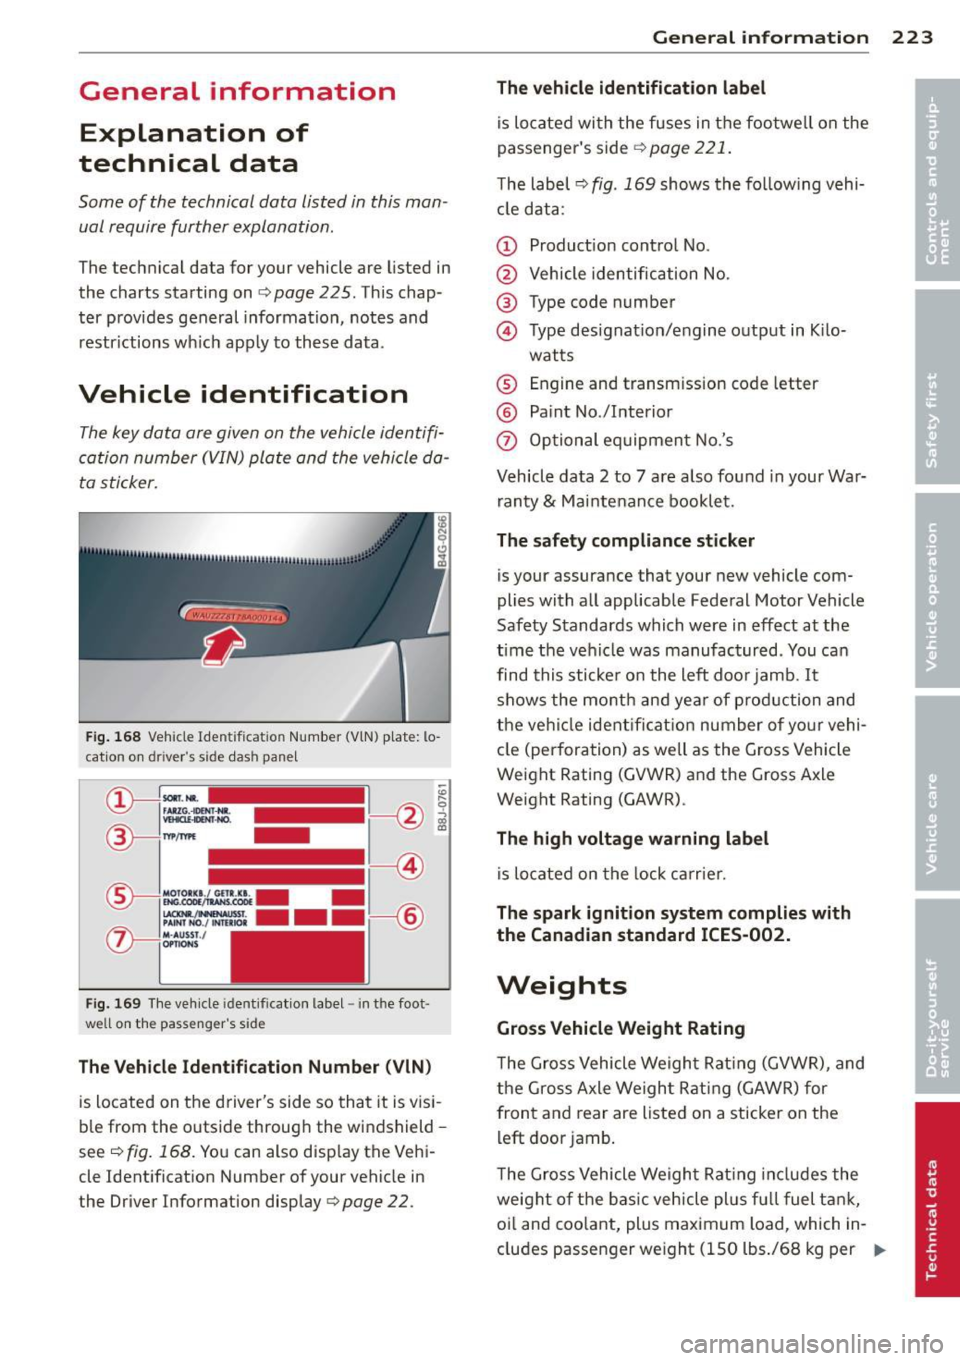
The key data are given on the vehicle identifi
cat io n number
(V IN) pla te and the vehicle da
ta sticker.
Fig. 1 68 Vehicle I dent ificat ion Num ber {VlN) p la te: lo
cation o n driver's side dash pa nel
Fi g. 1 69 The ve hicle identificat ion label -in the foot
well on the passenger's side
The Vehicle Identification Number (VlN)
is located on the d river's side so tha t it is v is i
b le from the outsi de throug h the windshield -
see
c!) fig. 168. You can also disp lay the Vehi
cle Ident ificat ion Number of your vehicle in
the Driver Information display
Q page 22.
General inform ation 223
The vehicle identification label
is lo cated wi th the fuses in t he footwe ll on the
passenger 's side
Q page 221 .
The label c!) fig. 169 shows th e fo llow ing vehi
cl e data :
(D Product ion cont ro l No .
@ Vehicle identific ation No.
@ Type code number
© Type designat ion/engine o utput in K ilo-
wat ts
® Engine and transm ission code letter
® Pa int No./lnterior
0 Option al eq uipment No.'s
Vehicle data 2 to 7 are a lso fo und in your War
ranty
& Mai nte nance bookle t.
The safety compliance sticker is your assurance that your new vehicle com
plies with a ll applicable Federal Motor Vehicle
Safety Standa rds which were in effect at the
time the ve hicle was manufactur ed . You can
find this sticke r o n the left doo r jamb.
It
sh ows the month an d ye ar of pro duction and
t he ve hicl e ident ifi cat io n number of yo ur vehi
cle (perfora tion) as well as the G ross Vehicle
Weight Rating (GVW R) and the Gross Axle
Weight Rating (GAWR) .
The high voltage warning label i s lo cated on the lock ca rrie r.
The spark ignition system complies with
the Canadian standard ICES-002.
Weights
Gross Vehicle Weight Rating
T he Gro ss Vehicle Weigh t Rat ing (GVWR), and
the Gross Axle We igh t Rati ng (GAWR) for
fron t and rear are lis ted on a sticker on the
l eft door jamb .
T he Gro ss Vehicle Weigh t Rat ing incl udes the
weight o f the bas ic ve hicle plus f ull fuel t ank,
oi l and coo lant, plus maximum load, which in
cludes passenger we ight (150 lbs./68 kg per ..,.
Page 226 of 244
224 Genera l inform ation
designated seating position) and luggage
w eight .
Gross Axle W eight Rating
The G ross Axle Weight Rating is the maximum
l oad that can be applied at each axle of the
vehicle
q _& .
Vehicle capacit y weight
The vehicle capac ity we ight (max . load) is list
ed either on the dr iver's side B-pilla r or inside
the fuel filler flap.
_& WARNING
- T he actual Gross Axle Weight Rat ing at
the front and rear axles shou ld not ex
ceed the permissible weights, and their
combination must not exceed the Gross
Vehicle Weight Rating .
- Exceeding permissib le weight ratings can
result in vehicle damage, accidents and
persona l injury.
(i) Note
- The vehicle capacity weight figures apply
when the load is distributed evenly in the
vehicle (passengers and luggage) . When
transporting a heavy load in the luggage
compartment, carry the load as near to
the rear axle as possible so that the vehi
cle's handling is not impa ired .
- Do not exceed the maximum permissible
axle loads or the max imum gross vehicle
weight . Always remember that the vehi
cle's handling will be affected by the ex
tra load . Therefore, adjust your speed ac
cord ingly.
- Always observe loca l regu lations.
Dimensions
-
The specifications refer to the basic model.
Diffe rences may occur depending on the mod
e l type and options ordered, for examp le, tire
sizes.
(D Note
When driving up steep ramps, on rough roads, over curbs, etc . it is important to re
member that some parts of your vehicle,
such as spo ilers or exhaust system compo
nents, may be close to the ground . Be
careful not to damage them .
Page 227 of 244
Data
Data
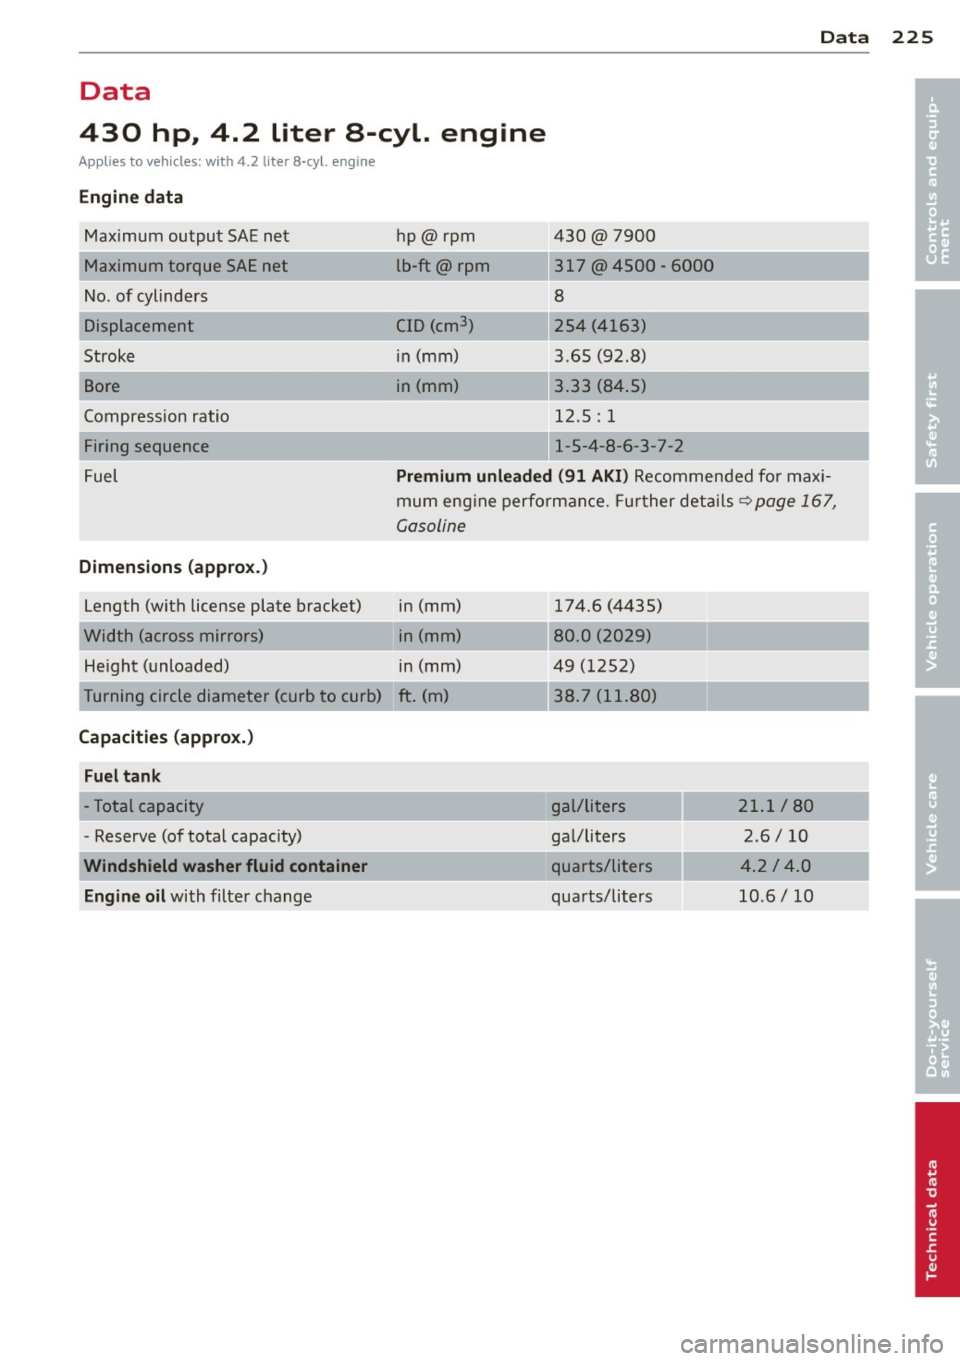
430 hp, 4.2 liter 8-cyl. engine
Applies to vehicles: with 4.2 liter 8-cyl. engine
Engine data
Maximum output SAE net
Maximum torque SAE net
No. of cylinders
Displacement
Stroke
Bore
Compression ratio
Firing sequence
Fuel
Dimensions (approx.)
Length (with license plate bracket)
W idth (across mirro rs)
He ight (unloaded) 430@ 7900
hp@rpm
lb-ft@ rp m
-~--
CID (cm3
)
in (mm)
in (mm)
---·
317 @4500 - 60 00
8
254 (4 163)
3 .65 (92 .8)
3.33 (84 .5)
12.5: 1
1-5-4-8-6-3-7-2
Premium unleaded (91 AKI) Recommended f or max i
mum eng ine perf orman ce. Fu rther detai ls~
p age 16 7,
G asoline
in (mm)
in (mm)
in (mm)
T urning circle diameter (curb to curb) ft . (m) 174.6 (4435)
80.0 (2029)
49 (1252)
38. 7 ( 11.80)
Capacities (approx.)
Fuel tank
- Total capacity
- Reserve (of total capacity)
Windshield washer fluid container
Engine oil
with filte r change gal/liters
21.1 / 80
ga I/liters 2.6 / 10
quarts/liters 4.2 / 4.0
qua rts/liters 10.6 / 10
225
•
•
Page 228 of 244
226 Data
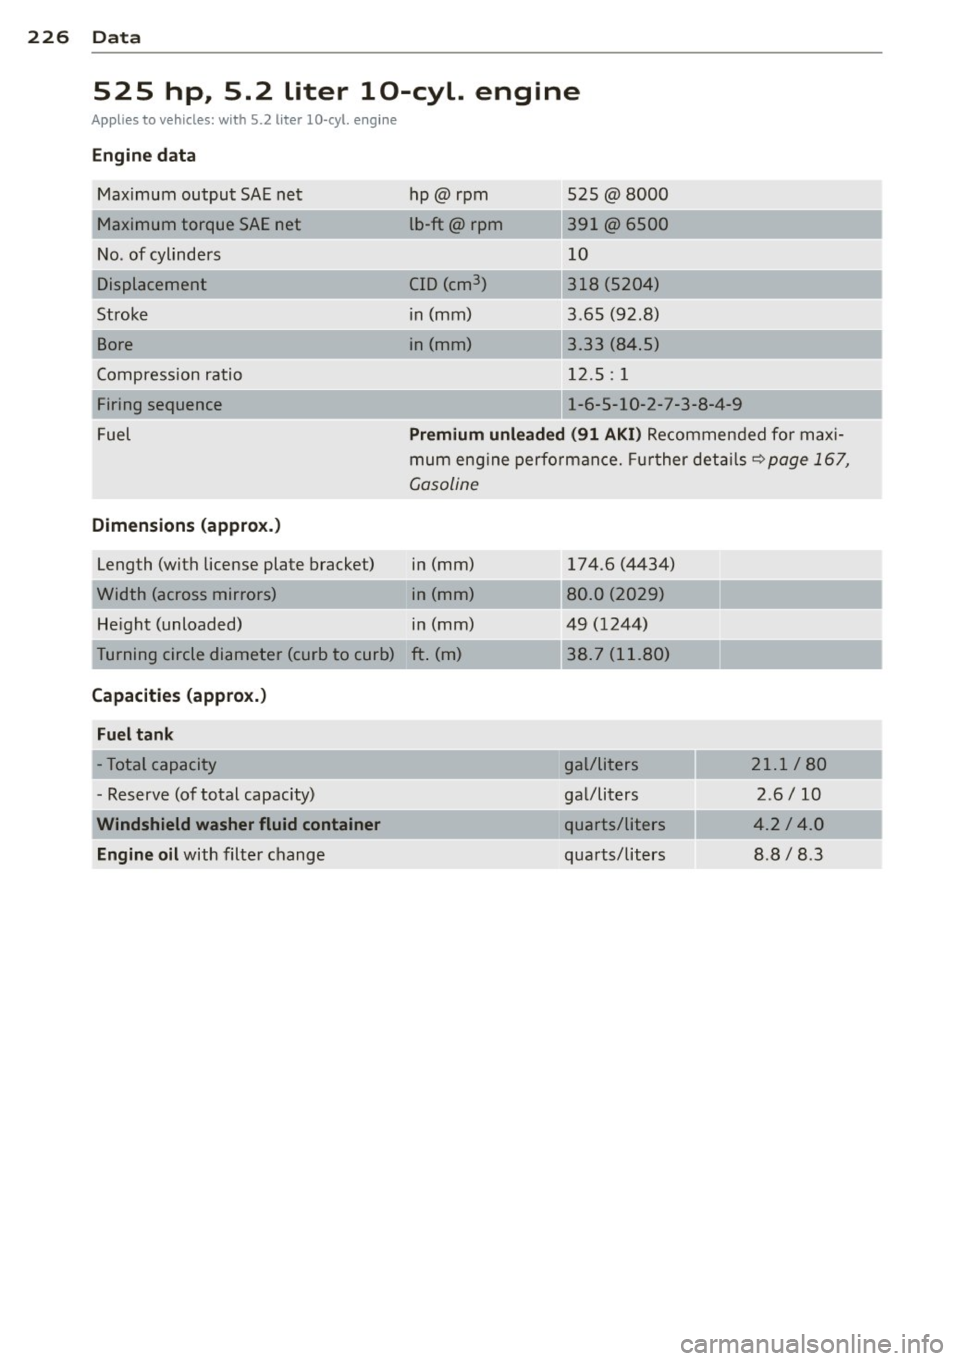
525 hp, 5.2 liter 10-cyl. engine
Applies to vehicles: with 5.2 liter 10-cyl. engine
Engine data
Maximum outpu t SAE ne t
Maximum torque SAE net
N o. of cylinders
Stroke
Bore
Compressio n ratio
Firing sequence
Fuel
Dimensions (approx.)
Length (wi th license plate bracket)
W idth (across mirrors)
He ight (unloaded) hp@r
pm
l b-ft@ rpm
CID (cm
3 )
in (mm)
i n (mm) 525 @8000
-·--39
1 @650 0
10
318 (520 4)
~-·
3 .65 (92 .8)
3.33 (84 .5)
---· 12.5 : 1
1-6-5- 10-2-7-3-8-4-9
Premium unleaded
(91 AKI) Recommen ded fo r maxi
mum eng ine perfo rman ce. Fu rther det ails
~page 167 ,
Gasolin e
in (mm)
in (mm)
in (mm)
T urning circle diameter (curb to curb) ft . (m ) 174
.6 (4434)
80.0 (2 029)
49 (1244) 38. 7 ( 11.80)
Capacities (approx.)
Fuel tank
- Tot al capacity
- Reserve (of total capacity)
Engine oil with filter chang e gal/liters
gal/liters
quarts/liters
qua
rts/liters 21.1 / 8
0
2 .6 / 10
4 .2 / 4.0
8 .8 I 8 .3
Page 229 of 244
Consumer Information
Warranty coverages
Your Audi is covered by the following war
ranties :
-New Vehicle Limited Warranty
- Limited Warranty Against Corrosion Perfo-
ration
- Emissions Control System Warranty
- Emissions Performance Warranty
- California Emissions Con trol Warranty (USA
vehicles only)
- California Emissions Performance Warranty
(USA vehicles only)
Detailed information regarding your warran
ties can be found in your
Warranty & Mainte
nance booklet .
Operating your vehicle
outside the U.S.A. or
Canada
Government regulations in the United States
and Canada require that automobiles meet
specific emission regulations and safety
standards. Therefore, veh icles built for the
U.S.A. and Canada differ from vehicles sold in
other countries .
If you p lan to take your vehicle outside the
continental limits of the United States or Can
ada, there is the possibility that:
- unleaded fuels for vehicles with cata lytic
converter may not be available;
- fuel may have a considerably lower octane
rating . Improper fuel may cause engine
damage ;
- service may be inadequate due to lack of
proper service facilities, tools or testing
equipment ;
- replacement parts may not be readily availa
ble.
- Navigation systems for vehicles built for the
U.S.A. and Canada will not necessari ly work
in Europe, and may not work in other coun
tries outside of North America.
Consumer Information 22 7
@ Note
Audi cannot be responsible for mechanical
damage that could result from inadequate
fuel, service or parts availab ility.
Audi Service Repair
Manuals and Literature
Audi Offic ial Factory Service Manuals and Lit
erature are published as soon as possible after
model introduction. Service Manuals and liter
atu re are availabl e to order from the Audi
T echnical Literature Ordering Center at:
https: //www.a udi.techliterature.com
Maintenance
' General
Your vehicle has been designed to help keep
maintenance requirements to a minimum.
However, a certain amount of regular mainte
nance is still necessary to assure your vehicle's
safety, economy and rel iability . For detailed
vehicle maintenance consult your Warranty
&
Maintenance booklet.
Under difficult operating conditions, for ex
ample at extremely low outside temperatures,
in very dusty regions, etc., some service work
shou ld be pe rformed between the intervals
specified. This applies particularly to:
- oil changes, and
- cleaning or replacing the air fi lter.
@ For the sake of the environment
By regu larly maintaining your vehicle, you
help make sure that emission standards
are maintained, thus min imizing adverse
effects on the environment.
Important considerations for you and
your vehicle
T he increasing use of electron ics, soph isticat
ed fuel injection and emission control sys
tems, and the generally increasing technica l
complexity of today's automobiles, have ..,_
•
•
Page 230 of 244
228 Con sum er Inf ormation
steadi ly reduced the scope of maintenance
and repairs which can be carried out by vehicle
owners.
Als o, sa fe ty a nd en vir onm ent al con
cerns place very strict limits on the nature of
repairs and adjustments to engine and trans
miss ion parts which an owner can perform .
Maintenance, adjustments and repa irs usua lly
require special tools, testing devices and oth
er equipment available to specially trained
workshop personnel in order to assure proper pe rformance, reliab ility and safety of the vehi
cle and its many systems.
Improper maintenance, adjustments and re
pa irs can impair the operation and reliab ility
of your vehicle and even void your vehicle war
ranty. Therefore, proof of servic ing in accord
ance w ith the ma intenance schedule may be a
condition for upholding a poss ible warranty
claim made within the warranty period.
Above all, operational safety can be adversely
affected, c reating unnecessary risks for you
and your passengers.
If in doubt about any se rv icing, have it done
by your author ized Audi dealer or any other
p roperly equipped and qualified workshop.
We strong ly urge you to give yo ur autho rized
Audi dealer the opportunity to perfo rm all
schedu led maintenance and necessary repairs.
Your dea ler has the facilities, original parts
and trained specialists to keep your vehicle
running properly.
Performing limit ed m aint enance yours elf
The following pages describe a limited num
ber of proced ures which can be performed on
your vehicle with ordinary too ls, shou ld the
need arise and trained personnel be unavaila
ble. Before performing any of these proce
dures, always thoroughly read all of the app li
cable text and carefully follow the instruc
tions given . Always rigorously observe the
WARNINGS p rovided.
Before you ch eck anything in th e eng ine
co mpartm ent , alway s re ad and h eed all
WA RNINGS
c::> .&. and c::> ..&. in Working in the
engine compartment on page 173.
A WARNING
- Serious personal injury may occur as a re
sult of improperly performed mainte
nance, adjustments or repa irs.
- Always be extremely careful when work
ing on the vehicle. Always follow com
monly accepted safety pract ices and gen
eral common sense. Never r is k personal
injury.
- Do not attempt any of the maintenance,
checks or repairs descr ibed on the fol
lowing pages if you are not fu lly fam iliar
with these or other procedures with re
spect to the vehicle, or are uncertain how
to proceed .
- Do not do any work without the proper
too ls and equipment. Have the necessa ry
work done by your authorized A udi deal
er or another proper ly equipped and
qualified workshop.
- Always remove the ignition key before
anyone gets under the vehicle.
- Always support your veh icle with safety
stands if it is necessary to work under
neath the vehicle. The jack* is not ade
quate for this purpose and cou ld collapse
causing ser ious personal inju ry.
- If you must work underneath the vehicle
with the wheels on the ground, a lways
make sure the vehicle is on level ground,
that the wheels a re a lways secure ly
b locked and that t he engine cannot be
started.
- Always make sure the transmission se
lec to r l ever is in
"N" (Neut ral) (R t ron ic)
or Neutral (manual transmission) and
the hand bra ke is f irmly app lied.
@ For the sake of the environment
- Changing the engine sett ings will ad
verse ly affect emission leve ls. Th is is det
r imental to the environment and increas
es fuel consumpt ion .
- Always observe environmenta l regu la
tions when disposing of old eng ine oil,
used brake flu id, dirty engine coo lant,
spent batteries or worn out tires.